
Last Modified on January 9, 2025
Are you new to Google Tag Manager and want to learn what it is all about and how to use it?
Google Tag Manager is a tag management system almost all digital marketers use. It allows you to configure and manage tags without changing your website’s code.

Sign up to the FREE GTM for Beginners Course...
When installed, you can set up tags, establish triggers that cause your tag to fire when certain events occur, and create variables for simplifying and automating your tag configurations.
In this Google Tag Manager tutorial for beginners, we’ll learn about GTM and how to use it for effective tracking purposes.
Here is an overview of what we’ll cover:
- What is Google Tag Manager?
- How to Install Google Tag Manager on a WordPress Website
- How to Implement Your First Tags in Google Tag Manager
- Conversion Tracking with Google Tag Manager and GA4
- How to Track Events in Google Tag Manager
- How to Learn Google Tag Manager in 2025
Let’s kick off our Google Tag Manager tutorial by learning the basics!
What is Google Tag Manager?
Google Tag Manager is a tag management system that simplifies managing tracking codes on your website. By consolidating various tags into a single web interface, it eliminates the need for manually inserting code into your site’s HTML.
This powerful tool streamlines your tracking implementation and provides efficient version control and debugging capabilities.
GTM vs No GTM
First, let’s look at a website with Google Tag Manager installed.
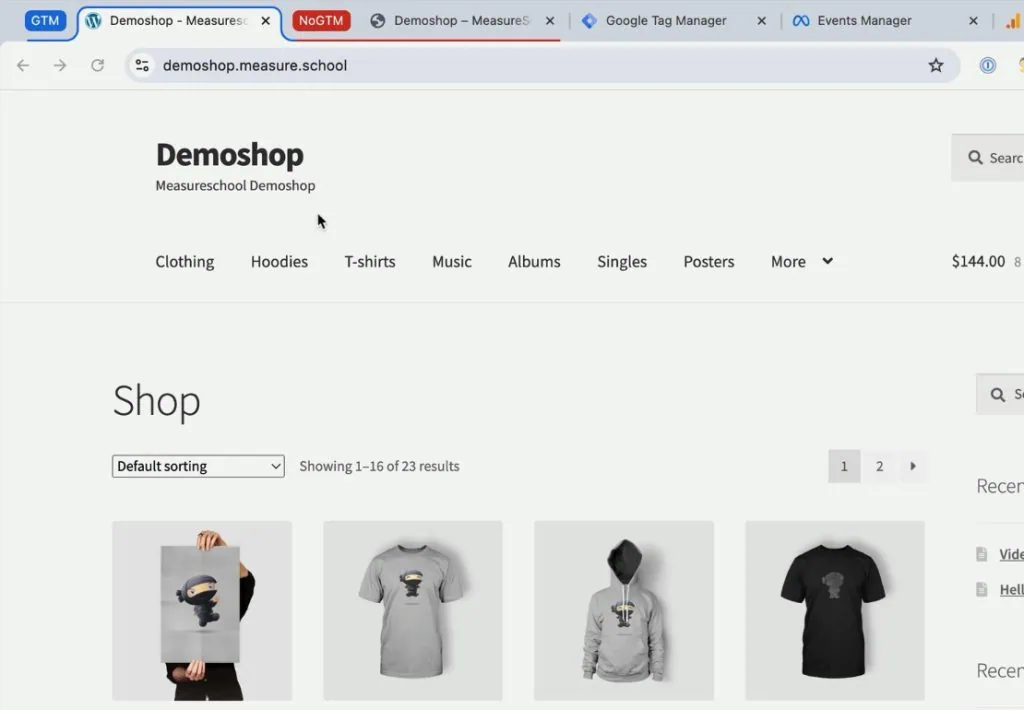
We have another website that doesn’t have Google Tag Manager installed.
What is the difference between the two? First, let’s start with their similarities. On both these websites, we have tracking codes installed.
If you want to utilize other marketing tools, you will usually need to install their code on your website. It will then allow the marketing vendor to tell you how many people converted or what products they bought, for example.
It is typical with marketing vendors like Meta with the Meta Pixel.
Even Google follows this pattern with its analytics tool called Google Analytics.
How would you install these codes on your website? You will need to add them to the HTML.
💡 Top Tip: Are you wondering what are the similarities and differences between these two marketing tools? Check out our guide on Meta Pixel vs Google Analytics 4 for more insights.
Going to our demo shop without Google Tag Manager installed, let’s confirm the marketing tools we have installed.
With the Meta Pixel Helper Chrome extension, you can see that we have Meta Pixel installed on our site.
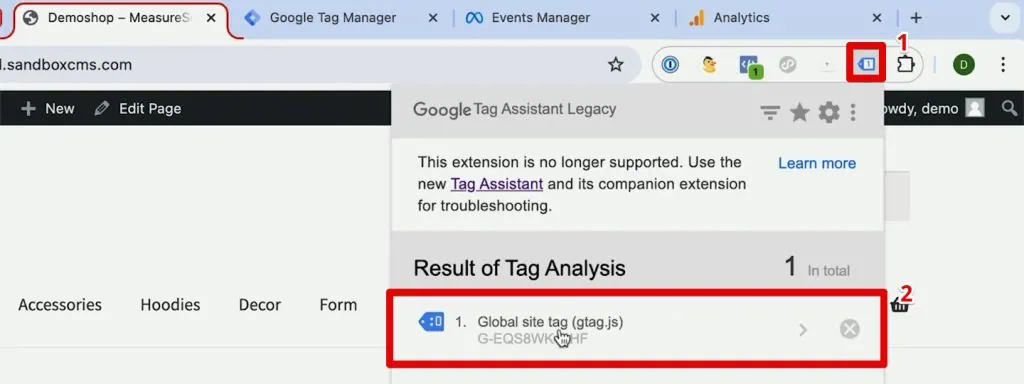
Next, with the Tag Assistant, we can also see the Global Site Tag installed.
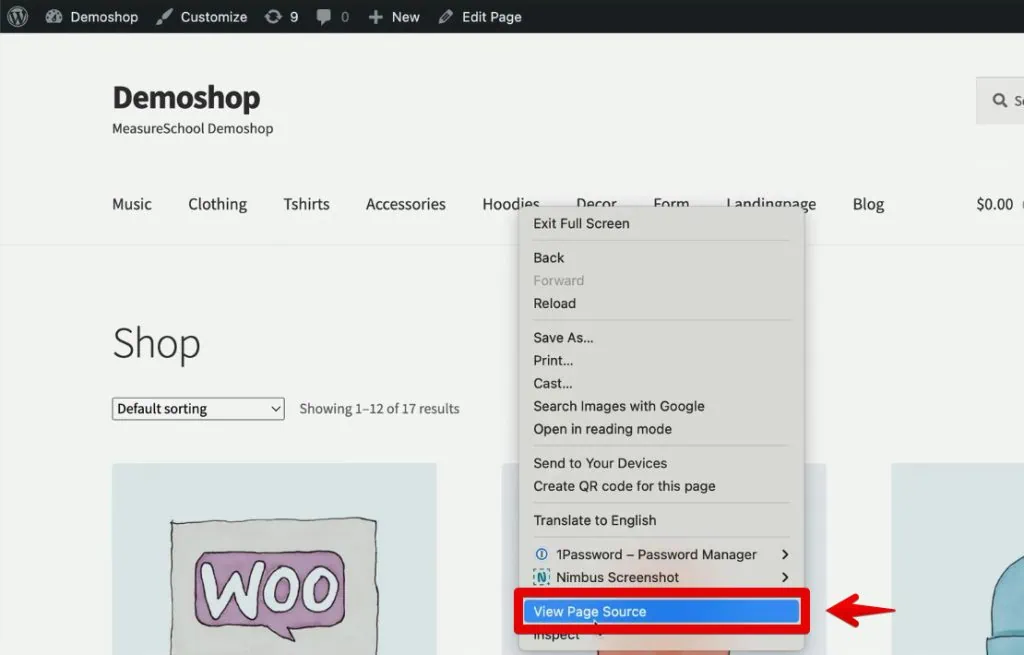
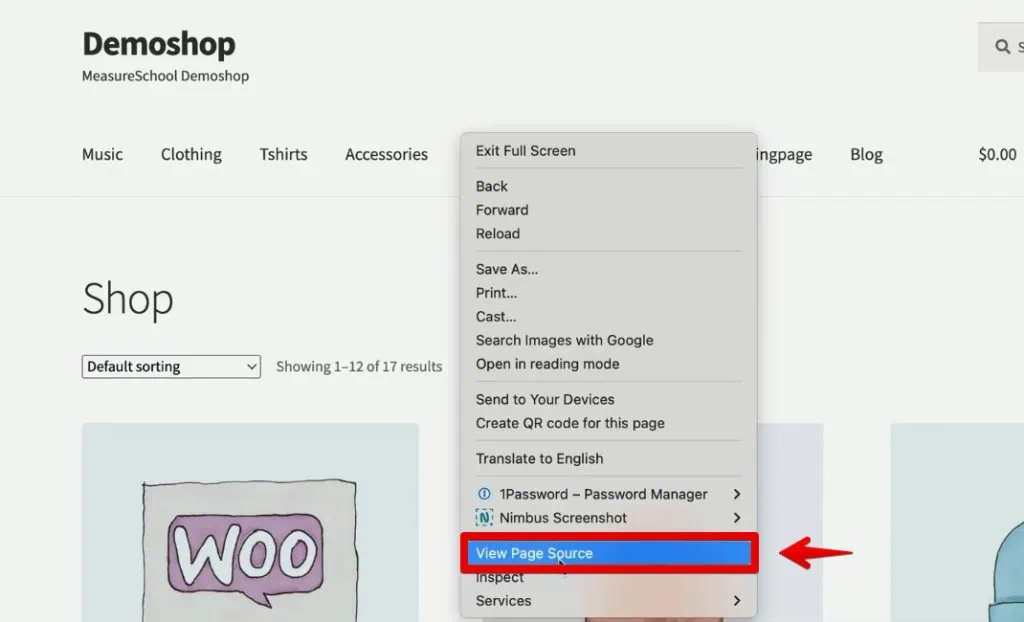
If we want to look at the HTML downloaded from the server, we can right-click on the page and select View Page Source.
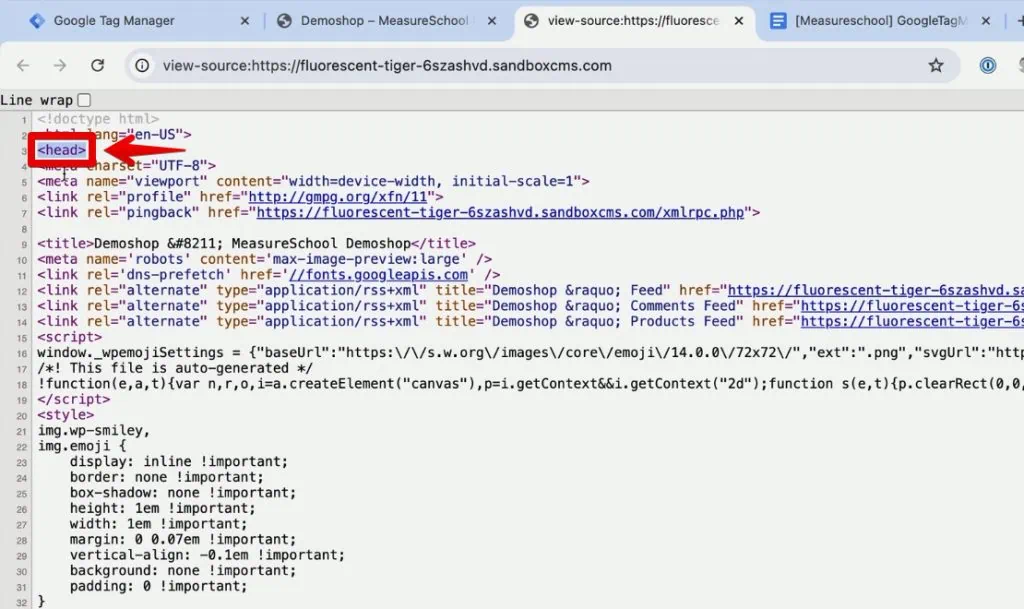
We see our little codes installed on the website in the head section.
First, we have the Meta Pixel code, then the Global site tag.
What we did to install these codes on our website is to go into the backend of the website, its source HTML code, and install these codes manually.
In larger websites, this manual process may not be possible or entirely practical because you need to install these codes onto your website, on every page, every time you want to add a tag.
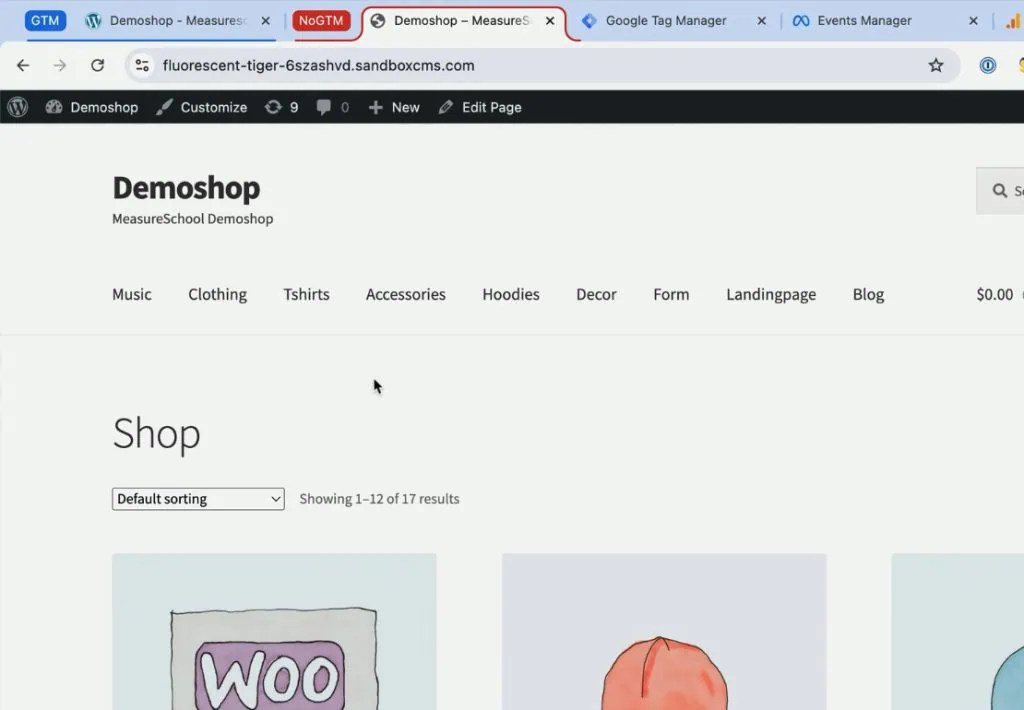
Now, we’ll look at our demo shop with Google Tag Manager installed.
Again, we can see that this page also has Meta Pixel installed.
Then, checking the Tag Assistant, we also have the Global site tag installed, along with Google Tag Manager.
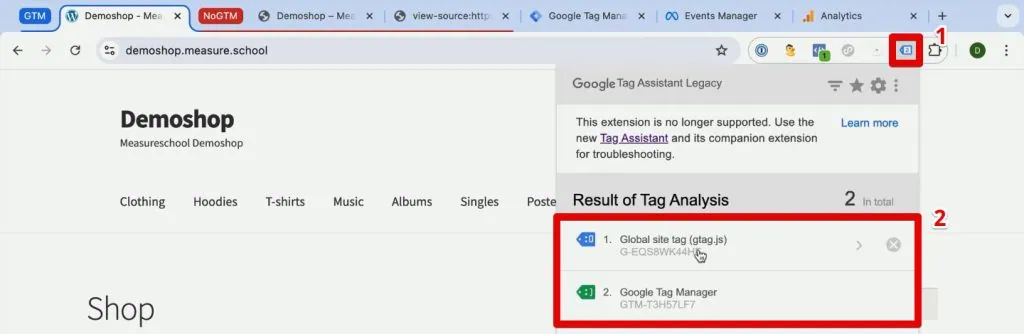
At this point, both websites are mostly the same, with similar marketing tools installed on both. The difference lies in the page source.
At the top of the head section, we can see the Google Tag Manager code.
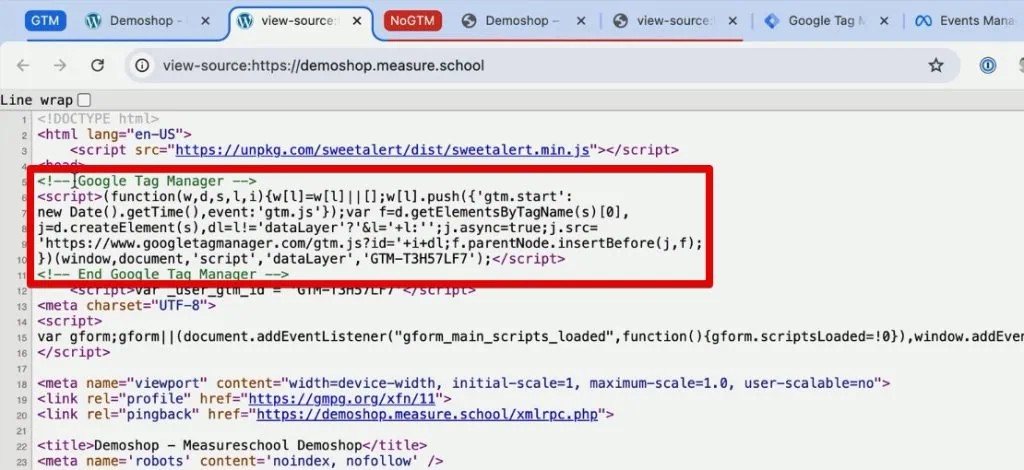
If you scroll down to the approximate location of our Meta Pixel and Global site tag codes on the other website, you will no longer find them. That essentially explains what Google Tag Manager is in a nutshell.
Google Tag Manager helps us consolidate codes into a single code we must install on our website. Afterward, we no longer have to go into the HTML source code whenever we want to deploy other tracking codes.
Once you install GTM on your website, you’ll get a central interface for deploying your tags.
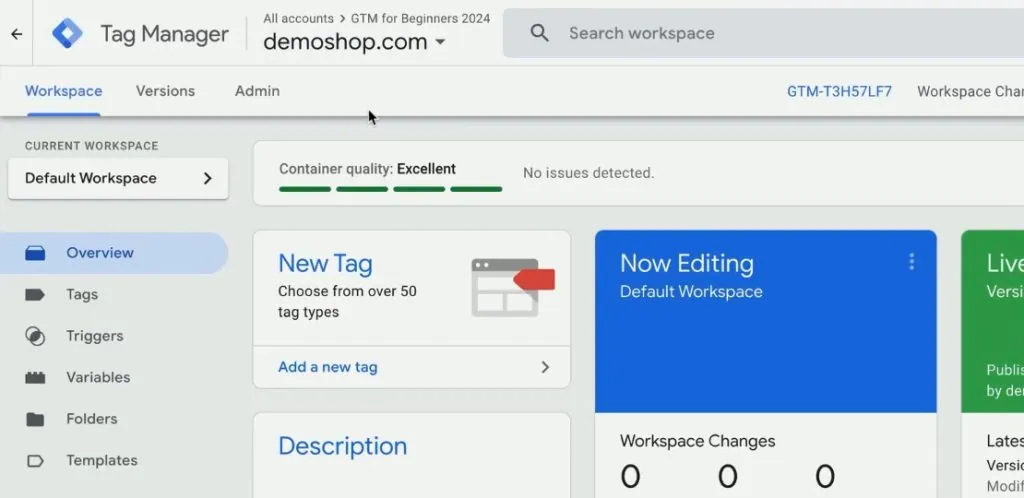
That is what the interface looks like.
How Does GTM Work?
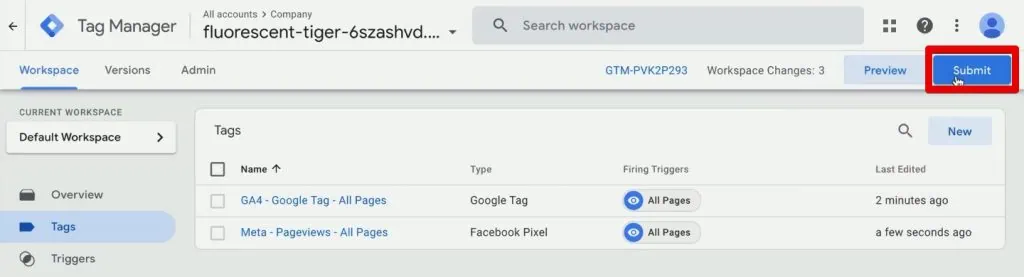
If we go to the Tags section, we can see the tags that we have already installed. We have the Google Analytics and Meta Pixel codes.
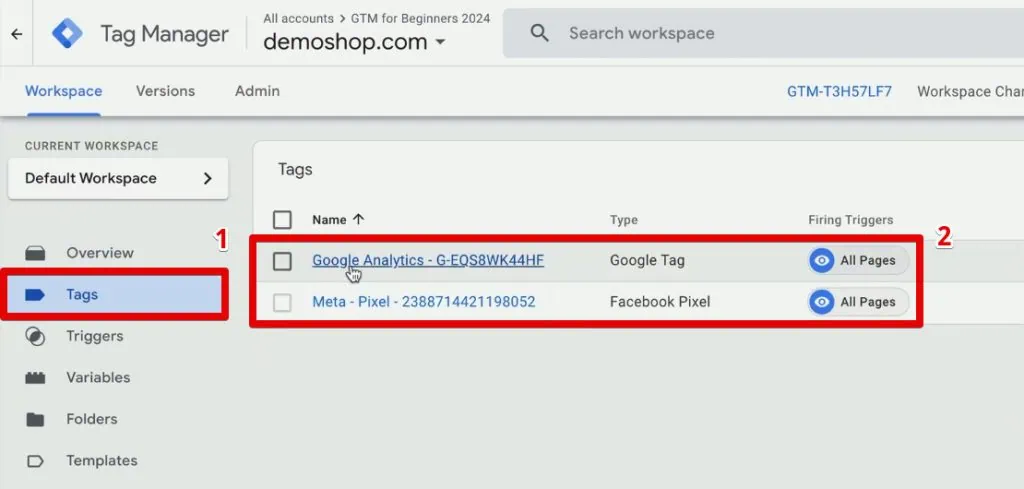
You might ask yourself, where are the codes? GTM works with tag templates that let you install the codes via a form where you only need to fill out the essential details.
For example, you only need the Pixel ID for the Meta Pixel tag.
Then, for Google Analytics 4, you will need to use the Google Tag template. To fill this in, you will need the Tag ID.
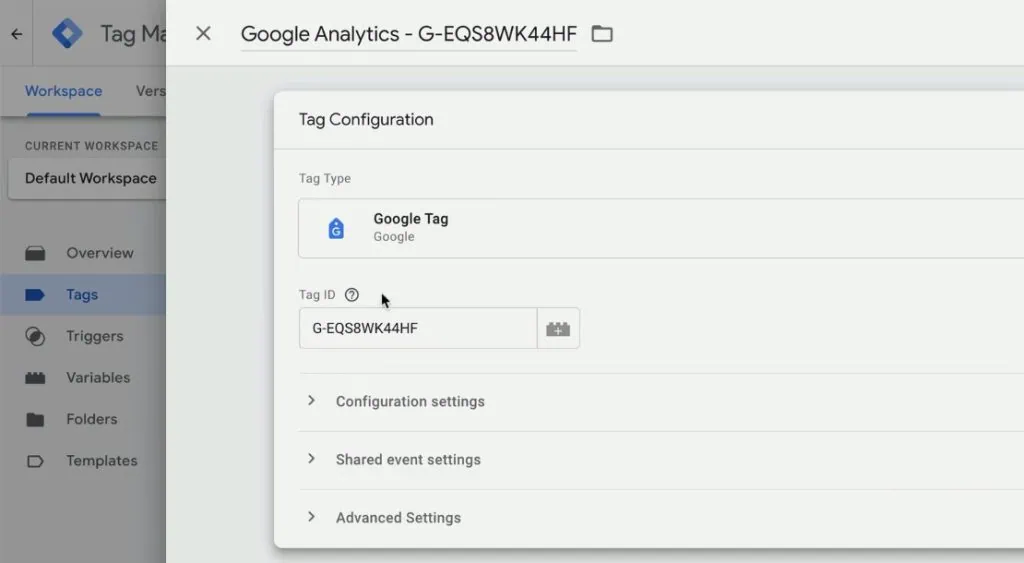
After filling out these templates, your code will deploy in the background. These templates are often built by the tracking vendors themselves, so you don’t have to maintain the underlying code if anything changes, for example.
You can also implement more complex tag deployments with GTM, as some forms can get long while others are short, like the Google Tag, which only needs the Tag ID.
With the help of these tag templates, we don’t need to manage the code in the background anymore nor have to deal with coding itself. We can utilize this interface available to us through Google Tag Manager.
In addition, you have some other capabilities with Google Tag Manager.
You can utilize triggers that are rules on when your tag should fire. There are also variables, which are like placeholders. These can make your tracking deployment more flexible and complex.
Google Tag Manager Tutorial: Preview Mode
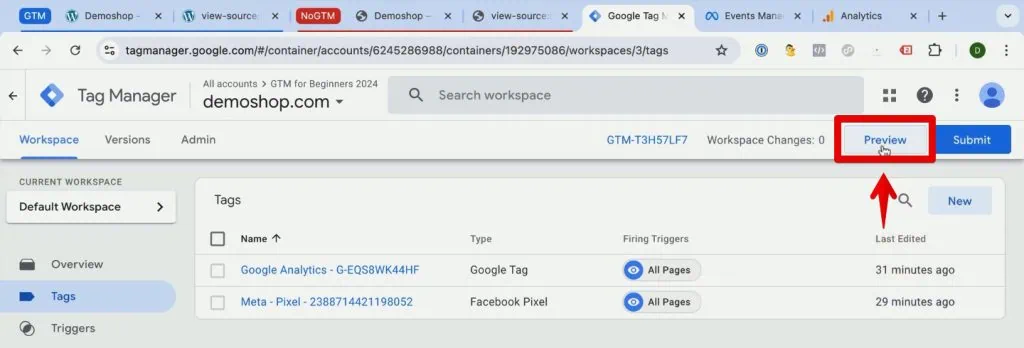
Once you have implemented these codes on your GTM container, you can test them with the Preview Mode.
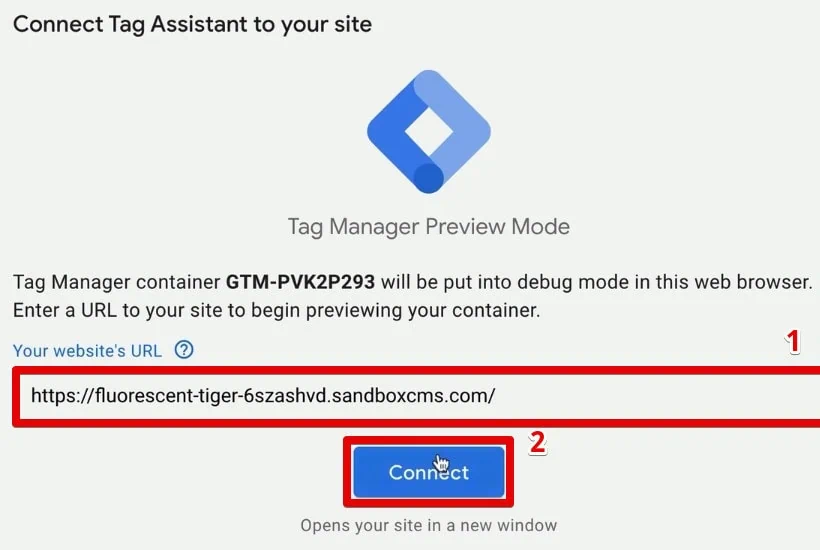
It is a special mode you can activate by clicking the Preview button.
Then, you will connect the Tag Assistant to your website by clicking Connect.

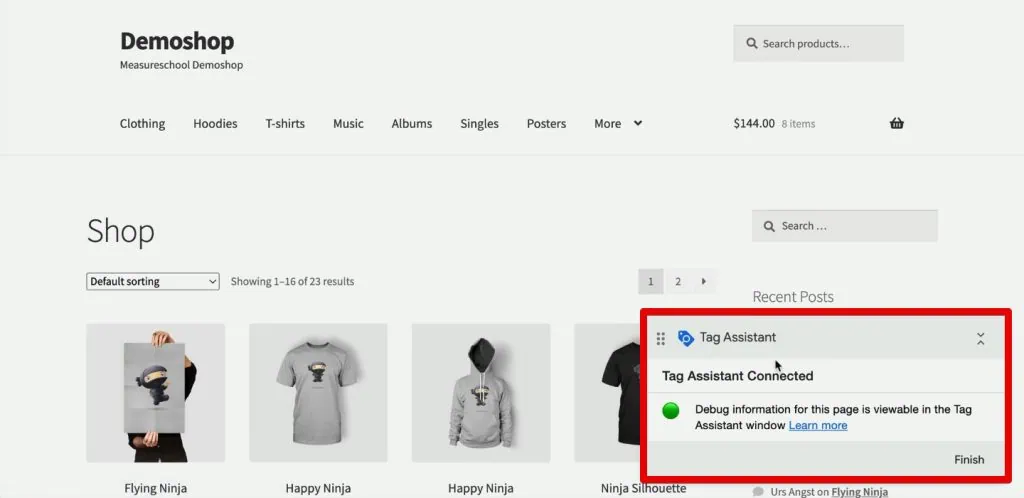
It will put your browser into a particular mode. You can deploy your tags only on your browser during this preview version.
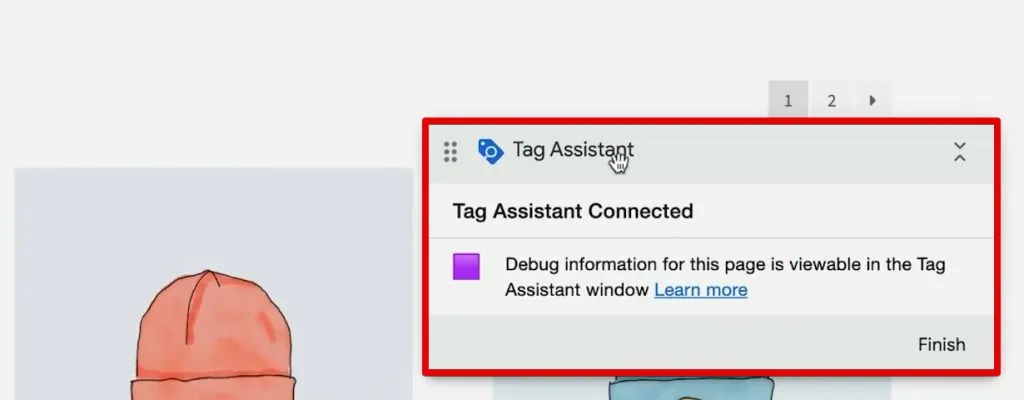
You will see a new tab open and a window at the bottom-right corner indicating that the Tag Assistant is Connected.
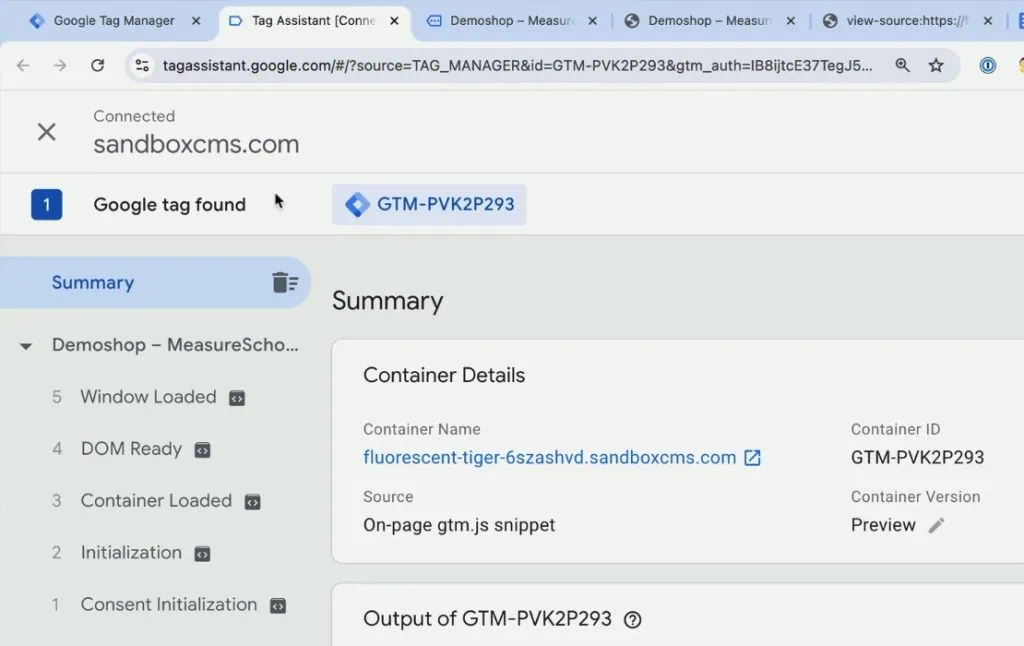
We also get another tab where the information about the different events and tags deployed on our website is available.
In this Tag Assistant tab, we can see that our Google Analytics and Meta Pixel tags fired.
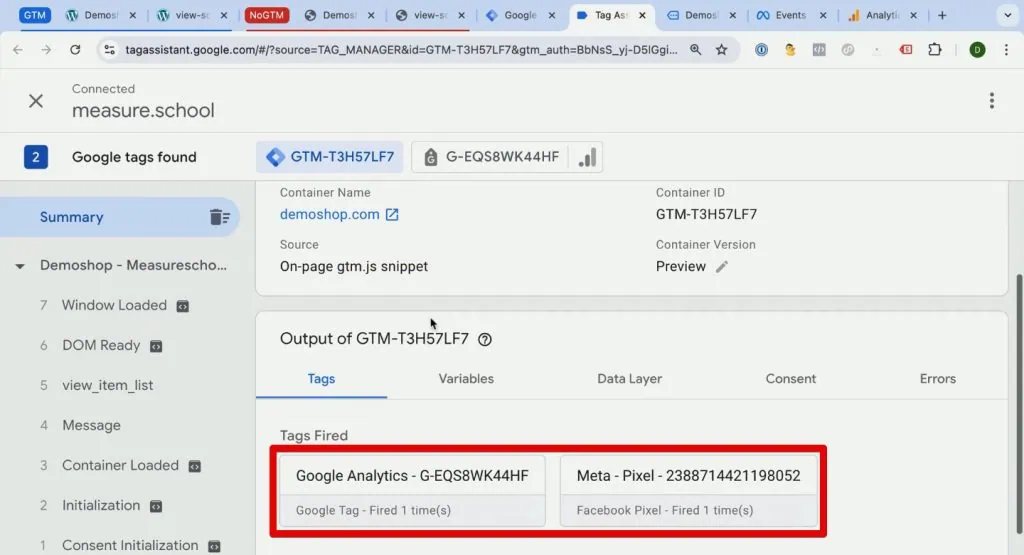
If we click on one of them, we can get more information on its configuration. For this example, let’s open the Meta Pixel tag.
Accessing this information is highly valuable because we’ll be able to utilize this information to debug our implementation and give us a better overview of the deployed tags on our website.
After testing everything and configuring the tags, triggers, and variables to your liking, you won’t have your tags on the website yet.
Once you configure your GTM container, you must deploy a version first.
Deploying a Version
Deploying a version comes from web development, where you don’t want to push a live version before testing it correctly.
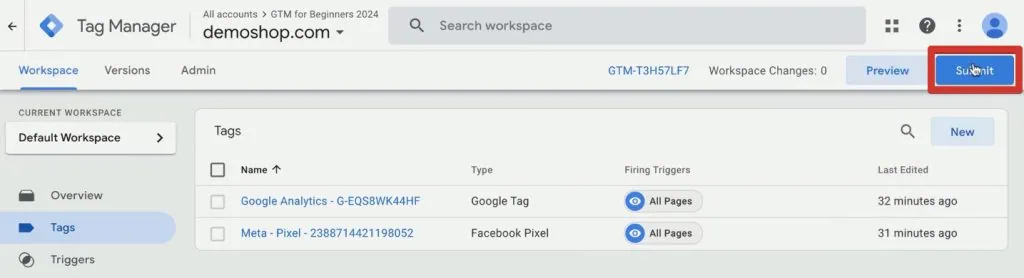
Once you are ready to deploy a version to all your users, you only need to click the Submit button beside the preview.
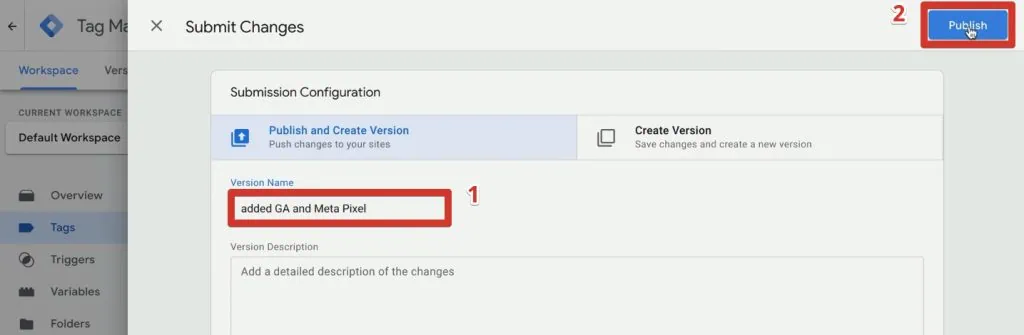
Give your version a name. For example, Added GA4 and Meta Pixel. Then, click Publish.
Great! You have now deployed your tags to all your users!
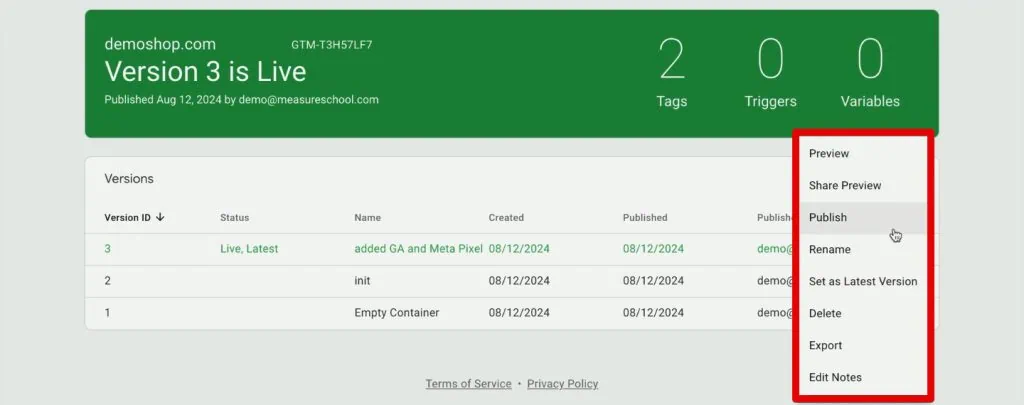
There’s another advantage of using Google Tag Manager: it has a built-in version control. We can have an overview of all the versions deployed on our website.
We can deploy a previous version if something is wrong or a tracking deployment doesn’t work. You click the three dots beside the version you want to return to.
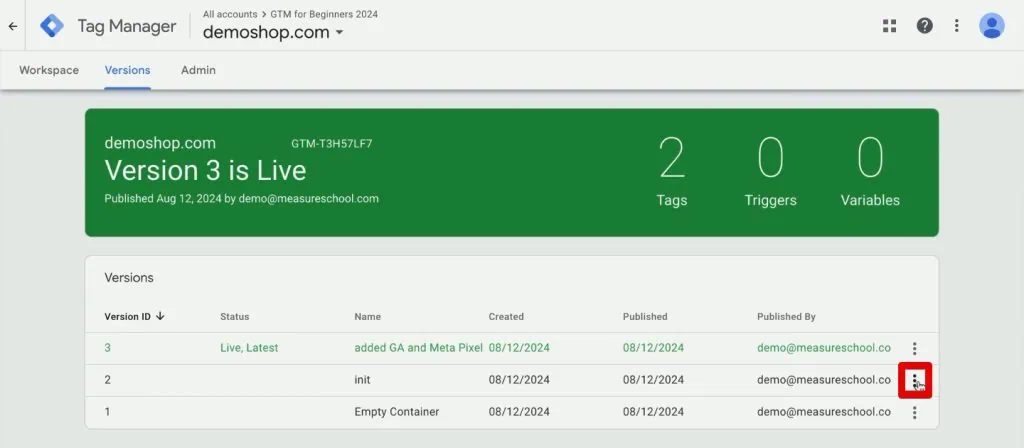
Here, you will see a bunch of different options for version management. Select Publish to roll back the version.
It is best practice to keep a log of the changes you implemented on your website, and Google Tag Manager helps with the management part of your tags.
Hopefully, we have convinced you that Google Tag Manager is a fantastic tool for your tracking deployment. It will add to your governance of deploying codes on your website.
How to Install Google Tag Manager on a WordPress Website
Installing Google Tag Manager is pretty simple. You only need to follow these two steps:
We will walk you through these steps thoroughly in the following sections. We’ll cover three installation methods for those comfortable with coding or prefer using plugins.
You will see that you will not need extensive development knowledge to proceed.
Creating a GTM Account
- Our journey starts by going to tagmanager.google.com.
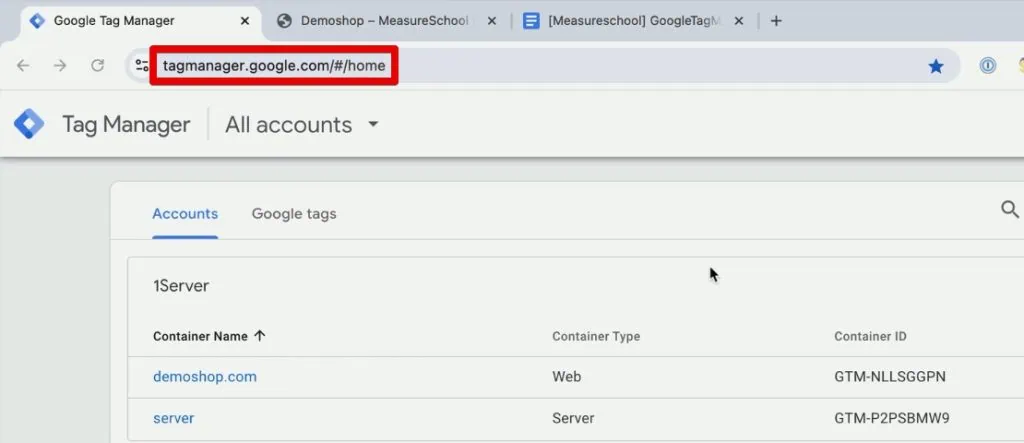
- If you go to this site and haven’t logged into your Google account, it will ask you to either create an account or log in with your account credentials. You will then see this interface.
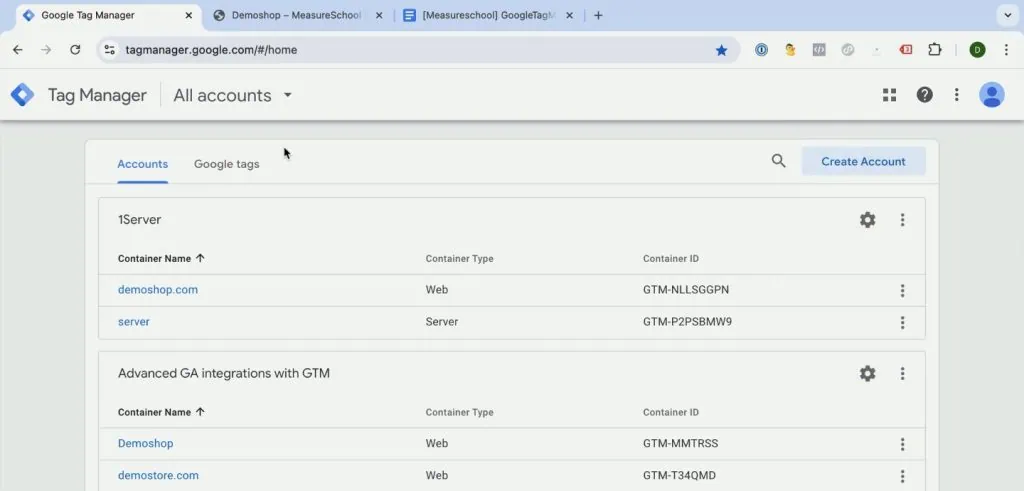
- Even though you have a Google account, you still must create a Google Tag Manager account. Click Create Account.
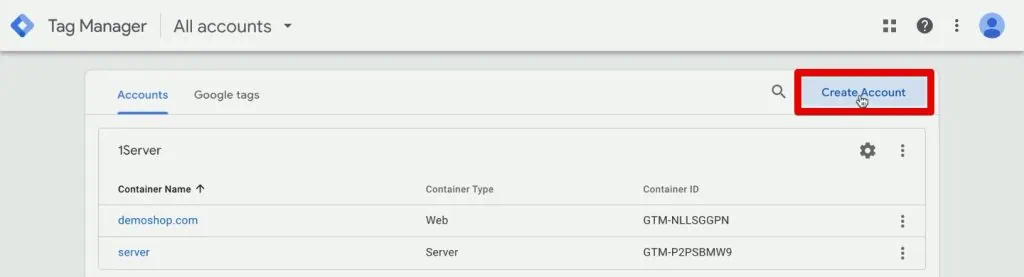
Then, you will see this interface. You may also be directed to this page when you open the GTM link for the first time.
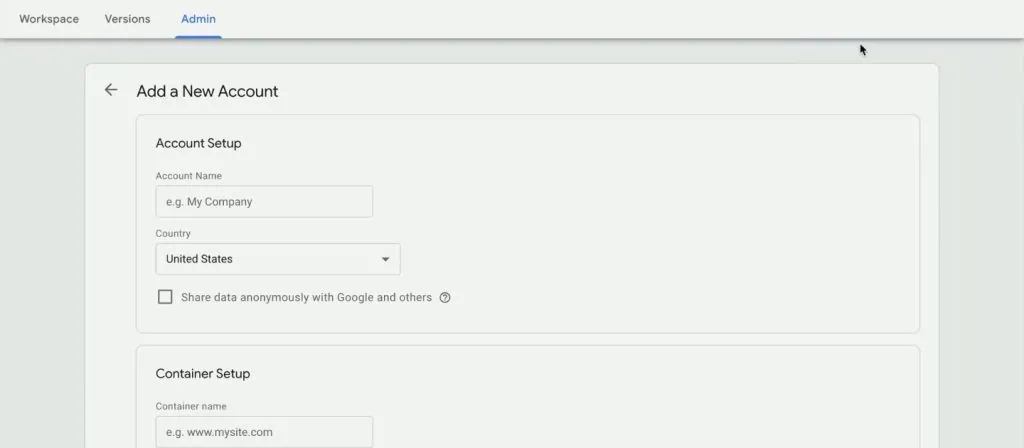
In Google Tag Manager, you have accounts and containers. An account is a collection of various containers. Containers are the snippets installed onto your website.
The usual account structure is to have a single account for your company. Then, you can break your websites and apps into different containers.
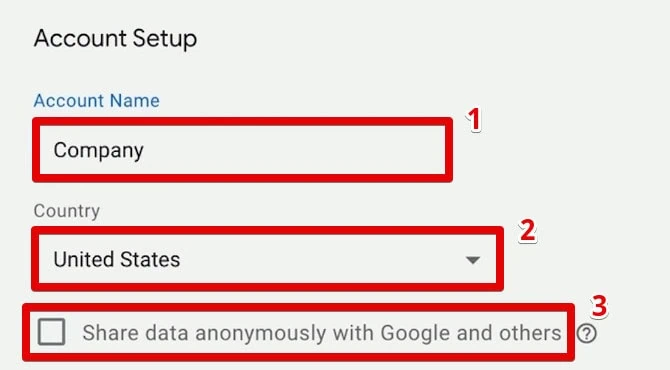
- Let’s select an account name. Put in your company name. You can also choose your country or share your data with Google.
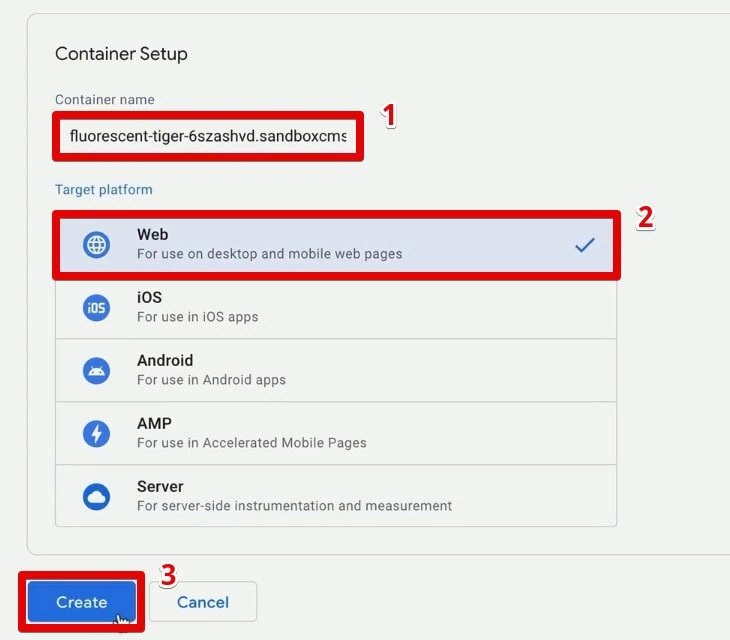
Next, let’s proceed with the container setup.
🚨 Note: For this example, we’ll show how to create a container for a website target platform. There are options for iOS or Android apps, Accelerated Mobile Pages (AMP), and Server – for server-side tagging.
- You can use your website URL as the container name, but remove the extra forward slash symbols and the https text string to keep it clean. Select Web for the target platform, then click Create.
- You will then see the GTM terms of service agreement, read through it once, click the acceptance tick, and then click Yes to proceed.
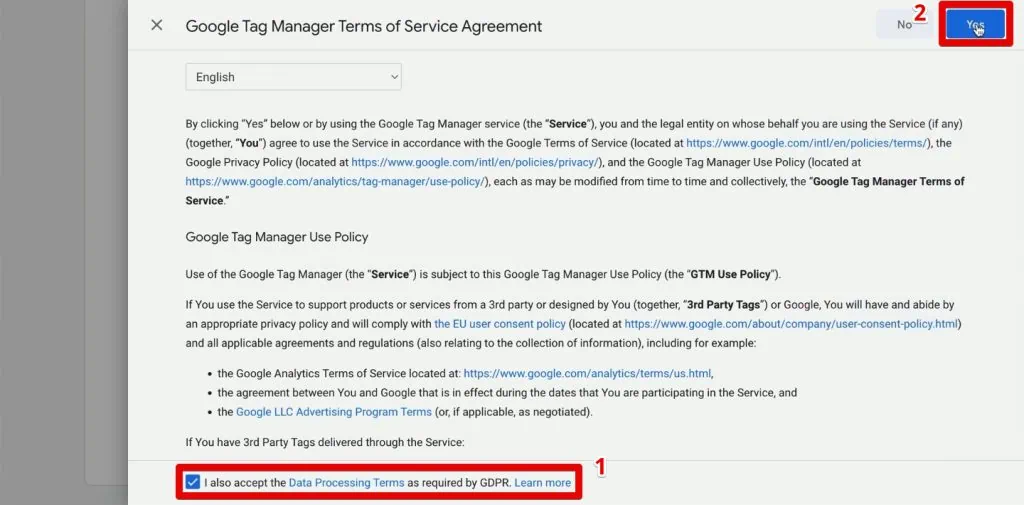
Great! We have successfully created our Google Tag Manager account.
Installing Google Tag Manager
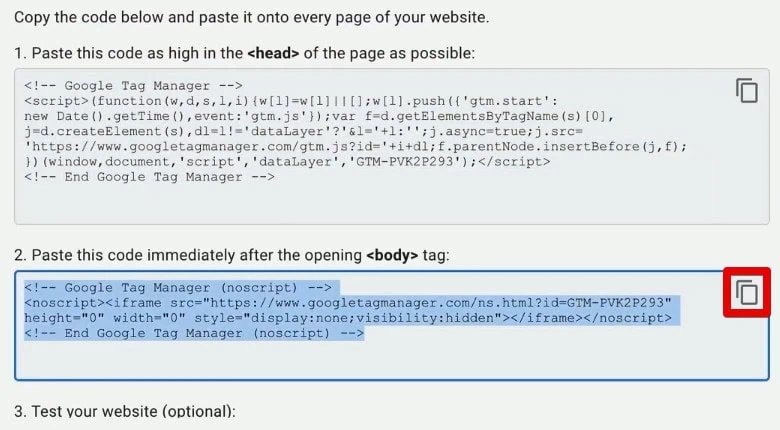
The first thing that will pop up is the instructions for installing the Google Tag Manager code.
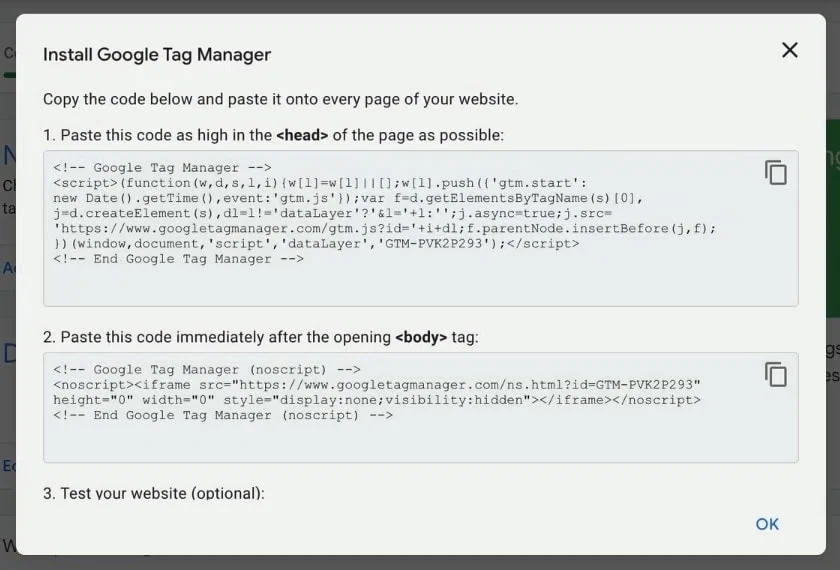
To install GTM on your website, you must install these pieces of code onto every page. Then, we can utilize GTM on the website.
We have two pieces of code, one that you need to place in the head section and another in the body section. What does this mean? As we did on our website earlier, let’s look at the page source for more context.
Right-click on the page and select View Page Source to see the HTML code.
We want to place the first code as high up in the head section. The head section starts with the <head> tag.
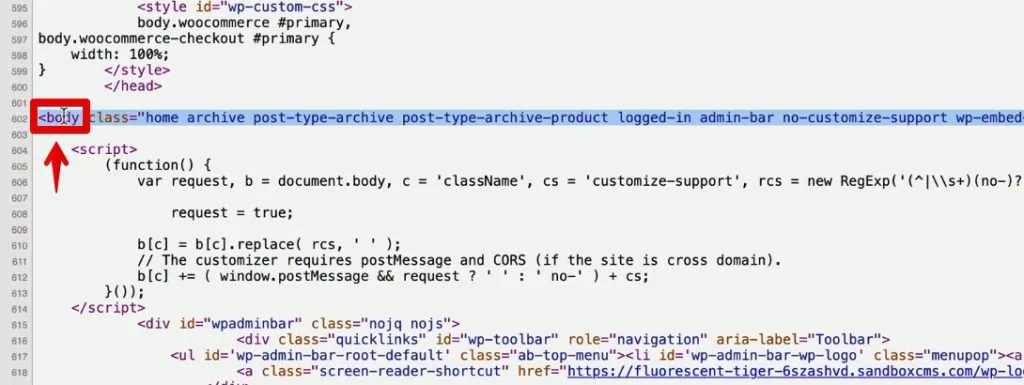
Next, the second code should be immediately beneath the opening <body> tag.
There are three ways of installing the Google Tag Manager code on your website:
🚨 Note: The installation process may vary depending on your content management system (CMS), but most steps apply universally. For this example, we’ll show how to install Google Tag Manager on a WordPress site.
1st Method: Editing Code Yourself
We need to edit the theme files to edit the underlying HTML of a WordPress site.
- Go to your WordPress backend and open Appearance → Theme File Editor. Of course, you must have access to the website to edit the theme files.
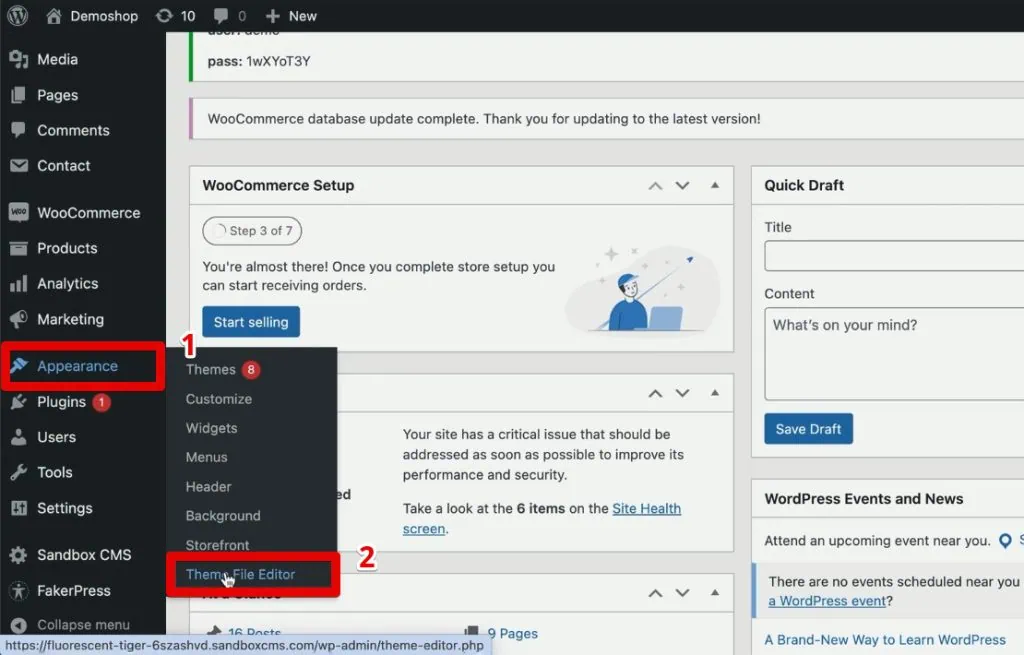
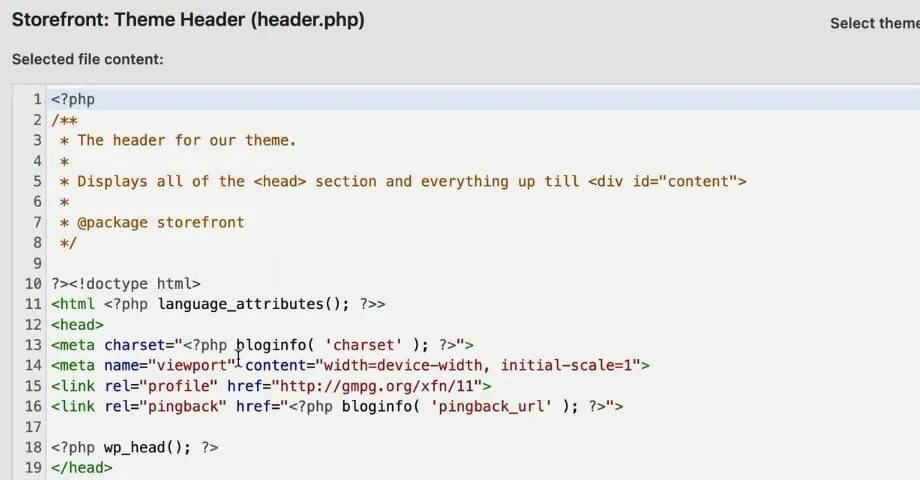
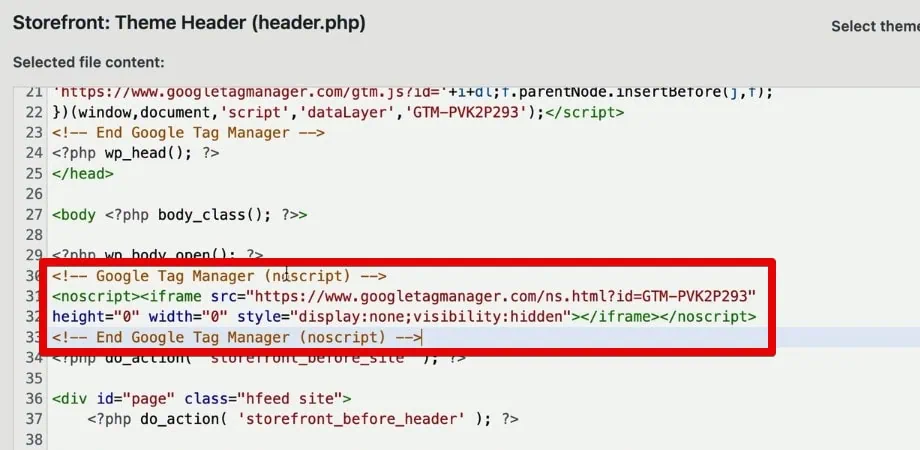
- Next, search for the Theme Header or header.php.

Here, you will find some PHP code and the head section where we want to place the first code.
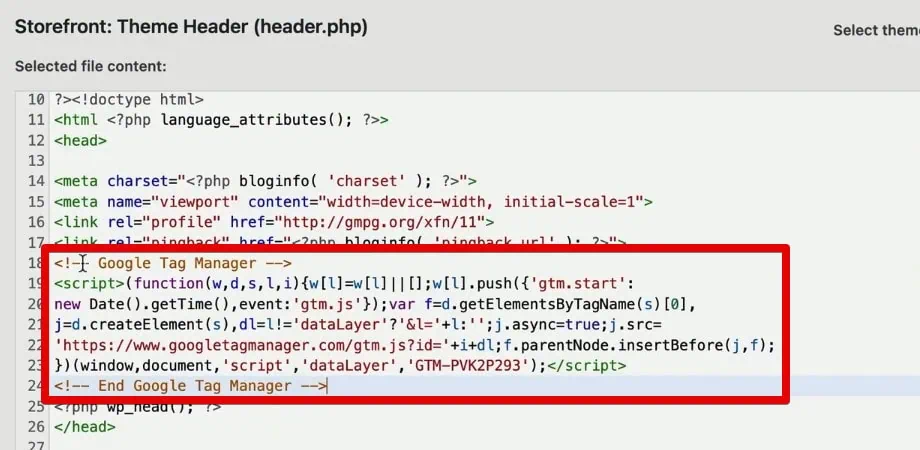
- Copy the first code of the Google Tag Manager snippet.
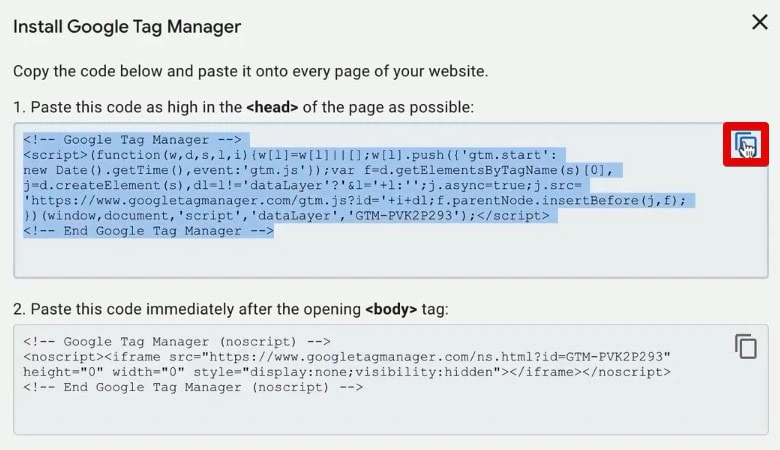
- For this instance, paste it on line 18.
- Copy the second code of the GTM snippet.
- Then, scroll down to the opening body tag and paste the second code.
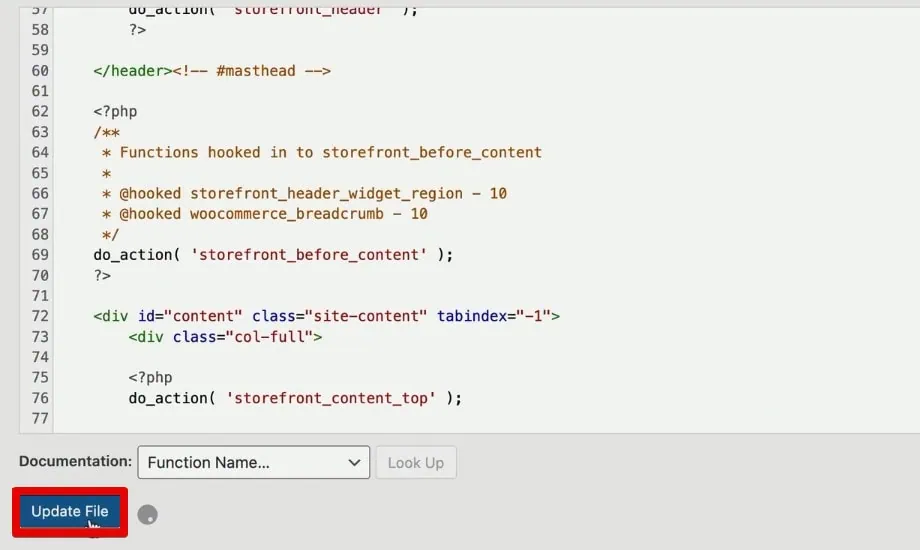
- Finally, click the Update File button.
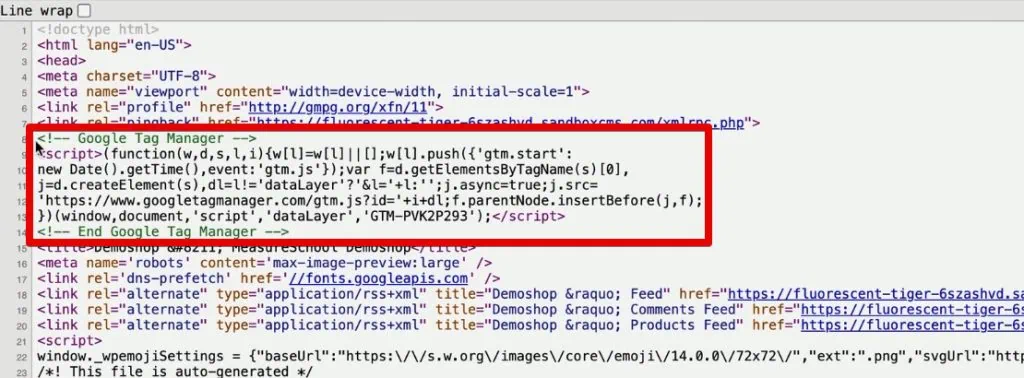
- Now, go back and refresh our website. Then, open the page source code. We should see our Google Tag Manager code now. In the head section, we should see the first snippet of our GTM code.
- Let’s also check if the second snippet is in the body section.
They are both present. With that, we have Google Tag Manager installed on our site.
- As a final check, we can go into the preview mode. Add the website URL, then click Connect.
- If we installed GTM correctly, we should see a little panel that says Tag Assistant Connected.
- We should also see some data in the Tag Assistant tab.
We have installed Google Tag Manager correctly on the demo shop. It is now connected and working on our site.
2nd Method: Using a Plugin or Extension
If you don’t want to deal with code, you don’t have access to it, or you don’t know what you’re doing, you may want to check if your CMS or shop system has plugins or extensions that you can use to install these codes on your website.
🚨 Note: The availability of these plugins or extensions may vary per CMS or shop system, so it’s best to look for instructions for your specific case if the following steps differ from your use case.
For WordPress sites, there is a vast ecosystem of plugins we can use.
Returning to our backend, let’s quickly reverse our implementation to avoid double implementation of the codes. Remove the first and second code snippets and update the theme file. We have now uninstalled GTM.
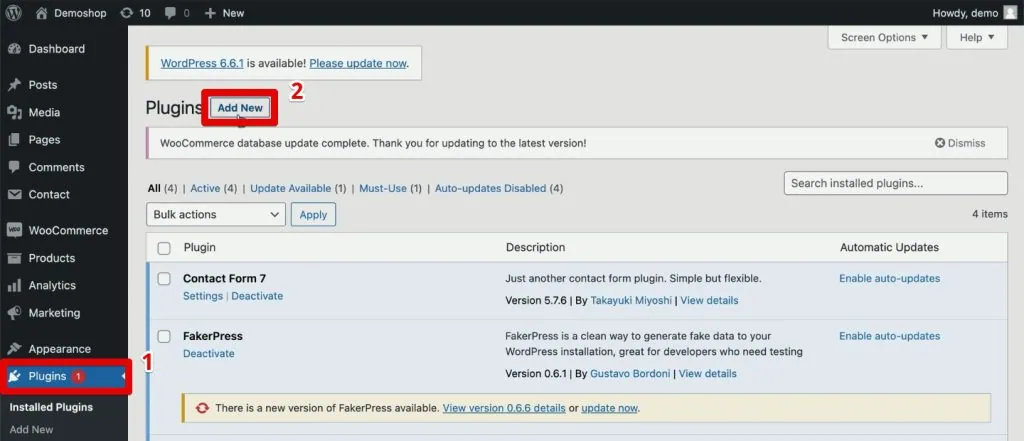
- Go to the Plugins section and click Add New.
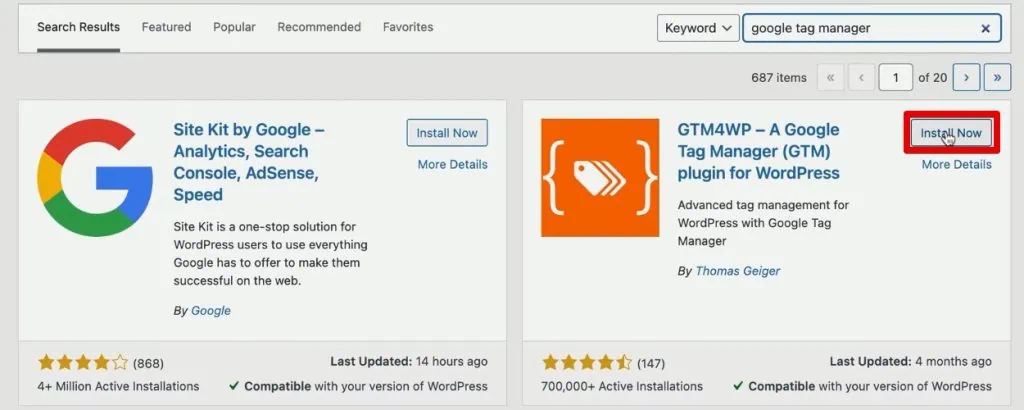
- Search for Google Tag Manager.
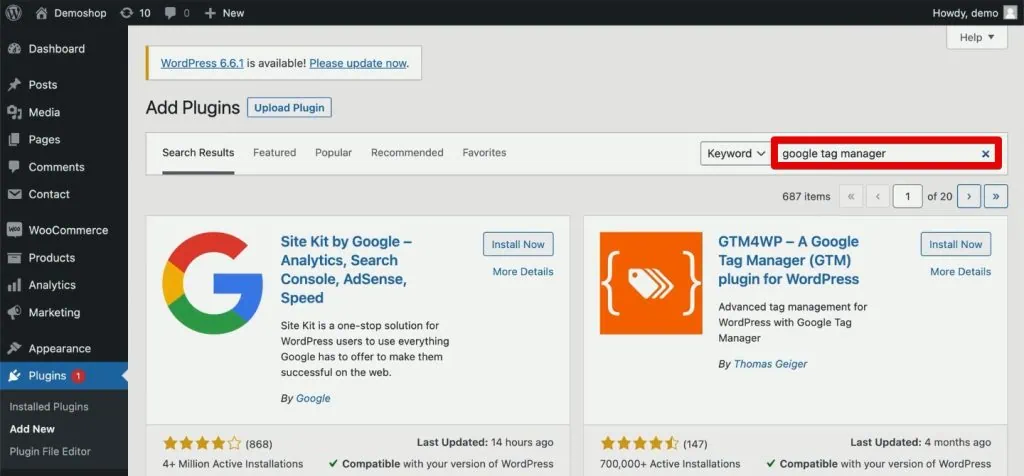
- There are multiple plugins, but let’s choose the Google Tag Manager for WordPress (GTM4WP) plugin. Click Install Now.
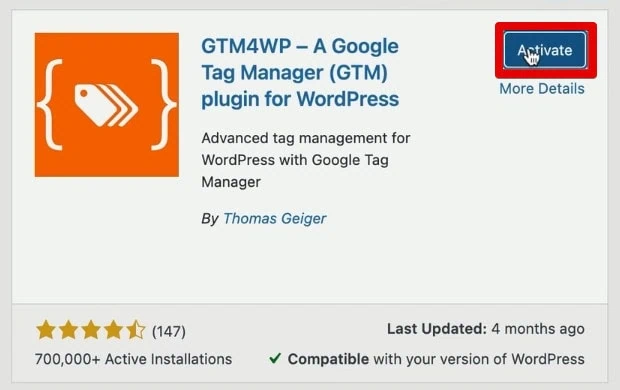
- Once installed, click Activate.
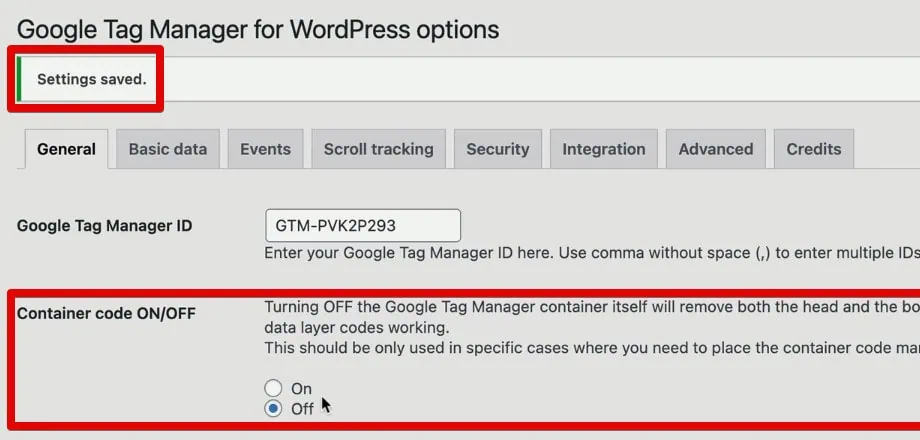
- Then, we will have new settings for GTM. Go to Settings → Google Tag Manager.
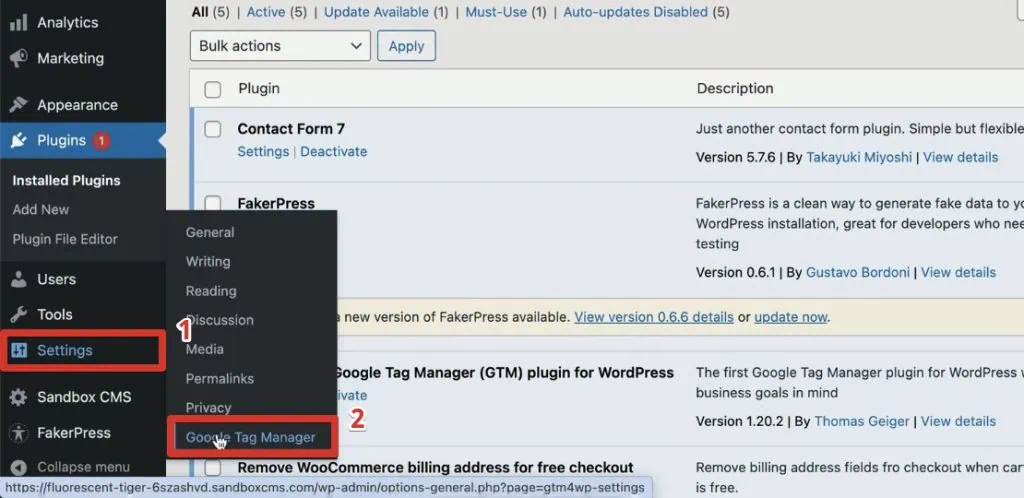
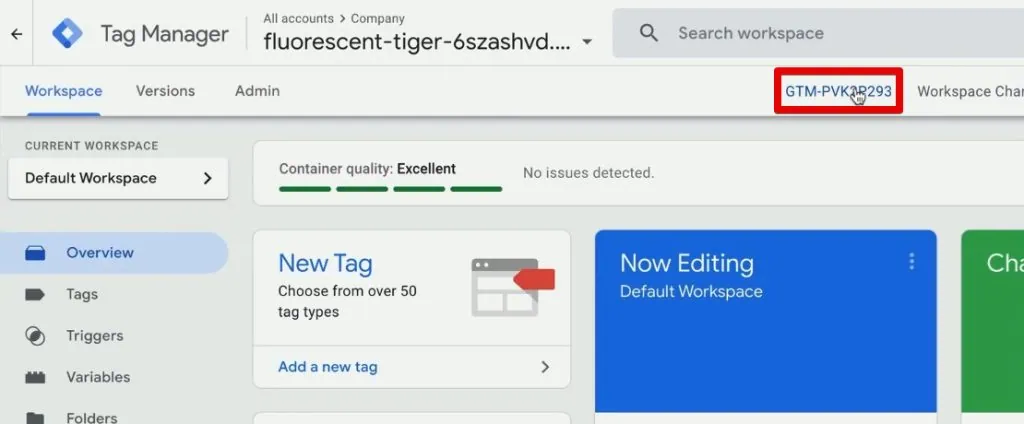
- Here, we need the Google Tag Manager ID. Copy this from your GTM container. It is at the bottom header.
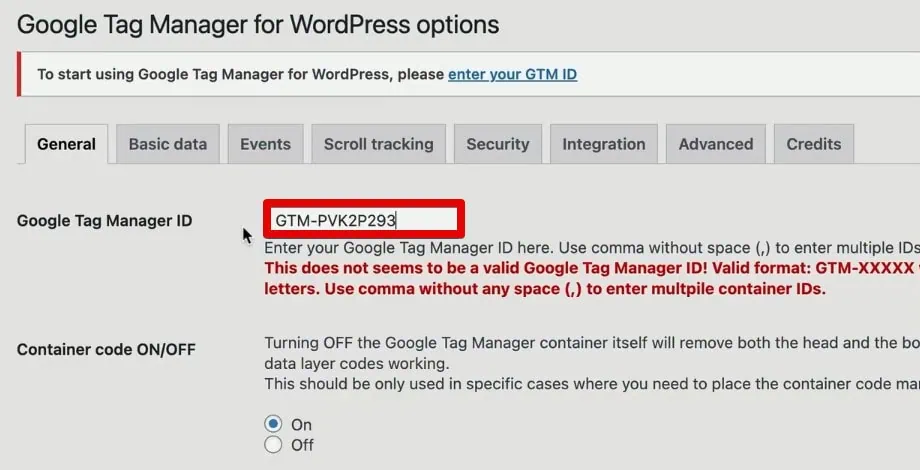
- Paste it to the Google Tag Manager ID space in WordPress.
- Leave the container code on and leave the container code compatibility code off. Finally, click Save Changes.
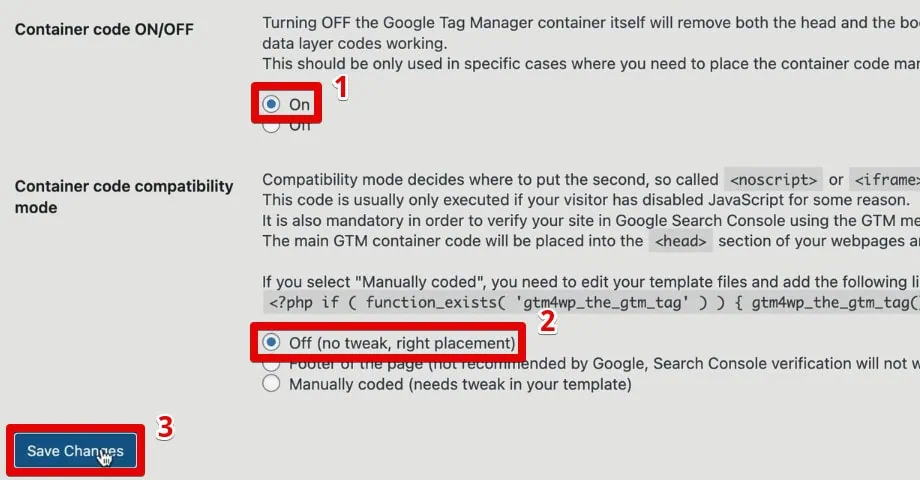
- While it says we have saved our settings, it’s good to double-check the container code setting. Sometimes, it turns off, so turn it on again.
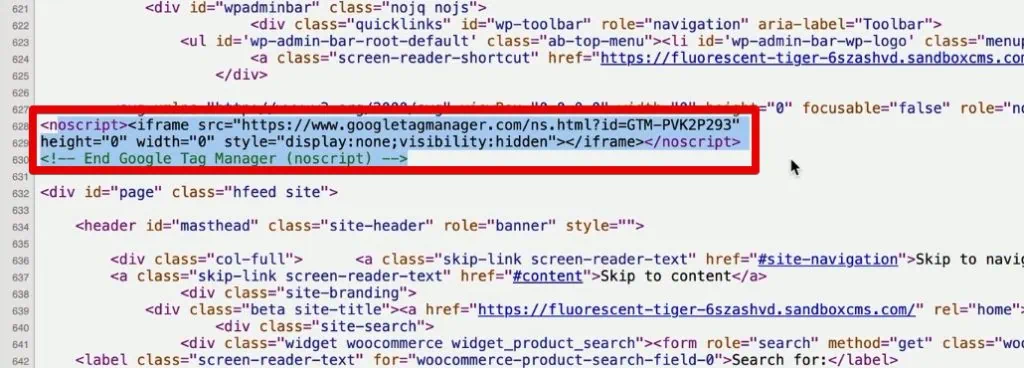
- Let’s check the page source of our demo shop. Here, we should see the Google Tag Manager code installed through GTM4WP.
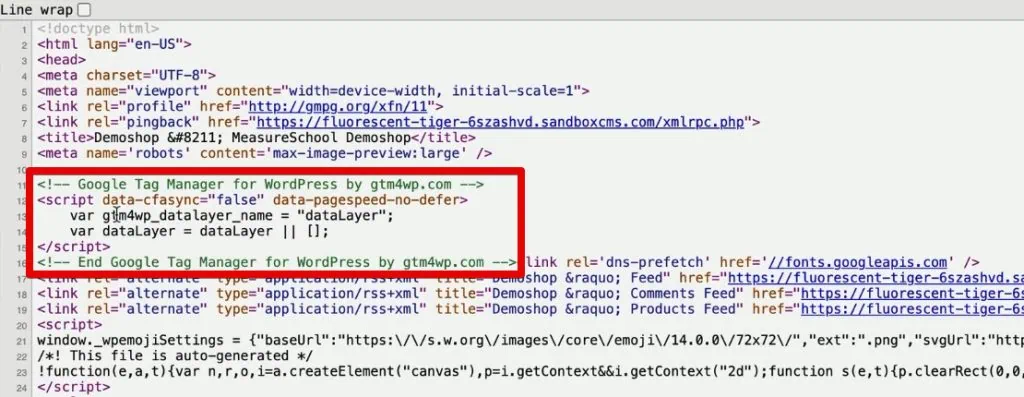
- Searching for our GTM ID in the source code, we can see an additional piece of code this plugin places on our website to connect to our GTM container.

- Scrolling down, we can see the NoScript tag in the body section.

We have placed all these tags without going to the code base itself.
- Let’s perform a final check by opening the preview mode and seeing if the Tag Assistant will connect successfully.

We are all good and have Google Tag Manager installed on our website using a plugin.
Pros and Cons of Installing GTM via Plugin
Using extensions or plugins may be an option if you can’t code. Some pros include:
- You don’t need to utilize any coding knowledge.
- There is more functionality built into the plugin that we can use later.
Of course, this method also comes with a couple of downsides:
- It can slow down your website, especially if you have installed multiple plugins.
- It may not always work. Developers build plugins based on a standard use case. If you have a heavily customized website, the installation may not work because your website doesn’t have the correct hooks for the plugin to work correctly. You may need to change the plugin around, further complicating the implementation.
If these disadvantages apply to your website, installing the code in the source code may be the better option. If you can’t access your website code, try the following method.
3rd Method: Providing Documentation for the Developer
This last method applies to those who don’t control or make changes to the website directly. You can instruct a developer to install Google Tag Manager for you.
While you can send the two code snippets over to your developer, giving them a guide to go along with this may be beneficial to ensure proper installation.
- Google has its own Quick Start Guide that your developer may want to check out.

- MeasureSchool has done this with hundreds of clients and has created our GTM Implementation Documentation that you can copy to your Google Drive account.

It has the objective, the link to Google’s quickstart guide, who to email for support and code examples.
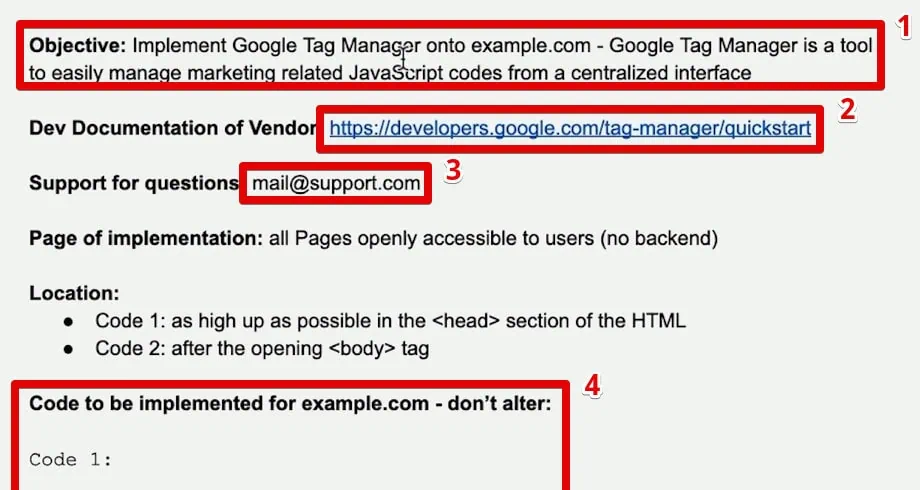
Since this is a template/guide, you must change a few details, like the email for support and parts of the code.
Those are the steps for installing Google Tag Manager. You must create a GTM account and install two code snippets on your website by choosing from one of the three methods we discussed.
How to Implement Your First Tags in Google Tag Manager
We will guide you through installing and deploying your first Google Analytics 4 (GA4) and Meta Pixel tags using Google Tag Manager.
Here are the steps that we will cover:
- Gather Information for Tag Installation
- Plan the Tag Implementation
- Set Up the Google Analytics 4 Tag
- Set Up the Meta Pixel Tag
- Debugging and Real-Time Data View
- Publish the Tags
This step-by-step approach is essential for anyone looking to track website data and streamline their tag management.
Gathering Information for Tag Installation
Before setting up your tags, it is essential to have a plan. First, you need to gather some information from these tools to know what to put in the fields inside Google Tag Manager.
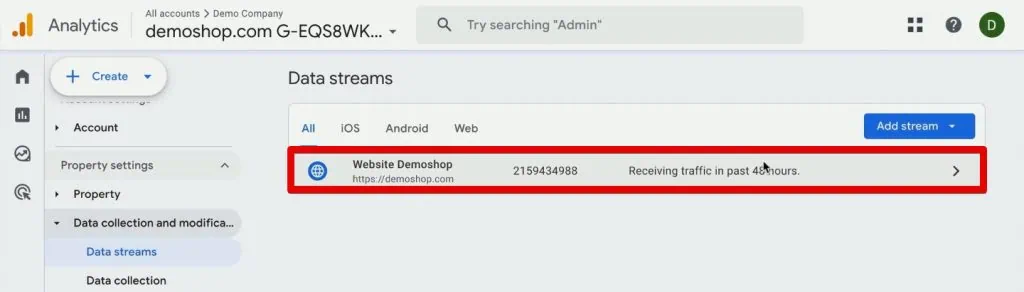
- Inside Google Analytics 4, go to Admin → Data Collection and Modification → Data Streams.
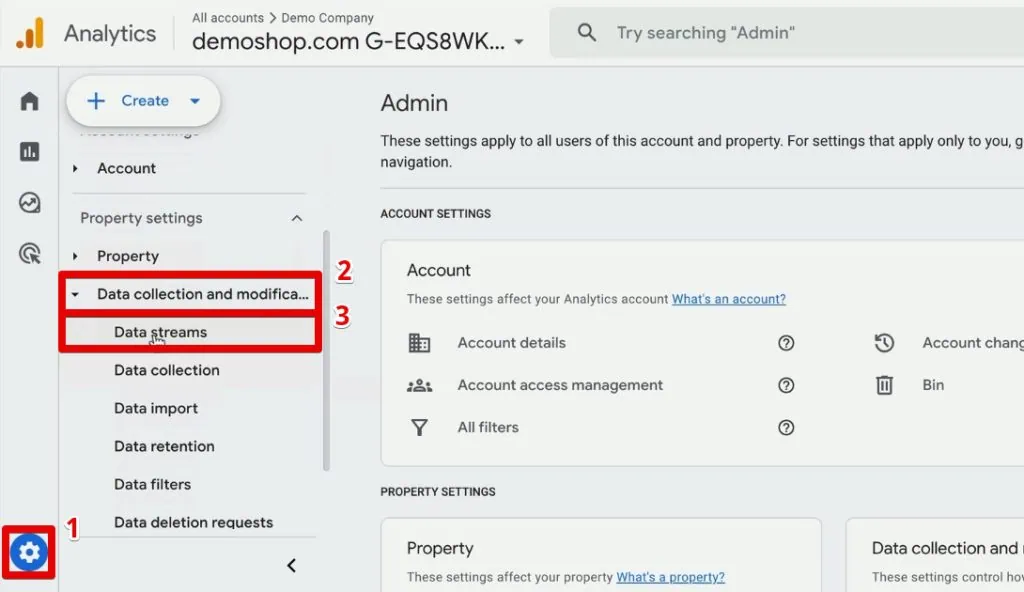
- Open a data stream if you already have one set up.
🚨 Note: If you haven’t set up a data stream yet, check out our guide on How GA4 Data Streams Work, where we have a section on how to set up different types of data streams.
- Scroll down and click View Tag Instructions.
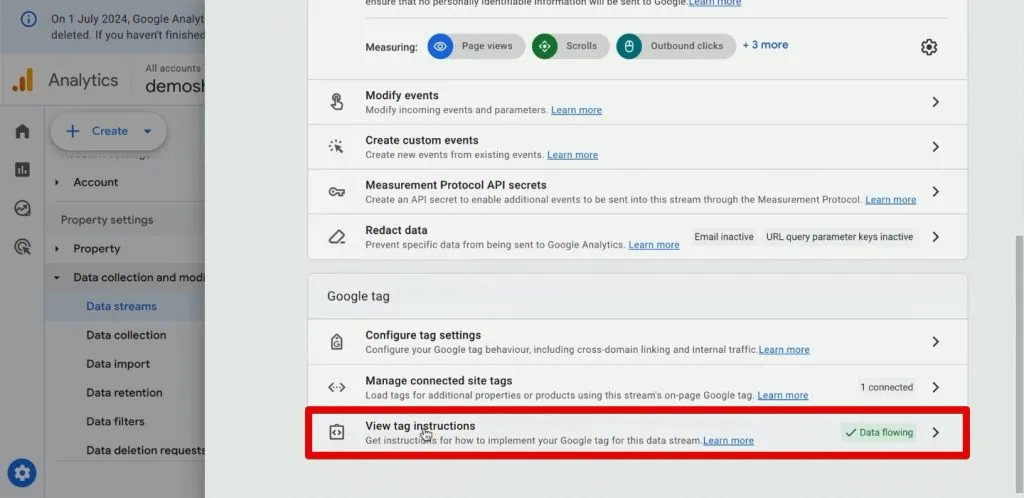
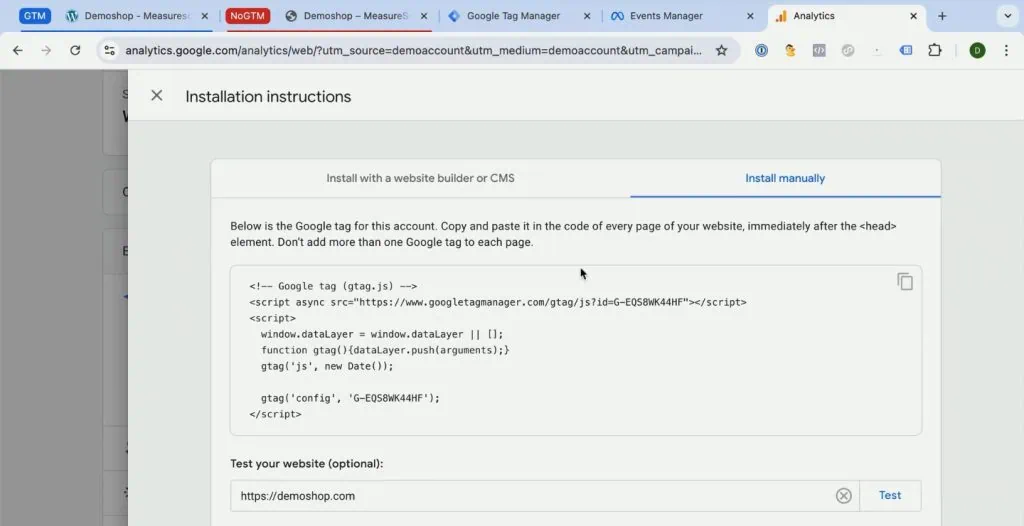
Here, we get instructions for implementing the Google tag for our data stream.
- Click Install Manually. We get the Google Tag code below.
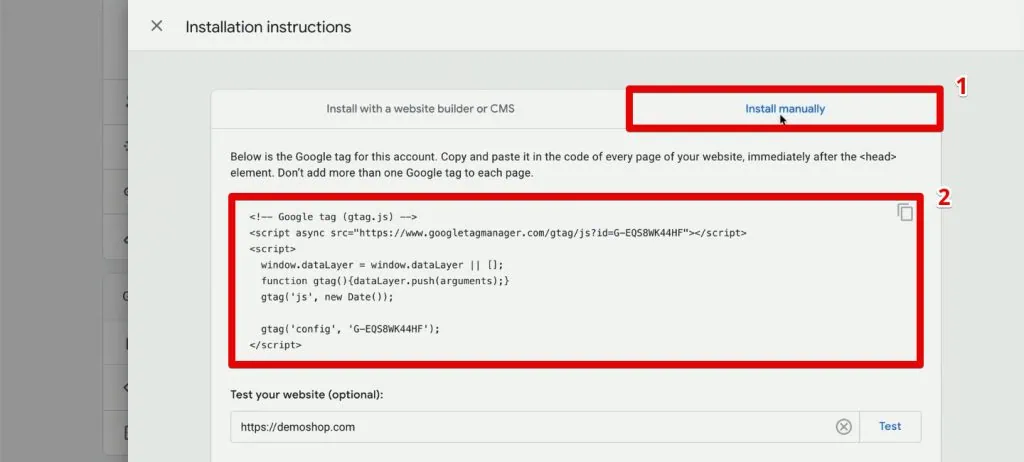
Since we are using Google Tag Manager, we don’t have to copy the entire code. We only need the portion that contains the data stream measurement ID.
- In the code, copy the second parameter of the gtag function in line 8.
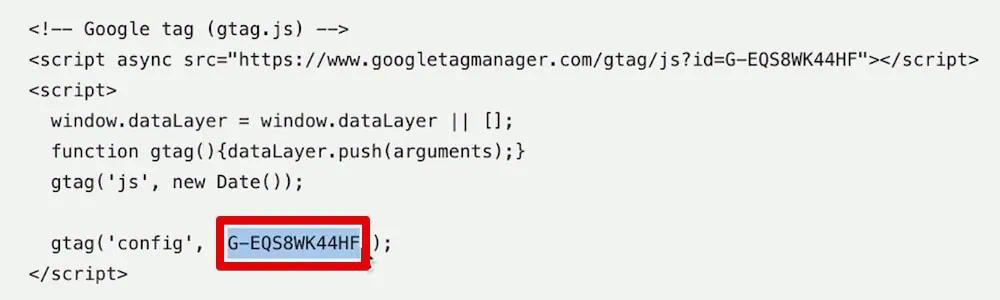
- This tracking ID is all we need to accomplish the form inside Google Tag Manager. Copy the measurement ID.
Planning the Tag Implementation
Why is it essential to have a plan before diving straight into implementation? By writing everything out, you can more easily follow your plan and have everything ready.
We have prepared this Tag Plan template using Google Sheets. You can download or create a copy for your purposes. Below is an example of how it would look when you have it filled out.
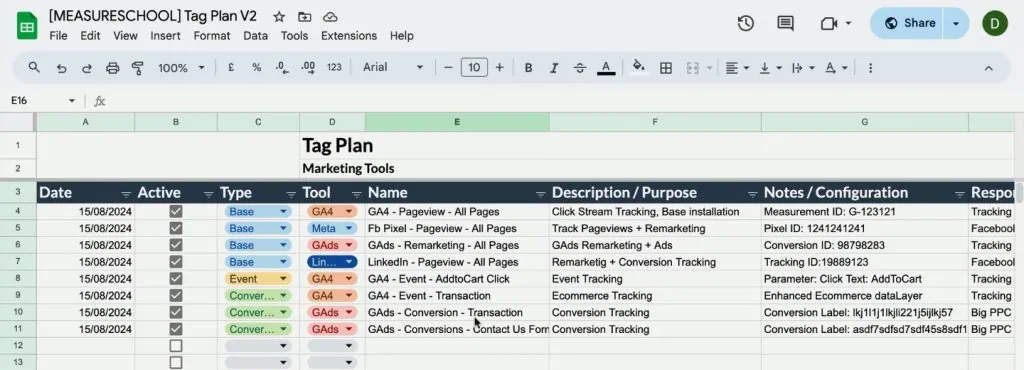
Let’s go through the information in the tag plan.
We have the date when you added a tag, if it is active on your website or not, what type of tag it is, which marketing tool it is for, the name you assigned to this tag, and a short description of the purpose of the tag.
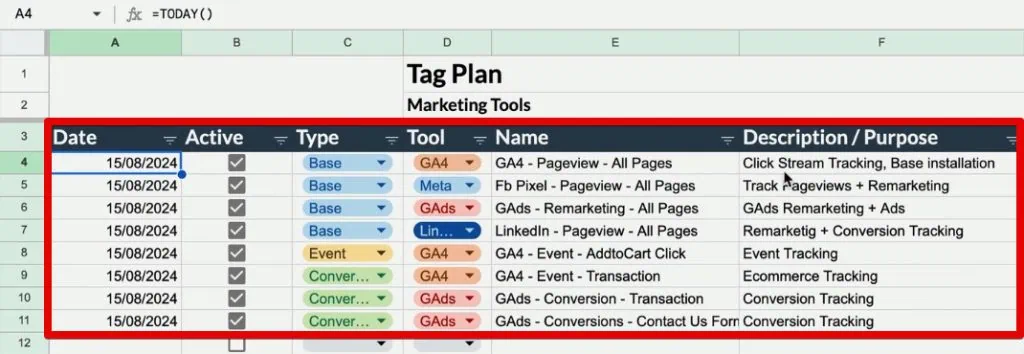
Next, you can add any notes like the measurement ID, who is responsible if multiple people are working on a single GTM account, and some tasks to do related to the tag.
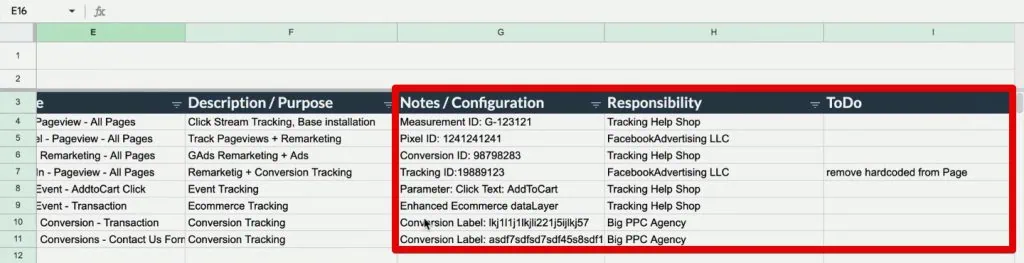
It is valuable information, especially if you want to work with clients, as you can have something ready to show them later on.
While this information is also available in Google Tag Manager, having it outside the system makes you more secure for what you’re trying to do and makes it easier to reference later.
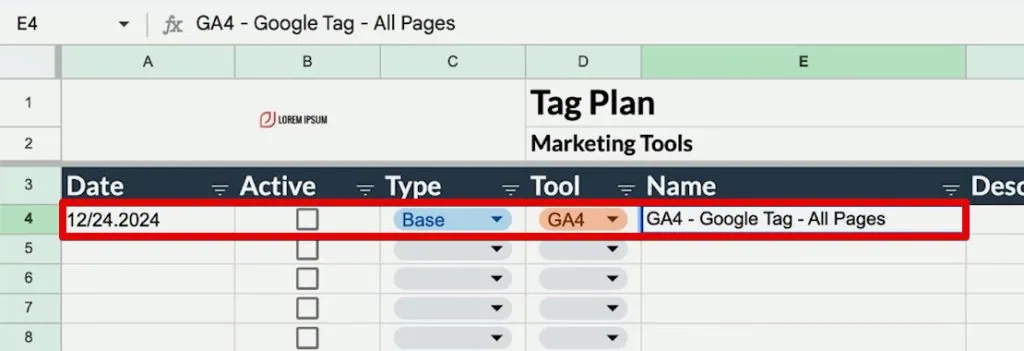
🚨 Note: You can change the formatting and replace the logo with your own. The following steps will focus on the essential information for the Tag plan for our demo shop.
- First, fill out the date. Leave the checkbox unticked for the active column since we have yet to implement this tag. We want to install the base tag for Google Analytics 4, so select Base and GA4 for the Type and Tool columns, respectively. Then, provide a name for the tag.
Naming conventions are necessary for Google Tag Manager, so ensure you decide on a scheme and follow it for the other tags you will put in this list.
We usually put the tool first, then the tag type. In our case, it would be the Google tag. Finally, we include the scope; in our case, we want to deploy this tag on all pages.
- Then, we can put in a description like Base Tracking for GA4. Adding this description will be helpful for anyone trying to understand your GTM implementation and find out what these tags are all about if they join later.
Lastly, for the notes/configuration column, we will put in the measurement ID we copied in the previous section.

Next, let’s do the same for the Meta Pixel tag.
- We have the Base tag for the Meta Pixel. It will be for the Pageviews on All Pages. For the description, similarly put the Base Tracking for Meta.
For the configuration, we need the Pixel ID.
- Go to the Events Manager and sign in to your Facebook / Meta account. In the Data Sources section, you can copy the Pixel ID either at the top under the pixel name or in the Dataset ID section.
- If you don’t have that set up, go to Integrations → Add New Integration.
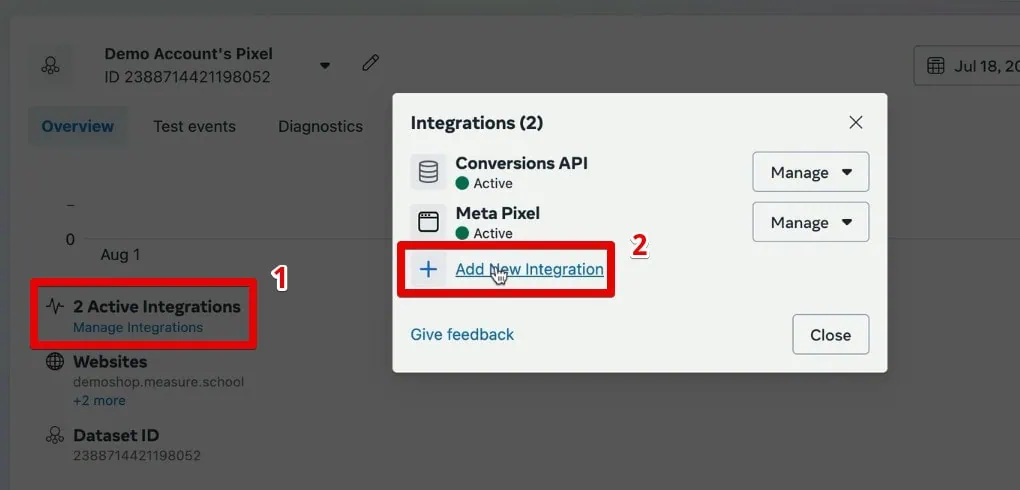
- Select Meta Pixel, then click Set Up.
- Select Manually Add Code to Your Website, then click Get Started.
- Finally, we reach the page where we see instructions on how to install the base code. Here, click Copy Code.
- Looking at this code in a text editor, we can see the same pixel ID we need for our tag.
💡 Top Tip: While we breezed through the Meta Pixel setup in this Google Tag Manager tutorial, you may want to check out our post on How to Set Up Meta Pixel with GTM if you want a more detailed step-by-step guide.
- Paste this ID into our tag plan.
With those details filled out, we have a great starting point for a plan we want to implement.
Setting Up the Google Analytics 4 Tag
Now, let’s go ahead and start with the GA4 tag implementation.
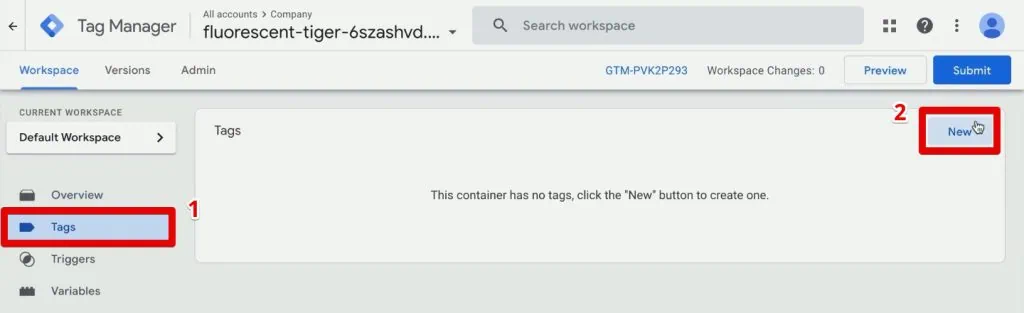
- In Google Tag Manager, go to Tags → New.
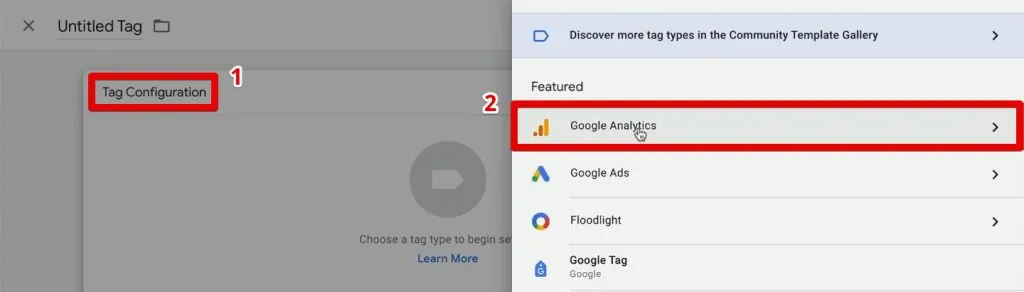
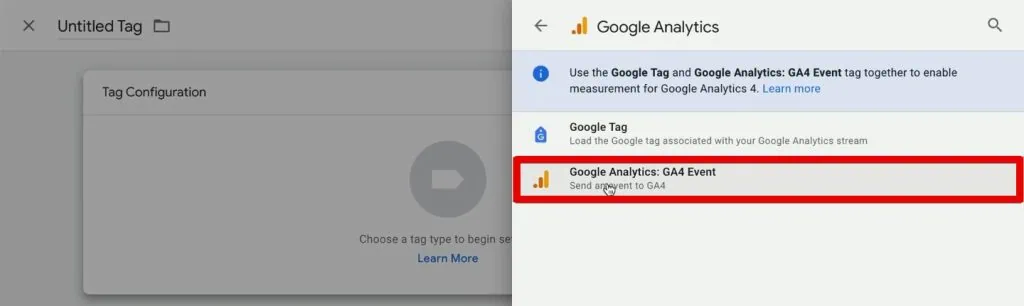
- Next, we’ll select the Tag Configuration. Here, you can choose among the tag types built into GTM. There are different types associated with various marketing tools available here. Since we are creating a GA4 tag, select Google Analytics.
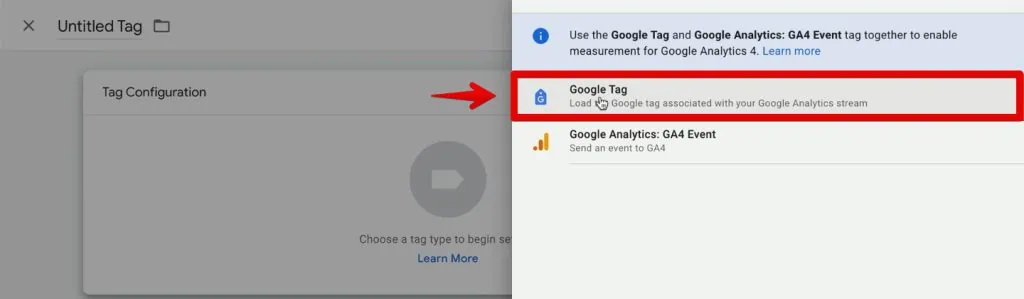
- Here, we have two tag types: the Google Tag and GA4 Event Tag. Select the Google Tag, an overarching tag that can also deploy Google Ads.
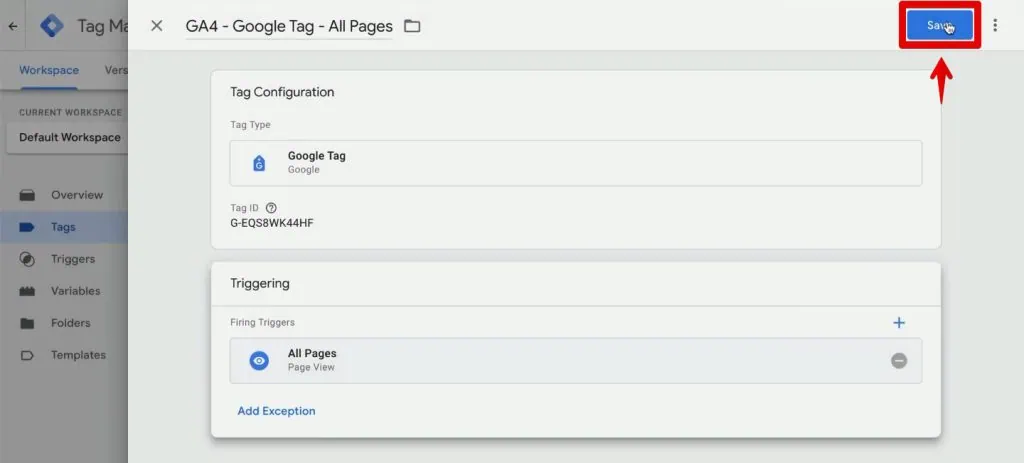
- Next, we only need the Tag ID to fill out the form, which is the configuration ID. Copy it from the tag plan, then paste it into the form. Copy over the tag name, as well. Finally, select the trigger by clicking Triggering.
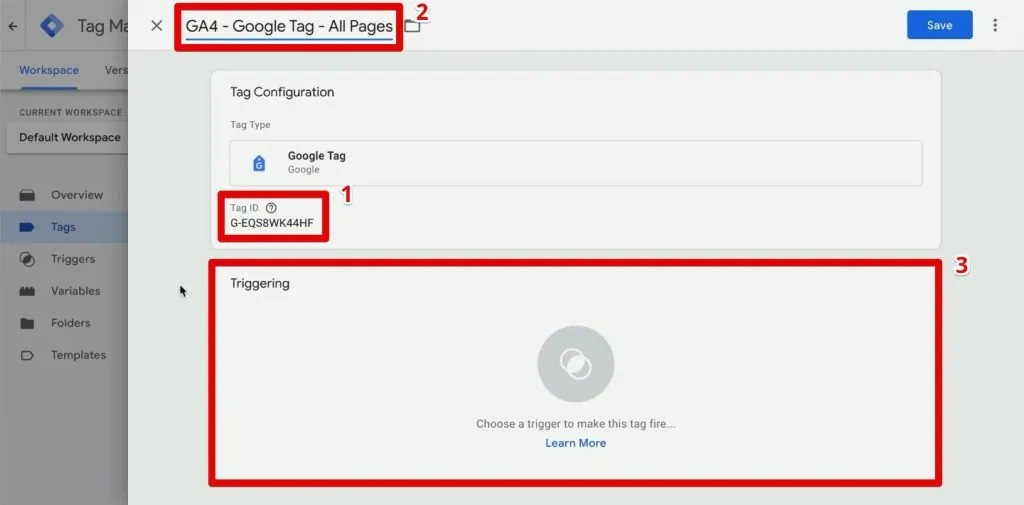
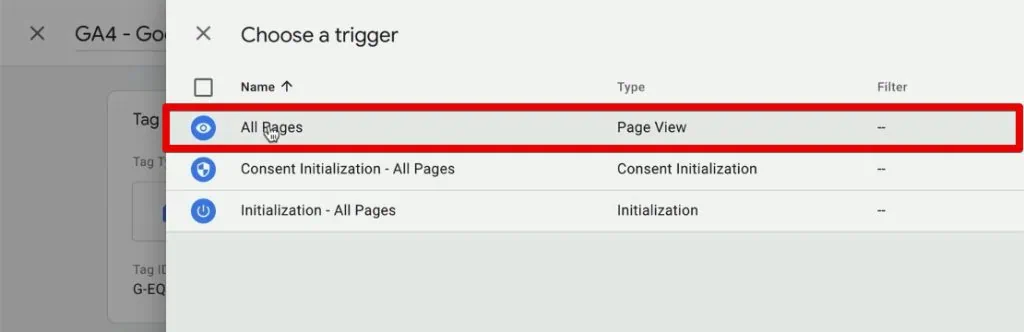
- We will discuss triggers more in the following sections. Meanwhile, we’ll go with the All Pages trigger already preconfigured inside GTM.
- Finally, click Save.
- Let’s go into the preview mode again. Remember that this puts the browser into a special mode that can connect to our website and gives us tracking information on what is firing on our site.
- When you connect the Tag Assistant to your site, you should see the Google Tag fire successfully.
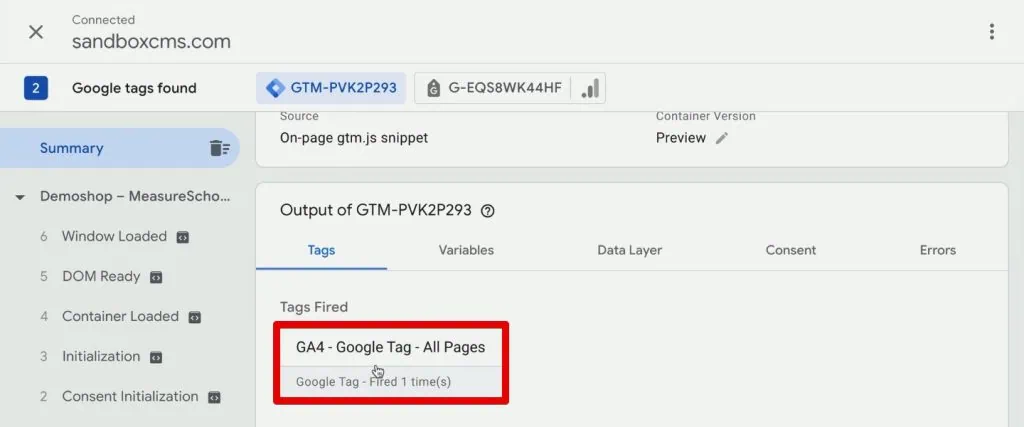
- We now have data flowing to our Google Analytics 4 account! Clicking on the tag will give us more information on the tag details.
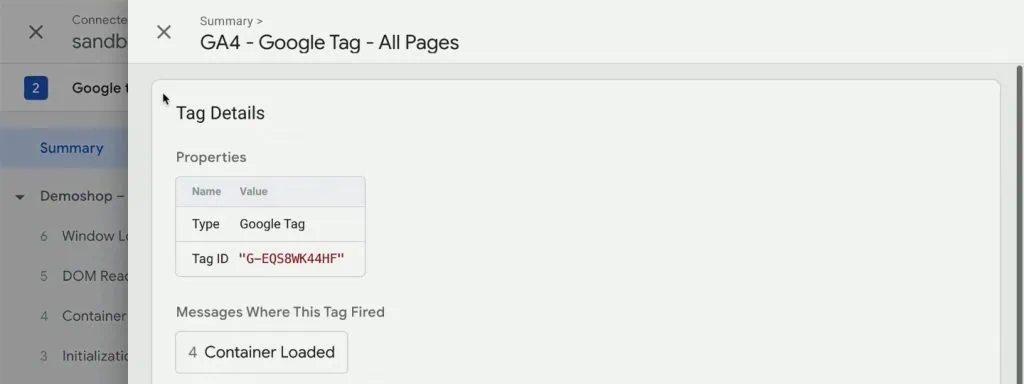
Setting Up the Meta Pixel Tag
While we see a lot of tools in the tag configuration section, you won’t see any Meta or Facebook tags right away because they are not part of the vendors GTM has put into the system.
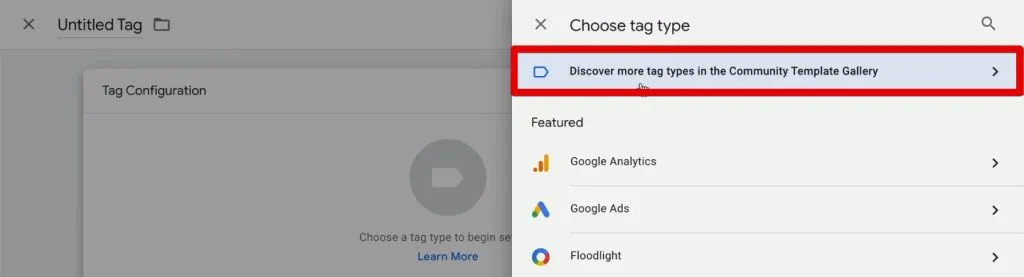
There is something called the Community Template Gallery, where other developers have built a template for various marketing tools, and we can find these tags here.
- Again, let’s start by creating a new tag. Click Discover more tag types in the Community Template Gallery.
- Search for Facebook. Select the Facebook Pixel by the FacebookArchive.
- Install it to your GTM workspace by clicking Add to Workspace.
Then, you will see the Facebook Pixel tag template available under the custom section.
- Copy over the Pixel ID from the tag plan.
We will keep the remaining configurations untouched, but remember that you can change around other settings like enabling enhanced eCommerce Data Layer integration, the event name, consent granted (GDPR), etc.
We will create the base tracking pixel to track the page views. We can stick with the default configuration.
- Next, choose the All Pages trigger again.
- Finally, copy the tag name from the tag plan, then click Save.
- Refresh the preview mode to load the newest version of our GTM container.
- Check the Tag Assistant and confirm that we have fired the Meta Pixel tag together with our GA4 tag.
Great! Data should now flow to Google Analytics 4 and Meta.
Debugging and Real-Time Data View
Some marketing tools have debugging functionality to see the data flowing into your account.
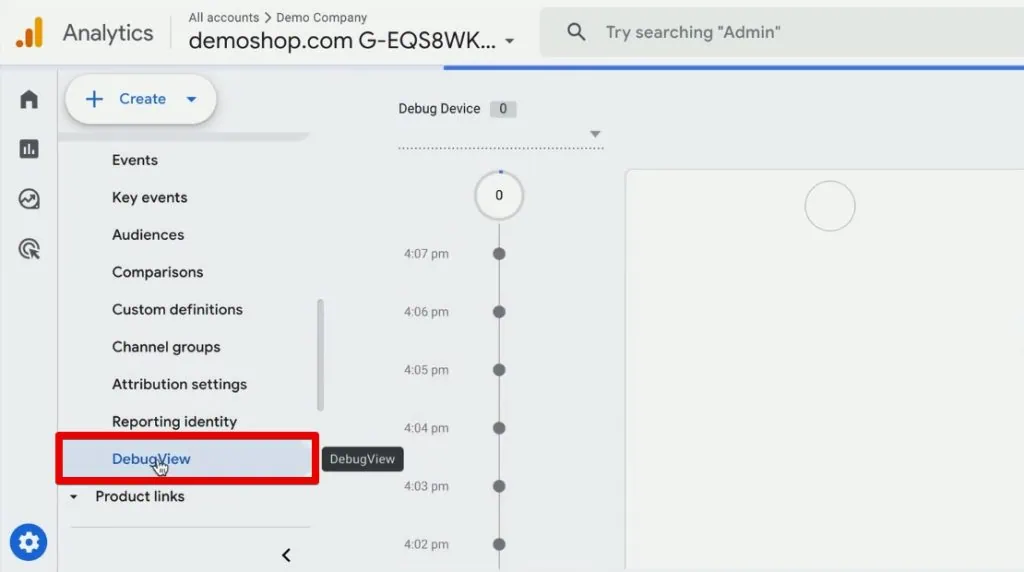
Google Analytics 4 has a handy debug mode called DebugView.
Google Analytics 4 DebugView
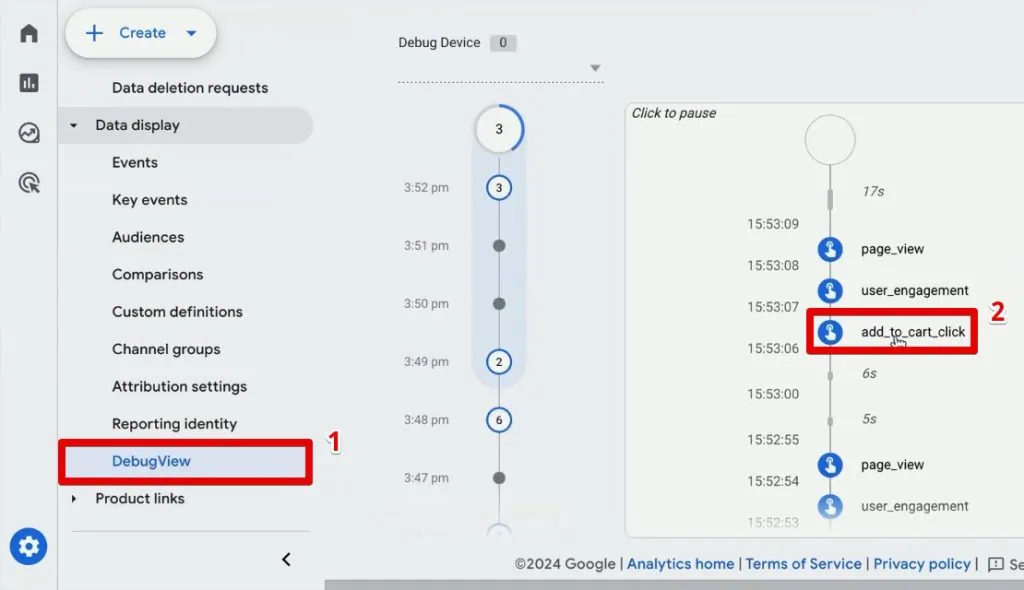
- In the Admin settings, under the Data Display section, select DebugView.
- Here, we can see the data arriving at our GA4 account. For example, we had a page_view event at the last minute.
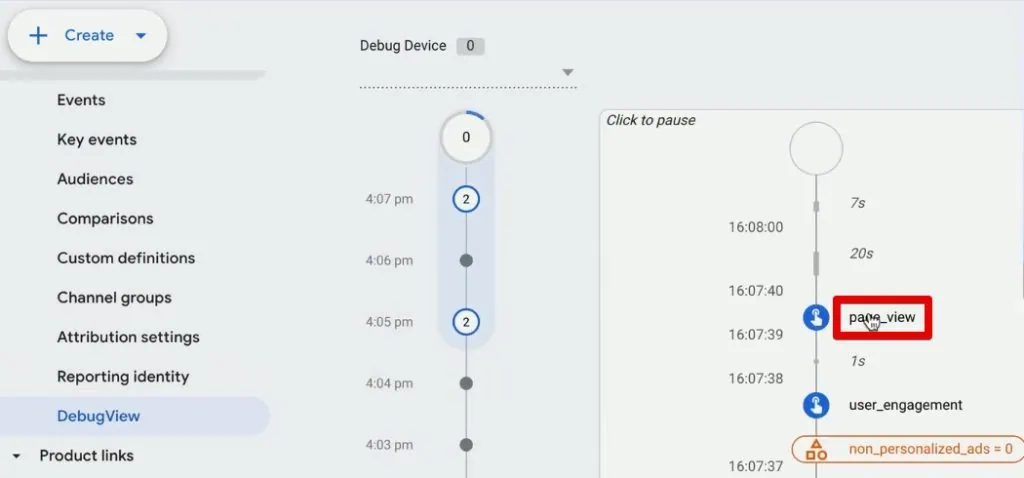
- Let’s go to a different page to verify that we can see information here almost in real time. Go to a different product page. In this instance, we will navigate to a beanie product page.

- Back in the DebugView, we should see another page_view event.
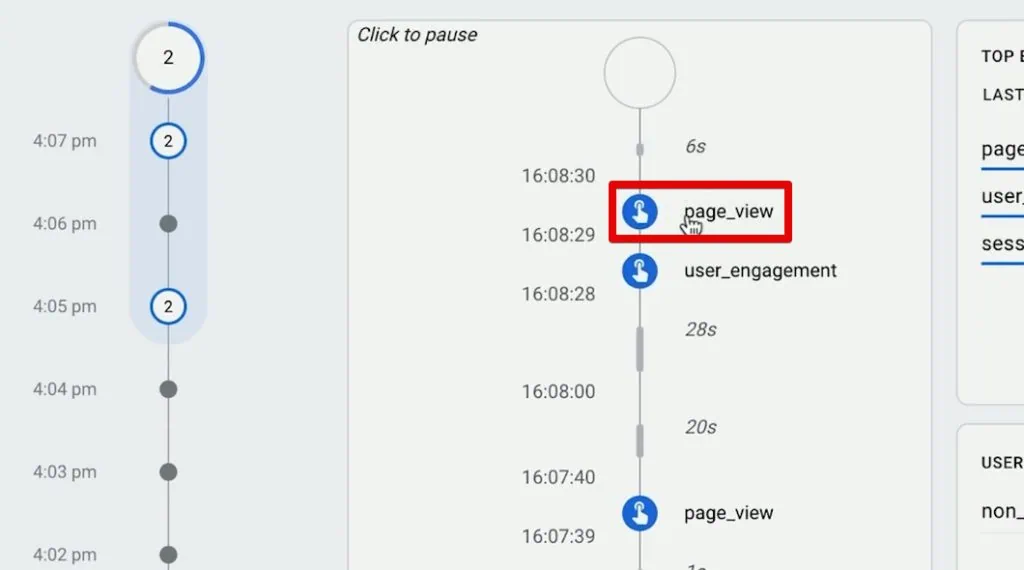
🚨 Note: It may take a few seconds for a new entry to pop up in the DebugView due to batching.
- Clicking on an event in the DebugView will show the different parameters associated with that event. For our page_view event, let’s look at the page_location parameter. We should see the product link for our beanie.
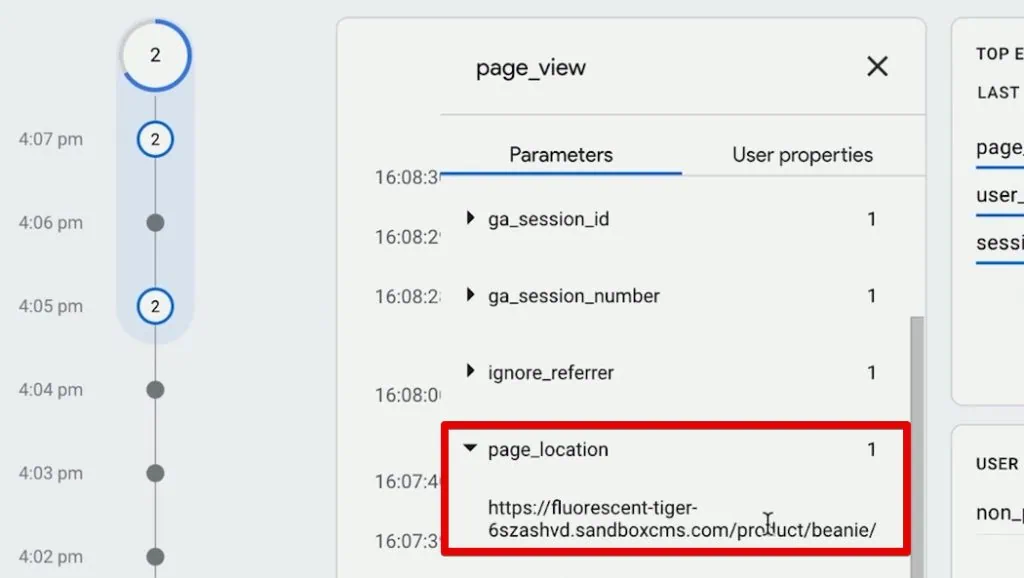
So, our tag sends data just fine to Google Analytics 4.
Meta Pixel Test Events
Meta has a similar debugging section where we can test our pixel implementation.
💡 Top Tip: Check out our guide on How to Fix Meta Pixel Errors and Test Events for more details on how to test your Meta Pixel implementation.
- Back to our data sources, go to the Test Events tab. Here, we can confirm if we have set up our website’s events correctly. Put in your website URL, then click Open Website.

Since we have not yet published our base Meta Pixel tag live on our website, go to the tab connected to the Tag Assistant.
- Here, go to a different webpage, let’s say the T-shirts category.
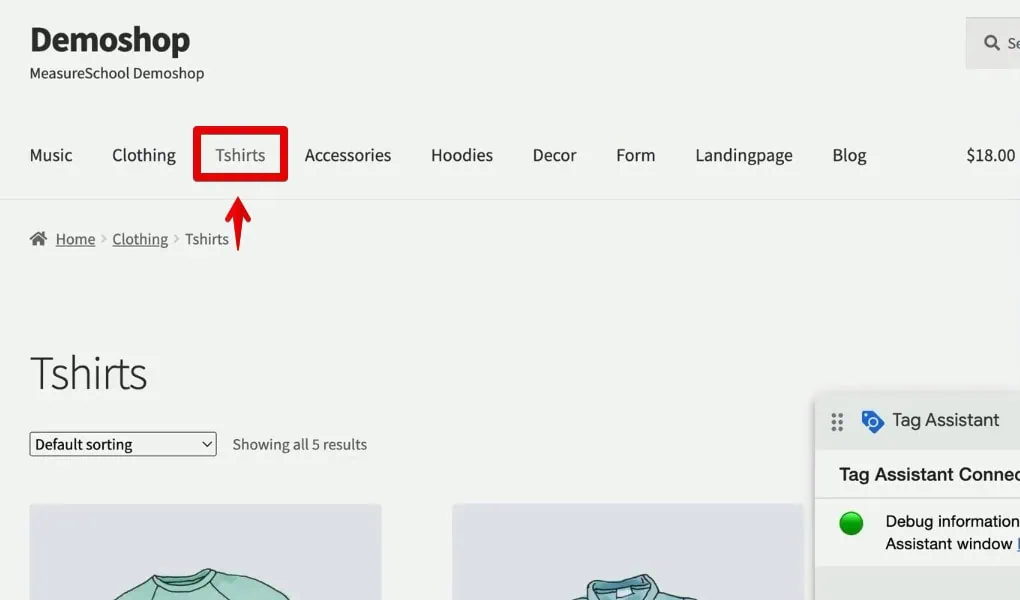
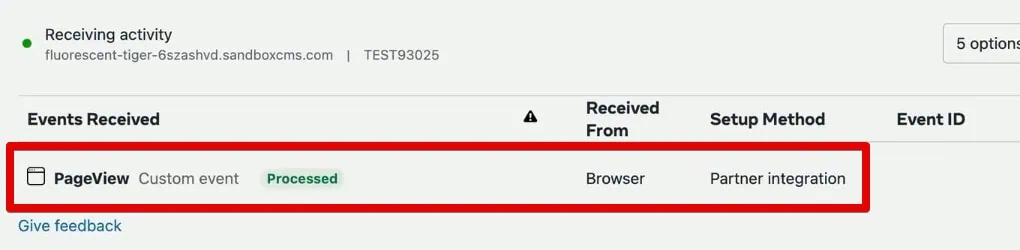
- You should receive a PageView event in the events manager.
Note that some marketing tools allow you to see the data coming into their service, so always check if you can test your implementation in the tool.
With that, we have double-tested our implementation. We can confirm that we are sending data to our marketing vendors successfully.
Publishing the Tags
We need to publish our tags because our tracking is not yet live. They are still only running on our browser in the preview mode. Publishing a version will make our implementation live for all our users.
- Go to GTM and click Submit.
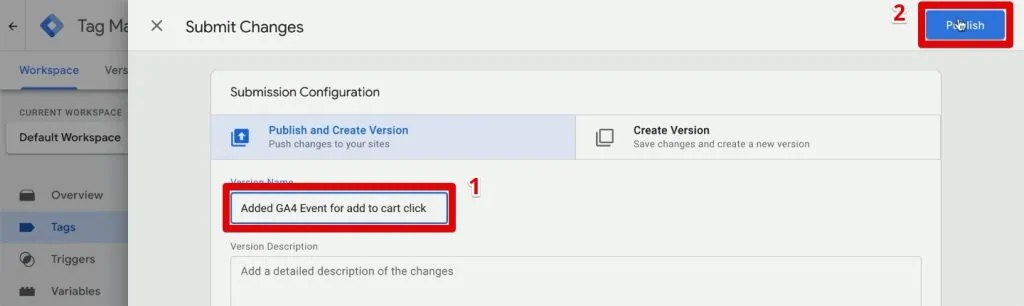
Next, provide a version name. It is best practice to be as descriptive as you can and give a name that concisely details the changes you have made. You can also provide more details in the version description.
- We’ll provide the version name Installed GA4 and Meta Base Pixel.
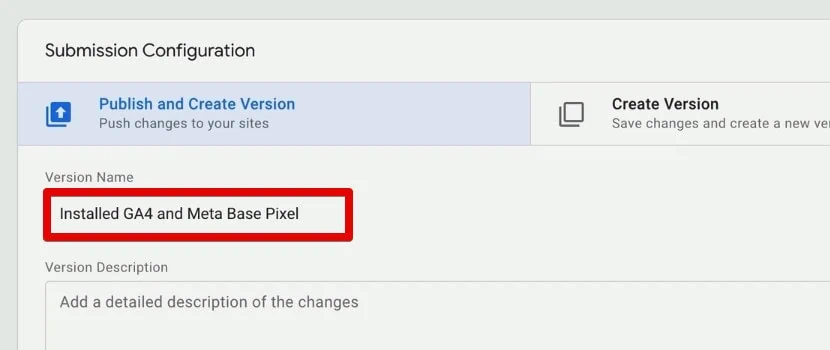
If you want, you can also put the spreadsheet URL in the version description so that your tag plan is readily accessible and anyone viewing this container will have more context on the implementation.
- Go ahead and publish the container. Our tags are now live for all our users. Even when we exit the Tag Assistant and open our website, we should see data come through.
- Open a new tab and go to your website. Click on any product.
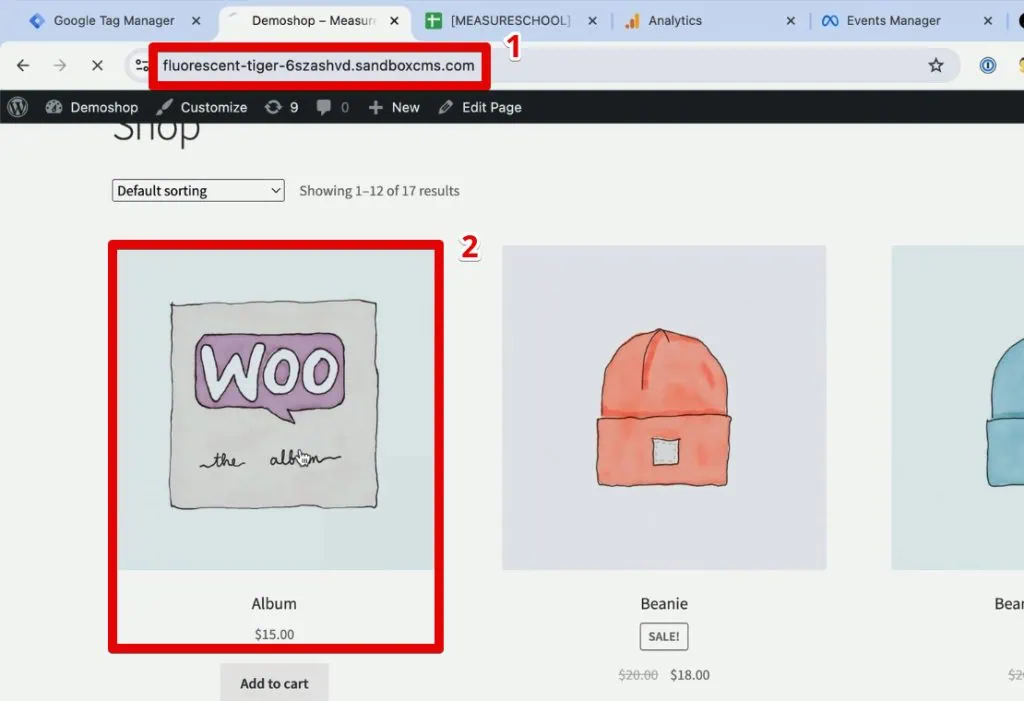
We should still see data in the events manager or your GA4 reports.
- In GA4, go to the Reports section.

Here, you should have data after a while. Sometimes, it takes up to 48 hours for the data to be displayed, but now those viewing your website can trigger your tags and send data to Google Analytics 4 and Meta Pixel.
To summarize, the deployment process starts with planning your implementation, configuring your tags in GTM, testing and previewing the implementation, and publishing it live by deploying a version.
That is the typical process you would go through if you deploy a tag. We will do this more often in the following section about conversion tracking.
Conversion Tracking with Google Tag Manager and GA4
What are conversions? Conversions are essential actions you want a user to take on your website.
Say you’re running ads on Facebook or Google. You want to know how many people clicked on your ad and how many people took the action you wanted them to take, i.e., converted.
These actions can be diverse. You could track when somebody buys something in your store, reads through an article, or submits a form.
Google Tag Manager helps us track all of these different interactions. It will fire our tag and send data to our tools so they know about the conversion.
So, we will discuss the following topics:
- Creating a Trigger to Track Form Submissions
- Attaching a Trigger to a Tag
- Testing the Trigger
- Marking the Event as a Conversion in GA4
- Sending Data to a Meta Pixel
- Publishing the New Version
We’ll create a trigger based on a page view, configure event tags, and test your setup. This process is crucial for tracking conversions efficiently, allowing you to gather valuable data and optimize your marketing efforts.
Creating a Trigger in GTM
Let’s first go to our website and look at what we aim to do here. Our website is an online store, so it would be good to track the online purchases. However, let’s take a different approach and consider a form conversion.
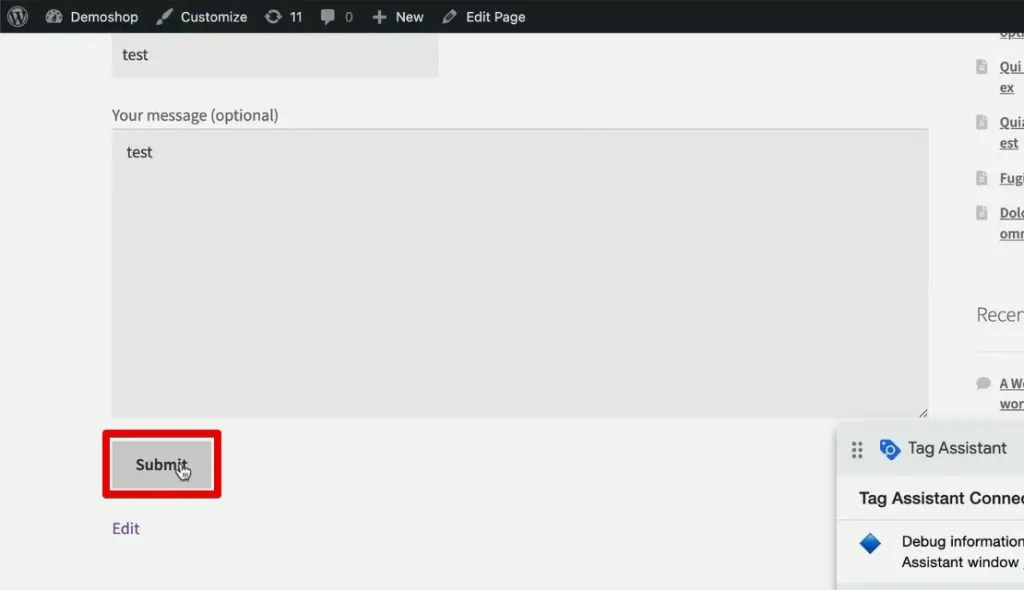
- Go to the Form page to see our standard Contact Us form.
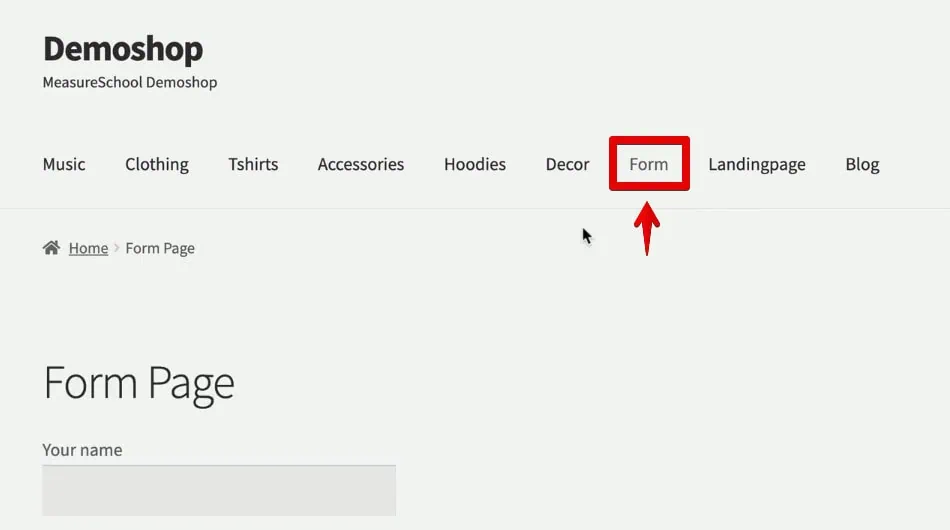
- Test it out by filling in sample details and clicking the Submit button.
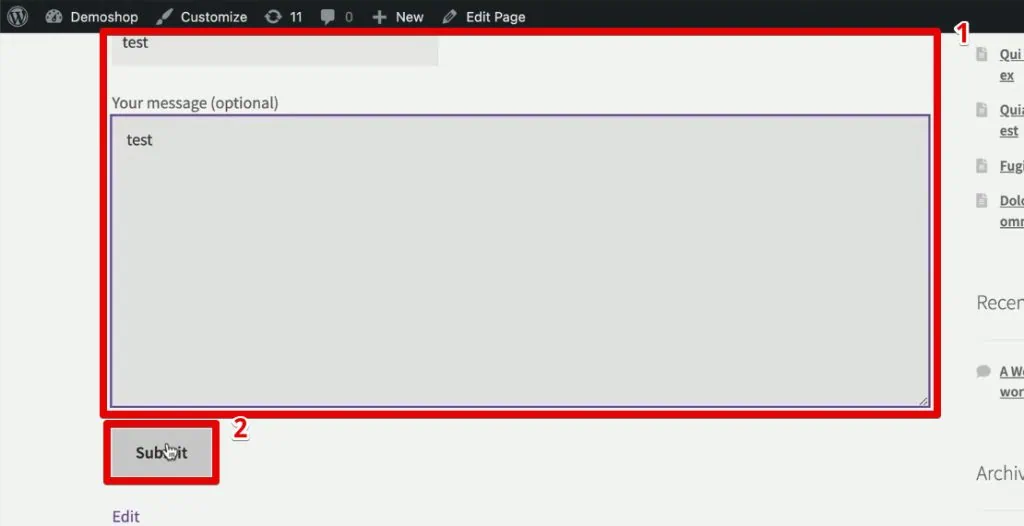
- Here, we arrive at a thank you page.
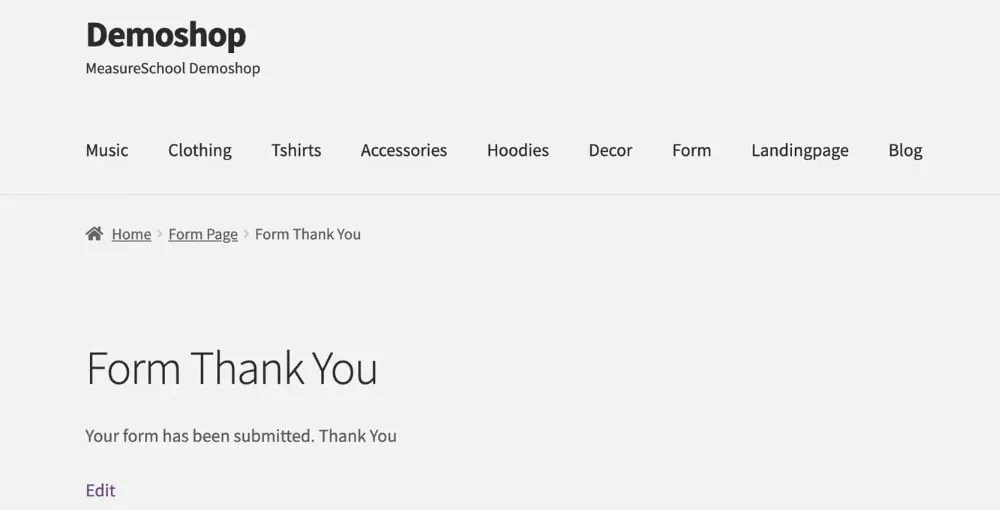
This behavior is what we want to track. We want to know how your website handles a form submission, and the trigger we create will depend on how your form behaves.
💡 Top Tip: Check out our guide on Form Tracking with GTM & GA4 if your form exhibits a different behavior after a form submission. Here, you’ll discover the appropriate trigger for your use case.
Again, we want to fire our conversion tag when the user has reached this thank you page.
- When it comes to firing tags, we need to specify the trigger. In Google Tag Manager, go to Triggers → New.
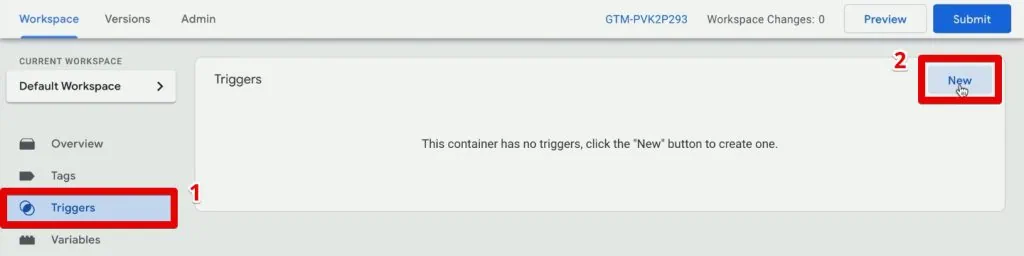
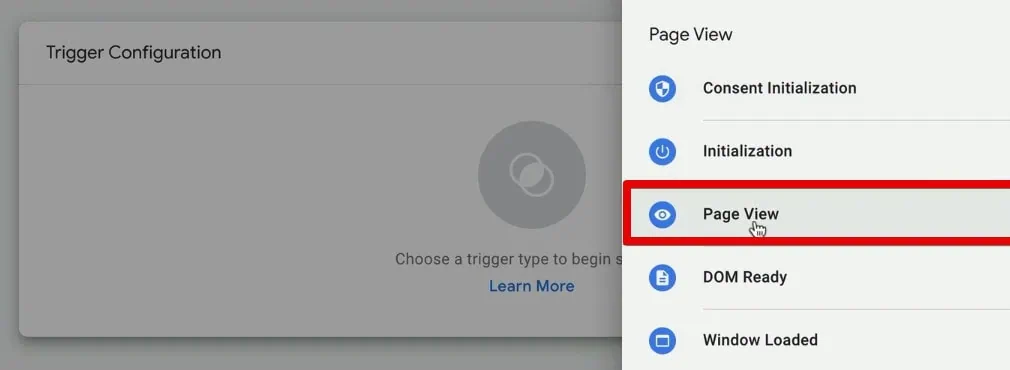
- To create our first trigger in GTM, click Trigger Configuration. Here, we have all the different events we can choose from to track interactions.
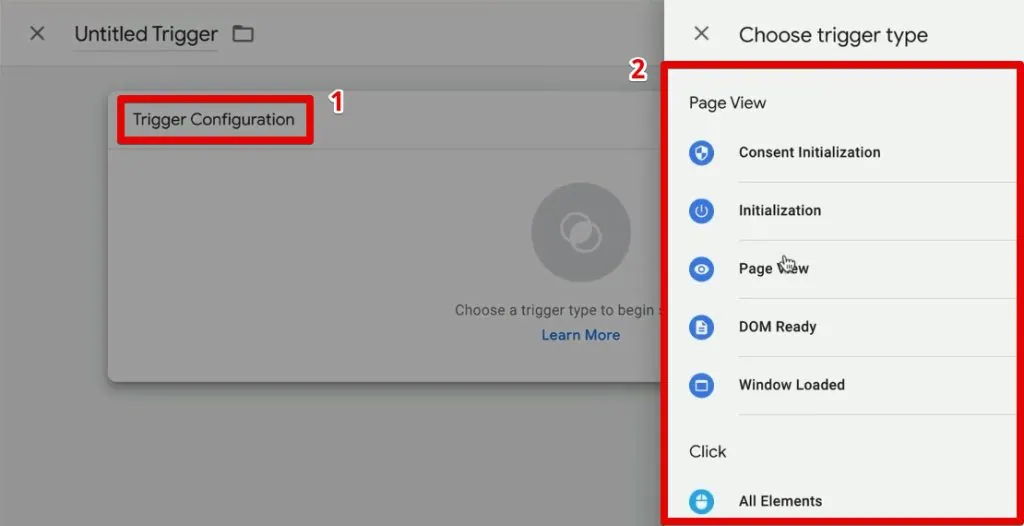
- We’ll go with Page View since the user goes to a specific thank you page upon submitting the form. We can use this page view as our triggering point.
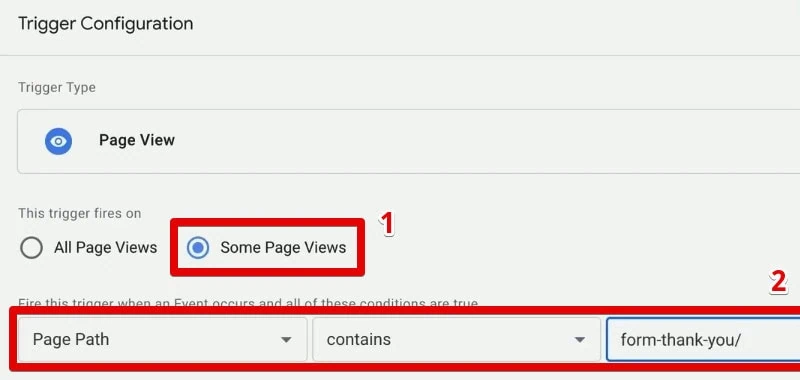
Let’s refine the trigger by specifying that we only want the trigger to fire on some page views. We will have a filter menu that lets us choose a condition for when the trigger should fire.
Since we have a unique URL for the thank you page, we can use the page path variable to specify the condition.
- Copy the URL portion that specifies it is the thank you page.
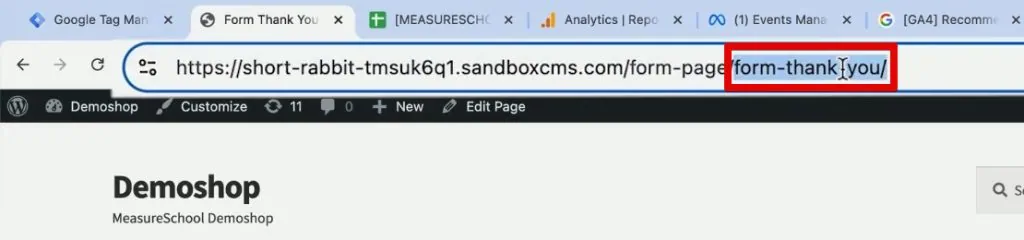
- Set the trigger to fire on Some Page Views, then specify the condition to Page Path contains form-thank-you.
Once a user meets these conditions, that would be the signal to fire the tag.
- Name the trigger. It is a good idea to start with an abbreviation of the tag type, followed by the specific page, so in this case, we will use pv – form thank you/.
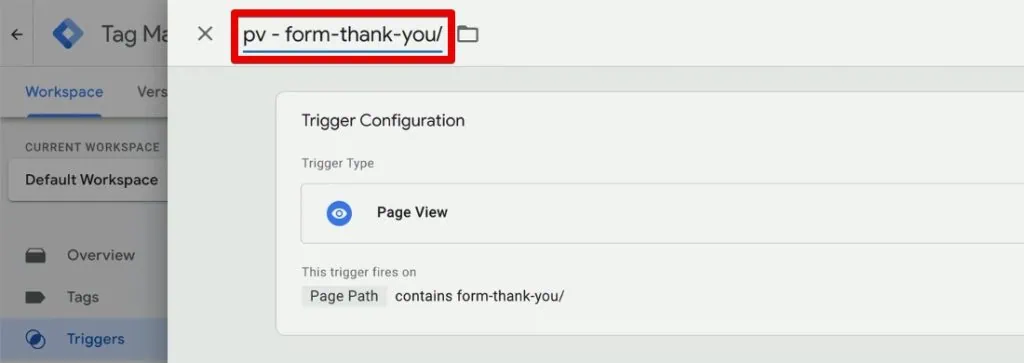
Now, we have created a new trigger. Since you cannot test triggers individually, we must attach them to a tag first.
Attaching a Trigger to a Tag
Let’s create a new event tag in Google Analytics 4.
- Create a new tag. For the trigger configuration, select Google Analytics: GA4 Event.
- Next, we put in our measurement ID. Hopefully, you still have your tag plan opened, so you can easily copy over this information.
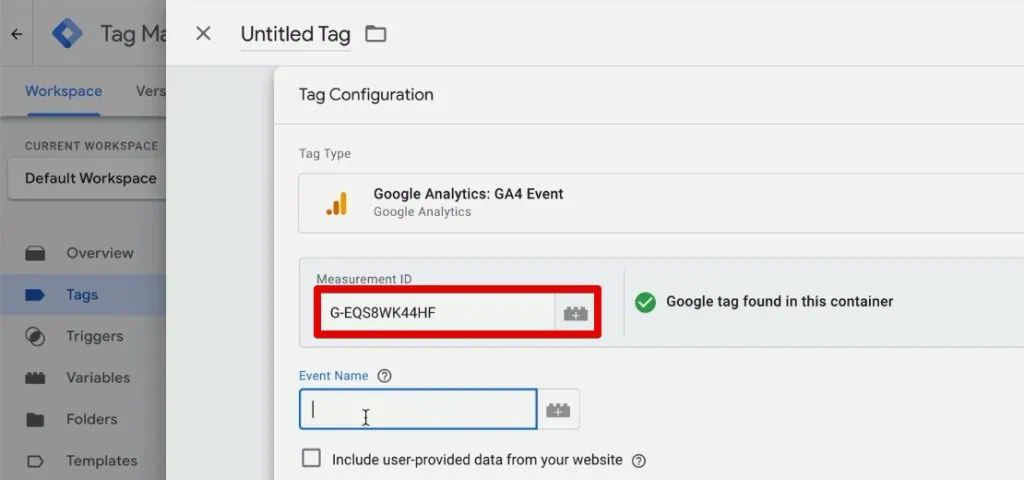
Then, you must provide the event name for the event you will send to GA4. There are different ways of naming your events inside Google Analytics.
- Check out and follow the naming from the recommended events in GA4 if the event you’re tracking is on the list.
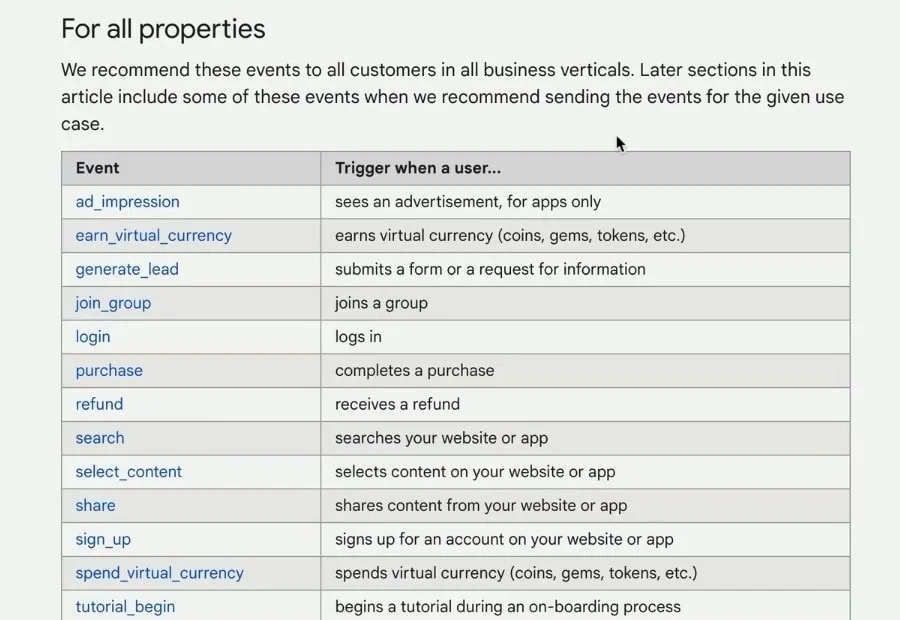
Using and following the naming from this list helps you measure additional features and behavior, so check out the list and use these features whenever possible. If your event isn’t on this list, use a custom one.
- Let’s go with the event name form_submit. Next, select our form thank you page trigger. Finally, add a name to the tag.

- Save the tag, and now let’s test it.
Testing the Trigger
- Enter the GTM preview mode. Open the Contact Us form once we connect our website to the Tag Assistant. You should still see the Google tag and the Meta Pixel base tag fire, but our GA4 event tag should not.
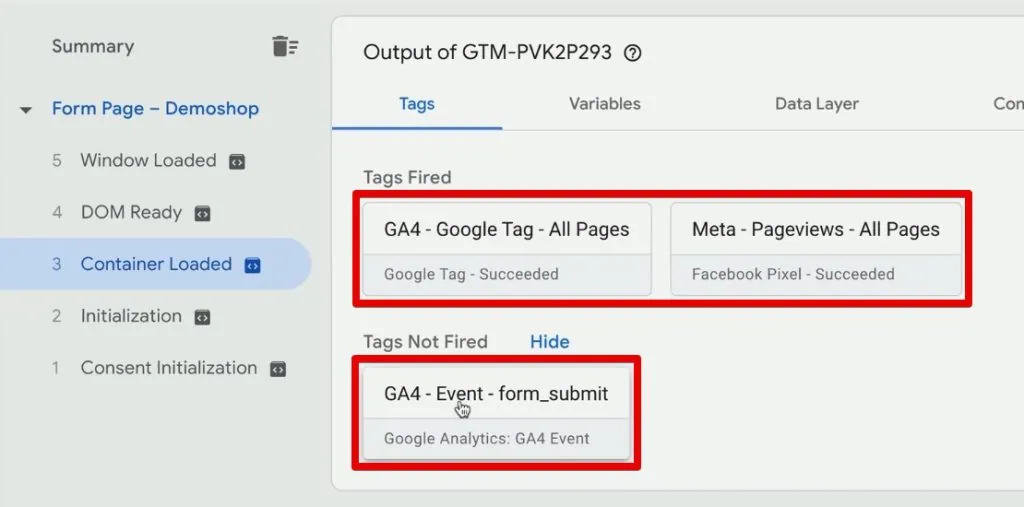
- When we click on our GA4 event tag, we can see in the Firing Triggers section that it ultimately did not fire because we did not meet the Page Path condition.
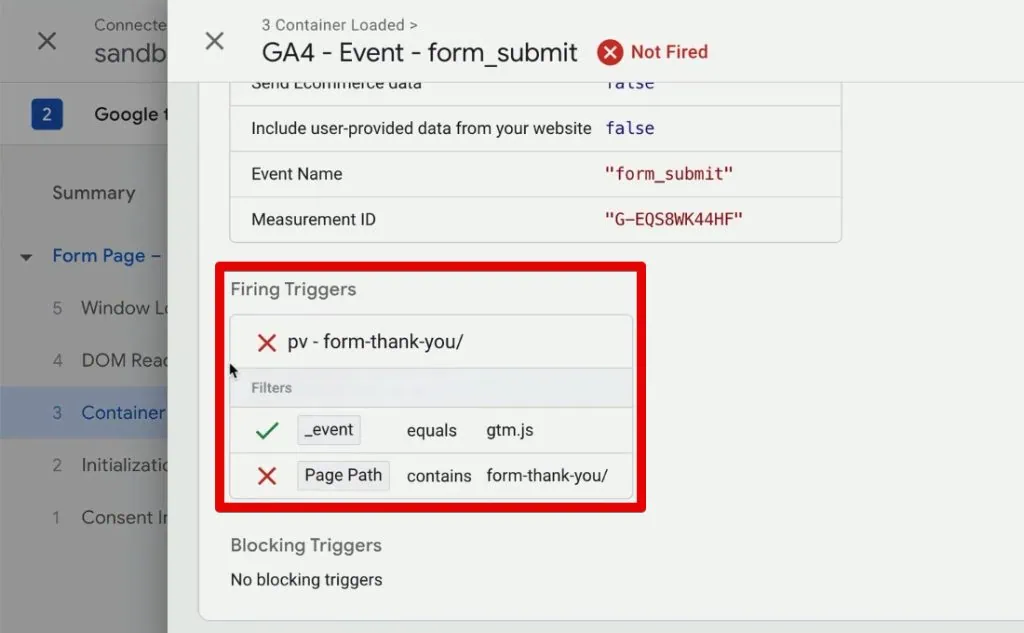
That is good because the trigger does not fire on a negative case. Now, let’s check if it will fire when we intend it to.
- Fill out the form and click Submit.
- In the Container Loaded event in the form thank you page, the GA4 event should now fire.
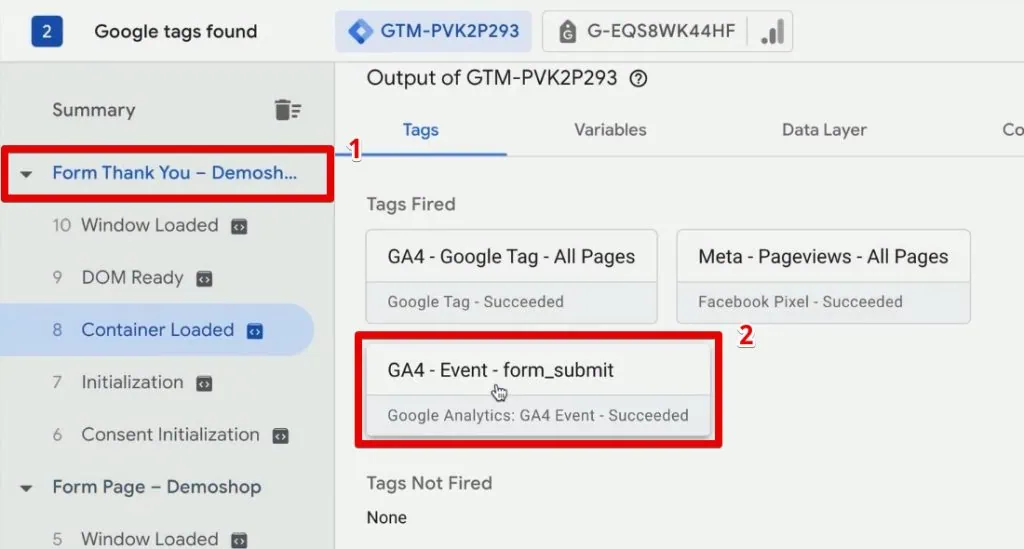
Now, we should be sending this event to Google Analytics.
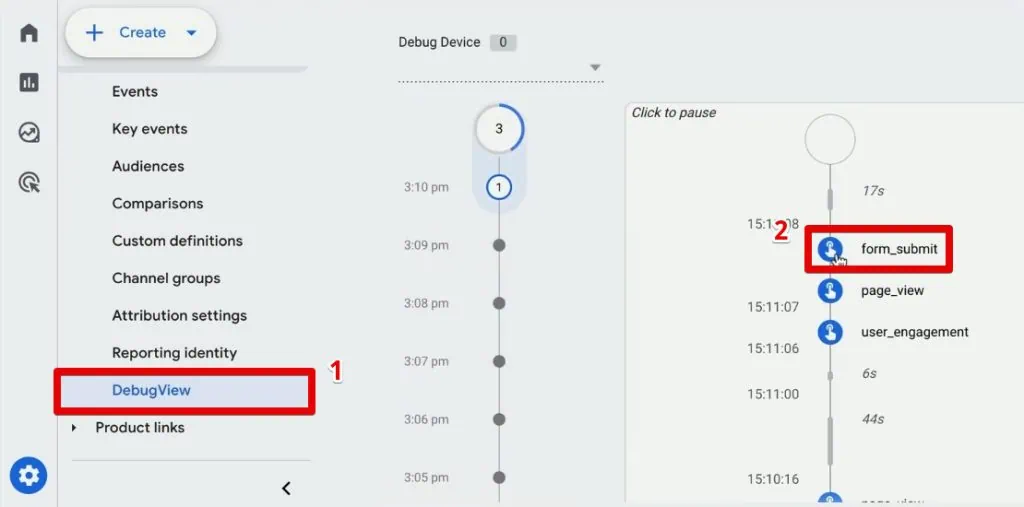
- To ensure it reached GA4 properly, open the DebugView, where we should see a new form_submit event.
We successfully sent a custom event in GA4, but this is not yet a conversion. We still have to mark it as a conversion (key event).
Marking the Event as a Conversion in GA4
Marking an event as a conversion is needed so that GA4 recognizes it as an essential event and puts it into your conversion report.
- Under Key Events, we will see the list of events in your GA4 account. You have the purchase event as a conversion/key event by default.
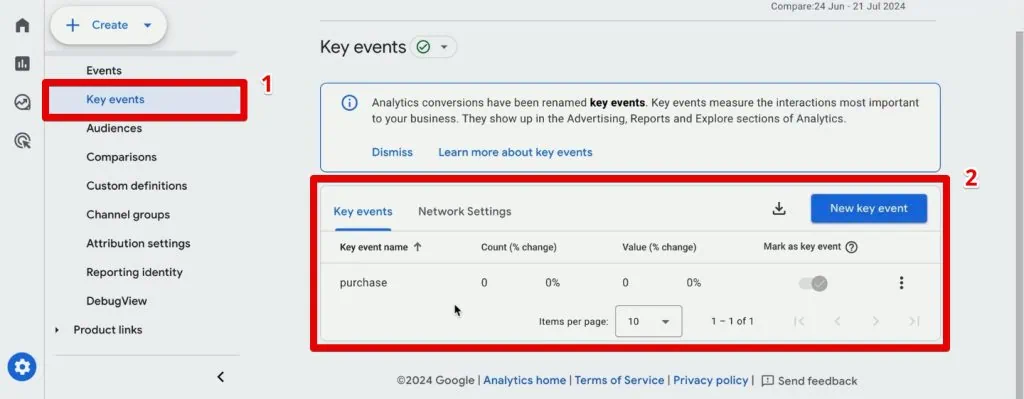
Unfortunately, we won’t see our form_submit event in this list yet. It will show up eventually in this menu, but it could take up to 48 hours. Then, you can toggle the Mark as Key Event option.
- Another option is to add an event to this list by clicking New Key Event.
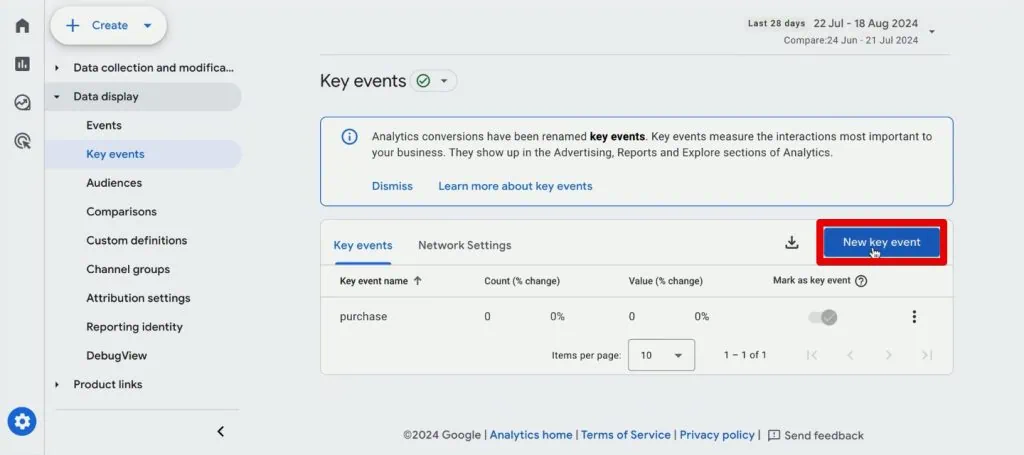
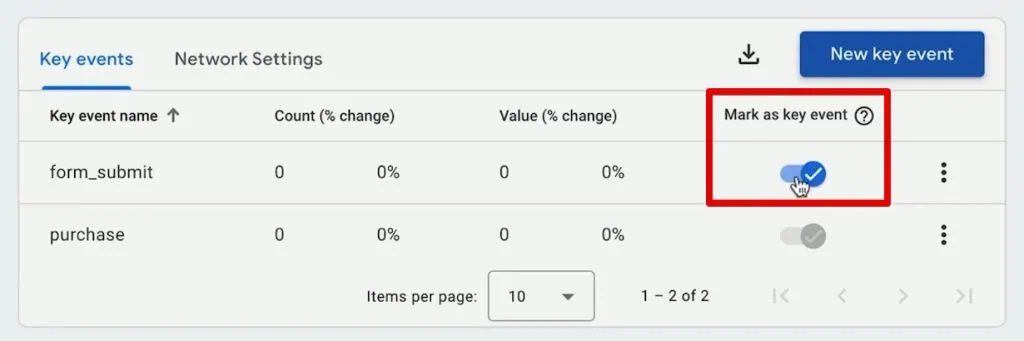
- Next, put in the event name. Ensure that this matches the name you are sending from GTM. Copy this and click Save.

- That will add the form_submit event to the list. Ensure you toggle the Mark as Key Event column.
Now that you can track conversions inside Google Analytics 4, you can send this conversion to Google Ads if you have it connected.
💡 Top Tip: Check out our Google Ads Conversion Tracking guide to send conversions to Google Ads.
Sending Data to a Meta Pixel
- Like GA4, Meta also has some standard events they want you to use.
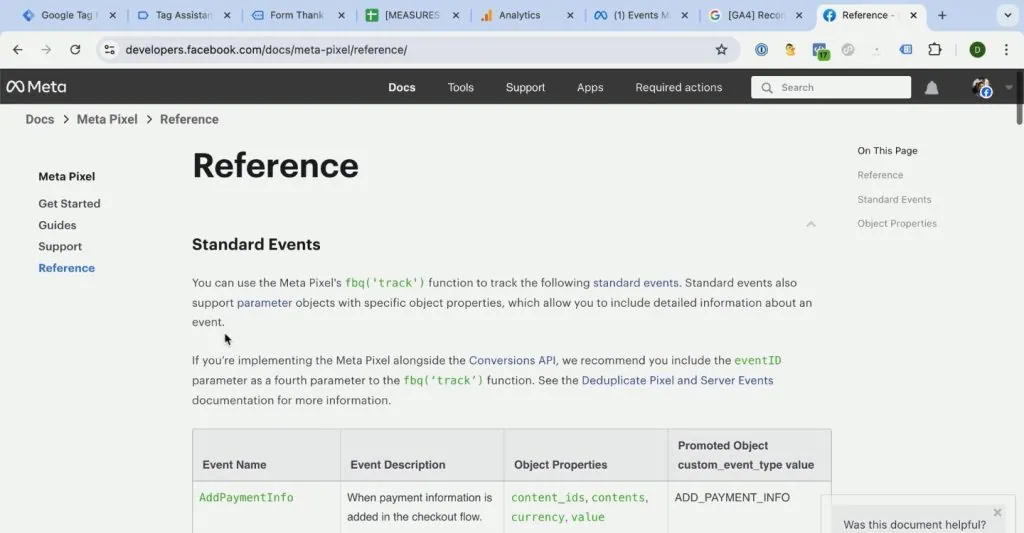
- One that fits well with our use case is the Contact event.

- Go to Google Tag Manager and create another Meta Pixel tag. Next, add the Pixel ID.
- Under standard events, select Contact.
- Then, we need to choose a trigger. Select our form thank you page trigger. Name the tag, then click Save.
- Refresh the preview mode and fill out the form again.
💡 Top Tip: To learn more about setting up Meta Pixel events, check out our guide on How to Set Up Meta Pixel Events.
- In the Tag Assistant, we should also see our new Meta Pixel event tag with the GA4 event tag in the Tags Fired section.
Another way to ensure we fired our tag successfully is by checking the Meta Pixel Helper.
- Open the Meta Pixel Helper and check if the Contact event shows up.
- As a final check, you should also go to the Test Events section in your Events Manager and see if you have the Contact event.
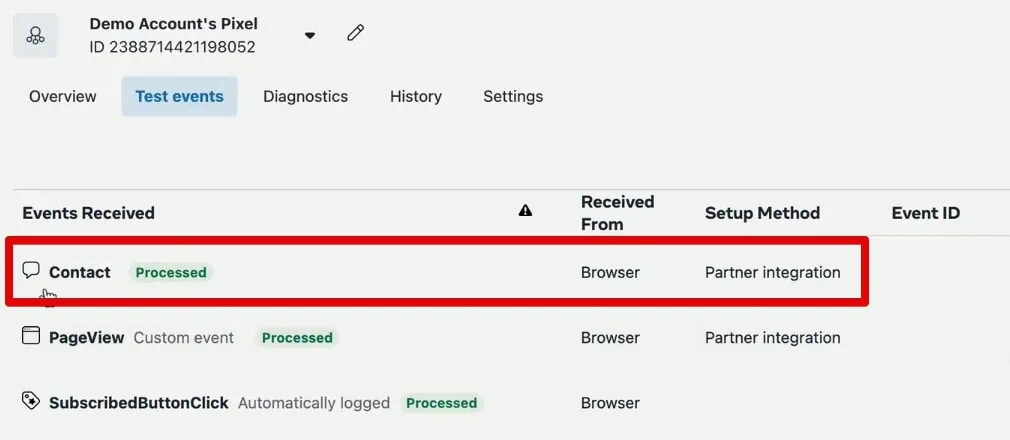
- If you see your events here, you only need to mark them as a conversion in Meta Pixel.
💡 Top Tip: Check out our guide on Meta Pixel Conversion Tracking with GTM to learn more about how to set your Meta Pixel events as conversions.
To recap, we have now set up conversions using Google Tag Manager. We created custom events upon form submission and sent this data to Google Analytics 4 and Meta.
We created a custom trigger that captured the form submission interaction and used this trigger to configure our GA4 and Meta Pixel event tags.
You can also use this trigger for other tags where you want to send conversion data. You have already seen how convenient the ability to reuse triggers is, as we only had to set up a single trigger for our GA4 and Meta Pixel event tags.
We only have this setup on our browser because we are still only in the preview mode. We still need to publish our tags.
Publishing the New Version
- If you want to publish your implementation live to your users, submit a version of your GTM container.
- Provide a descriptive version name, then click Publish.
You have successfully added the GA4 and Meta Pixel conversion tracking tags to your website, and now, you can track conversion information from your users.
We are entering the fun part where you can install custom tracking on your website with any interaction your browser can detect.
How to Track Events in Google Tag Manager
We touched upon event tracking earlier, but now, we’ll put a little twist and show you the capabilities of auto event tracking within Google Tag Manager.
We will focus on how to set up click triggers. You’ll learn to track interactions like add-to-cart clicks and configure triggers to fire on specific actions.
This hands-on guide will help you capture valuable user behavior on your website, enhancing your analytics setup.
Google Tag Manager Triggers Overview
- Let’s go to the Tags section of our GTM account and see the types of tags we have created so far. Here, we have four tags and can see their types and firing triggers.

Notice how all the triggers have the same eye symbol. They are all based on a Pageview trigger.
- Go to the triggers section and create a new trigger. Click the trigger configurations to select a trigger type.
- We will see all the different events we can base to determine when to deploy our tags.

This list indicates that Google Tag Manager triggers always need an event to evaluate their conditions.
In our previous cases, it has always been upon a page view. Once the page loads, the trigger evaluates our conditions and will turn true or false depending on which page loaded. If it satisfies the condition, GTM will then fire the tag.
- The great thing about Google Tag Manager is that it has many more capabilities for firing our tags upon different interactions. Scrolling further down, we can see more types like Clicks, User Engagement, and Custom Events.

Looking into the different event types under user engagement, we have the element visibility – when an element is visible on screen, form submission, scrolls, and YouTube video.
These are all non-standard interactions that depend on user actions.
On our website, we can choose between user interactions, whether the client clicks, scrolls, or when they see an element on the screen. We can track all these different interactions.
- One that would make sense for our case is a click on an Add to Cart button.
Determining how often users add a product to their carts can provide valuable information like the product’s popularity among users.
Let’s track Add to Cart clicks and send that information to GA4.
🚨 Note: Here, we will discuss a specific event tracking case. If you want a more detailed breakdown of the steps, check out our guide on How to Track Events with Google Analytics 4 and Google Tag Manager.
Tracking Add to Cart Button
We will implement button click tracking by creating a generic click trigger.
- The first step is to choose the specific interaction we want to track. There are two click triggers available: All Elements and Just Links.
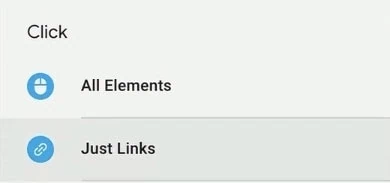
In our case, the Add to Cart button is not a link. It is an element that we click. Then, the website will add the product to the cart without going to a different page.
We will first deploy a test click trigger to understand how it works.
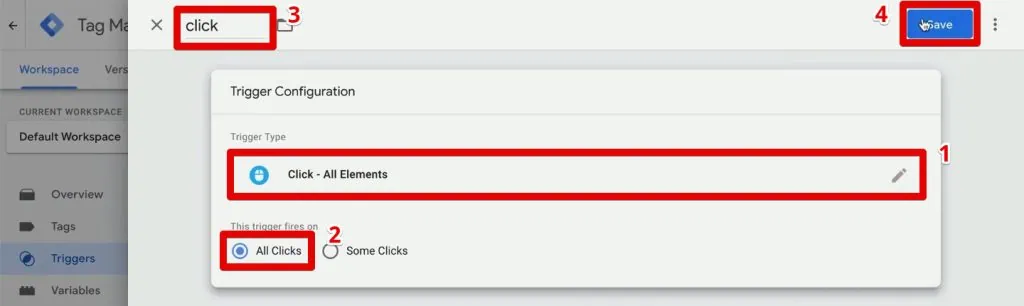
- Select the All Elements trigger. We don’t want to set any restrictions on the type of clicks we track with this trigger. We will retain the All Clicks option. Provide the name, click, then click Save.
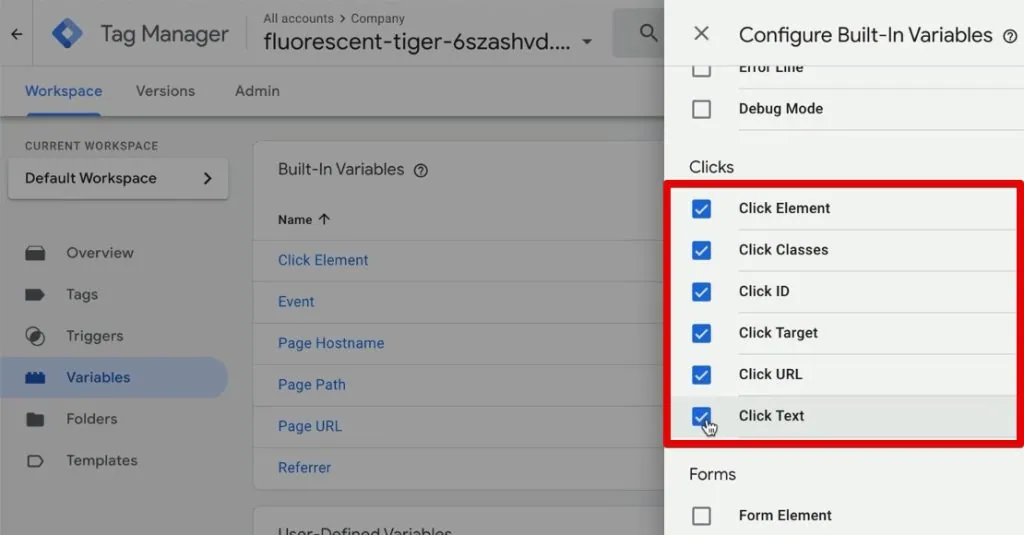
The next thing we want to change is activating our click variables. Variables are placeholders for information inside Google Tag Manager. In some instances, the triggers can fill that information.
- Go to Variables. In the Built-In Variables section, click Configure.
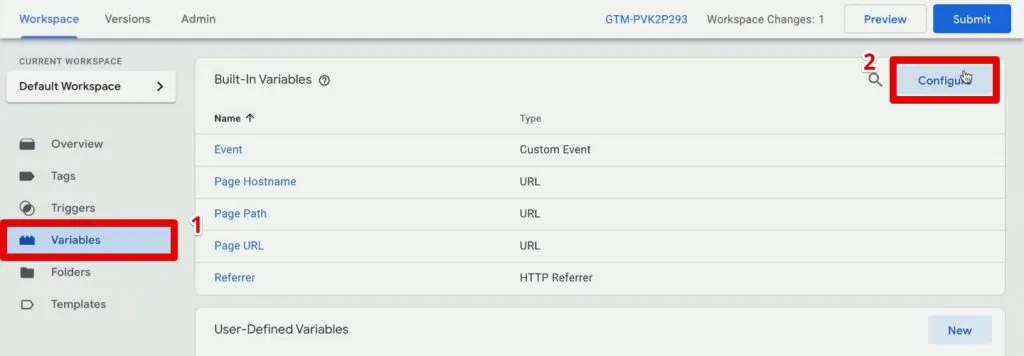
- Next, enable all of the click variables.
- With the click triggers activated, we can go into the preview mode and test the trigger.
- Add a product to the cart after connecting the Tag Assistant to your browser.
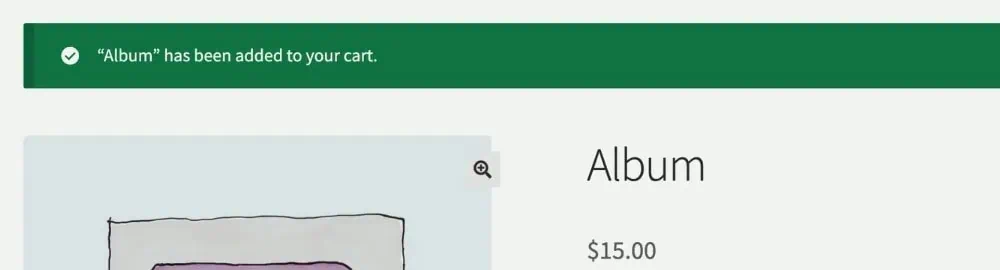
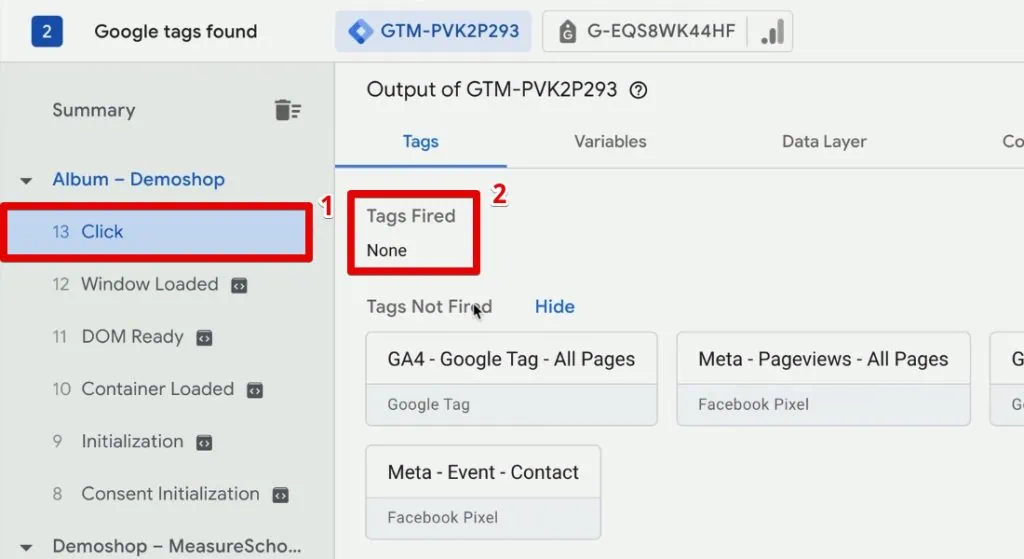
- We should see a new Click event in the Tag Assistant. It is only possible because we have a click trigger installed. During this event, we did not fire any tags.
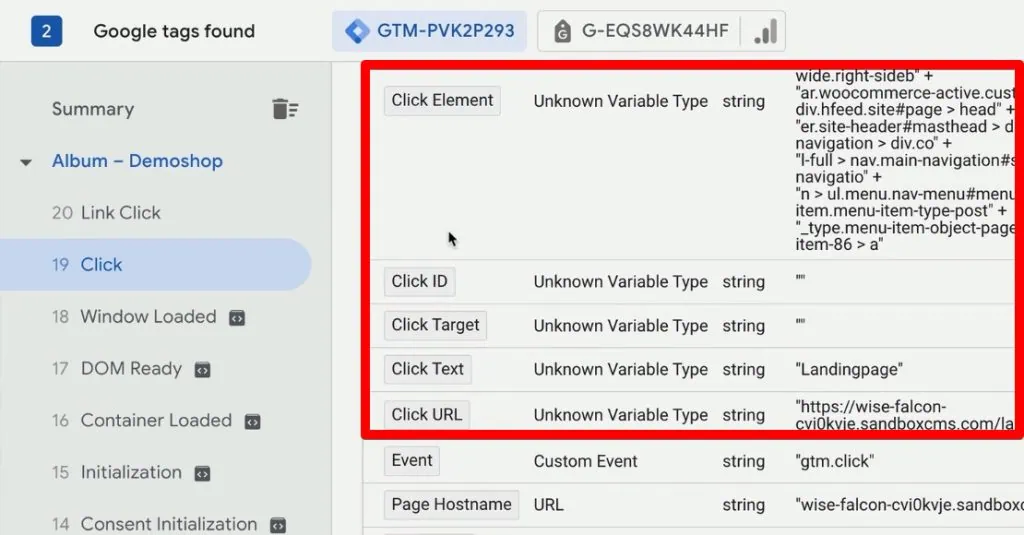
- If you go to the Variables tab, the click variables should automatically contain information through our click trigger.
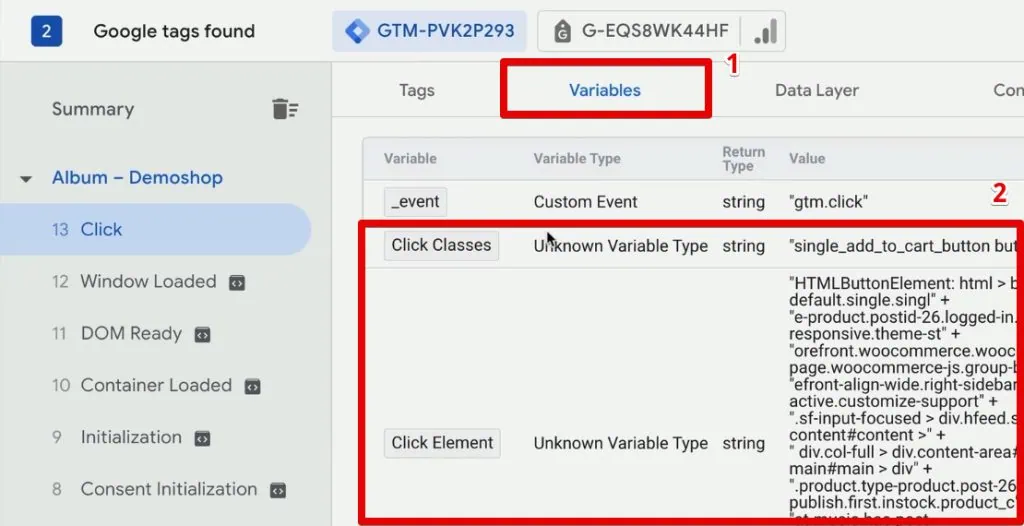
- Anytime we click on a different element on our website, we should see another click event with updated information on the click variables. For example, here is what the information on the click variables looks like after clicking the landing page button.
We don’t want to fire our tag whenever a user clicks on something on our website. We only want to track the clicks on certain events/items we deem interesting for our analytics. In our case, it is an add-to-cart button click.
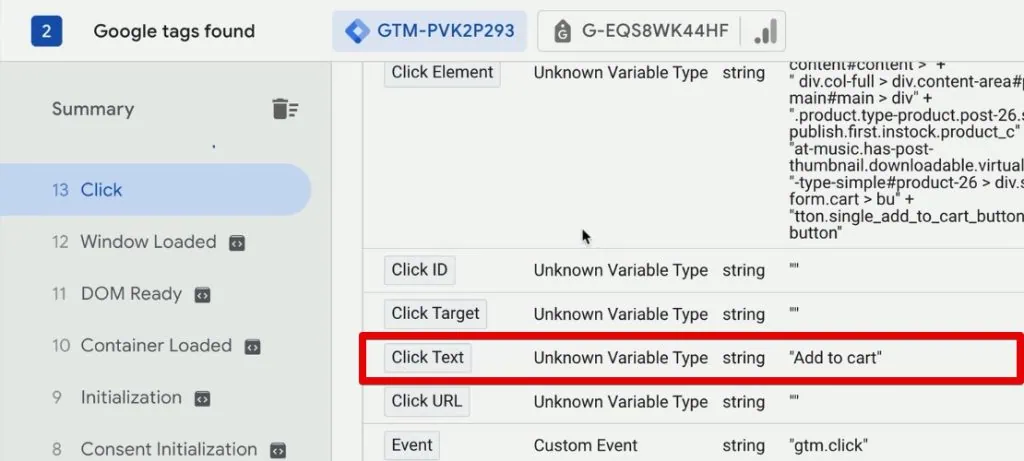
- We will use these click variables as a reference point for determining the elements we want to track. For our case, we will use the Click Text since it identifies our Add to Cart button.
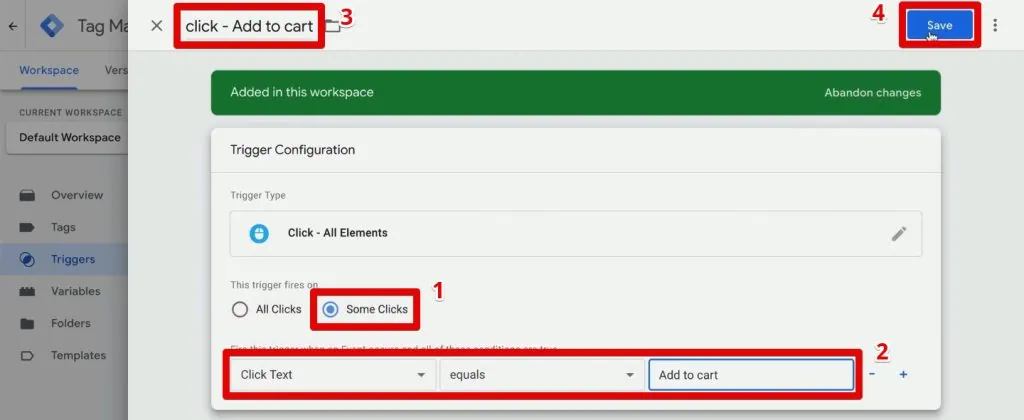
Now, let’s go back and edit our test trigger to only listen for add-to-cart clicks.
- Select the Some Clicks option. Set the condition to Click Text equals Add to cart. Provide an appropriate name for the trigger, then click Save.
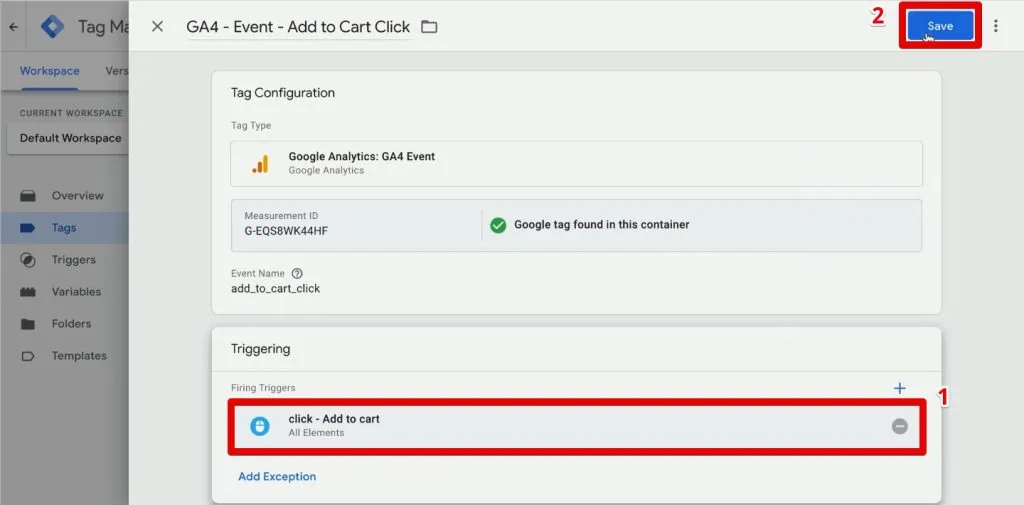
- To properly test out our new trigger, we need to attach it to a tag. Create a new GA4 event tag and copy over the measurement ID from either inside Google Analytics or the tag plan.
- Provide a name for the tag. Next, give the event a name – let’s go with add_to_cart_click.
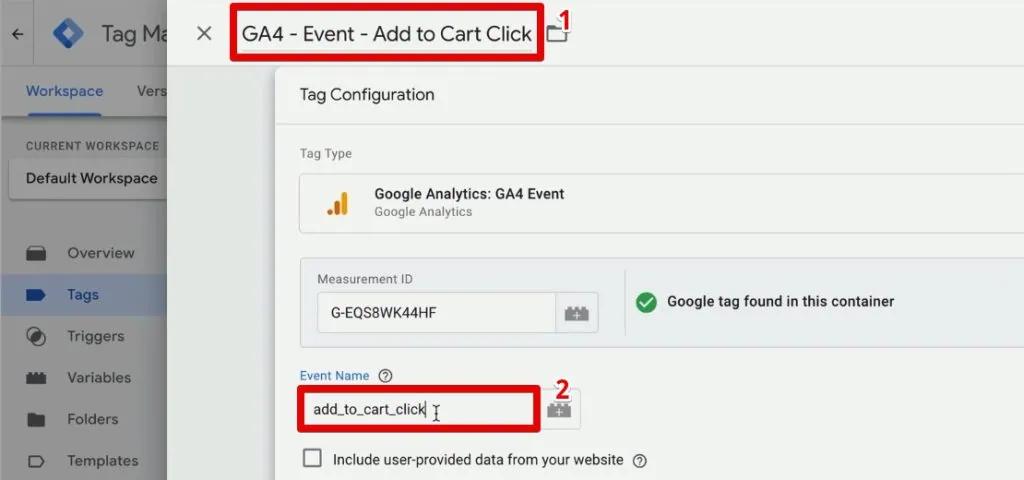
We used the underscores in between to follow GA4’s naming convention, but you can name it whatever you want. That is just best practice.
- Scroll down and select the add to cart trigger. Finally, click Save.
Let’s go ahead and test it.
Testing the Event Tracking
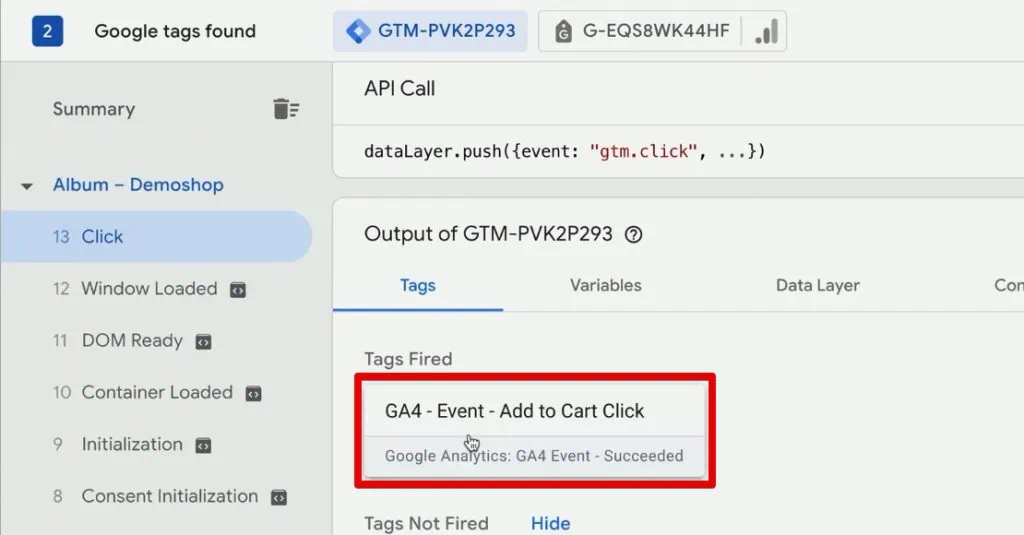
- Refresh the preview mode, then click on any product. While we should see a click event come through from this click, we shouldn’t see our GA4 tag fire during this stage.
- Add the product to your cart. After this click, we should now see the GA4 event tag fire.
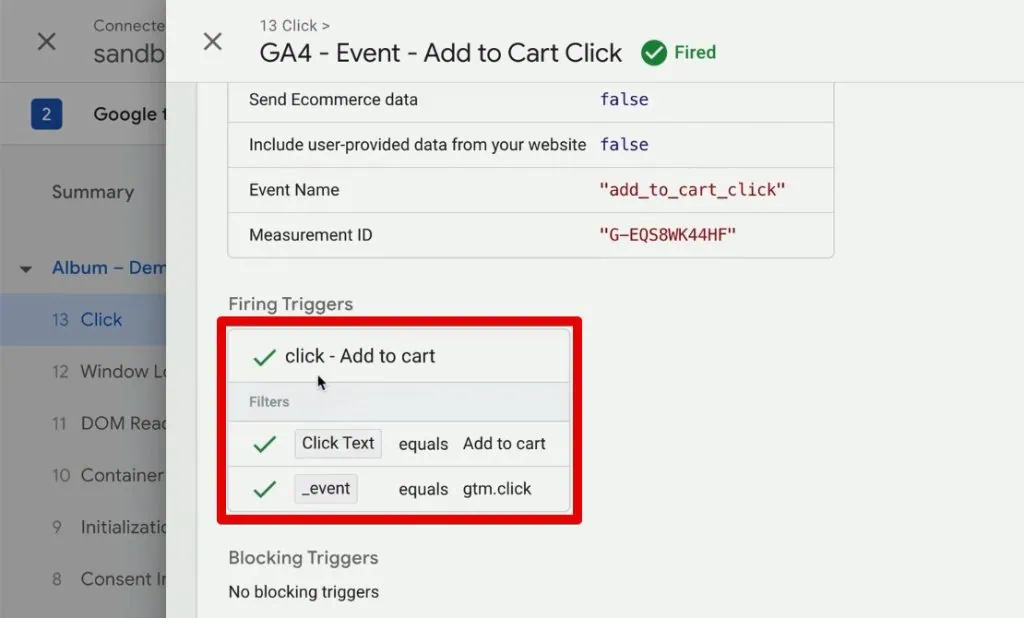
- If you click this tag, you will see the conditions for why our trigger turns true.
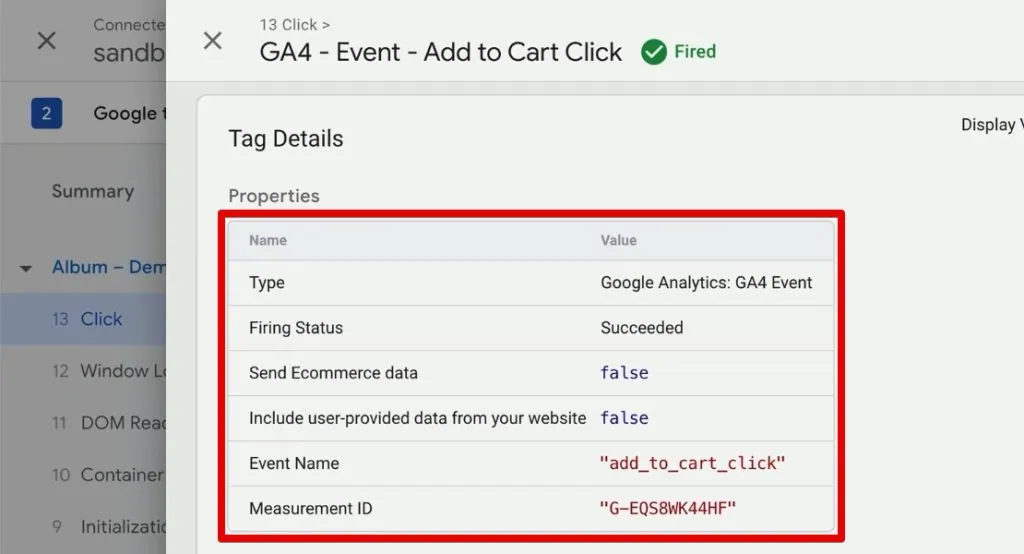
- We can also see the information sent over to GA4 through this tag.
- Check if this event also shows in the GA4 DebugView. Look for the add_to_cart_click event.
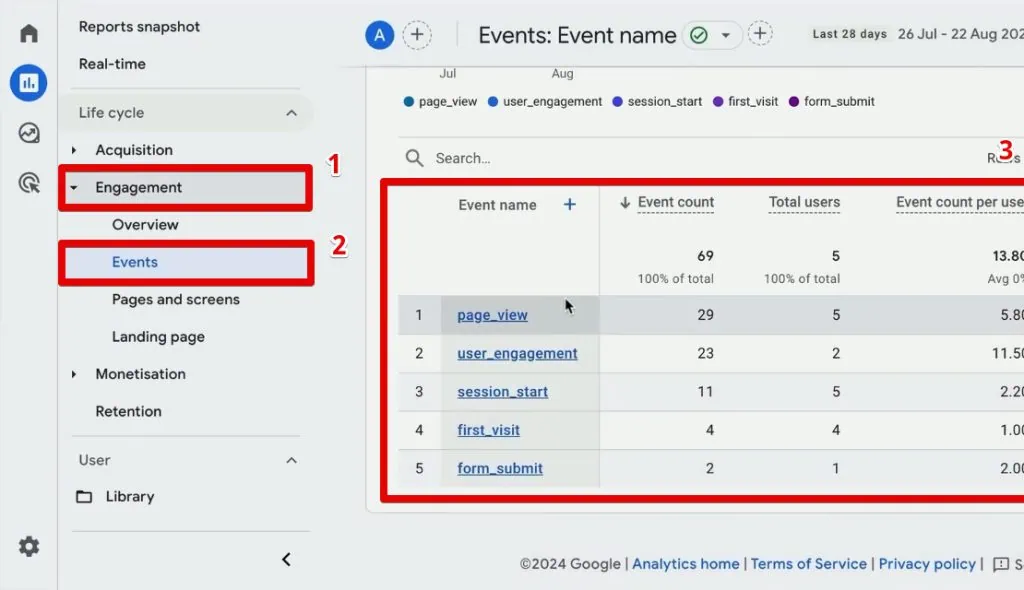
- After 48 hours or less, this information should also be available in the standard engagement reports. Go to Engagement → Events. There is a table at the bottom with the list of events. You should see our custom event in this table after that period.
We have successfully configured a GA4 event for an add-to-cart button click. Don’t forget to publish this live to all your users by submitting a version.
- Give this version a descriptive name, then click Publish.
To summarize, here are the steps for implementing add-to-cart button click tracking.
- Configure a generic click trigger.
- Enable the built-in click variables in GTM.
- Determine a click variable that uniquely captures the add-to-cart button click.
- Set a condition for the click trigger to match this variable.
- Attach the trigger to a GA4 event tag.
- Test the implementation.
- Publish the tag live to your users.
Remember that a button click is only one of the many interactions you can deploy with the help of Google Tag Manager. There are also scrolls and YouTube views.
The trigger type you’ll select depends on the interactions you want to track, so keep testing and playing around with the other event options.
💡 Top Tip: Do you want to stay on top of your event tracking? Check out our Google Analytics 4 Event Tracking Checklist to ensure proper event-tracking implementation.
Now that you know about event tracking, your capabilities with GTM should expand.
How to Learn Google Tag Manager in 2025
Whether you’re eager to dive deeper into GTM or want to refine your tracking skills, we will highlight below why continued learning is essential for mastering Google Tag Manager.
What’s Next in GTM?
By now, you should have the basics down for Google Tag Manager, know what it is all about, and how to use it.
Here is a recap of what we have learned so far:
- We started by learning what Google Tag Manager is about so you know how to explain it to a client.
- Next, we discussed how to install GTM on our website correctly.
- We went into the importance of planning our implementation.
- Then, we started implementing our first tags and triggers.
- With this knowledge, we installed conversion and event tracking on our website, using more specific triggers for our use case.
With all this knowledge, you probably ask: what should I learn in Google Tag Manager next? It’s great that you asked because there is much more to learn in GTM.
The rabbit hole is deep, and we prepared a mind map to show you what else you can learn if you want to dive deeper into Google Tag Manager.
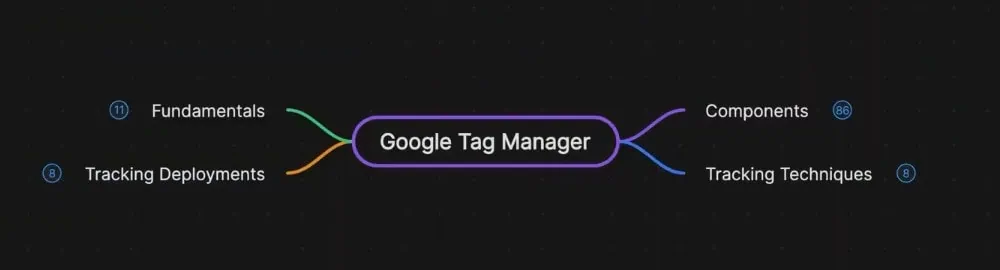
As with any marketing tool, you should always start with the fundamentals.
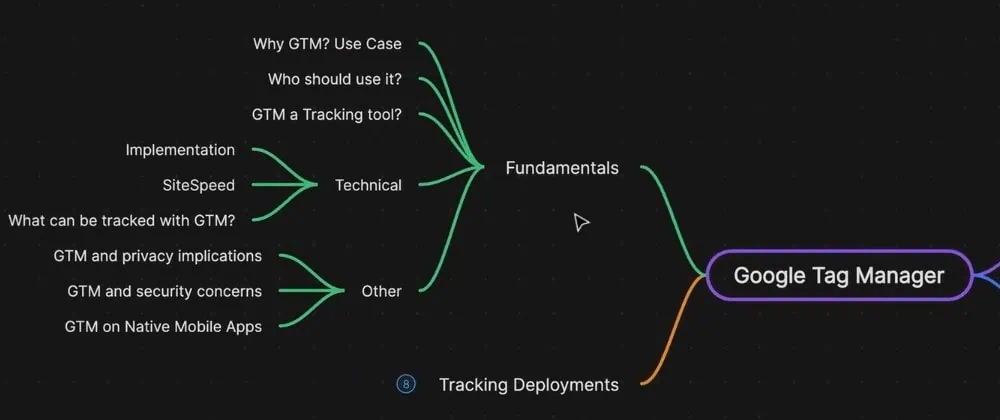
These points are essential from a business sense: knowing what Google Tag Manager is all about, the use cases, etc.
You can then go deeper into the technical specificities like the implementation, site speed, and things you can track with GTM. There are also privacy implementations, security concerns, and mobile apps.
Google Tag Manager on mobile apps is a whole other world. While the principles we explained also apply to mobile apps, they are fundamentally different GTM territories you can explore.
That said, you should focus on the components like the data layer, tags, triggers, variables, templates, and management.
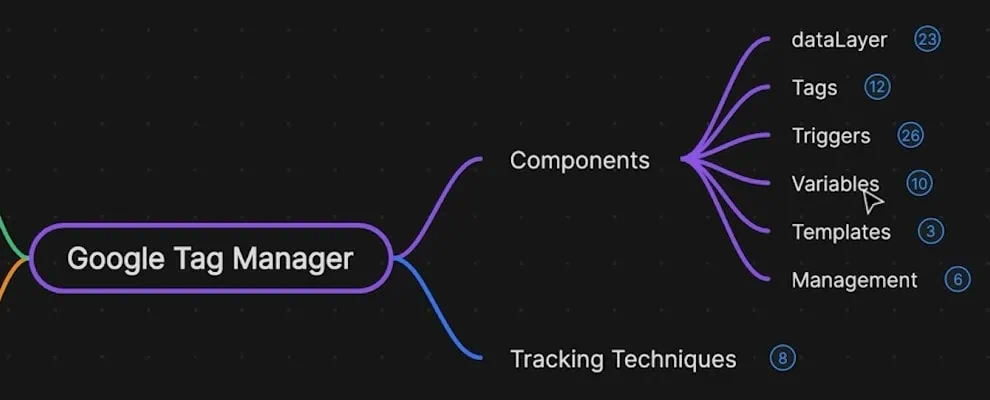
We already touched upon tags, triggers, and variables earlier, but it starts with the tracking code. After implementing this code on your website, you build the data layer.
The data layer is a concept within Google Tag Manager that you can’t leave out if you want to be proficient in the tool. It is a topic in and of itself with many subtopics you can dive into.
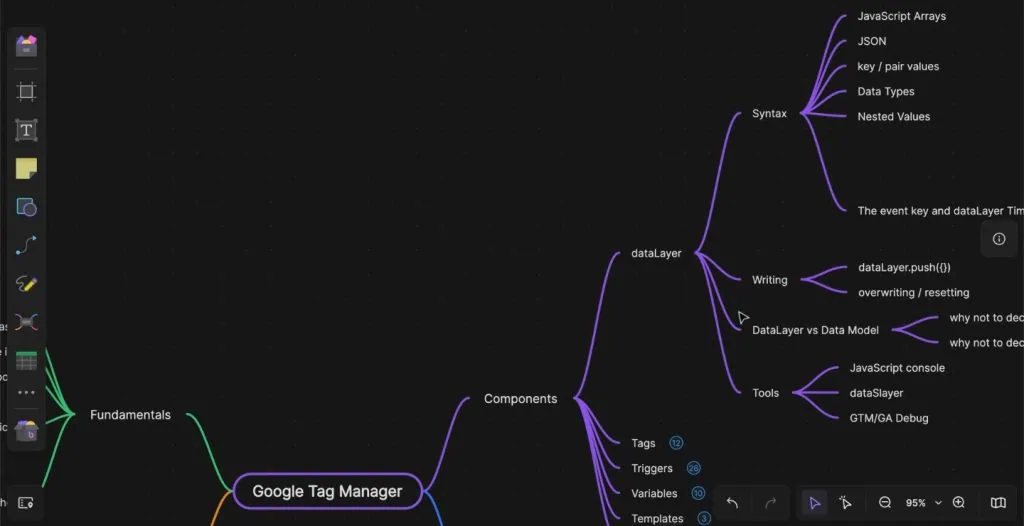
Before diving in, know that the data layer follows a specific syntax. Next, you need to know how to write the data layer, how it compares to the internal data model, and the additional tools you can use to make your life easier.
There is a lot to talk about the data layer, and we encourage you to read more on this topic if you want to dive deeper into Google Tag Manager.
While we briefly discussed tags, triggers, and variables, there is still much to know about these points. Let’s look at the other topics we can look into, starting with the tags.
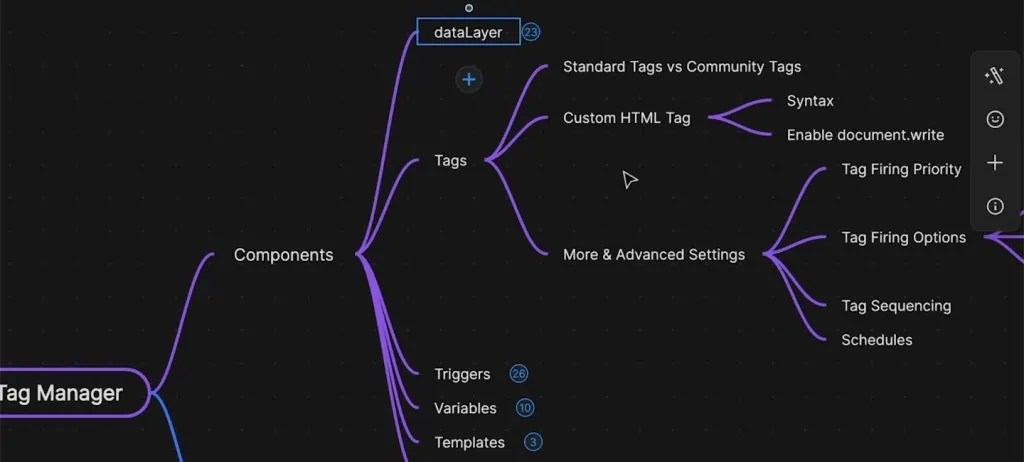
We haven’t covered all the standard tag types like the Custom HTML tag, not to mention the countless community tags in the Community Template Gallery.
You could also look into the upsides and downsides when using some of these built-in or community tags. There are also advanced settings like the tag firing priority, options, sequencing, and schedules.
Triggers are another big field that we have barely scratched the surface of.
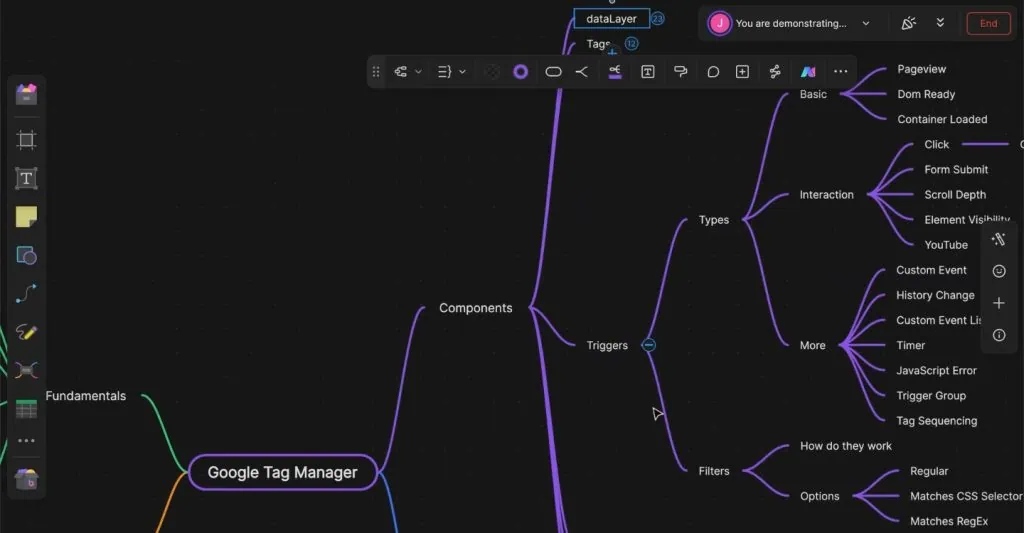
We have only covered some trigger types, and it can get quite complicated once you start utilizing some of the more advanced triggers built into Google Tag Manager.
Try experimenting and see what the other trigger types can do for yourself!
With our short description of variables earlier, you may mistake that there isn’t much to talk about them beyond being placeholders for information inside GTM.
They can almost be like little programs that run in the background. You can do much with them to make your tag deployment more flexible and add data to your tracking.
There is tons to learn about the components themselves. We still have some smaller topics, like the templates and management side, for you to look into.
Once you understand all of this, we encourage you to practice all you have learned and use different tracking techniques.
We have topics like iframe tracking, form tracking, cross-domain tracking, custom UTM parameters, overwrite referrer, and retaining data across page views.
Check out our detailed guides on these topics and our other GTM guides to see what else you can do with Google Tag Manager.
Finally, there are also some tool-specific tracking deployments you can explore.
We have some for Google Analytics 4, Meta Pixel, LinkedIn, TikTok, etc. If you want to tweak those tracking deployments with Google Tag Manager, you can dive deeper into these topics.
Introduction to Server-Side Tagging
We hope this gave you a good overview of Google Tag Manager. However, this is only a sliver of what GTM can do because of a new feature added in recent years.
It is Google Tag Manager server-side tagging and running a GTM server. They get into building up a server in the cloud and proxying your data request through a GTM server.
These are more advanced topics. We recommend mastering the client side before diving into the GTM server side.
How to Learn More & Practice
With that, you probably ask yourself, how can I learn all this information?
Our first recommendation is to go out and build your demo shop to try out the tracking yourself. Just like we did in this course, having a website for your tracking is vital to getting proficient at these techniques.
💡 Top Tip: If you want to try out GTM but don’t want to implement these changes on your website yet, check out our guide on How to Create a Demo Website for Practicing GTM.
Try it out and make mistakes. It is inevitable to make mistakes while testing because you will learn from them after pushing through the barrier.
Many resources are available online that can help you. MeasureSchool is just one of them. You can check out our blog with multiple Google Tag Manager tutorials.
We also have a YouTube channel where we have published many videos on GTM already.
If you want a more structured way of going through the features of Google Tag Manager, we invite you to check out our Google Tag Manager Essentials Training.
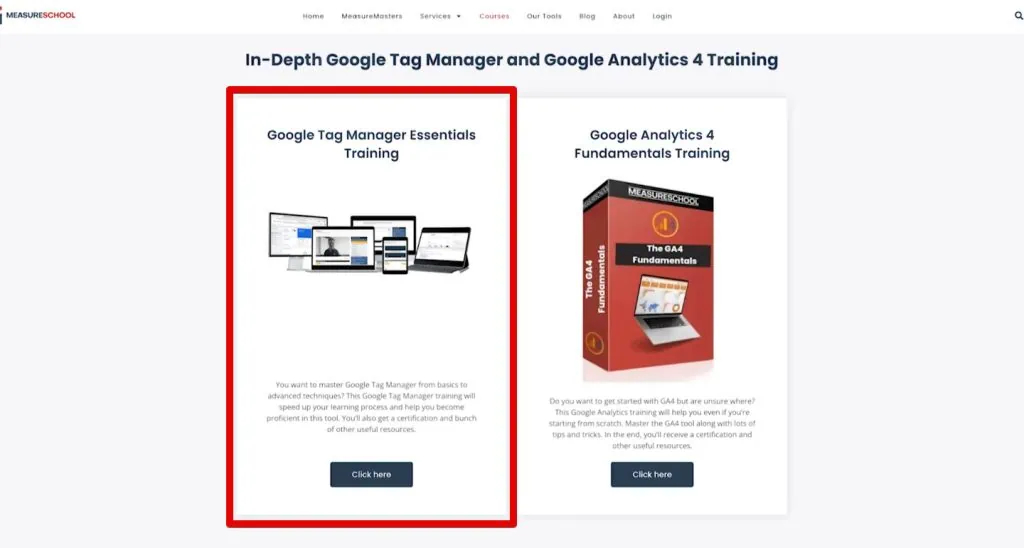
It is the next logical step after completing this Google Tag Manager tutorial. We will go in-depth into all the different GTM components so you understand it under the hood and reliably and confidently deploy tracking with GTM.
Throughout the course, we have extensive video lessons and challenges. You will get access to your demo shop, where you can implement your tracking and see if you can apply the knowledge you have learned in the videos.
Once you have gone through all the videos and completed the challenges, you will get a certificate at the end of the course. Hundreds of students have finished this course already, and you can read some of their reviews.
We hope we have ignited your curiosity about Google Tag Manager.
Summary
In this beginner-friendly course, we walked you through the fundamentals of Google Tag Manager, an essential tool for managing website tracking codes.
We covered what GTM is, how it works, how to install it on a WordPress website, topics like conversion tracking, custom event tracking, setting up tags, triggers, and variables, and exploring advanced tracking techniques.
If you want to streamline website analytics without extensive coding knowledge, Google Tag Manager is just the tool for you. Check out our self-study guide, where we shared 5 Steps to Get Started in Learning GTM.
How did you set up your tracking? What events do you track on your website? Let us know in the comments below!
Sign up to the FREE GTM for Beginners Course...


")