
Last Modified on January 7, 2025
Part of running ad campaigns is measuring the performance of your ads and using that data to optimize your campaigns.
So, if you’re running Meta ad campaigns to acquire traffic and hope to convert them into customers, you need to learn how to set up Meta Pixel on your site.
Meta Pixel is a code snippet that you can add to your website to measure the performance of your ads and gather data about the actions users from Meta ads take on your site.
As with other analytical tools, you can install them directly on the website or use some tag management solution like Google Tag Manager (GTM).
If you use GTM to manage your tags (recommended), then this post will be of interest to you. We will cover the following topics:
- Why Install Meta Pixel
- Getting Meta Pixel Code
- How to Set Up Meta Pixel with GTM
- Verify Meta Pixel Installation
Let’s get started.
Why Install Meta Pixel
The primary reason to install Meta Pixel is to measure the performance of your marketing campaigns and optimization. Still, knowing what specific benefits it can bring can be helpful.
- Remarketing and Relevance – With data from your Pixel, you can retarget the visitors who view a specific page or take certain actions like adding to a cart, making purchases, etc., making your campaigns more relevant.
- Drive more Conversions – You can set up automatic bidding for your campaigns to reach people more likely to convert or take actions that matter to you.
- Learnings – Measuring the performance of ads also means you have a lot of information from which you can learn and optimize your campaigns and do things like split testing.
- Split Testing – Once you know what actions users are taking, it’s simpler to run split testing for your ads and see which leads to more conversions.
Now that we understand how beneficial Meta Pixel can be, let’s see where the pixel code comes from.
Getting Meta Pixel Code
You can get pixel code from your Facebook account by following these steps:
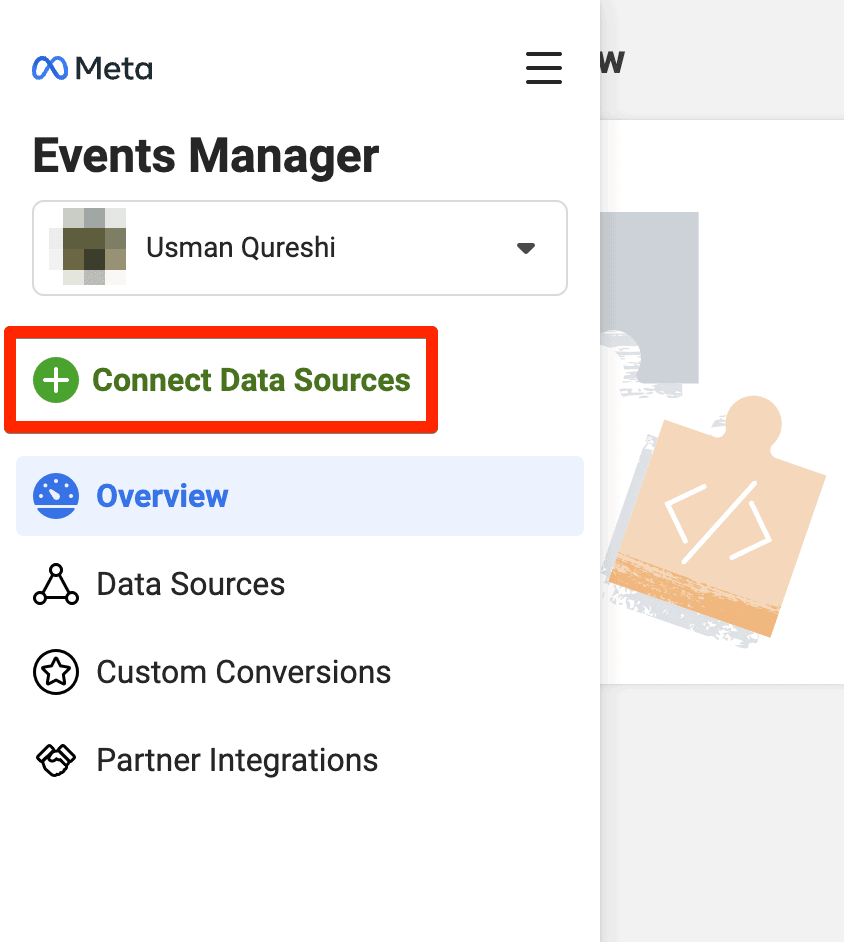
- Go to Meta Events Manager.
- If you haven’t created any Pixel code before, then you click on the green Connect Data Sources button.
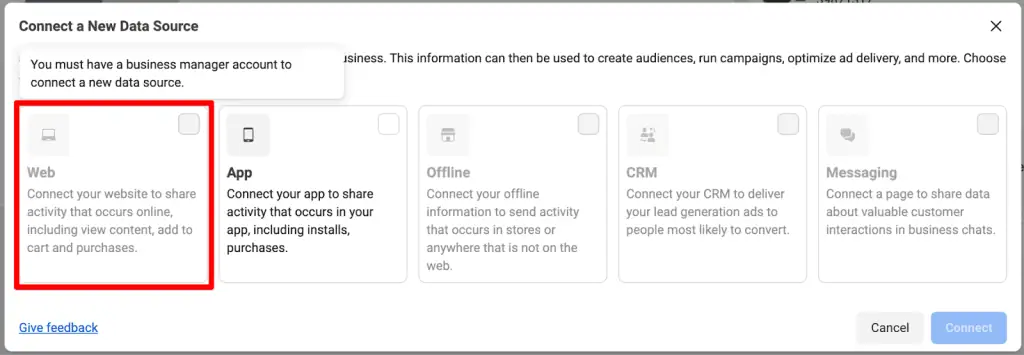
- Next, select Web from the data source. You do need a business manager account to do that.
- Now, you can name your Pixel. Click on Create Pixel, and it will create a new ID that you can see in your Events Manager.
You will see an option to install code manually or through a partner integration.
If you click on the Check for Partner button, you will see a screen with multiple options on how you can install Pixel code, including Google Tag Manager.
We don’t recommend this method because it grants Meta access to your container to edit, add, and remove tags. It also publishes the container without warning, which can be a nuisance if you’re still working on any tags.
So, if you close this prompt, you can see your Pixel ID in the Events Manager which we are going to use in GTM in the next section.
How to Set Up Meta Pixel with GTM
Now that we have what we need, we can log into our GTM account (assuming you already have one) and install the Meta Pixel code aka the base code. We are going to use Measure School’s Demo Shop to show how the installation works.
There are two methods to install Meta Pixel with Google Tag Manager:
- Install with a community tag template
- Install with a custom HTML tag
Install with a Community Tag Template
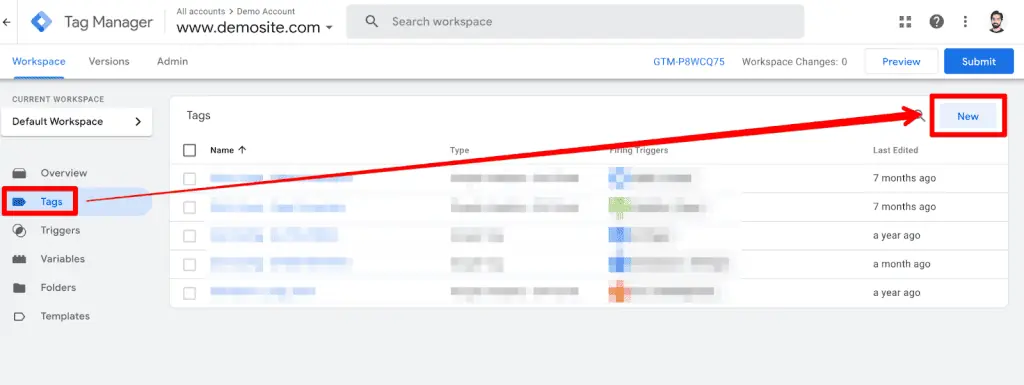
- We can start by creating a simple page view tag. Click on the Tags in the left pane, then click the New button on the right.
- In the Tag configuration interface, we will search for Facebook (yes, it’s still referred to as Facebook in some places) in the GTM tag template gallery and select the Facebook Pixel template by facebookpixelarchive.
- Click on the Add to Workspace button and then again on the Add button.
- In the Tag Configuration interface, we can now enter the Meta Pixel ID we saw in the Events Manager.
- Since we want the base pixel code to launch on all the pages, we will choose the All Pages Page View trigger and Save the tag.
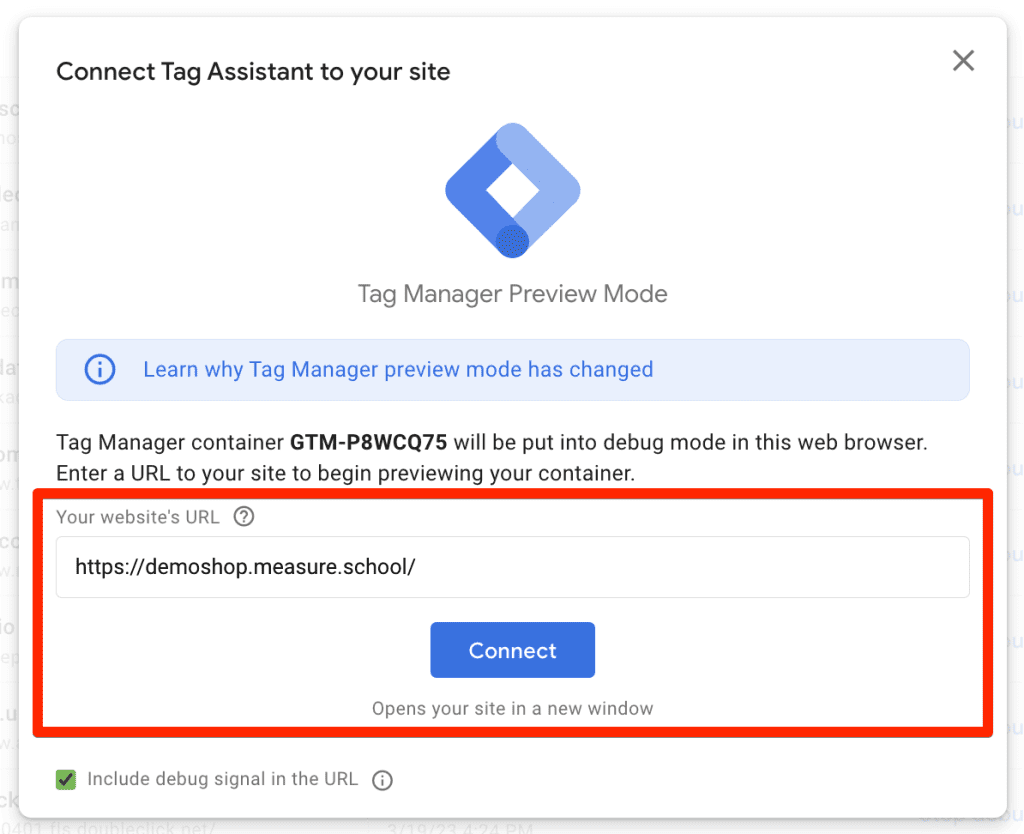
- The last step is to ensure the pixel code is loading on our demo site using GTM’s preview mode and tag assistant.
- If the tag is firing correctly, the setup in GTM is working fine.
Install with a Custom HTML Tag
Installation with a custom HTML tag requires getting the code from the Events Manager.
- Go back to your Pixel, and click Manage Integrations → Manage → Add to another website.
- Click the Install code manually button, as we saw in the Getting Meta Pixel Code section above. Then, copy the code.
- In GTM, go to Tags → Click on Tag and select Custom HTML.
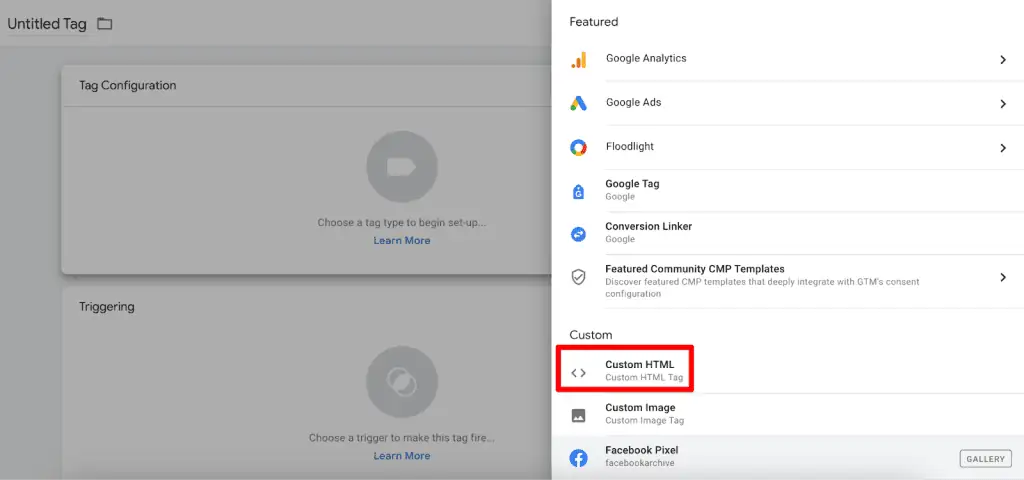
- Paste the base code in the tag and use the All Pages Page View trigger as we used for the first method.
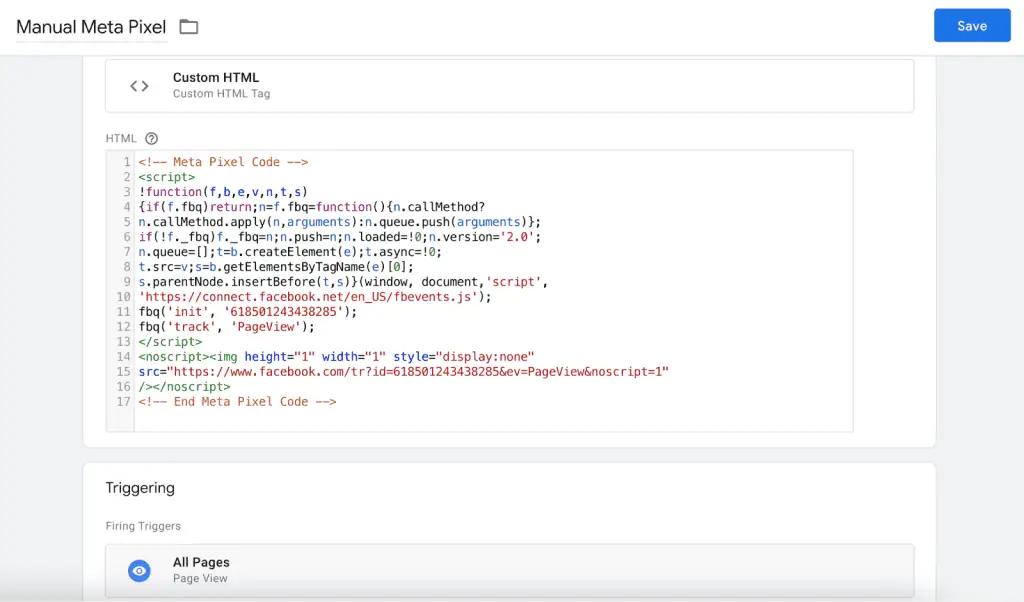
- Finally, we can test the tag in preview mode and see that the Manual Base Pixel tag is firing correctly.
The problem with using the manual method is that you will have to edit the code every time you want to add other events apart from the basic PageView.
If you don’t want to edit the base code, you can create separate tags. However, they must fire after the base code is loaded, so it can be a bit annoying.
However, either method means the events should now be sent to the Meta Events Manager.
Verify Meta Pixel Installation
There are two ways to verify that your events are sent to your Meta account:
- Verify with the Meta Pixel Helper extension
- Verify with the Meta Events Manager
Verify with the Meta Pixel Helper extension
The Meta Pixel Helper Chrome extension helps you to see if the events are tracked correctly and check for any errors like multiple pixel codes loaded, the same pixel code firing twice, duplicate events, and so on.
Once we have installed the pixel code on the website, we can quickly check with the extension if everything is working as expected.
You can see how it mentions One Pixel Found and the website where it’s installed. It also mentions the Pixel ID so you can see if it’s going to the correct pixel.
Below the pixel info, it mentions the events sent to your Meta account, which is only the PageView for this account.
Any other events you send will be mentioned here as they are triggered. The green check means everything is fine, with no errors or duplications, etc.
Setup Method: Manual doesn’t mean that it’s installed with a base code here. It simply means you didn’t use any partner integrations.
Great! So far, it looks like our installation is working fine. If you want a final check for satisfaction, we can also check the events received by the Events Manager.
Verify with the Meta Events Manager
The first step is to go to the Meta Events Manager → and then click on your Pixel.
It looks like we are receiving the PageView event, and we can also see that it’s installed on one website, i.e., our demo shop.
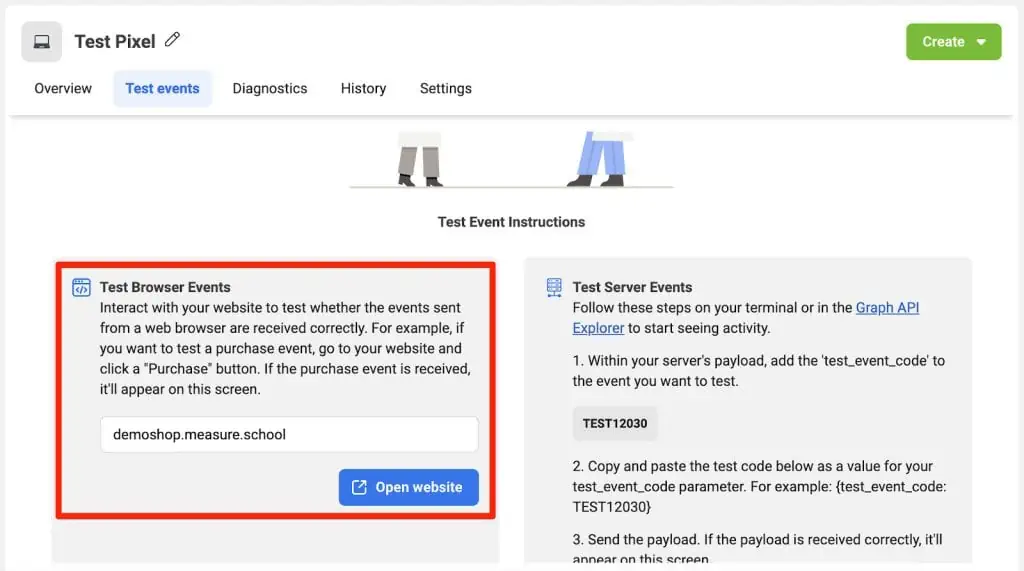
But to make sure your events are coming in as you browse the site, click on the Test events tab. This could be termed Meta’s version of the Eventsw mode in GTM, but probably not as fast and robust.
Once you’re in the Test Events tab, enter the URL of your website under Test Browser Events and click the Open Website button. It will open in the new tab. Watch this space as the live events flow in.
After a moment, you should be able to see your events.
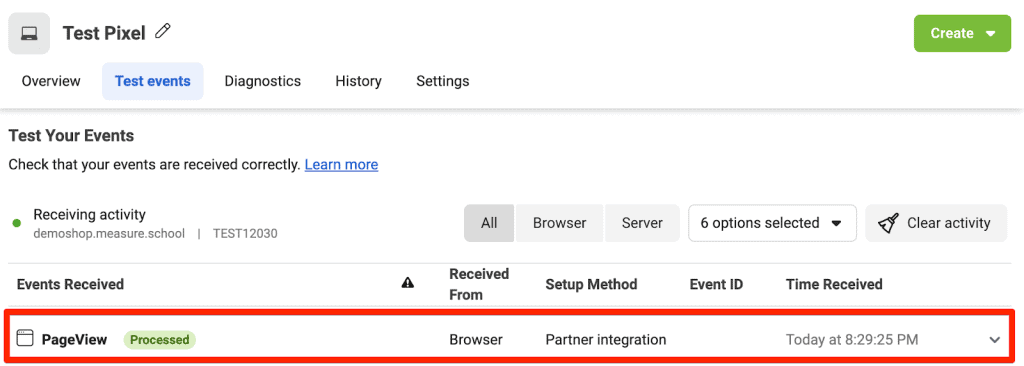
The events saying Processed in green mean everything seems to be working fine. You can expand and see any other details of the event as well.
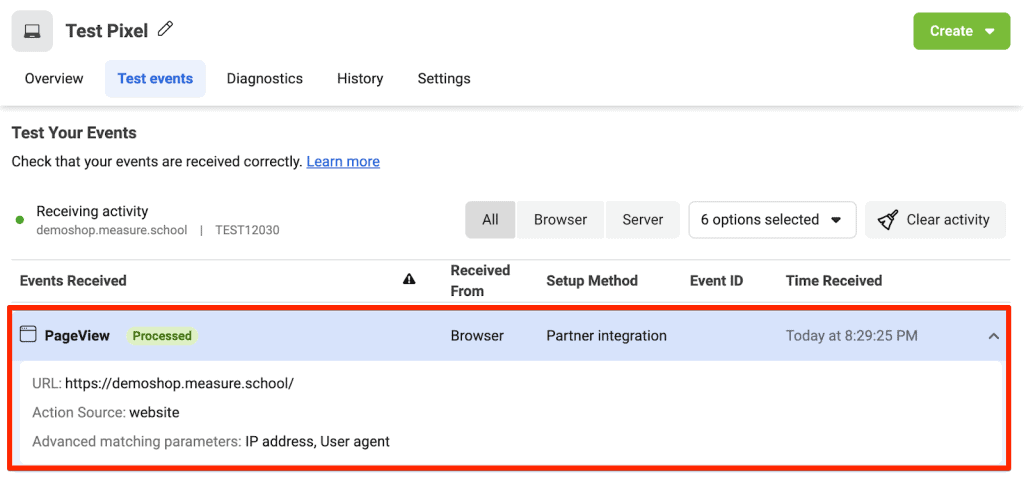
If you’re noticing Partner integration under the Setup Method column, don’t worry. It’s a bug, also Pixel Helper mentions it as manual at the same time, and we installed it with GTM.
Summary
In today’s post, we covered how installing Meta Pixel on your website can help you measure your ad performance and optimize campaigns thanks to the data your Meta account collects.
We then looked at how to create/get the Pixel code from your Meta account and why we should avoid the partner integration method.
We also learned the two methods of how to set up Meta Pixel on your website with GTM, i.e., with a community tag template and creating a custom HTML tag with the code snippet from the Pixel.
But using the custom HTML method would mean editing the code every time you want to add any new events or create separate tags that should fire after the base code fires, so keep a note of that.
If you are reading about Meta Pixel, you might be interested in installing GA4 on your website. Here’s a recent post comparing Google Tag Manager vs Google Analytics 4.
So, how have you installed the Meta Pixel on your website, and why? Let us know in the comments below!


")