
Last Modified on June 6, 2024
The Meta Pixel is a multi-purpose tool that helps you optimize your campaigns and analyze your audience data.
You can enhance the Meta Pixel by integrating it with Google Tag Manager, which makes tracking easy, consistent, and powerful.
There are three ways to install the Meta Pixel tracking with Google Tag Manager, which we demonstrate in this complete training guide.
🚨 Note: If you’re new to Google Tag Manager, take a peek at our Google Tag Manager tutorial and cover the basics.
An overview of what we’ll cover:
- Meta Pixel Tracking with Google Tag Manager
- Automated Meta Pixel Installation
- Manual Meta Pixel Installation
- Custom Tag Template
- Creating FB Custom Conversion Using Events
Meta Pixel tracking with Google Tag Manager will help you measure and optimize your advertising even more effectively.
There are a few different setup methods and lots of specialized features, but we’ve made a complete training tutorial to guide you through the process.
🚨 Note: This tutorial will use a demo store running on WordPress and WooCommerce. We also use an almost-empty GTM Container, which is already implemented on this store using the free Google Tag Manager for WordPress plugin by Thomas Geiger.
Let’s dive in.
Benefits of Integrating Meta Pixel with GTM
- Gather Audience Insights: Even if you’re not running Meta ads yet, the Pixel can start collecting data on your website visitors. This data becomes invaluable when you decide to run ads in the future.
- Custom Audience Creation: The insights obtained from visitor activities can be used to create custom Meta audiences for retargeting. This allows advertisers to tailor ads based on specific actions users took on the website.
- Lookalike Audiences: Using the data from custom audiences, Meta can identify users with similar characteristics and behaviors. This lookalike audience can be targeted to expand your customer base.
- Conversion Tracking: To assess the effectiveness of Meta ads, it’s crucial to track conversions on your website. The Pixel provides detailed information about user actions, helping advertisers understand their return on ad spend.
- Optimization for Conversions: With the Pixel, you can optimize your ad campaigns to target audiences most likely to convert.
- Dynamic Product Ads: If a user shows interest in a product but doesn’t make a purchase, the Pixel can retarget them with dynamic product ads showcasing the same product.
Meta Pixel Tracking with Google Tag Manager (3 Methods)
In this post, we will cover three different methods to install the Meta Pixel with Google Tag Manager.
You can skip to the most relevant method if you know what you’re looking for, or you can read through to figure out which method will best suit your tracking needs.
The first method is automatic installation using Meta integration. It is the simplest and fastest, but it is quite limited in functionality: you can track page views, but not other types of events.
The second method is manual installation directly through Google Tag Manager. This is much more flexible and powerful, so we recommend it if you feel comfortable working with a little bit of code.
The final method uses Custom Tag Templates through Google Tag Manager’s Template Gallery. It is fast and easy, but still very customizable. Custom Templates are an incredibly user-friendly way to track all kinds of events.
1. Automated Meta Pixel Installation
Pros and Cons of Automated Installation
Before moving forward, let me tell you why I usually avoid this method.
When you authorize Google Tag Manager and verify it for Meta, Meta goes into Google Tag Manager and creates Tags and triggers on its own. It assigns triggers to the Tags and publishes your Container immediately.
If you have any changes or works-in-progress in your Container, or if someone else is already working on your Container, then you don’t want to publish it immediately to a website.
Doing so can make things complicated, and possibly even break things that you already had in place.
If you already have Tags or triggers in your Container, you should skip ahead to a different method. I’d also recommend either of the other two methods for anyone who wants more customization and control.
But if you have an empty Container, this shouldn’t affect you. This method is still a great option if you don’t have a lot of time and you only want to track pageviews instead of events.
Install Meta Pixel with Google Tag Manager
We’ll start with the quick and dirty method.
1. First, let’s navigate to the Meta Events Manager and find our pixel.
2. Click the business tools menu icon, then select Events Manager.
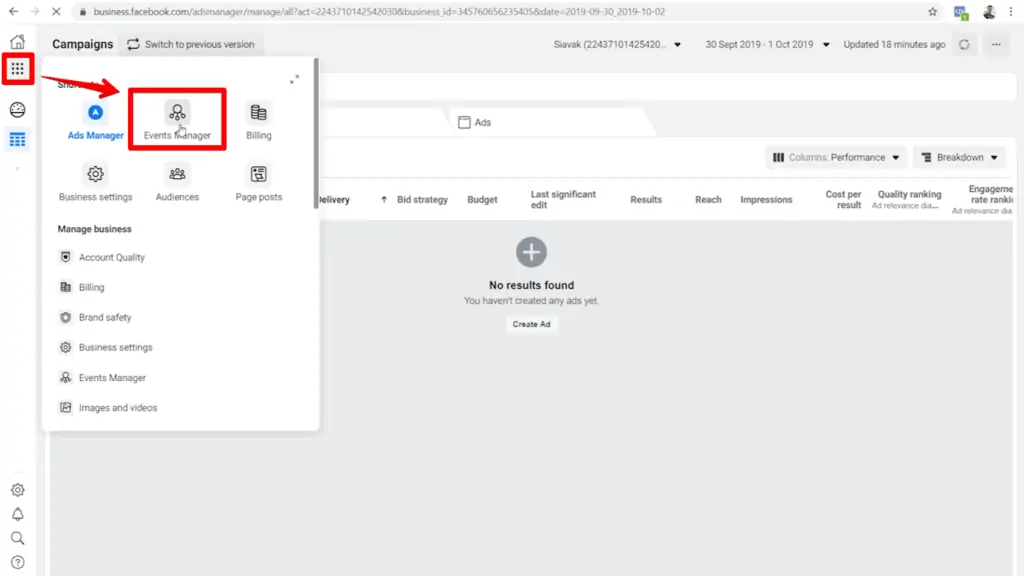
3. On our data sources page, we’ll select the pixel that we want to install.
4. And in the top-right corner, under the Set Up dropdown menu, we’ll click Install Pixel.
This first installation method is the most automatic one: partner integration.
5. Click on the first option, Add code using a partner integration.
Connect and Verify the Google Tag Manager Account
Now, we will see a list of icons for different platforms and tools that already integrate with Meta. Among these is Google Tag Manager.
6. We can click on Google Tag Manager, connect and verify our Google Tag Manager account, and let Meta do the rest for us.
7. To carry on with automatic installation, click Continue.

You will get another popup to choose the Google account that you want to authorize and connect to your pixel.
8. Allow Meta the prompted permissions, and on the next page click Finish Setup.

Next, Meta will try to help us set up some extra events, which we won’t worry about at the moment. For now, we just want to go back to Google Tag Manager and refresh our page so we can review the tags and see what Meta has done.
And here in Google Tag Manager, we’ll see that the Meta Pixel tag has already been created.
9. The Workspace Changes in the upper-right corner are zero, which means the workspace has already been published.
So Meta has come into Tag Manager, created the Tag, assigned a trigger, published a Container, and created a new version all in one step.
10. We can see this new version by clicking the Versions tab in the top bar. Meta has created version two, although you’ll notice that it has no name.

This is another reason that I don’t like the automatic installation method.
It doesn’t give you much control or flexibility, and it auto-publishes a work-in-progress Container. This can cause confusion or complications later down the road, so be aware of it if you use this method.
So that’s it—although the automatic installation method can be limiting, it’s quick and easy. By all means, if you’re short on time or if you only have a few tracking requirements, take advantage of how short and simple this process is.
In short: go to the Meta Events Manager, click setup, and authorize Meta to access your GTM Container. Click “continue” a few times and BAM, installation is done for you. It’s finished, and you can go on with the rest of your day.
2. Manual Meta Pixel Installation
If you want more flexibility and more analytical power using your Meta Pixel and Google Tag Manager, the manual installation method is the way to go.
1. Like the first method, we’ll start with the Meta Events Manager’s view of our pixel. In the Set Up dropdown, click Install Pixel.
2. When prompted, we’ll choose the second option in the popup: Manually add pixel code to website.
Adding Pixel Code to All Pages
Once you select the manual option, Meta instructs us to add this base code on every page of our website. We’ll get to that in a moment.
3. For now, we’re going to click on the code to copy it to the clipboard.
Back in Google Tag Manager, we need to create a new Tag.
4. Under the Workspace tab, click the Tags header and click the New button.

Because Google Tag Manager doesn’t already have any built-in Tags for Meta, we need to build our own Custom Tag that can use our JavaScript code from Meta.
5. Give your new Tag an informative name. Here, I’ve used FB – Base Pixel.
6. Select the Custom HTML Tag type, then paste your copied code into the HTML field.
7. We want this Tag to fire on our whole website, so add a trigger for All Pages and click Save.

Advanced Tip: Pixel Components
If you know JavaScript, you should always look over someone else’s code before you put it on your website.
You might not change anything, but it’s good to know exactly what your code is doing. Most importantly, you may notice that Meta’s code may break in certain cases.
To find out why, let’s take a closer look at the Meta Pixel code.
We have two main parts to this code. The first part is the <script> segment from line 2 to line 13, and the second part is the <noscript> segment from line 14 to line 16.
Let’s start with the first part of the script segment, from lines 3 to 10. We have a function, !function(f,b,e,v,n,t,s), for Meta events. This will load a JavaScript library from Meta’s servers.
Once the library is loaded, we have the pixel initiation code on line 11. fbq(‘init’ initiates the code, and the following number is your Meta Pixel ID. This line of code uses the loaded library to activate your specific pixel on your page.
When the Meta Pixel is activated, it will listen to events, collect them, and report them to the Meta Events Manager. Line 12 is an event. It tells Meta to track a pageview and send it to your activated pixel.
So the script portion is quite simple and should work just fine. It loads a library, initiates your pixel, and tracks the first event to that pixel, which is a pageview event.
Since that looks good and we understand the code, we’ll check out the NoScript portion next.
The NoScript code is expressly for browsers that have JavaScript disabled. So if a page loads in a browser that doesn’t support JavaScript, this is usually the portion of the code that will be executed.
But the Google Tag Manager Container is made of JavaScript, and it executes Custom HTML when JavaScript is supported.
So if you think you may have a lot of users whose browsers don’t support JavaScript, you’ll want to take this piece of code out and put it in an image Tag instead.
So in this case, we’ll delete the NoScript portion, which is lines 14 through 16 of the original HTML code. Our code should end up looking like this:
To be honest, this isn’t a super critical step. Most browsers support JavaScript, and for those that don’t, your website probably won’t function correctly anyway.
However, it’s certainly something to be aware of so that you can support users when they encounter problems.
Testing
Testing with Preview & Debug Mode
To test our new Tag, let’s preview our Container to verify our setup. Click on Preview and we will see a new dashboard.

Remember: while in Preview mode, click the orange Refresh button to see any new changes you make.
Let’s go to our website and refresh the page there to preview the Container. If everything is working, you will see that the Tags fired both in your Google Tag Manager bar and in the Meta Pixel Helper.
💡 Top Tip: If you don’t have the Meta Pixel Helper Chrome extension, we recommend it! Get it here.
Testing with Meta Pixel Helper Extension
If we investigate the Meta Pixel Helper, we can see that a pageview event has been fired and that some microdata have been automatically detected.
Under the pageview dropdown, there’s some information about the pageview. You’ll find information like the recorded URL, the pixel code, and the pixel location.
Top Tip: How “Microdata Automatically Detected” Works
When we install Meta Pixel on the page, it seeks out context for the page and user interactions. It can find and track things even without us asking it to, such as button clicks or what users viewed on the page.
The blue lightning icon identifies automatically detected events in Meta Pixel Helper. The green checkmark icon identifies events that we set up and fire ourselves using Google Tag Manager.
Testing with Meta Test Events
We should also test our Tags using Meta’s Test Events function, which will verify that Meta is receiving the events that were recorded. In the Meta Events Manager, click the Test Events header. It will show us all recent activity for that pixel in real-time.
To make sure we are looking at the right events, empty the activity list by clicking Clear Activity.
Refresh your shop page, then come back to the Meta Events Manager. If events are being properly recorded and sent to Meta, you’ll see a page view with the URL of the page you just refreshed.
Event Debugging
Things are looking good so far, but you should test multiple functions on your site to make sure you’re not missing any events. For example, let’s go back to the website shop and click the Quickview button for a product.

We can see that the Meta Pixel Helper detected the button click.
But if you go back to your Test Events page on the Meta Events Manager, we won’t see that automatically detected button click in the list of events. That’s some important data that we’re missing out on.
We want to see those activities. The solution is pretty simple, but it takes a bit of navigating to find. To get to your debugging tool, open the business tools menu and click the Expand Menu icon.
In the expanded menu, click on Analytics.

Select the pixel that you’re currently using.
Click the Activity dropdown in the sidebar, then click Event debugging. On this page, hit the Refresh button.
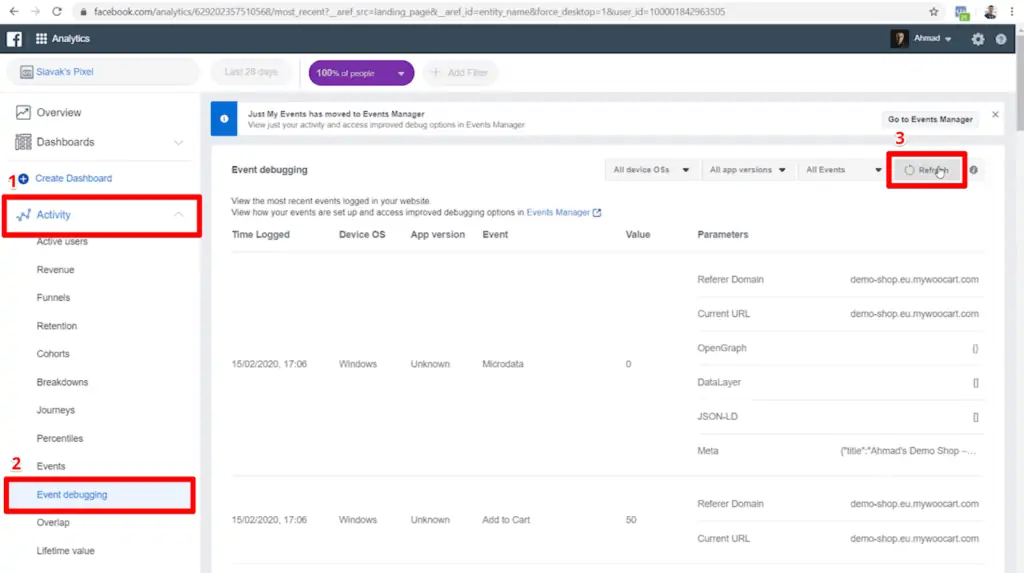
After the list is refreshed, you’ll be able to see all events, even those that are automatically detected like microdata and button clicks.
Once you’ve found this solution, it may be tempting to just rely on Meta’s automatic microdata detection for all of your event tracking instead of manually setting up a bunch of events through Google Tag Manager.
This is a really bad idea for your analytics.
Although Meta can detect microdata including some events like button clicks, its detections are not always completely accurate. Meta will try its best to pick up user interactions and the context around it, but it has its limitations.
It’s always better to manually set up tracking for events that are important to us. If you want to use event data to set up conversion tracking or to create Custom Audiences, you need your data to be as reliable as possible.
The best way to make sure that information is being recorded the way you want is to set it up yourself.
Custom Event Pixel Installation
Now, if you only want pageviews to be tracked to your Meta Pixel, you can stop here. You can use pageviews in the Meta Events Manager to create a few Custom Conversions, create Custom Audiences, and run Remarketing Ads.
But the Meta Pixel can do so much more for you beyond tracking pageviews.
In the second part of this tutorial, I’m going to show you how to get the most out of the Meta Pixel by setting up event tracking.
Pageviews don’t tell anything about a user’s interactions with a page. These missed interactions include button clicks, watching a video, adding something to a cart, or purchasing a product.
Event tracking is a game-changer if you have only been tracking pageviews.
We can see how many times an event has been fired and create Custom Audiences based on that event. We can also define an event as a click conversion, which we can use to optimize our Meta campaigns.
The possibilities are endless when you include events in your Meta Pixel tracking with Google Tag Manager. Let’s learn how to implement this valuable tool.
What Kind of Events Can You Track on Your Website?
There are two types of events that we can track on a Meta Pixel: Standard Events and Custom Events.
Standard Events are popular user interactions that are recognized by Meta. These include leads, viewing content, adding a product to the cart, initiating the checkout process, purchasing a product, and more.
Standard Events probably cover most of the things that you want to track.
We can also still track other events even if Meta doesn’t recognize them as Standard Events. For example, if we want to track users who spend five seconds on our landing page, we can configure a custom user interaction event.
Some possibilities for creating Custom Meta Events include:
- Time on Site
- Button Clicks
- Outbound Link Clicks
- Internal Link Clicks
- File Downloads
- Scroll Tracking
- Element Visibility
We can create these kinds of Custom Events and more. And if you used manual installation or Custom Tag Templates to implement your Meta Pixel, it’s not as hard as you might think. Let’s learn how.
Step-by-Step: Setup Event Tracking
Separate the Meta Base Pixel and Pageview Event into Two Tags
To track events, we’ll start with Google Tag Manager. Remember that we can’t set up event tracking this way if you use the automated installation process, but it’s pretty easy if you use either manual installation or Custom Templates.
The first thing we need to do is split our Meta Base Pixel code into two parts. Our goal is to separate the initiation part of this pixel from the first event, which is the pageview.
This is because we want to track more events different from the pageview. Those events will also require the Base Pixel to be initiated; otherwise, they won’t function correctly.
So the sequence is like this: the Meta Pixel must be initiated before an event can fire to pick up that event and report it to Meta.
We only need to execute the Base Pixel once, but as long as it initiates first, it will record every other event that fires on a page.
To accomplish this, click on your Base Pixel Tag in Google Tag Manager.
When you open the Tag configuration settings, you’ll be able to directly edit the HTML code. We need to take out the Meta pageview tracking code and add it to its own Tag.
Highlight the segment fbq(‘track’, ‘PageView’); and use either Ctrl+X or right-click and select Cut to remove it from this code.

With that pageview section removed, the Base Pixel Tag looks exactly how we want it. Click Save and close the Tag configuration.
Next, we’ll create a new Tag to host the pageview section that we just cut out of the Base Pixel code. Name it something like FB – Pageview and choose Custom HTML as the Tag type.
In the HTML field, add the opening and closing script Tags <script> and </script>, then paste our pageview segment fbq(‘track’, ‘PageView’); between them. Assign All Pages as the trigger and click Save.

Assign Firing Order to Your Tags
Now we have both the Meta Base Pixel and the pageview event firing separately on all pages. However, we have to find a way to ensure that Meta’s Base Pixel always fires before the pageview event.
When we see our Tags in the dashboard like this, we have no way of knowing this because Google Tag Manager fires Tags asynchronously. It is not possible to tell which one fires first and which one fires second on the default settings.
So our next order of business is assigning an order of firing to these two Tags. We have two possible solutions to this problem.
Method 1: Firing Priority
The first way is called Tag firing priority. By default, the firing priority of each Tag is zero. We can assign a priority using any integer, with the highest value firing first and the lowest value firing last.
This works for some situations, but we’re not going to use it in this tutorial. Tag firing priority ensures that Tags fire in a certain order, but it doesn’t guarantee that a Tag will finish its execution before the next Tag is initiated.
This means that it is possible for your pageview Tag to fire before your Base Pixel Tag has finished executing. If this happens, the pageview Tag won’t be picked up or reported to the Meta Pixel, and you will lose tracking data.
Method 2 (Recommended): Tag Sequencing
So we will use the second method, which is Tag sequencing. With Tag sequencing, we can assign an order to Tag firing, and Google Tag Manager will ensure that the first Tag has been fired and executed completely before it fires the next Tag.
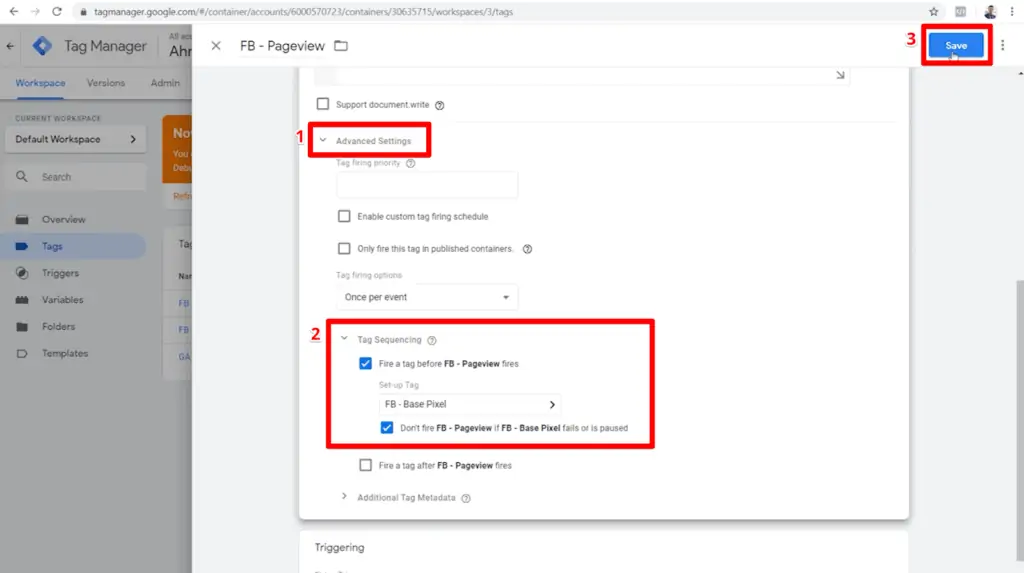
To set up Tag sequencing, let’s open our pageview Tag. In the Tag configuration settings, open Advanced Settings and then Tag Sequencing.
Check the box next to Fire a tag before FB – Pageview Fires, then select your Base Pixel Tag as the Set-up Tag. Finally, check the box next to Don’t Fire FB- Pageview if FB – Base Pixel fails or is paused, and click Save.
These settings allow you to choose Tags that either must precede or must follow your Tag. Since the Base Pixel must be initiated before the pageview Tag, the Base Pixel is called a set-up Tag.
You will need the Base Pixel to be selected as a set-up Tag for any events that you want to be tracked by the Meta Pixel.
In this case, I recommend checking the box to not fire your current Tag if the set-up Tag fails. If the Meta Base Pixel fails to execute, there is no way the pageview Tag’s HTML code will work on its own.
It doesn’t know where to send data, and there is no base Tag to listen for this event.
Okay, so that’s it. So we’ve set up Tag sequencing to ensure that Meta Base Pixel always fires and finishes execution before the Meta pageview Tag.
Set Base Pixel Tag to Fire Once per Page
Your Base Pixel and pageview Tags are now ready to support other event Tags. You can add new Tags for events like add to cart, initiate checkout, and leads using Tag sequencing.
For all of those events, we also need to set our Meta Base Pixel as the set-up Tag. If we change nothing else, then our Base Pixel Tag will fire multiple times—once for each event that uses it as a set-up Tag.
This is inefficient. If the pixel is initiated already, it should pick up all the following event Tags, and we don’t want it to fire extra times.
So now we need to set up just one more configuration. This time, we’ll open Tag configuration for our Meta Base Pixel Tag. Click Advanced Settings, and under the Tag firing options select Once per page. That’s it! Click Save and you’re done.
Now Meta Base Pixel will fire just once per page, and it will finish executing before any other event Tag fires on that page. Even if another event has defined the Base Pixel Tag as its set-up Tag, Base Pixel will fire just once per page.
Set Up Meta Standard Event Tag
Let’s set up a new Standard Event to go with our fully functional Base Pixel and pageview Tags. Since our demo page is a shop, let’s use Meta’s Add To Cart Standard Event for our Tag.
Create Add-to-Cart Button Trigger
The Meta Pixel interface recognizes add-to-cart events as Standard Events, but we need to help Google Tag Manager identify which button click we want to track.
A temporary trigger will help us find the correct Click ID; then we’ll edit the trigger to record only that button click.
We’ll start in the Google Tag Manager Container. Click the Triggers menu item, then click New to create a new trigger.

For now, we’ll temporarily name this Tag All Clicks and set its trigger to Click – All Elements, which should record All Clicks. Click Save.

Enable Click Variables
Next, we need to make sure that Google Tag Manager will record the identifying variables when our trigger fires. These variables will help us tell Google Tag Manager to record only add-to-cart clicks instead of all clicks.
In the Variables section, click Configure to decide what variables will appear when the trigger fires.

Scroll through the built-in variables until you find the section called Clicks. Check the boxes for all of these variables: Click Element, Click Classes, Click ID, Click Target, Click URL, and Click Text.

Inspect Add-to-Cart Click Variables
Refresh the Google Tag Manager Container and your website page. Now it’s time to identify our add-to-cart button click.
Click on Add to Cart, then examine the Click action recorded in Google Tag Manager. Under the Variables tab, we’ll see all the click variables that we just enabled.

In the case of our demo shop, you will notice that most of our click variables have empty values. However, there are two variables whose data values identify an add-to-cart button click: Click Classes and Click Text.

For this tutorial, we’re going to use the Click Text value ‘Add to cart’ instead of the Click Class value. This is because our shop probably has multiple add-to-cart buttons for different products, but they might not have this exact button class.
This ‘Add to cart’ value seems a bit more universal across all add-to-cart buttons. You can test this by clicking other add-to-cart buttons across your site to make sure they return the same value for your Click Text variable.
Define New Trigger for Add-to-Cart Clicks
With this variable in hand, let’s go back to Google Tag Manager. Under Triggers, click our All Clicks trigger to edit it.

We can change the name of this trigger now that it will track just add-to-cart clicks instead of all clicks. To specify these clicks, select Some Clicks and configure the trigger so that Click Class equals Add to Cart.
Make sure that you type the value exactly as it appears inside the single quotes in Google Tag Manager—it is also case-sensitive. Click Save.

Refresh your Container so that your trigger is live. Now, we can make a Tag for this trigger that will be reported to the Meta Pixel.
Create Add-to-Cart Click Tag
In the Container under Tags, click your FB – Pageview Tag to open it. Click the options button and select Copy as we did earlier.
Let’s name this FB – Add To Cart. Since Add to Cart is a Standard Event, we only have to edit the HTML code by replacing PageView with AddToCart (again, these are case-sensitive).
Our Base Pixel is already assigned as our set-up Tag, so now just change the trigger to our new Add To Cart – Clicks trigger and click Save.

Testing
To test this new Tag, refresh your Container and your web page. Let’s see what shows up in our tracking when we click Add to Cart on our product page.
If the Tag and trigger are configured correctly, a click trigger will be displayed and you will see a new Tag has been fired both in Google Tag Manager and the Meta Pixel Helper.
We should also be able to see our add-to-cart Tag in the Meta Events Manager. We can tell that Meta has recognized the Tag as a Standard Event because of the shopping cart icon next to the name instead of a Custom Event icon.
Set Up Meta Custom Event Tag
Now that we can add a Standard Meta Event, let’s set up a Custom Event for the Meta Pixel to track.
This time, we’re going to add an event that tracks when a user spends at least five seconds on a page, which can be more informative than a pageview.
Create New Tag
Under the Tags header, click New to create a new Tag, then click on Tag Configuration. We’ll call it FB – 5 Seconds.
Again, we want to use the Custom HTML Tag type for this event. However, because this isn’t a Standard Meta Event, we need to replace ‘track’ in the code with ‘trackCustom’. Then we’ll name our event in the code ‘5-Seconds’.

We also need to make sure our Tag sequencing is set up properly. Assign your Base Pixel Tag to execute as a set-up Tag before our timer Tag.
Remember that we don’t want to fire this Tag if the Base Pixel set-up Tag fails since this Tag will function incorrectly without the Base Pixel.

Create and Apply Timer Trigger
As our add-to-cart button clicks, a five-second timer isn’t a built-in Tag. That’s ok, though, because it is easy enough to customize one ourselves.
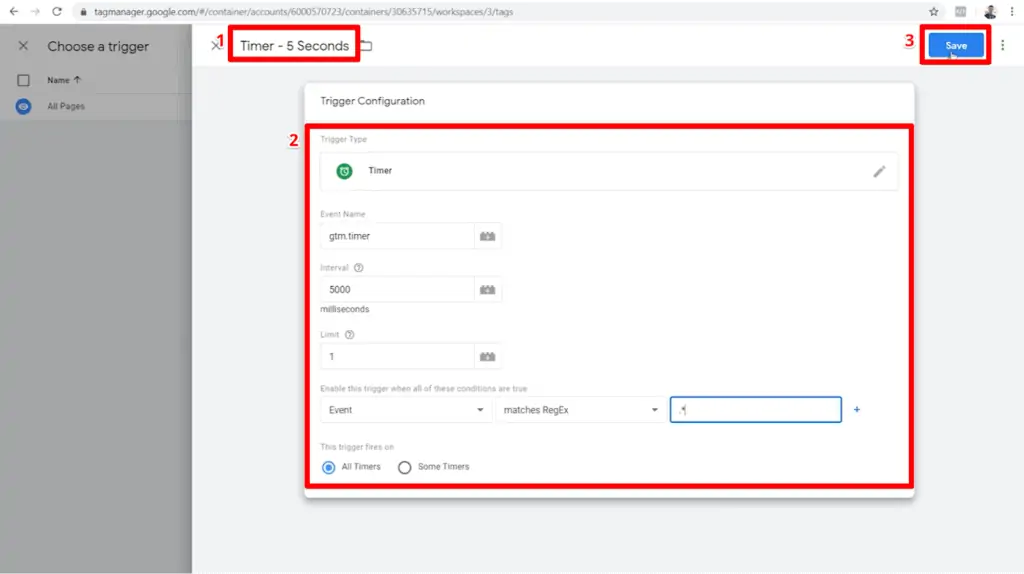
In the Tag configuration settings, click Triggering to see available triggers. Then, click the “add” icon to create a new trigger.
Let’s name our trigger Timer – 5 Seconds and select Timer for the trigger type. For the timer to count down five seconds, enter 5000 in the Interval field since it asks for milliseconds.
We only need this trigger to fire once per page, so set the Limit to 1. I want this trigger to fire in all pages and situations, so we will write this as Event matches RegEx .*
Click Save to attach this trigger to our Tag.
Now, we can click Save on our Tag configuration and refresh our Container to implement our new Tag.
Testing
Okay, let’s go back to the website, refresh the page, and see what happens.
In Google Tag Manager, we have our five-second event, our Base Pixel, and our Meta pageview. The Meta Pixel Helper shows the pageview, the five seconds, and some microdata.
Next, we’ll want to make sure that Meta is receiving the data that’s recorded here. Let’s go to the Meta Events Manager and select this pixel. Go to Test Events and click Clear Activity.
Refresh your website page, then wait for the Tag to fire and appear here in Meta Events Manager. If everything is debugged and working properly, you will see your five-second Custom Event here.
Top Tip: The Multi-Pixel Problem
Before we wrap up the manual installation portion of this tutorial, I want to show you an advanced trick. This solution will help you achieve accurate event tracking when using multiple pixels.
So far, we have only used one Meta Base Pixel. But sometimes you might need more than one Base Pixel to fire on a single page.
This could happen if you have multiple stakeholders or agencies involved with a website. Some of them might be doing brand advertising while others are doing performance marketing.
This means that they’ll each want to track different data with their own Meta Pixels. But each of these pixel accounts should initiate its own Base Pixel for the events they track to function properly.
To simulate this situation, let’s copy this Base Pixel. We’ll call it FB- Base Pixel 02 and change the pixel ID code. Click Save.
Now, if we preview the Container and refresh the page, you’ll see in the Meta Pixel Helper that we have two pixels initiated on this page.
Each pixel detected the pageview and five-second timer, but it seems that the pageview fired before the second Base Pixel finished executing.
Meta will say here that they detected the pageview event code, but no pixel was activated for it.
This data gets especially confusing because the five-second timer was still recorded by the second Base Pixel since it had time to finish executing before the event fired.
So you can already see that lots of things can go wrong when we have multiple pixels.
Some Tags may fire before the Base Pixel finishes loading, some Tags might fire to all pixels instead of just one, or some Tags could fail to fire to the pixel that they were supposed to find.
The Solution
Okay, so what’s the solution? We’ll have to rely on the code ‘trackSingle’.
If you take another look at our event tracking code, the piece from Meta starts with fbq(‘track’,. We can change this to fbq(‘trackSingle’, which tells this event to find a single, specific pixel.
We will include this specified pixel’s ID number inside single quotes and followed by a comma, then click Save.

Now the page view event will only fire to our first Base Pixel. You can make this same modification to most other event Tags using whatever Pixel ID you need.
There is a slight modification for Custom Events. For Custom Events like our five-second timer, we need to use the code ‘trackSingleCustom’, to send the event to a single pixel.
To demonstrate how to test this, I have modified the pageview, add to cart, and five-second timer to track exclusively to our first Base Pixel, even though we will have both Base Pixels initiated.
Let’s refresh the Container, go back to our website, and refresh the page. All three Tags have been recorded to just the first pixel.
You can change the HTML code for your Tags to send any event to different pixels without doubling them up or losing data.
3. Custom Tag Template
Our third method of installing the Meta Pixel tracking with Google Tag Manager uses Custom Tag Templates. This is a newer but incredibly useful technique that combines flexibility, power, and ease of use.
What Are Custom Tag Templates?
In 2019, Google Tag Manager introduced a new feature called Custom Templates. Custom Templates function for users the same as built-in Tags from Google Tag Manager.
But the difference is that anyone can create a Tag Template and share it with others via the Community Template Gallery. This means that you have access to a huge pool of experts who are solving current problems in real-time.
Why Use Them?
No Base Pixel Needed
The beauty of Custom Tag Templates is that they can automate Tag firing priorities, sequencing, and frequency.
Manual installation requires setting each of these up yourself for every individual Tag, and in the case of the Meta Pixel, this includes an additional Base Pixel Tag.
A Template simplifies this process and eliminates the need for a Base Pixel Tag.
The Template we use in this tutorial ensures that the Meta Base Pixel initiates before each event that you want to record. It also won’t fire extra times or before any other events.
In other words, you just have to create Tags for the specific events you want to track. Everything else is configured automatically to make sure that the Meta Pixel and Google Tag Manager work together.
Easy Multiple Pixel Set-Up
The other nice feature of the Custom Template we use in this tutorial is that the default setting is to track single. The Tag configuration includes your Meta Pixel ID as part of the setup, so it only fires the event to that specific ID.
You can easily include multiple IDs to receive tracking data from a single Tag, or you can send different Tags to different pixel IDs.
This is super useful and important if you have different audiences that you want to target. If you manage multiple sites, you don’t want to mix up the audiences and misdirect your advertisements.
Add Tag Template to Your Account
Now, let’s go to Google Tag Manager and start using Custom Templates.
If you go into Google Tag Manager and create a new Tag, you will see an option to Discover more tag types in the Community Template Gallery. Click on this to view and search through community-sourced Tag Templates.

In this tutorial, we’ll be using Simo Ahava’s Meta Pixel Tag Template, which quickly and easily implements the Meta Pixel using Google Tag Manager.
Simo Ahava contributes a lot of high-quality Templates to the community library, and he shares a lot of knowledge about Google Tag Manager and Google Analytics on his blog.
Check out his work if you’re interested in more creative solutions!
To find this Template, you can search for it by name: Meta Pixel. The creator will be listed as gtm-templates-simo-ahava.
When you click on it, you’ll be able to see all kinds of details about the Template, including a description, recent updates, and permissions that the Tag will need to function.
This is also where you can investigate who built the Template you want to make sure that you trust it. Google is pretty good about vetting Community Template Gallery submissions, but always do your reading just in case.
To add this Custom Template to our Container, click the Add to Workspace button.
Google Tag Manager will give you a popup just to make sure you know that the Template comes from a third party. Click Add to confirm that you want to add this Template to your Container.

Set Up Meta Pageview Tag
Working with this Custom Tag Template is easy. Let’s create a new Tag and see just how simple it is.
First, let’s give our new Tag a name. I use “CT” here for “Custom Template.” Select the Custom Template that we just added, and enter your Meta Pixel ID.
For now, select Standard for our event and choose PageView from the dropdown (we’ll look at Custom Events in a moment).
Since we want to see all pageviews, we’ll set the firing trigger to All Pages. Click Save and we’re done!

Now that we have a pageview Tag set up with our Custom Template, let’s test it on our website. Refresh the Container, then go to your website and refresh the page.
If everything is configured correctly, Google Tag Manager and the Meta Pixel Helper will show that our Meta Pixel Custom Template Tag has been fired. Just like that, we have a fully-functioning Tag using a Custom Template.
Set Up Other Meta Event Tags
To demonstrate how easy it is to expand your setup, let’s make two more Tags: one Standard Event and one Custom Event.
In Google Tag Manager, open your newly minted pageview Tag. Click the three-dot options menu icon and select Copy.

This will make a new Tag that is configured the same as our pageview Tag.
Let’s rename this copy so that we know it records add-to-cart events, then choose AddToCart from the Standard Event dropdown. Change our trigger to fire on Add To Cart – Clicks and click Save.

Next, we’ll copy this Tag again to set up a Custom Event. Let’s make a Tag that records when a user has been on a page for at least five seconds.
Name your new Tag, select Custom for the event name, and type in a unique name for this event. For the triggering, we can use a timer trigger that fires after five seconds. Click Save and you’ll have a Custom Event.

Now that we have three Tags using the Custom Template, let’s refresh the Container and refresh the website page. Click a product’s add-to-cart button to make sure you fire that Tag.
In Google Tag Manager and the Meta Pixel Helper, we should see our Tags recorded for the pageview, five seconds of viewing, and add to cart.
Extra Features
Now before we wrap up this tutorial, I want to show you two other features that this particular Custom Tag Template has that are difficult to accomplish through manual tracking.
Disable Automatic Configuration
Under More Settings in our Tag configuration, we can disable the automatic configuration. This disables the Meta Pixel’s ability to automatically collect metadata, which you saw labeled as microdata in the Meta Pixel Helper.
Disabling automatic configuration will stop all of your Meta Pixel’s attempts to detect button clicks and other page context, which we mentioned earlier can be unreliable. If you check this box, it will disable that functionality.

Wait for the GDPR Consent Option
This Custom Template also has a setting that allows you to hold an event from being fired until the user gives tracking consent. You will notice that the initial setting for this field is True.
If you set it to False, it means that by default, we do not assume that the user has consented to be tracked by Meta. In this case, the Tag will fire but it will not be executed; it will wait until another Tag with consent granted (set to True) fires.

When set to False, the Tag will queue and wait until the user gives consent either by clicking “I accept” or “I agree” or whatever consent button you have on your site.
Then, when the user consents to tracking, all the queued events will fire and be recorded to Meta.
This is good for compliance purposes, especially with GDPR when you need to get users’ explicit consent before doing any marketing tracking.
🚨 Note: If besides Meta you’re also running ads on TikTok, be sure to learn how to set up TikTok event tracking with GTM.
Creating FB Custom Conversion Using Events
Let’s take a quick look at how we can use the events you’ve tracked in the Meta Events Manager to create Custom Conversions.
To create a Custom Conversion, we can click on Custom Conversions in the sidebar, then click the Create Custom Conversion button.
In the configuration settings, select which event you would like to use for your conversion. In this case, I’m going to choose the add to cart as my Custom Conversion.
For the Rule, we’ll record this conversion whenever the URL contains demo-shop. I’ll name it Add To Cart and click Create.

Once you’re done, you can click on the conversion and take a look at how many times the conversion has occurred. You can use this data to optimize your campaigns like you would with any other conversion data.

Summary
In this tutorial, we covered three different methods of Meta Pixel tracking with Google Tag Manager.
The first one was automatic installation. This is remarkably quick and easy to set up. It’s limited in its tracking capabilities and can disrupt a Container-in-progress, but it’s great for pageview tracking if you have an empty Container.
The second one was manual installation. This method is the most powerful and customizable, but it can be challenging to execute. There are a lot of small, detailed steps to set up and test things like Tag sequencing and tracking with multiple pixels.
It may not be for the faint of heart, but if you’re comfortable working with Google Tag Manager, you can customize it exactly how you want.
The third and final method was using Simo Ahava’s Custom Tag Template. It grants just as much flexibility and power as manual installation, but it is much quicker and easier to set up.
Custom Templates are the most user-friendly way to track all kinds of events with the Meta Pixel.
If you pick one method and stick to it, then you’re in great shape when it comes to using the Meta Pixel with Google Tag Manager. You should be able to accomplish all of your website tracking needs.
If you learn all three methods, you’ll be an expert on using the Meta Pixel with Google Tag Manager.
You’ll be able to customize your solutions and advise others, and you’ll always feel confident that you’re using the best possible approach for each job.
There’s always more to learn with the Meta Pixel! If you want to learn a few more tricks, check out these tutorial posts:
- How to Set Up Meta Pixel (Facebook Pixel) with Google Tag Manager
- How to Fire Multiple Meta Pixels on the Same Page with Google Tag Manager
- Meta Pixel Scroll Tracking with GTM
- Meta Pixel Conversion Tracking with GTM
Do you have other recommendations for installing the Meta Pixel with Google Tag Manager? Have you encountered other challenges without a solution yet? Let us know in the comments!
FAQ
How do I create a Custom Event Tag, such as a timer for tracking when a user spends at least five seconds on a page?
To create a Custom Event Tag like a timer for tracking user engagement, you need to create a trigger that fires after a certain time interval. In Google Tag Manager, create a trigger with a timer type and set the interval to five seconds. Configure the trigger to fire once per page. Then, create a new Tag with the HTML code for the Custom Event, assign the trigger to it, and save the settings.
How do I create a new Standard Event Tag, such as the “Add To Cart” event, with Google Tag Manager and the Meta Pixel?
To create a new Standard Event Tag like “Add To Cart,” you need to create a trigger to identify the button click associated with the event. In Google Tag Manager, create a trigger for the specific button click, enable click variables to record relevant information, and configure the trigger to match the click class or text of the “Add To Cart” button. Then, create a new Tag, specify it as a Standard Event Tag with the appropriate HTML code, and assign the trigger to it.
How do I set up Tag sequencing for the Meta Pixel with Google Tag Manager?
To set up Tag sequencing, open the configuration settings of your pageview Tag in Google Tag Manager. Under Advanced Settings, enable Tag Sequencing and select the Base Pixel Tag as the set-up Tag. Additionally, you can choose to not fire the pageview Tag if the Base Pixel fails. Save the settings to set up Tag sequencing.
How can I ensure accurate event tracking when using multiple Meta Pixels?
When using multiple Meta Pixels, it is crucial to specify the pixel to which each event tag should be sent. To do this, modify the event tracking code by replacing fbq('track') with fbq('trackSingle') and including the ID of the specific pixel inside single quotes followed by a comma. This ensures that the event is sent only to the designated pixel. Make the same modification for Custom Events by using fbq('trackSingleCustom'). By doing so, you can avoid issues where Tags fire to the wrong pixels or duplicate data.
What are Custom Tag Templates in Google Tag Manager, and why should I use them for implementing the Meta Pixel?
Custom Tag Templates are a feature in Google Tag Manager that allows users to create and share Tag Templates with others. They automate Tag firing priorities, sequencing, and frequency, simplifying the implementation process. When using Custom Tag Templates for the Meta Pixel, you don’t need a separate Base Pixel Tag, as the Template takes care of initiating the Meta Base Pixel and ensuring proper Tag firing.


")
Hi Julian,
This is the best video on GTM/Facebook I’ve seen.
Simple and comprehensive.
I’ve learned a lot from this now.
As you mentioned, a lot to take in within a short span.
Thank you for this!
There is no video on this page..
Congrats Julian for this awesome and insightful video! Just already applied some of the tips there