
Last Modified on January 7, 2025
Do you want to start measuring user activity with GA4 events?
There are several event types available in Google Analytics 4. Two types are collected automatically, while the other two require additional implementations to see them in your reports.
In the latter group, we have recommended events and custom events. How do you differentiate the two? We’ll figure it out by learning how to track recommended events in GA4.
We’ll also cover how to send parameters together with your events so that you can measure some additional features and generate more insights with your reports.
Before we start, ensure you have implemented Google Tag Manager and Google Analytics 4 on your website.
Here is an outline of what we’ll cover in this guide:
- GA4 Events Overview
- Adding Parameters
- Starting the Implementation
- Testing the Implementation
- Publishing the Implementation
Let’s get started!
GA4 Events Overview
To start, let’s talk a bit about GA4 event types.
There are four event types in GA4: automatically collected events, enhanced measurement events, recommended events, and custom events.
To better understand the differences between each type, let’s refer to their official definitions in the GA4 events documentation.
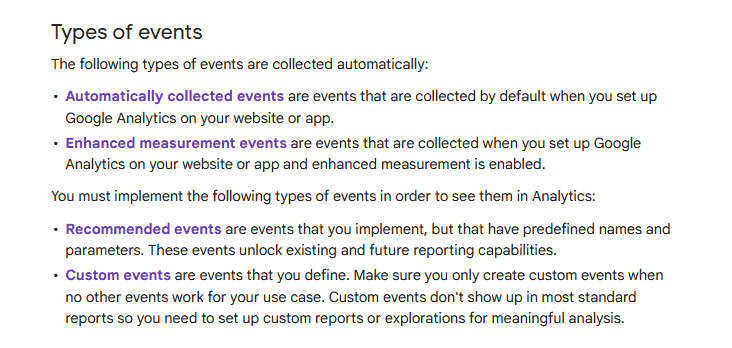
Automatically collected and enhanced measurement events, as the names imply, are collected without doing much. All you need to do is install GA4 on your website and ensure that you have enabled enhanced measurement during setup.
On the other hand, recommended and custom events require your implementation before GA4 collects them. In this session, we’ll focus on how to track recommended events in GA4.
While we need to configure them, this event type has predefined names and parameters that help unlock existing and future reporting capabilities. Why have those names at all if we still need to implement them manually?
Working with Google Analytics 4 requires appropriate communication. For the tool to understand you, you need to feed it with the correct data.
Google has been heavily investing in machine learning. While there have been significant developments, we haven’t reached the point where implementations have been simplified. You cannot just input anything for the tool to understand what you want to do.
Algorithms still require you to use the names that Google suggests so that they understand what you need them to do. Even for custom events, there are still grammar rules we need to follow.
Keep in mind that GA4 events use the snake_case naming convention. Take note of this when naming your events and parameters.
Adding Parameters Based on Google Documentation
Let’s start our implementation to track recommended events in GA4.
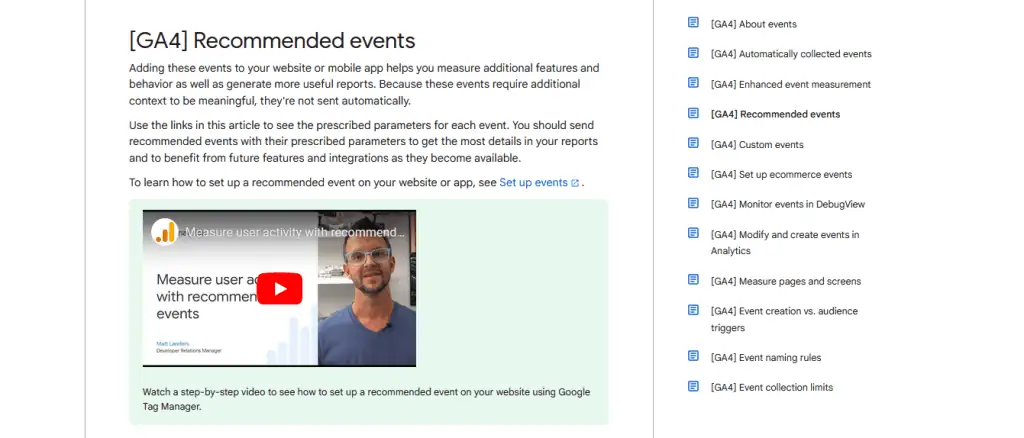
Before implementing any event, you should always check the GA4 recommended events documentation and see if the event you want to track is listed.
For our case, we have a sign-up form that we want to track. After checking the list of recommended events, the sign_up event is under the for all properties section.
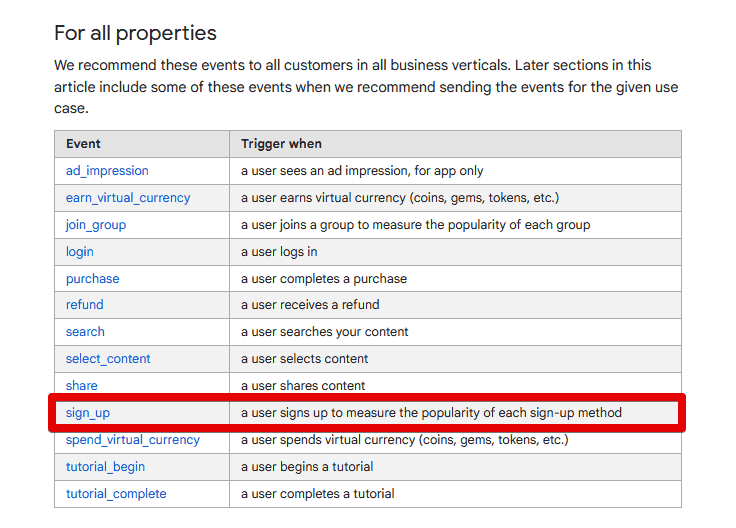
Great. We can use this name when we create our event.
Clicking on the link leads us to the developer page. Here, we’re given more details on the event, the parameters you can send with it, and an example of how you can implement it.
For our sign_up event, we can also send the method parameter.
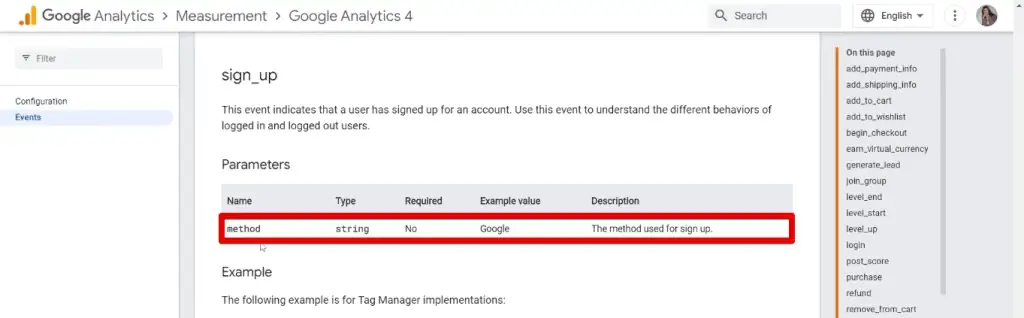
Any parameter that Google recommends you send with your events, while great to have, is not required. You can configure your event without a parameter.
However, if you want to send additional information about your event, you could do so with the help of parameters. These are data points that describe your event better.
To sum up, start looking at the GA4 recommended events documentation for the recommended event names and parameters you can use to track recommended events in GA4.
Starting the Implementation
Now, we’ll move to the implementation. First, we need to check and test out how our form works.
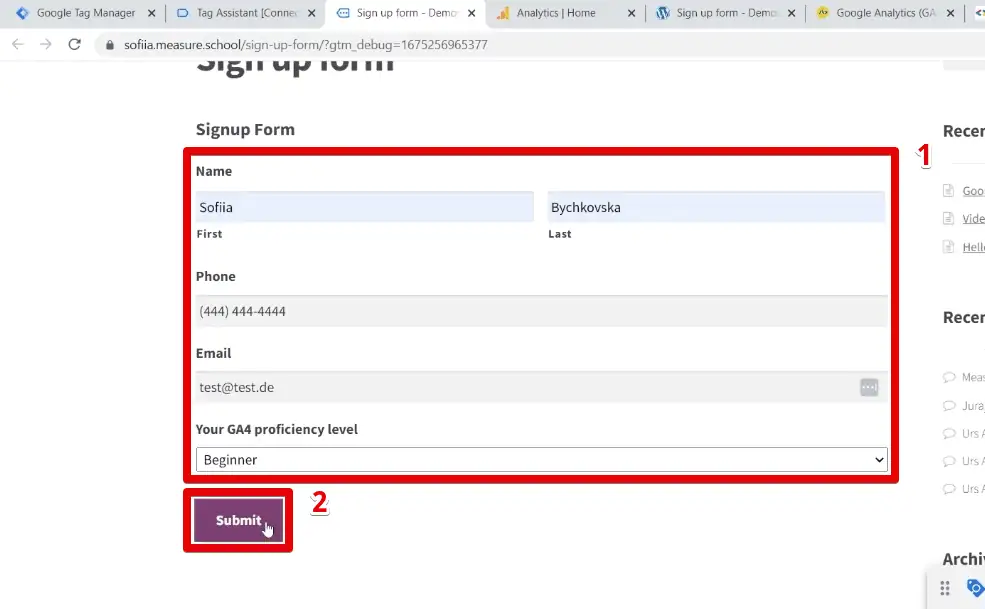
Input sample information to your sign-up form, then click Submit.
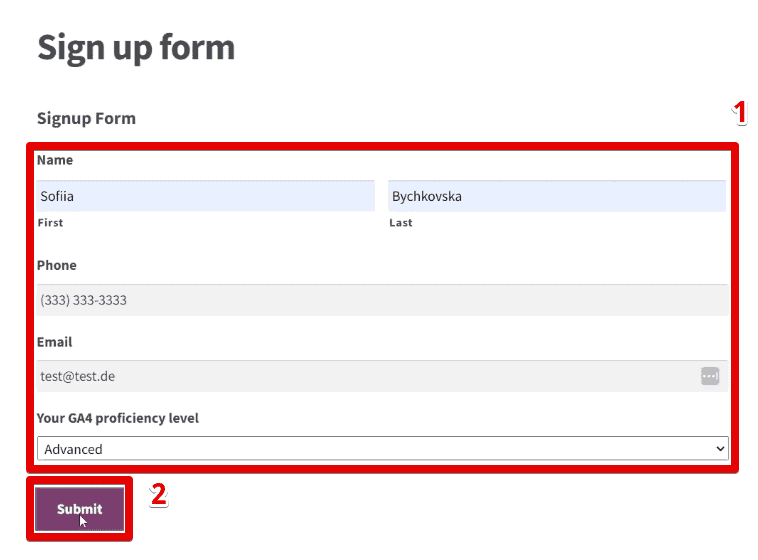
The goal is to determine how the form behaves after a form submission, which informs the kind of trigger to use in tracking our sign-up form.
💡 Top Tip: Check out our guide on the 3 Form Tracking Techniques with Google Tag Manager to learn the three possible behaviors of form submission.
For our example form, we are lucky because we are redirected to a success page once we have submitted the form.
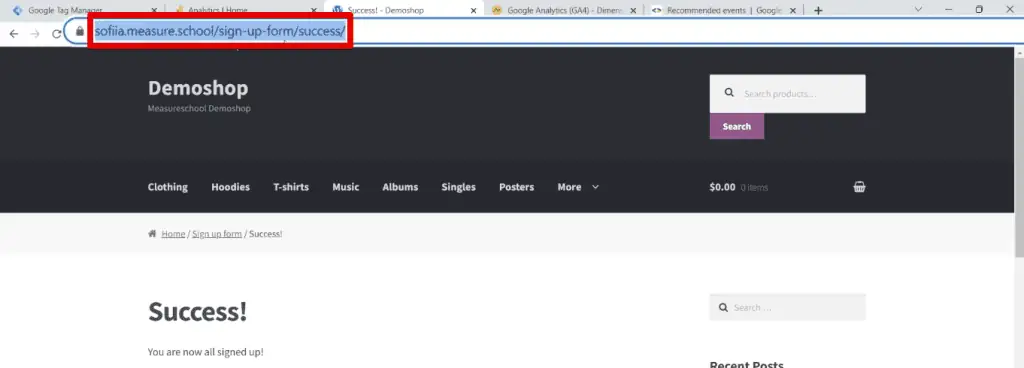
Each time a user submits a form, they get redirected to this page and we could easily track this URL. Copy this page path.
🚨 Note: Before proceeding, ensure you have created a Google Tag that replaced the old GA4 configuration tag in your Google Tag Manager account.
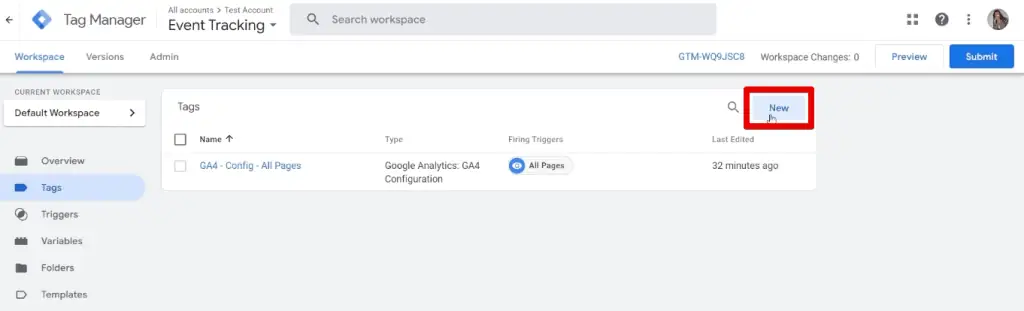
Go to your Google Tag Manager account and create a New tag.
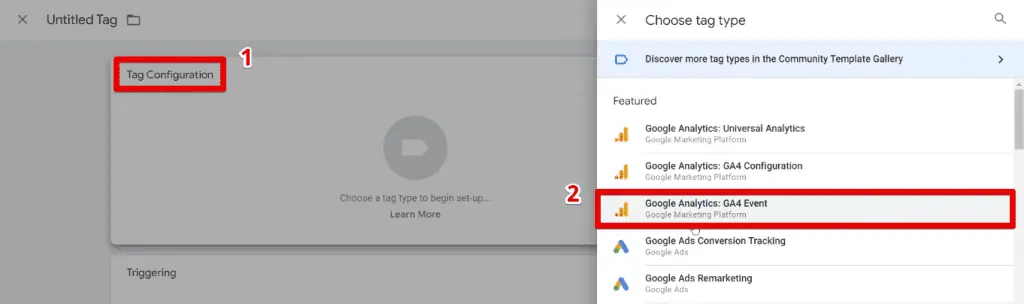
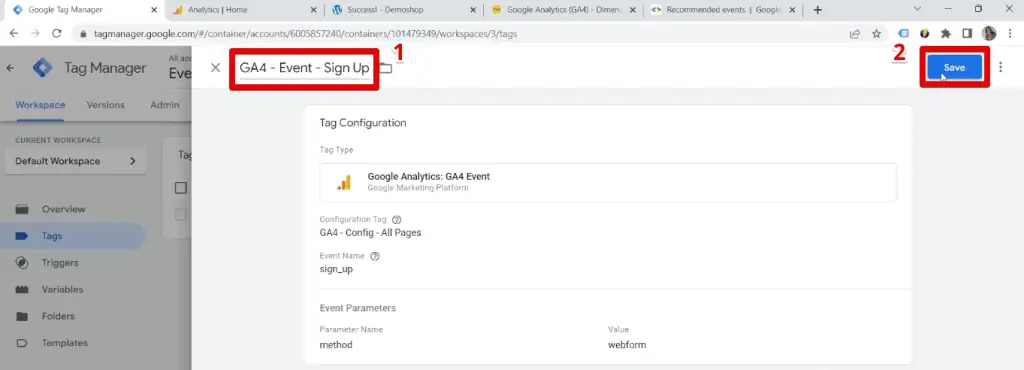
Next, click on Tag Configuration → Google Analytics: GA4 Event.
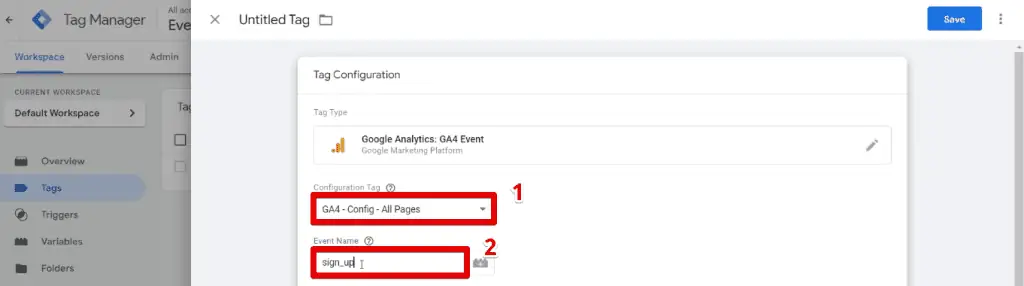
We need the GA4 configuration tag and an appropriate event name to set up our event tag.
To make a configuration tag, you only need the measurement ID. Next, make sure to set the firing trigger for all pages. Next, use the recommended event name from the official documentation.
Select the GA4 configuration tag we made, then type our sign_up event name.
Next, add the Event Parameters. For a sign_up event, we’ll also send the method parameter. For this specific form, set its value to webform.
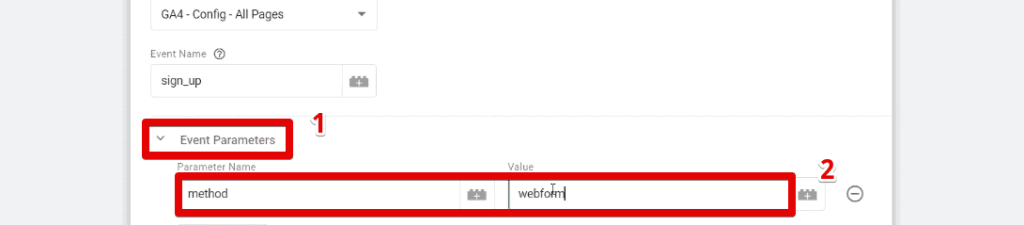
You can provide any value you want, but we recommend setting one that helps you easily distinguish this form if you have multiple sign-up forms. Since we are working with analytics, we should provide proper names that are useful for our analysis.
Next, configure our trigger by clicking on Triggering.
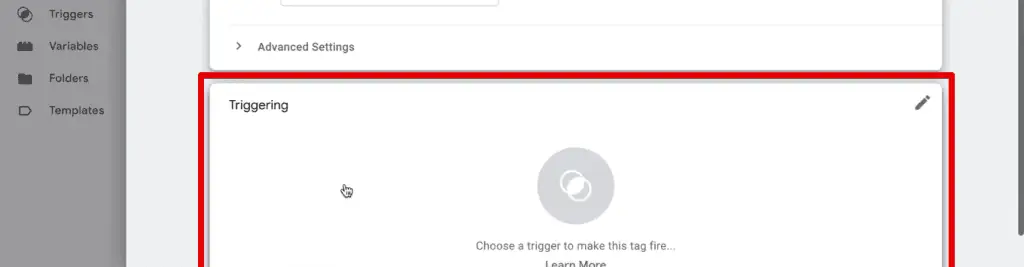
Create a custom trigger by clicking on +.
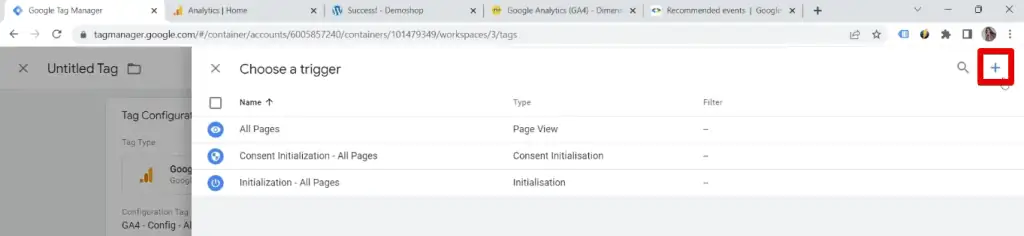
Since our form redirects to a specific page, utilize a trigger based on the URL.
Click on Trigger Configuration → Page View.

Then, set the trigger to fire on Some Page Views. The condition is when the Page URL contains the page path of our redirect page. In our case, it is sign-up-form/success.
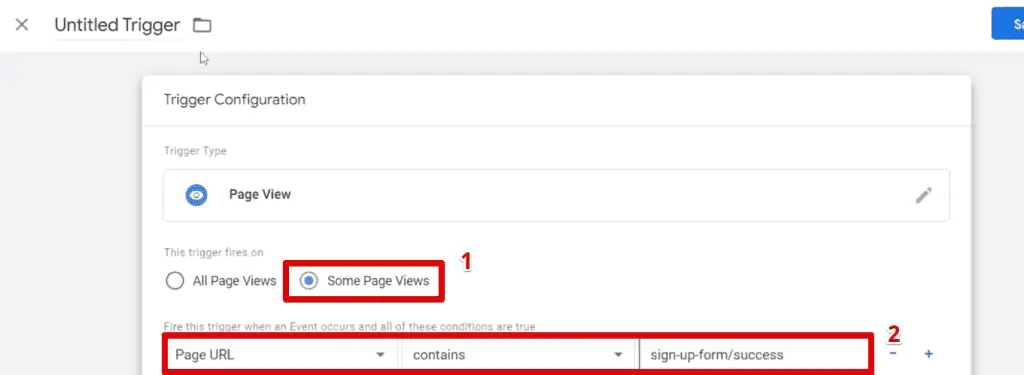
Provide a name for the trigger, then click Save.
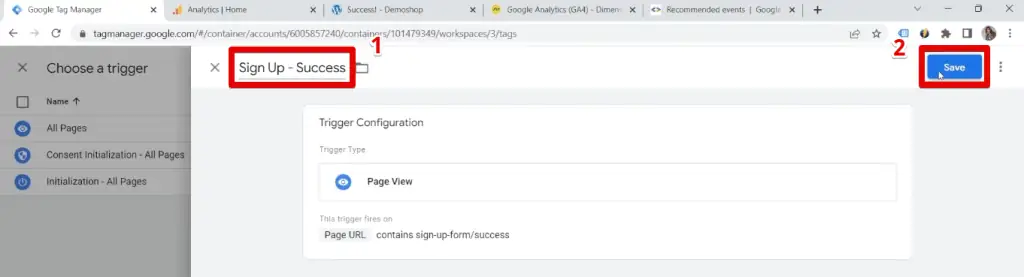
Finally, also provide a name for the tag, then click Save.
🚨 Note: It’s good to have a naming convention, especially if many people are working on the project, to keep everything clean and tidy.
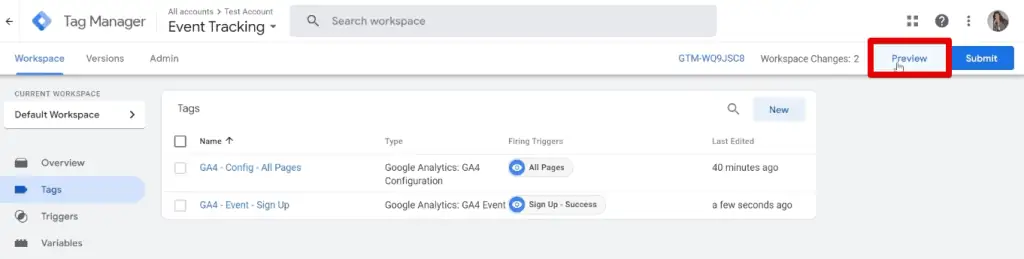
To ensure that we can track recommended events in GA4, we must test and see if our implementation works.
Testing the Implementation
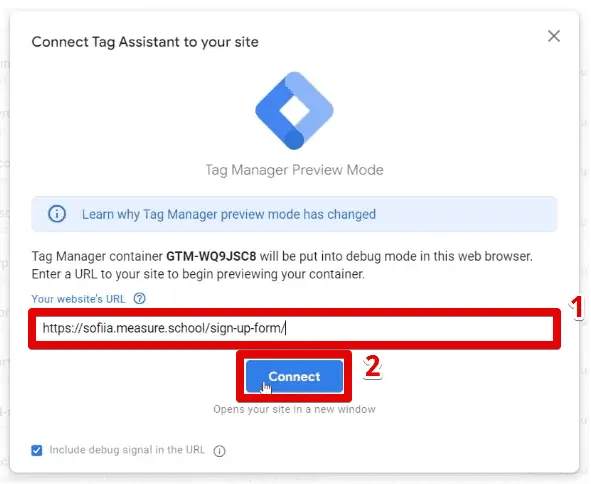
To begin, click Preview.
Go back to our website and copy the link for the sign-up form.
Paste this URL to the Tag Assistant, then click Connect.
In the tab connected to the Tag Assistant, fill in your form again. Then, click Submit.
Testing your implementation is crucial. It is essential to verify if everything works when you want to track recommended events in GA4.
In the Tag Assistant, the sign-up event tag has fired successfully.
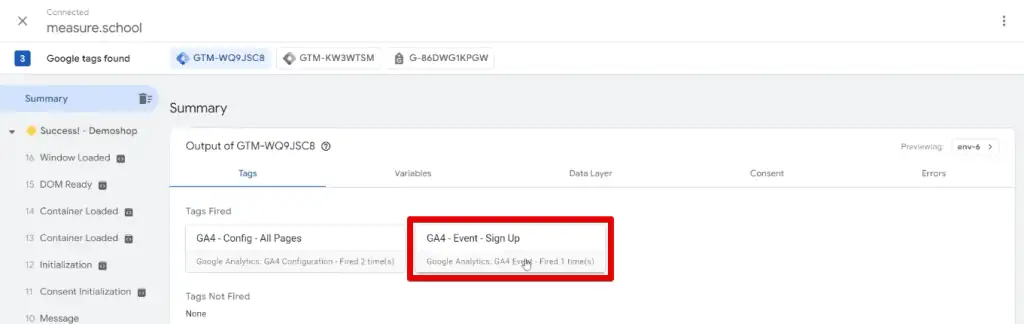
For our final check, we need to verify if the event was sent to our Google Analytics account and if it is in DebugView.
Go to the Admin section → DebugView. Here, we should see our sign_up event.
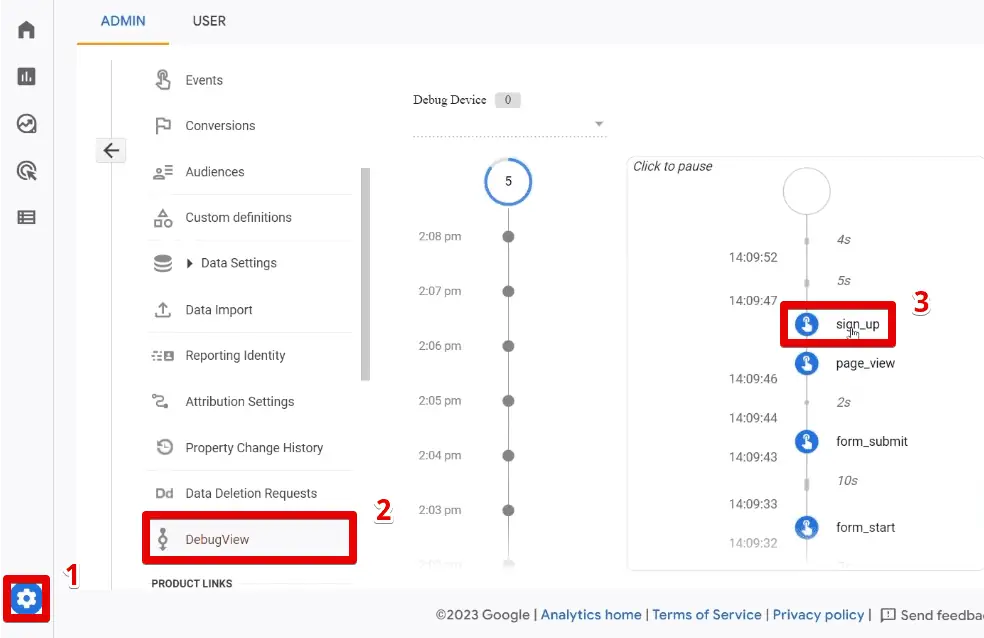
Clicking on our sign_up event lets us see the parameters that came with it. Here, we can see that the method parameter has the webform value.

Well done! We have managed to configure our sign_up event correctly.
Publishing the Implementation
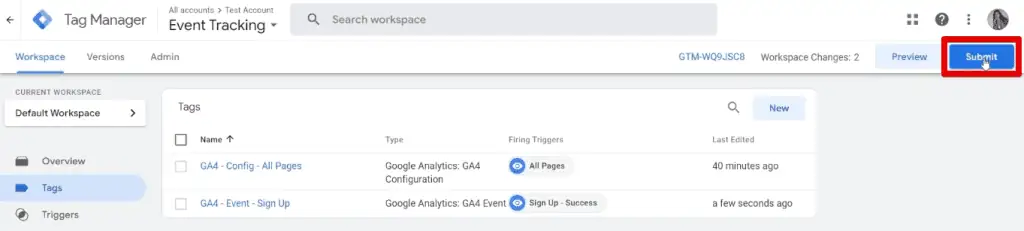
Go back to Google Tag Manager, and click Submit.
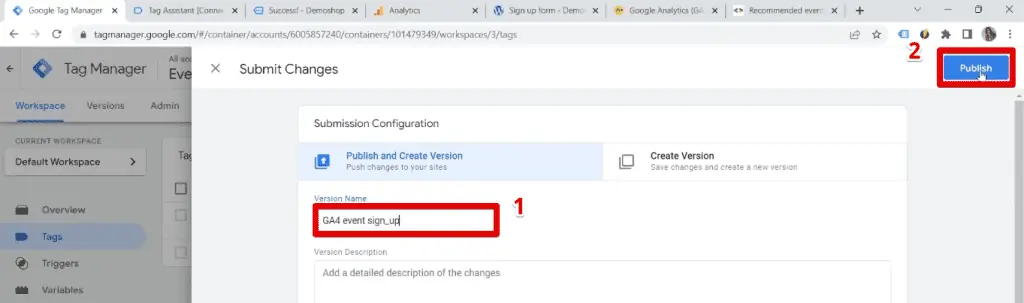
Provide a version name, then click Publish to make our changes live.
You should now be able to track recommended events in GA4. Now, should we register this parameter as a custom definition in GA4?
Logically, all recommended parameters should be available in your reports since Google encourages you to use them, right? Well, it is preferable to double-check.
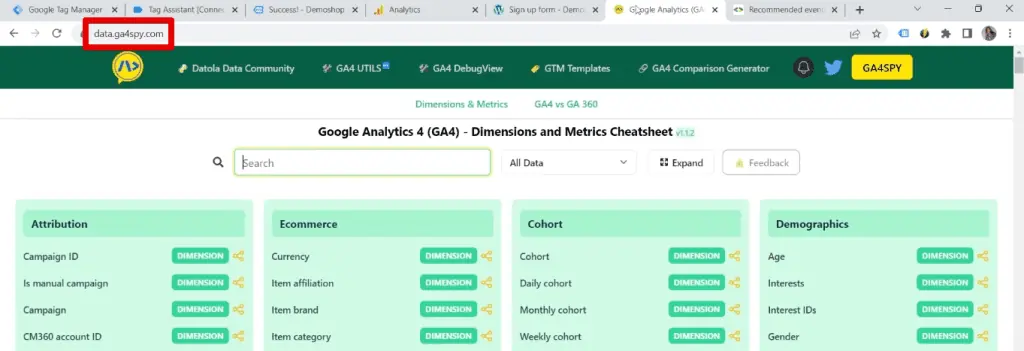
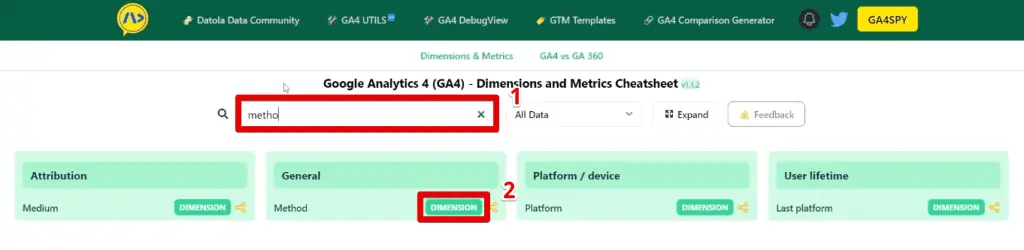
We recommend using the GA4 dimensions and metrics cheat sheet by GA4 Spy for this situation. We’ve been working with this tool daily because it’s impossible to keep everything in mind and remember all the parameters, dimensions, and metrics.
Go to data.ga4spy.com to access the cheat sheet.
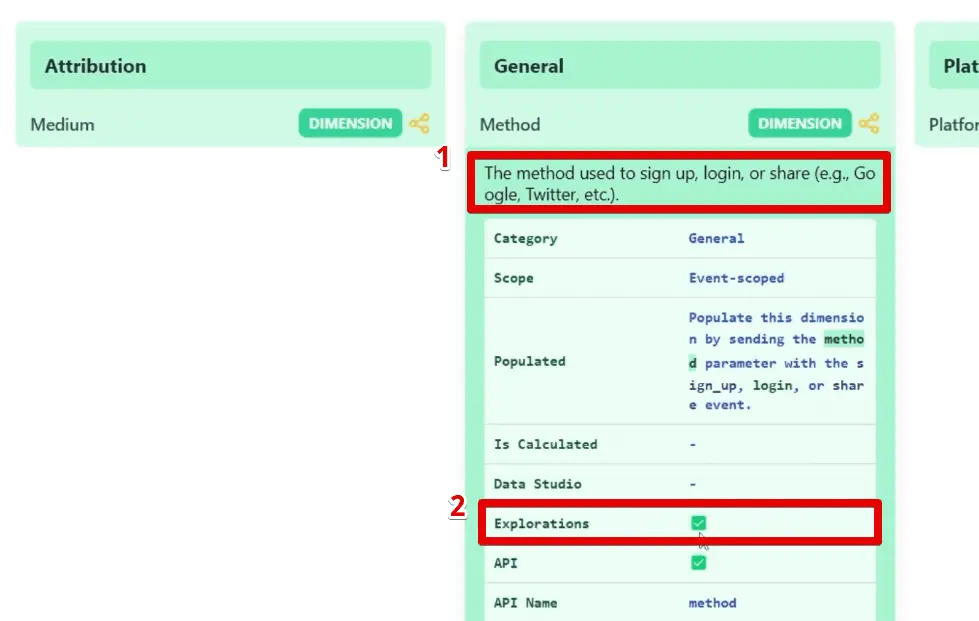
Here, look for our method parameter. Under general, click on the Dimension button next to method.
Clicking on this opens a panel showing the definition and other pertinent information like the scope, how it’s populated, etc. For our case, we can see that the method parameter should be available in the Explorations as a dimension.
Check our exploration reports and see if this parameter is there.
Go to the Explore section, then create a Blank exploration.

Under dimensions, click on +.
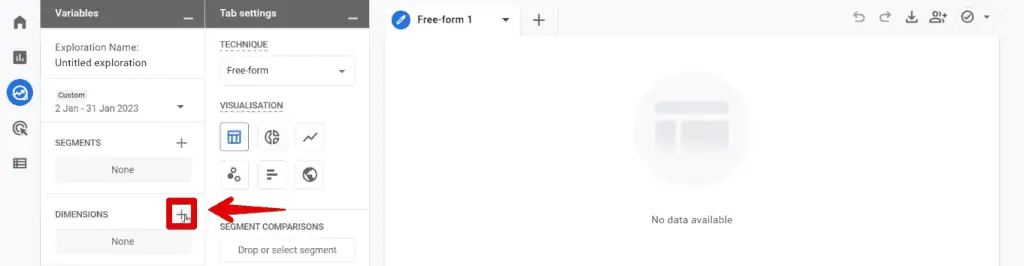
If we search for “method,” we can see that the Method parameter is available under the General category. To add this to the report, select it, then click Import.

🚨 Note: It will take some time after implementation for the event to be available in GA4. It can take up to 24 hours, but you can use the events eventually in your exploration reports.
FAQ
What is the difference between recommended events and custom events?
Recommended events and custom events require your implementation before GA4 collects them. Recommended events have predefined names and parameters provided by Google, while custom events allow you to define your own names and parameters.
Can I send additional parameters with recommended events?
Yes, you can send additional parameters with recommended events to provide more information about the event. These parameters are optional but can enhance your analysis and reporting.
How can I check if a recommended parameter is available in my GA4 reports?
You can use the GA4 dimensions and metrics cheat sheet by GA4 Spy to check if a recommended parameter is available. The cheat sheet provides information about dimensions, metrics, and parameters in GA4. You can also explore your reports in GA4 to see if the parameter is available as a dimension or metric.
Summary
How to Track Recommended Events in GA4 (Steps Summarized)
- Check GA4 Setup:
- Ensure Google Tag Manager and Google Analytics 4 are implemented on your website.
- Consult GA4 Recommended Events Documentation:
- Verify if the event you want to track is listed in the GA4 recommended events documentation.
- Note any parameters that Google suggests for the event.
- Identify Event Behavior:
- Test your form or event on the website to understand its behavior.
- Determine the page or action that occurs after the event (e.g., redirect to a success page).
- Create a GA4 Event Tag in Google Tag Manager:
- Go to your Google Tag Manager account.
- Create a new tag and select Google Analytics: GA4 Event.
- Enter the GA4 configuration tag and use the recommended event name (e.g.,
sign_up).
- Add Event Parameters:
- Add any recommended parameters (e.g.,
methodwith the valuewebform).
- Add any recommended parameters (e.g.,
- Set Up the Trigger:
- Create a custom trigger based on the URL or specific action.
- For a success page redirect, use a Page View trigger and set the condition to fire on some page views where the Page URL contains the success page path.
- Name and Save the Tag and Trigger:
- Provide descriptive names for the tag and trigger.
- Save the tag and trigger configurations.
- Test the Implementation:
- Click Preview in Google Tag Manager.
- Fill out and submit the form on your website.
- Verify in the Tag Assistant that the event tag fires correctly.
- Check GA4 DebugView to ensure the event and parameters are recorded.
- Publish the Tag:
- In Google Tag Manager, click Submit.
- Provide a version name and click Publish to make the changes live.
- Verify Parameter Availability in GA4 Reports:
- Use the GA4 dimensions and metrics cheat sheet (e.g., GA4 Spy) to confirm the parameter is available.
- Check the Explore section in GA4 to see if the parameter can be used in reports.
Great! Those are the steps to follow to track recommended events in GA4. We should always begin checking the recommended events documentation to see if the event you want to track is there with the parameters you can send along with it.
Next, you create a GA4 event tag in Google Tag Manager with a trigger suitable for the event you want to tack. Finally, test the implementation before publishing it live on your website.
What if the event you want to track is not a recommended event? Check out our guide on How to Track Events with GA4 and GTM to learn how to track custom events.
Which recommended events would you like to track on your website? Do you send all recommended parameters, as well? Let us know in the comments below!


")