
Last Modified on October 23, 2024
This is a guide on using a free plugin called Google Tag Manager for WordPress made by Thomas Geiger.
Learn how to install Google Tag Manager on WordPress and how to use all the built-in configurations of the plugin in this guide.
The Google Tag Manager for WordPress Plugin is on of my favorite plugins to use to install Google Tag Manager (GTM) on WordPress. It is packed with functionalities to enhance your tracking deployment including alot of Data Layer options.
In this guide, I’ll take an in-depth look at Google Tag Manager for WordPress, and I’ll also cover some more advanced topics like the Data Layer.
So if you’re on WordPress and want to install GTM, you may want to give this powerful plugin a try.
An overview of what we’ll cover in this guide:
- How to install the GTM for WordPress plugin
- Creating a Data Layer with the plugin
- Exploring some Data Layer options
- Advanced plugin features
- Blacklisting tags
There are tons of features inside of the plugin and I’ll go through almost all of them, so let’s get stuck in.
Create a GTM Container
I’m going to use a demo e-commerce store, which is running on WordPress Woocommerce and I’ve already created a brand new Google Analytics account to track the page views of this website too.
Then I’m going to create a new Google Tag Manager container, add a Google Analytics tag in it and then we are going to use Google Tag Manager for WordPress plugin to add this container to this eCommerce shop that is running on WordPress.
Let’s create a GTM account.

I’ll name it Ahmad’s demo shop and the container name would be Ahmad’s demo shop – Woocommerce. And select Web container.

Now click on Create, read and (eventually) accept the terms and proceed.
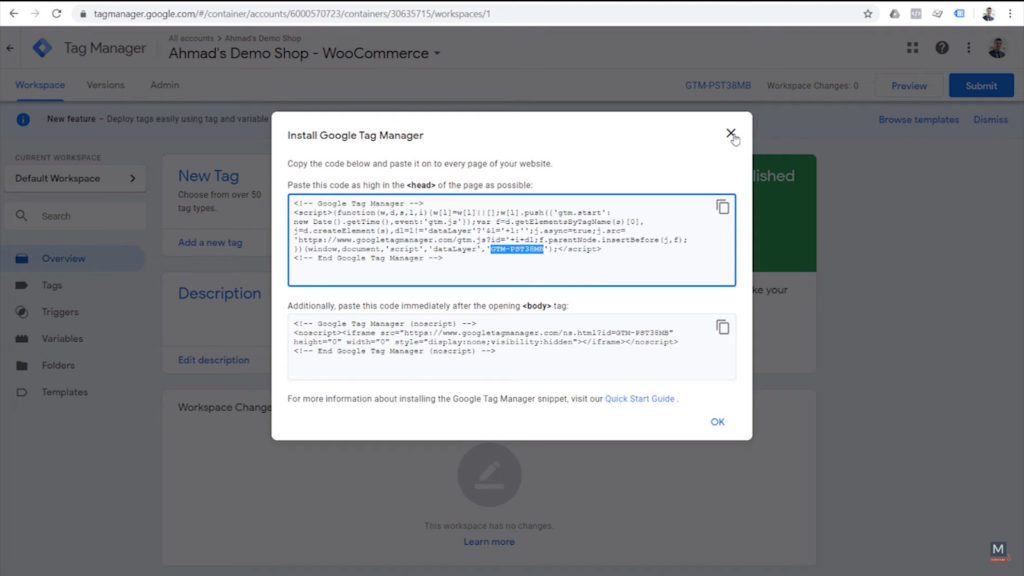
After doing that, a popup will come up with the snippets we would need to insert in our website’s code. But since we are going to use a plugin, we only need the container ID, which we will need later on, so we can close this window for now.
Let’s first add the Google Analytics tag and publish the container.
Creating a Google Analytics Tag and Publish
I’m going to create a new tag and name it GA – Page View.

Click on the Tag Configuration area, and select Google Analytics Universal Analytics tag type.

Select Pageview, as the Track Type.
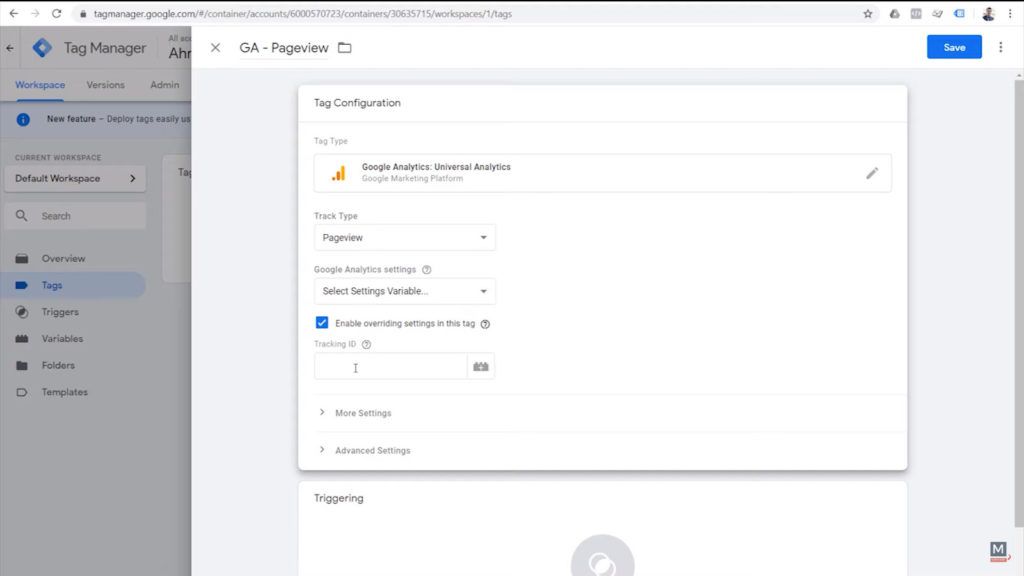
For the Google Analytics settings add your Google Analytics Settings Variable, if you don’t know how to set this up, check out this video below.
Alternatively, just grab your Google Analytics tracking ID from Your Google Analytics Admin area.
At the bottom left, click on the gear icon.

Click on Property Settings.

And here we have the Google Analytics Tracking ID.
Now we can go back to Google Tag Manager and paste it into the Tracking ID field of our Tag Configuration.
Now click on the Triggering section, and for the Trigger we select All Pages.

Now we can save.

Now we can publish the container. Click on Submit, and add a version name, which we’ll call GA – Pageview.

Always add a version name when you’re publishing a container. It just helps everyone to figure out what has been done on the container.
How to Install and Setup the Google Tag Manager for WordPress Plugin
Steps to installing and setting up the Google Tag Manager for WordPress plugin summarized:
- In your WordPress admin panel, go to Plugins → Add New.
- Search for “Google Tag Manager for WordPress” by Thomas Geiger.
- Click Install Now and then Activate.
- Go to Settings → Google Tag Manager.
- Enter your Google Tag Manager container ID.
- Configure additional settings as needed (e.g., data layer options, and integration with other plugins).
Find and Install the Plugin on WordPress
Now that our container is ready, we go back to the demo store, go to the admin area and add the Google Tag Manager for the WordPress plugin.
We’re gonna navigate to plugins, and click Add New.

Search for it: Google Tag Manager for WordPress by Thomas charger.
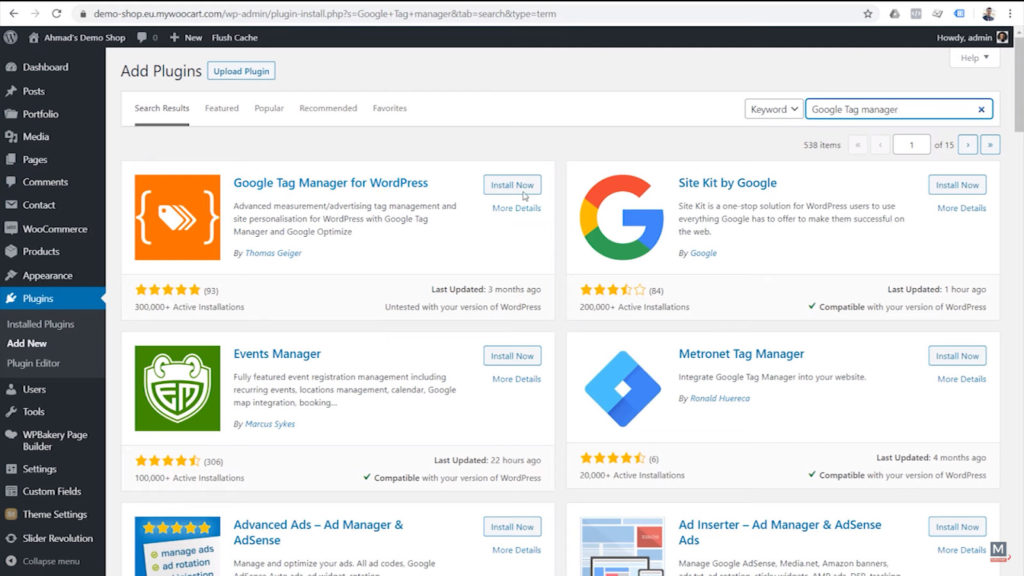
Click Install, and then once it’s done, click on Activate.
GTM Plugin Settings Configuration
Once our plugin is activated, let’s navigate back to our Plugins area and go to the Google Tag Manager for WordPress Plugin Settings.

And the first thing we need to configure for this plugin is that we need to add our Google Tag Manager ID.

Adding Your Google Tag Manager ID
Now, we have to go back to Google Tag Manager, go to Admin and click on Install Google Tag Manager

Here we can grab the GTM ID. We don’t need all of the code.

The plugin actually does most of the heavy lifting and will add those pieces of code in the head section and in the body section of your pages. We just need to give the plugin the Google Tag Manager ID and it will take care of the rest.
Now we can go back to our plugin settings in the admin area, paste the ID and save the changes.

Testing that the Plugin correctly works on WordPress
Now, let’s verify that the Google Tag Manager container has actually been added to the website. Let’s navigate to Google Tag Manager Workspace and preview the container.

Now we navigate our website and refresh the page. We should be able to see the GTM Preview mode.

This shows that the Google Tag Manager container has been added to this website and is loading on this page. Our Google Analytics Page View tag has been fired one time, which is good.
We can also go to the Google Analytics Real-time Overview interface and check the real-time view to verify that Google Analytics is actually receiving the hit that was sent to Google Tag Manager.

Now, if you just want to use this plugin to add a Google Tag Manager container to your WordPress or eCommerce website, that’s it. You don’t need to do anything else. It works and it works reliably.
But the actual power of this plugin comes from everything else that it can do other than just injecting a Google Tag Manager container on your website. It can actually put many types of useful information into the Data Layer. Let me show you.
Google Tag Manager for WordPress Plugin and the Data Layer
What is the Data Layer?
Here we have a full article talking about the Data Layer, but I’m going to give you a quick introduction to the topic.
The Data Layer is a repository of structured data that gets automatically created by Google Tag Manager when you install it. In it, you can store data that comes from your backend system or databases (e.g. Is the user logged in?).
This data is usually not visible on the page, it lays in the background (in a data layer) and is accessible to GTM to use that data in Tags, Trigger, and Variables.
Why is it Important?
Some data is not available to Google Tag Manager by default (like revenue). With the Data Layer, you can provide data explicitly to GTM and it can be used in several ways:
1. Tags
Include Data Layer information in your tags to send it to your tracking tools and enable extra features. E.g. in Google Analytics, you will be able to use eCommerce Tracking with the correct Data Layer information
2. Triggers
Data Layer information can be used in Triggers to make a decision to fire or not fire a tag. This is a crucial way to be able to segment data in your Analytics tool later. E.g. fire a retargeting tag only for logged-in users.
3. Variables
Variables are placeholders in GTM. You can utilize Data Layer information in these Variables (most commonly a Data Layer Variable) and include them into your tags or Trigger.
Exploring the Data Layer Options in the Plugin Google Tag Manager for WordPress
If we go back to our website, with the Preview mode from GMT still on, you can see that other than Page View, Dom ready, and Window loaded, which are the default events that fire in a Google Tag Manager container, we also have one event firing before these, which is called Message (it means that we don’t have any events name associated with this event).
If we click on it and check the Data Layer at this time, you can see that three pieces of information have been added into the Data Layer: pagePostsType, pagePostsType2, and pagePostAuthor.
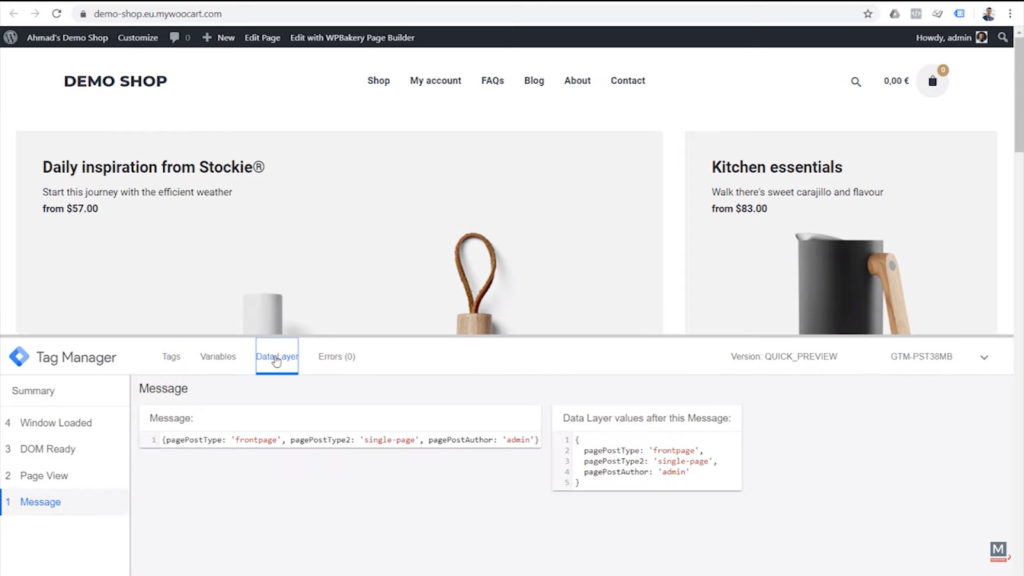
So we can already know that this is a front page and this is a single page and it was created by the admin, but the plugin can actually do much more than that.
In the plugin’s settings, under Basic Data, we can decide what kind of information this plugin actually pushes into the Data Layer when a page loads.

We have post type category, post alter ID… we’ve seen the name admin but maybe you want the ID of the user that has published a post, as well the date of the post being published, the title of the post, how many posts are being shown on the page, the idea of the proposed format and terms too. We’re gonna select all.
Based on your usage, you might or might not need all of this information, but the fact that this plugin can actually push all of this info into the Data Layer, is actually pretty cool. Now let’s save and head back to the website and refresh the page.
Now again, we see this message but if you take a look at the data that now it has much more information inside of it.

The date of the post being published, year, months, etc.
Now let’s check the rest of the configuration for display login and see what other kinds of information it can actually put into the Data Layer for us.
We have Search data.

Visitors.

This is something actually really nice because you can see if the user that is visiting the website has actually logged in, and if they’re logged in, what is their role…
Are they an administrator, a moderator, an editor, or a customer? What is their ID, what is the name, what is the email, what is the date that the user account has been created, and what is their IP?
Of course, we don’t want to send emails to Google Analytics because it’s a PII, (personally identifiable information). As well as IPs, but we can use them to look up the geographic locations, etc.
We’re gonna select all and save the changes.

Let’s go back to our website, refresh the page, and take another look at the Data Layer.

We now have some new pieces of information added to the Data Layer. Login state, email, the date of registration, ID, IP, etc.
Before I go back to the plugin settings and show you all the other types of information that it can actually push into the Data Layer, let’s see an example of how can we access this information in Google Tag Manager, and what can we do with this types of information.
Example: How to Use the Data Layer to Block Counting Page Views for Site Admins?
Usually, we can do two things with a piece of information that we have in the Data Layer. We can either send it to a tracking or marketing tool or an analytic tool, like Google Analytics, or we can use the information to make some kind of decision.
In this example, I would like to use this piece of information visitor type and if visitor type equals administrator, I don’t want to track that Page View into Google Analytics.
The reason is that being an administrator of the website, we don’t need to see what he/she does. We just want to track our users, not our own administrators or internal team. This is a useful example of how we can use information into the Data Layer to increase our data quality.
To do that, let’s navigate to Google Tag Manager and see how we can access that piece of information. To access the information that is in the data set we need to use Variables.
Create Data Layer Variable
I’m going to create a New Variable.

I’ll name it DLV – visitor type, which means Data Layer value and what value we’re interested in. This is not a critical rule to follow, but I would suggest you implement a clear naming convention.
This way, when looking at the name of a Variable, I can immediately see that, for example in this case, this is a Variable that is getting its data from the Data Layer and visitor type is the information that the Variable is getting from the Data Layer.
Click on the Variable configuration field and use the Data Layer Variable as the type of Variable
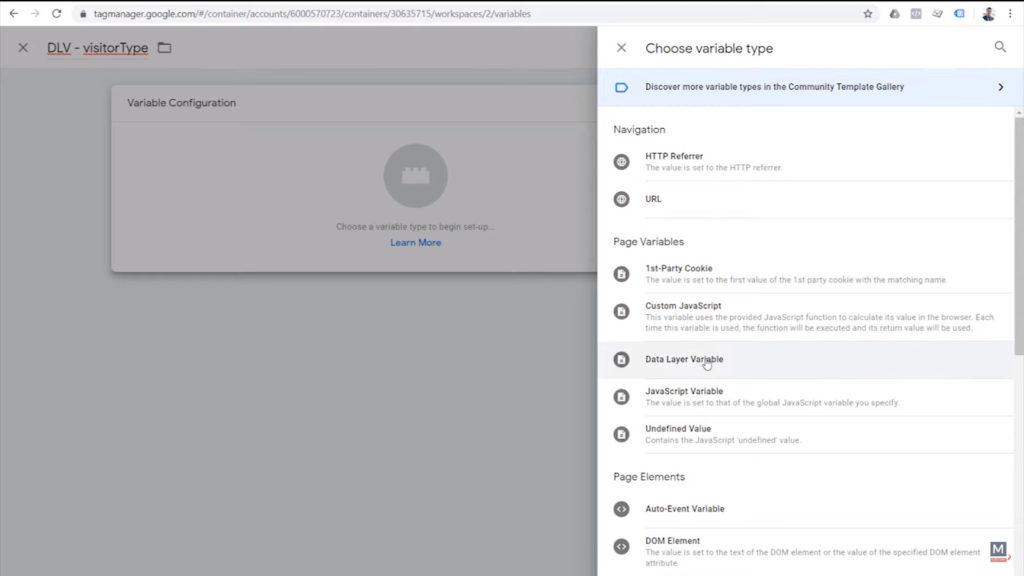
As, we can see in the Data Layer, the name of the Variable is gonna be visitorType.

Let’s enter that, and click Save.

Click Refresh, underneath that orange bar, then go back to your website and refresh the page.
Select the first message and take a look at the Variables that we have access to at this point in time.
We now have a Variable with the name of DLV – visitorType, and a value of administrator.

The value within the Variable has been taken from the value within the Data Layer.
When the event named message happens, Google Tag Manager wants to evaluate the value of the Variables, in this case DLV – visitorType. So it goes into the Data Layer, looks for the value visitorType, which we have defined in Google Tag Manager, and returns the value of it as the value of the Variable.
Now we can use this Variable to either send a value to some tool or use it to make some kind of a decision. If we check the summary and the tags that have been fired, I can see that the Google Analytics Page View has been fired on this page.
What we are going to do is that we would like to take a look at the value of visitor type and if it’s administrator, we want to block the Google Analytics Page View tag from being fired.
Example: Blocking Tags in GTM
Create Trigger
There are multiple ways of blocking a tag from being fired based on some criteria, like exception Triggers or actually limiting the Trigger itself. For this purpose, we’re going to use a simple method.
We’re going to create a Page View Trigger that fires only when the value of visitor type does not equal to administrator.
Let’s create a Trigger, and call it Pageview – NOT administrator.

This is a Page View Trigger, it fires only on some Page View, and it fires when DLV – visitorType, which is our valuable, does not equal administrator.

Replace Trigger in Google Analytics Tag
Now we’re going to switch the Trigger of our Google Analytics Page View Tag with this Trigger because right now our Google Analytics Page View fires on all pages, and we want it to fire only on page views that are not being viewed by a user with a role of administrator.
Select the Tag

Remove the All Pages Trigger

Select the NOT Administrator Trigger

Click Save.

Testing
Now I’m going to test it. Click refresh on GTM, (or click on preview again) and refresh your website’s page.
As we can see in the Summary Tab, no tags have been fired on this page, and it’s stated that GA – Pageview Tag has not been fired.

This is because of the limitations that we defined in Google Tag Manager.
Let’s dig deeper. Click on the event that this tag was supposed to be fired on, in this case, GA – Pageview, and click on the tag.

If you scroll, under firing Triggers, we can see that the event equals gtm.js with a green check. Gtm.js means Page View, so the events equal Page View, but the Data Layer value of Visitor Type does not equal administrator.

These criteria have not been met and we can actually verify that by clicking on Variables.

As you can see, at the time that the event Page View happens, the value of visitor in the Data Layer was administrator, and it actually prevented the GA tag from being fired.
Other Data Layer Options
Now that we learned what kind of information this plugin can add into the Data Layer for us to use, and how we can actually make use of them, let’s go back to the plugin settings and see what else it can help us to put into the Data Layer.
Google Ads remarketing
Still, under the Basic Data Tab, we have Google Ads. This setting actually includes all the Data Layer values into a single Data Layer Variable to be used for Google Ads Remarketing. This is an advanced use case and I’m not gonna activate it right now.

Browser/OS/Device
If for any reason you want to have the name of the browser being used by the user, the operating system, or their device data, whether it’s a desktop, tablet, or mobile, inside the Data Layer, you can check these.

They are in beta, so be careful and test them out before actually using them in a live environment.
They can be useful though. For example, if you want to fire some tags only on desktop only on mobiles, or only for some operating systems.
Weather and Geo Data
This one is interesting. The plugin can actually use the user’s IP address who called IPN stack dotcoms API and receive some geographic and vetted data so it can actually push the latitude, longitude, and the country and city of the user into the Data Layer.
This way we can use it, either report it to some tool or again, just like our example, use it to make some decision about tags being fired or not.

You will need an API key from IP stack.com and if you have a really high volume website you might need to pay them as well for your usage.
Here you can define whether you would like to have Veta Zeta inside a Data Layer or not, and what kind of unit you want to use for the temperature.
Multi-Site Environment
If you are using a multisite WordPress multisite environments, you can have your Site ID and Site Name be pushed into the Data Layer on each page load.

Events
The plugin can push events into the Data Layer when form fields are being tracked.

It can also push an event into the Data Layer when a new user registers on your website or logs in, or an existing user logs in.
It can help you get engagement information with the videos that you have on your pages.

Of course, for YouTube videos there is a built-in YouTube video Trigger inside Google Tag Manager, and there are several other scripts available for Romeo and SoundCloud, but you might want to use these instead of having another script on your website.
You can test it, and see if it works for your case and if yes, you can activate it and use it.
Scroll Tracking
Scroll tracking is also built in Google Tag Manager so you can do it right within there.
3rd Party Integrations
Contact Form 7
I’m gonna skip Blacklist tags, for now, I’m gonna cover this later. Let’s talk about Integrations now.
The plugin actually allows you to track interactions and form submissions on contact form seven, which is another plugin that I have activated and can actually detect that the plugin is active and recommends enabling this integration.

Woocommerce
If you have an eCommerce and you use the WooCommerce plugin, GTM4WP can see that the plugin is active.
Since I’m using WooCommerce, we can choose to Track classic or enhanced eCommerce.

For enhanced eCommerce, the plugin actually pushes so many useful values about product impressions, add to cards, transactions, etc, into the Data Layer.
We can also use the Data Layer that is already formatted in the way that is required for enhanced eCommerce tracking, and use it in GTM to track transactions, revenue, product impressions, add to cards, et cetera.
Products Per Impression
Products per impression is a fairly advanced feature that allows you to batch your product impression hits into different payloads.
Because sometimes if you have a lot of products on a page, let’s say 48 products are being loaded on a page and you want to send product impression hits for all of them at once to Google Analytics, the size of the hits, and the size of the packet of data that is going to Google Analytics can get larger than eight kilobytes, and in that case, Google Analytics will not register such a hit.

In that case, you may want to use this plugin to break this product impression hits into smaller pieces, like eight products at a time.
So in case you have 48 products on a single page, let’s say, it can break it down to six different smaller hits, and send six small hits to Google Analytics rather than a really large hit that is likely to be ignored.
Other features
Scrolling down you can find Cart as 1st checkout step, which is for checkout step tracking. You can have your cards page be the first page of checkout. It depends on where you want your data to be recorded in Google Analytics.
Cart content in Data Layer can push all the content of your shopping cart into the Data Layer to be used for Google Optimize or other purposes.
With Include full category path you can select which taxonomy to be used for a product brand because a product brand is something that in enhanced eCommerce or can report to Google Analytics and here you can select what type of Taxonomy are you going to use as the brand.
So if you organize your products in a way that each brand has its own category or its own tag, you can select here which one to be used.

You can have Customer data inside the data layer, and Order data inside the Data Layer. These are all useful pieces of information that based on the tracking scenario that you’re having, you might or might not want to activate.
It can also Exclude tax and shipping from the revenue, so if you sell something for $100 and they choose it to be shipped with DHL let’s say, and they actually want to pay $200 for the shipping and some foot tax as well, then instead of recording a transaction for more than $300, you might be interested in having actual product revenue recorded in Google Analytics.
In that case, you can Exclude tax and shipping from the revenue being reported.
They plug in, can add Google Ads Dynamic Remarketing Variables inside the Data Layer. It can add any prefixes to the product in case you have any prefixes in your product feeds.
And it can also use the product SKU instead of product ID. Because if you use an inventor inventory software, you have SKUs recorded in your inventory, and you might want your Google Analytics data to actually match those SKUs instead of the product IDs of Woocommerce.
Do Not Flag Orders As Being Tracked is another advanced feature that allows you to decide if you want to flag an order as being already tracked.
This way, when an order happens on your website, you are able to track it in tools like Google Analytics, Facebook analytics, etc, and the tool can actually flag that specific order as being already tracked.
So if someone reloads the page, or there is another circumstance that actually causes the same transaction hits to be fired into Google Analytics and Facebook, you can prevent that and avoid receiving duplicate transactions in your tools.

For now, I’m going to only have the Track Enhanced eCommerce active, so only the second checkbox, save changes, and head back to the website to see quickly how it pushes enhanced eCommerce Data Layers.
Enhanced Ecommerce Data Layer with GTM
Let’s go back to the website, refresh the page and I’m going to visit a product page to see what kind of values it pushes into the Data Layer.

Now that I visited a product page, let’s take a look at the Data Layer values that have been pushed into the Data Layer at the time of page load.

Scrolling down, we can see that an eCommerce object has been pushed into the Data Layer, and all the information about the product that has been viewed.
We can see the currencycode, product ID, product name, product SKU, the category, the price and stock level, which right now is not available.
And that’s a quick overview of a Woocommerce integration in Google Tag Manager for the WordPress plugin.
Google Optimize
The plugin can actually help you add a Google Optimize container to your website and it will also add the page hiding snippets to all of your pages, which is a small piece of JavaScript that actually helps Google Optimize, reduce the flicker of a page when deciding whether to show the control or the variation of an AB test.
It actually prevents the page from being loaded before the controller variation is decided, in order to prevent page flicker.

Accelerated Mobile Pages
Another integration that this plugin can help us with is AMPs, Accelerated Mobile Pages.
If you use AMP pages on your website, you can actually enter a comma-separated list of GTM containers for AMP GTM containers in here, and the plugin helps with implementing them on your website.

Advanced Features
There are also some Advanced features, like what name to use for the Data Layer and Environments, etc, which I’m not going to cover in this tutorial, but the two final checkboxes are actually useful so I’m going to talk about them quickly.

Do not Track Setting
First is the Do not track Browser setting. Some people configure their browsers to tell tracking tools their preference of not wanting to be tracked.
If you check this, it actually sends this value into the Data Layer which, just like we use the visitor type value, you can use it to decide if you want to fire any kind of marketing or analytics tag or not, if you want to respect the user’s preference of not wanting to be tracked.
GTM Loading
In some cases, you might want to Load the GTM container as early as possible on the page.
Instead of adding the Google Tag Manager container at the end of the head section, it will try to put it as early in the head section of the page as possible.

Blacklist Tags
The final feature that I’m going to cover in this tutorial is Blacklist tags and Variables.

Here Variables are called Macros because that was the name of Variables in the first versions of Google Tag Management. Right now we called them Variables, so we can use macros and Variables interchangeably.
Why Use This?
What does it actually mean to blacklist Tags and Variables? Think about this: why do we use a Tag manager in the first place?
Tag managers were introduced to make it easy for marketers to actually add scripts to the website to track interactions to marketing tools and analytics tools, et cetera, without the need for developers.
So without the need to access the actual code of the website, you can easily go to Google Tag Manager, add a Google Analytics tag, and it will load that Google Analytics tags on all pages of your website.
You actually saw that without having to touch any line of code or write any PHP or JavaScript, we could actually set a criteria to fire or not fire a tag based on the role of the user that was logged in to a website.
Without Google Tag Manager and without using this plugin to push those values into the Data Layer, that would be something that we would need to call our developers, or email someone, to actually write some code to make it possible.
Google Tag Manager, and any kind of tag manager, actually gives marketers so much power and flexibility to inject, as to say, whatever tag or script that they want into all pages of a website.
When GTM Can Go Wrong
And yes, this is flexible, but it can also be dangerous.
Someone can add a custom HTML tag that actually breaks a website, or some kind of some parts of its functionality.
This tool, the blacklisting tags functionality, actually gives the power to the administrator of the website, or whoever has access to the settings of this plugin, to blacklist or control what kind of tags a marketer can later go and add and run in Google Tag Manager.
By installing this plugin, by adding Google Tag Manager container to the website, and giving someone access to the admin panel of Google Tag Manager, we have actually given them the possibility to add any kind of tag or script or HTML to the website, and we might not want to do that.
Let me show you an example.
Let’s say we don’t want anyone on our team, that has access to Google Tag Manager, to be able to fire any kind of custom HTML tag.
I’m gonna create a new tag, and call it CHTML – Test.

Click on the Tag Configuration area, scroll down and select the Custom HTML type.

Now I’m going to write a piece of JavaScript and write an alert that says Hello World.

Now I’m going to select the Trigger All Pages,

and save it.

What this does is that on all pages of this website I am going to show you a pop up that says Hello World.
Now I refresh the Preview Mode.

Let’s go back to the website and refresh the page.

See, in under one minute I was able to break the entire website. I’m a marketer, and without any access to the code, I could do that.
This is the kind of flexibility and power that I have within Google Tag Manager, and the level of responsibility that I should have on how to use it.
Control What Types of Tag Can and Can’t be Created in GTM
As the administrator of this website, because you’re using Google Tag Manager for WordPress Plugin, you can select Allow all, except the checked items below (blacklist).

Scroll down, select Custom HTML Tag to be executed within this container, and hit Save Changes.

You could block the other types of tags as well.
Now if you go back to the website and refresh the page again, you’ll see that the alert is gone.
Why? Because the custom HTML tag that we have active and running on this container has been blocked by the tool itself and the mechanism to do so works like this:
In the Message event, check the Data Layer Tab.

As you can see here if you scroll down, the plugin has also pushed two new pieces of information, two arrays of the types of Variables and tags that are whitelisted or blacklisted.
On the line n.30 you can see: gtm.blacklist: HTML. Even before the Page View event happens, it tells Google Tag Manager: you are not allowed to run any HTML or custom HTML tag.
That is why among the tags in the Page View event, you can see that my custom HTML tag, called CHTML – Test, has not been fired.

If you click on it, you can see that the criteria for firing Triggers were met.

There was no blocking Trigger, but because we had that limitation set at the time of page load that we cannot have custom HTML tags firing on this page, the TAG was not fired.
This is a way for website administrators or website owners to actually block and limit the type of tags and type of Variables that eMarketer or their team can use inside their Google Tag Manager container.
FAQ
What is Google Tag Manager?
Google Tag Manager is a tag management system that allows website owners to easily add and manage various tracking tags, such as Google Analytics, Facebook Pixel, and more, without directly editing their website’s code.
How does the Google Tag Manager plugin for WordPress work?
The Google Tag Manager plugin for WordPress simplifies the process of adding and managing Google Tag Manager containers on a WordPress website. It provides a user-friendly interface within the WordPress dashboard, allowing you to add and customize tags, triggers, and variables without touching any code.
Why is the Data Layer important?
The Data Layer is crucial because it allows you to provide explicit data to Google Tag Manager that may not be available by default. This data can be used in various ways, such as sending it to tracking tools, making decisions based on triggers, or utilizing it in variables to enhance the functionality of your tags.
How can I access and use Data Layer information in Google Tag Manager?
To access Data Layer information, you can create Data Layer Variables in Google Tag Manager. These variables fetch specific values from the Data Layer and make them available for use in tags, triggers, or other configurations. You can then utilize this information to send data to tools, make decisions, or enhance your tracking capabilities.
Can the Google Tag Manager plugin for WordPress provide additional information in the Data Layer?
Yes, the plugin offers various options to push additional information into the Data Layer. For example, it can include post-related data, visitor information, browser/OS/device details, weather and geo data, events, scroll tracking, and integrations with third-party plugins like Contact Form 7. These options allow you to further enrich the Data Layer and enhance your tracking capabilities.
Is it possible to block tracking for specific users or roles using the Data Layer?
Yes, you can use the information available in the Data Layer to make decisions about tracking. For instance, you can create triggers that prevent certain tags from firing based on specific criteria. In the example provided, blocking page views for site administrators was demonstrated by utilizing the visitor type information from the Data Layer.
Are there any additional considerations or limitations when using the Google Tag Manager plugin for WordPress?
While the plugin offers powerful features, it’s important to test and verify its functionality in your specific environment. Some features, such as browser/OS/device data and weather/geo data, are in beta and may require additional testing. Additionally, certain features, like Google Ads remarketing and IP stack integration, may require API keys or have usage limitations. It’s recommended to thoroughly test these features and ensure compliance with privacy regulations and best practices.
Summary
To recap, that’s how you can use the GTM for WordPress Plugin by Thomas Geiger to add Google Tag Manager to your website, as well as to add many useful pieces of information into the Data Layer.
We went through an example of how to use the values in our Data Layer to prevent tags from being fired and we took a comprehensive look at all the different types of information that this plugin can add to your Data Layer.
We quickly reviewed the integrations and how deploying can be used to add enhanced eCommerce Data Layer values to track transactions, revenue and product impressions in a Woocommerce store, and we also saw how to blacklist the kind of tags and Triggers that can actually be used into Google Tag Manager container that has been added to this website.
If you want to deepen your GTM knowledge, check out our handy guide on Server-side GTM.
I hope you found this post useful, let me know if you have any questions down below in the comments!


")
Hi Julian, great article. I have started using this pluggin and it works great. Now I have started playing around with custom events based on user clicks and I see the GTM trigger fails to evaluate the contains tag, it is clearly shown that the string is there in the id and yet GTM fails. Is this a known issue with GTM ?
no, I haven’t experienced this issue before.
Correct me if I’m wrong but it looks to me like the plugin has depreciated the ability to fire custom events in GTM: https://www.screencast.com/t/syrgIe1U1dgi
Hey Julian, nice one, I’m using this plugin everywhere I can 🙂 I’ve got a question about AMP tracking with this plugin – when You enter the comma-separated list of GTM ID’s, the integration doesn’t seem to change into an active one. It still shows the plugin as not enabled. Is there something I’m missing? I can’t seem to find a button or a checkbox that would enable the integration.
Great article btw.
I am having trouble to receive the variable values on GA4 debug view.
On GTM preview i can see the variables being called like e.g: pageCategory: [promo] but
i cant send those vars to GA4 debug view, any default var works fine but gtm4wp category not.
Any suggestion?