
Last Modified on January 3, 2024
Do you want to get rid of the error messages inside your Pixel?
If your Meta Pixel (previously called Facebook Pixel) is working properly, it can be an effective tool for measuring the effectiveness of your advertising. Once set up, it generates and reports the information you can use to better understand user actions on your website.
However, you may find that some of your Meta events won’t load or that you get warning messages. This makes the data you gather not as accurate as it can be.
Whether you’ve made massive changes like transferring from WordPress to Shopify, or just a few minor changes, it is important to ensure that your current setup is still sending everything properly to the events manager.
In this post, we’ll show you how to fix Meta Pixel errors and how to test your events to prevent these errors from happening again.
Here’s an overview of what we’ll cover:
- Meta Pixel Test Events
- Testing Browser Events
- Purchase Process Test
- Purchase Events Error
- New Domain Sending Data
- Invalid Purchase Currency and Value
Meta Pixel Test Events
First, let’s verify if all our events are being sent to the events manager.
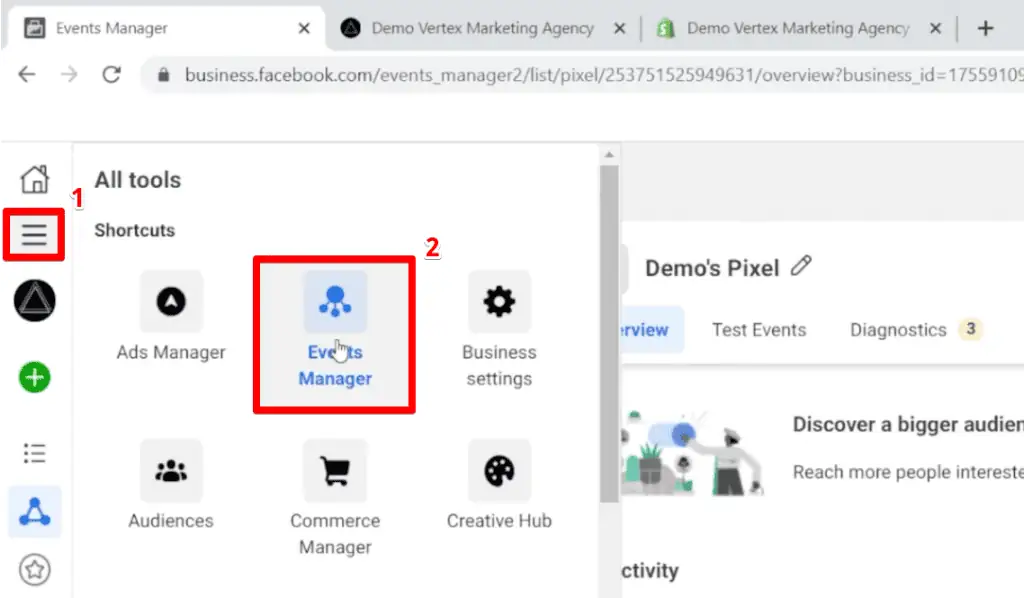
On your Meta Business Suite homepage, go to All tools (indicated by the little hamburger menu) and select Events Manager.
Now, go to the Test Events tab. Select Clear Activity and confirm for a second time when the popup comes up.
If we scroll down, we can see that there are two kinds of tests we can do – Test Browser Events and Test Server Events.
Here, we can see the steps you can follow to test each type of event. In this post, however, we’ll only go in-depth on discussing how to test browser events.
If you want to learn more about server events, check out our post on how to send Meta Pixel events via the conversion API using Zapier, or our video on how to use the conversion API with Google Tag Manager.
Testing Browser Events
To test browser events, all we have to do is enter our website URL.
Copy your website URL and paste it into the space provided. Then, click on Open Website.
This should load our website on another tab.
If we go back to the events manager, we should get a PageView event.
If you are still not receiving a PageView event, I recommend using Google Chrome and trying again. If you’re still not getting the event, download the extension called Facebook Pixel Helper.
Facebook Pixel Helper
The Facebook Pixel Helper extension is a troubleshooting tool that shows the number of Pixel events sent to your Meta account. It can also show a detailed overview of the page’s pixels, including warnings, errors, and successes.
Opening this extension on my website, we can see that a PageView event was sent successfully.
If you find that there is no Pixel event showing when you want to test your events, it’s usually because you’re using the wrong Pixel ID. Make sure that the Pixel ID you see in this extension matches the one you have in the events manager.
One way to verify this is by going to the Overview tab. You will see your Pixel ID on the right side.
Other ways to view your Pixel ID are checking the URL and looking at your Data Sources in the events manager.
If you find that your website is sending events to the wrong Pixel ID, install the correct one and repeat the steps mentioned above.
Purchase Process Test
Now, we need to verify if all the events we care about are showing in the events manager without an error warning. Since our demo website is an eCommerce shop, let’s go through the entire purchase process.
Note that I have tweaked my setup to ensure that I have errors to show you exactly what it looks like when you have an error and how to fix them. Even before testing our events, you can see in my Pixel diagnostics tab that I have three active issues.
For issues relating to eCommerce websites, we have the Invalid Purchase Currency Code and the Invalid Purchase Value Parameter.

The last issue is a widespread one. No doubt that a majority of you who had been running ads for at least a year have seen this warning here. It is the New Domain Sending Data issue.
We’ll show you how to fix all that. But for now, let’s go back to our test events tab and start the purchase process to check if any other errors appear.
Let’s scroll down and click on one of the products. This opens the product on a new page.
Click on the ADD TO CART button.

Those steps should have triggered a few events already. Let’s quickly go back to our events manager to check if new events have been sent to our Pixel.

Here, we can see five new events in the test events tab, sorted in reverse chronological order.
If you are following, you will see that you might not have the same events listed in your Pixel. The setups and the events we want to track are likely different. At this point, just ensure that the events important to you are being shown.
Let’s briefly discuss how to structure an eCommerce store to explain these new events. Having all these events on your website is not mandatory, but feel free to implement them if you want.
After the PageView event, you can see that I have a custom event for when the user clicks on the product. This is because I consider a click as a website engagement that I want to track.
Then, I’ll trigger the View Content event whenever we view a product. Since we are viewing our product on a different page, we should get another PageView event.
Next, we clicked on the add-to-cart button. That’s another click that sends a website engagement event. This also triggers the Add to Cart event.
That finishes all the events we have so far. If you want to see more details about an event, you can click on it.
Let’s open our Add to Cart event as an example.

Here, we have details like the URL, event ID, action source, and advanced matching parameters. If your events have additional parameters, they should also be listed here.
We can see that our events are being sent properly. Let’s go back to our website, proceed to checkout, and complete our purchase. We should now have the purchase event in our events manager.
Purchase Events Error
Since this is a demo, I don’t have all the events that an eCommerce store would want to track. Don’t worry if a few events that you may be tracking are missing from my events manager. Again, just make sure that those relevant to you are still showing.
Now, let’s check if our purchase event came through in our test events tab.

The good news is that our purchase event is working and is being sent to our Pixel properly. The problem is that there are two of them.
While we are not getting an additional error message in our diagnostics tab, this is still an error that we need to address since it says that we have two different purchases when we only made one.
Looking at our purchase event, we can see that we have included the parameters for the value and currency, but nothing is set here.

If you were using a lead event, you don’t need to add a lead value or a lead currency. You can set a value though if you know exactly what a lead is worth to you. This will enable you to look at the potential return on ad spend whenever you’re looking at your campaigns.
However, since this is an eCommerce store, I recommend that we set a value and currency to solve the warning message that we have.
For now, let’s solve this duplicated purchase event error.
Let’s figure out why Pixel has this error. What usually happens is that a GTM tag is created to send a purchase event, while a purchase event is already being sent using the Events Setup tool.
Things like this usually happen when a lot of people are working on the same thing and there is not that much communication. Even if you are the only one working on your Pixel, this error could still appear simply because it has slipped your memory.
This is why it is essential to ensure everything is working properly. Whenever you see or think that something is off, it is always a good idea to double-check. I recommend that you go through this step often, especially before a big sale like Black Friday.
To solve the duplicated purchase error, simply check which tools are sending your purchase events and remove one of them.
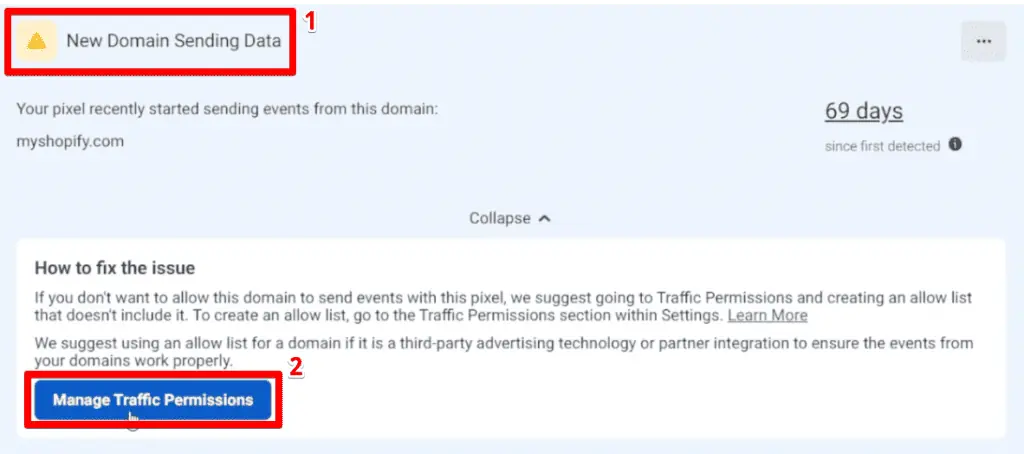
New Domain Sending Data
Now, let’s clear the issues in the diagnostics tab, starting with the new domain sending a data warning message.
The description states that my Pixel started sending events from a new domain. It has also specified this new domain. Don’t get upset if you see this issue. It’s usually just a plugin or maybe a Shopify app that is also sending an event to the Meta Pixel.
To tackle this issue, you have to understand and see which domains are currently sending data to your Pixel. If you’re using WordPress, Shopify, or any other platform. Next, go through your apps and see which ones are sending information to the Pixel.
You then need to figure out which of these should continue to send data to your Pixel, and which ones you should block. Once you do, go to your Pixel’s diagnostics tab.
Click on the New Domain Sending Data message and select Manage Traffic Permissions.
This will lead you to the settings tab. Scroll down to the bottom. Under Traffic Permissions, click on Create Allow List.
By creating an allow list, we’ll specify which domains we will accept data from. As the name suggests, this list contains the traffic sources you allow to send data to your Pixel.
We have two options of how we can add domains to our allow list – by entering the domain URL or selecting from the Top Domain Traffic list.
You can add all the domains you wish to keep sending information to your Pixel.
If your domain is in the top domain traffic list, simply click on the Add to allow list button beside that domain.

This will open another window. Click on Confirm to finish adding this domain to the allow list.

All traffic and event data from other domains will stop when you add your first domain to the allow list. Your Pixel will only accept events from that domain, and any events coming from its subdomains.
Notice how all the other domains in the Top Domain Traffic list are now blocked.

What happens if I’m sending events through Zapier? If I put my website domain in the allow list, will it block those events? Unfortunately, yes. However, you can just as simply add Zapier’s domain to the allow list.
The same goes for server-side tracking, where you decided not to use a custom subdomain as part of your server, and you’re using the server that Google gives you when you create a server container inside GTM. Go to your traffic permissions and add those to your allow list.
If you fail to do these steps, then you might not receive the events that you want to see in your events manager. So, it’s vital to double-check which domains are sending events to your Meta Pixel, and which ones you want and should accept.
Once everything is all good, go back to your Diagnostics tab. Click on the more options button beside the new domain sending data issue then click Ignore.

Even if this issue appears again in the future, it’s fine because we have already created an allow list. If you start using a different tool, however, you might want to go back and update this list to allow that new domain to send data to your Pixel.
Invalid Purchase Currency and Value
Now, let me show you how to fix our two remaining errors – the invalid purchase currency code and invalid purchase value parameter.
The way I have this set up is that I’m using GTM to send all my events to my Meta Pixel. If you’re getting the same warning but are not using GTM, the process will be a little different, but you will do the same thing as follows.
I’ll open up my Google Tag Manager account and go to Tags. Next, select the tag that sends the purchase event. In my case, that is the FB Purchase (extra) tag.
You will notice that I have two tags for a purchase. This is what caused the duplicated purchase event earlier. To solve that error, I can simply delete the extra tag here.
However, as mentioned earlier, I have tweaked my setup so that we can see errors pop up. Aside from the duplicated purchase, this extra tag also makes the invalid purchase currency and value errors appear.
I’ll put off deleting this, for now, to show you how to fix these errors.
With our tag open, scroll down and click on Object Properties.

Here, we have our currency and value properties. Notice that they are empty.
For currency, you should simply put the currency code that you will implement in your store. If you are using more than one currency on your site, it would be better to create a variable here.
If your store operates internationally, then your website should have the ability to display your prices in the currency that your customer uses. If you are based in the US but have a customer from Canada, the currency should be in CAD instead of USD.
To do this, you should use a custom variable for your currency. The JavaScript variable can be a good option, but I recommend using a data layer variable instead. However, both options are good.
For the value, you have the option of setting a static value, let’s say $40 for example. This allows you to get an idea of your return on ad spend when you’re looking at your ads and your campaigns, but it won’t be accurate.
Even if you only sell a single product priced at $40, when a customer orders 3 of those products, our event will still report a sale of $40. Using a static value will almost always report inaccurate data.
Hence, I recommend also using a variable for the value property. It could also be a data layer variable or JavaScript variable. It doesn’t matter which type you choose to use, as long as you do use a variable.
Since this is only a demo and I will delete this extra tag eventually, I’ll just put USD in my currency and 40 for the value before clicking on Save.

Once you have made these changes and are sure that everything is working properly, you can go ahead and publish the tag.
Click on Submit.

Now, all that’s left to do is go through the process again and test if everything is working properly. For my setup, I’ll have to make sure to delete that extra purchase event.
As soon as you’re done with your changes and have made improvements, go through the process again and ensure that all the events are coming in. Check if they are coming in with a value, currency, and all the different parameters you want to send.
FAQ
How can I test my Meta Pixel events?
To test your Meta Pixel events, you can use the Test Events feature in the Meta Business Suite. Clear the session activity, and then proceed to test browser events by entering your website URL and opening it. The events manager should show a PageView event.
What should I do if I’m not receiving a PageView event during testing?
If you’re not receiving a PageView event, try using Google Chrome and testing again. If the issue persists, you can use the Facebook Pixel Helper extension, which can help troubleshoot and identify any errors or warnings related to your Pixel events.
How can I address the “New Domain Sending Data” issue?
The “New Domain Sending Data” issue typically occurs when a plugin or app sends events to your Meta Pixel from a new domain. To address this, review the domains currently sending data to your Pixel and decide which ones should continue sending data. Create an allow list in the Meta Pixel settings and add the approved domains to it.
Summary
That’s how you test your events and how to fix Meta Pixel errors. Specifically, we dealt with how to fix duplicated purchase events, the new domain sending data issue, and invalid purchase currency codes and value parameters.
If you want to optimize your audience for retargeting purposes, did you know that you can delay Meta Pixel from firing immediately? This enables you to focus on users who are interested in what you have to offer.
Do you also have these errors on your Pixel? Were you able to fix them? Let us know in the comments below!


")
hi, i have pexel in my website and when make test event it works properly but when try ad event say this :
A pixel wasn’t detected on this website. Check that the URL you entered is correct or use Test Events to make sure you have a pixel set up on this website