
Last Modified on October 23, 2024
Do you require further insight into your users’ activity and understand the performance of your campaigns?
Google Ads can drive more traffic to your website, but measuring ROI (Return on Investment) is crucial to ensure you spend your money wisely.
If you’re running campaigns, it is fundamental to set up Google Ads conversion tracking to measure the effectiveness of your campaigns. Conversion tracking is crucial for your optimization process. Usually, you would expect a developer to set it up for you, but you can do it yourself if you cannot reach your developer.
In this tutorial, we’ll learn how to set up Google Ads conversion tracking in Google Tag Manager (GTM).
Here is an overview of what we’ll cover:
- What is a Conversion?
- Creating a Conversion in Google Ads
- Google Ads Conversion Tracking Setup with GTM
- Testing the GTM Implementation
- Data Layer
- Data Layer Variables
- Setting Up a Tag
- Conversion Testing
Are you excited to explore? Let’s dive in!
What is a Conversion?
Let’s discuss what a conversion is, so we are all on the same page.
A conversion is any valuable action you want a website visitor to take, i.e., the user buys a product or submits a form.
In Google Ads, here are the steps for recognizing conversion actions.
- A user sees your ad.
- A user clicks on the ad and goes to your website.
- A user makes a valuable action you want this user to take.
- Google Ads receives the conversion data.
- You can see what ad clicks led to the successful outcome (conversion).
Viewing conversion data in Google Ads can help you understand how your campaigns perform. It helps determine what is more effective, defining more clearly the optimization steps.
To start, you need a few things set up and ready. First, you need a Google Ads account.
Next, you also need a Google Tag Manager account.

Ensure that you already have GTM implemented on your website.
🚨 Note: If you don’t know how to create a Google Tag Manager account or don’t know where to get started, we recommend checking out our guide on How to Install Google Tag Manager.
Finally, you should have an eCommerce store. We have this demo shop, which we built using WordPress. So, we will use this for our tutorial.

You might have a different eCommerce store or a different CMS platform, which is fine. There is no need to worry because the implementation process is universal.
We need to understand the logic behind the implementation, and you can easily set up Google Ads conversion tracking on your own in any website/CMS platform.
Now that we have everything, let’s hone in on the conversion we want to track.
For this part of our tutorial, we have a sign-up form, and we want to track whenever a user fills up this form and submits their details.

Let’s quickly fill it in and fulfill the action we want to track. I will use the Lorem Fill Chrome extension to make his process easier and faster. Once you’ve installed this on your browser, right-click on the form field and select Lorem Fill this single element.

💡 Top Tip: Check out our list of the Top 10 Chrome Extensions for Digital Marketers to learn other Chrome extensions that can aid with your digital marketing works.
Once you’ve filled everything in, click Submit.

Now we see this thank you page, which is also what our clients see when they submit this form.

Let’s have a look at the URL. Here, we have the sign-up-form/success text after our website domain.

Note this URL because we will need it later.
We want to track this thank you page because this confirms a successful form submission. How do we do it? Let’s start by going to our Google Ads account.
Creating a Conversion in Google Ads
If you have used Google Ads before, you’ll notice that it now has a new interface.

Even though I’m not a big fan of the new one, it is essential to adapt and move on. We can revert it to the original view if we want, but I will continue with this new one for the rest of our tutorial.
However, if you want to change it to the original design, go to Appearance → Use Previous Design.

Next, Google will ask you why you want to change it to the previous design. Finally, click Send and Go to Previous Design.

Life is about changes, right? So I have decided that we have to push ourselves out of our comfort zone and test the new interface.
The conversion setup process is pretty straightforward.
Here’s how to set up conversion tracking in Google Ads:
1. Go to Goals → Conversions → Summary.
Here, we have a list of all the conversions we have configured.
2. To create a new one, click New conversion action.
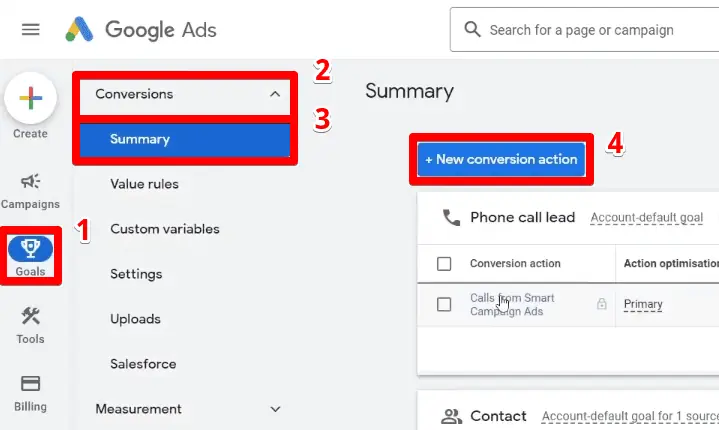
Alternatively, we can also click on the Create (+) button at the upper-left corner of the page.

3. Next, click Conversion action.
This method is a kind of shortcut for creating new conversions, which is very convenient.

Follow any method of creating a new conversion action so that we can start our Google Ads conversion tracking.
First, we must select the kind of conversion we want to track. In our case, we want to track website actions from our eCommerce store.
4. Select the Website option and click on Next.
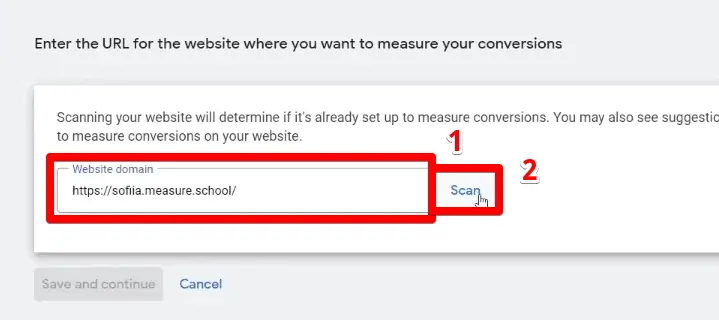
Next, we need to enter our website URL. Google Ads will scan our website and determine if it can measure website conversions on our site.
5. Paste your website domain, then click Scan.
We don’t want to set up our conversions directly in the interface because we want to do it via Google Tag Manager.
Why? We want complete control over our Google Ads conversion tracking and keep everything in one place, neat and well-arranged.
6. Click Add a conversion action manually.

We’ll reach the conversion action details page. Here, we have various configuration fields where we need to provide details about our conversion.

First, we have the Goal and Action Optimization field. We must specify the goal category for the conversion. We can then use these categories to group conversion actions and segment your campaign reports.
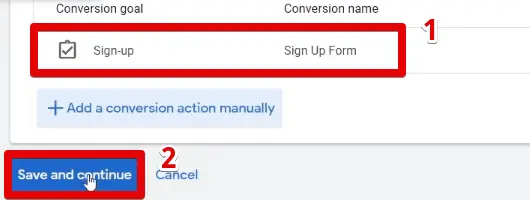
7. In our case, remember that we want to track a sign-up form. so select Sign-up.

Next, we need to specify the Conversion Name. Select a descriptive name for your conversion, so that you can quickly recognize it from a list, especially if you plan to track multiple conversions.
8. Let’s keep it simple by naming our conversion Sign-Up Form.

Then, we have something called Value. This field helps measure the impact of your advertising by assigning a value to your conversions.
Google Ads recommends the following: use the same value for each conversion if you’re tracking leads, sign-ups, or page views, and different values if you sell multiple products at different prices.
In our case, I don’t want to use a value for this conversion action, even though Google Ads does not recommend this. Not setting a value means that the revenue we generate or the exact monetary value of this conversion is zero.
9. We are just tracking a sign-up form, so I won’t assign a monetary value to it. So, we will select the option: Don’t use a value for this conversion action.

Next, we have Count. This field dictates how often we count the conversion for each person who clicks our ad. Here, we have two options: Every and One.
Google Ads gives you some hints here. Option One is for leads and sign-ups because it makes sense that a user will sign up only once on your website. Meanwhile, we will select Every for purchases because even if the same user purchases multiple items multiple times, each is valuable.
10. Since we have a sign-up form, select One.

11. Next is the Click-Through Conversion Window, set to 30 days by default.
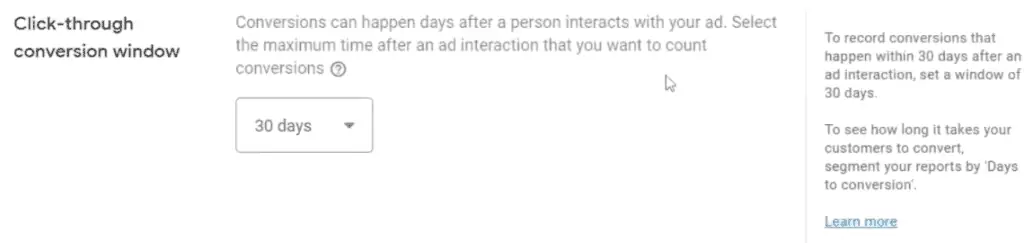
What does this field mean? It is the given time frame that you allow your users to convert after interacting with your ad.
Since conversions can happen days after a user first interacts with your ad, this window is the maximum time after the ad click that you allow the conversion action to count as a conversion.
Let’s say a user clicks on your ad. However, they only completed the order after a few days because they looked for other alternatives before ultimately buying your product. Google Ads will count this purchase as a conversion if it is within the specified timeframe.
If you’re selling expensive products, it is natural for people to take some time and ponder the decision of purchasing something expensive. You may want to play around with the settings and extend this window the pricier your products are.
The click-through conversion window can be between 1 to 90 days.
12. Then, we have the Engaged-View Conversion Window, which is set at three days by default.

This conversion window is the period you give your users to convert after they watch at least 10 seconds of your video ad.
The engaged-view conversion window can be between 1 to 30 days.
13. Next is the View-Through Conversion Window, which is set to 1 day by default.

This conversion window is an interesting one, though. View-through conversions are for when customers see but don’t interact with your ad, and then convert to your site.
They are a helpful way to track the value of your video and display ads. Check out this link if you want to learn more about display ads.
Since these ads show when the user is consuming other content, the subtle impact of your ads for brand awareness can be harder to track. Enabling view-through conversions gives us a rough estimate of the ad’s effectiveness.
This type of conversion is intriguing because users aren’t interested in clicking your ad, but familiarity with your brand still can cause the user to convert to your website.
We will leave this for now, because conversions after may be best attributed to other factors and not directly due to the ad the user saw.
The view-through conversion window can also be between 1 to 30 days.
14. Then, we have the Attribution field. It is Data-Driven by default.

Let’s say you’re running multiple ads. Some users may click on the first one, then the second, and so on. Later, after clicking on the fifth ad, they finally decide to make a purchase.
How can we identify which ad was the most effective? Which ad led to the most successful outcome? The attribution model determines how much credit each ad interaction gets for your conversions.
For example, let’s continue with our scenario where the user clicks on multiple ads before completing a purchase. If you select the last-click attribution model, all the credit will go to the last-clicked ad.
🚨 Note: We will not discuss the different attribution models today. You can learn more about the attribution models in Google’s official documentation.
One important thing to keep in mind is that the first click, linear, time decay, and position-based attribution models across both Google Ads and Google Analytics 4 will be going away soon.
Aside from the fact that these models don’t provide the flexibility needed to adapt to evolving consumer needs, less than 3% of Google Ads web conversions use these models.
This decline is due to data-driven attribution becoming the most used attribution model for conversions using automated bidding in Google Ads.
Starting July 2023, you can no longer select these models for conversion actions in Google Ads that do not already use one of these models. Then, from September 2023, Google will switch any conversion actions still using these models to data-driven attribution.
The default attribution model for most conversion actions is the data-driven attribution model. It uses Google AI to understand the impact of each touchpoint on conversions and distributes credit for the conversion based on past data.
Finally, let’s move to the final detail we should set for Google Ads conversion tracking.
15. We have the Enhanced Conversions setting. When we click on it, it says: Enhanced conversions are not configured for this account.

What are enhanced conversions? Simply put, they allow you to send hashed customer data such as email addresses, phone numbers, and more to Google for more accurate tracking. You supplement your tags with additional information about your users.
However, we will not set up enhanced conversions in this guide.
💡 Top Tip: If you’re interested in implementing enhanced conversions on your website, check out our guides on How to Set Up Google Ads Enhanced Conversions with GTM and Offline Conversion Tracking: Enhanced Conversions for Leads.
16. Finally, click Done.

17. Ensure your conversion action is recognized, then click Save and continue.
Great! We have successfully created our conversion. Next, we must specify how to implement our Google Ads conversion tracking.
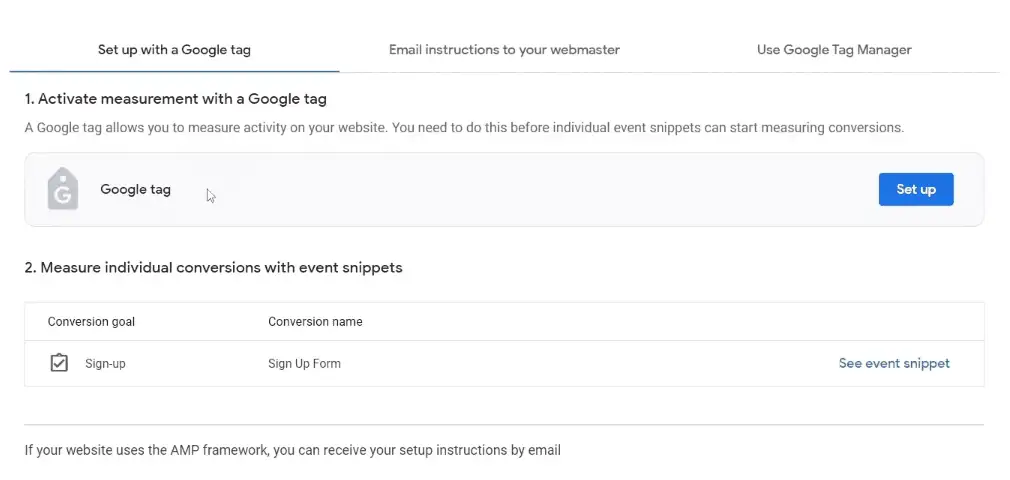
We have the following options:
- Activating measurement with the Google tag: in the source code directly.
- Emailing instructions to your webmaster: the webmaster will do it for you.
- Using Google Tag Manager to install the Google Ads conversion tracking tag.
We will use Google Tag Manager for Google Ads conversion tracking because it is easy, and this is how you can manage your tags.
Google Ads Conversion Tracking Setup with GTM
Let’s click Use Google Tag Manager. Note the conversion ID and the conversion label of our sign-up form.
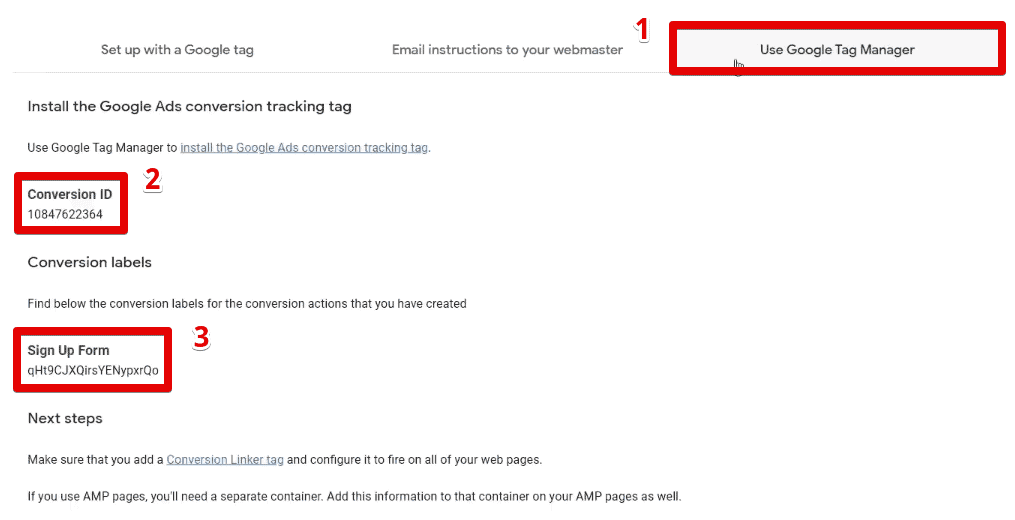
We need this information to set up our Google Ads conversion tracking in Google Tag Manager.
In your Google Tag Manager account, go to Tags.

Next, select New → Tag Configuration → Google Ads Conversion Tracking template.
Next, paste our conversion ID and conversion label in the indicated boxes.

Next, name the tag.

So, we don’t need to add a value or the transaction ID because we are just tracking a sign-up form.
Next, let’s add a trigger by clicking Triggering.
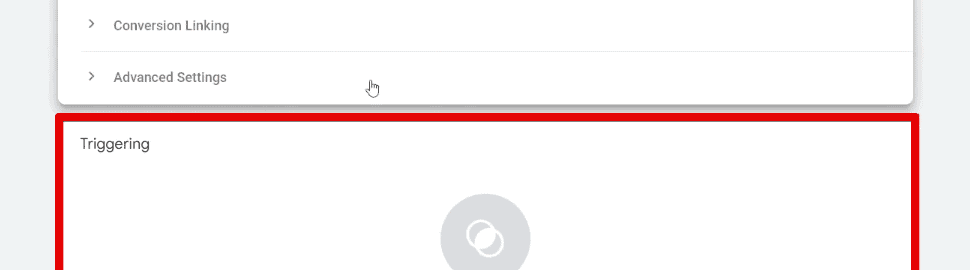
Now, when should we fire our tag? Remember that we have the thank you page when users finish submitting the sign-up form. It is the page we want to track.
Click the + button to create a new trigger.

Click Trigger Configuration → Page View.

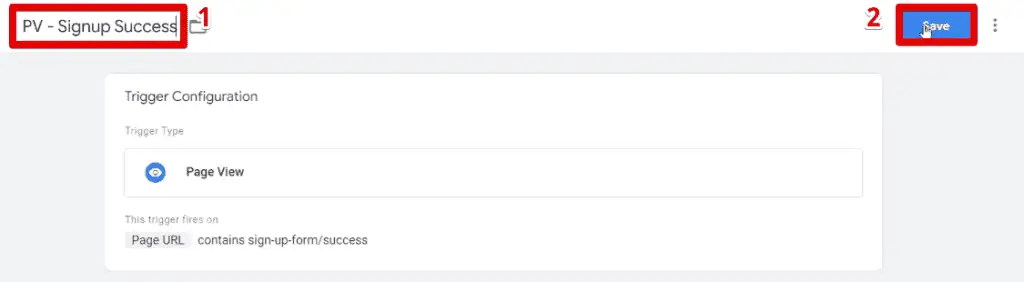
Next, let’s go back to our website and copy the part of the URL after our domain.

We don’t want to track all page views, so select Some Page Views. Next, set the condition to Page URL contains sign-up-form/success.

We should also provide a name for our trigger, then click Save.
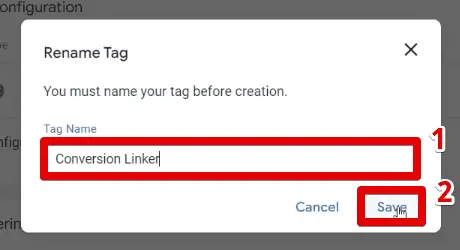
Back to our tag, we can see the warning: Conversion Linker tag missing in the container.

As we are setting up our tracking via Google Tag Manager, we should install the Conversion Linker to ensure that everything works correctly.
Thankfully, GTM makes this process very easy. Click Create beside the error message.

Everything is ready, and you can click Save.

Google even suggests a name for you if you get lazy and forget to type one. Confirm this name by clicking Save.
Finally, let’s Save our Google Ads conversion tracking tag.
Let’s get to the most exciting part – testing our implementation.
Testing the GTM Implementation
Let’s enter the preview mode to test out our tags.
Click Preview at the upper-right corner.

Paste the link to our sign-up form, then click Connect.

Again, fill out the form and click Submit.

Great! We should reach our thank you page. Go to the Tag Assistant and confirm that we successfully fired the Google Ads conversion tracking tag.
It means that you have now set up your Google Ads conversion tracking correctly.
🚨 Note: Alternatively, you can use the Google Tag Assistant Chrome extension to quickly identify what Google tags have fired and the information sent over.
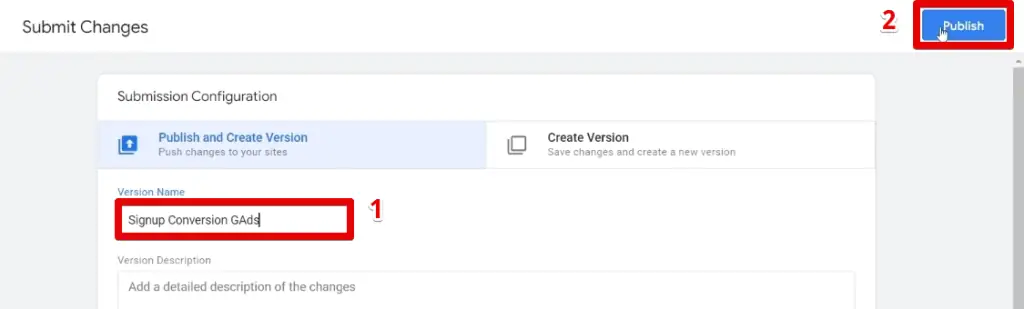
We can now go to Google Tag Manager and publish our GTM container. Click Submit.

Next, provide a descriptive version name. You can use any name you want, but it’s good to establish a proper naming convention, especially if many people are working on the project. Then, click Publish.
We have implemented our first conversion! Great!
If we go back to Google Ads, you can click Done.

You should see our new conversion action in the list.

The status is unverified for now because you have to fire your tag. Then, to start counting conversions, a user must click on your ad and complete the conversion action.
We have already fired our tag, so it should change to no recent conversions later. It works technically, but no one has clicked on your ad and converted.
Great! That was the first part of our Google Ads conversion tracking tutorial.
Now, let’s move on to the second part of our tutorial. It is a bit more advanced, where we take it up a notch by adding dynamic values. So, what do we mean by adding dynamic values?
Data Layer
Let’s go to our website again and close the Tag Assistant.
Here is my eCommerce store, where I offer these products to our website visitors.

People can buy multiple products at different prices. We want to track whenever we make a sale from our ad clicks. However, we cannot do it statically because some products cost $35, while others cost $30, and so on.
Different products have different prices, and each purchase can comprise various combinations of our products. Therefore, we need a way to record these dynamic values. How can we do this, technically? It seems a bit complex, but we will nail it together.
We need a data layer to set up Google Ads conversion tracking with dynamic values.
What is a data layer? Let’s check Google’s official documentation. Here, we can read all about what a data layer is, how data layer information is processed, and view an example of how the data layer looks like.
Let’s look at an example of a data layer below:

Here, we have a couple of key-value pairs. The keys are the different attributes your object/event can have. Then, we have the equivalent values. In the example above, the book category is fiction. We also have the book title and author.
In our case, we should have key-value pairs related to our products. We should have, for example, the product ID, transaction ID, product name, cost, and so on. The data layer we generate should be dynamic and change according to what the user has purchased.
A data layer is a JavaScript object that passes information from your website to Google Tag Manager. It lives in the background of your website.
It does its job behind the scenes and passes the data to GTM. Then, we can capture it and set up our Google Ads conversion tracking.
Usually, you would ask your developer to install the data layer. We can do it easily with the help of a plugin. We’ll be using the plugin called GTM4WP (Google Tag Manager for WordPress).
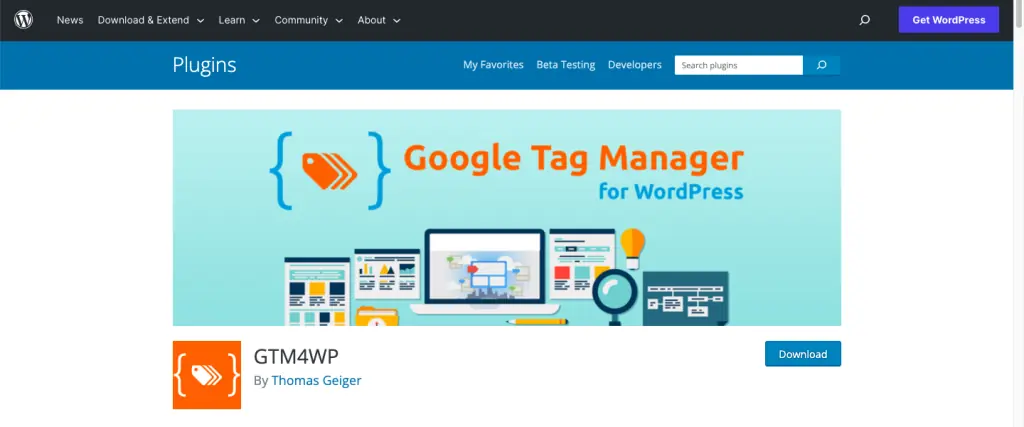
Go to the plugin page to check the description. I recommend this plugin because it is helpful and creates the data layer for me. It is also how I installed GTM on my website.
🚨 Note: We have discussed the step-by-step procedure for using the GTM4WP plugin in our GA4 eCommerce tracking guide, so check it out if you also use WordPress for your online store. We also discussed alternative methods if you don’t use WordPress.
Now, let’s have a look at how it works technically.
First, enter the preview mode again once you have installed this plugin. Connect the Tag Assistant to your website, then make a purchase. You should reach the thank you page.

Next, go to the Tag Assistant. Here, you should see the purchase event.

The purchase event fires whenever a customer buys the products and reaches this thank you page. Here, you can see the dataLayer.push API call.

We can see that the event = purchase and we also get the data about our products: item ID, item name, price, category, etc. We also have the currency.
Scrolling down, we can also see the transaction ID, value (overall revenue), etc.

We can use this data to set up our tracking. All we have to do is to define a way to grab those values.
Data Layer Variables
Often, you will have nested data layers with the purchase event, so you need to learn the proper syntax for pulling data from the data layer. We need to understand something called dot notation.
💡 Top Tip: Check out our guide on the Data Layer Variable in GTM to learn how to pull essential data from the data layer.
If you’re not sure what dot notation is and are uncomfortable with the code, we can recommend another Chrome extension called Datalayer Checker.
In the pinned Chrome extensions, we have this blue eye icon, the Datalayer Checker extension. If you click on it, you can see the purchase event.

Here, we can see all the information pushed to the data layer, similar to the view in the Tag Assistant. The difference, however, is that each key-value pair is in the dot notation. We have the event name purchase and all the information related to our products.
What’s interesting to note is the ecommerce.transaction_id and the ecommerce.value. To get the exact syntax, we can click on the Copy key.

Go to Google Tag Manager and create a variable that will grab these values for us.
Go to the Variables tab.

Under User-Defined Variables, click New → Variable Configuration. We will select the Data Layer Variable since we will be working with the data layer.

First, we’ll create the data layer variable for the value. Click on the Datalayer Checker extension again. Click purchase and copy the key for the ecommerce value.
Paste the value variable name, provide an appropriate name, and click Save.

Next, let’s create the data layer variable for the transaction ID. Again, click the Datalayer Checker extension and go to the purchase event. Copy the transaction ID key.
Paste the transaction ID variable name, provide an appropriate name, and click Save.

Great! We are now ready to set up our tag for Google Ads conversion tracking with dynamic values.
Setting Up a Tag
Let’s create another tag. Again, we’ll make a Google Ads conversion tracking tag. Now, notice that the Conversion Linker tag is found in the container.
We only need to make the conversion linker tag once, and then you can forget about it.
Next, we need the conversion ID and the conversion label. We cannot use the previous values since they were specific to the sign-up form conversion action.
We must create another conversion action in Google Ads. Again, we will make a website conversion action. Provide and scan your website domain.
If Google automatically added a conversion action from the page load, click Cancel. Instead, scroll down and add a conversion action manually. Now, let’s get to the conversion action details we should specify.
First, set the category to Purchase, since we want to track when users buy our products.

Next, for the conversion name, let’s set it to Purchase with Value as an example.

I want to track Dynamic values because there are multiple products on my website, and they have different prices. Therefore, we will use different values for each conversion.

We need to assign a different value for each purchase. Additionally, we can enter a default value for the conversion.
Next, we want Every purchase to count as a conversion regardless of whether the user only clicked on our ad once.

It is recommended for purchases since every purchase is valuable.
For the remaining options, we will keep them at the default settings. Click Done → Save and continue.
Now we have our new conversion. Again, go to the Use Google Tag Manager tab. Here, copy the conversion ID and conversion label.

Paste the conversion ID and conversion label to their respective fields.

Next, we must specify the conversion value. For this, we will use our value data layer variable. Click on the Lego icon beside the conversion value field.

Select the variable we made for the value. Next, repeat the steps above for the transaction ID.
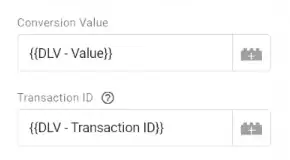
We want to avoid duplicate tracking of our purchases, so ensure you enter the transaction ID correctly. Another setting we can change is the currency code.
Adding a Trigger
What kind of trigger should we select? Remember, back in our Tag Assistant, we have our purchase event that fires whenever a user completes a purchase.
Our Google Ads conversion tracking tag should also fire alongside this event. Therefore, we will select the Custom Event trigger type.

Type purchase for the event name. Next, provide a name for the trigger, then click Save.

Finally, we should also provide a name for our tag and click Save.
Conversion Testing
We come to the most exciting part – testing. Preview the tags again, and finish purchasing until you reach the thank you page.

Let’s go to our Tag Assistant and see what happens.
We have now fired our purchase Google Ads conversion tracking tag.
Click on the purchase event and confirm that we indeed fired our tag during this event.
Go to the Variables tab and confirm that our data layer variables have the correct transaction ID and value.
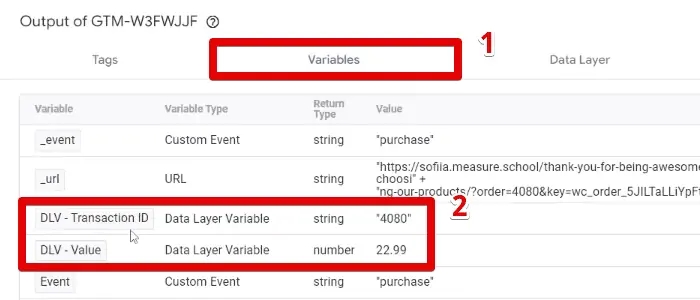
If you see this data and the values are correct, great! You have set up everything correctly.
Next, the most essential step you should not overlook is to publish the GTM container.
Go back to Google Tag Manager and click Submit.
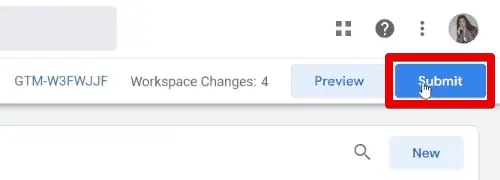
Again, you can provide a descriptive version name or leave it. We recommend you keep everything structured and organized by giving a name. Next, click Publish.
Here we go! We have published our GTM container on our website.
Go back to Google Ads. We can see the status of our sign-up form is now “no recent conversions.” Now, our purchase conversion action is unverified.

The status of our conversion actions is acceptable. To start recording conversions, you have to fire your tag and wait for users to click on your ads and make a conversion.
Summary
We hope you managed to set up your Google Ads conversion tracking correctly. To recap, we covered what a conversion is, how to create a conversion action in the Google Ads interface, and how to set up conversion tracking with Google Tag Manager.
We looked at two scenarios of conversion tracking: a simple one that tracks a sign-up form and a more advanced approach that deals with the dynamic values of a purchase.
The next step after conversion tracking is analysis. A great tool that gives you a more holistic overview of what’s happening with users coming from Google Ads is Google Analytics 4.
Using these two tools allows you to get rich insights about your users. They can help you better understand the performance of your marketing efforts. If you’re interested in using them, check out our guide on How to Link Google Ads to Google Analytics 4.
What actions did you find the most valuable on your website? Let us know in the comments below!
FAQ
How do I implement Google Ads conversion tracking for simple conversions, e.g., form sign-ups?
1. Create a conversion action in Google Ads that does not assign a monetary value for the conversion.
2. Set up a Conversion Linker tag in Google Tag Manager.
3. Install the Google Ads conversion tracking tag that fires upon the user making a conversion.
4. Test and publish the implementation live on your website.
How do I implement Google Ads conversion tracking with dynamic values, e.g., purchases?
1. Set up a data layer to capture eCommerce values. (The Google Tag Manager for WordPress plugin is a great option if you’re using WordPress.)
2. Build Data Layer variables in Google Tag Manager to grab the transaction ID and eCommerce value.
3. Create a conversion action in Google Ads that uses different values for each conversion and counts every purchase as a conversion.
4. Set up a Conversion Linker tag in Google Tag Manager.
5. Install the Google Ads conversion tracking tag that fires upon the user making a purchase.
6. Attach the transaction ID and eCommerce value Data Layer variables to the conversion tracking tag.
7. Test and publish the implementation live on your website.


")
Hi, i have problem about tracking 3d secure payments. this type of payments starts new session and i thik its impossible to track in analytics or adwords.Do you have any solution about this problem? Thank you.
no, just make sure the user is redirected back to the Thank You page.
Hi Julian, I have a problem with currency – for example – I have Google Ads in currency A. Website datalayer is in currency B. My currency in Ads is automatically converting to Google Ads currency A. Is there any way to have still currency B in Google Ads. I know that I will have different currencies in ads spend and conv. value, but I want to implement it like this if it’s possible. Thanks.
no, that’s not possible.
Hi,
Just wanted to clarify – This will show the value of conversions only if the conversion comes from Google Ads, right?
Yes, correct.
Hey Julian,
Thanks for this awesome article!
Couple of questions :
1. You had mentioned that you ‘set up a plugin on our eCommerce store that allows the transfer of the data from the shop system into the order-received page and makes it available to Google Tag Manager’. Could you plz let us know what plugin that is and how it’s to be configured?
2. There’s a new feature in Beta called ‘Conversions with Cart Data’. Would this eventually replace the need to have a data layer in order to track conversion value?
Ref : https://support.google.com/google-ads/answer/9028614?hl=en
Hi Mohamed,
The Plugin for WordPress is called GTM for WordPress https://gtm4wp.com/. Depending on what shop system you use, you might want to search for a plugin that can do the same.
No, conversions with Cart Data still need to have the tracking installed correctly. If you use GTM, then a proper dataLayer needs to be in place first for it to work.
This is a great article!
Question for you: Under the Tag Setup section in Google Ads, I do not see the option to Use Google Tag Manager. Therefore I cannot get the conversion ID and name to plug into Google Tag Manager. Can you help?
Hey Eric,
There was a Google Ads update, and the interface changed a bit. Here’s a short video that would navigate you: https://www.youtube.com/watch?v=S5oVy4XKpG8&t=0s
Thanks for this helpful article!
Do you also have a setup where I can see not only the revenues, but also which products were purchased? So not total conversions, but at product level (Conversions with Cart data?)? Or is that only possible via Google Analytics?
Hey everyone, I have a question about the Google Tag.
If I’m using the Conversion Linker in GTM, do I still need to set up a Google Tag for my Google Ads account? As far as I know, using GTM with the Conversion Linker used to be enough, and previously we didn’t have the option to load the Google Tag in GTM. However, recently I’ve been seeing errors in some Google Ads accounts saying, “Google Tag is missing on the website.”
Thanks