Last Modified on January 7, 2025
You’ve probably just set up a Microsoft Ads account and are wondering what your next steps are. Microsoft Advertising conversion tracking, of course!
No PPC campaign is complete without conversion tracking to measure how many leads or purchases it generates. In this quick guide, you’ll learn how to install Microsoft UET Tag with Google Tag Manager (GTM).
Setting up your ads is just half of the picture when it comes to PPC. The Microsoft Universal Event Tag (UET) is a piece of code that will allow you to track your conversions and remarket to your audience.
Without it, you won’t be able to establish the value of your ads.
Without conversion tracking, you’d have no way to know how successful your ads are. What you deem as a conversion will vary based on outcomes you’d like your customers to take and what helps your business grow.
What actions or events you track will depend on what type of business you are advertising. For instance, you would track a purchase for an eCommerce store.
Alternatively, you would track a form fill for a service-based company looking to generate leads.
Conversions should be a valuable action. Other examples of common conversions are email signups, newsletter signups, and phone calls. Your conversion goals should align with your business goals like brand awareness, sales, or generating leads.
An overview of what we’ll cover:
- Prerequisites
- How to Set Up Microsoft Advertising Conversion Tracking
- Generating the UET Tracking Code
- Creating a Microsoft Ads Tracking Conversion Goal
- Testing Your Microsoft Advertising Conversion Tracking
Prerequisites
Before getting started, two preliminary steps will assist you in following the remainder of this guide. First, locate your UET tag ID, and second, install the UET Tag Helper extension.
How to Set Up Microsoft Advertising Conversion Tracking
Getting started with Microsoft Advertising conversion tracking is relatively straightforward. You’ll need to:
- find or create a UET code that we’ll install on all pages using GTM
- set up a conversion goal in Microsoft Advertising and GTM
- test your Microsoft Advertising conversion tracking
Finding the UET Tag ID
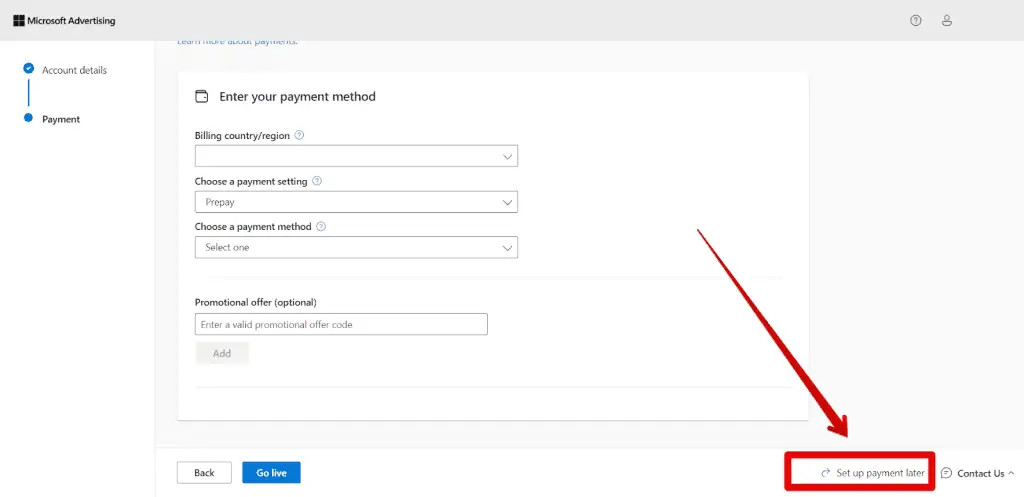
You can start setting up your Microsoft advertiser account by clicking here. During the onboarding, if you’re only interested in practicing conversion tracking, you can skip adding your billing info by selecting Set up Payment Later at the bottom right.
Step #1: Generating the UET Tracking Code
Similar to the Facebook Pixel, we will install this code on all our website pages.
In the navigation:
- Click Conversions.
- Click the UET tag.
- Keep note of your Tag ID.
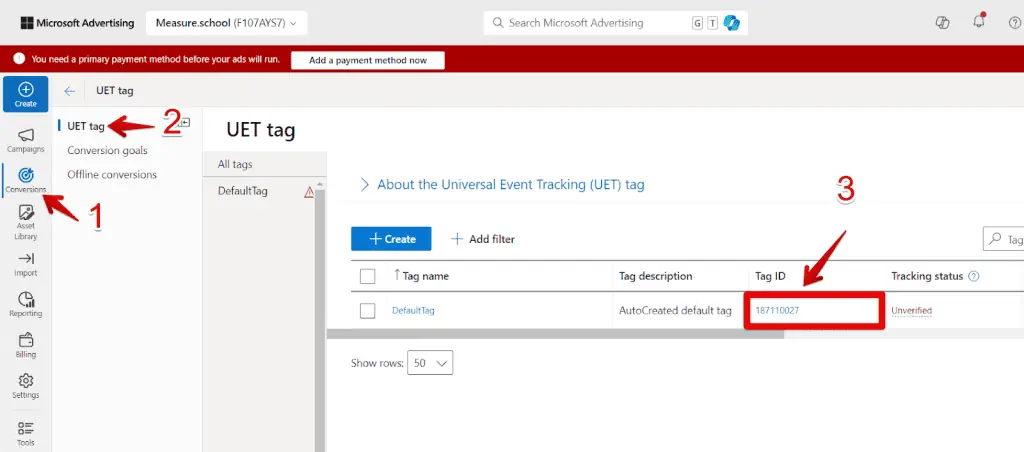
This tag is created automatically, as you can see, with the Tag name which has the value of Default Tag, and the Tag description which is AutoCreated default tag.
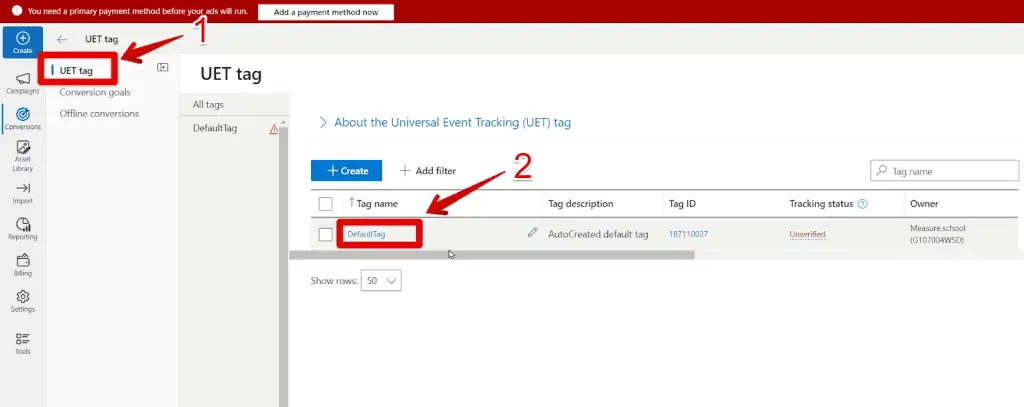
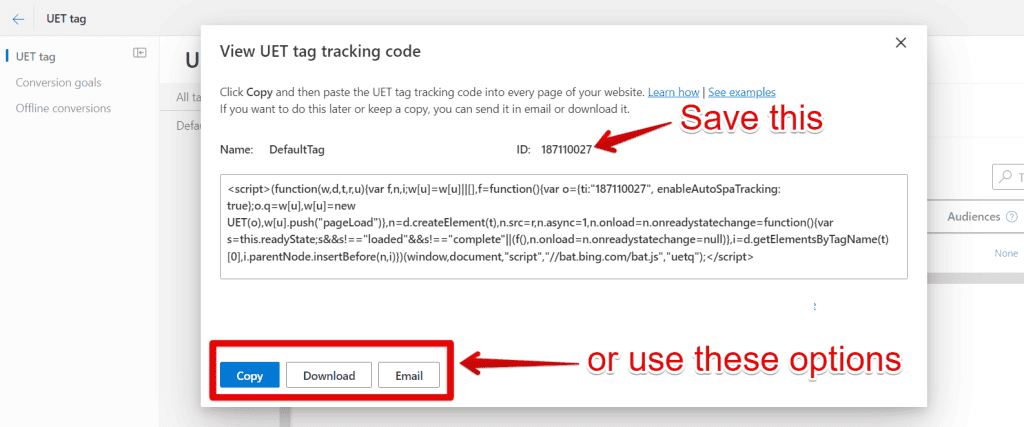
View the UET tag tracking code, stay on the same page, and scroll horizontally until you reach the Action column. Click View tag.

You’ll now see a pop-up with your code. This is the tag you’ll have to install on all pages of your website. We’ll save the ID and use it in GTM.
In Google Tag Manager, create a new tag:
- Click Tags.
- New.

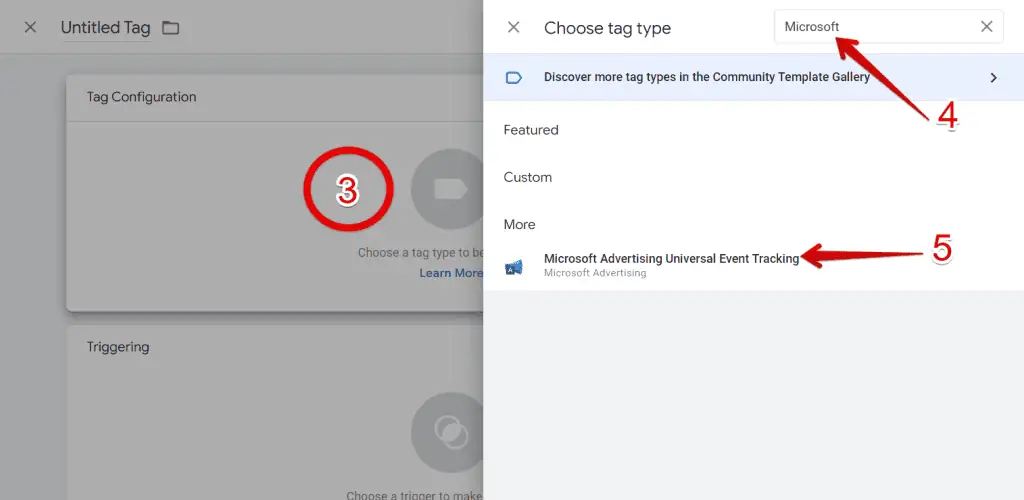
- Click Tag Configuration.
- In Choose tag type, type Microsoft in the search bar.
- Click Microsoft Advertising Universal Event Tracking.
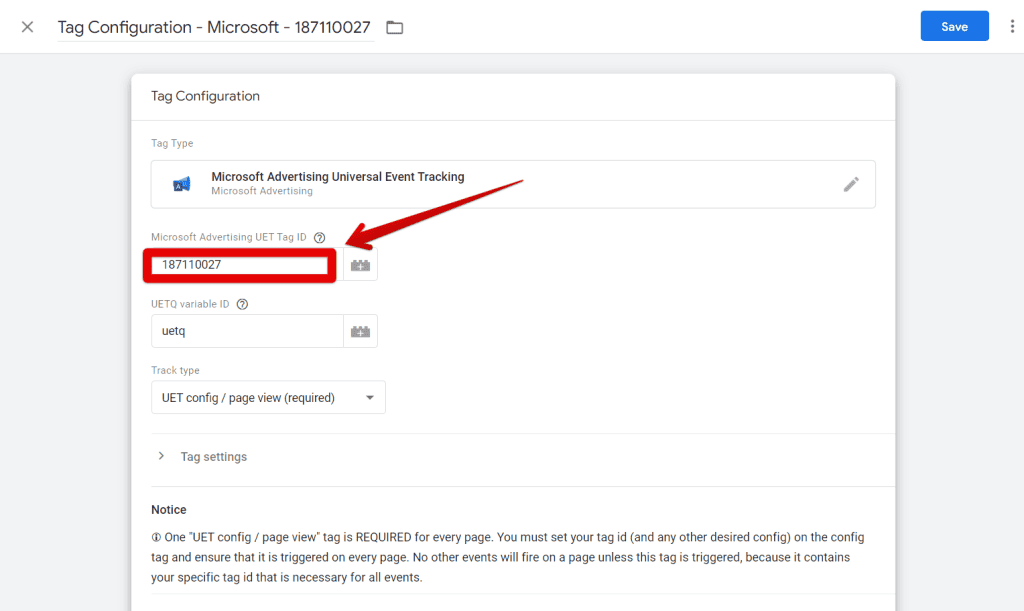
Under the Microsoft Advertising UET Tag ID, paste your Microsoft Advertiser ID.
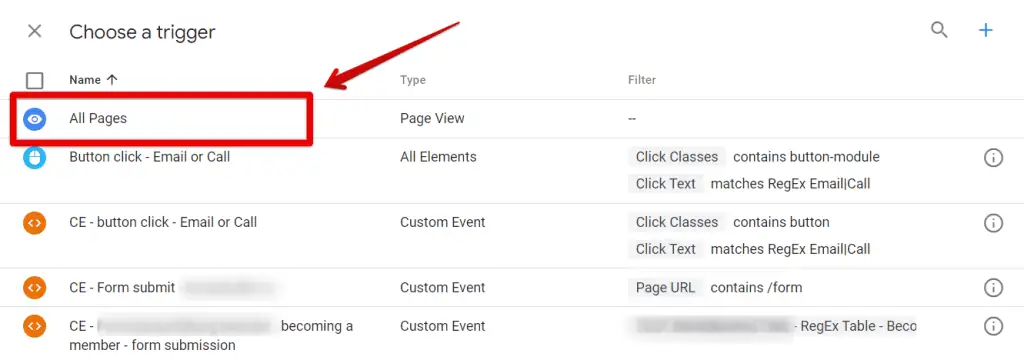
Click the Triggering box.

Select All Pages.
Use a meaningful name for your tag and click Save.
Installing the UET Tag Helper Extension
To help you with your configuration and tracking, the extensions will ensure that you’ve set up Microsoft Ads correctly by verifying that:
- Your tags are functioning properly.
- Your conversions and remarketing are working.
- Any other issues are identified along with suggestions on how to resolve them.
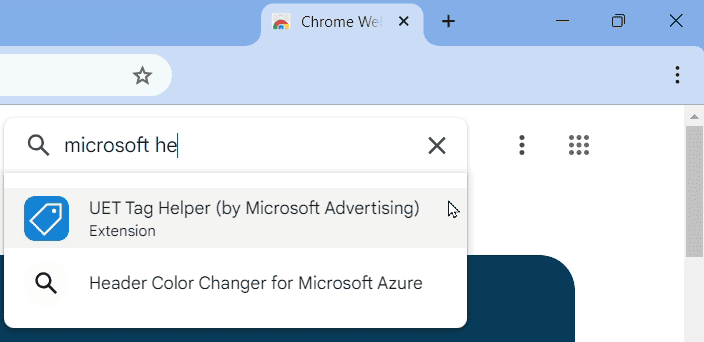
You can install it on Chrome here UET Tag Helper (by Microsoft Advertising).
Step #2: Creating a Microsoft Ads Tracking Conversion Goal
Once you’ve finished creating a UET tag and have saved the code for later, the next step is to create a conversion goal. The Microsoft UET tag tracks the conversion goals, such as form fills.
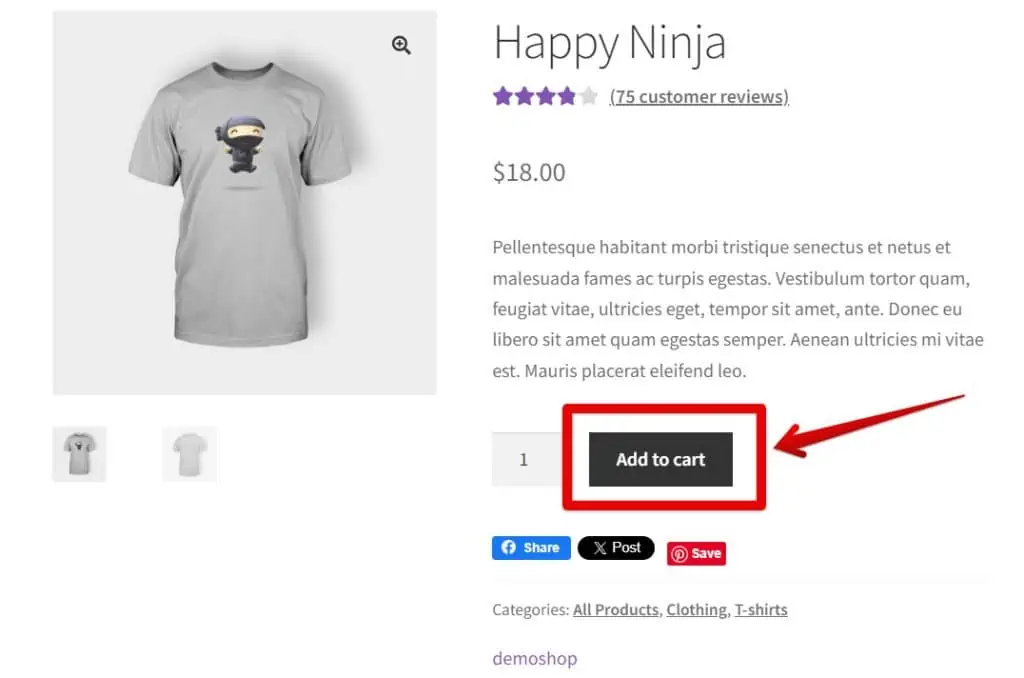
To illustrate how we track the value of products added to a cart on our demo shop website, let’s consider an example.
When a user clicks the Add to Cart button for an item, like our Happy Ninja T-shirt priced at $18.00, the product value should be sent to Microsoft.
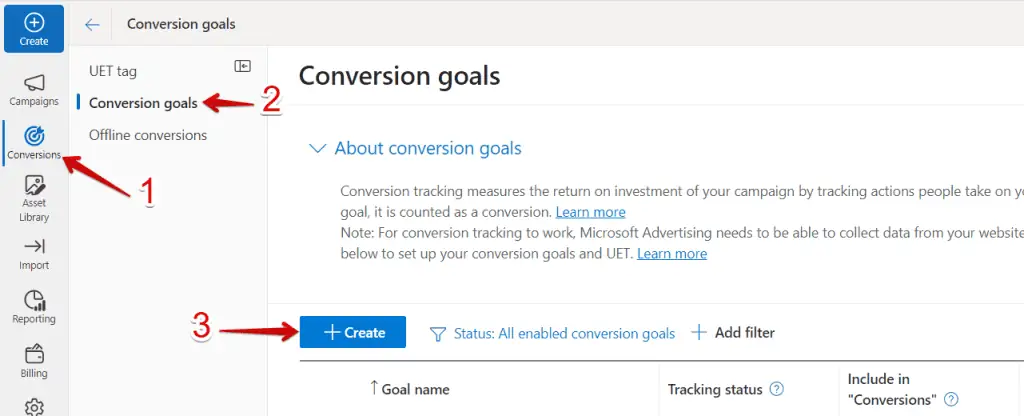
To start creating goals, navigate to the left side of the screen, then:
- Click Conversions.
- Click Conversion goals.
- Click + Create.
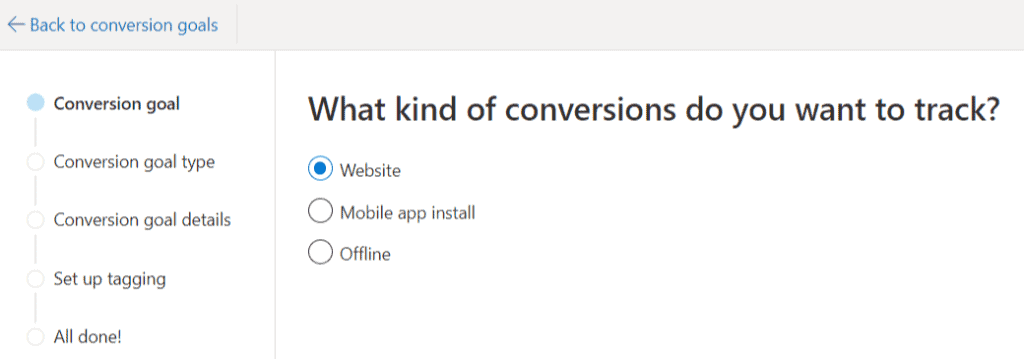
We’ll now go through a series of four steps.
1. Decide what kind of conversion you want to track. We will select Website for our use case.
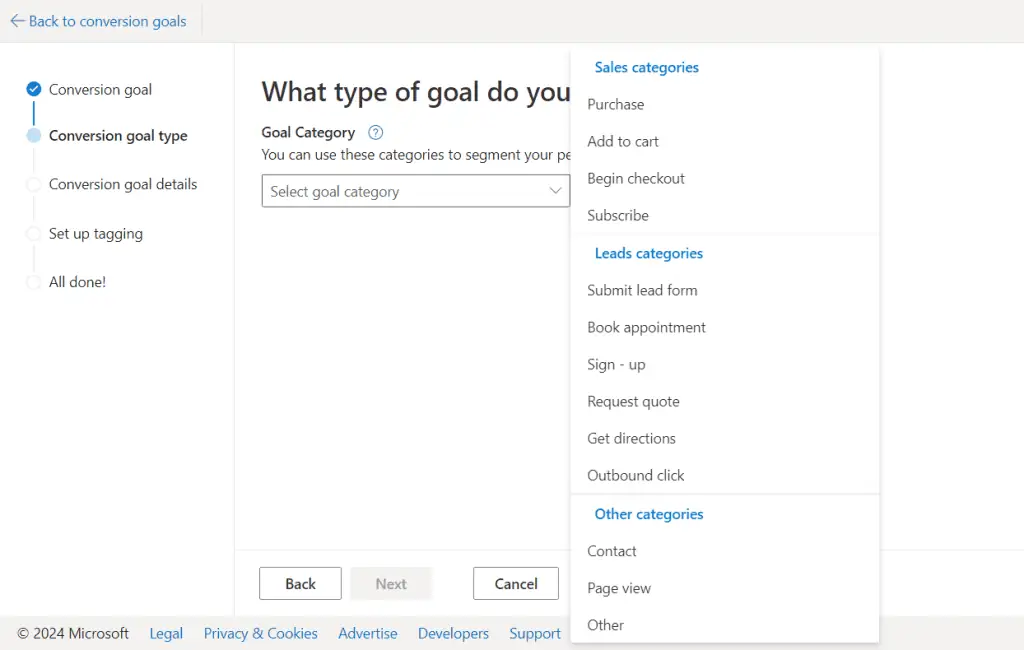
2. Select a conversion goal type
A list of conversion goal types will be listed. For our demonstration, we’ll select Add to.
You’ll then be presented with two options: Destination URL or Event.
Since we’ll be tracking when users click on the Add to Cart button, we’ll choose Event. If your GA4 event or conversion is tied to a URL, select Destination URL.
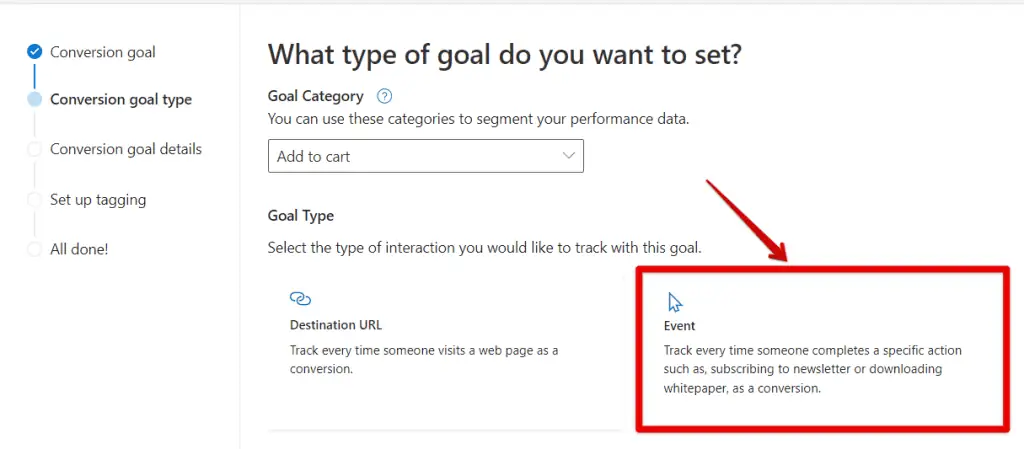
3. Conversion goal details
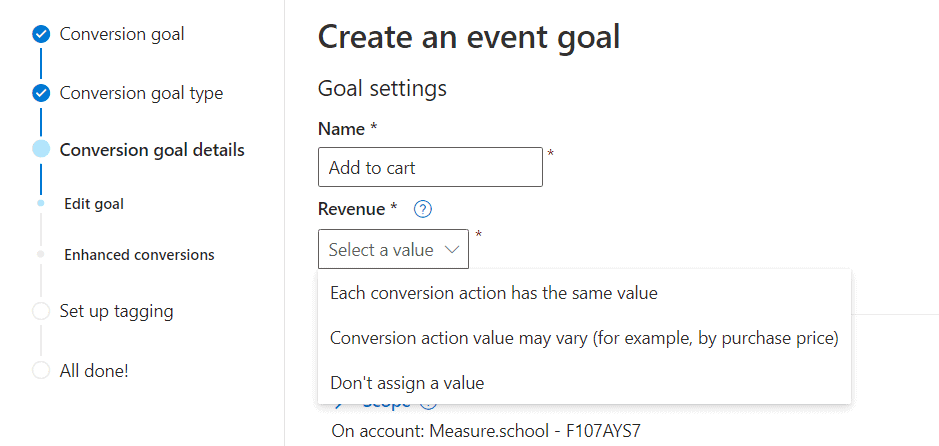
This section allows you to name your event and select how you’d like to set the Revenue value.
Because we’re tracking value from online products, we’ll need to substitute this value with a dynamic one, thus choosing this option:
- Conversion action value may vary (for example, by purchase price)
🚨 Note: for this option specifically, the Revenue value is not the value of a product. Microsoft defines it as the default amount to be used when no value is received for a conversion.
For product items, this value will come from the Data Layer. If you’re unfamiliar with what a Data Layer entails, please read our post on How to pull important data with the Data Layer Variable in Google Tag Manager.
In essence, the dataLayer serves as a repository for information that isn’t readily accessible by default within Google Tag Manager (GTM). This data can subsequently be leveraged for your triggers and other GTM functionalities.
In our case, we’re using the GTM4WP plugin by Thomas Geiger. This plugin helps us with eCommerce by automatically sending eCommerce event data, like “Add to cart” to GTM.
What we’ll have to do is create a custom event variable to use the add-to-cart event as a trigger.
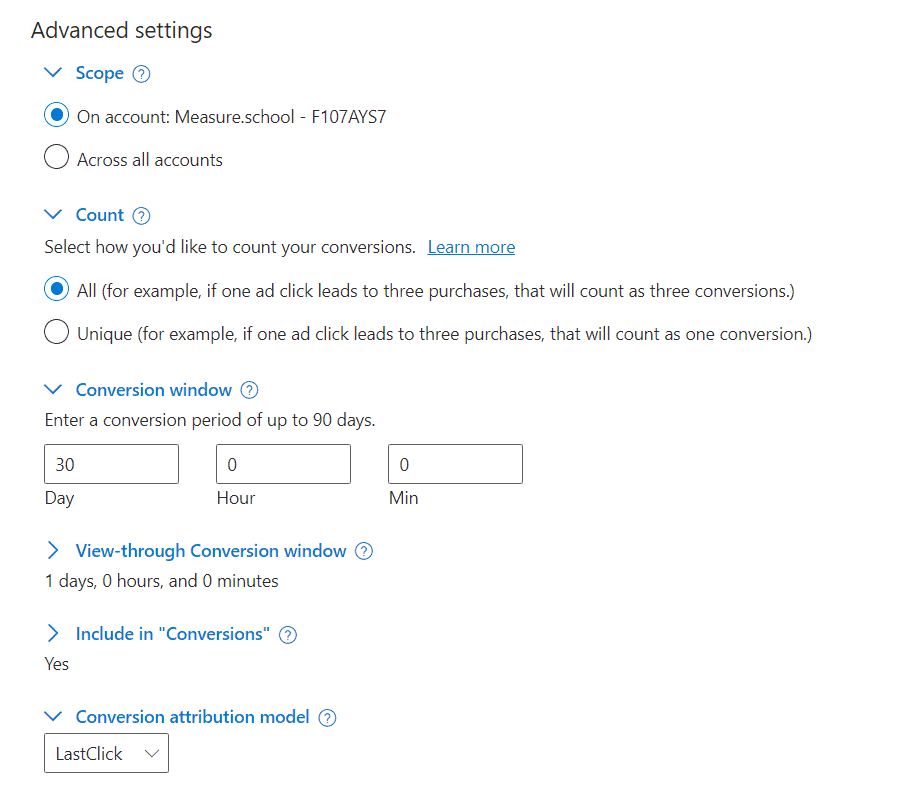
Below Revenue value, there are Advanced Settings you can use to refine your conversion tracking, including:
- Scope
- Count – This is how your conversions will be counted. The options are all or unique. Unique is best for lead gen campaigns, and All aligns with eCommerce campaign goals.
- Conversion window – The period after interacting with your ad during which completing your goal action will be considered a conversion. For instance, if I sign up for your newsletter 10 days after clicking your ad, and your window is 10 days or more, it will be counted as a conversion. The window can be any number up to 90 days.
- View-through Conversion window – This is a little bit different than the Conversion Window. In a view-through conversion, the user doesn’t need to click the ad. Instead, a conversion happens when an impression is recorded, and then that person completes the goal action. This window can be up to 30 days.
- Include in “Conversions” – Check this box if you want to see the conversions in the data table. Not checking the box means your conversions will not appear in the conversion column, and it will affect bid strategies that use conversions in their optimization processes.
- Conversion attribution model – You can choose between LastClick and LastTouch models.
Once you’re done, click Next.
Now, you’ll be guided on how to install your tag using a Microsoft no-code feature. Simply navigate to the website and, in our example, click the Add to Cart button. Alternatively, you can choose manual installation, which is the method we’ll be using.
4. Set up Tagging
Now it’s time to set up your tagging. This part is simply about making sure you have the UET tag installed on your website or not for your conversion event tracking to work.
Our selection may confuse you as we did not create a goal before. However, simply remember this:
- If you didn’t install the UET tag, come back to the Finding the UET Tag ID section, and follow the steps until you’ve installed the code with GTM. Then come back where you left off and select: Yes, the UET tas was already installed on all website pages when you created another conversion goal or audience list.
- If you’ve already followed our steps and have deployed the tag using GTM, select:
Yes, the UET tag was already installed on all website pages when you created another conversion goal or audience list.
Which is what we did.
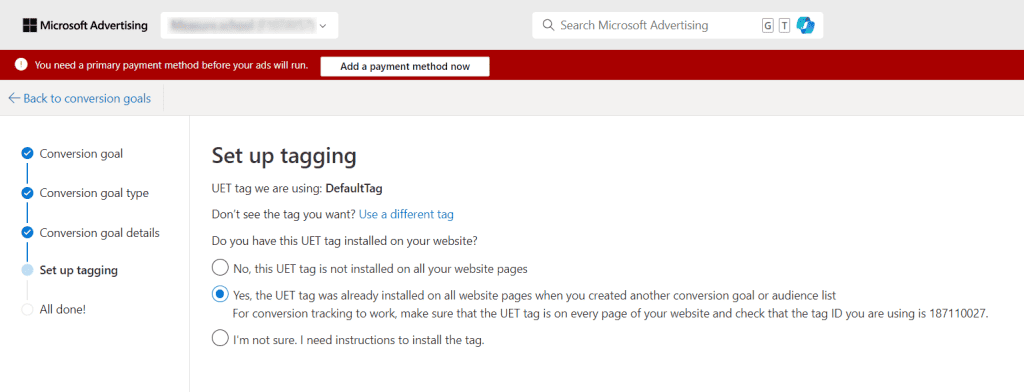
After clicking Next, we’ll select the Manual Installation option.
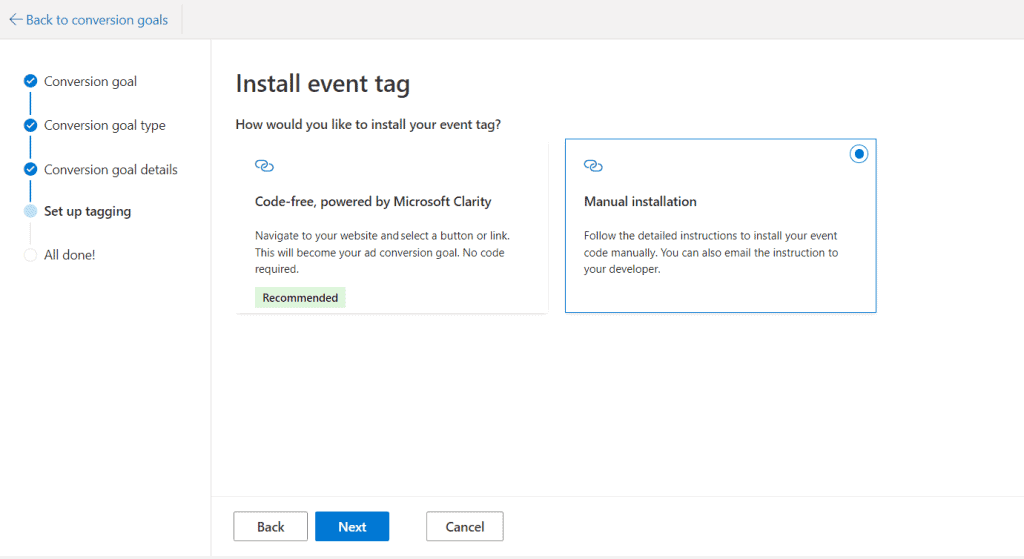
Click Next. Under the Install event tag, click Save and Next.
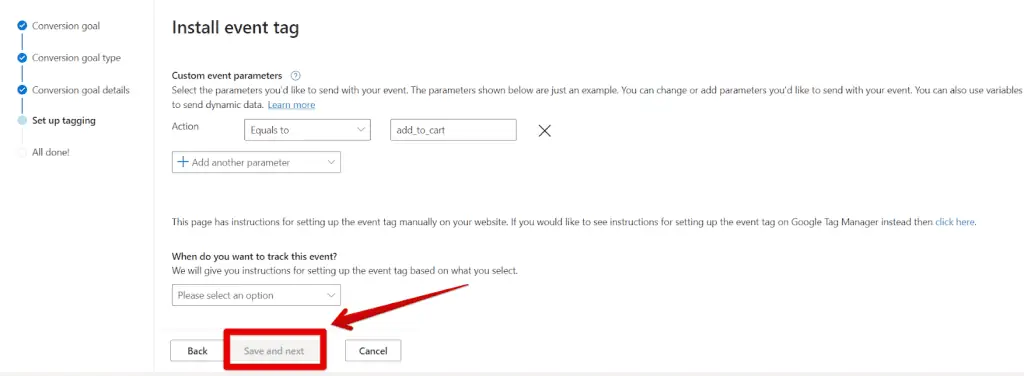
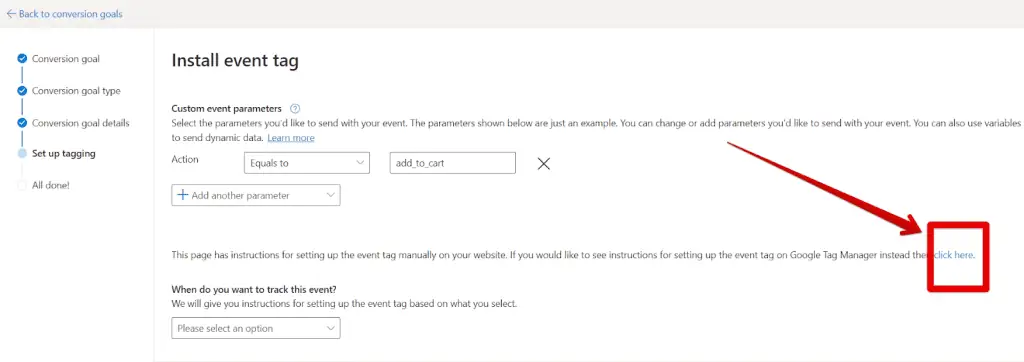
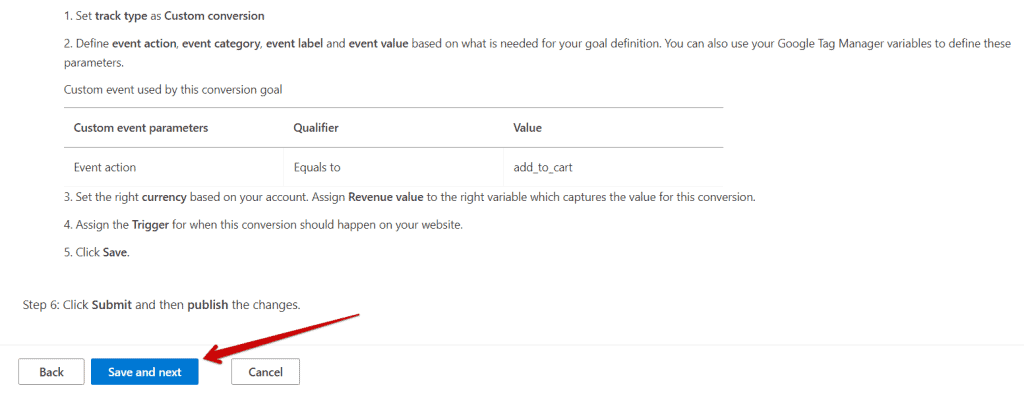
Because we’re using GTM, just follow the steps for setting up the event tag in Google Tag Manager. You can find these steps by clicking on the Click here link.
Click Save and Next.
And you’re all done!
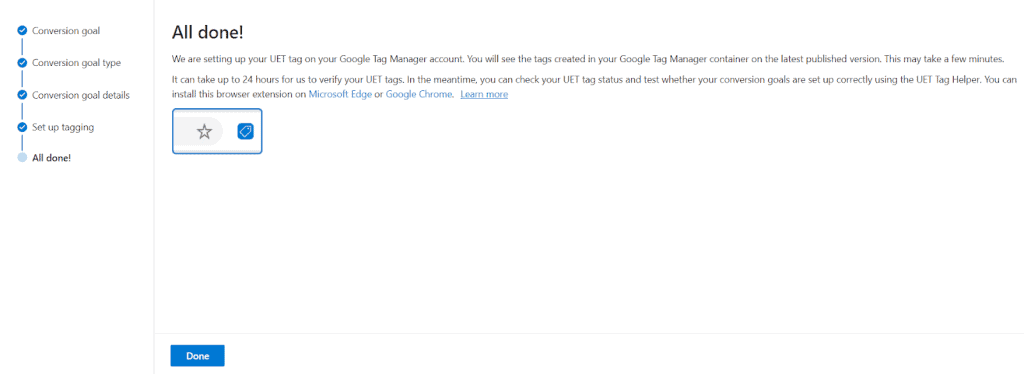
🚨 Note: It can take up to 24 hours for Microsoft to verify your UET tags. Therefore, you should keep an eye on your UET tag status by testing if your conversion goals work using the UET Tag Helper extension.
Click Done.
Custom Event Tag
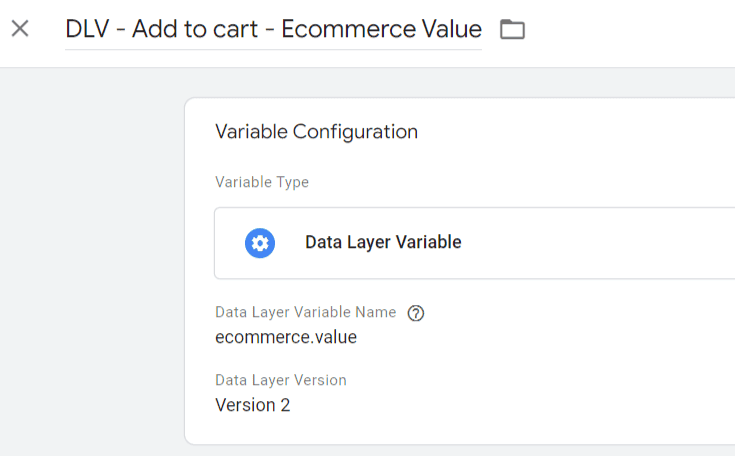
First, we’ll need to use the GTM dataLayer Variable to read Add to Cart values.
- In variables, scroll down to User-Defined Variables → Click New.
- Click the Variable Configuration box.
- In Choose variable type, select Data Layer Variable.

In GTM, have a look at the dataLayer for your Add to Cart event.
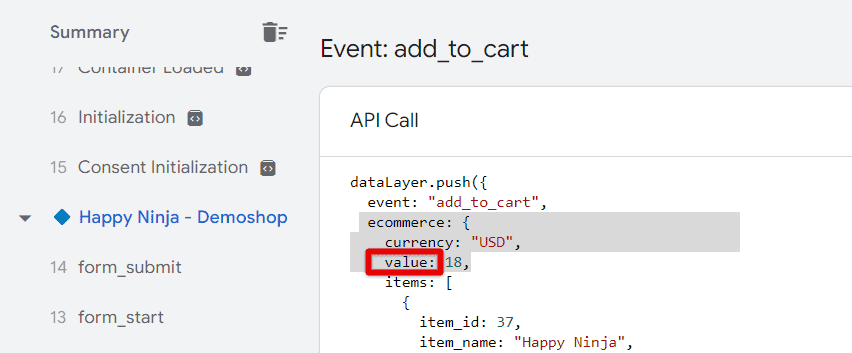
We are interested in the values of products added to the cart. To get this information we’ll need the right value key.
But since it is a JavaScript object, just writing the key pair value in the Data Layer Variable Name won’t do anything. You need to follow its structure.
The value key is part of the eCommerce object, so you’ll have to type ecommerce.value in the Data Layer Variable Name.
For custom events, you should now add the Event Parameters. However, since we’re tracking eCommerce data, we’ll use a track type.
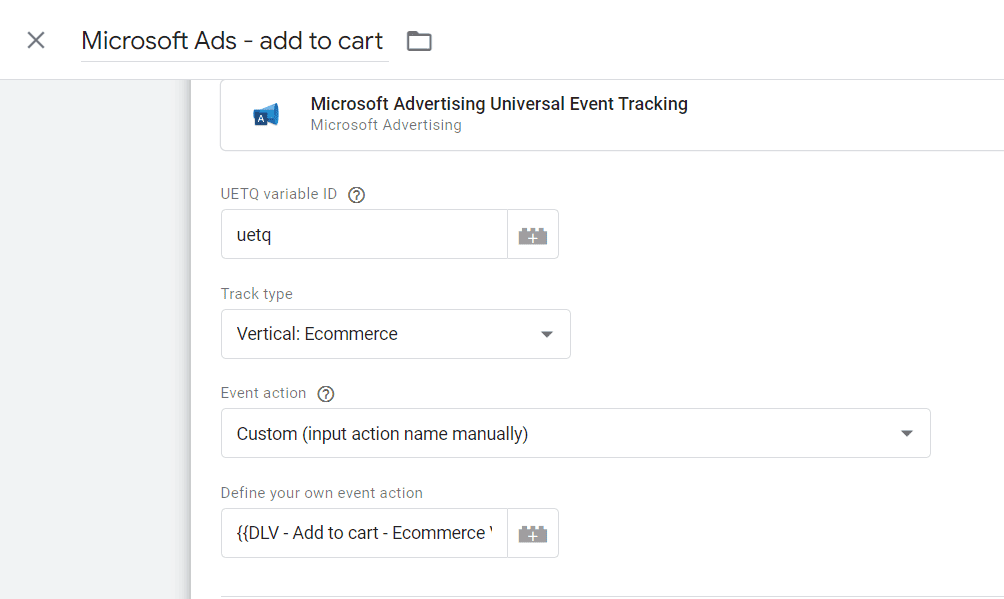
Follow the same steps we did earlier to configure the Microsoft Advertising Universal Event Tracking. Except this time, to track our Add to cart conversion:
- Click the Track type dropdown arrow.
- Select Vertical: Ecommerce (that is because tracking eCommerce data, we’ll use a track type.
- In Event action, select Custom (input action name manually) as we will determine the name.
Step #3: Testing Your Microsoft Advertising Conversion Tracking
You’ve added your Microsoft UET code to Google Tag Manager and created a tag for custom events. It’s time to test your tag to make sure it fires. You can use the preview mode in Google Tag Manager or the Microsoft UET Tag Helper.
Check UET Tag
Let’s start by using the Preview button located on your Workspace tab. Once you press preview, navigate to your page.
Complete the event action. Check for the Microsoft UET Tag Configuration under Tags Fired. If you see it there, you know you’ve installed the UET tag correctly.
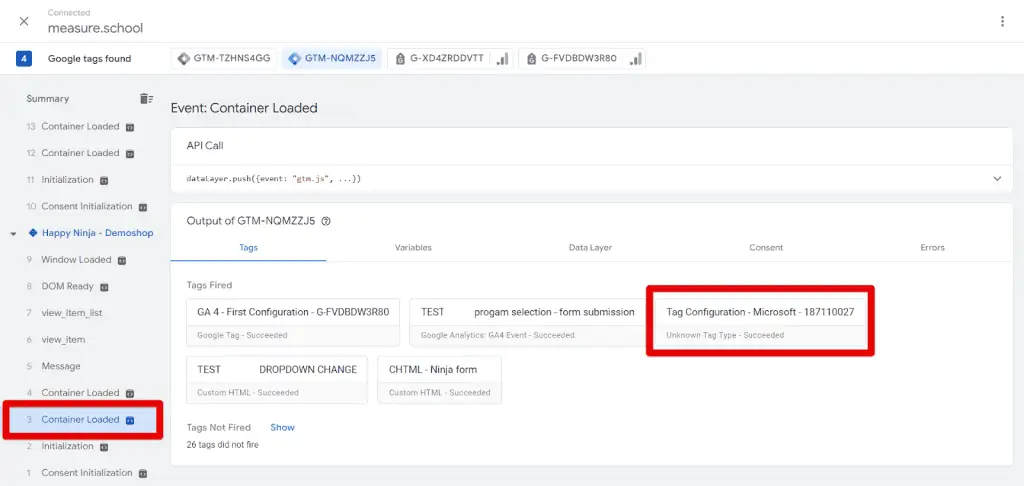
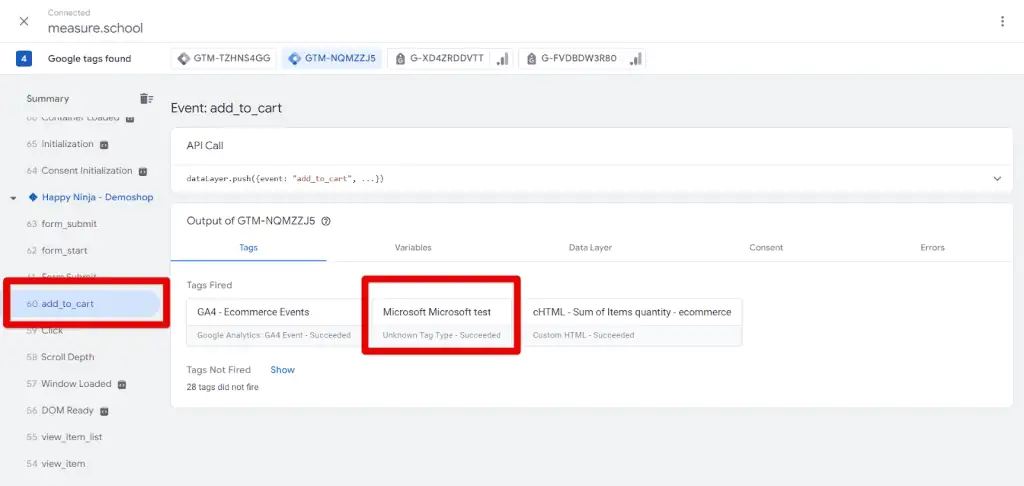
To check your custom event, you will complete the action and look for the tag to fire the way your UET tag did.
If you are pressing a button, you will need to ⌘+click (Mac) or Ctrl+click (PC) to keep you from navigating away from the page and not being able to see the tag fire.
Check Your Microsoft Ads Tracking with Microsoft UET Tag Helper
Another way to find out if your tags fired is to use the UET Tag Helper. Navigate to the page. Click your browser extensions and turn on the UET Tag Helper.
Use the extension to see if your UET tag is firing. You may have to refresh your page. If your tag was installed correctly, the extension will let you know straightforwardly with this message:
“This UET tag is set up correctly“.
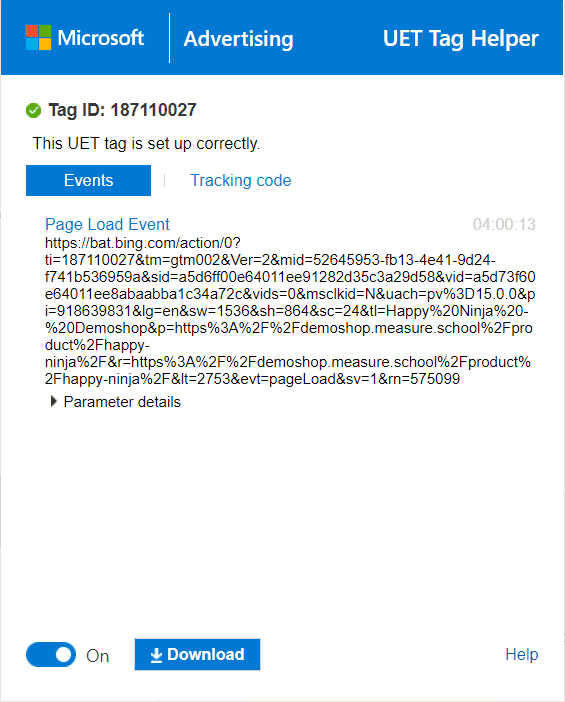
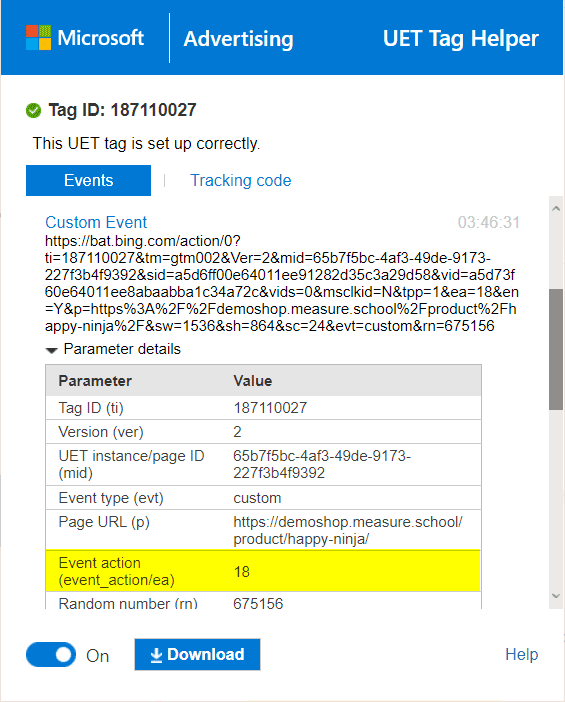
Next, complete your custom event action and check to see if it registers with the Microsoft UET Helper. In our case, this is clicking the add to cart button associated with the $18.00 Happy Ninja t-shirt.
Under Custom Event, in the Parameter details, check the Event action. You’ll notice that it has a value of $18. This is the value of the Happy Ninja t-shirt introduced at the beginning.
FAQ
How do I test my Microsoft Advertising conversion tracking?
You can test your Microsoft Advertising conversion tracking by using the preview mode in Google Tag Manager or the UET Tag Helper. In the preview mode, complete the desired event action and check if the UET tag and custom event tags fire correctly. The UET Tag Helper is another tool that helps verify if your tags are firing as expected.
What actions or events should I track for conversions?
The actions or events you should track depend on the type of business you are advertising. Examples include purchases for an eCommerce store, form fills for service-based companies, email signups, newsletter signups, and phone calls. Your conversion goals should align with your business objectives.
What is the significance of tracking conversions?
Tracking conversions allows you to assess the success of your ads and measure their impact on your business goals. It provides valuable insights into the effectiveness of your PPC campaigns and helps optimize your advertising strategy.
Summary
We’ve walked you through the steps of setting up Microsoft Advertising conversion tracking and adding it to your website with Google Tag Manager.
To summarize the steps for tracking Microsoft Ads conversions, start by creating your Microsoft Advertising account. Then, locate the Universal Event Tracking (UET) Tag ID, which is essential and must be installed across all your pages.
Once this is in place, you can proceed to create a Custom Event Tag to monitor your conversions.
You can now successfully measure your Microsoft Advertising conversions. Want to learn more about GTM? Take our course GTM Beyond the Basics!


Hi Julian,
thank you for the guide, it’s really clear and useful 🙂
I have a question about the Custom Event Tag in GTM. Why did you suggest to create a Custom Javascript Variable? If we’re passing a static value for Category and Action, wouldn’t it be easier to use a Constant string variable or just type in the value?
Thanks,
yea, you could use different methods
Scroll down to find Bing Ads Universal Event Tracking or use the search box at the top.
Is there a reason why I do not see “Bing Ads Universal Event Tracking” option in my Google Tag Manager?
It has been renamed to
Microsoft Advertising Universal Event Tracking
thanks for letting us know!
Are you going to update your instructions for ‘Microsoft Advertising Universal Event Tracking’ at some point? The configuration process/options look a little different now. Anyhow, thanks for providing these resources. Very helpful stuff!
Hi Julian. One interesting thing I’ve noticed is that the Bing Ads Universal Event Tracking tag no longer exists inside of Google Tag Manager.
Do you know when that was removed?
yes, true. It’s gone. Hopefully it will be back soon
Hi Julian,
Thanks for the great tutorial once again! Question. Usually we use DataLayer variables to retrieve revenue. We noticed when adding a DLV with the revenue once the tag is fired the revenue is “undifined”. Does the Microsoft Advertising Universal Event Tracking only support Javascript variables? Which wouldn’t make sense because from an ecommerce perspective datalayer variabels are preferred.
Hi Julian!
How to setup server side tracking for Bing ads conversion with google tag manager? could you please tell me the process? thank you.
Hi Julian,
thanks for that. Is there also a solution to send the Custom Events from the serverside container? Like for the GAds Conversions?
Do you have any content, how to set this up?
I think there is a mistake in your how to.
event_action should not be the event value. It should be something like “add_to_cart”
Good catch @diesdasannanas!
I’d recommend using the Custom conversion for the Track type in the Microsoft Tag. The “Vertical: Ecommerce” option can sometimes lead to issues, so you may have better trouand Microsoft’s examples and documentation still uses the Custom conversion. We’ll update the post to reflect these details.
for purchase conversion, I am using the datalayer variable to send the revenue value, but when I go to the preview mode of GTM and purchase any product, the datalayer is firing properly and variable collects the revenue. Still, when I goto the tag section in preview mode and open the bing ads tag which is fired, I am not able to see my actual revenue value it shows only ‘{}’. due to that, my bing ads are not generating revenue for purchase,
can anyone help me why this is happening