
Last Modified on January 9, 2024
Do you want to connect Shopify and Facebook Ads?
If you’re selling your products in an online store using Shopify, then using Facebook Ads along with this subscription-based software can help you reach your ideal customers on Facebook, Instagram, and Messenger.

Subscribe & Get our FREE GA4 Course for Beginners
Both tools can become very useful for your business if you know how to properly connect them. They will allow you to target your specific audience based on what they like, their interests, behaviors, and other crucial details at any stage of the sales funnel.
In this tutorial, we’ll cover how to set up Facebook Ads for Shopify, how to confirm if events are being sent properly to the Events Manager, and the ad structure for an eCommerce store.
Here is an overview of what we’ll cover:
- Connecting Facebook to Shopify
- Creating a New Campaign
- Interests Ad Set
- Lookalike Audience Ad Set
- Retargeting Campaign
Let’s dive in!
Connecting Facebook to Shopify
Setting up Facebook Ads for Shopify starts with adding the Facebook channel app from the Shopify app store.
In your Shopify account, go to Apps → Facebook channel.

If you’re not seeing this under your app recommendations, click on View more apps in this collection.

After logging into your account again, you’ll be directed to the Shopify app store.
Here, click on the Facebook channel.

Then, click on Add app.

You’ll be directed to a page containing the permissions you will allow Facebook to do if you add this app to your Shopify account.

To proceed, scroll down and click on the Add sales channel.

You can determine if this sales channel has been added successfully if you see on the left side of the screen that Facebook has been added as a sales channel. Here, click on Start setup.

We are then directed to a page where the steps in setting up a Facebook shop are laid out.

We’ll go through the individual steps shortly. Keep in mind that since this is a demo account, a Facebook shop will not be created and some steps cannot be completed. However, we will still discuss what you should do to complete the Facebook shop setup.
Since you have a real store, you’ll be able to publish your feed on Facebook and Instagram. You’ll have to wait for a bit until it gets approved, but then you can use content from your feed inside your ad campaigns. More on this later!
Before proceeding, you’ll need a business manager or a Facebook page. Follow our guide on how to set up a Facebook business manager account, where we discuss how to put all your different assets inside the business manager.
The first step of the Facebook shop setup involves connecting to your Facebook account.
Click on Connect account.

Log into your Facebook account, and select the business manager associated with your shop. In the Business Manager section, all of the Business Manager accounts you or your organization handles will be listed.
Click Connect on the business manager account that you want to handle your Shopify store.

The next step is domain verification.
Since this Shopify store is created for demonstration purposes, the online store is not yet verified. You can choose to skip this step, but we recommend that you proceed with the verification process if you haven’t already.
Once your domain is verified, you should see a green checkmark in place of Pending review. Click on Confirm to proceed.

Next, we’ll select the Facebook page you will be using to sell your products or post your ads.
Besides this Facebook page, click on Connect.

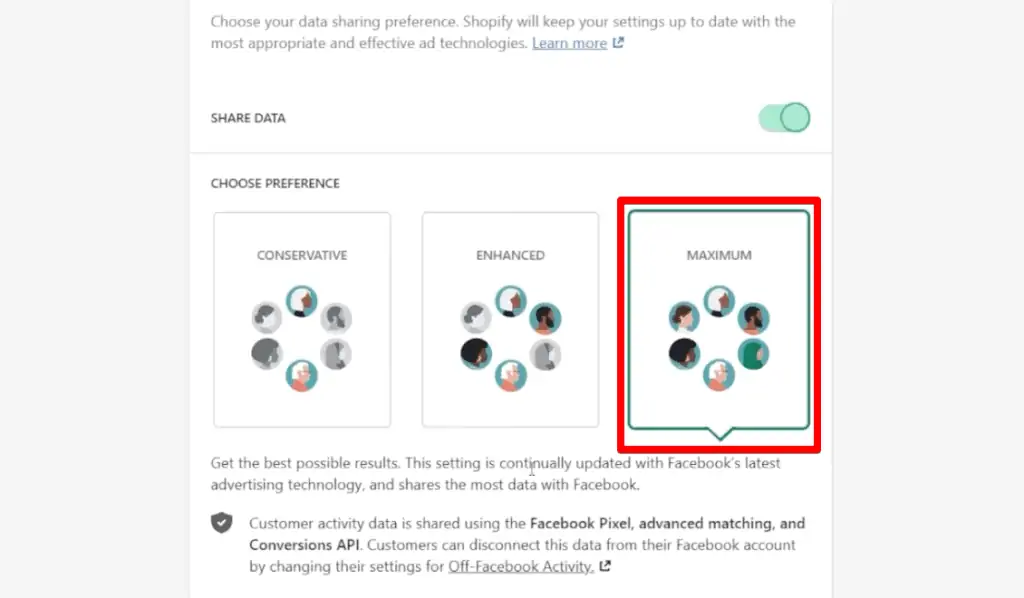
The next part involves choosing how you want data to be collected and shared between your online store and Facebook. In the data-sharing settings, you have three options to choose from – Conservative (now called Standard), Enhanced, and Maximum.
The Standard option uses the Meta Pixel to collect data from customer browsing behavior.
The Enhanced option uses the Facebook Conversions API with the Meta Pixel to send purchase event data that can’t be blocked by browser-based ad blockers.
Instead of sending data through the browser, information is sent from server to server so it is more secure.
The last option, Maximum, uses both the Meta Pixel and the Facebook Conversions API and is updated with Facebook’s latest advertising technology.
You will get access to advanced matching where you will send information like your customer’s name, location, email, and phone number to Facebook.
This will then be used to better match users on Facebook’s network, allowing you to see more results in your campaigns.
We recommend choosing the Maximum option to have access to all these different features, especially post-iOS 14.
Scroll down and click Connect on the pixel you will use to track customer behavior.
The next step involves connecting products from your Shopify product catalog to a Facebook Commerce Account. Since this is a demo shop, there aren’t any real products being sold so Facebook has flagged my account.

You will likely not run into this problem, so just click on Connect beside your product catalog. Lastly, just accept the Terms and conditions, and click on Finish setup.

Your Shopify store should now be connected to Facebook.
Testing Facebook and Shopify Integration
Before proceeding to set up Facebook Ads for Shopify, we need to verify if events are being sent properly to Facebook.
Go to the Meta business suite, and click on All tools → Events Manager.

Here, click on the Test events tab. On the Test Browser Events section, put in your website URL and click on Open website.

Go through the purchase process on your website – view a product, add it to your cart, and make a trial purchase. Then, go back to the events manager and see if you’re seeing each event of the purchase process, especially the purchase event.
It is necessary to check the Shopify and Facebook integration because all themes are made differently. Some themes don’t work well with the native Shopify and Facebook integration.
For these cases, some tweaks need to be made and there are even times when you will need to message the Shopify support team to help out. You can also check out our guide on how to set up Meta Pixel events to manually create any missing events.
We also have a guide on how to fix Meta Pixel errors and test events that you can check out. You can see how to test purchase events and how to use the events manager.
Once you’ve verified that everything is coming in properly, click on All tools → Ads Manager.

Creating a New Campaign
We recommend an ad structure for an eCommerce store that is a combination of prospecting and retargeting campaigns.
Let’s start with creating the prospecting campaign. In the Ads Manager, click on Create.

Next, we need to choose the campaign objective. This section may look different for some users as an update to the Meta Ads Manager objectives, introduced a new set of 6 simplified campaign objectives.
Choosing the right objective based on your business goals is the first important decision you need to make when creating an ad campaign. For an eCommerce store, we recommend optimizing for conversions or sales, for the new set of objectives.
Select Conversions (or Sales), then click Continue.

Let’s name this campaign, Prospecting.

Next, let’s keep the A/B Test and campaign budget optimization settings off.

We’ll turn off the campaign budget optimization option here because we’ll be setting the budget on the ad set level. We won’t enable the A/B test because the content of our ad will be based on whether the campaign is for prospecting or retargeting.
We’ll also make different ad sets to target specific audiences, not only to determine which is performing better, but also so that we can provide a specific budget for each.
Next, go to the ad set level, and name it Interests. For the conversion event location, we’ll keep it on the Website.

Scrolling down a bit, we will then select the conversion event we would like to optimize.
You can choose whatever you want from the list, but we recommend starting with a purchase conversion event.

While we recommend that you try to optimize for purchases when you’re just getting started, if you’re having issues generating purchases, then you could potentially optimize for something higher on the purchase funnel like an add-to-cart event.
We can see a warning message because this is a demo account and the domain has not been verified. If you also see this message but have verified your domain, then you should set up the web events you want to be optimized.
Optimizing Web Events
Go back to your events manager and click on Aggregated Event Measurement → Configure Web Events.

You’ll be redirected to a page where you’ll select a verified domain where you would like to configure your web events.
After selecting your domain, click on manage events, then Edit.

The next page is where we can add all our events, sorted by importance.
In this example, you can see that starting from the bottom, we have the View content, Contact, and Lead events.

This configuration works well for service-based businesses, as generating leads is the most important event for those businesses. For an eCommerce store, you can optimize for View content, Add to Cart, Checkout, and Purchase events – sorted from least to most important.
Adding an event is as easy as clicking the Add Event button, selecting your Pixel in the Pixel/Custom Conversion column, then selecting the event from the list.

Notice that the events list is divided into two sections, depending on if the event has been sent to your Pixel during the past 28 days.
This separation can become a metric for you to determine if you’re properly receiving an event in your Pixel. If you want to add an event from the bottom list, then you may want to check if it is being sent properly to the Pixel.
You can rearrange your events by clicking and dragging on the 6 dots beside the event. Once you’ve sorted the events to your desired priority order, click on Apply.

If, for whatever reason, you’re not seeing the apply button, simply zoom out your screen.
Make sure that everything looks good and is configured properly. To proceed, click on Yes, I confirm these changes, then Apply.

This change should take effect in about 72 hours, and the warning message in the ads manager should disappear at that time.
Ad Set Configuration
Going back to the ads manager, the next thing we want to set is the budget.
You may be wondering how much budget you should put into prospecting and how much should be into retargeting. We recommend setting 70% of your budget towards prospecting and 30% towards retargeting.
Let’s say you have a total budget of $150. For a prospecting campaign, 70% of $150 is $105. We can then divide this number between the ad sets under the campaign.
In this example, we’ll have to create two ad sets. So, let’s set a budget of $50 for the interests ad set, and put the remaining $55 on the other.

Scrolling down a bit takes us to the audience section. Here, we can specify a custom audience to target. We won’t be targeting a custom audience in this ad set, but rather are targeting based on interests.
Since this is a prospecting campaign, we want to exclude the people who are familiar with or have previously interacted with our brand. Our goal for this campaign is to find new people who don’t know the brand.
Click on Exclude.

Since this is a demo account, we don’t have any existing audiences yet.

To create a custom audience, go to the audience manager by clicking on All tools → Audience.

Since this is a demo account and we don’t have real audiences, we won’t go through the process of creating a custom audience in this guide.
The people you should put in this custom audience are those who have been to the website, made a purchase, liked or shared content on both Facebook and Instagram, or going a step further, people who have viewed certain videos on the page.
Once you’ve created a custom audience, import them in the exclude section.
Next, scroll down to locations. This is where you can specify where you want to target.
Click on Edit in the location section.

For most eCommerce brands, the United States and Canada are targeted. However, editing this section depends on your location and where you can ship.
To include a location to target, search for the location in the search bar, and then click on the location from the list.

The next sections are Age and Gender.

For these two sections, it is a good idea to take a look at your Universal Analytics or Google Analytics 4 property and see the ages and genders of users that are coming to your website and making a purchase.
🚨 Note: Since all Universal Analytics properties will stop processing new hits on July 1, 2023, we recommend doing the GA4 migration if you’re still using a Universal Analytics property.
If you don’t have data on your audience and have no idea how old your users are, you can just leave it at the 18 to 65+ age range.
Facebook has a pretty complex AI that understands all this information about its users, and because we’re optimizing for purchases, our ad will only be shown to people that are likely to purchase.
Targeting your audience based on their gender can be important if you’re selling a product that caters mostly to only one gender.
If you did select for only men or women, you might want to change this setting if there is an upcoming holiday like Black Friday, Christmas, or Valentine’s Day.
People will usually buy gifts for their partners or loved ones during these holidays, so targeting all genders during these times can be good practice.
Interests Ad Set
The detailed targeting section is where can add demographics, interests, and behaviors. For this example, the ad set we’ll create will be grouped by interests.
For example, let’s pretend that we’re selling a product in the fitness industry. What we can do is go to Google and search for the most popular fitness brands. You might find brands like Gymshark, Lululemon, etc. We can then add these to the interests inside our ad set.
Type in and select one of the brands in the detailed targeting section.

Scroll back to the top and add Fitness Clothing Brands to the ad set name.

The reason why we want to group our ad sets this way is so that, in the future, if we want to then target gyms, we can duplicate this ad set and only replace the interests.
We can similarly look for the biggest gyms in the United States and Canada and can add them to this section.
You can keep doing this for different ad sets. It is great for learning what kind of people are purchasing and whom should be targeted to result in a cheaper cost per result for our ads.
Depending on your budget, you can start with having only two ad sets, one for interests and another for a custom audience, or even three or four ad sets if you have a higher budget.
Next, we recommend selecting the automatic placements (now Advantage+ placements), especially if you’re just starting.

If you find that a majority of your purchases are happening on specific placements, then you can go ahead and choose manual placements.
This is not the most significant thing that you can change to help with results, so it doesn’t matter much where you will place your ads. Focus more on audiences and creatives, not on the placements.
The last section is Optimization & delivery.

We usually leave these on their default settings. They will not change much especially post-iOS 14 because there’s not much that you can change anymore. The most unfortunate change to note is the removal of the 28-day click attribution setting.
Ad Creation
Let’s now go to the ad level, and this is where we can fully appreciate how the prospecting and retargeting structure works so well.
For those people who don’t know who you are, you can create ads that explain in a few seconds exactly what you sell, their benefits, and why they should purchase from you.
You can use ads that are UGC or user-generated content. You can ask one of your customers to give an honest review of your product and that could be your ad.
What we found for a prospecting campaign is that videos usually perform best, because you can explain your product in more detail compared to an image.
While we found more favorable results for videos, you should still try an image to see which is going to perform better.
At the ad level, select your Facebook page and/or Instagram account, then activate the ad preview.

Scrolling down to the ad setup, we have several options to choose from on how to create our ad. We can create an ad from scratch, use an existing post or use a Creative Hub mockup.

If you have a post that is performing well and is getting a lot of likes and comments, then you can use this post for your ad. This not only brings the post content to your ad but also its engagement.

This could be a good thing as social proof can potentially help with conversions. The only downside to this is you cannot change the headline/ad copy or tweak the message.
Since creating an ad from scratch gives us the most freedom, we prefer this option setup. The ad creatives for this option are media, primary text, headlines, and optional descriptions.

While you can add up to 5 different primary texts, headlines, and descriptions, we recommend only having two to three versions for each.
Next, enable the Optimize text per person option, and choose the Learn more option for the call to action.

The call to action for prospecting can change if you’re doing a sale, where you should probably use the Shop Now option, instead.
In general, using the learn more option is good especially if you have a good landing page or product page describing the product’s benefits. Reviews for your products can also be a good landing page if you’re using the learn more call to action.
The goal of the prospecting campaign is to get people who are not aware of your brand, educate them, show them who you are, and get them to know and trust your brand.
While we usually get more conversions on the retargeting campaign and some of these can be tracked, the prospecting campaign’s main goal is to educate your customers. This indirectly helps in driving traffic to your website and obtaining organic conversions.
In the destination section, put in your Website URL, then add your UTMs by clicking on the Build a URL parameter.

Lastly, in the tracking section, make sure that your Meta Pixel is selected. If you’ve verified your domain, you should also select your domain here.
💡 Top Tip: Once everything is set up, a time-saving tip for creating a new ad in the ad set is to duplicate the ad. It is a good idea if you want to try out different visuals for your ad, but will keep the same headlines or descriptions.
Lookalike Audience Ad Set
Once you’ve reviewed everything and your ad set is good to go, you can also save some time by duplicating the ad set.
Right-click on the ad set, then click on Duplicate.

A popup window lets you specify which campaign you want to put your ad set in and the number of copies you want to make.
Click on Duplicate.

The ad set we’ll create is to target lookalike audiences, so let’s name this ad set LAL 4%.

Since we duplicated the ad to save time, we want to keep most of the options the same and only tweak a few. The first thing we will change is the audience section. As mentioned earlier, this ad set is created to target lookalike audiences.
To create a lookalike audience, you can go to the audience manager in the all tools section, or click on Create new in the ad set audience section.

Here, you can bring a CSV file of all of your customers or those in your email list, and then create a lookalike audience. For the lookalike audience size – how closely you want to match your base audience – you can select a value of 1% to 10%.
Post iOS 14, a 4% lookalike audience size is usually a good balance of finding a similar, but still a decent number of new users. Depending on the size of your base audience, you can bump this number up if you have a large number of users in your database.
The lookalike audience ad set is usually the best-performing audience before iOS 14, but nowadays there are some times when an interest-based audience can perform better.
If you’re creating a new structure, then it’s always a good idea to test it and see which ad set will perform better.
The next setting to change is to remove the interest by clicking on the ✕ button.

Lastly, we will change the budget of this ad set to $55 to obtain our total of $105 for the prospecting campaign.

We recommend using the same ads that you are using in the interests ad set for the lookalike audience because you don’t want to have too many variables affecting the performance of your ads.
If you have different audiences that have different ads, you won’t have a clear answer as to which variable is causing one ad set to perform better.
Only by changing one variable between ad sets, you’ll know which variable to change or keep – the creative or the audience.
This prospecting campaign is ready to go! You can launch it now or wait until we have the retargeting campaign set up.
Retargeting Campaign
The last section of our Facebook Ads for Shopify is all about creating the retargeting campaign. To save time, we can start by duplicating the prospecting campaign.
In your ads manager home, go to the Campaigns section, click on the drop-down arrow beside Duplicate, then choose Quick Duplicate.

First, rename this campaign to Retargeting.

Next, we’ll enable campaign budget optimization for the retargeting campaign.

The reason why we set the budget at the campaign level is that we’ll be combining all the different warm audiences. This is what we found that performs best, especially post-iOS 14.
Since we’ll only have one ad set for this campaign, delete all but one ad set in this campaign.

Name this remaining ad set Warm Audience.

Next, we’ll keep everything mostly the same, only removing possibly the interests, custom, or lookalike audiences that were copied from the previous ad set.
For the retargeting campaign, we’ll target everyone we excluded in the prospecting campaign.
We’ll add people who had been to the website, added a product to the cart, are on the email list, follow any of the brand’s social media accounts, and have viewed videos on the website.
Search for this custom audience in the search bar.

The idea here is to stack everyone who has possibly interacted with our website in any way. Add as much as possible without going overboard. You want to have a big enough audience so that you can get some purchases and conversions.

For the ads in this ad set, we recommend using different styles. Let’s say you’re selling shoes, then maybe you can have one ad displaying the shoe’s design and describing what material it’s made of, and another that has a testimonial on top of it.
Testimonials or reviews can be added to the primary text, and you can even use different types of ads like a carousel where viewers can browse through 2 or more scrollable images or videos.
User-generated content still works great for retargeting campaigns, but it should be a little bit different because the people we’re targeting here already know who you are. Therefore, you don’t need to explain the product as much compared to a prospecting campaign.
For retargeting, we recommend at least 3 different ads, as well as 2 or 3 ads for prospecting campaigns, depending on how much you’re spending.
Once you have made all your ads, go back to the campaign level, and set your campaign budget. In our earlier case, if we stay with the $150 budget, 30% of that comes to $45.

Review everything in the campaign, and ensure it is set up the way you want it to be before publishing the campaign.
When your campaign is published, look at the frequency and check how large the warm audience is. It can be potentially very low after iOS 14 or if you’re a newer business that might not get lots of followers or page views.
The frequency is the number of times users see the ads. Too high of a frequency means that your ad is reaching the same people over and over.
If in a day or two, this number is higher than 2 or 3, then you might want to lower the budget in retargeting and put it into prospecting.
FAQ
How do I connect Shopify and Facebook Ads?
To connect Shopify and Facebook Ads, you can follow these steps:
1. Add the Facebook channel app from the Shopify app store.
2. Connect your Facebook account and select the associated business manager.
3. Verify your domain and connect your Facebook page.
4. Choose the data-sharing settings and connect the Meta Pixel.
5. Connect your Shopify product catalog to a 6. Facebook Commerce Account.
6. Complete the setup by accepting the terms and conditions.
How do I create a custom audience in Facebook Ads?
To create a custom audience in Facebook Ads, you can follow these general steps:
1. Go to the Audience Manager in the Ads Manager.
2. Click on Create Audience and choose the type of audience you want to create.
3. Specify the criteria for your custom audience, such as website visitors, customer lists, or engagement with your content.
4. Save the custom audience and use it for targeting or exclusion in your campaigns.
How can I test if events are being sent properly to Facebook?
You can test if events are being sent properly to Facebook by following these steps:
1. Go to the Events Manager in the Meta business suite.
2. Click on the Test events tab and enter your website URL.
3. Open your website and go through the purchase process.
4. Check the Events Manager to see if all events, especially the purchase event, are tracked correctly.
Why should I connect Shopify and Facebook Ads?
Connecting Shopify and Facebook Ads allows you to reach your target audience on Facebook, Instagram, and Messenger. It enables you to target specific audiences based on their interests, behaviors, and other details at various stages of the sales funnel. This integration can help boost your online store’s visibility and drive conversions.
What should I include in the targeting settings for my ads?
When setting up targeting for your ads, consider the following:
1. Locations: Specify where you want to target based on your shipping capabilities and target market.
2. Age and Gender: Analyze your audience data to determine the age and gender of users who are making purchases on your website. Alternatively, you can leave it broad if you have limited data.
3. Detailed Targeting: Add demographics, interests, and behaviors that align with your target audience. Research popular brands or relevant keywords in your industry to find potential interests to include.
Summary
Great! That’s how to run Facebook Ads for Shopify. We started by connecting Facebook to Shopify using the Facebook sales channel app. We briefly explained how to test if events are going through properly. Then, we created prospecting and retargeting campaign structures.
The aim is to focus more on gaining new customers from the prospecting campaign and targeting those already familiar with the brand with the retargeting campaign.
We also looked at dividing your prospecting campaign by the different interests and audiences you want to target. For the retargeting campaign, we combined all our warm audiences into one ad set since these configurations were found to work best.
To make sure that you’re spending your budget wisely, check out our guide on how to analyze Facebook Ads campaign data so that you can make sense of the different metrics available in the ads manager.
Did the native Facebook and Shopify integration work well for you? What are your thoughts on the prospecting and retargeting structure? Let us know in the comments below!

Subscribe & Get our FREE GTM for Beginners Course...


")