Last Modified on July 12, 2024
Are you looking to jump into Meta Ads? Before you get started, let’s set up a Meta Business Manager account!
In this guide, I’ll show you how to set up Meta Business Manager account so that you can use Meta Ads to improve your marketing game.
This tutorial will explain:
- The Difference Between Meta Business Manager and Ads Manager
- Create a Business Manager Account
- Adding your Social Media Pages and Accounts to the Business Manager
- How Meta Access Works
- Adding Your Billing Info to the Business Manager
- Verifying Your Domain
- Best Practices and Tips
Let’s dive in!
How to Set Up Meta Business Manager Account (Summarized)
Here are the steps to set up meta business manager account:
- Create Account:
- Go to business.facebook.com and click Create Account.
- Enter your business name, name, and email address, then click Submit.
- Verify your email via the link sent to your inbox.
- Add Pages and Accounts:
- Go to Business Settings, click Pages, then Add.
- Choose to add an existing page, request access, or create a new page.
- Add Ad Accounts:
- In Business Settings, click Ad Accounts, then Add.
- Enter your ad account ID.
- Set Permissions:
- Add yourself and other users with appropriate permissions.
- Add Billing Info:
- Go to Business Info, enter business details, and add a payment method.
- Verify Domain:
- Go to Brand Safety, click Domains, then Add.
- Verify using DNS Verification by adding a TXT record to your DNS configuration.
What is the Meta Business Manager?
Meta Business Manager is an impressive platform centralizing control over multiple Meta-related business assets.
Benefits of Using the Meta Business Manager
- Centralized Control: Manage all your Meta assets from one place.
- Secure Environment: Enhanced security features to protect your assets.
- Multi-User Access: Easily collaborate with team members by assigning roles and permissions.
- Comprehensive Reporting: Get detailed insights into your campaigns and assets.
Understanding User Roles
In Business Manager, you can assign different roles to team members based on their responsibilities. These roles include:
- Admin: Full control over all assets.
- Editor: Can edit and manage most assets but can’t change settings.
- Viewer: View-only access to assets.
- Job-specific roles: Custom roles like Advertiser or Moderator for specific tasks.
The Difference Between Meta Business Manager and Ads Manager
First, let’s outline the main differences between Meta Business Manager and Meta Ads Manager. These tools are often confused with each other.
Let’s start with Ads Manager. As a marketer, you’re pretty familiar with it, right? Ads Manager is where you create campaigns, audiences, and ads. Pretty simple.
Business Manager is a little bit different.
It is where you manage your overall business and connect it to your ad campaigns. It also includes a Facebook page and Instagram account representing your business — places where clients can interact with you online.
Your Business Manager is the central hub for all of your Meta tools. You can add and connect your Ads Manager, pixels, and payments.
All businesses should have a Business Manager account configured (with their Ads Manager attached). And it is simple to set up — let me show you how.
Create a Business Manager Account
First, head to business.facebook.com and click Create Account. (You’ll need to log into your Facebook account in your browser if you haven’t already.)

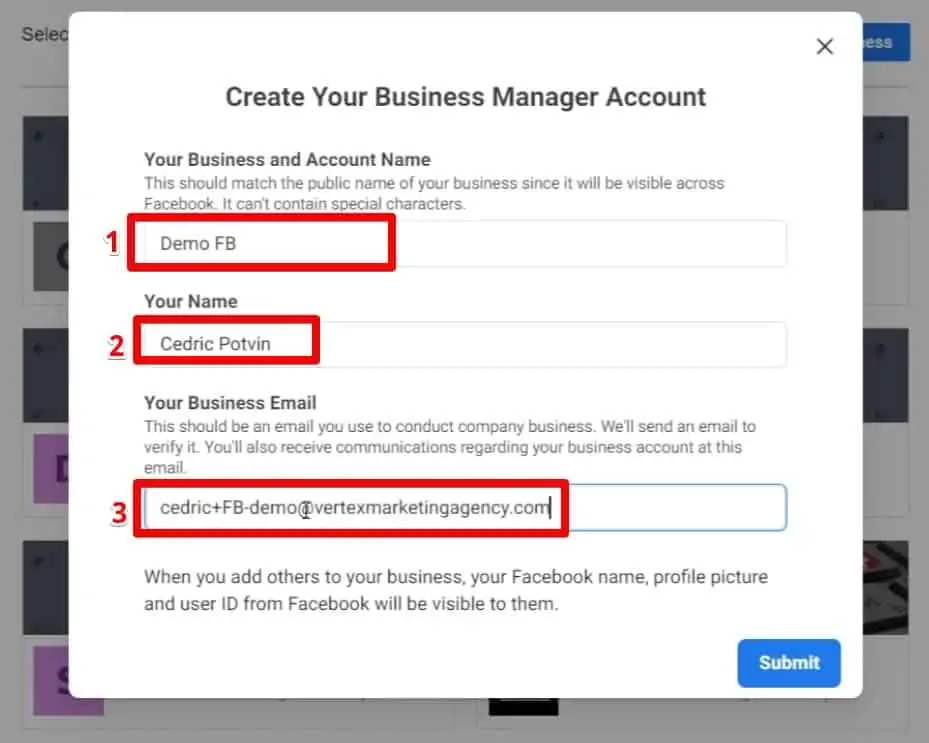
Click on the blue Create Business button to get this Create Your Business Manager Account popup.
For example, I’ll call mine Demo FB. Then, add your name and email address and click Submit.

Once you click Submit, Facebook will need to verify your email address. In your email inbox, find the verification email and click Confirm Now.

Congrats! You just set up a Meta Business Manager account. However, there is more to cover.
There are some other things that you need to do to make sure that you’ve set up for success. Our next step is to connect any existing pages and accounts to this Business Manager.
Connecting Other Pages and Accounts to Business Manager
One of the chief benefits of a Business Manager account is that you can centralize your control and analysis over multiple Meta-related business accounts.
You can attach your Facebook Page, Instagram business account, WhatsApp accounts, and even apps.
Adding Your Social Media Pages and Accounts to Business Manager
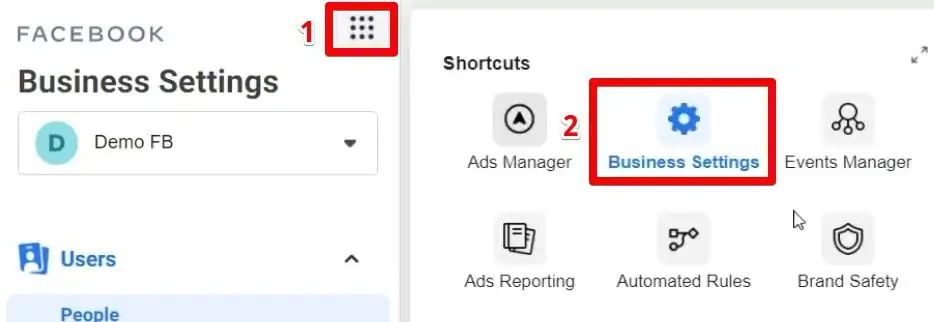
Adding a Facebook page and Instagram account is simple in this case. First, click the dot menu at the top of your sidebar and go to Business Settings.

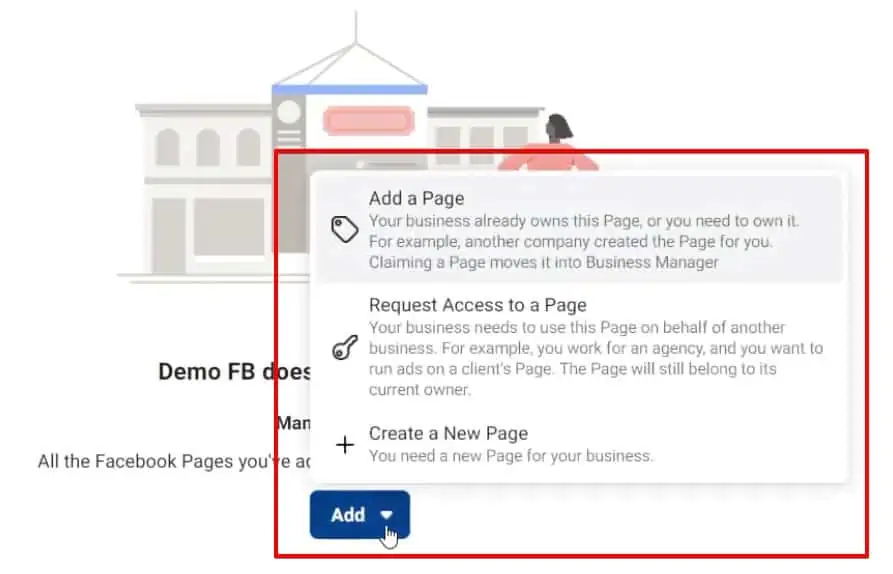
To add a Facebook page, click Pages, then click Add. You have three options: Add a Page, Request Access to a Page, and Create a New Page. All you have to do is click Add. Here are the three options:

If you own the page you want to add to this account, click Add a Page.
🚨 Note: This only works if no other Business Manager accounts have claimed this page.
Request Access to a Page is for an agency or freelancer using Business Manager on behalf of a client who owns the page. In this case, you should usually request access to their Facebook page, Ads Manager account, and Instagram account.
The last option, Create a New Page, is if your business doesn’t have a Facebook page yet. Since you need a page to advertise on Facebook, you should make this a priority if you don’t have a Facebook page.
How to Set Up Meta Business Manager with Your Ads Account
Easy, right? Connecting your Ads Manager account is almost the same.
Click on Ad Accounts in the sidebar menu, then click Add to get similar options: Add an Ad Account, Request Access to an Ad Account, and Create a New Ad Account.
I’ll assume you already have an Ads Manager account. Click Add an Ad Account.

The next step is to enter your Ad account ID (this is the same if you’re requesting account access from someone else). Where do you find this?
The quick and easy way is to go to your Ads Manager account and check out the string of numbers after campaigns?act= in the URL. You can also find it in parentheses after your account name in the top bar dropdown.

Then, copy and paste the Ad account ID into your Business Manager account and click Add Ad Account. Easy!

How Meta Access Works
Here’s an important thing to note: when you create a Business Manager account, you still need to add yourself as a user for any pages or accounts you’ve connected.
It may not seem very intuitive, but it’s because your business owns the accounts — not you. The Business Manager account is a separate entity from your account.
So you wouldn’t be able to change your business profiles, but your business can (even though it’s still you).
Make sense? Here’s an example.
Let’s go to our Meta Business Manager, go to Ad Accounts in the sidebar menu, and click our Meta Ads account.
Here, we can set permissions and add users — including ourselves. The first time you connect an account to a Business Manager, you must ensure to add yourself!
Select your profile from the left side, then turn on the Manage Ad Account switch on the right. It gives you full permission and control for everything to do with this account.

Remember, you’ll need to add yourself (and any other clients or teammates who need access) to each account, even if you’re the owner.
That said, the ability to easily add users and set permissions is exceptional. You can set various permission levels to give access to teammates, clients, or freelancers. You can even set view-only access if you’re getting an audit from a consultant.
🚨 Note: Your Business Manager and your personal profile are different entities.
When you add a user in your Ad account to your Business Manager, you also need to give access to the ad account where you create campaigns, publish ad sets, and create ads.
Adding Your Billing Info to Meta Business Manager
As I mentioned, one of the best parts about Business Manager is that it centralizes all your Meta business functions in one place. It includes any billing info or accounts that you use.
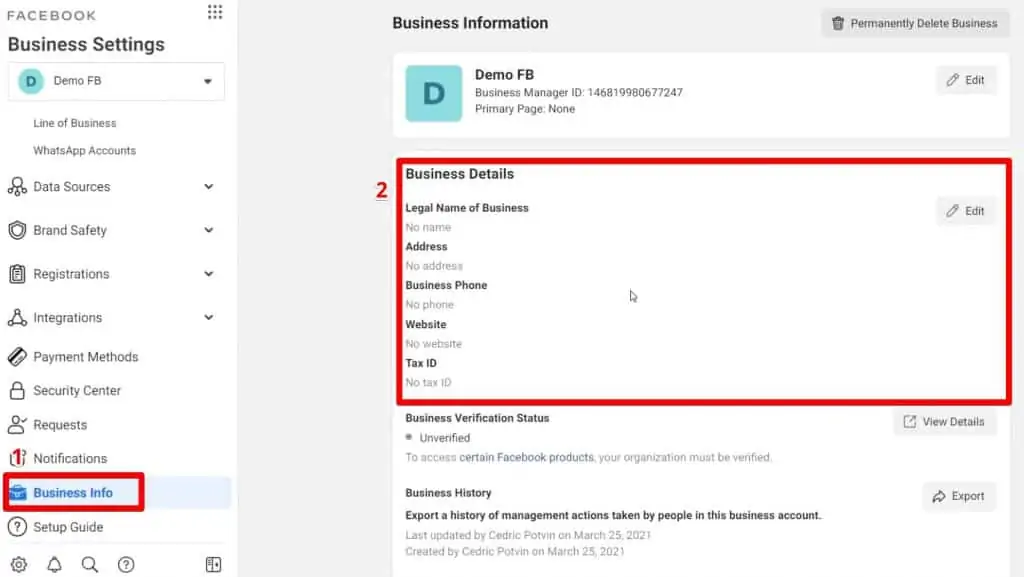
To add your billing info to Business Manager, go to Business Info in the sidebar menu. Here, fill in your Business Details, such as the Legal Name of the Business, Address, Business Phone, Website, and Tax ID.

Once you have completed the Business Information, head to Payment Method and click Add Payment Method.
Add a credit or debit card here to charge for all your Meta Business transactions. After adding your billing info here, you can streamline future ad or other Meta product purchases.

Verifying Your Domain in Business Manager
The final step to configuring your Meta Business Manager account is verifying your domain.
To do this, click on Brand Safety in your sidebar menu, then go to Domains and click Add.

Enter your website domain and click Add. Then, refresh the page to see your domain added.
The next step is to verify that domain. There are three ways of verifying your domain: Meta-tag Verification, HTML File Upload, and DNS Verification.
I recommend DNS Verification because it’s pretty easy. Go ahead and click on that tab.

All you have to do is log into your domain registrar and go to the DNS records section. Then, copy and add the TXT record given in Step 2 into your DNS configuration.
Some registrars will also ask you to add a Host field — you can use the symbol @ for this.

This step will look a little different for everyone, depending on which domain registrar they’re using, but I’ve found a nifty article on how to do all of this on GoDaddy.
But even if you’re using another host, it doesn’t matter — they’re all similar in process, and you can probably find an article somewhere specifically for your domain provider.
The DNS change typically takes effect around 48 hours, but Meta warns that it may take as long as 72 hours. When the change is completed, this little circle next to your domain name is going to turn green to let you know it has been verified.

Best Practices and Tips
- Regularly audit user access to ensure only relevant team members have access to assets.
- Use the Security Center to set up two-factor authentication for added security.
- Frequently review and update your connected assets to ensure they’re relevant.
FAQ
How can I add my social media pages and accounts to Business Manager?
To add your social media pages and accounts to Business Manager:
1. Go to Business Settings.
2. Click Pages.
3. Choose to add an existing page, request access, or create a new page.
4. Follow similar steps for adding your Instagram business account.
How do I verify my domain in Business Manager?
To verify your domain in Business Manager:
1. Go to Brand Safety in the sidebar menu.
2. Click on Domains.
3. Choose to Add Your Domain.
4. Follow DNS Verification steps: Add a TXT record to your DNS configuration through your domain registrar.
5. Wait for up to 72 hours for verification.
How does Meta access work in Business Manager?
In Business Manager, when you connect pages or accounts, you must add yourself as a user for each. The Business Manager account is separate from your personal account, and your business owns the connected accounts. You can add other users with different permission levels.
Summary
And that’s it — this is how to set up Meta Business Manager account.
Business Manager helps manage several Meta ads, accounts, and pages more productively, which can help make you a better marketer. It’s also ideal for agencies that manage clients’ social media accounts or ad accounts.
Now that we’ve learned to set up Meta Business Manager account, we should start advertising! To make the most out of your ads and data, set up conversion tracking so that you can replicate strategies from your best campaigns.
Have you encountered any challenges in setting up your Meta Business Manager account? What else do you think is essential to do in the Business Manager? Let us know in the comments!


