
Last Modified on July 2, 2024
Are you looking into how to track lead sources in ConvertKit?
Let’s say a user enters your website and fills out your newsletter form. You send them many emails, and later, they take you up on your offers and buy from you.
While it is possible to see sales information inside Google Analytics 4, it is limited.
It will depend on how long the cookie was available and if the user is still being identified by GA4. It is unlikely to backtrack and know precisely where the user or purchase came from.
A far better way of doing things is to attach UTM information directly to the user’s CRM profile. This way, if the user converts later, you can go back into the user profile and see where the user came from when they signed up for your form.
We’ll show how to set up form fields to capture UTM data, then use Google Tag Manager to store UTM data in a cookie and automatically fill in the form fields with this data.
Here is an overview of what we’ll cover:
- Import UTM Parameters into ConvertKit
- Preparing ConvertKit Form with Hidden Form Fields
- Hiding the Form Fields
- Preparing GTM to Capture UTM Information
- Filling the UTM Information into the Form
- Testing
Let’s dive into lead source tracking in ConvertKit with UTMs!
Import UTM Parameters into ConvertKit
We first need to demonstrate the end behavior we want to set up on our website. For this, we’ll enter the GTM Preview Mode.
Enter the URL of our website and attach a few UTM parameters. Next, click Connect.

💡 Top Tip: Check out our guide on How to Track UTM Codes in Google Analytics 4 to see a list of the different available UTM parameters, learn why they are essential to track, and best practices for tracking.
Once we connect to our website, we can see the UTM information in the URL. This information gets stored in a cookie.

Next, go to the page with our ConvertKit form and fill out the information. In this case, fill in an email address, then click Subscribe.

We should then see this user in the subscriber list in ConvertKit.

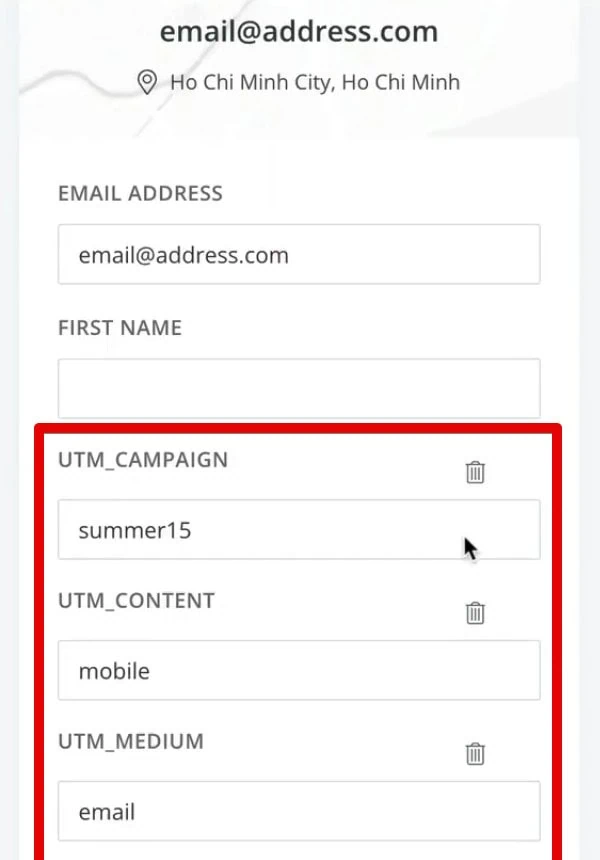
Looking at the subscriber details, we should be able to see the UTM information that was on the landing page.
We’ll use Google Tag Manager to implement this setup. We will use hidden forms and first-party cookies, as well. It is a great technique to spice up the data inside our CRM.
Let’s get started on setting this up.
To set this up, first, we need access to the website with our ConvertKit form.

Next, we also need a GTM account set up on that website.

💡 Top Tip: Check out our ultimate guide on Installing Google Tag Manager if you haven’t set it up on your website yet.
Lastly, we need the ConvertKit account open to implement our changes here.

Now, the steps for how to import UTM parameters into ConvertKit are as follows:
- Prepare the ConvertKit form to include hidden form fields. We also need to add custom fields so that the data can flow into the ConvertKit account.
- Prepare Google Tag Manager to capture UTM information. We must prepare GTM to pick up the UTM information from the landing page and store it in a cookie.
- Fill UTM information into the form. Once the user goes to the form page, we want to take that information from the cookie and fill it into the different form fields.
Finally, we must test the implementation to ensure everything works as intended.
Preparing ConvertKit Form with Hidden Form Fields
The first step to import UTM parameters into ConvertKit is to prepare our ConvertKit account and change our forms.
What we’ll do is go into our database of subscribers. Go to Grow → Subscribers.

Next, open up any random subscriber from the list.

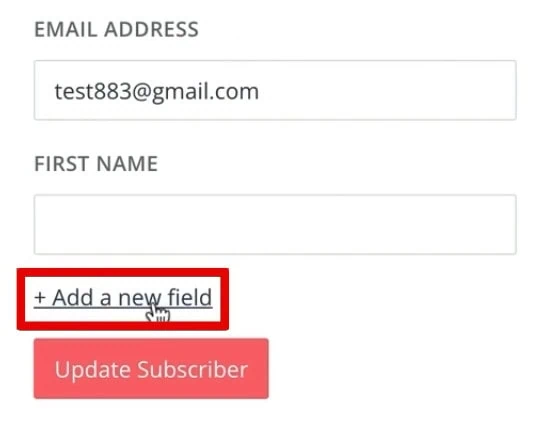
Then, we will implement custom form fields to store the data in ConvertKit.
Click Add New Field.
We’ll add the most common UTM parameters that we want to store. In our case, they would be utm_medium, utm_source, utm_campaign, utm_content, and utm_term.
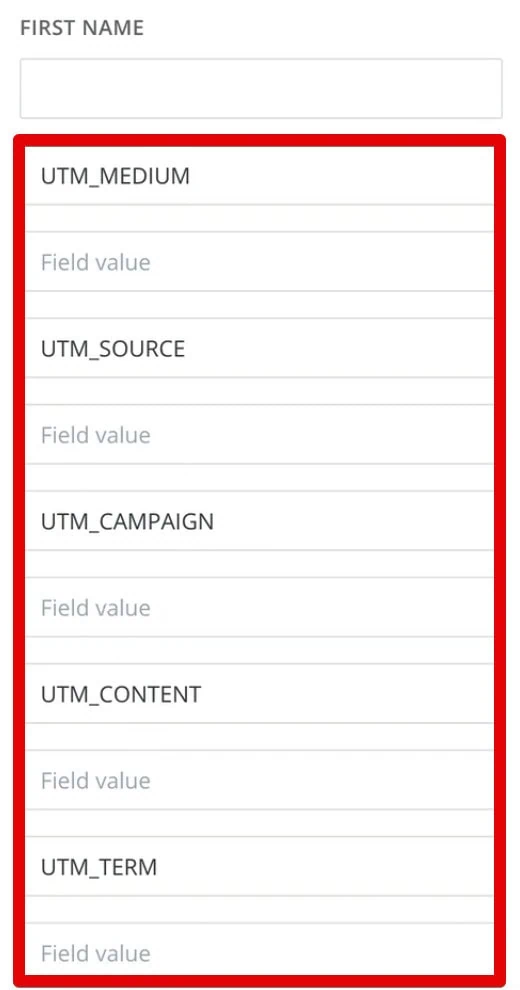
There are more UTM parameters you can use, and you can even create custom UTM parameters. We included the most common ones for simplicity, but feel free to add as many as you want.
You can change them around and name them as you wish. You don’t need to follow this same naming convention.
Finally, click Update Subscriber.

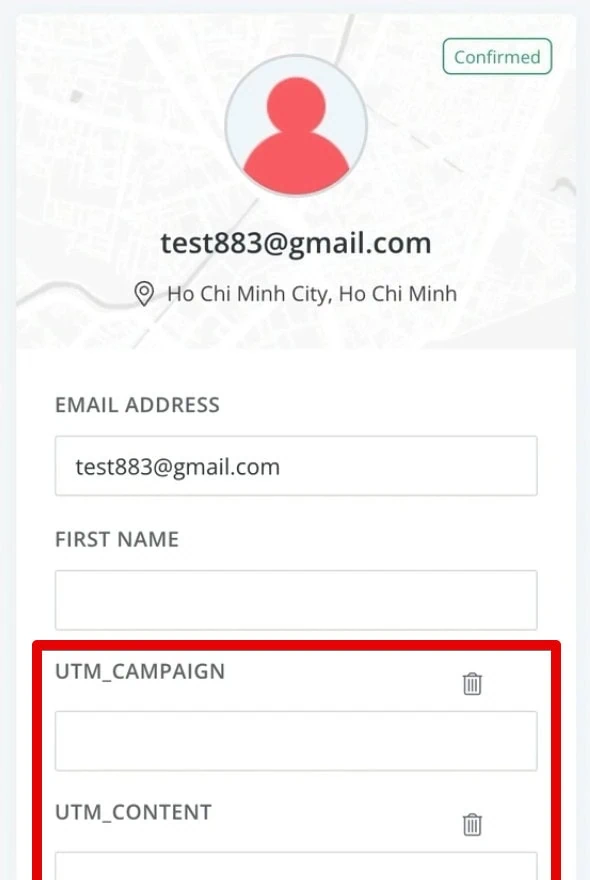
We now see these UTM fields for subscribers.
Now, let’s change our form around to implement these fields in the form.
Go to the Landing Pages & Forms page.

Next, click Create New.

Next, select Form.

You can select any form display format. For this example, we’ll pick Inline. It is an HTML form, and you need to be able to change HTML to make our technique work.

Next, select from one of the templates. Let’s go with the Pine template. Click Choose.

We’ll reach the form builder.

Here, click the + button. For each additional field, select our custom UTM fields from the dropdown list.

Repeat this step until you have included all your UTM parameters. It won’t look nice, but we’ll show you how to hide them later.
For now, click Publish.

Finally, go to the HTML tab and click Copy.

Let’s enter this code into our website.
Hiding the Form Fields
Go to your website and edit the old form. If you use WordPress, click Edit Page at the top of the screen.

Replace the old code with our new form. Next, update these changes to your page.

Go back to your page and confirm that the form has been updated.

Now, let’s see how to hide the UTM fields in our form.
Press Ctrl (or Cmd) + F on your keyboard and search type. Notice the word “type” gets highlighted in our code. Each one corresponds to the type of each form field.

The email address field has an email type. For our custom UTM fields, the type is text.
To hide these fields, change the type to hidden.

That’s it! Update the page again. With this, we should see that our different form fields are hidden.

We still have the UTM fields available in the background. To check, we can go to your browser’s Developer Tools.
Right-click on the form and click Inspect.

We see six div tags with the formkit-field class. Expanding one of these tags, we can see the UTM field is still present, and their details are still on the page.

Preparing GTM to Capture UTM Information
In this section, we’ll put in the logic for grabbing the information on the landing page and putting that into a cookie. Next, we’ll fill in this information into our hidden form fields once the user reaches the page with our ConvertKit form.
We’ll do all this in Google Tag Manager.
Go to your GTM account and create a new tag. Go to Tags → New.

Next, click Tag Configuration → Custom HTML.

We will set a cookie with this tag. We have created this little script for you. Get the code from our Source Form Fill script.
Copy the first code from this link.

Paste this code in our HTML tag and name it set cookie – query string.

Next, let’s set the trigger by clicking Triggering.

We’ll create a new trigger by clicking +.

Nest, select Trigger Configuration → Page View.

We want the trigger to fire once the user has UTM information in the URL.
Select Some Page Views. Next, set the condition to Page URL contains utm_medium.

Provide a name for the trigger, then click Save.

Finally, Save the tag.

So, what will this tag do? It will check the URL, grab the query string of the URL, and put this information into a cookie.
Let’s take a look at what this means. Click Preview.

Again, enter a URL with UTM parameters attached to it.

Our tag should fire as we enter the website since we have the utm_medium inside the URL. Let’s go to the Tag Assistant to confirm.
In the Container Loaded event, we can see that our Set-Cookie tag fired successfully.

This tag should set a cookie with the UTM information. Let’s check the cookie in the Developer Tools.
Go to Application. At the left pane, expand the Cookies section. Select your website domain.

Check if there is a cookie named source_query. You should see the cookie value is equivalent to the entire query string attached to our URL, including the question mark.

There’s all of our UTM information in this cookie. We have grabbed that information now, and even if the user goes to a different page, we still have it available in the cookie and can use it later. When do we want to use it?
In our case, we want to keep this information for our ConvertKit form. We want to grab this information from the cookie and fill it into the hidden form fields.
Filling the UTM Information into the Form
Again, we will utilize Google Tag Manager to automatically grab this UTM information from the cookie and fill in our hidden form fields.
First, go back to our Souce Form Fill script and copy the second code.

Create another Custom HTML tag and paste the code into the HTML section.

We need to change the script a little because GTM needs to match the UTM fields to the correct form field.

For that, you need to know a bit of CSS or ask a colleague who is knowledgeable on the topic.
💡 Top Tip: Check out the Query Selector Method section of our Top 5 Techniques in JavaScript for GTM guide to get started.
You can also use the magical powers of your AI tool of choice by going in and copying the whole outer HTML. In the developer tools, right-click on the code containing your ConvertKit fields and select Copy → Copy outerHTML.

Then, you can put this into ChatGPT or Gemini and ask for the CSS selector that grabs the individual form fields for the UTM parameters you included.
💡 Top Tip: Check out the Create a CSS Selector section of our 10 Ways to Use ChatGPT with GTM tutorial if you need help generating prompts.
In our case, we have these different forms, and there is a CSS selector we could utilize for each form field to be identified by the script and filled out correctly.
For the utm_campaign field, this would be the name= ”fields[utm_campaign]” portion. We can fill this inside of our script.

We want to select the input tag with the name of fields utm_campaign, utm_medium, and so on. To change this around, you need to know what you want to map and which UTM parameter should match to which field.
So, in our code, the format is that you need to match the UTM parameter (1) to the CSS selector (2).

You can probably reuse the codes we currently have here if you are using a ConvertKit form. You should adjust those to your HTML if you’re using any other CRM. From here, you should be able to change this around.
This tag will pull information from the cookie, map the relation between the query string and the form fields, and then fill in that information to the hidden form fields depending on the CSS selector you have chosen beforehand.
Next, what should we use for the trigger? When should we fill in this information? We want to have this information once the page has loaded.
Again, let’s create another custom trigger. This time, let’s select the DOM Ready trigger.

We only want it to fire for our page with the ConvertKit form. Select Some DOM Ready Events. Next, set the firing condition to Page Path contains convertkit-form.

You could utilize other mechanisms to determine if there is a form on the page, so you can have it on all the pages. But for this example, we want to deploy it on a DOM ready, so we can know that the ConvertKit form has loaded.
Finally, provide a name for this trigger, then click Save.

Finally, let’s save our tag and preview our implementation again.
Testing
Open your website through a link with UTM parameters attached. The tag that sets our cookie should fire under the Container Loaded event like earlier.
Next, go to our target page with the ConvertKit form. In the background, our tag should fill out the UTM information in the form fields. Right-click and click Inspect.

We will temporarily change the visibility of the form fields to see if they contain our UTM information. We’ll do this by changing the type.
For example, expand the utm_campaign tag and change its type to text. Voila! Our field should reappear again.

Here, we can see that it has been filled out in the background. So when the user fills out the form field and subscribes to our form, we can import UTM parameters into ConvertKit.
Let’s check this by changing the type back to hidden. Next, fill in an email address and submit the form.

Go to the ConvertKit subscriber list and open the email we put in for our second test.

We can see all the UTM information has now been filled out automatically depending on what was present in the original URL.

We have the UTM campaign, content, medium, source, and term.
Now, we have all the UTM information inside our CRM. If the user converts later, we can backtrack and know where they came from.
Don’t forget, if you want to make this permanent on your website, you must publish and Submit this version of your GTM container.

Provide a descriptive version name, then click Publish.

Great! We have now published our changes live to all users of the website.
Summary
As you can see, this is a great technique for tracking lead sources in ConvertKit. It may be a little convoluted because you need to set up the form fields, know the right CSS selectors, and deal with Javascript inside Google Tag Manager. But, it is doable.
If you want a more hassle-free way to do this process, you might be interested in the new tool we developed called SourceLink. All you need to do is sign up to our platform and put in the API key for your ConvertKit.
Then, we will go in and create all of the different custom form fields.
From there, you need to install a script, maybe through GTM, and we’ll grab the information about where the user came from and connect it to your ConvertKit account. Then, all of this is synced up and will run smoothly from there.
The setup takes a few minutes, and you will get rich and rewarding data later on your account. If you’re interested, sign up and join our beta list!
Since we have learned how to import UTM parameters into ConvertKit, we now need a place to view this information. Check out our Guide to UTM Parameters in GA4 to learn how to view your UTM information in Google Analytics 4.
Have you tried importing UTM parameters into your CRM? What technique did you utilize to capture this information? Let us know in the comments below!


")