
Last Modified on June 6, 2024
Do you want to manage your own marketing tags but don’t know where to start?
Google Tag Manager can help you deploy and manage your tags without hiring a developer.
In this guide, we will cover how to properly install Google Tag Manager on your website. Also, you will get some tips and learn more about Container snippets and where to correctly place them in your HTML codes so that you’ll be ready for your first tag deployment.
An overview of what we’ll cover in this guide:
- Benefits of Using Google Tag Manager
- Log in to Your Google Account
- Create a Google Tag Manager Account
- Create a Container
- Install the GTM Code Snippet on Your Website
- Testing
- Common Mistakes and Troubleshooting
Let’s dive in!
Benefits of Using Google Tag Manager
Google Tag Manager (GTM) has rapidly become a staple in the toolkit of digital marketers, web developers, and data analysts. Here’s why:
- Centralized Management: GTM provides a centralized platform to manage all your website tags. Whether it’s analytics, remarketing, or conversion tracking, you can deploy and update tags without touching the website’s code every time.
- Ease of Deployment: With GTM, you don’t need to be a developer to add or modify tags. The user-friendly interface allows for drag-and-drop functionalities, making tag deployment a breeze.
- Version Control: GTM automatically saves versions of your container every time you make a change. This means you can easily roll back to a previous version if something goes wrong.
- Built-in Debugging Tools: The “Preview” mode in GTM allows you to test and debug your tags before they go live, ensuring that they work as intended.
- Enhanced Data Security: GTM provides settings that can help in anonymizing data, like IP addresses, ensuring you’re compliant with data protection regulations.
- Flexibility with the Data Layer: GTM’s data layer functionality allows for advanced tracking setups, capturing a wide range of user interactions on your site.
- Integration with Google Suite: GTM seamlessly integrates with other Google products like Google Analytics, Google Ads, and more, making it easier to set up tracking for these platforms.
- User Permissions: GTM allows you to set different permission levels for users, ensuring that team members have the appropriate access they need.
Log into Your Google Account
All right, we will start at tagmanager.google.com. You can log in to your Google Tag Manager account from this page.
Now, you will need to have a Google account in order to use Google Tag Manager which means if you already have a Gmail account, or a YouTube account, or any account for the Google services, you most likely will be able to use it here as well.

Create a Google Tag Manager Account
Now, if you are completely new to the system, click on Create Account.

And this is where you start setting up your Google Tag Manager account.
Google Tag Manager accounts are divided into two levels: the Account level and the Container level. You can have multiple accounts, and within each account, you can have multiple containers.
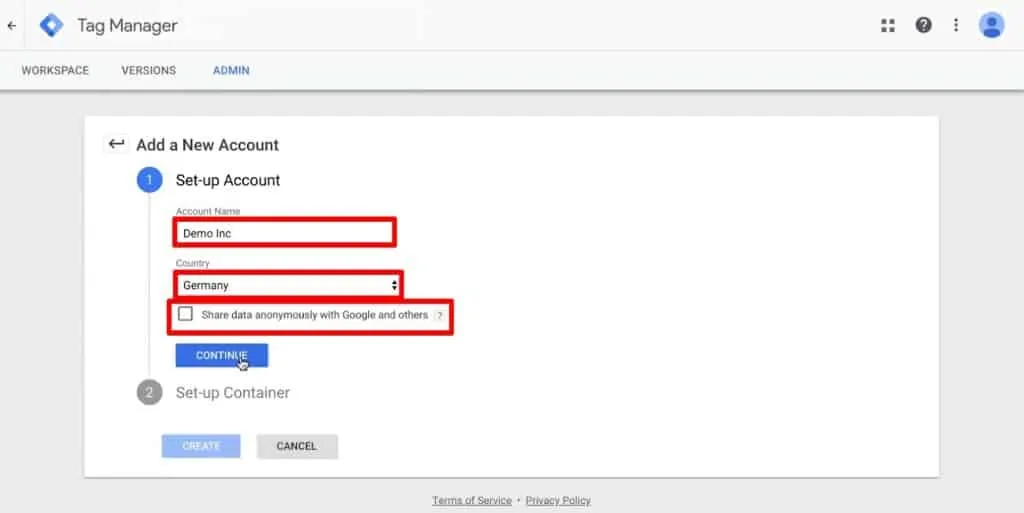
Containers are the snippets or the central code that exist for your website. So the best practice is to name your account after your company. Let us take for example, Demo Inc as the Account Name.
Choose your Country, and then you can choose whether or not you want to Share data anonymously with Google and others.
Click on Continue to go to the Container setup.
Create a Container
Now, the Container is unique for your website where you are going to install Google Tag Manager. So I’d recommend entering your website URL or domain as the Container name. It doesn’t matter what you call the Container. But for you to recognize it later on, I would recommend the URL here.
You can use the Container in different instances. Here, we will install Google Tag Manager on the Web.
There’s also a Container available for iOS, Android, and AMP pages, but the setup process for these is completely different. You can check out our other tutorials if you want to learn more about iOS, Android, and AMP page setup.
For now, we will continue with the Web option and Create our Google Tag Manager account.

We need to adhere to some Terms Of Service. If you have read it you can accept it and click Yes. Your new Google Tag Manager account will be initiated.

Once you have gone through the process, you will be greeted with Google Tag Manager snippet.

If you don’t see the snippet when you open your Google Tag Manager account, you can always access it by clicking on your Google Tag Manager ID. This will open the code snippet window.

Install the Google Tag Manager Code Snippet on Your Website
Our code snippet popup contains some installation instructions.
- Place the first part of the code as high in the head section of the HTML as possible.
- Insert the second part of the code immediately after opening the body section of the HTML.

This will probably be the last snippet or piece of code that you will need to install onto your website for tracking purposes. However, note that you will need to have access to the website code in order to install this.
There are different methods of installing this code. Let me take you through the options.
1. Developer Installation
First of all, if you already have a developer working on your website who is responsible for the technical infrastructure of the website, I would suggest you to consult with them in order to install the snippets correctly. This eliminates the risk of errors, plus it will keep your developer well-acquainted everything going on in your website’s code in case they need to make adjustments later.
2. CMS Installation
Secondly, if you have a CMS (Content Management System) such as WordPress, Shopify, Magento, Joomla, or any other backend system that generates your website, you might be able to install a plugin to add these codes.
There are many GTM plugins out there. I would just encourage you to research widely-used plugins for your CMS. For example, I recommend the Google Tag Manager for WordPress plugin by Thomas Geiger if you’re using WordPress as a CMS. Whatever you use, there will most likely be a tutorial that will explain the right setup for that particular plugin. We have some of our own tutorials for installing GTM on Wix and WordPress.
3. Manual Installation of GTM Code (on WordPress)
Thirdly, you can also install this manually on your website. If you have access to the code of your website and feel comfortable doing this, then I’ll lead you through the steps here.
This is what your developer would do, or what the plugin does in the background. As an example, I have a WordPress installation right here. WordPress is the most commonly used Content Management System in the world. So if you are running a WordPress blog, you can follow along with these instructions. If you’re running a different CMS, these instructions will most likely differ, but the general idea is the same.
Now, Content Management Systems are generally governed by a theme with which you can control the design of the website. Within WordPress, you can log into your backend system, and then go to Appearance → Theme Editor. Here, you can see the different themes that you have set up, and you also have access to the theme files themselves.
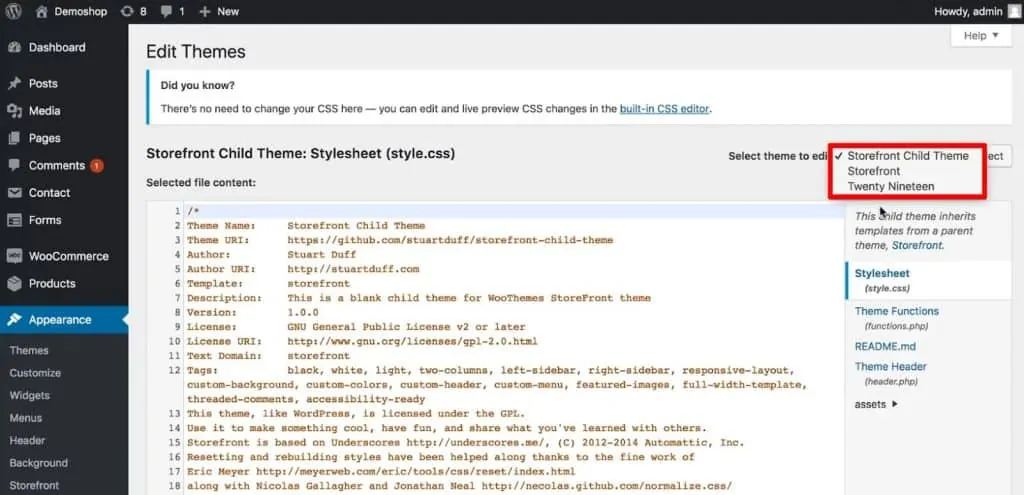
Now, notice that I have set up a child theme here because I don’t want any changes in the theme files to get affected when a new update is released to the parent theme. It’s best practice to use a child theme if you’re working in WordPress and making any changes to the theme files.
I have this already set up. Now, I have my Theme Header file that I can click on. This is a PHP file that governs all the different sites that are generated by WordPress on my front end.
I can see that there’s a <head> tag that is generating my HTML, and then there’s the closing </head> tag.

Now, I can copy my code snippets from the Google Tag Manager. The first snippet should go to the head section.

<!-- Google Tag Manager -->
<script>(function(w,d,s,l,i){w[l]=w[l]||[];w[l].push({'gtm.start':
new Date().getTime(),event:'gtm.js'});var f=d.getElementsByTagName(s)[0],
j=d.createElement(s),dl=l!='dataLayer'?'&l='+l:'';j.async=true;j.src=
'https://www.googletagmanager.com/gtm.js?id='+i+dl;f.parentNode.insertBefore(j,f);
})(window,document,'script','dataLayer','GTM-XXXX');</script>
<!-- End Google Tag Manager -->
Here, replace the XXXX with your Container ID.
I’m going to paste this into the head section of the theme file. And I want to place it as high up as possible into the HTML.
This is important because the browser will pass the website from top to bottom. We want to fire our tracking codes with Google Tag Manager as soon as possible so the likelihood of them firing is higher.
Thus, I’m going to place them directly under the opening <head>tag.

And then we have the opening <body> tag as well. I’m going to copy my second code snippet, go back to the theme files and look for the opening <body> tag. And right underneath I will paste my Google Tag Manager code.

<!-- Google Tag Manager (noscript) -->
<noscript><iframe src="https://www.googletagmanager.com/ns.html?id=GTM-XXXX"
height="0" width="0" style="display:none;visibility:hidden"></iframe></noscript>
<!-- End Google Tag Manager (noscript) -->
Here again, replace the XXXX with your Container ID.
Now, I’m going to click Update File and it should be written to my theme files.

If this is not something that you can do in your WordPress theme, then you might need to directly access these files via FTP in order to change them.
Testing
Now we should have the Google Tag Manager installed.
If I go over to my website page, and reload that page, I can right-click and select View page source. Here, I can see the HTML of my website of how it is marked up. We have our Google Tag Manager code at the beginning under the <head> tag.

If we scroll down with all the generated code by the CMS system, we should also find our no script part of Google Tag Manager. It is right under the opening <body> tag in our HTML as well.

So, Google Tag Manager is correctly installed on this website. Now, we can go through all the pages that we have on our website and look into the HTML, but that would be rather cumbersome.
A better way of validating is simply to go into the preview and debug mode by clicking the Preview button in Google Tag Manager. This will put our browser and only our browser into a special mode which will pop up a debug console in a separate tab (you can read more about this in our guide to the new GTM preview mode).
I’m going to reload the website page. Here, we see that a Summary of Google Tag Manager pops up at the bottom of the webpage. Nothing fires at the moment but this way, we can go through the pages. If this pops up at the bottom of all pages, we can validate that Google Tag Manager is installed on all pages.
And if you don’t see this console pop up, it is most likely that you haven’t installed Google Tag Manager correctly on your website.

But before you start deploying any Tags, remember to Submit the first version in Google Tag Manager in order to initialize GTM correctly.

Now, give a Version name and click on Publish.

This will go live to all the users although we have zero Tags, triggers, or variables installed yet.

So this is how you can install Google Tag Manager on your website. And now we are ready to deploy our first tag with Google Tag Manager.
Common Mistakes and Troubleshooting
While GTM is a powerful tool, it’s not uncommon to encounter issues, especially when first starting out.
Here are some common mistakes and how to troubleshoot them:
- Incorrect Placement of GTM Code: Always ensure that the first part of the GTM code is placed as close to the opening
<head>tag as possible, and the second part immediately after the opening<body>tag.
Troubleshooting: Use “View Page Source” in your browser to check the placement of the GTM code on your website. - Not Using “Preview” Mode: Forgetting to use the “Preview” mode before publishing changes can lead to errors.
Troubleshooting: Always use the “Preview” mode to test new tags and changes before publishing. - Conflicts with Other Scripts: Sometimes, other scripts on your website can interfere with GTM.
Troubleshooting: If you suspect a script is causing issues, try temporarily removing it and see if the problem persists. - Forgetting to Publish Changes: Any changes made in GTM won’t reflect on your website until you publish them.
Troubleshooting: If your tags aren’t working as expected, check if you have any unpublished changes in GTM. - Not Setting Up Triggering Correctly: Incorrectly set up triggers can prevent tags from firing.
Troubleshooting: Review your trigger conditions. Use the “Preview” mode to see when triggers are activated as you navigate your site. - Overlooking Tag Sequencing: If you have tags that depend on each other, the order in which they fire matters.
Troubleshooting: Use the tag sequencing feature in GTM to specify the order of tag firing. - Ignoring Built-in Variables: GTM has several built-in variables. Not enabling or overlooking them can lead to missing data.
Troubleshooting: Review the list of built-in variables in GTM and ensure you’ve enabled all that are relevant to your tracking setup.
FAQ
What are containers in Google Tag Manager?
Containers are snippets or central code that exist for your website. They allow you to manage and deploy tags. You can have multiple containers within each Google Tag Manager account.
Can I install Google Tag Manager on different platforms?
Yes, Google Tag Manager can be installed on various platforms, including web, iOS, Android, and AMP pages. However, the setup process differs for each platform.
Can I use a CMS plugin to install Google Tag Manager?
Yes, if you have a CMS like WordPress, Shopify, Magento, or Joomla, there are plugins available that can simplify the installation process. Research widely-used plugins for your CMS and follow the provided setup tutorials.
How can I install Google Tag Manager?
1. Log in to your Google account and create a Google Tag Manager account.
2. Create a Google Tag Manager container.
3. Install the GTM code snippets on your website through one of the following methods:
-Developer Installation – ask your website developer to install the GTM code snippets on your website
-CMS Installation – utilize a plugin on your Content Management System (CMS) to add GTM on your website
-Manual Installation – access your website code and install the code snippets as per the code snippet installation instructions
4. Test and publish the implementation live on your website.
Summary
All right, so there you have it. This is how you can install Google Tag Manager on your website. You can also learn to install it for iOS, Android or AMP pages.
Apart from this, you can also install Google Tag Manager for WordPress Plugin to install Google Tag Manager on WordPress.
Please feel free to comment below how you installed the Google Tag Manager on your website.
We also have a free beginner video course on Google Tag Manager which can help you further to learn GTM.


")
Hi there, I wanted to have google analytics installed. I followed your instructions step by step, however, I am not sure if I have done it correctly and if I have the tag manager on my blog now?!
Would you be able to assist me? Also, my computer knowledge is very little 🙁 Thanks,
Hi, you can go to our services page and receive help with your implementations.