
Last Modified on January 7, 2025
As a website owner, having information on the origin of your traffic sources helps to better understand your audience and make decisions about where to allocate your resources.
Google Analytics 4 is great to do that, but on the journey to your site, things can happen. Pieces of data can be added or lost, resulting in fuzzy reporting.

Master the basics with our FREE GA4 Course for Beginners
Today, we’re going to look at how to track website traffic sources with GA4 for those important campaigns, how to make sense of this data, and what you can do about it to increase conversions.
What we’re going to cover:
- How Can I Track Website Traffic Sources with GA4?
- Can Google Analytics Track Traffic Sources?
- How Do I View Traffic Sources in Google Analytics 4?
- How Do I Track UTM Links in Google Analytics 4?
- Does Google Analytics 4 Use Views?
- Can You Set Up Views in GA4?
- How Do I Monitor My Website Traffic in Google Analytics?
Let’s get going!
How can I Track Website Traffic Sources with GA4?
The primary way to track website traffic is by using analytics software. The most renowned are standalone like Matamo, Plausible Analytics, Yandex, etc.
Also, popular website builders these days come with analytics capabilities built right in and are getting better at tracking user interactions.
Wix, for example, is known to help non-technical users to build websites with drag-and-drop features and has analytics where you can see incoming traffic sources.
Other popular software like WordPress offers the option of installing plugins with analytics capabilities. Think of them as add-ons to enhance the main software of CMS.
Essentially, you do not have to do anything except install these tools on your website.
Can Google Analytics Track Traffic Sources?
By default, GA4 does a fantastic job at tracking website traffic sources without us having to lift a finger. However, there is more that you can do to track website traffic sources with GA4.
Besides knowing where to find the report to see your traffic acquisition, it’s important to make this data even more accurate, understand which traffic source does what, and extract useful insights to produce the results you want.
How Do I View Traffic Sources in Google Analytics 4?
To view traffic sources in GA4, open your Google Analytics account and go to the Acquisition reports. The acquisition reports will show you where your visitors are coming from, but also how they reach your website and how your marketing is working.
To get to the Acquisition reports, simply follow these steps from your Google Analytics account: Reports → Acquisition.
Within Acquisition, you find 3 reports:
- Acquisition overview
- User acquisition
- Traffic acquisition
The Traffic acquisition report is the closest to the Source / Medium report in Universal Analytics. To access the Traffic acquisition report go to Reports → Acquisition → Traffic acquisition.

Marketers often focus on this report. Do you know what’s the difference between the User acquisition and Traffic acquisition report? Can you describe when to use which?
If you’re struggling a bit, this explanation should bring you some clarity.
Simply put, the User acquisition report is useful if you want to understand how users discovered your website.
For example, someone visited your website for the first time after clicking on a Facebook ad. Even if they come back to your site after clicking a link on their email a few days later, the User acquisition will credit this to Facebook.
This is the opposite of Traffic acquisition. This report looks at the most recent source/medium before a session.
Using our above example, you will have Facebook for that first session. Then for the other session, it will show email. Therefore, it’s not just about how visitors found out about you, but rather all the traffic sources involved when they go to your site.
You now know that GA4 tracks traffic sources automatically and where to find them. But can you completely trust what you see? Not always.
This inconsistency could end up costing you.
Even though GA4 does an outstanding job at tracking traffic sources, it sometimes has difficulty identifying where certain sources originate and how they got to your site. The next section on UTM links will address that.
How Do I Track UTM Links in Google Analytics 4?
GA4 will track your UTM links automatically once they’re built and clicked on.
UTM tracking can be an art, so even if you’re already familiar with them, take some time to check our dedicated guide on how to track UTM in Google Analytics and our UTM tool to build them fast and use them strategically.
Essentially, UTMs allow you to customize your URLs. These are little text snippets that you add to your URL parameters.
This is very useful to pass on any information that you find relevant about a campaign you want to track. This added information will be available in your GA4 reports.
Google Analytics 4 tracks traffic sources pretty well. However, you may want to add more specific information that helps you understand how one product or service you promote works.
What Is a UTM Example?
Here’s a UTM link we’ve customized to suit our needs. We’ve replaced our domain with yourwebsite.com just for demonstration.
https://yourwebsite/?utm_source=youtube&utm_medium=social&utm_campaign=tools&utm_term=live-sessions&utm_content=december-8---tracking-utm-in-google-analyticsFor inexperienced marketers, this will look like complete gibberish to you. But you’ll quickly understand that it is carefully constructed to include your brand, product or service, and campaigns.
You could even go as far as adding the titles of your resources (blog posts, images shared on social media, etc.). You don’t have to be as precise as we are, but this is to show you the possibilities. The sky’s the limit.
The campaign parameters you can add to your URLs are:
- Campaign
- Source
- Medium
- Term
- Content
In our example, here’s how we use them:
Campaign
tools
We typed in tools. Because the purpose of this campaign was to lead our audience to visit the page that lists our tools.
Source
youtube
Since we used YouTube we simply added youtube (if you implement a campaign across different platforms you’ll simply build multiple campaign URLs and replace the source with Facebook, TikTok, etc.,).
Medium
social
How did we use our traffic source? Or, how did we use the link? We added this link in the description of our Youtube video. We consider YouTube as a social media. So, we just wrote in social. If this link was shared with our email subscribers, we would have written an email.
Term
live-sessions
Measureschool regularly conducts live sessions, and that’s what we’ve put. We could have also used the title of our video or parts of it.
Content
december-8—tracking-utm-in-google-analytics
Content is used to differentiate your campaign even more. So we added a date and the title of our video.
What is UTM used for?
Unless you or your client have been fighting tooth and nail to track traffic sources accurately from the start, there is a good chance that GA4 will not capture or categorize them right.
If you’re starting with collecting data, you’ll do fine. Even websites with substantial amounts of traffic can have their sources reported well or well enough to conduct meaningful analysis.
But when budgets are involved, if you run paid campaigns, or if you need to evaluate which of your marketing activities work or not to decide where to invest your time and resources, then tracking traffic sources accurately is a must.
Many websites have direct/none at the top of their source/medium report. This can be misleading as you may overestimate your brand power, and believe that most visits to your site are from visitors who typed your site’s URL directly into their browser.
Direct/none often means that GA4 has no idea where your traffic is coming from. UTMs can help you fix that. You should be concerned if direct/none represents more than 20 or 30% of your traffic.
Moral of the story? Use UTMs!
🚨 Note: When it comes to analytics, you will not have perfect data. But the idea is to get the data close enough.
Does Google Analytics 4 Use Views?
Does Google Analytics 4 use views? If you’re asking this question, you most likely were a Universal Analytics user (the previous version of Google Analytics 4), where Views were a key reporting feature for analysis.
Concerning tracking website traffic, Views made it possible to look at all your metrics from the perspective of a specific traffic source.
What Are Views in Google Analytics?
Views, or Reporting Views to be more precise, were like replicas of your account’s reports. Imagine having copies of your reports (and their settings) that you can customize.
The benefits of views were that you could not only have a backup of your data in case you made a mistake, but also could increase your analytical experience by viewing reports in different ways.
For example, rather than navigating through a bunch of reports repeatedly or creating custom reports to understand how Facebook traffic performed, you could create a View with all the regular GA reports showing data related to Facebook traffic only.
The same is true if you wanted to narrow down your reports to show only metrics for traffic for country-specific traffic. With some tweaking of filters, you could have multiple lenses to look at your data.
This was a common best-practice structure for Views in Universal Analytics.
Here you’ll notice 3 views:
- Master View: Also called a production view. Here reports are for daily usages, like the end product of your analytics settings. This is the report everyone including decision-makers should get a look at.
- Test View: Here you’ll make sure that you’re testing things out, ensuring that your tracking is working correctly before implementing them in the Master View.
- Raw View: This is a backup view(typically one where you don’t configure anything) in case you or something is messed up. For example, if for some reason an item broke in your Master View resulting in 0 traffic because GA couldn’t track it anymore, you could just duplicate the raw view and reproduce your Master View. The question is how to achieve the same in GA4.
Can You Set Up Views in GA4?
GA4 does not have the concept of Views. However, there are several methods to somewhat recreate them.
For our demonstration, we’ll look at how to only display Facebook paid traffic for each alternative. These are:
- Comparisons
- Explorations
- Looker Studio
Comparisons
Views in Universal Analytics were subsets of data. In GA4, you can use Comparisons to compare subsets of your data. Let’s say we were interested in analyzing our Facebook advertising.
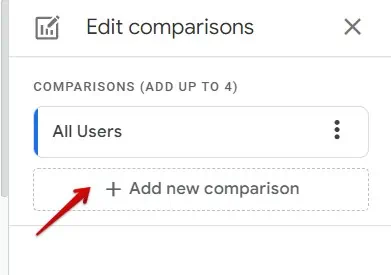
First, go to the report section (or any report), and click the Edit comparisons icon at the top right of the interface.
An overlay will appear. Select + Add new comparison.
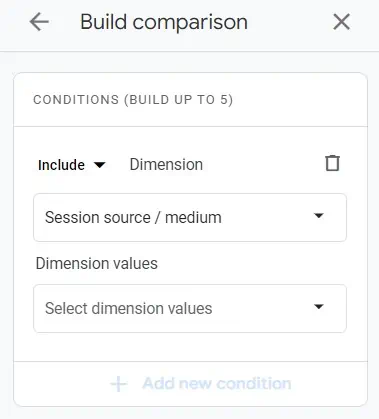
Click Select Dimension. Since we’re interested in traffic sources, we’ll add the Session source / medium dimension. You can type it in the field or scroll through the list of dimensions. Make sure to use the Include condition.
Then, you’ll be prompted to Select dimension values. Since we want to look at Facebook paid traffic, we’ll select facebook / cpc.
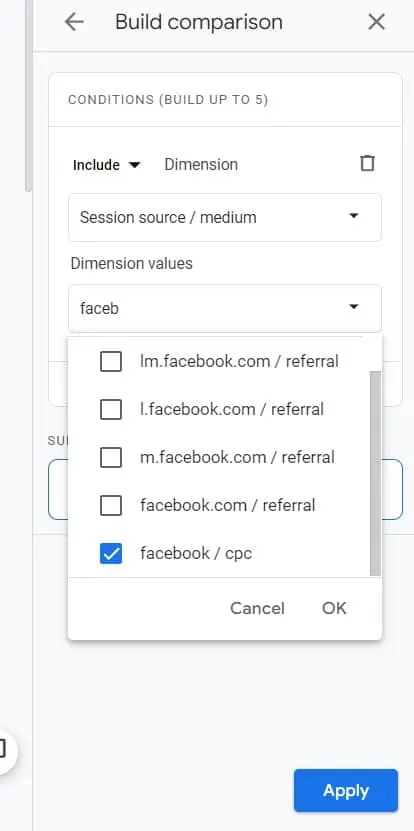
Click OK. Then click Apply.
You’ll be left with 2 comparisons: All Users and Session source/medium includes facebook / cpc.
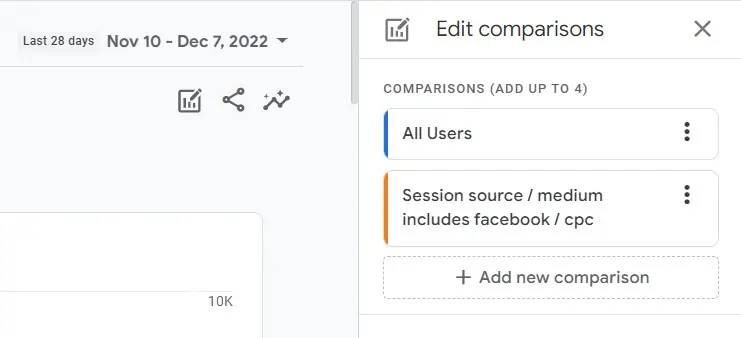
Remove All users from your comparisons.
Click on the 3 dots near All users and select Remove comparison.
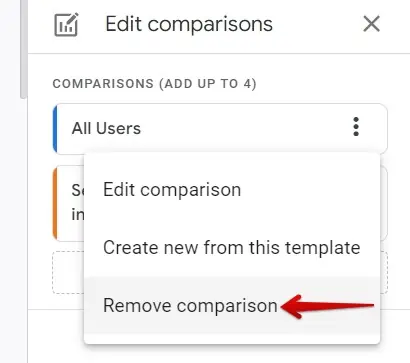
At this point, all your reports will show data specific to facebook / cpc traffic only.
The issue here is that you can’t save the reports or use them in Explorations, meaning you’ll have to recreate your comparisons every time you’re using GA4.
Explorations
With GA4 Explorations, you can uncover more insights and dig deeper into your data than GA4’s standard reports. They are collections of techniques you can use to create tables and charts that are customizable.
For Views, you can start to build a report with a Blank exploration (or the Free-Form) and use either Segments or Filters.
Unfortunately, Segments and Filters sometimes don’t work for this purpose (no data shows up), and you will see the following message.
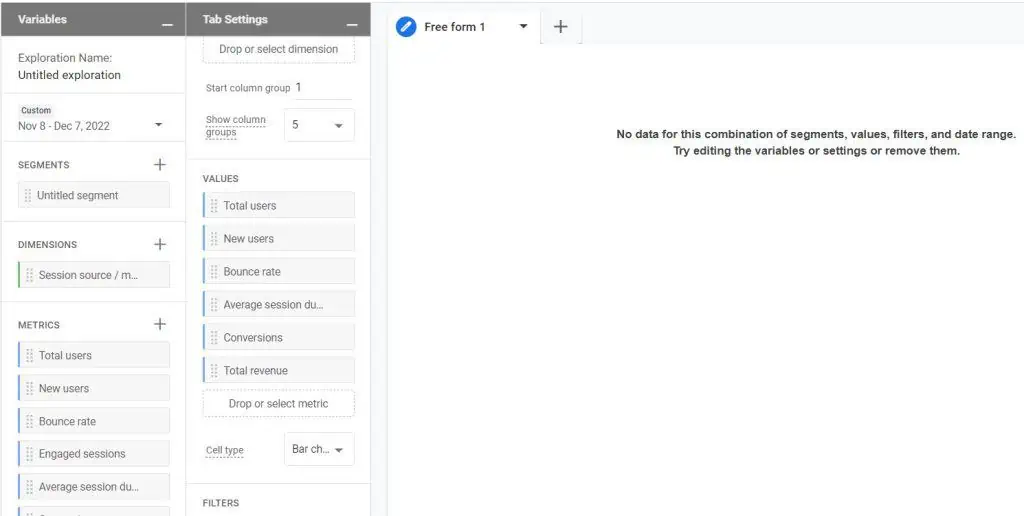
Also. you need to understand the way the conditions of Segments and Filters work or work together, which can seem perplexing at times.
However, it may work great for you, so give it a try.
Looker Studio
The visualization and analytics tool Looker Studio (formerly known as Google Data Studio) is great for recreating Views.
In addition to designing captivating dashboards to facilitate analysis or even visually recreate Universal Analytics reports, Looker Studio’s Filters or Data Controls allow us to see data as we want.
These filters allow you to set conditions identical to the filters in Universal Analytics to modify the data of a View.
Here is an example of a filter in Looker Studio to see only paid Facebook traffic:
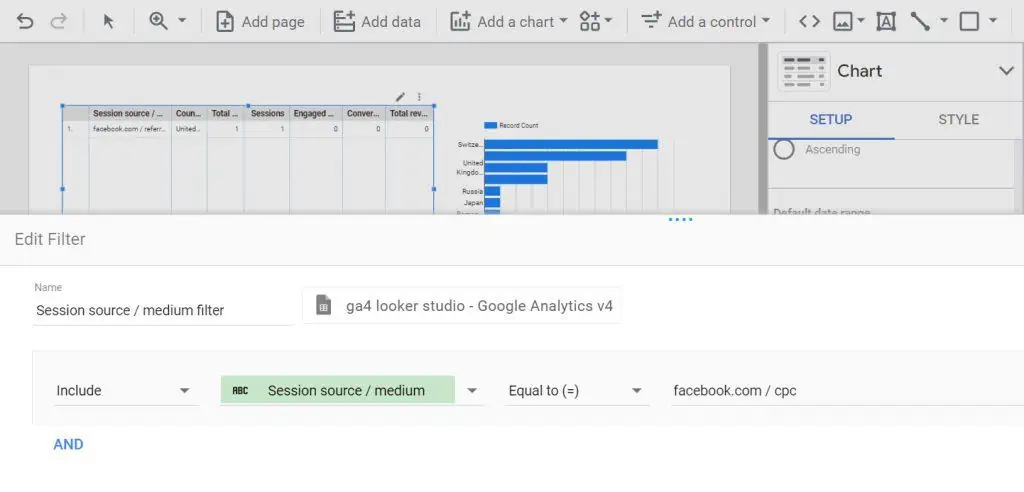
Make sure to apply this filter at the report level (meaning it will apply to all your charts).
Another easy and more flexible option is to use a Data control and include facebook.com / cpc (apply it also at the report level). If you’re new to Looker Studio (known before as Google Data Studio), our Looker Studio guide will help you get started.
How Do I Monitor My Website Traffic in Google Analytics?
You can monitor website traffic in Google Analytics by having an understanding first of the trends of your traffic sources’ performance in the source/medium report. This monitoring can also be automated with Insights & recommendations in GA4.
If you don’t have enough traffic to identify patterns, then just keep an eye on this report.
When you have conversions and targets or KPIs relevant to your operations, compare each traffic source to see how they achieve them.
About Insights & Recommendations, GA4 provides them using machine learning capabilities that are excellent at detecting anomalies in your site. You can use them to monitor your site’s traffic.
There are two ways you can go about it.
The first one is by using GA4’s Suggested insights. Suggestions are Google’s recommendations and are usually enough to get you at least a small indication of something going awry.
The second way (in case they don’t provide the information you require) is to modify Suggested insights or create new Custom Insights from scratch.
Both allow you to notify issues via email to you or multiple people.
To access Insights, go to Reports → Reports snapshot
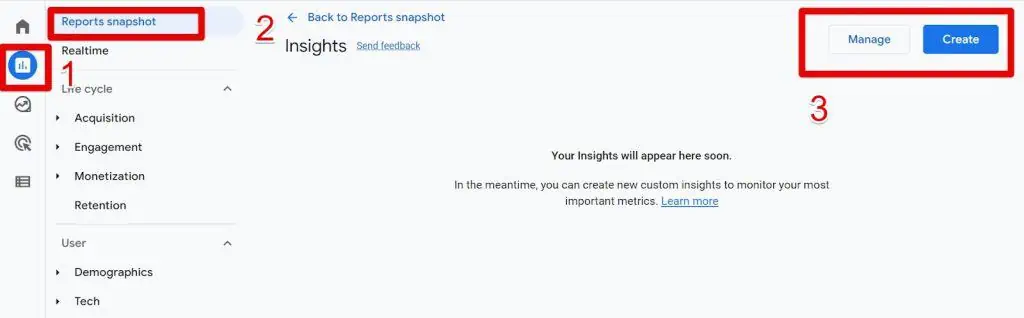
Click on Manage to view the list of suggestions by Google. You can either use these, modify them, or create new ones based on your criteria.
FAQ
How can I track website traffic sources with Google Analytics 4?
To track website traffic sources with Google Analytics 4, you can rely on the default tracking capabilities of GA4. It automatically tracks the sources of your website traffic. However, you can enhance the accuracy of the data by using UTM links to customize your URLs and provide additional information about your campaigns.
How do I view traffic sources in Google Analytics 4?
To view traffic sources in Google Analytics 4, log in to your GA4 account and navigate to the Acquisition reports. From there, you can access the Traffic acquisition report, which is similar to the Source/Medium report in Universal Analytics. This report will show you the different sources from which your visitors are coming.
What are UTM links and how do I track them in Google Analytics 4?
UTM links are customized URLs that allow you to track specific campaign parameters in Google Analytics 4. By adding UTM parameters like source, medium, campaign, term, and content to your URLs, you can track and analyze the performance of different marketing campaigns and traffic sources. GA4 automatically tracks UTM links once they are built and clicked on.
Does Google Analytics 4 use Views like Universal Analytics?
No, Google Analytics 4 does not use Views like Universal Analytics. Views were a reporting feature in Universal Analytics that allowed users to customize their reports and analyze data from specific traffic sources. GA4 provides alternative methods like Comparisons, Explorations, and Looker Studio to recreate similar views or filter data for analysis.
How can I monitor my website traffic in Google Analytics 4?
You can monitor your website traffic in Google Analytics 4 by regularly reviewing the source/medium report to identify trends and patterns in your traffic sources’ performance. Additionally, GA4’s Insights & Recommendations feature uses machine learning to detect anomalies and provide recommendations for monitoring your site’s traffic. You can also set up custom insights or modify suggested insights to receive email notifications about any issues.
Summary
With GA4, you can see not only where your traffic is coming from, but also how users interact with your site once they arrive.
This information can be invaluable for making decisions about your marketing resource allocation, your website’s content, design, and user experience.
In this blog post, we have explained how to track website traffic sources with GA4. We showed step-by-step how to understand, track, cleanse, and view traffic source data from different perspectives.
To analyze your traffic sources further, use our 11 GA4 Metrics You Can Use to Better Understand Your User Behavior.
Don’t hesitate to comment below if you have any questions.
Master the basics with our FREE GA4 Course for Beginners


")
Hi Team,
I think the method you mentioned is no longer available in GA4. After following your steps Dimension Value step is changed to Match Type where their are only 4 options
I was trying to evaluate the traffic source by platform – specially in referrals.
Was I doing it wrong?
yes, that’s true the interface changed. Nonetheless you can still use this method. Just use one of the match types like exactly matches and type in your pair of utm parameters.
I have now read many blog pots claiming they can show me how to find where my traffic is coming from with Google analytics. I am still yet to find one that gives me the information I really want to know. Which is EXACTLY where my traffic is coming from not a vague its organic social or organic search. I need to know which URL’s are sending me the traffic. Can GA4 do this? I find the whole thing very confusing and can never find what I am looking for. I much preferred the old version. Bounce rate is another… Read more »
Hi Catherine, I’m sorry to hear you are having a hard time finding this information. There are different sources of website traffic. It sounds like you are specifically referring to Referral traffic because you mentioned URLs sending you traffic. To address your issues, I recommend creating GA4 Explorations. In your Exploration, you can add the dimensions and metrics you need. Make sure to include the “Page referrer” dimension, and then filter the Exploration using this condition: “Page referrer > doesn’t contain > your domain“. Explorations can also help with addressing the issue of bounce rate. You can add the bounce… Read more »