Last Modified on September 4, 2024
Would you like to collect and store user data?
That’s exactly where cookies come in handy.
Cookies allow the browser to remember important information, such as what items were added to the shopping cart, username, password, and language preference.
First-party cookie variables allow Google Tag Manager to access the first-party cookies created by your website so that you can fire tags, trigger actions, and assign value to users’ interactions within your website.
If we set this up correctly, additional pieces of information will allow us to understand our visitors and users better, provide a more elegant and useful visit to our website, and enable us to make better data-driven decisions.
In this post, we’ll show you how to properly set up your Google Tag Manager cookie.
🚨 Note: In case you need consent to track data, you’ll also need to learn how to install a cookie consent banner on your website.
An overview of what we will cover in this guide:
- Creating a GTM Custom JavaScript Variable
- Setting up a Cookie in GTM
- Creating a GTM Tag
- Creating a GTM 1st-Party Cookie Variable
So, let’s dive in!
Creating a GTM Custom JavaScript Variable
To demonstrate how helpful cookies are in your browser, let’s look at an example from my eCommerce shop.
I want to track the revenue I generated from a sale. After placing an order and confirming the purchase, however, this value cannot be seen anywhere on the page.
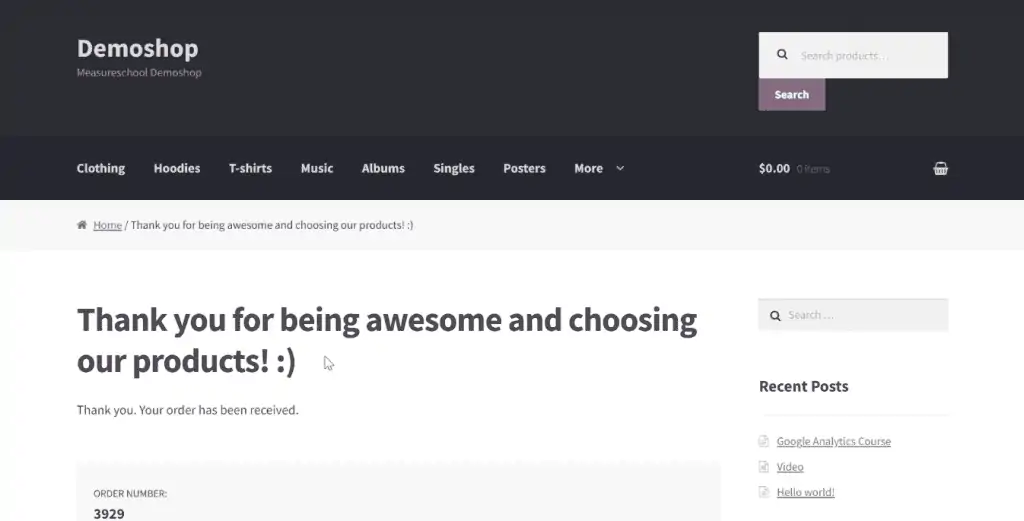
I want to grab the revenue somehow, but it is not saved anywhere even if you use Google Tag Manager and reload the page. It is simply forgotten once the thank you page is reached.
One of the solutions to grab and remember this value is by using cookies.
Now, let me show you how to create cookies using Google Tag Manager. We’ll make a purchase again and proceed to checkout.
Identifying a Value to be Tracked
Step one is to grab the value we want to track.
For this example, we want to grab the revenue. A helpful tool to make this easier is an extension called GTM Variable Builder.
Right-click on your webpage and select Inspect. From the panel, click on the Console tab. Highlight the value we want to track, then click on the extension.
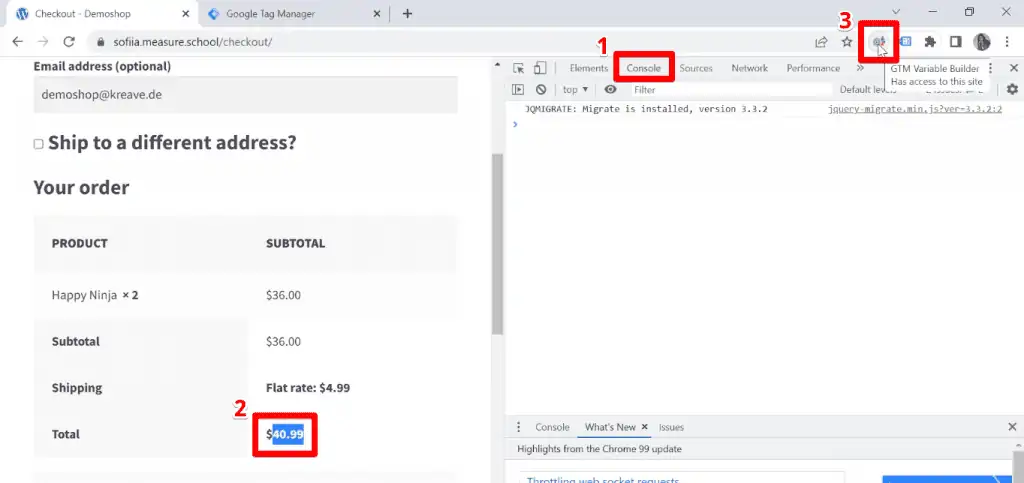
Here, we are given instructions on how to test it out.
Highlight the script and paste it into the console to test it.
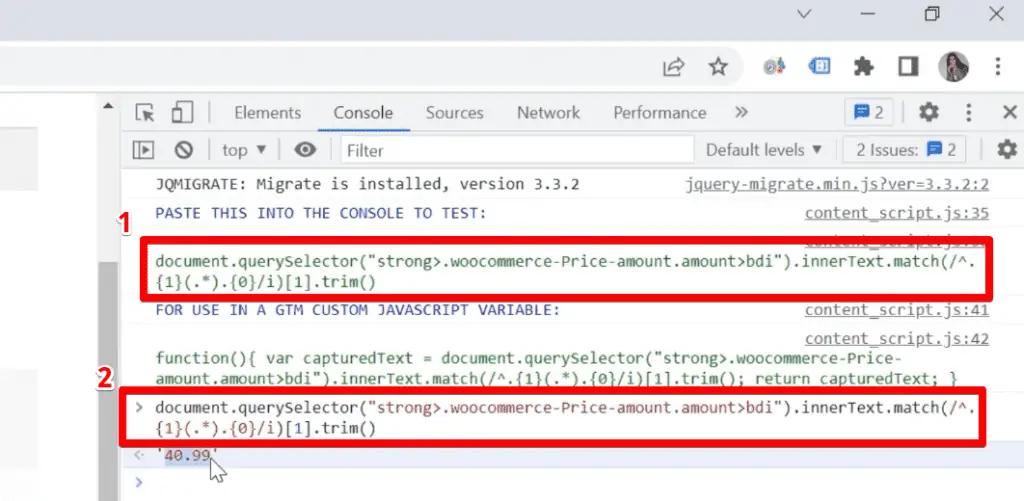
We can see that it returns the correct value.
This means we can use this generated JavaScript function in Google Tag Manager. Copy this function.
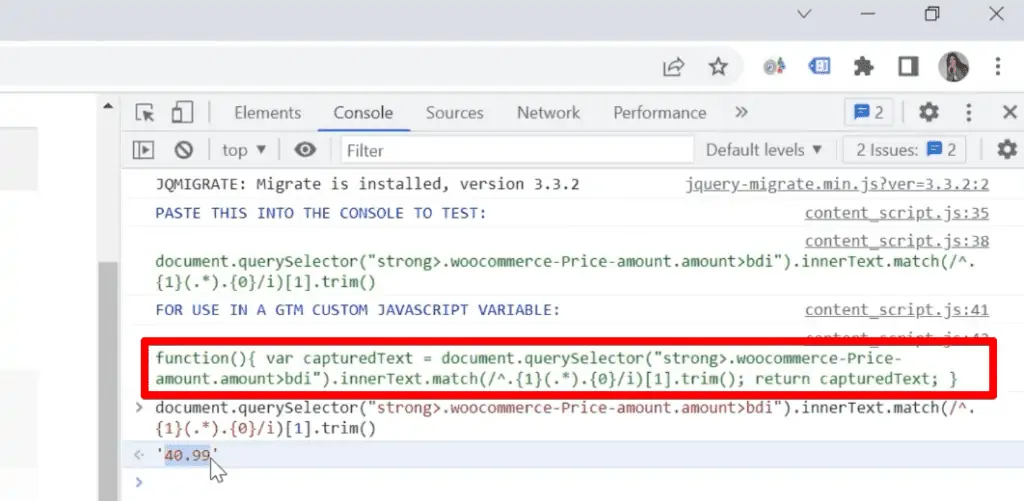
Creating a GTM Variable
Next, we’ll go to Google Tag Manager and create a variable.
Go to Variables → User-Defined Variables → New.
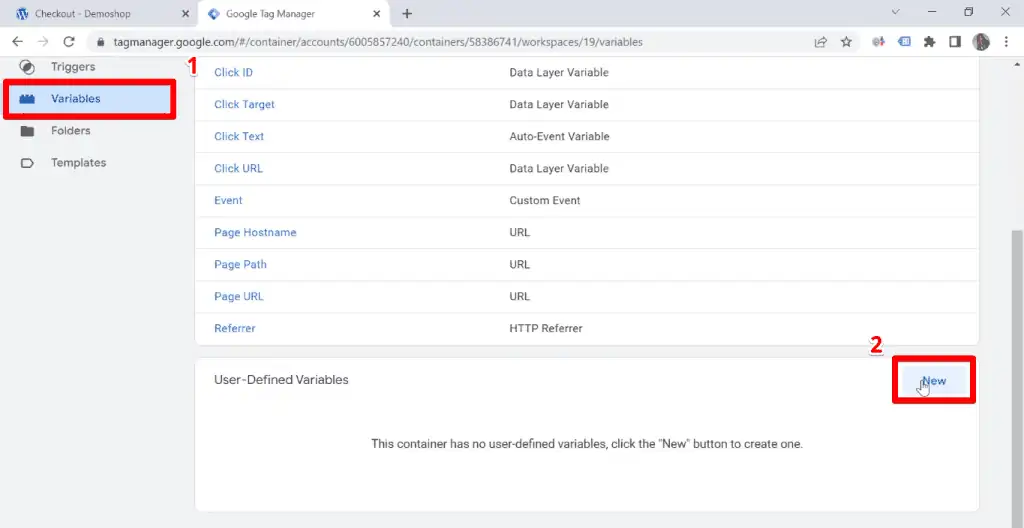
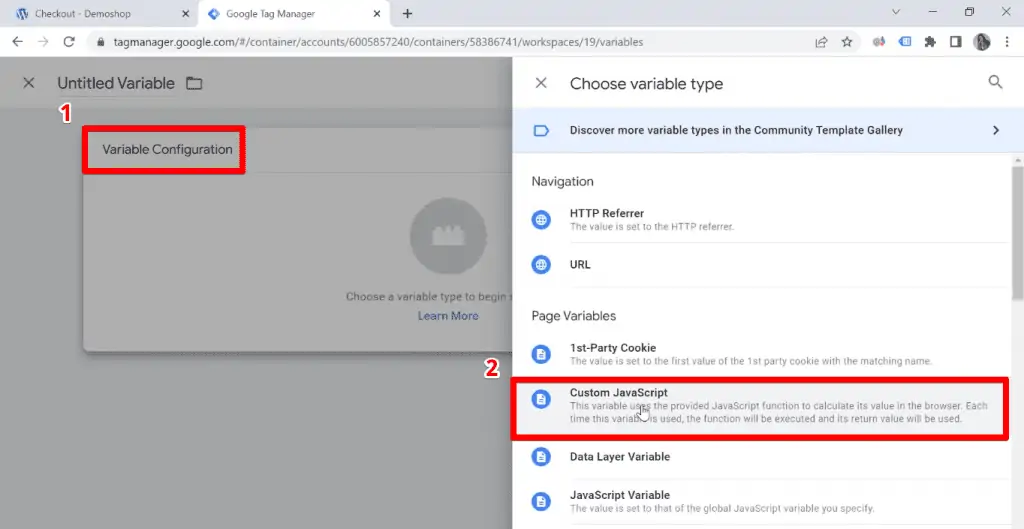
Create a new Variable Configuration. Click on Custom Javascript.
Paste the JavaScript function on the Custom JavaScript window. Let’s provide a name for this variable. I’ll name it cjs – revenue, then click Save.
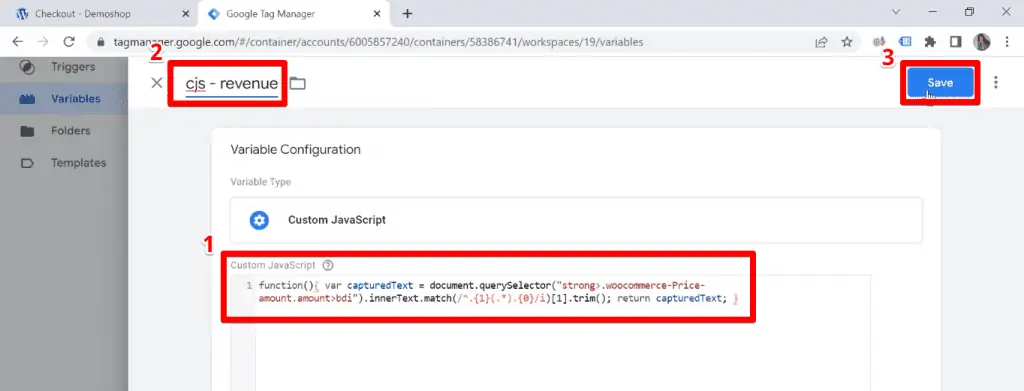
This value is our revenue.
Setting Up a Cookie in GTM
Step two is to set a cookie.
There are multiple ways to do this – you could use the custom HTML tag or create a Custom JavaScript variable.
There is a much simpler solution though, which is to use a custom Community Gallery Template.
If you want to dig deeper into templates, check out our handy guide on GTM custom templates.
Click on Templates then select Search Gallery in Tag Templates.
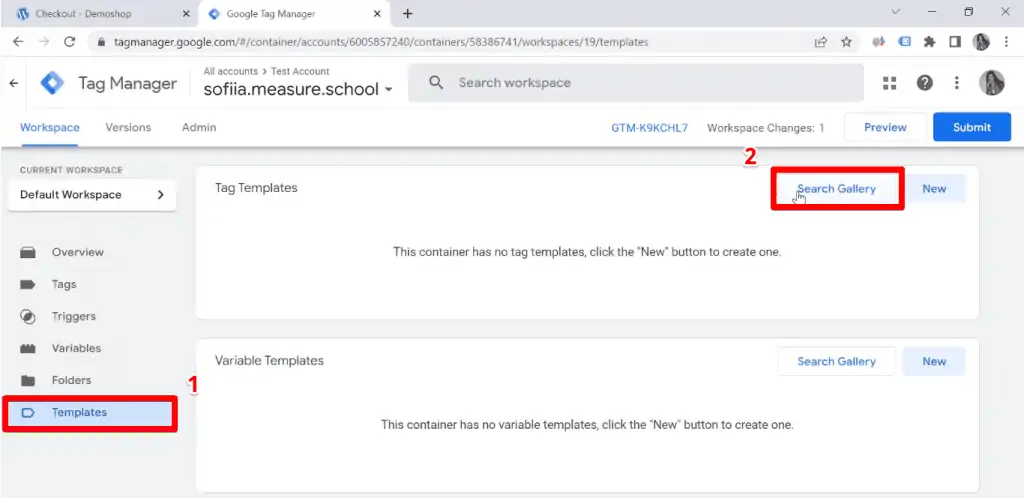
Type cookie in the search bar, and here we can see our template Cookie Creator.
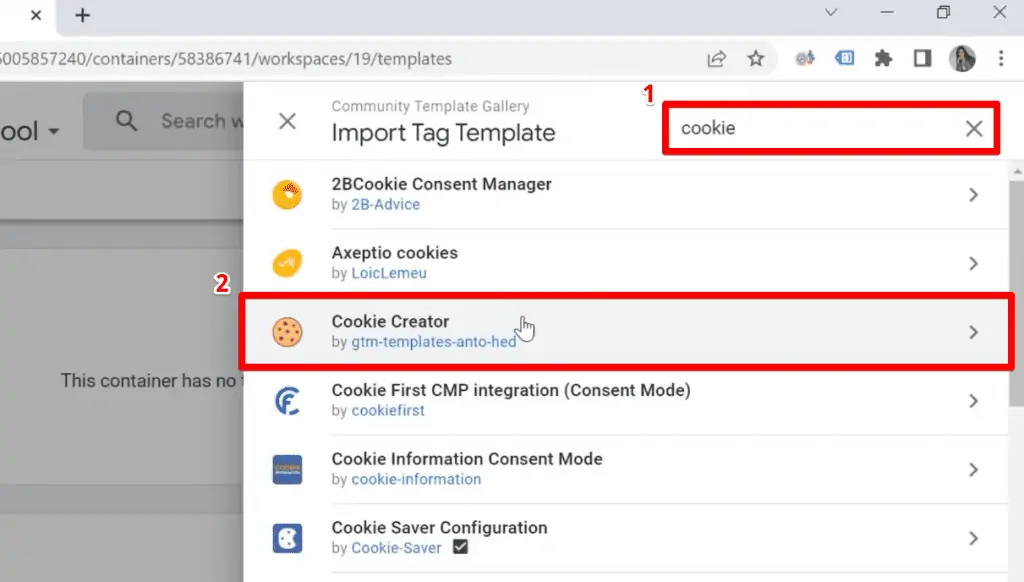
Choose this template and click Add to workspace. Confirm to add when prompted.
Before we can proceed to use this template, we should configure it. Click on Cookie Creator to give several permissions to be able to use it.
Click on Permissions → Sets a cookie → Add allowed cookie.
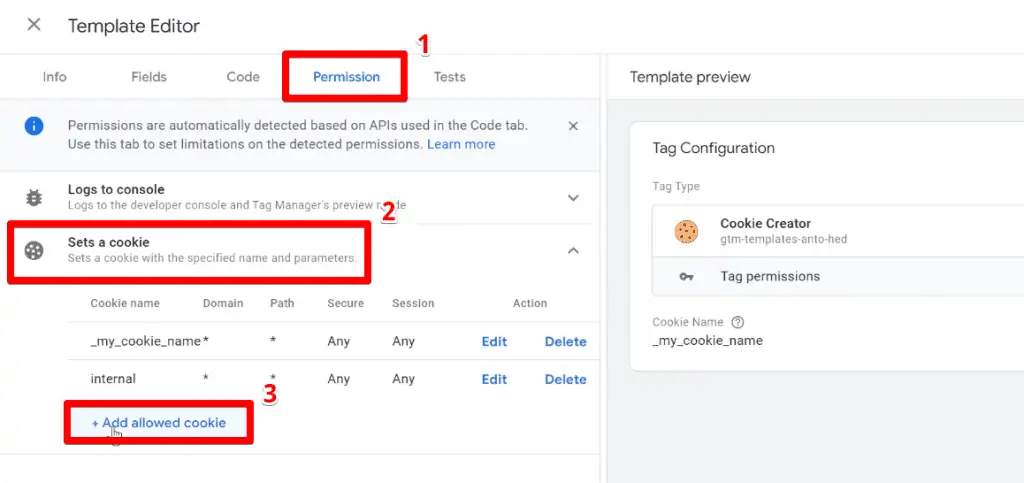
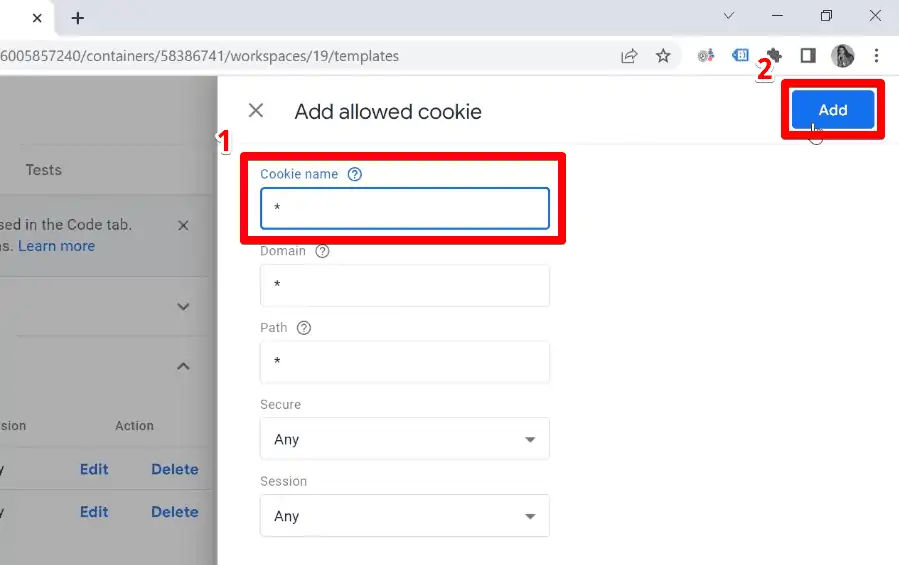
Here, we should list all the cookies that we want to use and provide their names. In my case, I want to use multiple cookies.
We could just use an asterisk symbol (*) for the Cookie name, click Add, and then save it.
Since this template is created by another developer, any modifications will pause future updates.
However, there’s no need to worry because you can do that manually. For now, let’s continue.
Great! Our template is now ready to use.
Creating a GTM Tag
Step number three is to create the cookie tag.
Let’s go to Tags to create a New tag.
Click on Tag Configuration and scroll down to the custom templates and select Cookie Creator.
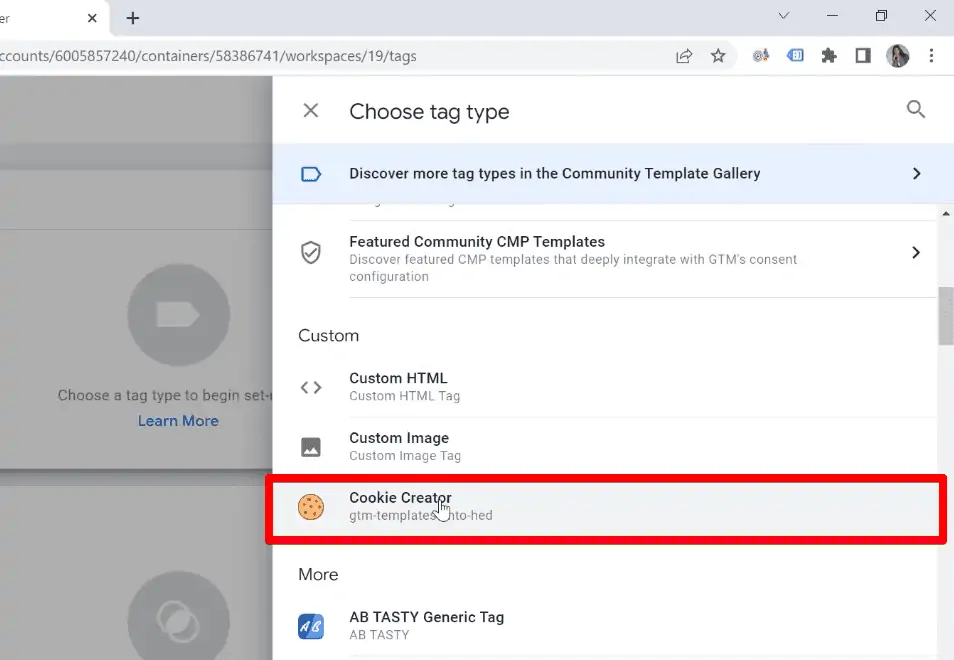
Under Cookie Name, type revenue.
For the Cookie Value, select the variable we created earlier, which is cjs – revenue.
For the Expiration mode, here you can choose the period for your cookie to expire. You may select another value depending on your business needs, but I will choose By month.

This setup should be fine for most cases, but the most attentive would have noticed that I have a subdomain. If you have a subdomain, you should do an additional setup.
Click on Advanced Settings → Set Domain → Enable Domain Option. Set Your domain as auto. Go to Set Path → Enable Path Option and put a slash on Your path.
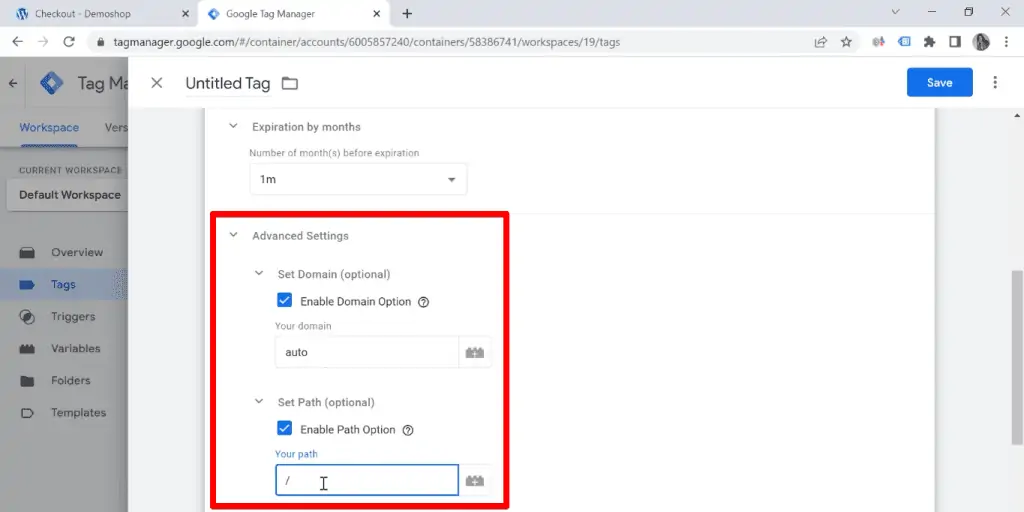
Great. Everything is set up correctly. Now, let’s add a trigger for when this tag should fire.
Adding a Trigger
So, what trigger should I use in this case?
Let’s go back to our checkout page and here you can see that the revenue is available on this specific subpage. This means I can use this part of the URL.
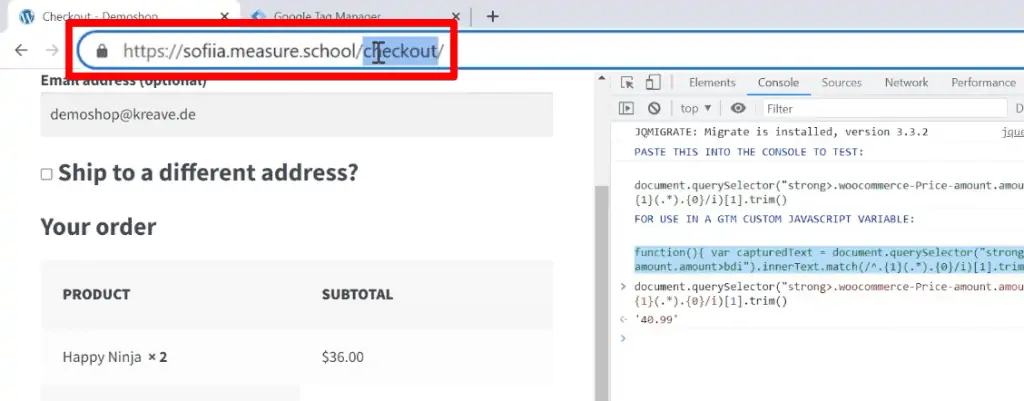
I can copy this and say that this is the subpage where I want to set a cookie.
Create a new trigger. Click on Trigger Configuration → DOM Ready.
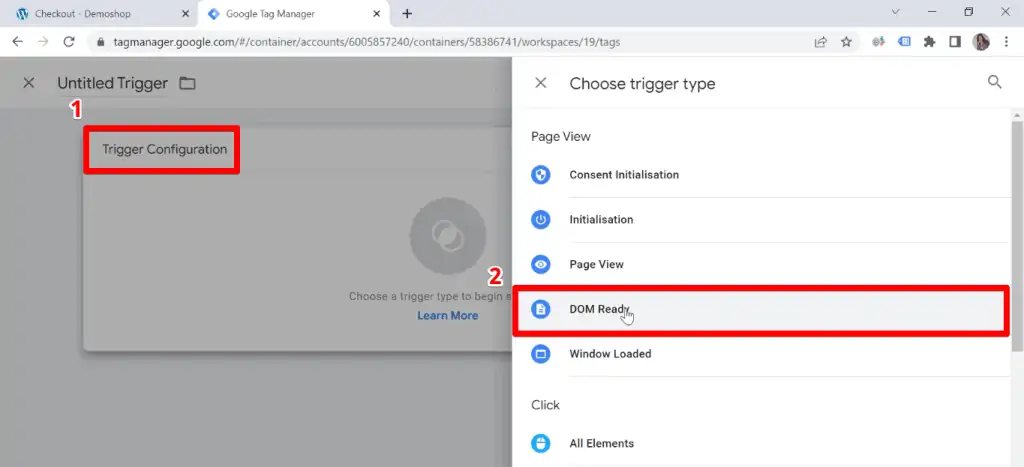
The reason that we’re using DOM Ready as a trigger is that we have to make sure that all elements are rendered and that we can access their values.
Let’s choose Some DOM Ready Events. Set the condition to be Page URL, contains, and checkout.
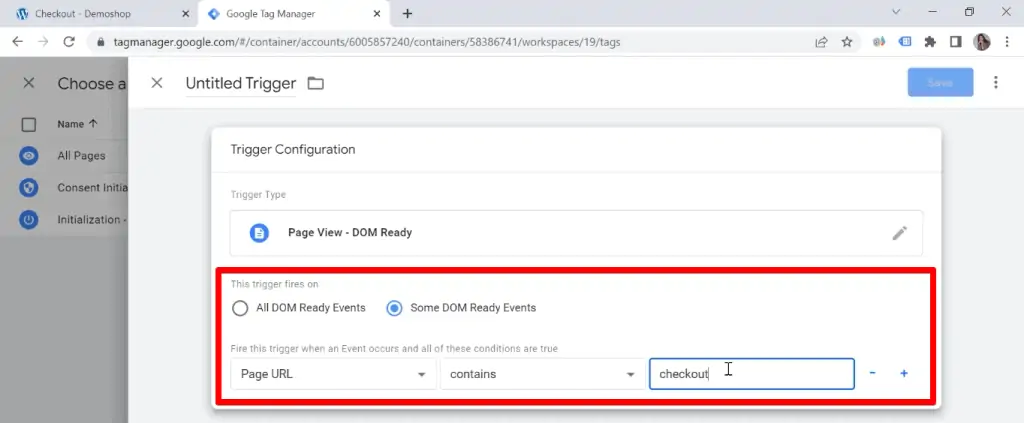
Let’s provide a name for this trigger, I’ll put checkout. Then, let’s save our trigger.
We should also provide a name for our tag. Let’s say set cookie – revenue and let’s save our tag.

Great! We have successfully created a cookie tag!
Testing the Cookie
Now, let’s preview what is happening and check if our tag is working properly.
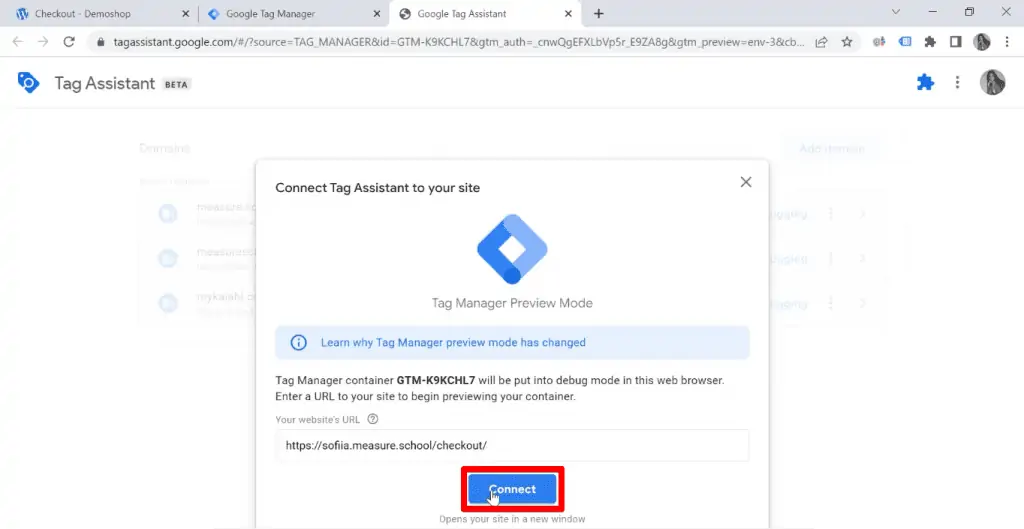
Let’s preview our tag. Then type in the URL of your checkout page and click on Connect.
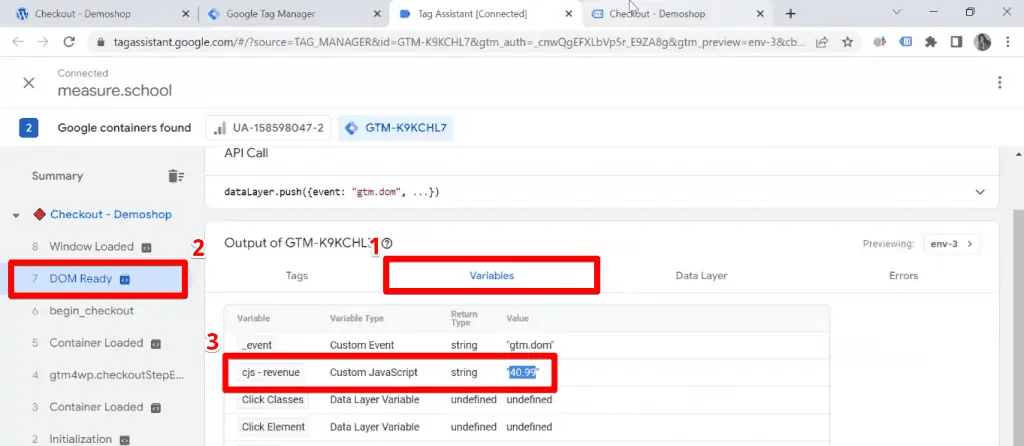
Under Variables → DOM Ready, we can see our Custom JavaScript variable and that the value is correct.
Now, let’s have a look at our cookie.
Right-click on our webpage and select Inspect.
In the panel, go to Storage → Cookies. Make sure your domain is selected. In some browsers, like mine, these panels are located under the Application tab.
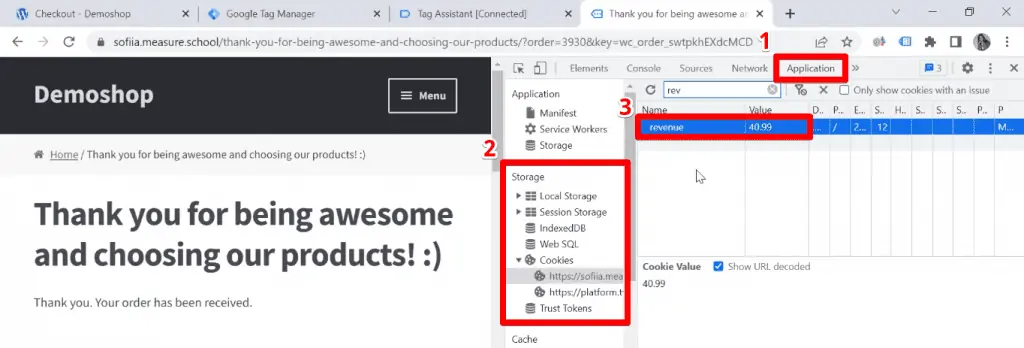
Here, we can look for revenue and see that the value is correct and works even on the thank you page.
Well done! We have successfully made a Google Tag Manager cookie.
Creating a GTM 1st-Party Cookie Variable
Now that we have grabbed the value, the question is – where can I store it?
Our final step is to create a 1st-Party Cookie variable.
Returning to the Google Tag Manager, we’ll go again to Variables → User-Defined Variables, and create a new Variable Configuration.
This time, however, we’ll select 1st-Party Cookie.

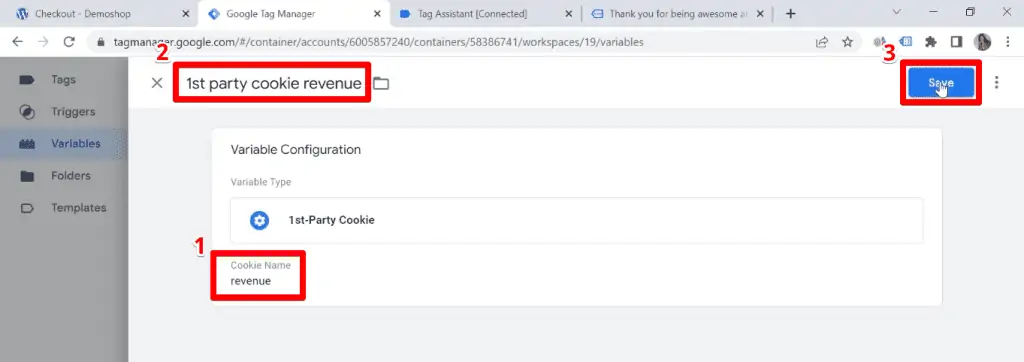
Under Cookie Name, we’ll select revenue because this is exactly the name of the cookie we created earlier.
Let’s name this variable as 1st party cookie revenue, then click Save.
Let’s check if this is working and preview our page one more time.
Testing the Variable
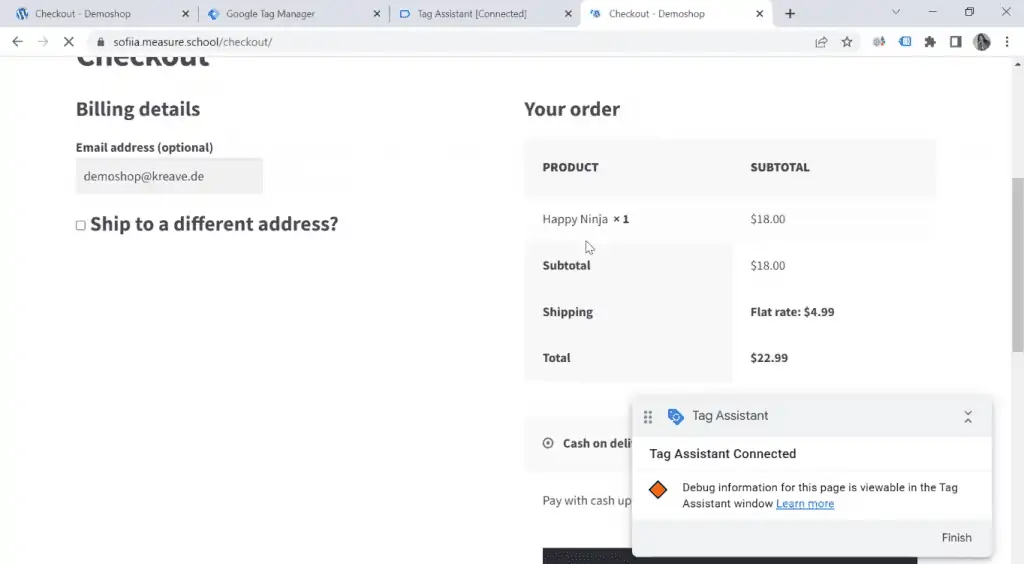
Okay, I’ll make a purchase again and proceed to the checkout page.
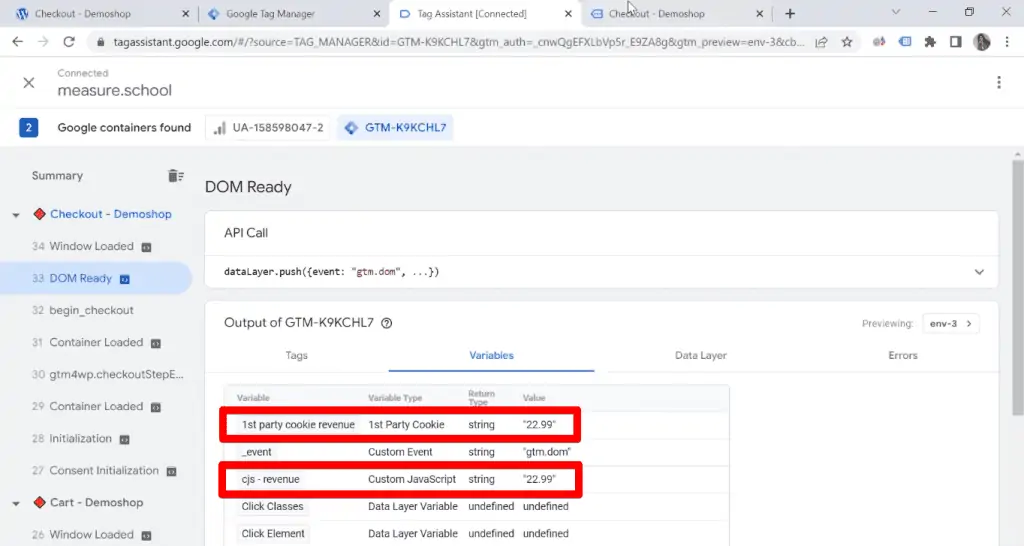
Going back to Variables → DOM Ready, we can now see both our Custom JavaScript and 1st-Party Cookie variables.
Both have the same value, which is exactly our revenue.
Now let’s make a test purchase to see if the web page can remember our value.
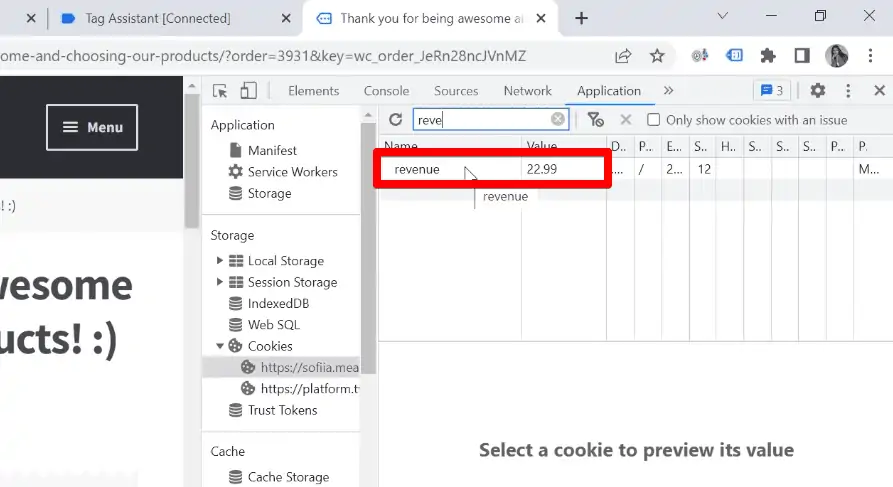
Again, right-click on our webpage and select Inspect → Application. Under Storage → Cookies, and let’s look for our revenue.
We can see that it has grabbed our new value and remembers it even on the thank you page.
Great! Now, we have a variable in the Tag Manager that you can use for your future tags if you wish to work with this value.
FAQ
What is the purpose of creating a Google Tag Manager cookie?
Creating a Google Tag Manager cookie allows you to collect and store user data, such as information about shopping cart items, usernames, passwords, and language preferences. It enables better understanding of website visitors and users, improves the user experience, and supports data-driven decision-making.
What is the process of setting up a cookie in Google Tag Manager?
There are multiple ways to set up a cookie in Google Tag Manager, but here is a simplified method using a custom Community Gallery Template:
1. Access Google Tag Manager and go to Templates.
2. Select Search Gallery in Tag Templates.
3. Search for “cookie” in the search bar and choose the Cookie Creator template.
4. Add the template to your workspace and configure it by granting necessary permissions.
5. Specify the cookie name and select a variable to assign its value.
6. Configure the expiration mode according to your requirements.
7. Adjust advanced settings if you have a subdomain.
8. Save the configuration.
How can I create a GTM 1st-Party Cookie variable?
To create a GTM 1st-Party Cookie variable, follow these steps:
1. Open Google Tag Manager and go to Variables.
2. Click on User-Defined Variables and create a new variable.
3. Choose the Variable Configuration option and select 1st-Party Cookie.
4. Select the appropriate cookie name for the variable.
5. Provide a name for the variable and save it.
Summary
So that’s how you set a Google Tag Manager cookie. Cookies only hold a small bit of data, but they unlock helpful information if set up properly. This additional information opens the room for an improved user experience on your website.
Want to maximize your use of Google Tag Manager? Whether you’re a complete novice or up to an intermediate level, you might find our Google Tag Manager Tutorial helpful.
What information will you grab using cookies? How will you use these cookies to improve your website? Let us know in the comments below!


