Last Modified on October 30, 2024
Remember when Google announced that it is going to be retiring our beloved Universal Analytics next year in July?
Since then, more and more marketers, companies, and well pretty much everyone has become super interested in implementing GA4, and rightly so!
So, how do you track events with GA4 and GTM? What are the things you should be aware of? Are there any limits?
You’ve heard that everything is an event in GA4. So, why track it? So many questions and confusion, but don’t worry we’ve got your back!
This post will provide a solid base for understanding GA4 events and tracking them.
Some of the major topics we’ll cover are:
- How do events work in GA4?
- What are the different types of events?
- Tracking events with GA4 and GTM
- Custom Definitions
- Creating and Modifying Events in GA4
If you are planning to migrate to GA4 or have to migrate multiple client accounts to GA4, have a look at our handy GA4 migration guide.
Now, without further ado, let’s dig in!
How Do Events Work in GA4?
The data model in GA4 works differently than UA ( Universal Analytics) and provides you with more flexibility in terms of how much information you want to collect and what is mandatory.
The good news is that since every interaction is an event, we no longer have to worry about sessions and pageviews because even a pageview is measured as an event.
GA4 events come with parameters that can provide us with much more detail and it depends entirely upon the person who is setting them up and how much information they want.
In UA, there were the following four event parameters:
- Event Category
- Event Action
- Event Label
- Event Value
In contrast, GA4 does not require you to fill in that information and as long as you have an event name (required) you can completely skip the event parameters or send several event parameters if you want to.
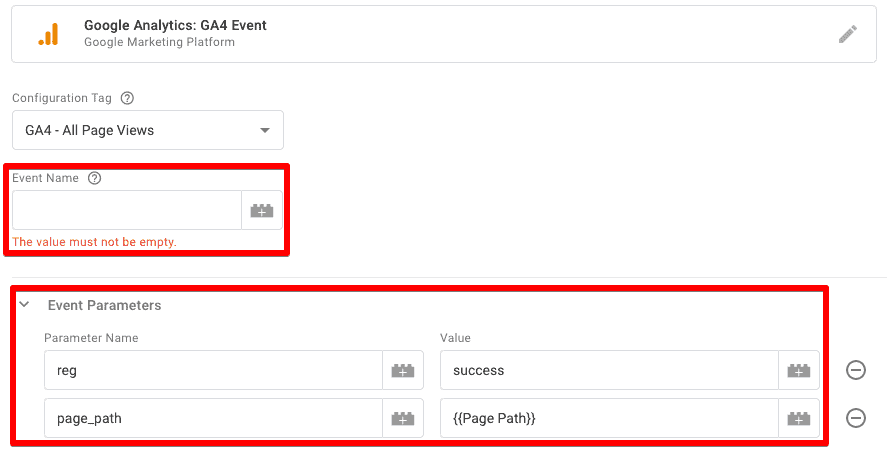
🚨 Note: There is a limit of 25 custom parameters that you can send with an event.
Different Types of Events in GA4
In short, GA4 has four types of events and they all have their specific use-cases. These events are:
- Automatically collected
- Enhanced measurement
- Recommended
- Custom
1. Automatically Collected Events
Once you set up your GA4 on the website or the GA4 SDK on your app, these events are collected automatically without any further coding or tagging.
Here’s a comprehensive list by Google that also includes enhanced measurement events.
A few examples of automatically collected events include session start, first visit, and user engagement.
Wondering why a session start is an event? Well, remember everything is an event in GA4.
2. Enhanced Measurement Events
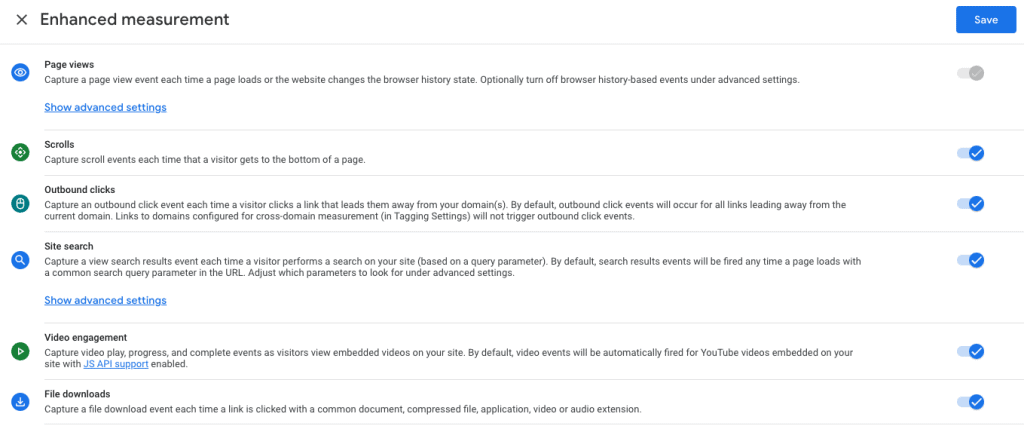
These events are collected once you enable the enhanced measurement events in GA4 and can be helpful in measuring the actions that would previously require you to set up separate events.
These events are triggered in GA4 for certain predefined actions that a visitor takes on your website.

Let’s talk briefly about these events and what else you can do with them.
- Page views are turned on by default and work every time a user reloads the page
- Scrolls logs an event when the user reaches the bottom of the page (you won’t see it for 25%, 50%, or 75% scroll depth)
- Outbound clicks event tracks the clicks that lead to external websites
💡 Top Tip: For cross-domain measurement, you can go under Additional Settings → More Tagging Settings → Configure your domains and add all your domains.
- Site search event is triggered every time a visitor performs a search on your site based on a query parameter
- Video engagement events like video starts, progression, and ends will be logged automatically when visitors view embedded videos on your website
- File downloads will track anytime a user downloads a common type of file extension. Scroll down on this page to view the full list
If you want, you can also turn off any individual event or go into their advanced settings from the same settings section.

In advanced settings, you can toggle any event you don’t want to track.
3. Recommended Events
These events are recommended by GA4 in the events report and do not trigger/track unless you manually set them up using exactly the same event name and parameters as recommended by Google.
While GA4 event tracking is quite flexible with names and what events you can track, these events require you to follow Google’s recommendations for them to trigger and track properly.
These recommended events are grouped under three business verticals:
- All properties (generic)
- eCommerce / Online Sales
- Games
You can view the list of these events here. These events show up in the Events report as recommendations.
If you are looking to track the events that already exist in any of these verticals, it’s better to use the event names and parameters Google wants us to. This would ensure we have proper tracking in place and we will receive quality data.
4. Custom Events
What if you want to track form submissions or button clicks but they do not fall under any of the above three categories? It would be good to start with the custom events in GA4.
Custom events need to be set up manually, but you have to use your own event names. We will be looking at how to set these up in the next section.
Tracking Events with GA4 and GTM
🚨 Note: If you haven’t connected these tools already, check out our guide on how to install GA4 with GTM.
Understandably, you won’t have to do a lot for automatic and enhanced measurement events.
So, we will show you how to manually add custom events. The same process would also work for the recommended events as long as you use the event names and parameters mentioned by Google here.
Let’s say you want to track CTA button clicks on your website. We will start by firing up your GTM account and creating a new tag.
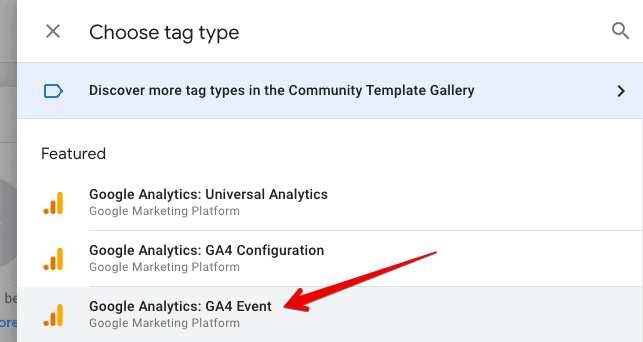
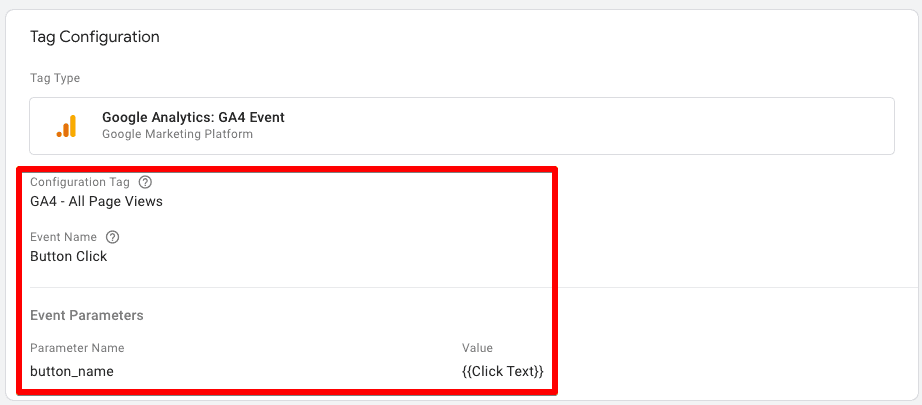
Choose the Google Analytics: GA4 Event tag type in the template gallery.
Next, select the Configuration Tag. Assuming that you have already installed GA4 on your website, you can choose your GA4 pageviews tag here and add an Event Name.
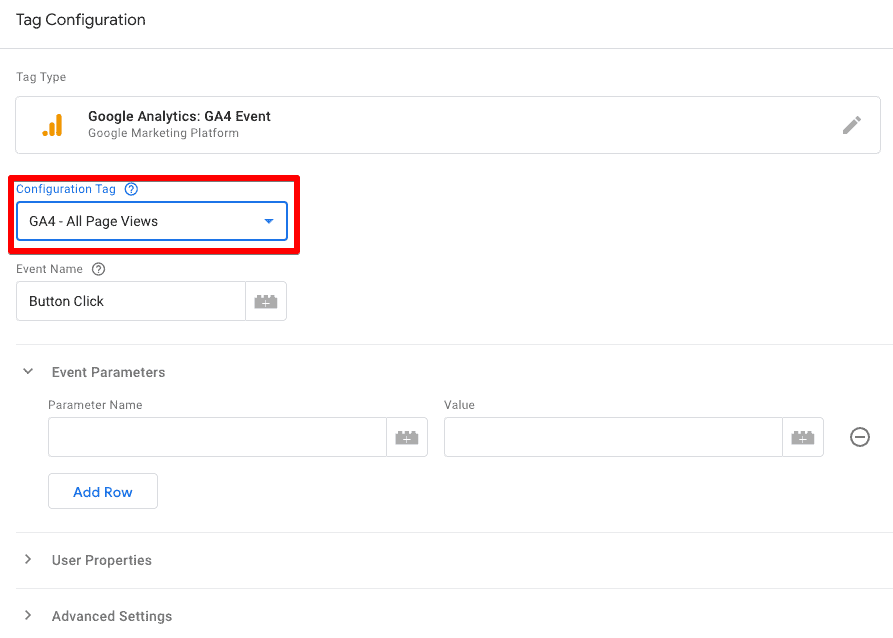
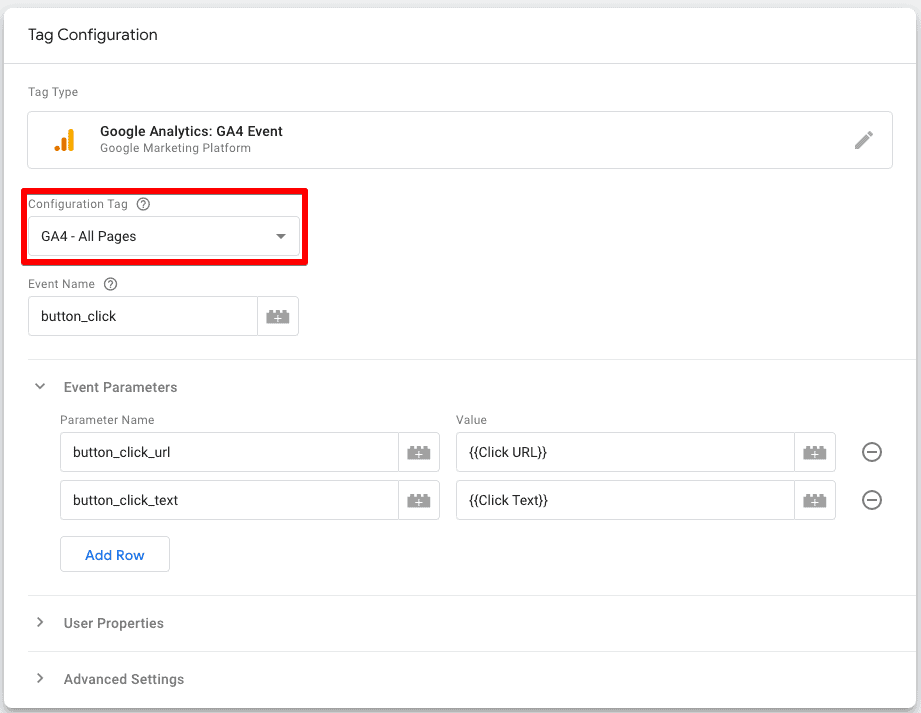
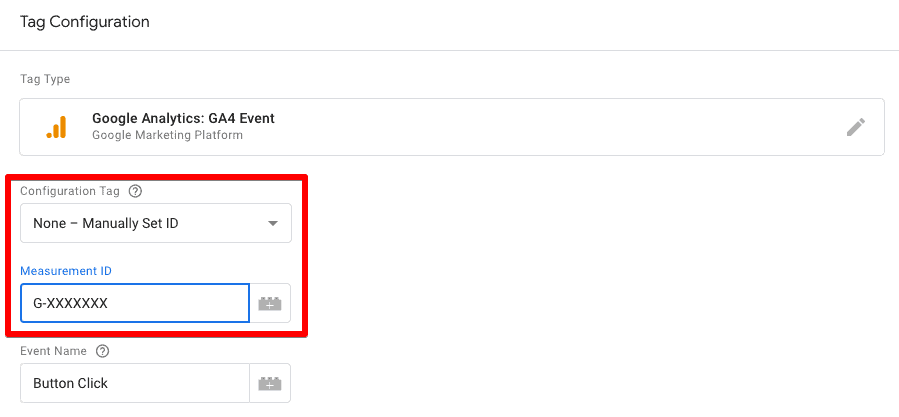
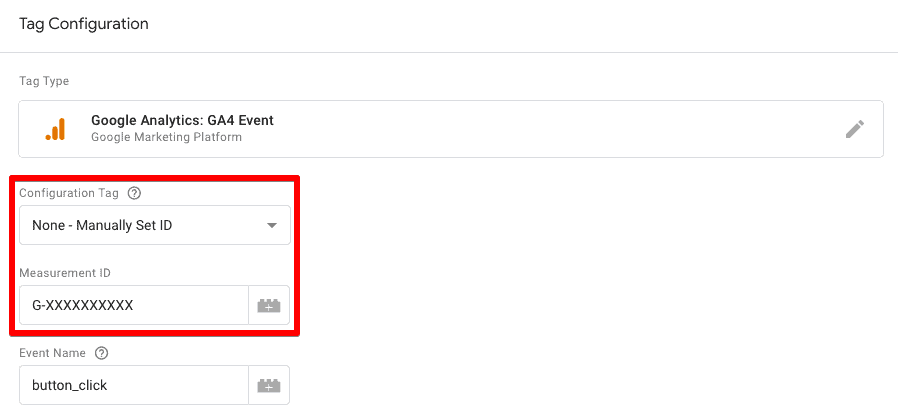
If you haven’t set up the configuration, you can select the None – Manually Set ID option and enter your GA4’s ID in the Measurement ID section.
This would be equivalent to your Universal Analytics tracking ID found in the admin settings panel.
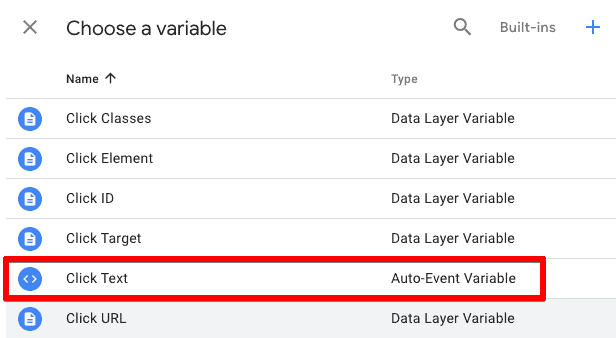
Next, you need to enter event parameters (similar to Universal Analytics). How you set these up depends on what information you want to send with your tracking to your GA4 account.
For this example, we want to know what’s the text of the button. We will set button_name as the parameter name and select the button’s value from the already available Click Text (Auto-Event Variable).
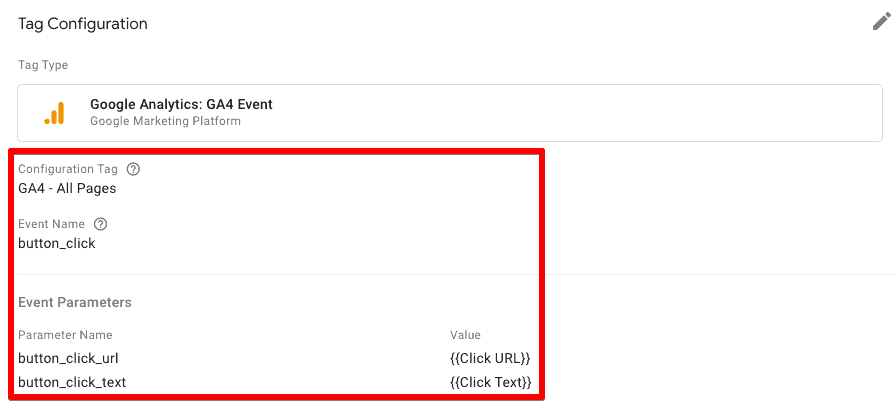
Now your tag configuration section would look something like this:
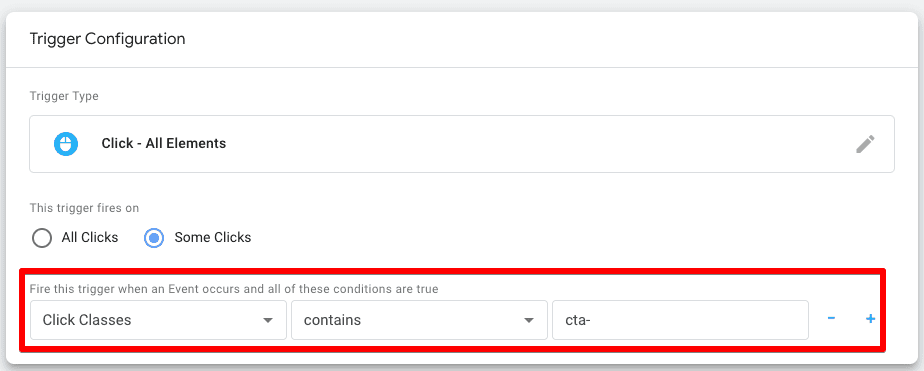
We have now successfully configured the tag, but still have to choose a trigger for our event to fire up. Click on the triggering area and choose All Clicks trigger.

Then, choose Some Clicks for the triggering condition, as you don’t want your tag to fire for all the button clicks. Enter Click Classes that are unique to the button(s) you’re tracking.
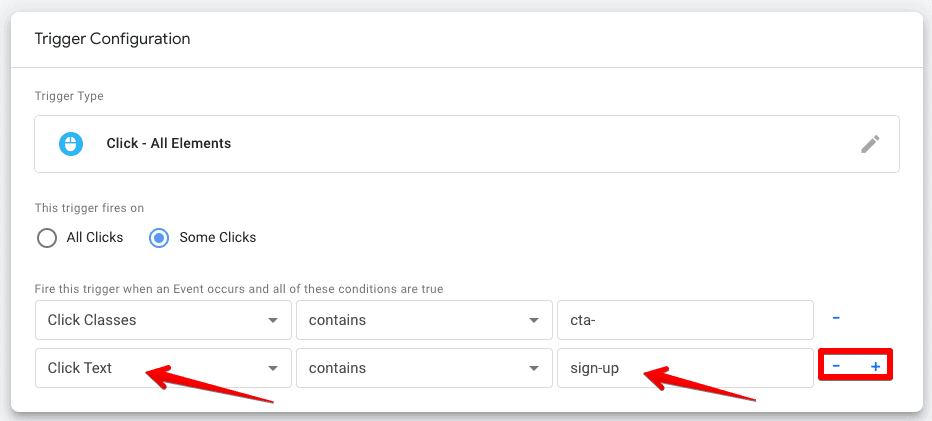
Depending if all the buttons share the same classes and you only want to track a few of them, you might have to further narrow down by adding more filters like Click Text or Click ID that capture only that specific button.
After adding the trigger, save your tag and check in the preview mode of GTM if the new tag is firing.
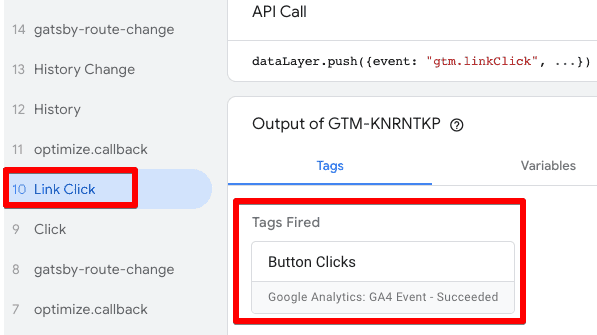
We can now also verify if GA4 is correctly receiving the event found under Configure → DebugView. Find if the event we just set up is showing up.
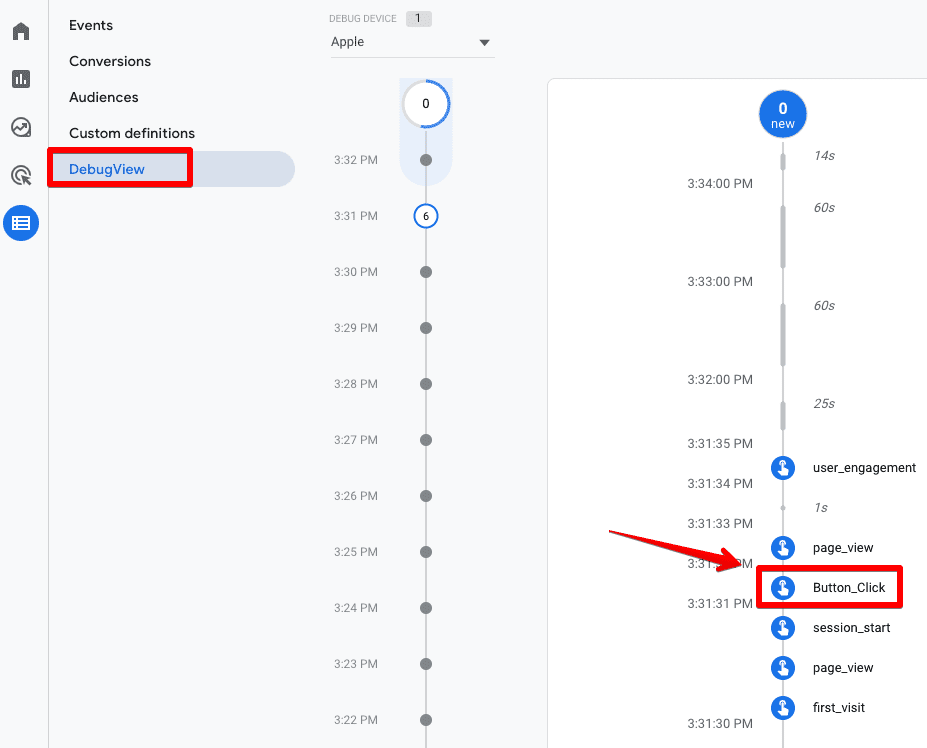
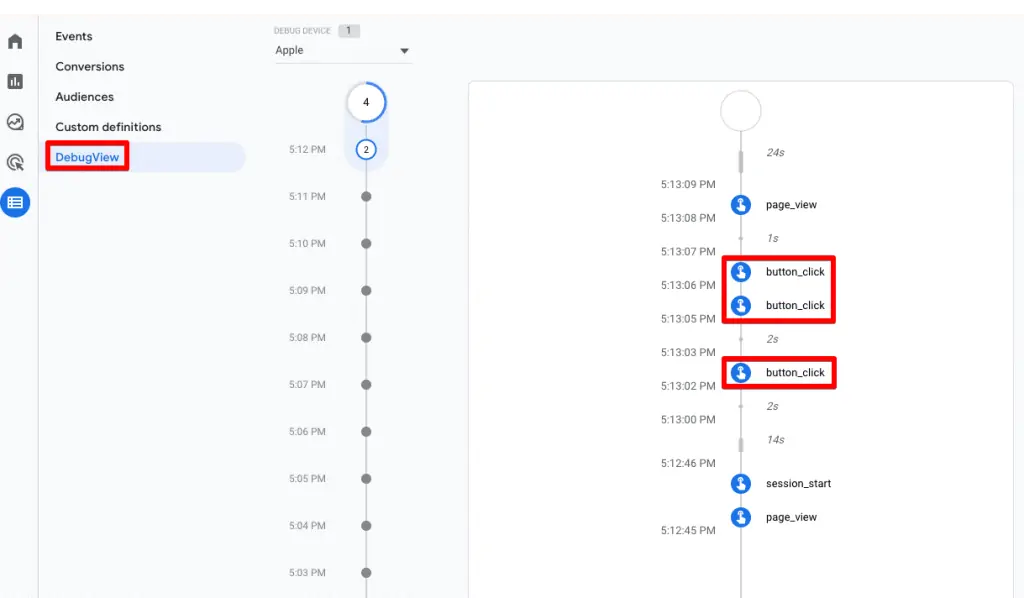
🚨Note: We’ve also created a GA4 event tracking checklist which will ensure you’re setting it up correctly.
Custom Definitions in GA4
Now that we are receiving the event in GA4, we need to set up our custom definitions for this event. Doing so will ensure that we can see it under the Events report.
You can create custom definitions for any event you are sending to GA4. Go to Configure → Custom Definitions → click on the Create custom definitions button

Now, we can add our event’s details for it to show up in the Events report. This prompt requires us to add four things:
- Dimension name – This can be anything you want to show up in different reports later on.
- Scope (User / Event) – We will go with the event scope since we want all events to be tracked. If we wanted to get data for users, then we would select User. Once selected, the scope cannot be changed later on.
- Description – This is an optional field, but if you want to add more information for other people, then this is the place.
- Event parameter – This should be the same event parameter we used in GTM and the most important part if you want to pull in the correct data. Therefore, we will use button_name here.

And there you go! Now we will wait for another 24-48 hours for our event to show up on the Events report, where we can toggle the Mark as conversion switch.

This process is similar to how we add Event Category, Event Action, and other optional fields in Universal Analytics and then save it as a goal.
Creating and Modifying Events in GA4
What if the event you are marking as the conversion is collecting several CTA buttons, and you only want to count conversion when only a specific button is being clicked?
If you’re already sending a dedicated event with GTM, then you don’t need to do anything.
But what if you’re tracking all the button clicks and want to count only CTA button clicks as conversions?
The simple solution would be to create a new event from your existing event by narrowing its scope.
You can simply go to Configure → Events → Create event and configure a new event from your existing events

In the configuration, we need to enter the name of the event that we want to display, but it cannot have spaces. After that, we need to add the details of the event we are looking for and the conditions for this new event to be created.
In this case, we want a new event to be created if the event value contains cta- in it. For Parameter configuration, if we want the same values to be copied, then we can leave the Copy Parameters from the source event checked.
Otherwise, enter the new parameter and value along with the old one. Add another row, but leave the new value field empty to remove any parameter.
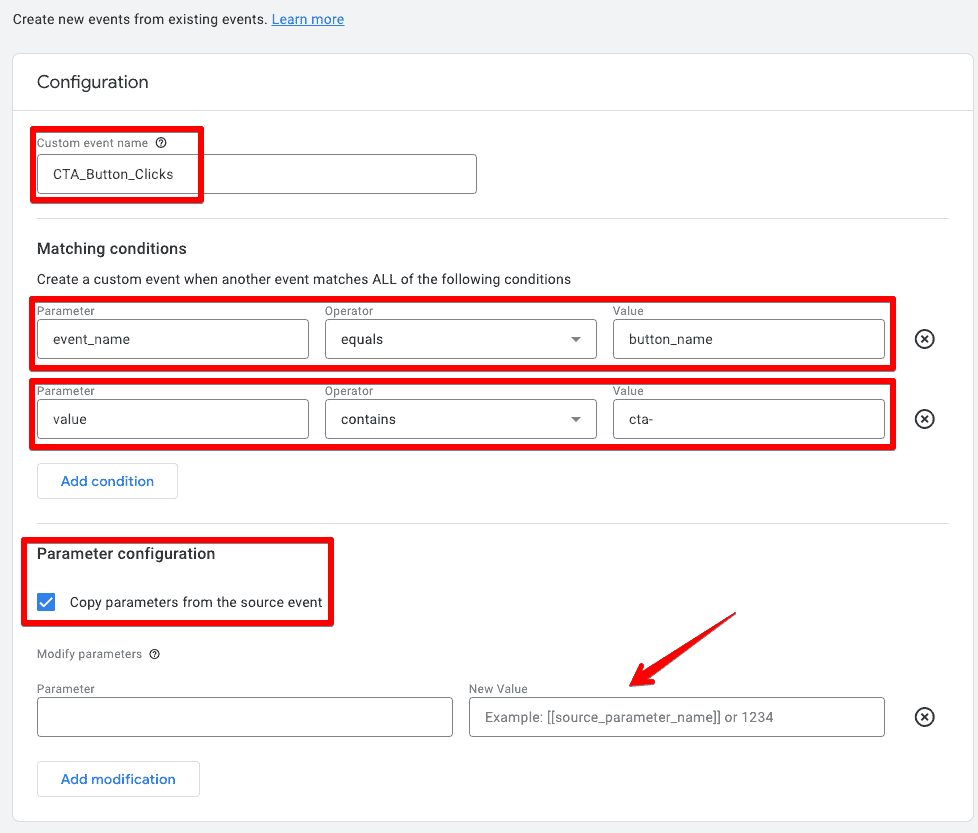
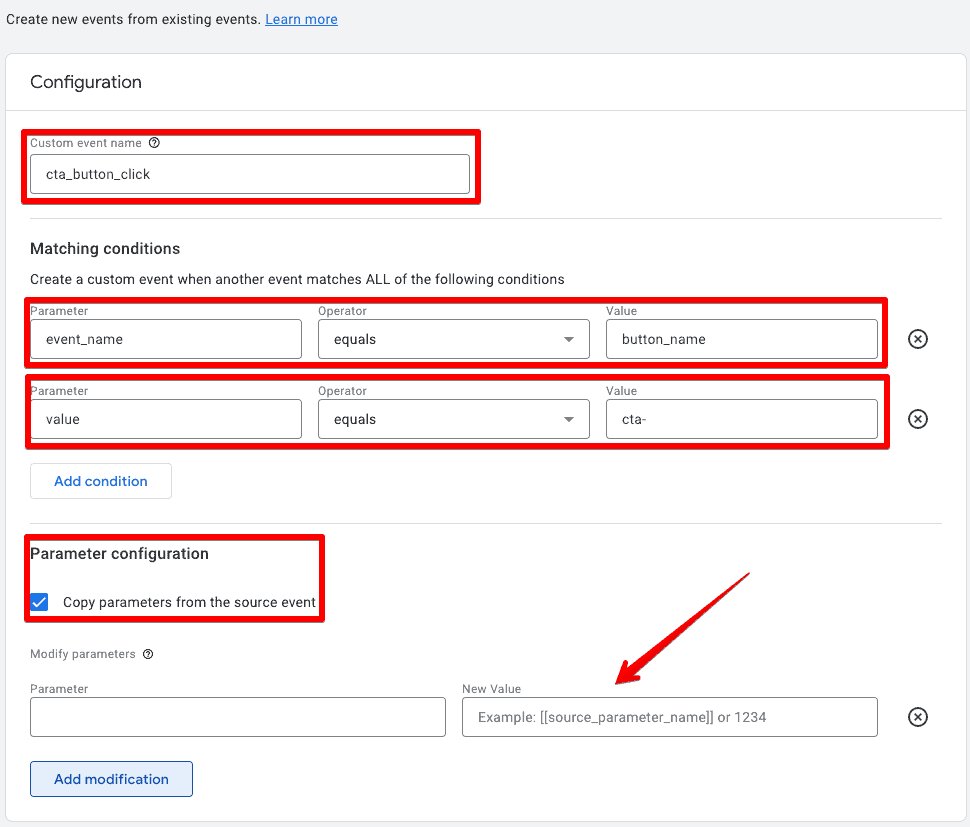
Save it and wait 24-48 hours for these events to show up. Don’t forget to mark them as conversions once they show up.
If you want to modify an event you created previously, you can simply go to Configure → Events → Modify event and configure your modifications.

Modifying the event configuration works the same as creating a new event except that you can give any name without worrying about the spaces.
🚨 Note: Modifications don’t apply to any past data and there is a limit of 50 modifications for each property
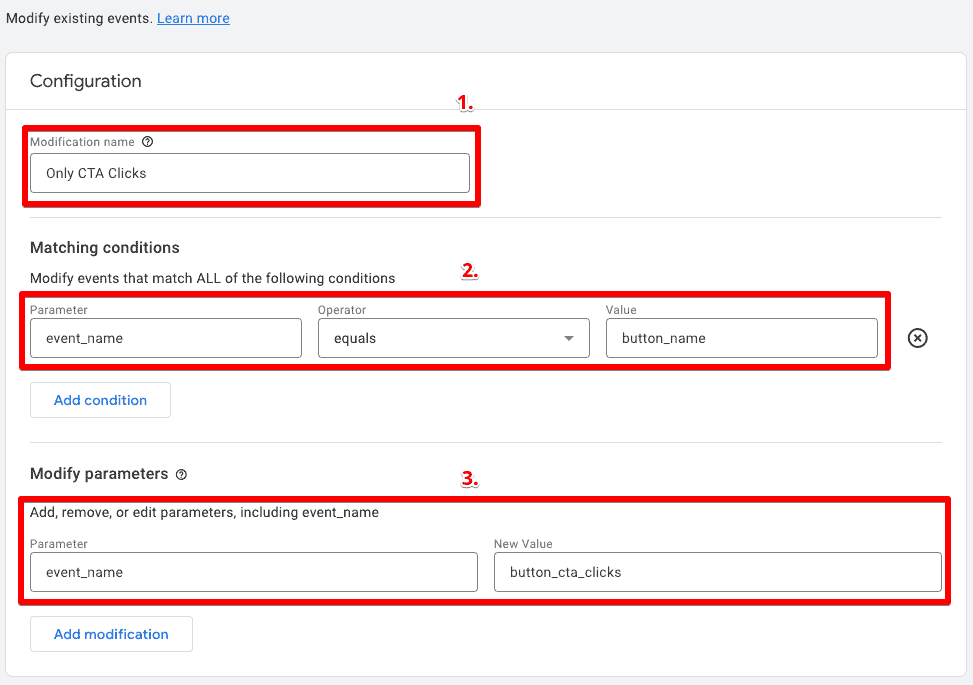
If you don’t want to wait 24-48 hours for the events to show up as conversions, you can set them up instantly by going to Configure → Conversions → New conversion event button by using the same name you used for your event.

FAQ
What are the different types of events in GA4?
GA4 has four types of events:
1. Automatically collected events: These events are collected without any additional coding or tagging once GA4 is set up on your website or app. Examples include session start and user engagement.
2. Enhanced measurement events: These events are triggered by predefined actions and can be enabled in the GA4 admin panel. Examples include page views, scrolls, outbound clicks, site search, video engagement, and file downloads.
3. Recommended events: GA4 recommends specific events based on your business vertical (generic, eCommerce/Online Sales, Games), but they won’t track automatically. You need to manually set them up using the recommended event names and parameters.
4. Custom events: If you want to track specific actions that don’t fall under the other event types, you can manually set up custom events in GA4 using your own event names and parameters.
How can I track events with GA4 and Google Tag Manager (GTM)?
To track events with GA4 and GTM, you can set up custom tags in GTM. Here’s a general process:
1. Install GA4 with GTM if you haven’t already.
2. For automatic and enhanced measurement events, no additional setup is required.
3. To track custom or recommended events, create a new tag in GTM and choose the “Google Analytics: GA4 Event” tag type.
4. Configure the tag by selecting the GA4 configuration tag and specifying the event name and parameters based on your tracking requirements.
5. Set up triggers to determine when the tag should fire, such as specific button clicks or other user interactions.
6. Save and test the tag using GTM’s preview mode.
Verify that the events are received correctly in GA4’s DebugView.
7. Set up custom definitions in GA4 to ensure the events appear in the Events report.
How do events work in GA4?
In GA4, every interaction is considered an event, including pageviews. Events in GA4 come with parameters that can provide additional details about the interaction. Unlike Universal Analytics, GA4 does not require you to fill in specific event parameters, but rather focuses on the event name as a required field.
Why should I track events in GA4?
Tracking events in GA4 allows you to gather detailed information about user interactions on your website or app, helping you gain insights into user behavior and optimize your marketing strategies.
Summary
In this post, I’ve explained the different types of events in GA4, their uses, tracking events with GA4 and GTM, and creating custom definitions. You also learned how to create events in the GA4 interface, as well as how to modify them.
Understanding how events work in GA4 can prove a very helpful weapon in your arsenal as a technical digital marketer, especially with the inevitable move from Universal Analytics to GA4 in July 2023.
The naming conventions and event reports are important areas to cover, but that’s for another time.
It’s also important to understand what GA4 metrics mean so you can better understand user behavior. These 10 GA4 metrics are a good starting point.
If you’re looking to dive a bit deeper into the basics of Google Analytics 4, check out our Google Analytics tutorial.
Have you tried creating any GA4 events or custom definitions? We would love to hear your comments about how you find the whole process, especially compared to Universal Analytics.


Hi, I tried to create a custom dimension but my event parameter is not listed in the drop-down.
Hii Julian,
Presenting a difficult topic in an easy way is not an easy task. you are doing well and all your efforts towards providing this type of information are admirable.
Great lesson, thank you. The one thing I still don’t understand is why a person would choose to create their events in GTM versus directly in GA4?
There may be some cases where it has to be one or the other, but often, it seems it’s possible to do it in both. How do you choose? Thank you!