
Last Modified on January 13, 2025
What are custom events in Google Analytics 4?
GA4 Custom events are personalized events with unique names and parameters.
They allow tracking user actions that are not automatically collected by Analytics and don’t belong to recommended events.
Google Analytics 4 provides four categories of events that can be tracked:
- Automatically collected events
- Enhanced statistics
- Recommended events
- Custom events
Tracking custom events in Google Analytics 4 (GA4) is increasingly important for businesses, to deeper understand their audience’s behavior on their website or app.
The lack of visibility into specific users’ actions makes optimizing marketing strategies difficult.
Custom events allow businesses to track user interactions unique to their business, such as button clicks, form submissions, popups, or registrations.
In this article, we will explore GA4 custom events in detail and describe how to configure them:
- How To Set Up GA4 Custom Events With Google Tag Manager
- How To Set Up GA4 Custom Events Directly To The Code
- How To View Custom Events In GA4
How To Set Up GA4 Custom Events With Google Tag Manager
First, we have to ensure that we need to install custom events and that there are no events collected by default.
We will take as an example clicking on the buttons on the landing page that opens a popup for login or sign-in.
We will also add a custom button name parameter to understand which button on the page has the most efficiency.
Step 1: Create a Tag
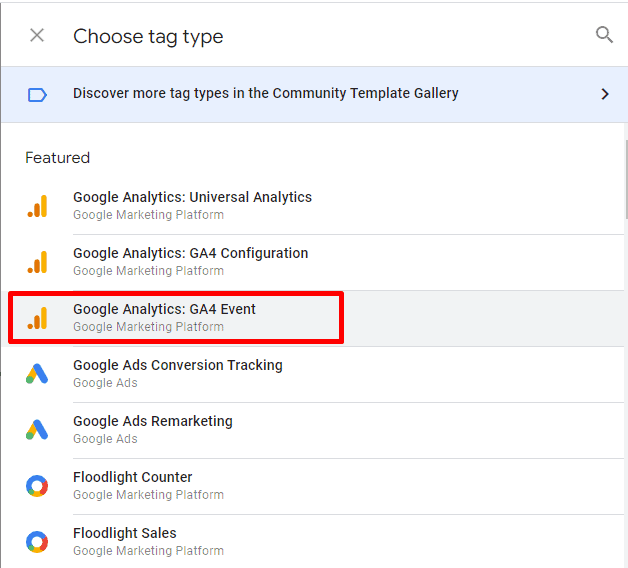
1. Go to your Google Tag Manager account. Click on the Create New Tag button:

2. On the pop-up window, in the list of tag templates, select GA4 event:
3. Add the name of your event

4. In the settings drop-down menu, select your GA4.
If you didn’t create it earlier, select manually set ID.
You can find this ID in the Admin section of the Data Streams tab in your GA4 view.
We recommend using variables, as they allow for quick account-wide changes.
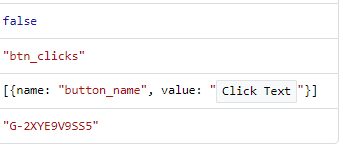
5. Add a title for our events.
For example, “btn_click”. Avoid the default and automatically collected event names.

6. If we need to add some custom parameters like button click texts, use the parameter row and add a value.
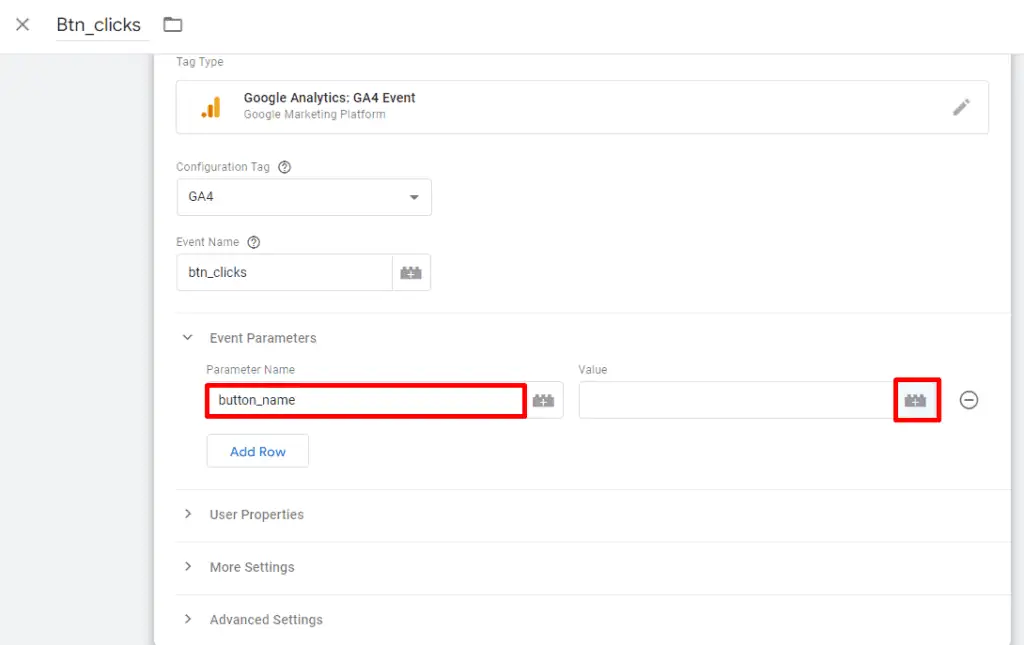
If you don’t see the necessary variable, click on Built-ins.

7. Enable the Click Text variable.


Step 2: Create a Trigger
Setting up a trigger is no different from setting it up in Universal Analytics.
In our case, clicking on the specified “buttons” is triggered by clicking on some site click elements.

1. Choose the trigger type All Elements.
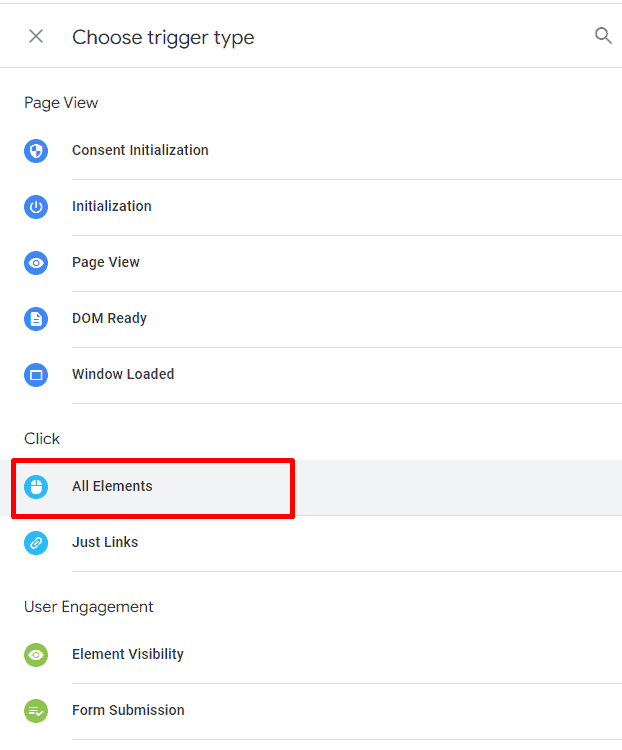
2. Let’s name our trigger, and choose when the trigger should fire, under Some clicks.
3. Choose from the drop-down menu Click Element matches CSS selector.

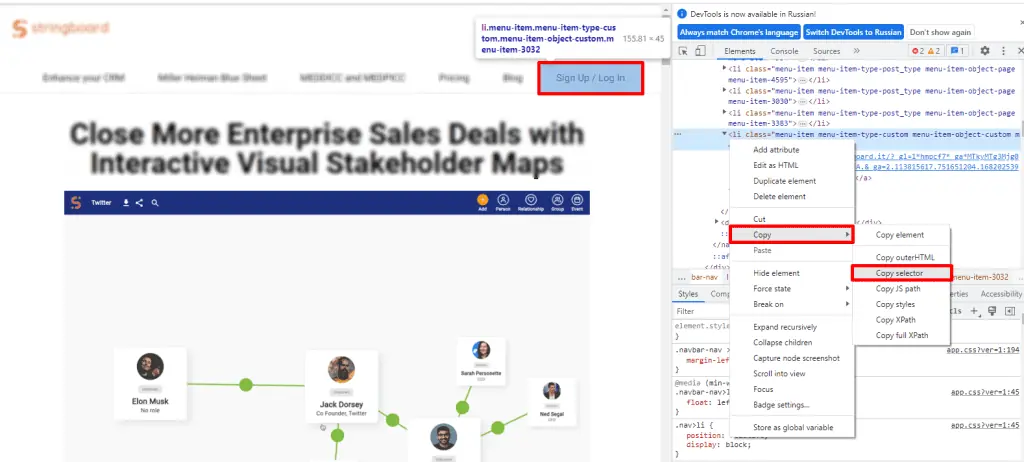
To find the CSS selector of the element on the page,
4. Go to your site and open the dev console by clicking on the right button.
5. Choose View code, click on the button, find Copy selector and put this code in our trigger.
6. Click Save tag.
Step 3: Debug and Publish Container
Let’s debug our tag and ensure that it is displayed correctly. We can do debugging in 3 ways:
- Real-time reports
- Debug View
- Google Chrome extensions like Google Analytics Debugger or any analog.
We chose the 2nd option.
1. Click Preview on the Workspace in Google Tag Manager.

2. Enter your website link or the landing page where your element is located.

3. Then, you’ll see your site with a tag assistant notification in the opened new window.

4. After clicking on your button back to the Google Tag Manager debug view, you should see your tag fired.

5. You can also click on the fired tag, and check whether your custom parameter is displayed.
6. Then, go to GA4 and check if it displays there. Go to Admin, then Debug View.


7. Let’s click on the event and see how our parameters are displayed.

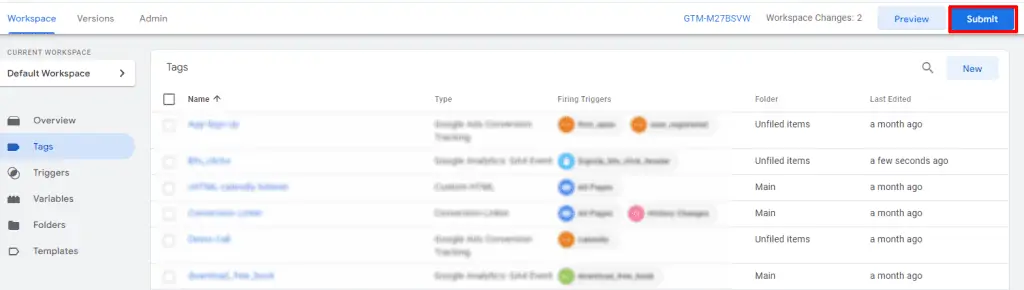
8. Going back to our Google Tag Manager, click Publish container.
How to Set Up GA4 Custom Events Directly to the Code
From a web analytics point of view, a button click is an event.
Unlike goals that are set directly in the Google Analytics interface, events are configured both in the interface and using a special construct that must be added to the code of your site.
This is not an easy process since it requires you to know programming and understand the principles of building such construction for events in Universal Analytics or for the Global Site Tag counter.
When can it be reasonable to track custom GA4 events directly through code without GTM?
We prefer using on-page tracking when we want to ensure the highest level of accuracy and reliability in our tracking data, or when we need to track events that are not easily captured through GTM, such as events that occur before the GTM container loads.
Additionally, tracking events directly through code can be beneficial if you want to minimize the number of third-party tools and scripts on your site for performance or security reasons.
To track the transmission of event data, we need to:
- Find the desired button on the page
- Manually add an additional event code to it
Use the event command and the following constructs based on the library you use:
For the analytics.js library, use below code template for tracking a button click custom event.
onclick="ga('send', 'event', 'button', 'click');"For gtag.js the following template:
onclick="gtag('event', 'click', {'event_category': 'button'});"In GA4, there are no such components as in Universal Analytics (Category, Action, Label, Value). So, for all the same buttons, it can be reduced like this:
onclick="gtag('event', 'buttonClick');"Tracking custom GA4 events directly through code changes can provide more accurate and reliable data than using GTM, as it ensures that no events are missed due to latency or other tracking issues.
This can help you gain a more complete understanding of your users’ behavior and make more informed decisions to improve your website’s performance.
However, configuring custom GA4 events directly through code can be challenging for those who are not familiar with programming, as it requires a good understanding of JavaScript and the GA4 measurement protocol.
Coding errors, missing or incorrect parameters, and compatibility issues with other scripts or plugins on the site are common issues that can occur with this method.
Additionally, it can be time-consuming to update the code manually each time you want to track a new event or change an existing one.
How To View Custom Events In GA4
Compared to Universal Analytics, GA4 is a relatively new version of analytics, which means that not everyone is yet accustomed to the system settings and interface.
Let’s find out where we can configure custom events within GA4 in order to display them.
In order to see the custom parameter of button_names, we need to add it as custom definition here.


The parameter name here should be equal to those we put into the Google Tag Manager parameter name.

Here you can read more regarding how to set up custom dimensions in detail.
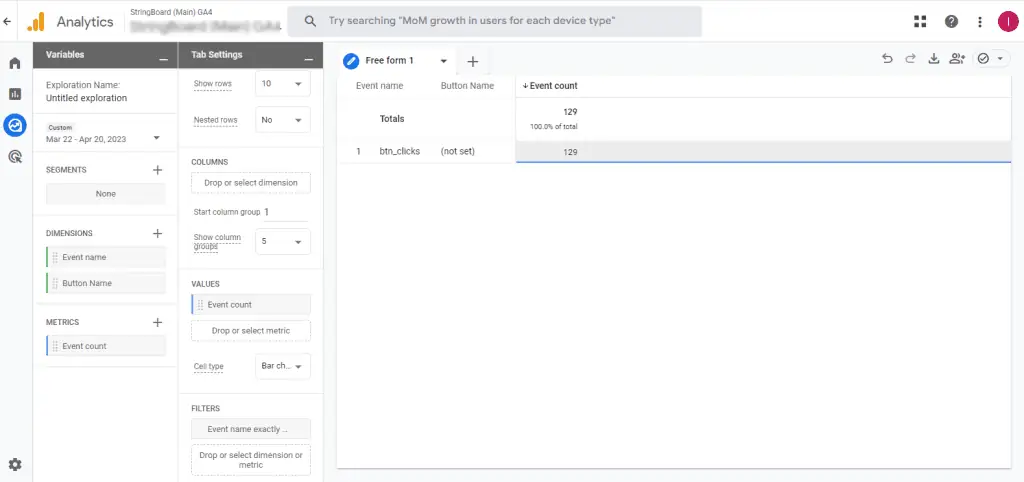
So, let’s build our report.
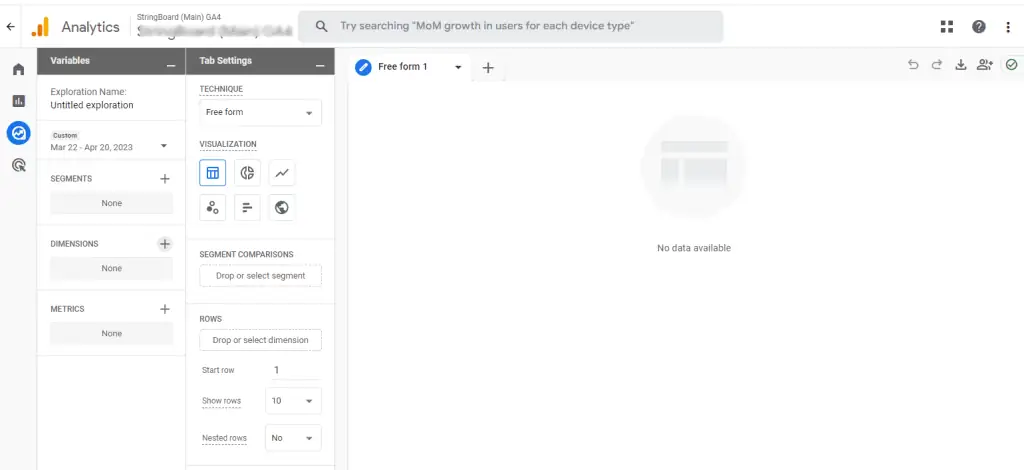
Go to the Explore section within your GA4. Create a new exploration.
Select the following Dimensions and Metrics:
- Event Name
- Event Count
- Button Name
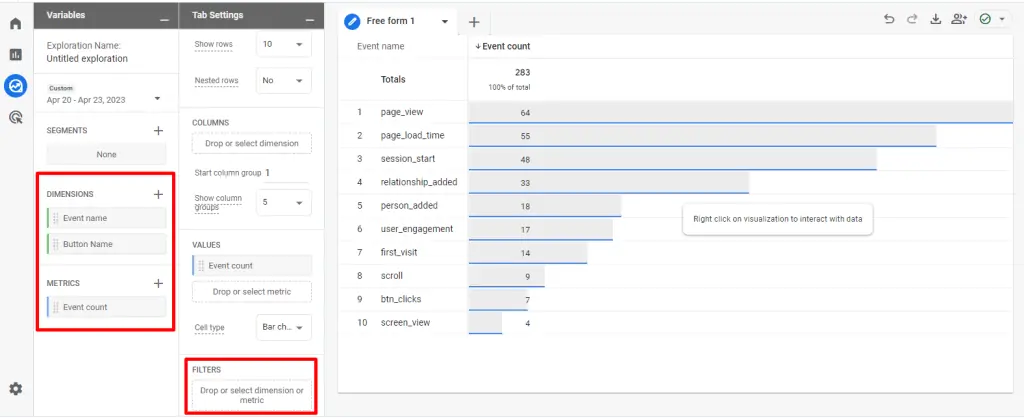
Choosing the list of dimensions within the exploration section (GA4) to build the custom events report

Add filter by the event name and wait until the data is displayed.
FAQ
How can I set up GA4 custom events using Google Tag Manager?
Here are the steps to set up GA4 custom events using Google Tag Manager:
1. Create a Tag: In Google Tag Manager, create a new tag and select the GA4 event tag template. Add the name of your event, select your GA4 configuration, and add a title for your event. You can also add custom parameters if needed.
2. Create a Trigger: Configure a trigger for the custom event tag. Choose the trigger type (e.g., All Elements), name the trigger, and specify when the trigger should fire. Use the Click Element matches CSS selector option to define the element on the page that triggers the event.
3. Debug and Publish Container: Use the debugging options in Google Tag Manager to ensure that the tag is firing correctly. Preview the tag, enter your website link, and verify if the tag fires and the custom parameters are displayed correctly. Finally, publish the container.
How can I view custom events in GA4?
1. Configure custom definitions in the GA4 interface.
2. Add the custom parameter names as custom definitions in GA4, matching the names used in Google Tag Manager.
3. Once the custom definitions are set, navigate to the Explore section of GA4.
4. Create a new exploration.
5. Select the relevant dimensions (e.g., Event Name, Event Count, Button Name).
6. Apply filters to build custom events reports.
Can I set up GA4 custom events directly in the code?
Yes, it is possible to set up GA4 custom events directly in the code. However, this method requires knowledge of programming and understanding of event tracking principles. It involves manually adding event code to the desired button on the page using constructs specific to the library you are using (e.g., analytics.js or gtag.js). Directly tracking events through code can provide more accurate and reliable data but can be challenging for non-programmers.
Summary
Let’s summarize. A custom event in Google Analytics 4 is an event that is neither among the automatic nor among the recommended events. You create it yourself for your tasks, come up with an arbitrary name for it and, if necessary, set a set of additional parameters.
In this post, we reviewed how to configure custom events via Google Tag Manager or directly with the help of code changes.
We also described how to build the reports with custom events in the Exploration section in GA4. Here you also can read more about building custom exploration reports to get more marketing insights.
By tracking custom events within GA4, businesses can gain valuable insights into how users engage with their website or app and identify areas for improvement.
This can ultimately lead to better user experiences, increased engagement, and improved conversion rates.
Share in comments what specific user actions have you found most valuable to track with custom events in GA4, and how have they impacted your business decisions?


")