
Last Modified on January 7, 2025
Button click tracking is probably one of the most requested features to implement. Luckily, GA4 and Google Tag Manager have made this possible.
GA4 tracks button clicks automatically using Enhanced measurement. Great for basic needs, this feature is however limited to outbound clicks and file downloads.
The alternative and recommendation is to use Google Tag Manager, which allows tracking of all kinds of clicks and more customization.
In many instances, button click tracking is easy to set up.
The goal of this post is to inform you about click tracking, but there are areas to take into consideration and even highly technical challenges that cannot be avoided.
In some cases, you will probably come back several times to this post to get the gist of it until it becomes second nature.
To save time, feel free to jump into the sections that fit your situation. These are:
- How Do You Track a Click on a Button? (Prerequisites & Framework)
- How do I track button clicks in Google Analytics 4?
- Track Button Clicks Without Tag Manager
- Track Button Clicks With Google Tag Manager
- How Do I See Events in GA4?
- How Do I Add a Button Click Goal in Google Analytics
- My Button Click Tracking Isn’t Working
🚨 Note: We’re specifically learning how to track button clicks here, but the methods also apply to tracking clicks in general.
Okay, let’s do this!
How Do You Track a Click on a Button? (Prerequisites & Framework)
You should have basic knowledge of how tags and triggers work in GTM.
If some areas of this post seem too complicated, don’t worry, as you can catch up with our Google Tag Manager and GA4 tutorials. The following are the best place to start:
The Google Analytics 4 Tutorial for Beginners
How to Track Events with GA4 and Google Tag Manager
Ideally, tracking button clicks should be as easy as 1-2-3. Fortunately, this will be the case for your project.
However, things can get tricky fast when dealing with different websites.
Many GTM beginners (or intermediate users) have become frustrated trying to figure out how to track what appears to be a simple form of tracking.
This is because button clicks are not all built or coded the same way. As a result, different methods will be needed to track different buttons.
First, you should ask yourself whether you should use GA4 automatic click tracking capabilities or Google Tag Manager to achieve your task.
The following chart will help you make that decision quickly.
Note that many buttons are just embellished links, therefore the chart works for buttons as well.
Let’s see all of this in practice.
How do I track button clicks in Google Analytics 4?
There are 2 options to track clicks in GA4:
- Without Google Tag Manager
This one is very easy to set up. There is no coding and no need for a developer. But, you’ll be limited in what you can track.
- With Google Tag Manager
This is perfect for tracking all types of clicks.
Track Button Clicks Without Tag Manager
GA4 can automatically track clicks easily without needing to code or go through the process we went through with GTM.
However, be aware that these clicks are limited primarily to Outbound clicks (clicks on links that send visitors to another domain) and File downloads.
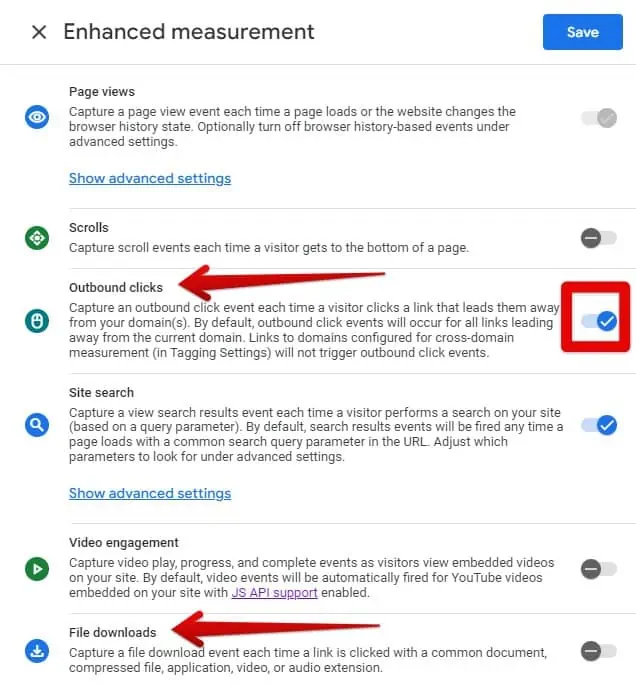
Google Analytics tracks clicks and other interactions through its Enhanced measurement features.
You’re only required to ensure that the options provided are either turned on or off.
If your outbound links or your file downloads are designed like buttons, and you intend to keep this setup long term, then the Enhanced measurements features for clicks can work for you.
To find these features, go to Admin → Data Streams
Select your stream. Then, click on the Enhanced measurement icon.
Turn on or off the feature for the right interaction.
You won’t have to name any event parameters here (we cover them later in the button tracking with GTM section). GA4 will automatically send them with your turned-on event. These are listed in Google’s documentation.
For clicks (outbound clicks), these parameters are:
- link_classes
- link_domain
- link_id
- link_url
- outbound (boolean)
For File downloads, these are:
- file_extension
- file_name
- link_classes
- link_domain
- Link_id
- Link_text
- link_url
Track Button Clicks With Google Tag Manager
To facilitate the click tracking process with GTM, you can use the following approach. It isn’t mandatory but it is a great way to structure your steps.
- Get as much info about the button (HTML source, enabling all Click built-in variables)
- Find distinct and robust data
- Refine your trigger
- Create a tag
1) Get as much info about the button
First, we need to create a trigger, or more specifically, a generic click trigger. This will allow GTM to listen to events related to clicks.
In Google Tag Manager, there are 2 click trigger options we can choose from:
- All Elements
- Just links
Just links is a common one because many buttons are essentially garnished links that users click on. However, you will not get more information to track if your button happens to not be a link.
This is why we like using All Elements as a trigger type. This trigger type is capable of listening to clicks that occur on anything (e.g., images, files, buttons, blank space, etc.) and links. It is just more generic and versatile.
Create a new trigger and choose All Elements.

Now, GTM can recognize when a click occurs, be it a link click or a click on any element.
However, we’ll probably need more information than just knowing that there was a click interaction.
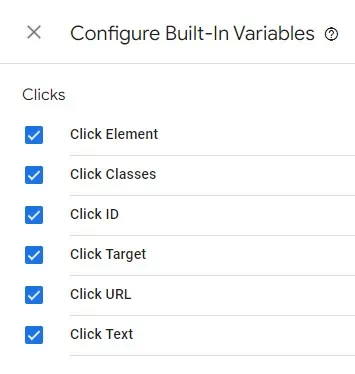
To get information about clicks, go to Google Tag Manager and enable all the built-in variables related to Clicks. These variables will provide us with most of the click details we need such as Click Text for example, which reveals the text on a button.
In your GTM workspace, select Variables, then Configure.

Now, enable all the Click Variables.
This information will then be used to create conditions to fire our tags.
Going back to our product page, let’s click on the Add to cart button.
Head over to Google Tag Manager’s debug interface. Identify the Click event under Summary and select it. We’ll now look at what the variables we’ve enabled previously can reveal to us.
The idea here is to find data that is unique enough for us to use in our trigger condition.
2) Find Distinct and Robust Data
In the Debug interface, select the Click event in the left panel, and then click on the Variables tab.

Focusing on the variables we had enabled (Click Classes, Click ID, Click Target, Click Text, and Click URL), do your best to identify data that is unique to your button.

Usually, many buttons are built as links, which means there’s a high chance that your Click URL variable value displays a link. You can use it for your trigger condition.
But, you may not always be so lucky.
In our example, there is a lot of data missing. There is no value for the Click URL, but there are 2 pieces of information we can work with:
- Click Classes, with the value: single_add_to_cart_button button alt
- Click Text, with the value: Add to cart
We know these values to be distinct or unique, because they are explicitly related to add-to-cart buttons and not other buttons such as ‘Read More’ buttons.
Although the values of these 2 variables can be modified by a developer and have the potential to break your tracking, Click Classes are still more robust than Click Text.
There may be situations where you don’t have the luxury to choose a class. If you’re left with a Click Text, then work with it until you can ask a developer to add an ID or a class to the item you wish to track.
Another aspect to consider is whether or not we want to track all Add to cart buttons or only the one associated with the Ninja product.
Let’s pretend we are only interested in the Add to cart button associated with this item alone.
How can we achieve that?
Our online store has many Add to cart buttons for all kinds of products, so how can we avoid tracking all of them?
First, we need to ensure that the button is unique and not duplicated throughout the site.
For this, we’ll use the Chrome developer tool. If you’re not familiar with it, just follow the steps.
Right-click on your button and select Inspect.

This will give you access to your browser’s Developer Tool to view the HTML and CSS source code of your button.
Click CTRL + F on your keyboard to filter your HTML document.
Copy and paste the class and paste it into the filter. We will copy paste single_add_to_cart_button button alt.
The filter will show how many of these classes exist on your site.

Fortunately for us, the filter returns ‘1 of 1‘, meaning that the Class for this button is only available for this button. We know for certain that using the GTM Click Classes related to this button will only track this button and not another one.
If there is more than 1 instance for this class, then you’d need to be more specific if you’re only interested in the button related to this item.
One solution could be to add the Page URL in our trigger to only track the Add to cart button located where the Flying Ninja poster is.
3) Refine Your Trigger
Let’s return to the All Elements trigger.
Until now, our trigger has helped us detect all types of user clicks. We can refine it now to include only the information relevant to our button. These are the values of our Click Classes as discussed above.
Switch from All Clicks to Some Clicks.
For the following conditions, follow our setup but change the value of your class. In our case this is: Click Classes → Contains → single_add_to_cart_button

Rename your trigger and save it.
4) Create a Tag
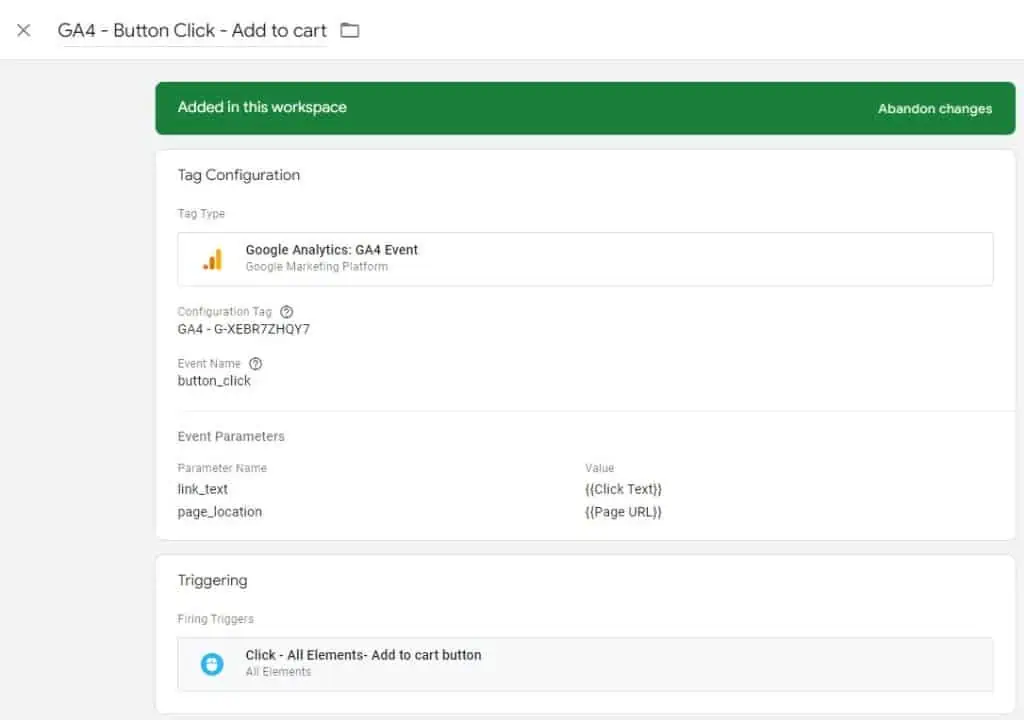
Let’s create a new GA4 Event Tag.
We can name our event whatever we want. We will use ‘button_click‘.
We’ve explained this naming structure with lowercase and underscores several times throughout our blog. In short, it’s best practice to follow Google’s naming convention.
Also, it is best practice not to invent names, but should look at what Google tracks first. Clicks are tracked in Enhanced measurement, but there is nothing specific to button click. They name the event ‘Click’ and we could use that, too.
At this point, we could send our event to GA4 just like that.
But, we’d like to send more details to GA4 regarding this click, so we’ll use Event parameters.
The button’s text and the page location are valuable to us, so we’ll add 2 custom parameters.
Our setup will look like the following.

🚨 Note: The approach we discussed for naming events is the same as for naming event parameters. Use any that suits your needs from the lists of Recommended events or Enhanced measurements. However, contrary to events, if you opt to use custom names for your event parameters, and if you want to use them in your GA4 report (custom dimensions), you will be limited to 50 parameters.
Use any of the parameters regardless of which events they’re associated with. For example, you can use parameters designed for file download events for your button click parameters. In fact, we’ll do that.
Google’s Recommended events and Enhanced measurement doesn’t have a parameter related to the button text. The closest we could find was link_text. The link_text parameter is used for file downloads and we’ll use it.
You could also write your own name. For example, button_text, or even click_text.
Since the goal is to show the value of the button text, we can fetch the value from the Click Text variable we enabled earlier.
To get it, click on the variable icon.
Select Click Text.

We also want to know the page where the button is located. Google tracks the parameter called page_location with the pageview event, which is just the page URL.
So, which variable can show us the URL of a page?
The answer is the Page URL variable. Simply repeat the above process and select Page URL under Choose a variable.
Add the All Elements trigger we created before.
You should have something similar to this:
Save your tag.
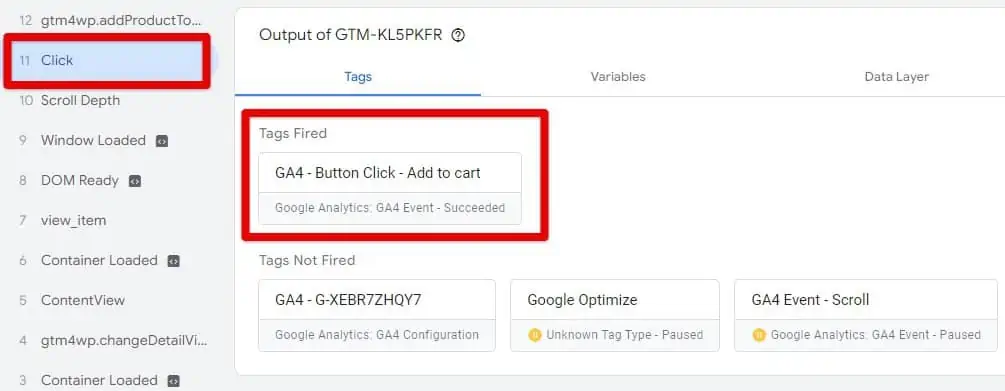
Enable the preview mode and click on the Add to cart button.
You can see that our tag has fired.
In GA4’s DebugView, you’ll see your coming events.

Just beside under Parameters, you can see our link_text and page_location event parameters and their values.

Remember to register the parameters we sent as custom dimensions, so we can use them later in our GA4 reports for further analysis.
How Do I See Events in GA4?
🚨 Note: It can take more than 24 hours to see your events in GA4 after configuring them.
To find your events in Google Analytics, go to Admin → Configure → Events.

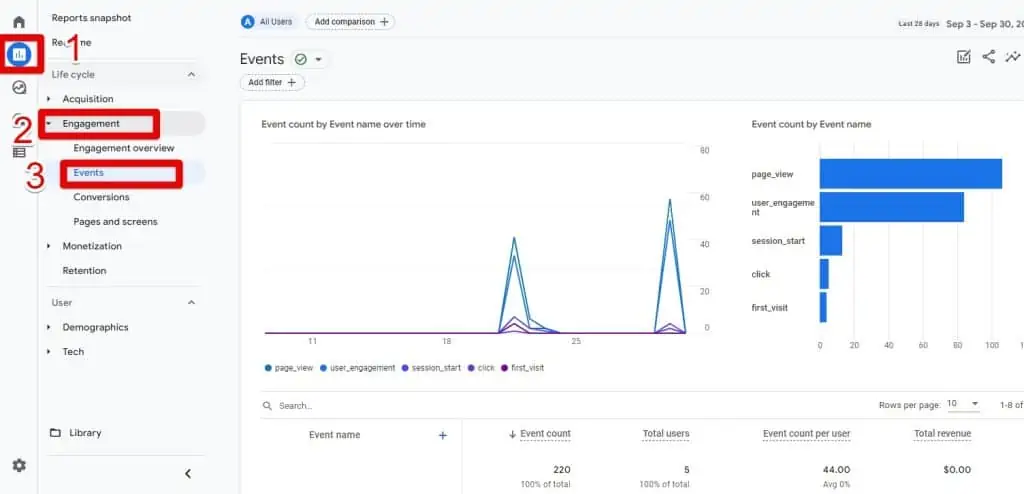
You can also find a dedicated report for your events in Reports→ Engagement→ Events.
You can find events also in your Realtime report and Explorations.
How do I see event parameters in GA4?
At the time of this writing, GA4 hasn’t yet proposed a dedicated report for event parameters.
You can still view them in the Engagement report, Realtime report and Explorations.
Explorations allow you to build reports that can be saved for later use. But to include event parameters in Explorations, they need to be converted first into custom dimensions. This post covers this in detail: how GA4 custom dimensions work and are set up.
Let’s use the Engagement and Realtime report for our example.
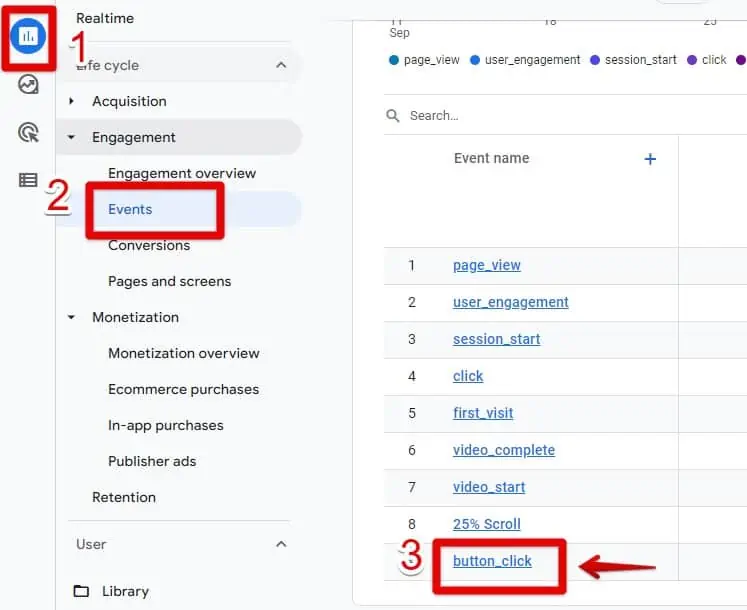
To see the event parameters we’ve configured for our button_click event, go to Reports→Engagement→Events.
In the list of Events, select your event. We’ll select button_click.
Access a report dedicated to the button_click event.
Find your parameters in Events in the last 30 minutes card, under Parameter name.
Click the dropdown arrow and select the specific event parameters you want to examine.

Link_text is the parameter we sent to know what text was on the button.

Another report to view event parameters is the Real time report.
Access the RealTime report simply by clicking View realtime without leaving the event dashboard, or navigate to the left menu in Realtime.

Scroll down and select your event in the Event count by Event name card. We’ll select button_click.

A list of event parameters associated with our event (including those we configured) will appear.
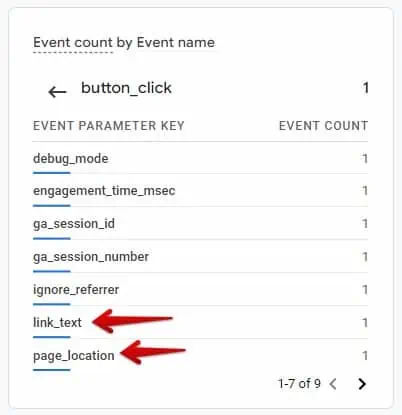
To see the values and count of our parameters, we only need to select them under the Event parameter key. We’ll select link_text to reveal the text on the button that was clicked.
Now you can see the values of event parameters associated with our button_click event.
This is our Add to cart button text.

How Do I Add a Button Click Goal in Google Analytics
If you’re successfully tracking a button click or any kind of click, you can add this interaction as a goal in Google Analytics.
GA4 calls use the term “conversions for goals.” Conversions used to be called goals in the previous GA versions. It means the same thing.
It’s an interaction that you expect your visitors to perform and is relevant to your business.
For example, if a button leads to another page that is part of your funnel, then you can turn this click as a goal to evaluate its performance as an in-between step.
Go to Admin → Configure → Events.
Find your event and turn on the toggle under Mark as conversion.

My Button Click Tracking Isn’t Working
In our previous Google Tag Manager example, we used the click class to track button clicks because the class value was available.
Still, chances are that you will face situations when no classes (or relevant ones) and links can be used for your trigger.
What should you do then?
Enter CSS Selectors, Custom Event Variables, and DOM Scraping.
This is where your tracking knowledge with GTM should evolve because it is likely guaranteed that you will deal with these issues.
🚨 Note: You can now also track QR codes with GA4.
FAQ
Can I track button clicks in Google Analytics 4 without using Google Tag Manager?
Yes, GA4 can automatically track outbound clicks and file downloads without coding or using GTM. However, for more advanced tracking and customization, it is recommended to use Google Tag Manager.
How do I track button clicks in Google Analytics 4 using Google Tag Manager?
To track button clicks with GTM, you need to create a trigger that listens for click events, enable click variables in GTM, identify distinct data related to the button, refine your trigger conditions, and create a tag to send the event to GA4 with additional details.
How can I see the tracked events in Google Analytics 4?
You can find your events in the Events section of the GA4 admin panel. Additionally, you can view event parameters in the Engagement and Realtime reports in GA4.
Can I track custom event parameters for button clicks in GA4?
Yes, you can add custom event parameters to your button click events in GA4. These parameters can provide additional details such as button text, page location, or any other relevant information you want to track.
Summary
There’s a lot you can do with the information gathered from tracking your most essential buttons.
Learning how to track button clicks in GA4 will provide you with in-depth information on what CTAs are working best with your audience.
With this, you can improve your funnels, identify where drop-offs in your user journeys, or have valuable website space wasted with buttons that no one may care about.
Tracking PDF downloads can also be quite useful. If you haven’t started tracking it already, check out our guide and find out how.


")
Hi,
How would I track all button clicks on a single page, separated by their click classes?
I’ve set the trigger and created the tag (image attached) but the tag doesn’t fire.
What am I doing wrong?
Thanks
Nice article, thank you. What if I had multi choice buttons, 1,2,3 or 4. All with sane class but different text? Is it possible to track which one is clicked?
They show up in GTM variables As button1, button2 etc but as its dynamic dependent on user choice I dint know how send the relevant one to GA4
Thanks for the positive comment Gary. Absolutely. An example of this was mentioned in the post. You can use 2 conditions in the same trigger. The first condition can be your the value of your “Click Classes” variable, and you can use the “Click Text” variable and its value as the second condition. Since all your buttons have different texts, the value of your “Click Text” will be your differentiator. You could also use the Click URL instead if your buttons have different links that can be tracked.