
Last Modified on January 7, 2025
If you’re struggling with the fact that Google Analytics 4 doesn’t include categories, actions, and event labels, this article is here to help.
Here is a spoiler – you can customize them and even add up to 25 additional parameters to your custom events.

Master the basics with our FREE GA4 Course for Beginners
This article will show you how to take advantage of GA4’s capabilities by using custom dimensions, giving you even more valuable insights from your event data.
We will guide you through the process of configuring Custom Definitions and viewing GA4 Event Parameters:
- Understanding GA4 Custom Definitions
- Setting up GA4 Event Parameters via GTM
- Configuring GA4 Event Parameters
- Modifying and Creating Events Parameter without GTM
- Case 1: Changing Outbound Traffic Parameters
- Case 2: Changing the Event Parameter of the Existing Event without GTM
Understanding GA4 Custom Definitions
What are custom dimensions?
In the context of GA4, a custom dimension is an event parameter. Custom dimensions are just like default dimensions, except you create them yourself because they don’t exist in Google Analytics by default.
What is the purpose of configuring custom dimensions within GA4?
As in Universal Analytics, custom definitions in GA4 are designed to extend the default settings built into the system by creating your dimensions and metrics. Even though GA4 offers more automated tracking than UA, it can still be improved upon.
Every time you take an action on a website or mobile app, Google Analytics is sent information with additional data about that action by default.
Data sent can include the user’s traffic source, the user’s location like city or country, device type, browser, the URL of the page the user went to, and much more.
Although Google Analytics 4 has more than 100 default parameters and indicators, in practice, this may not be sufficient. That’s when custom event parameters come to the rescue.
These newly created parameters allow us to expand the information we can gather about user actions. For example, along with the button click event, we can transmit data such as:
- the page where the button is located
- the time of the button click
- the URL or text of the button, and more
Furthermore, when submitting a form, we can transfer a significant amount of additional information to GA4, including the User ID, whether the user used a promo code, the date of the user’s first visit, the cost of the items in the cart, profit, and much more.
There are several options for setting up custom events.
Setting up GA4 Event Parameters via GTM
Let’s consider the first example using GTM.
We need to include additional information when submitting the form, specifically the postcode of the location the user selected for booking.

Step 1. Open GTM and create a GA4 event tag type

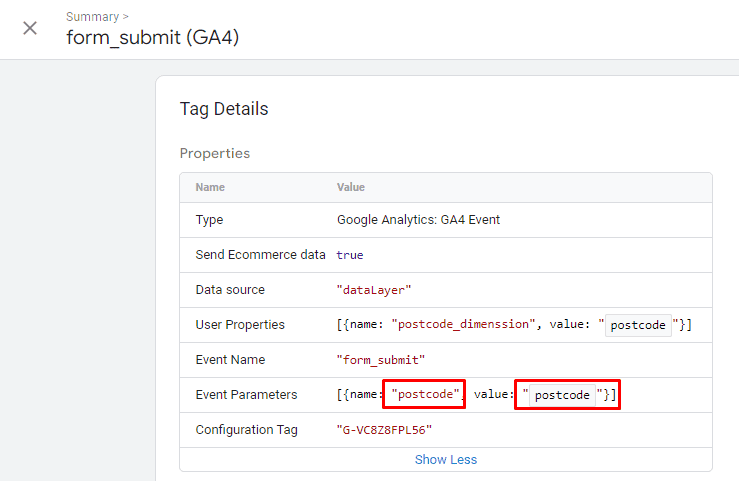
Step 2. Name your event
Choose your Analytics in Configuration tag (we assume that it is already connected. If not – read this manual). Add a row with the parameter. In our case, we named it postcode.

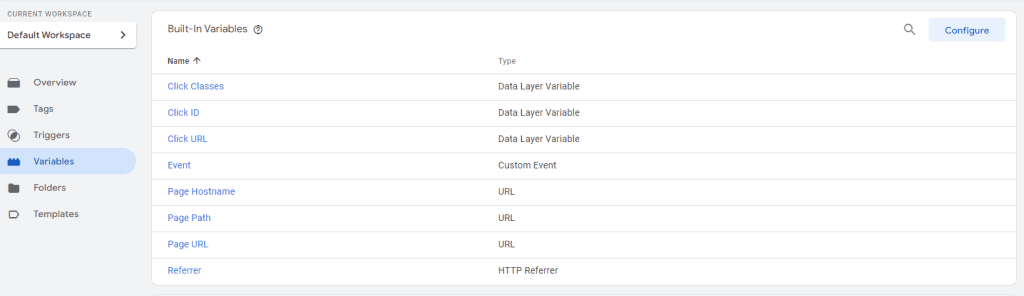
In value, we should choose a variable. If we need to track a build-in variable, we simply select it from the list, as Click Text or Page URL. Here you can see what built-in variables are tracked by default.
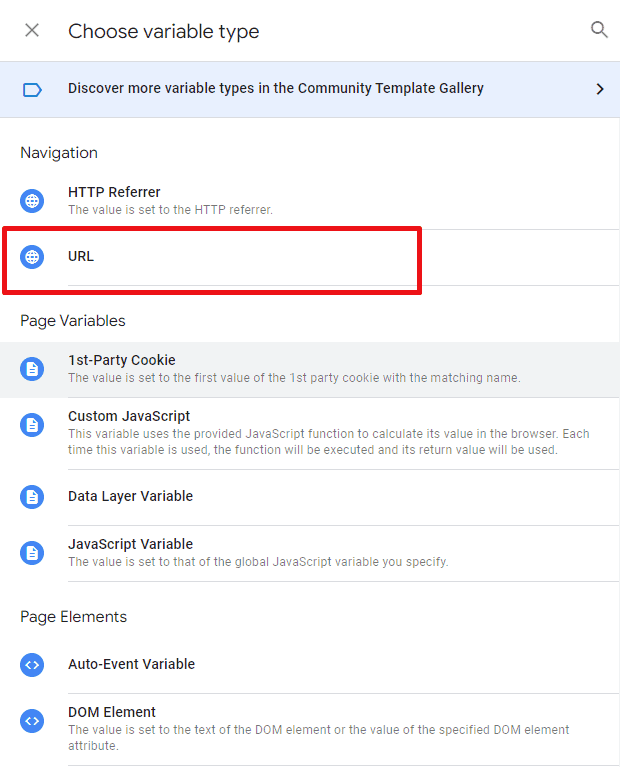
What if we need a parameter that is not among the default ones, as in our example? Then we need to create a new variable.
Step 3. Create User-defined Variable

When we entered the postcode within our form, we moved to the page with the following URL change.

Based on these evident site changes, we will choose the URL variable type.
Here you can learn more about the types of various variables and their settings in more detail.
3.1. Variable Type
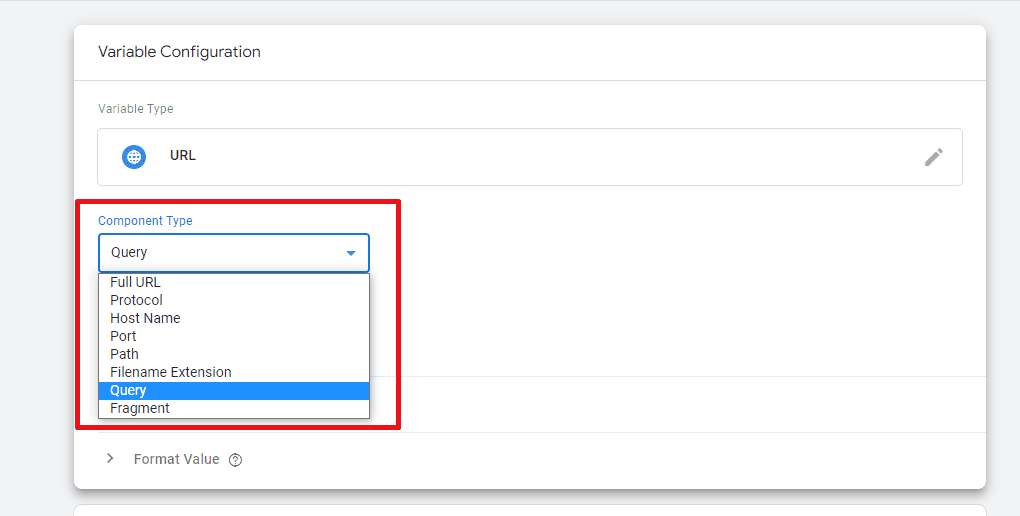
3.2. Component type
Choose the Component type “Query.”This component type is often used for adjusting search filters within Blogs or internal site search engines.
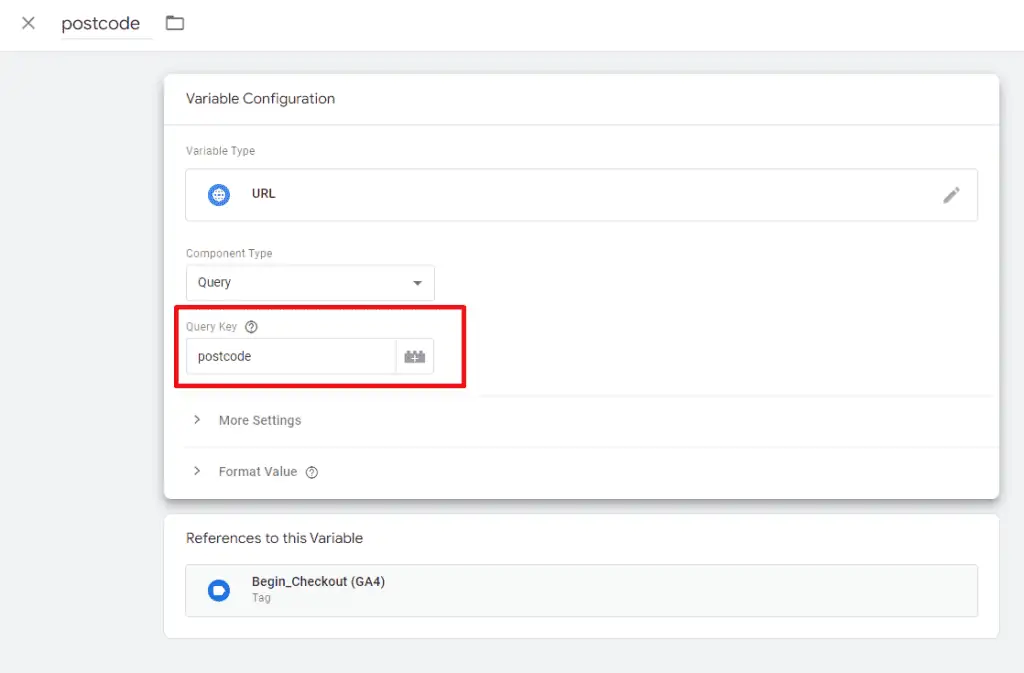
3.3. Query Key
The Query Key should be extracted in the same way as it appears in the URL after the “?” sign. In our case, it corresponds to our parameter name – “postcode.”
🚨 Note: If a query key is specified, the variable value will be the value of the first matching query component unescaped or undefined, if there are no matching query components. For instance, if the query key is ‘a’ and the URL is ‘http://example.com/?a=x&b=y’, the variable’s value will be ‘x.’
3.4. Set up the Variable
Save the variable and add it to our parameter value of the already configured tag.

Step 4. Add Trigger and Save Tag
Choose a trigger and save a tag.

Step 5. Debug and Publish Container
Configuring GA4 Event Parameters
Setting up parameters within GTM is not enough. To be displayed with GA4, we need to add the custom dimensions to the GA4 interface as well.
Step 1. Custom Definitions
Go to your GA4 Admin panel, find Custom Definitions, and choose to create custom dimensions.

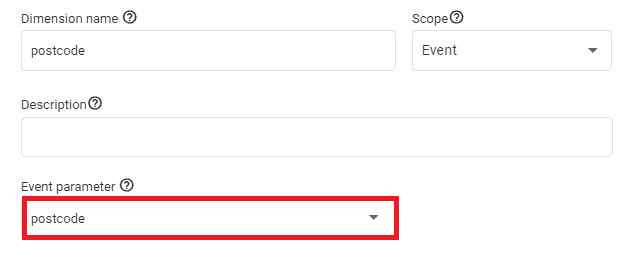
Step 2. Add your parameter name
Chose your created event parameter in the dropdown.
Step 3. Build reports with created parameters
To build a custom report within GA4 in the Exploration section, select the “Free-form” report type. Next, add the newly created parameters as dimensions and event count as metrics, in the report configuration.
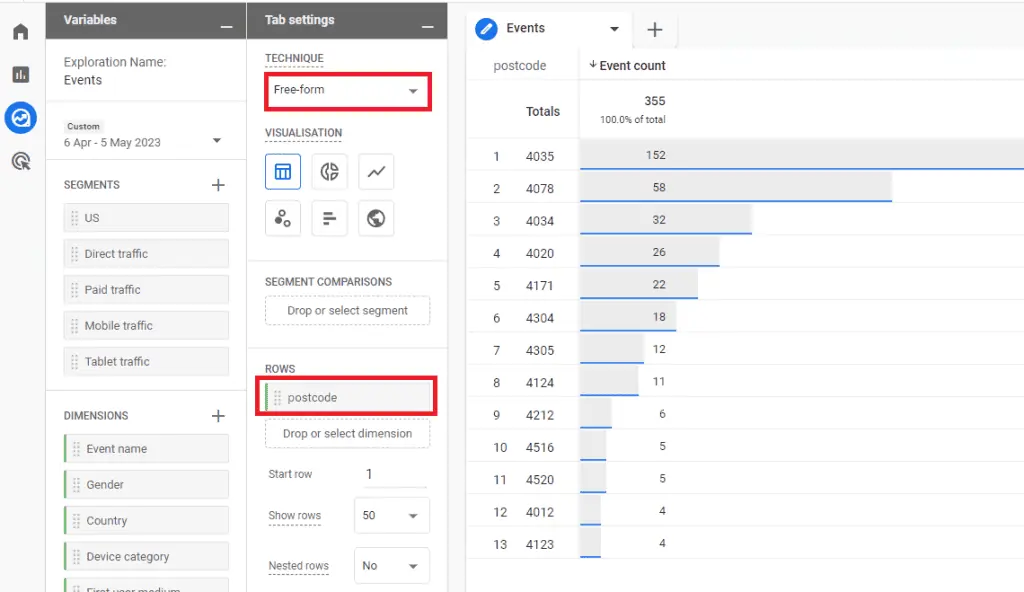
Finally, adapt and analyze the visualization of the data in the Exploration section to gain insights from the custom parameters report.
Keep in mind that Analytics takes time to display the data and you won’t get historical data.
Modifying and Creating Events Parameters without GTM
The above-described method works when we need to create something from scratch and require customization based on code. However, a lot of the existing parameters can be modified within the GA4 interface.

The main advantage of this feature is that you can modify someone’s mistakes in hard-coded events without code changes.
🚨 Note: These features overwrite GTM settings, so this should be done carefully as it might lead to a mess in the project. We recommend making changes via GTM or code directly. However, there is a situation when you need to make quick fixes such as fixing typos in events names. In such cases, this method can be helpful. Let’s see what we can configure directly via the GA4 interface.
Case 1: Changing Outbound Traffic Parameters
Let’s imagine the situation when you want to track an outbound link traffic and get the info from a click URL, but you don’t have access to the GTM container.
As you know, GA4 tracks Outbound clicks by default if you switch it on the Enhanced measurement.
If we make an outbound click on the site, we see the following data within Debug View.
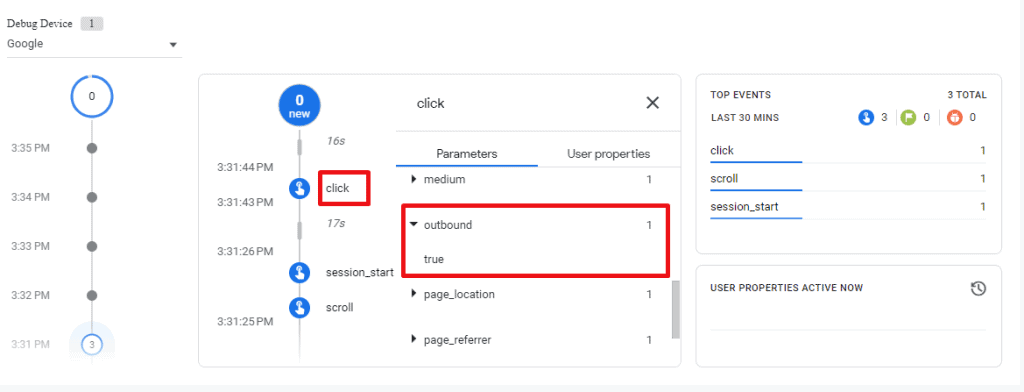
So, in the reports, we will see the outbound traffic only within the general event “click” where one of the parameters has the name “outbound” and the value is “true.”
Some may not find it convenient to look through the data to find it. Let’s configure these parameters directly within GA4.
Step 1: Modifying the Event in GA4
Go to Admin, Events. click on Modify event and Name your modifications.

Step 2: Add initial matching conditions
Here, you need to explain what events or parameters should be modified. In this case, we chose event_name equals click and we added the second condition as outbound click equals true.

Step 3: Modify chosen parameters
We added a new event_name parameter to the above-mentioned conditions, and we have renamed it to outbound_click.

Step 4: Delete the outbound parameter from the Click event
If we don’t want to track this parameter within clicks, we need to add one more row with the parameter “outbound” and leave the value empty.

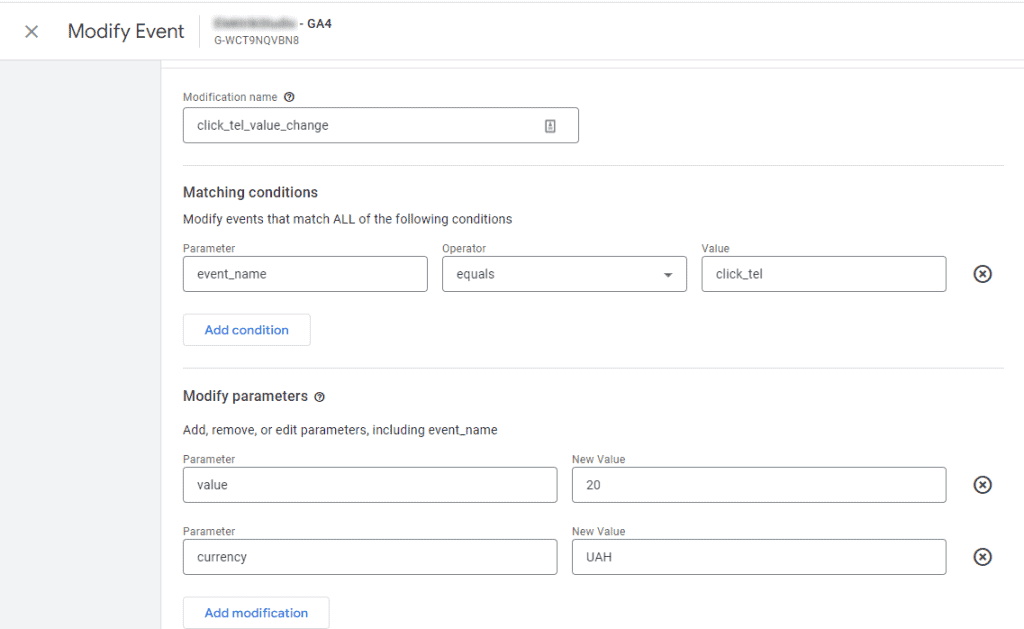
Case 2: Changing the Event Parameter of the Existing Event without GTM
In the second situation, you have some parameters hardcoded and you need to change them without code changes or if you don’t have access to GTM.
For example, in our second case, we had a telephone click parameter with a value of 50 and we need to change the avg price for this lead’s call to 20.
If we make click on the site, we see that the event click_tel has a value of 50 in Debug View

Step 1: Modify Existing Event
Then, go to the same modification page.

Step 2. Choose matching conditions and add the modifying parameter
We choose our existing click_tel event and added the parameter we need to change, in our case value. We changed it to 20 and saved the modification.
Unfortunately, this method is limited and we cannot add or configure new parameters from scratch in the interface. However, we can fix errors, customize, rename, or extract data from existing events and parameters right inside GA4.
FAQ
How many additional parameters can you add to custom events in GA4?
You can add up to 25 additional parameters to your custom events in GA4.
Can you modify and create event parameters in GA4 without using GTM?
Yes, you can modify and create event parameters in GA4 without using GTM.
There are two scenarios:
1. Modifying Outbound Traffic Parameters: You can modify outbound traffic parameters directly within GA4 by specifying matching conditions and modifying the parameters.
2. Changing Event Parameters of Existing Events: You can modify event parameters of existing events in GA4 by specifying matching conditions and changing the desired parameter values.
Can you create new parameters from scratch in GA4 without using GTM?
No, creating new parameters from scratch in GA4 without using GTM is not possible. You can only modify and customize existing events and parameters within the GA4 interface.
Summary
We’ve looked at a couple of practical use cases for custom GA4 event parameters. Now you know how to configure Custom Definitions and where to view Event Parameters on the GA4 platform to maximize your data analysis.
Check out this guide on How to Set Up GA4 Custom Dimensions for a more in-depth explanation of the differences between the types and scopes of Custom Dimensions.
Write in the comments if you have used the Modify Events feature. Also, please feel free to share the specific case in which you needed it.
Master the basics with our FREE GA4 Course for Beginners


")
Great articles. I managed to modify the chat button click under the clicks to make the separate event in GA4.