
Last Modified on January 7, 2025
This guide shows you how to leverage Google Analytics 4 to track your emails and heighten your overall marketing strategy.
You will gain insights into naming campaigns, using the best reports for email traffic sources, and extracting valuable email campaign insights.

Master the basics with our FREE GA4 Course for Beginners
We’ll cover:
- What is Google Analytics 4 Email Tracking?
- Tagging Your Emails for Effective Tracking
- How Do You Test Google Analytics 4 Email Tracking?
- Google Analytics Email Reports
- How Do You Analyze an Email Campaign?
Let’s dive in!
What is Google Analytics 4 Email Tracking?
Email tracking in the context of Google Analytics 4 (GA4) involves providing GA4 with enough information about your marketing emails to categorize and distinguish this traffic from other sources accurately.
This allows you to use GA4 reports to analyze email traffic performance and behavior, going beyond what traditional email marketing tools measure, such as open rates.
The process begins with using UTM parameters, followed by leveraging reports like Acquisition and Explorations.
With Google Analytics 4 email tracking, you can create better-targeted and personalized email campaigns.
Tagging Your Emails for Effective Tracking
Tagging here refers to adding UTM parameters to your links, which are small pieces of text added to the end of a URL. It looks like this:
https://demoshop.measure.school/?utm_source=newsletter1&utm_medium_email&utm_campaign=spring_saleYou may not always see those in links in your emails, as they’re often shortened or embedded in the text that you click on.
These parameters help you track where your website traffic is coming from. By tagging your links, you can see how users interact with your emails, measure the traffic generated, and assess the overall success of your email marketing efforts.
Proper tagging becomes essential when a user receives your email and clicks the link to one of your landing pages. The link needs to be decorated with enough information so that Google Analytics can accurately categorize the traffic.
You can add these parameters manually or use various tools to simplify the process. A popular choice is the GA4 Campaign URL Builder.
However, having a dedicated tool that allows you to track all your campaigns, not just emails, is even better.
The MeasureSchool UTM Tool
A dedicated tool like the one the MeasureSchool UTM Tracking Tool offers for free is handy for individual or agency use. This tool allows you to standardize naming conventions, ensuring consistency across your organization.
You can set up naming conventions that define how all campaigns (not just email campaigns) should be called, ensuring consistency and clarity across your team.
In contrast, while the GA4 Campaign Builder is great for quick tests or small campaigns, relying solely on it can lead to inconsistencies and difficulty maintaining structured campaign analysis.
How to Name Your Email Campaigns
There’s no single standard for naming email campaigns, but there are best practices you can follow. The key is to ensure that the naming conventions are clear to you and anyone who might need to access this information.
Generally, a good naming convention for your UTM parameters includes the following points:
Source
This refers to the origin of your campaign. It could be your email marketing tool, the platform (such as a website, social media, etc.) where the user who clicks the link will be directed, or the name of your newsletter (or simply “Newsletter”).
If you frequently work with the source/medium dimension, adding a date (month and year) can make it easier to identify the campaign, as the date is often included in the campaign name.
💡 Top Tip: You can add the names or aliases of figures or team members within your organization who are well-known or recognized as authorities on a subject as a source in email campaigns.
Medium
You can simply use email.
Campaign
Too often, campaign names aren’t descriptive enough. We recommend including the following elements in your campaign names. These are optional but are very helpful, mainly when you export your data to other marketing tools:
- Language: If your audiences engage with your content in different languages, use ISO codes to save space (e.g., EN for English, DE for German, etc.).
- Date: Including the month and year is usually sufficient.
- Version: If you’ve changed the content or made an error, it helps in making the distinction. While you can use the utm_content parameter instead, there’s no harm in including crucial details in the campaign parameter itself. For example, if you have a second version of the same campaign, you could use the following combination:
utm_campaign: summer_sale_V2
A few examples from you can draw inspiration from:
| Source | Medium | Campaign |
| summer_sale or summer-sale | ||
| newsletter1 | summer_sale_2024 | |
| newsletter_sept_2024 | EN_summer_sale_2024 | |
| jack | EN_course_promo_2024_V1 |
Examples of full URLs:
| Campaign URL |
| https://www.abc.com ?utm_source=newsletter&utm_medium=email&utm_campaign=spring_sale |
| https://www.abc.com ?utm_source=newsletter23&utm_medium=email&utm_campaign=EN_spring_sale_2024 |
| https://www.abc.com ?utm_source=newsletter_sept_2024&utm_medium=email&utm_campaign=spring_sale_2024_V2 |
How Do You Test Google Analytics 4 Email Tracking?
After tagging your email links, you need to test them.
Steps to test email campaigns:
- Send a test email to yourself.
- Validate your traffic in the Realtime report.
- Validate your traffic in DebugView.
Note that you don’t have to use both the Realtime report and Debugview. Pick the option you like best.
1. Send a test email to yourself
Send your test email using any email platform you like. We’ll be using Gmail. What’s important is to include the link sending users to your tagged resources. You can copy the following link if you want.
https://demoshop.measure.school/?utm_source=eric&utm_medium_email&utm_campaign=test1Make sure to:
- replace the domain demoshop.measure.school with yours (ex: yourdomain.com).
- replace utm_source with your name. Example: utm_source=jon.
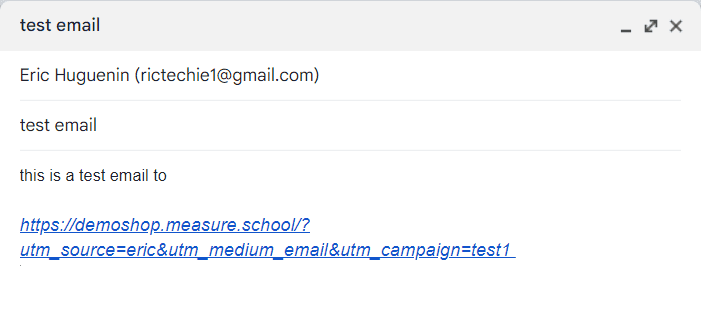
For an actual campaign, a link with parameters may look like spam, so you can hyperlink your email text instead.
2. Validate your traffic in the Realtime report
When a user (in this case, you) clicks on the tagged link and lands on your page, Google Analytics records the source of the email and the UTM parameters you’ve set.
To verify this, use the Realtime report in Google Analytics. You can monitor the incoming events and check the UTM parameters. Additionally, the DebugView can be helpful during this testing phase to ensure everything is set up correctly.
Realtime Report Validation Steps:
- Open the test email you sent yourself and click the link to land on the page.
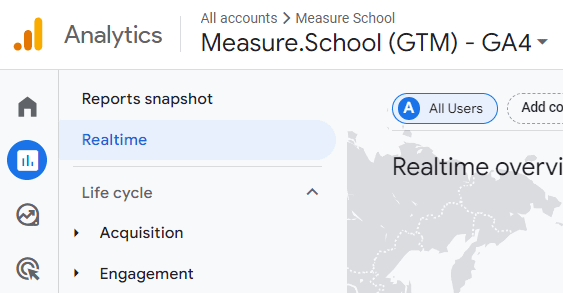
- In Google Analytics, go to the left navigation panel and click Reports.
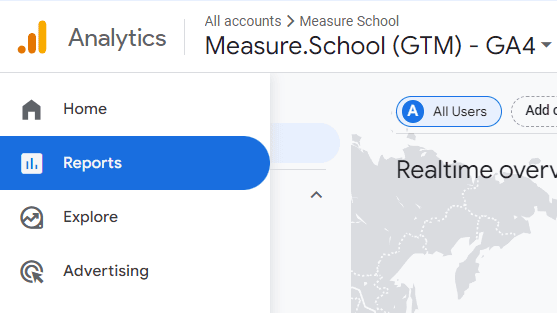
- Click Realtime.
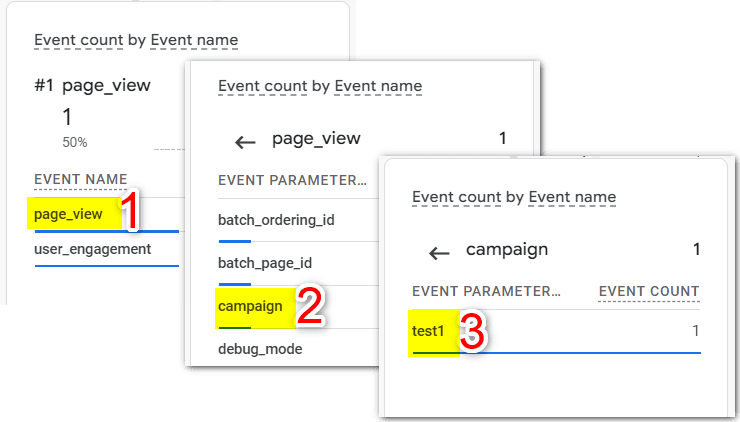
- Find the Event count by Event name card.
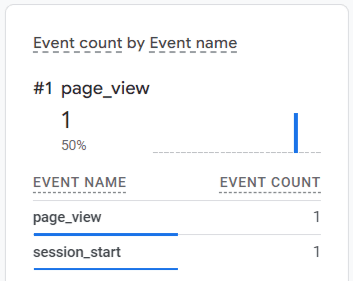
- Click Pageview.
- Click the parameters you need to verify it’s you. For example, we clicked Campaign and found test1, Which is the value we had in the utm_campgaign=test1.
3. Validate your traffic in DebugView
- Click Admin at the bottom of the navigation panel.
- In the Data display, click DebugView.
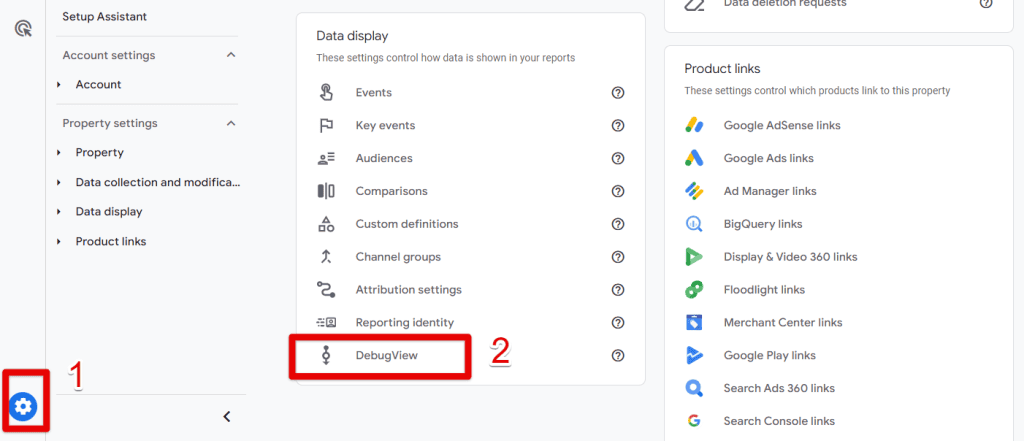
After you land on your page, you should see a Pageview event coming in.
- Click the page_view event.
- Expand the campaign parameter.

🚨Note: If you’re unfamiliar with the DebugView, see An Overview of DebugView (Google Analytics 4).
If you’re experiencing issues, just stick to the Realtime report.
Google Analytics Email Reports
Here are three key GA4 reports to help you understand how your email campaigns are performing and contributing to your overall traffic:
- User Acquisition Report
- Traffic Acquisition Report
- Path Exploration
1. User Acquisition Report
The User Acquisition Report is useful if you want to track the number of new users coming from your email campaigns. This report helps you assess how well your campaigns drive new user awareness.
Steps to Access the User Acquisition Report:
- In the left navigation panel, click on Reports.
- Under Acquisition, click on User Acquisition.
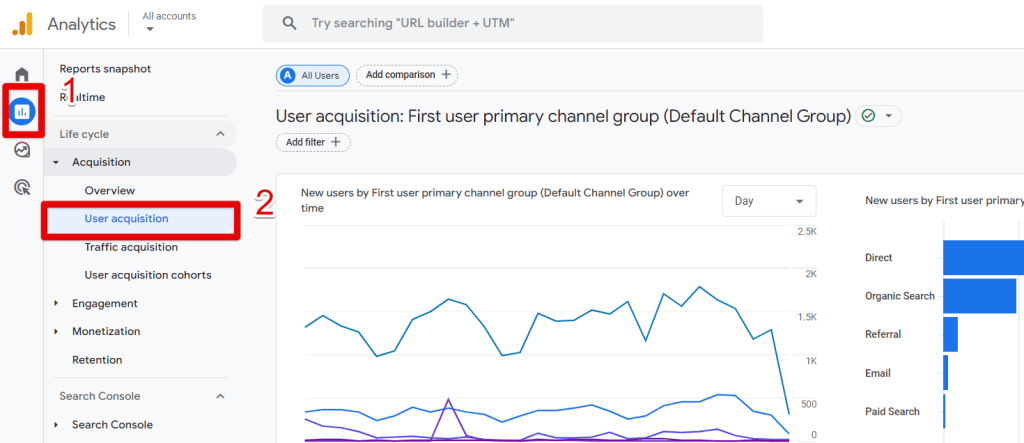
Here, you’ll find the primary dimension set to the First primary channel group, where you can see the email traffic grouped alongside other channels.
This gives you a quick overview of how your email traffic performs compared to other channels, showing metrics like new users, engaged sessions, and more.
Use the First user source/medium dimension to dive deeper into which specific email campaigns or sources drive traffic.
Steps to Switch to First user source/medium:
- Click the drop-down arrow next to the primary dimension (not the plus sign).
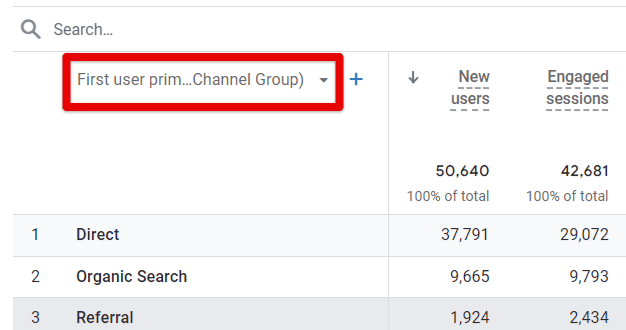
- Select First User Source/Medium from the list.
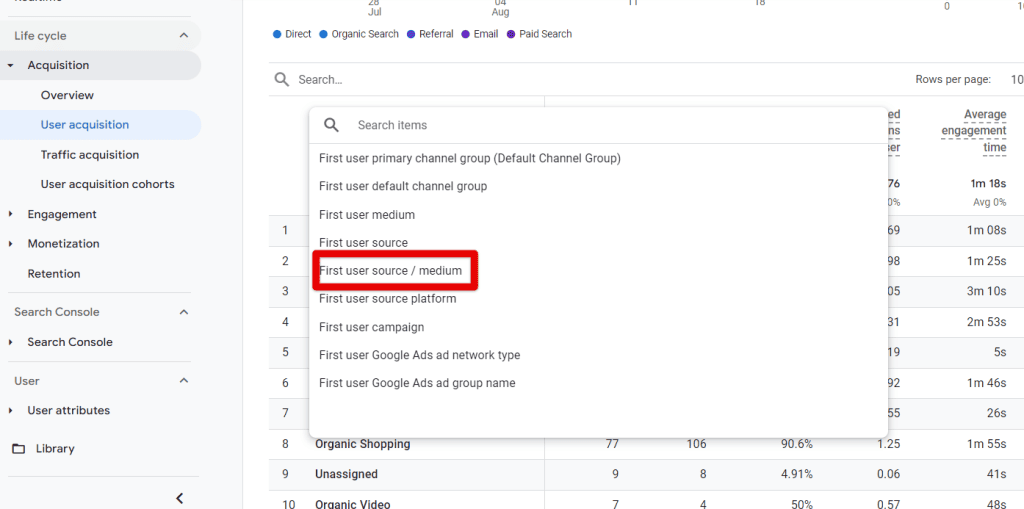
This adjustment lets you see the detailed performance of different sources and mediums, including specific email campaigns.
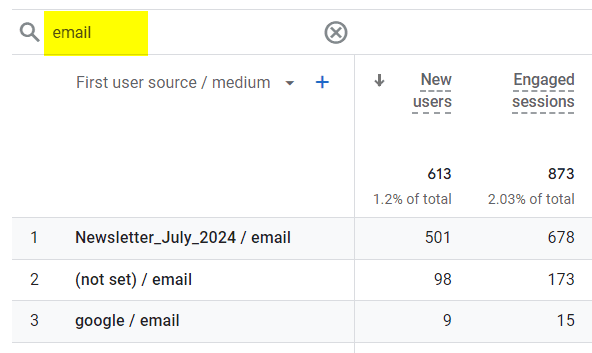
Steps to filter the report for email traffic only:
- Type email in the search bar above the table.
- Press enter.
2. Traffic Acquisition Report
The Traffic Acquisition report provides insights into all user sessions coming to your website, including new and returning users.
This report is broader than the User Acquisition report and helps you understand user behavior across different sessions.
Steps to Access the Traffic Acquisition Report:
- In the left navigation panel, go to Reports.
- Expand the Acquisition section and click Traffic Acquisition.

Here, you’ll see a table similar to the one in the User Acquisition report. You can filter this report using the same method as before to focus on email traffic specifically.
3. Path Exploration
Explorations are techniques for customizing your reports, which go beyond standard reports to analyze your email traffic.
One of the Explorations reports you can use is the Path Exploration.
Path exploration allows you to:
- Identify the most common pages new users visit after the home page (or your email campaign landing page).
- See what users do right after an app error.
- Detect if users are getting stuck by repeating actions.
- Understand how one event influences what users do next.
Steps to Set Up Path Exploration for Email Campaigns:
There are 3 main steps to build a Path Exploration for email marketing:
- Start a Path Exploration
- Build an email Segment
- Analyze the Paths
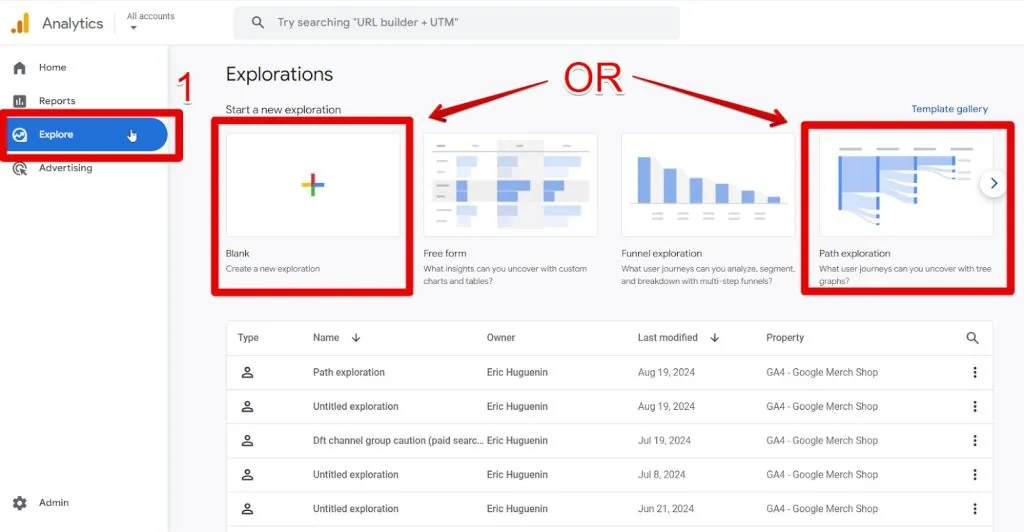
1. Start a Path Exploration:
- In the left navigation panel, click on Explore.
- Select Path Exploration (you can start from scratch or use an existing template). We’ll use a Blank to start a new one.
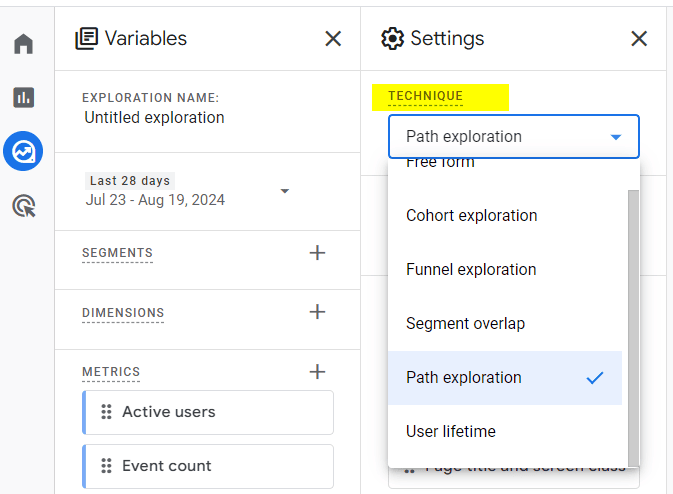
In the Settings column, go to Technique and select Path Exploration from the dropdown.
2. Build an Email Segment:
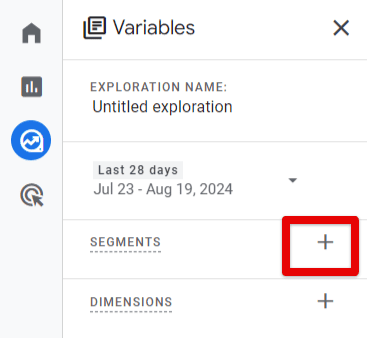
- In the Variables column, click the plus sign + beside Segments.
- In Create a Custom Segment, select Session Segment.

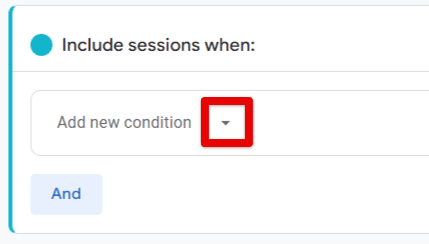
- In the Segment builder, click Add a new condition.
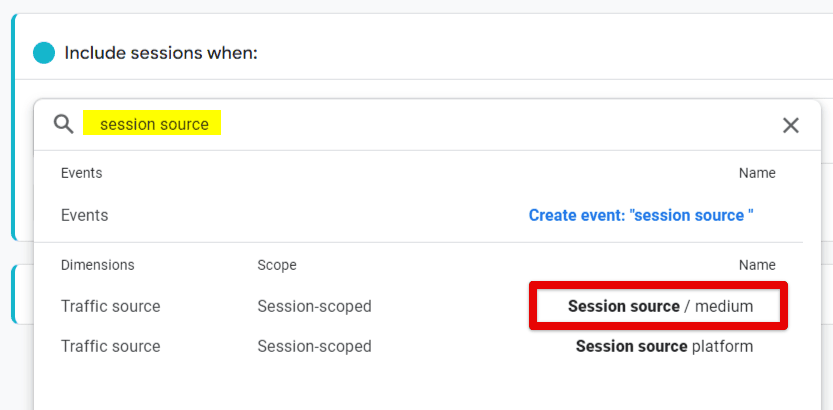
- In the Search items bar, type Session source.
- Select Session Source / Medium from the dropdown list.
- Click Add a Filter.
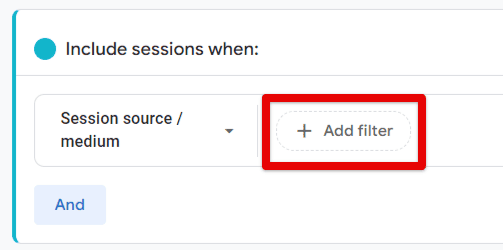
To look at a specific campaign, follow this setup:
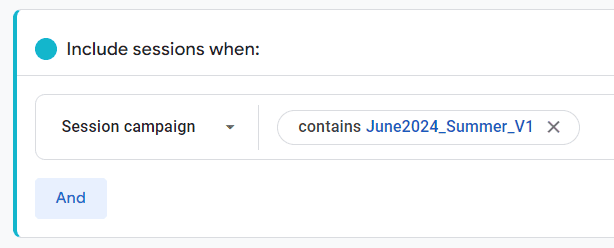
The condition can be: contains email.
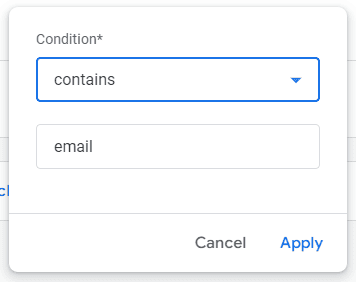
- Click Apply. You should see some number appearing in the Audience summary on the right.
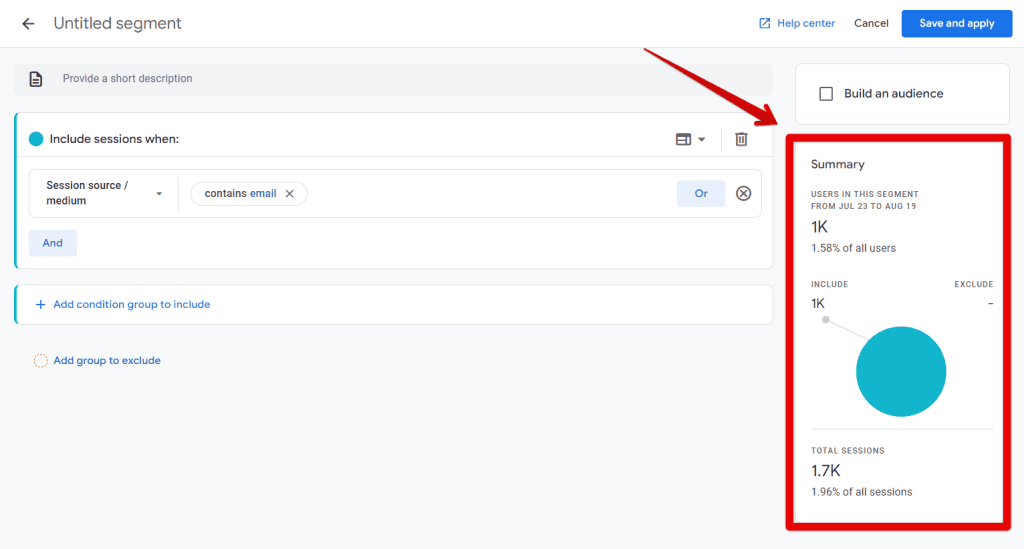
🚨 Note: If data in the Audience summary is empty, and you know for sure you had email traffic, this is a bug and you simply need to restart the process.
- Name your Segment, for ex: Email segment.
- Click Save and Apply.

3. Analyze the Paths:
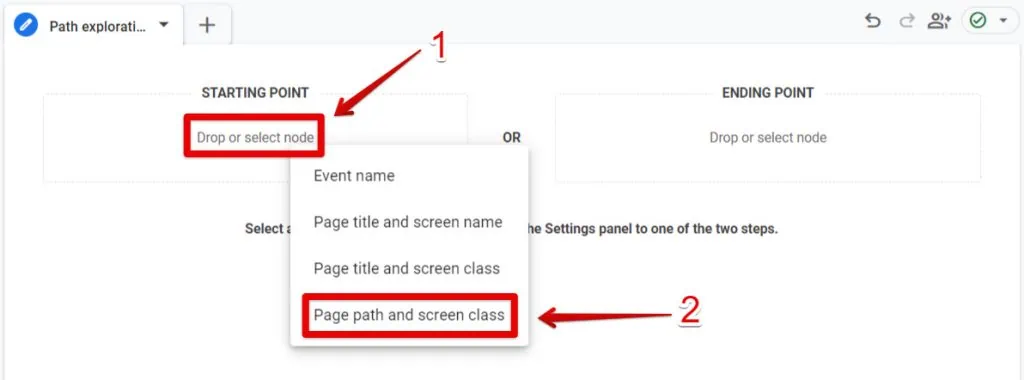
In the report, click Start over.
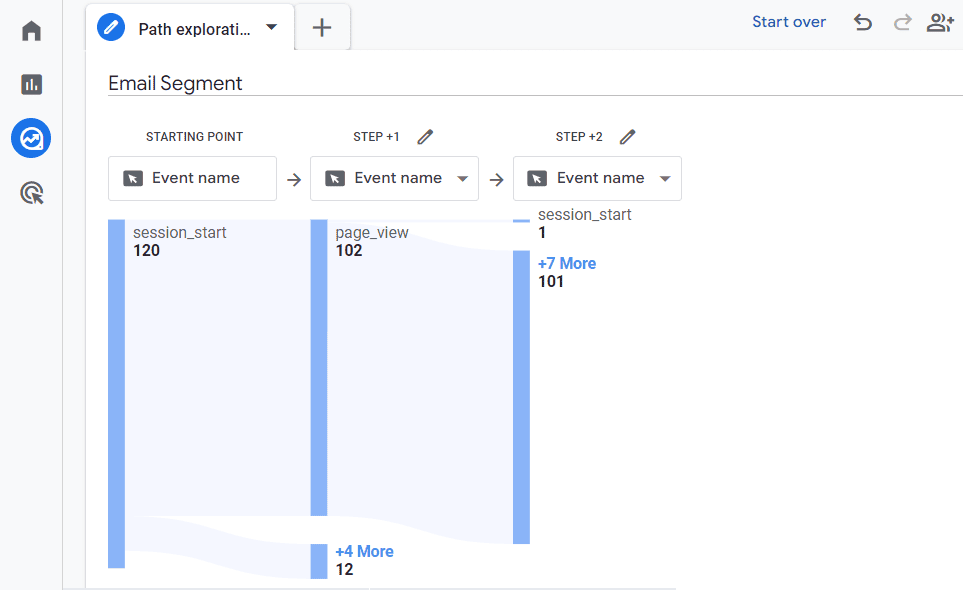
Set your starting point as Page path and screen class. Select the option you prefer.
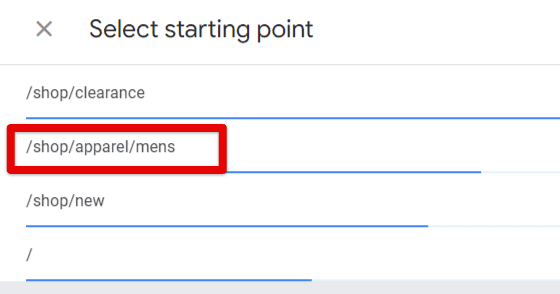
Choose a page path. We’ll select the men’s apparel shopping page. In your case, select your email campaign’s landing page.
Click on the first node in the second step to see your users’ next steps.
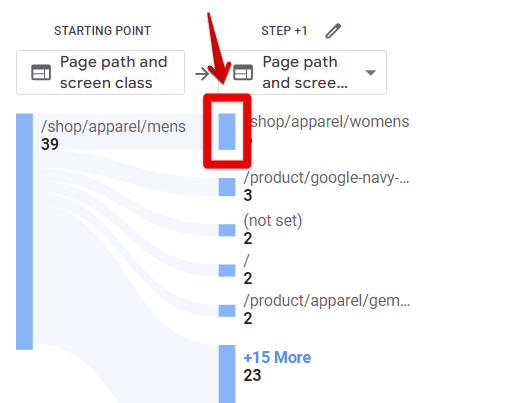
Repeat to see more steps.
How Do You Analyze an Email Campaign?
In many cases, Google Analytics 4 can offer a more in-depth analysis compared to your email marketing tool.
While email tools provide valuable data, such as open rates, Google Analytics offers another layer of insight. It allows you to understand user behavior past the initial email interaction and helps optimize your email traffic.
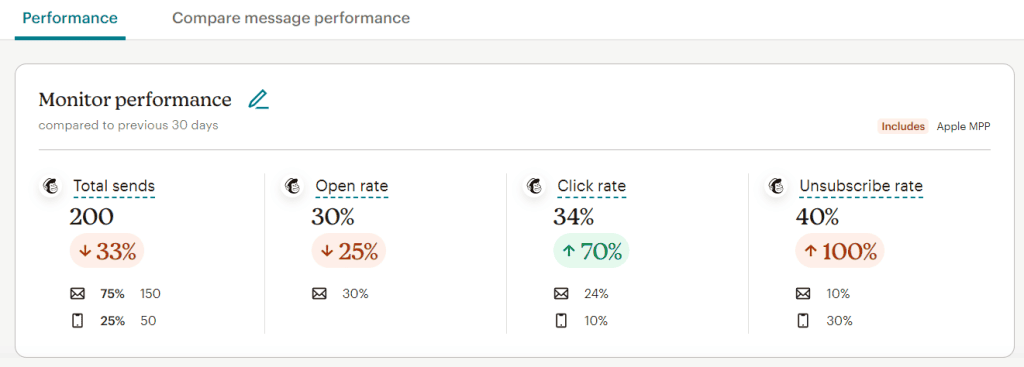
Start with Your Email Marketing Tool
Your email marketing tool is a good first stop for analysis. It provides key metrics like open rates, click rates, and unsubscribe rates. Understand how your campaigns performed.
Remember that metrics here tell one side of the story since they don’t track user behavior after they click the email and interact with your website.
The Role of Google Analytics in Email Traffic Analysis
Google Analytics 4 offers a different perspective and helps you understand the broader impact of your email campaigns, such as how engaged users are once they arrive at your site and what actions they take next.
In a nutshell, GA4 enables you to:
- Track how engaged new or subscribed users are after landing on your site.
- Analyze user interactions beyond the initial email click, such as purchases or other key events.
- Identify opportunities to re-engage subscribed and unsubscribed users by directing them to a page that offers value after they unsubscribe.
Running Quick Analyses in GA4
When analyzing your email traffic in GA4, start with the User Acquisition or Traffic Acquisition reports.
Here’s a simple approach:
- User Acquisition Report: Look at the number of new users coming from your email campaigns. Compare these numbers against your expectations and past performance.
- Engagement Metrics: Check the average engagement time per session to see how engaged users are during their visits. Are they spending the expected amount of time, or is there room for improvement? Components of the best-performing campaigns can be used to boost those that don’t.
- Key Events: Focus on specific events relevant to your goals, such as purchases or form submissions. Filter the report by these events to see which email campaigns drive the most conversions. For example, if you’re interested in purchases, filter by the purchase event to see which campaigns contribute the most to revenue.
Understanding User Behavior with Path Exploration
The reality is that many users will wander off your funnel. They land on your landing page but don’t convert right away.
For those who don’t leave, Path Exploration allows you to continue to track their whereabouts and learn how to better assist them.
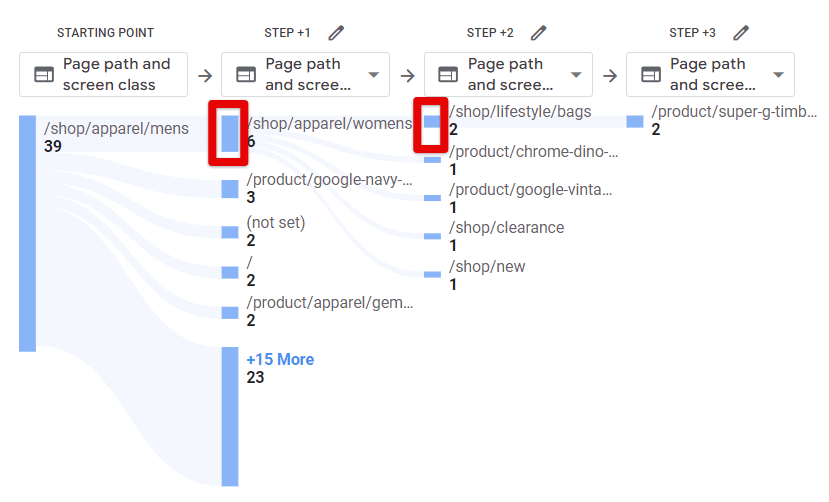
Take the following example from the Google merchandise store:
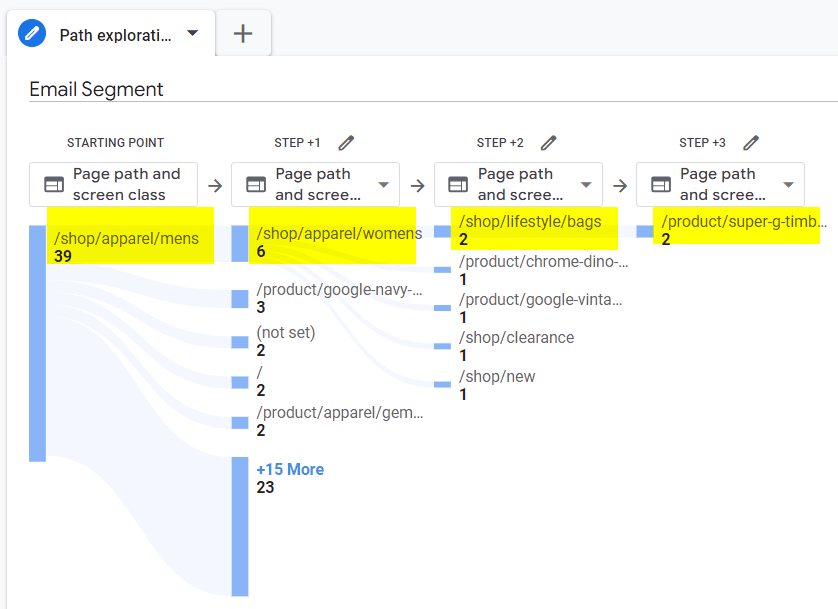
Here’s what we can deduct:
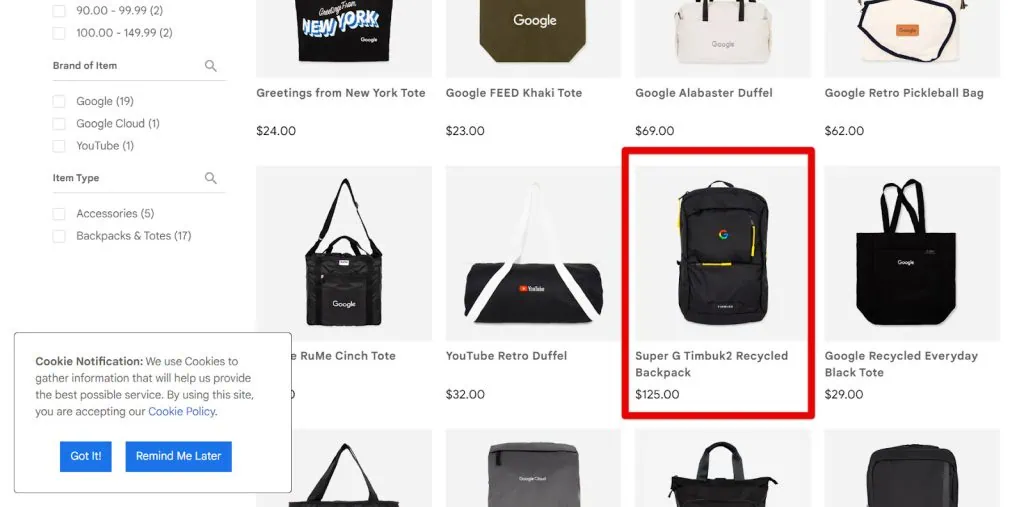
Email users who landed on the Apparel shop page for men went on to the apparel page for women. After which they went to the lifestyle bags page and purchased the Super G Timbuk2 Recycled Backpack for 125.00 USD.
Some ideas to improve your email campaigns:
🚨 Note: The ideas below apply to both eCommerce and content. This is not an exhaustive list but is based on an example to help you explore the possibilities.
- User Segmentation: Segment users who browse across different categories and create targeted email campaigns that cater to those interests. This could also include paid ads.
- Cross-Selling: After users visit the men’s apparel page, show them personalized offers such as bags that might complement their shopping preferences.
- Follow-Up Offers: Send a follow-up email to users who purchased the Super G Timbuk2 Backpack. Suggest complementary products like wallets, travel accessories, or even additional apparel items based on their page paths.
- Upsell Opportunities: During the checkout process, suggest related products that the user might find useful.
Summary
This was a comprehensive guide to Google Analytics 4 email tracking. We’ve looked in detail at how you track emails and how to maximize data coming from email campaigns using GA4.
Email tracking is a great start, but it’s conversions that tell the full story.
When someone asks, “How effective is our email traffic in driving key actions like purchases or downloads?”—you’ll want to have solid answers.
This quick 10-minute guide teaches you how to track conversions (Key Events) in Google Analytics 4, helping you answer confidently and connect the dots.
How have you been tracking emails? How did GA4 help with email marketing? We’d be interested to know.
Master the basics with our FREE GA4 Course for Beginners


")