

Want to learn how to install consent mode v2?
Google recently announced that the consent mode version 2 is becoming mandatory to build in your consent management platform if you want to utilize the advertising features of the available Google products.
In this tutorial, you’ll learn how to install consent mode v2 using Cookiebot and Google Tag Manager. This step-by-step guide covers everything from setting up your consent banners to configuring consent-based triggers for your GTM tags.

Sign up to the FREE GTM for Beginners Course...
Here is an overview of what we’ll cover:
- Cookiebot Setup
- How to Install Consent Mode V2 in Google Tag Manager
- Connecting GTM Tags to the Consent Management Platform
- How to Block Tags If There’s No Consent Given
- Testing Tags
- Testing the Consent Mode Implementation
- Advanced Consent Mode Implementation
Let’s dive in!
Cookiebot Setup
Let’s start by going to the Cookiebot website.
It is one of the many tools you can choose from if you want a consent management platform with the built-in features of the Google Consent Mode.
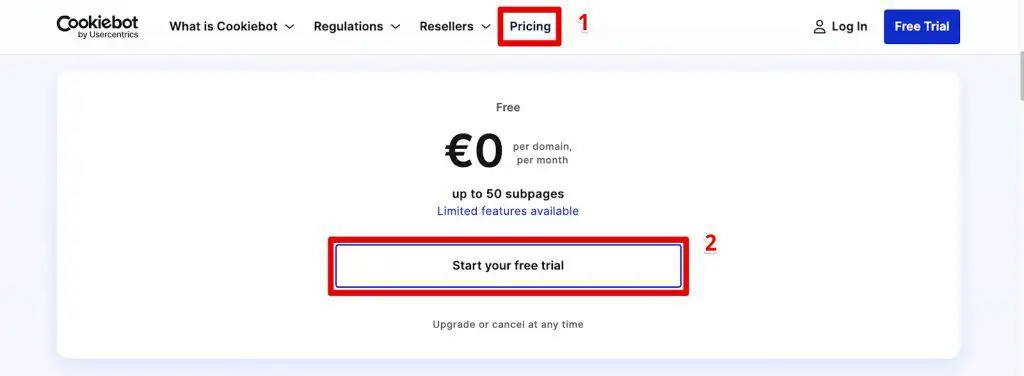
They offer a generous 14-day free trial and continue with a free plan for a single domain website and up to 50 subpages.
Go to Pricing → Start your free trial to get started.
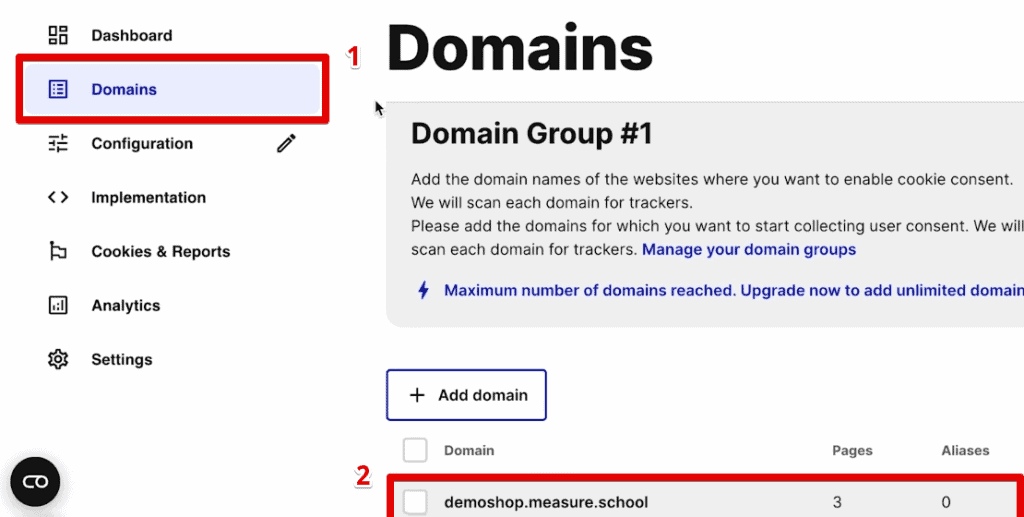
Once you have signed up, go to the Domains section and input the domain name of your website where you want to enable cookie consent.
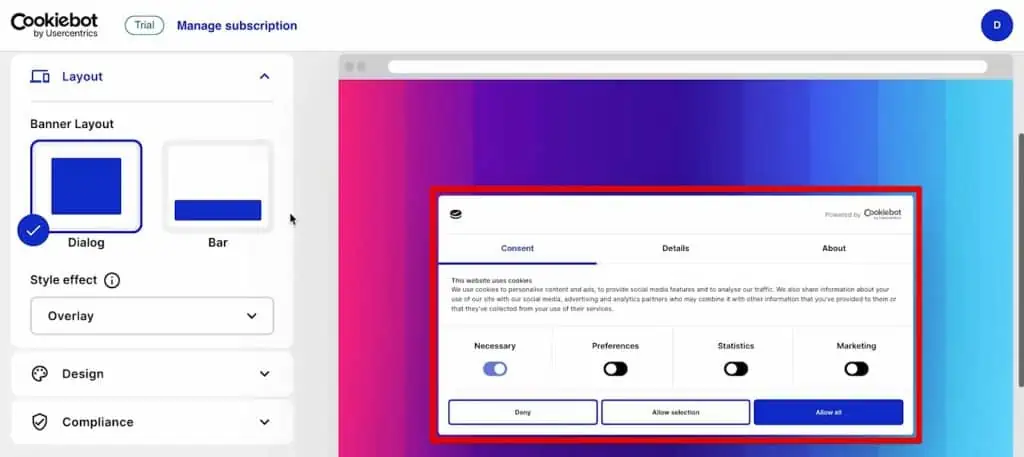
Next, go to the Configuration section to design the consent banner you want to show on your website.

Here is our cookie consent banner.
Then, note that I added the cookies and trackers running on our website in the Cookies & Reports section.
I added them manually because my website is under a login. It is not possible to get my website scanned. For most websites, however, you would scan your website, and it will pick up the cookies and trackers automatically.
💡 Top Tip: Check out our How to Create a GTM Cookie tutorial to learn how to collect and store more user data.
Finally, on our website, we have Google Tag Manager installed. Currently, we have four tags running that we want to put under the Consent Management Platform and consent mode.
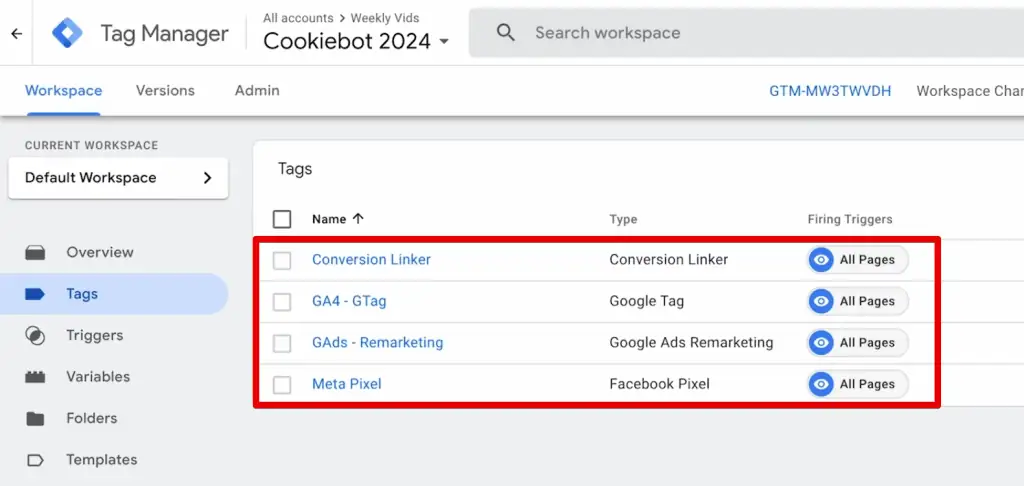
We have the conversion linker, Google Analytics 4 Google tag, Google Ads remarketing, and Meta Pixel tags.
How to Install Consent Mode V2 in Google Tag Manager
Here is our demo shop where we will implement our consent banners.
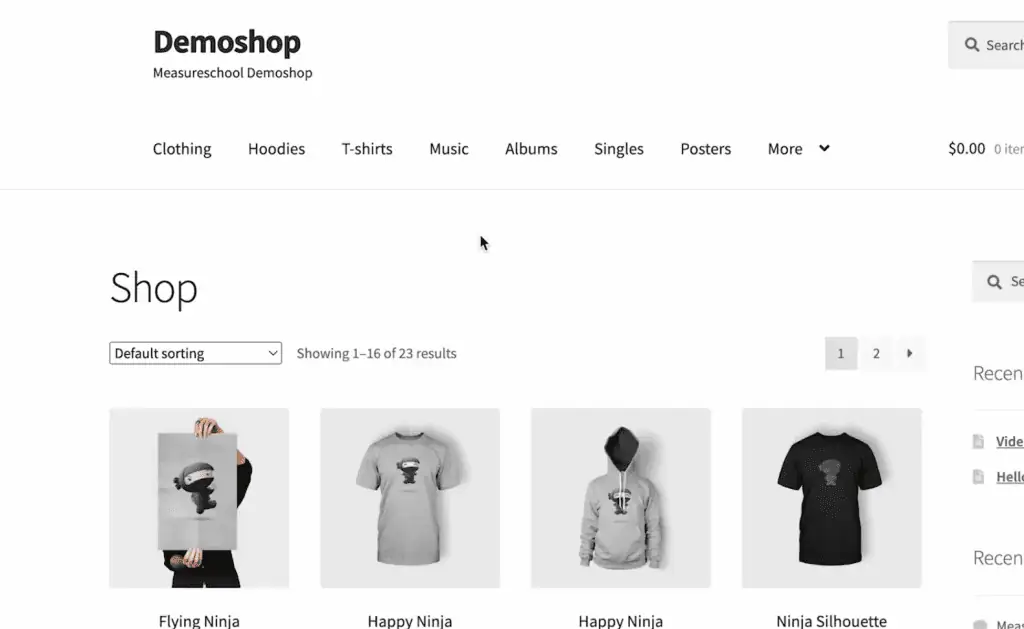
We currently don’t have any cookie consent or consent banner set up. Let’s change that by installing Cookiebot.
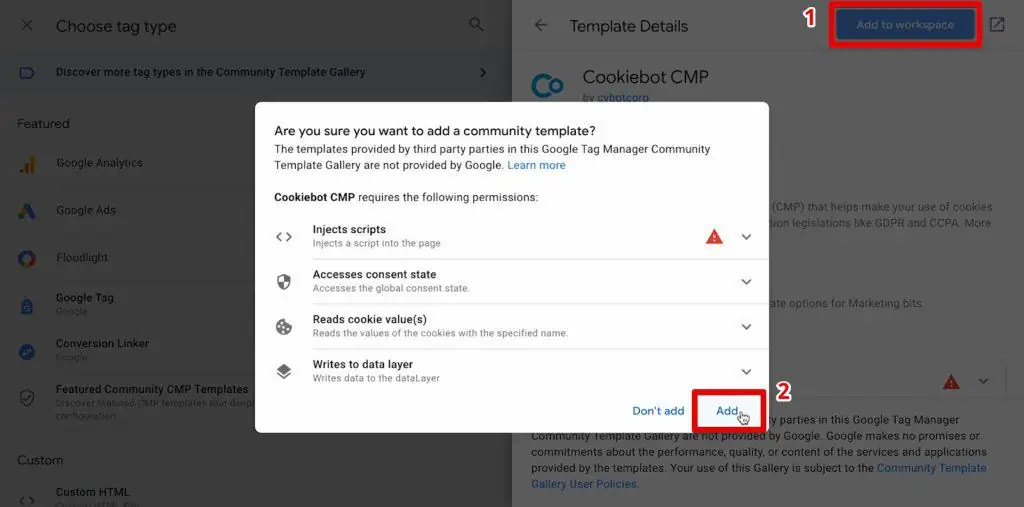
The cool thing about Cookiebot is that they have their custom tag template in the Community Template Gallery that we can install easily.
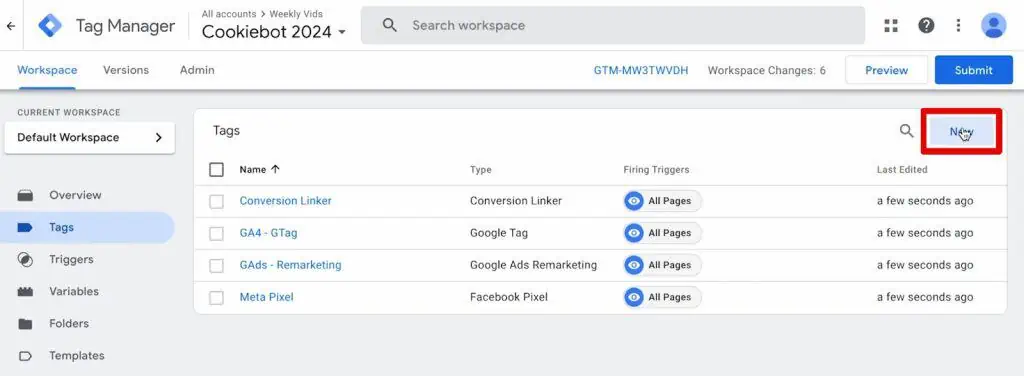
In our Tags section, click New.
Select the Tag Configuration and open the Community Template Gallery.
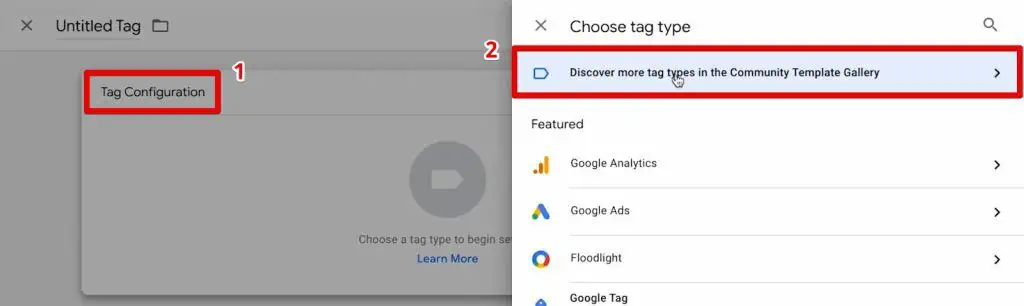
Search for Cookiebot and select the Cookiebot CMP tag template.

Click Add to Workspace. Confirm by clicking Add.
Next, we need the Cookiebot ID. We can get this value from Cookiebot in the Implementation section. Copy the Cookiebot ID.

Paste the Cookiebot ID in the allocated spot and click Enable Google Consent Mode.
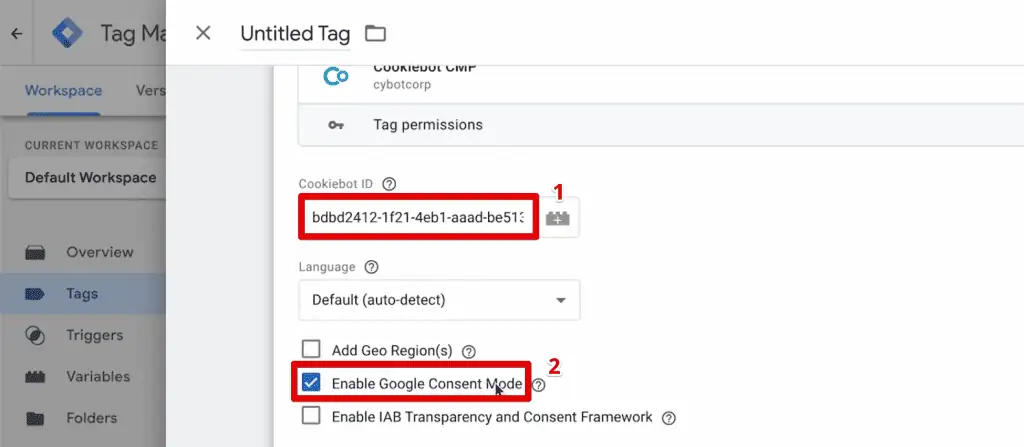
Enabling this option will connect our consent banner with the right calls to Google Tag Manager, the data layer, and the Gtag that uses the Consent Management API. So, we have all the right calls automatically here.
All you need to do once you have the Google consent mode enabled is to choose our default consent state. So, what should our state be once the consent popup loads before any tags fire?
You can decide on different consent states per region or apply a default state globally.
Click Add region. Next, leave the region empty and keep all default states at Denied. Finally, click Add to save this default consent state.

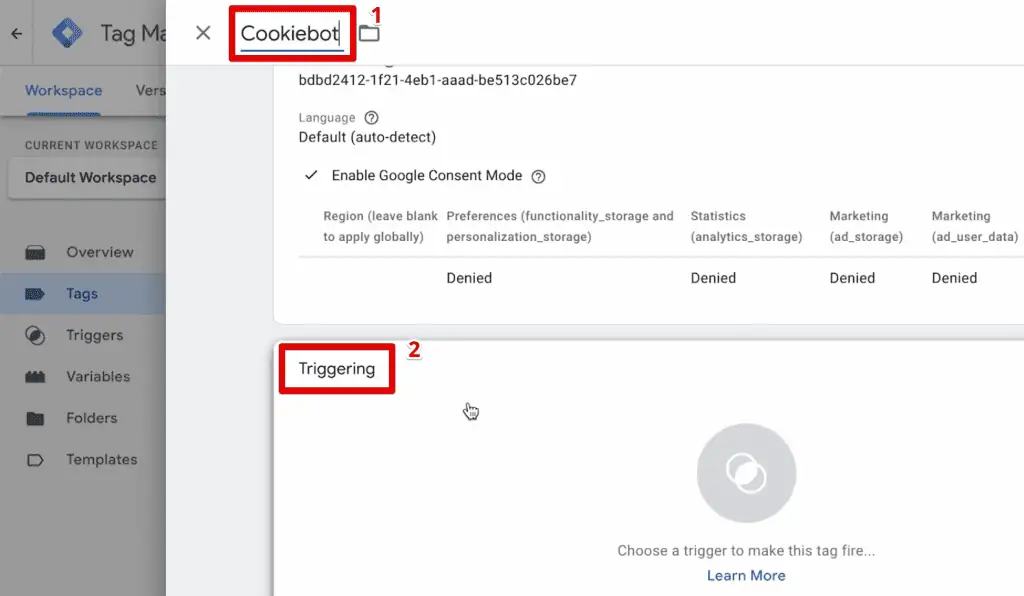
Let’s add a name to the tag and add a trigger by clicking Triggering.
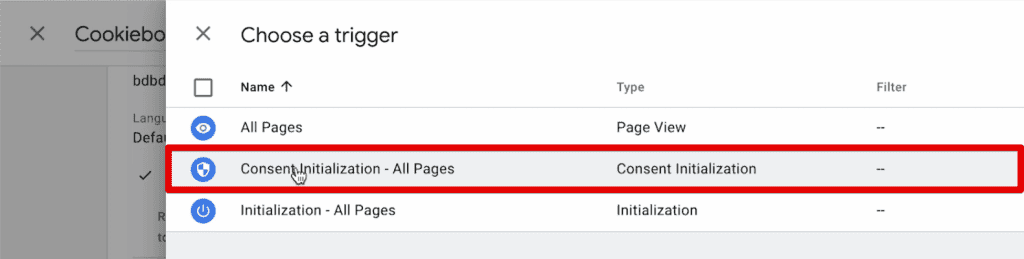
We’ll use the Consent Initialization – All Pages trigger because we want this tag to fire before any other tags.
Save the tag and enter the Preview mode.
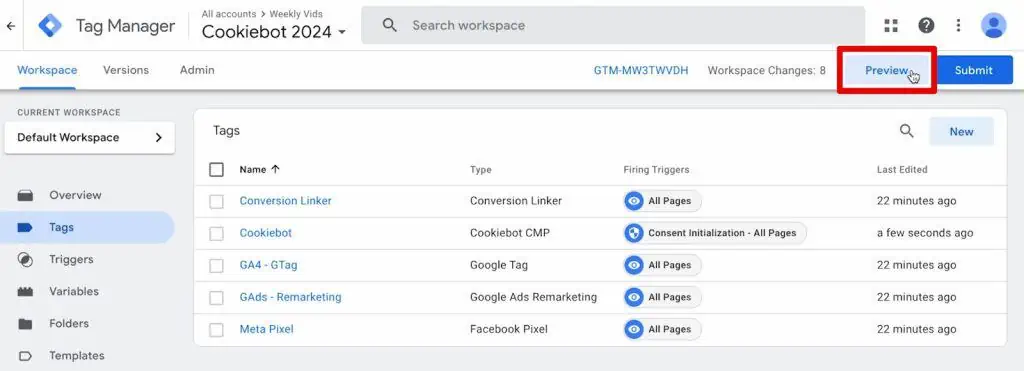
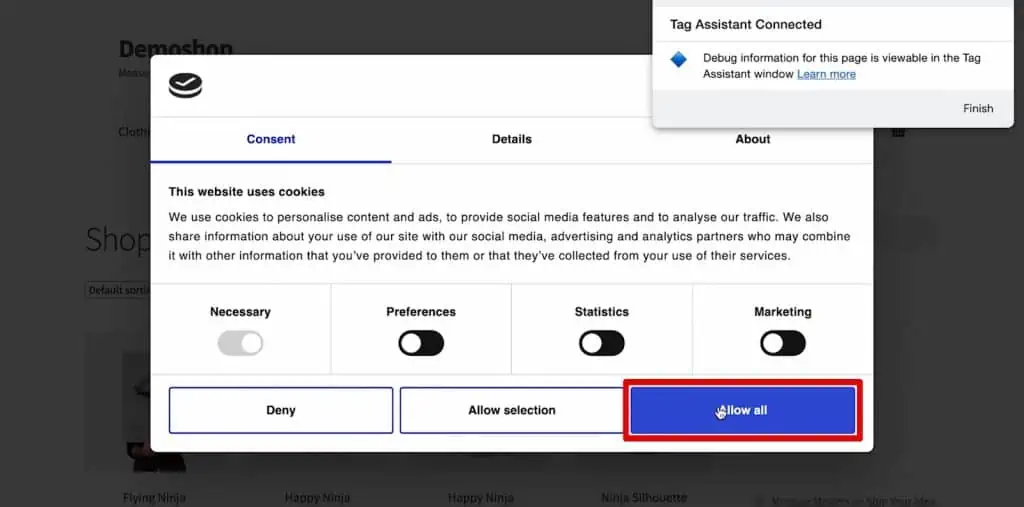
Put in your website’s domain and connect the Tag Assistant to your site. Your website will open in another tab.
Here we go! We get our consent popup where we can choose the different cookie categories we can allow or deny. Click Allow All.
Let’s take a look at the Tag Assistant at this stage. We can see a lot of different calls now.
We have an initial Consent event with the consent calls made to the Gtag through the consent mode API.
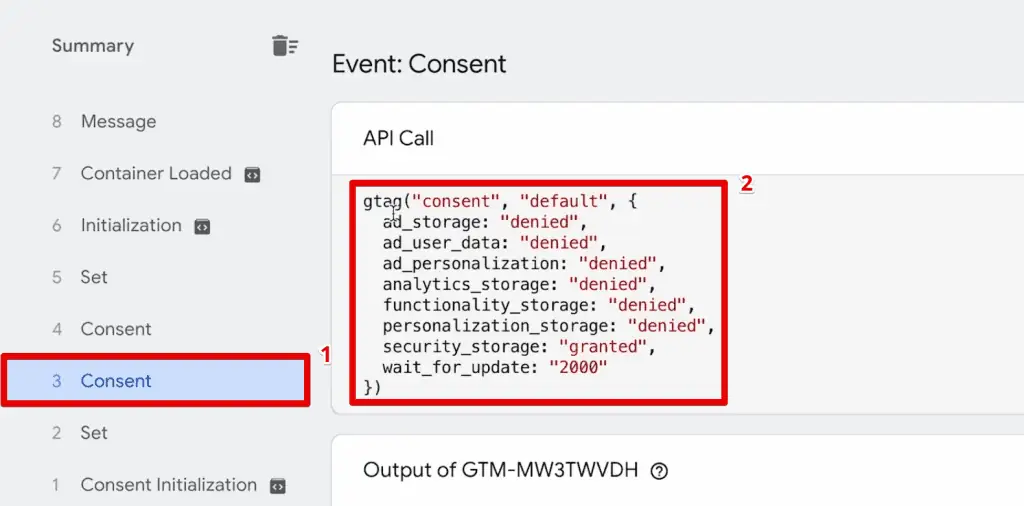
Here, we can see the different categories like ad_personalization, analytics_storage, etc. There are also new categories from the consent mode v2, like ad_storage and ad_user_data. By default, they are all denied.
Once the user has made a decision, another Consent event will fire. This event will update all the consent calls based on the user’s choice. In this event, no tags are firing.
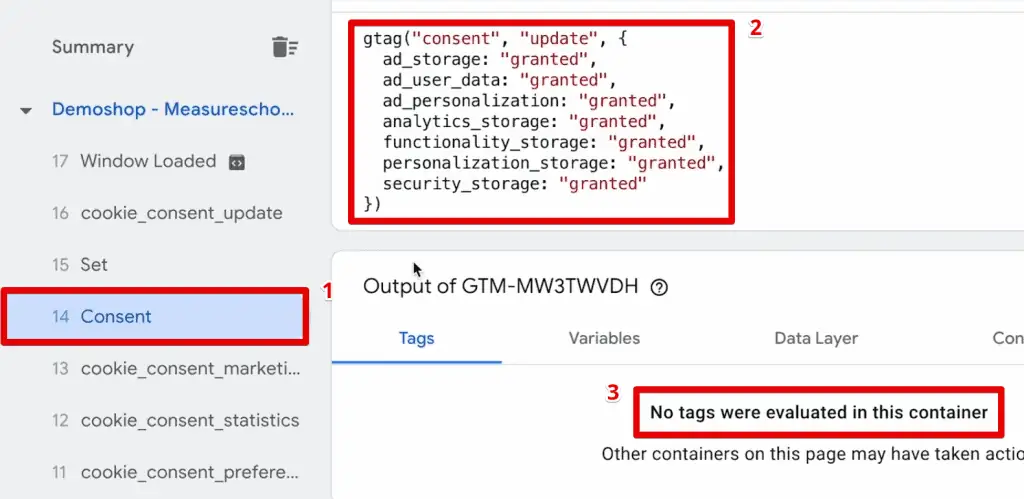
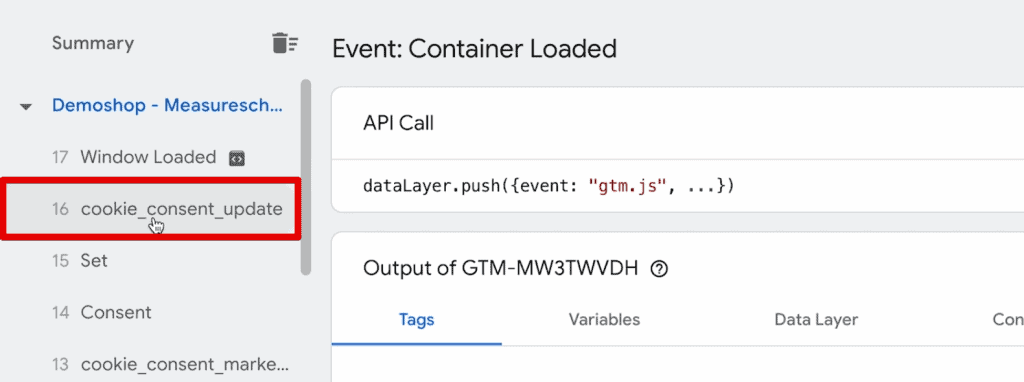
All our other tags fire at an earlier event, the Container Loaded event.
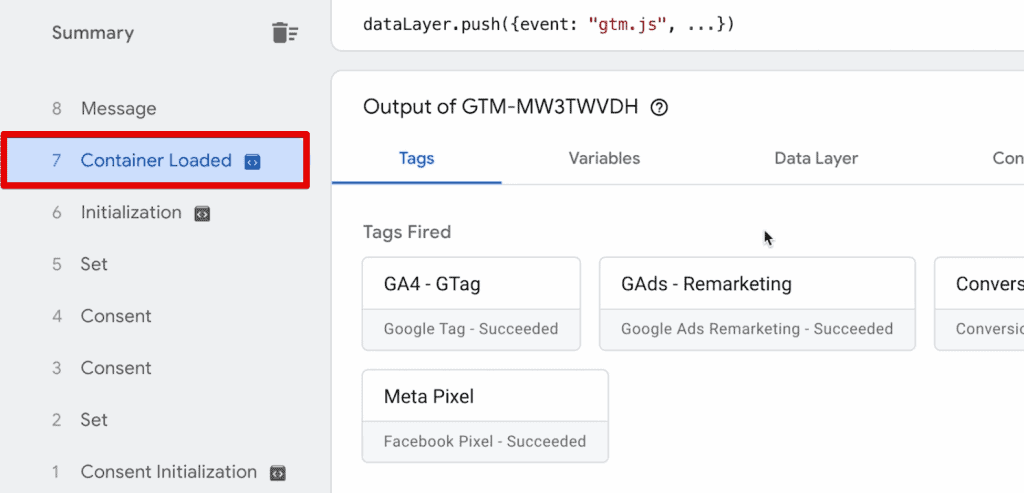
The Gtag, Google Ads, Conversion Linker, and Meta Pixel tags fire at this stage, which shows our tags are not yet connected to the consent management platform or to any of the consent choices the user has made.
We need to update the triggers of our tags so that they fire once the user has made their consent selection. Since we use the consent mode, we can connect GTM to these consent calls with the consent overview.
Connecting GTM Tags to the Consent Management Platform
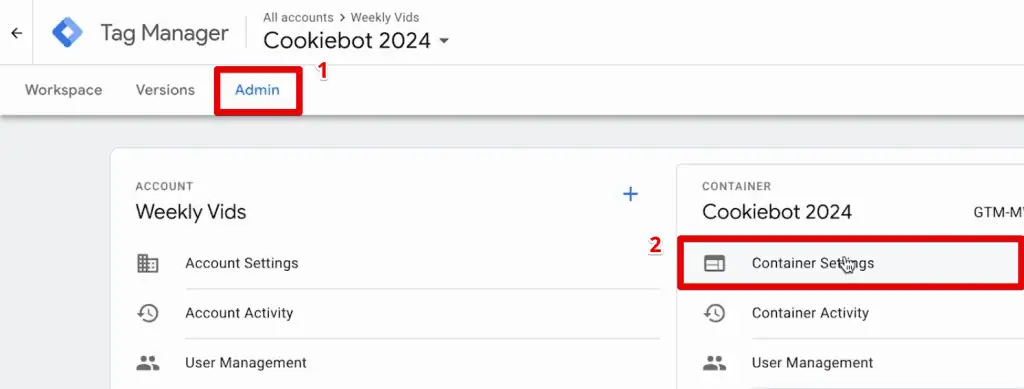
Inside Google Tag Manager, go to Admin → Container Settings.
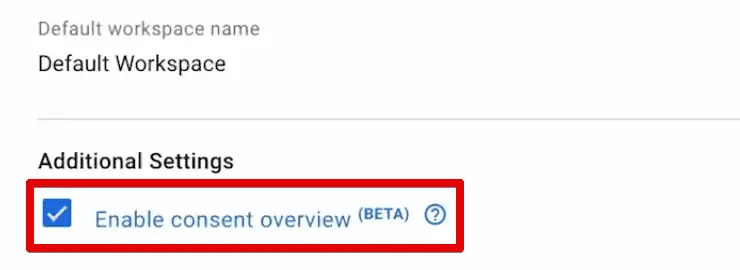
Under additional settings, enable Consent Overview.
Now, we can utilize specific triggers, kind of like new triggers, and add them to the tags.
In the Tags section, click the new button beside New, which opens the consent overview.
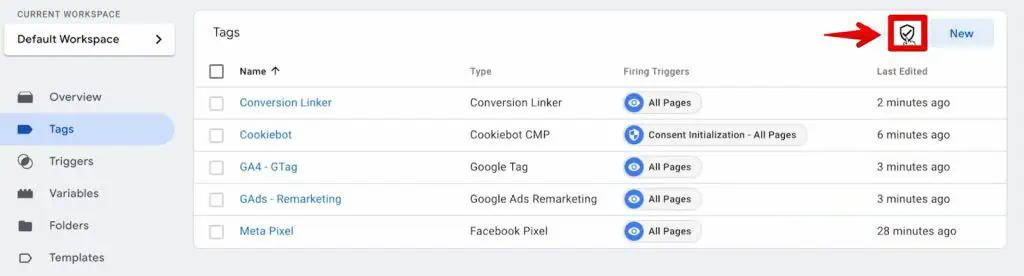
Here, you will see which tags have the new configuration of the consent overview applied to them, and we don’t have any of these applied yet.
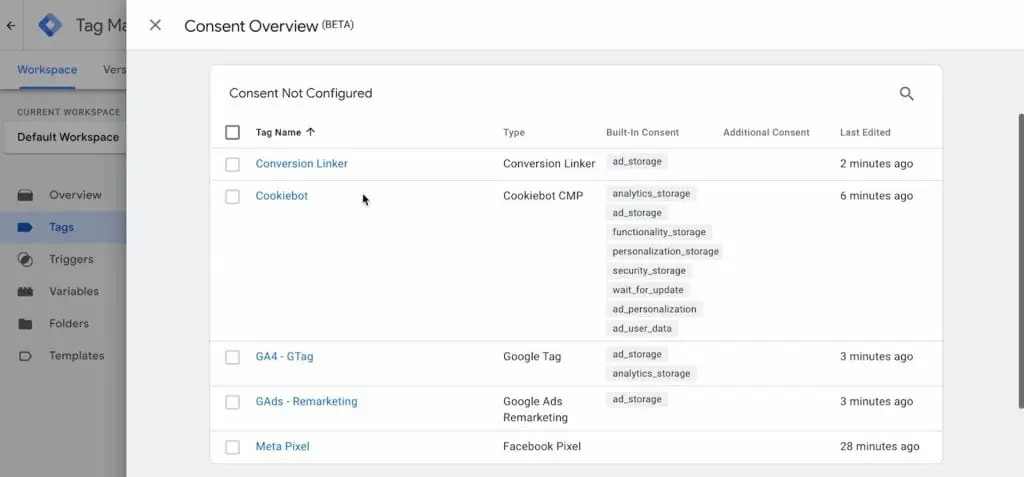
All our tags don’t have the secondary trigger that determines whether it can fire. There is also the built-in consent field that alters the functionality of the tags.
Looking at the GA4 Gtag, for example, if you have built-in consent and the user denies the ad_storage or analytics_storage, it will send cookie-less pings as part of the advanced consent mode. More on this later.
How to Block Tags If There’s No Consent Given
What if the user revokes consent? So, we need to require additional consent to our tags to block tags from firing.
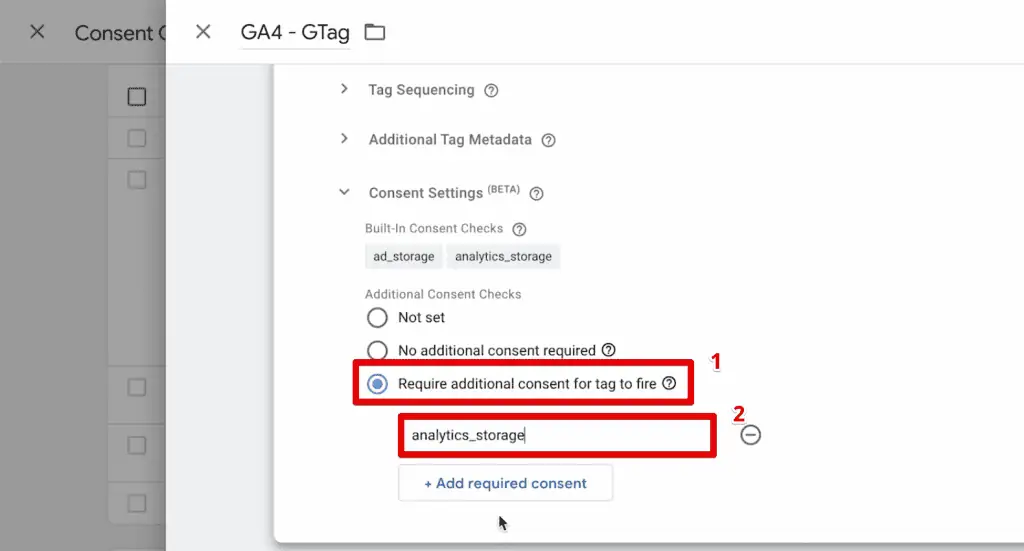
For example, open the GA4 Gtag and scroll to the consent settings. All tags have these additional settings now, where you can choose which additional consent is required for the tag to fire.
Select Require Additional Consent for Tag to Fire and add the categories for which you wish to act as a secondary trigger for the tag to fire.
Another option for requiring additional consent is to tick the checkbox beside the tags you want to put under a specific scope and select the shield icon.
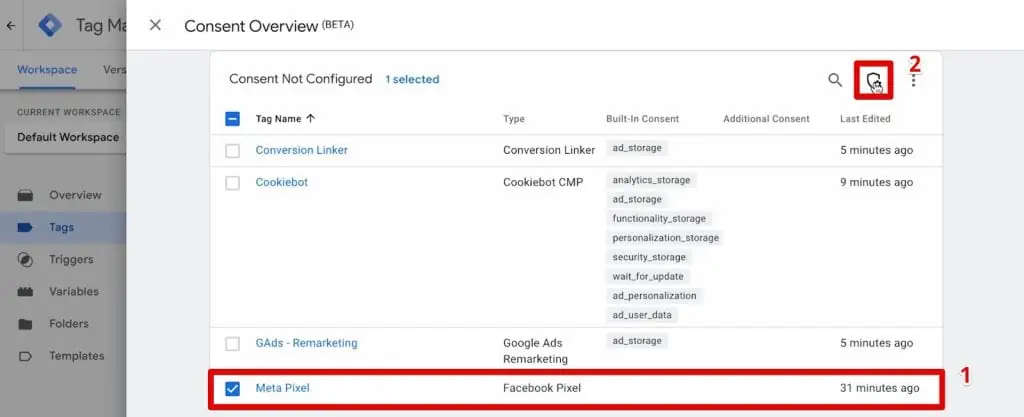
Follow the steps earlier for requiring additional consent. For the Meta Pixel tag, let’s include ad_storage. Save our configuration.
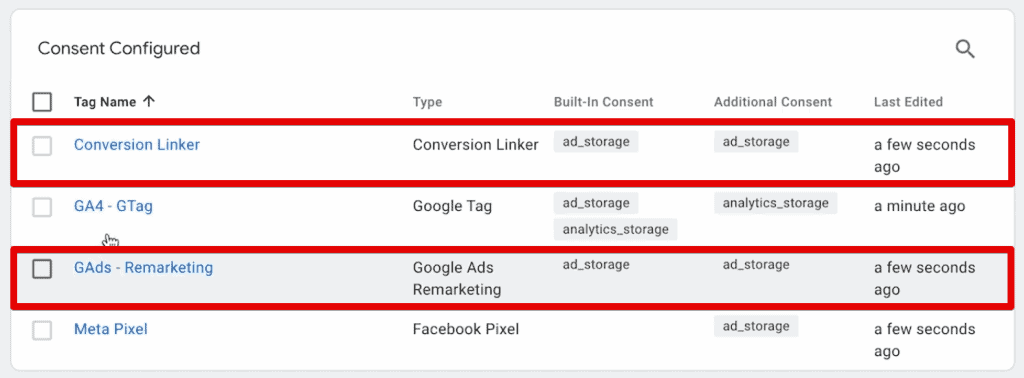
Repeat either method to add ad_storage for the conversion linker and Google Ads remarketing tag as additional consent.
You don’t need to configure additional settings for the Cookiebot tag since we need it to fire to ask for consent from the user.
Now, we need to modify the trigger itself.
Currently, our tags use the All Pages trigger. This trigger is not sufficient because it would be on the Container Loaded event where we don’t have a consent decision from the user yet.
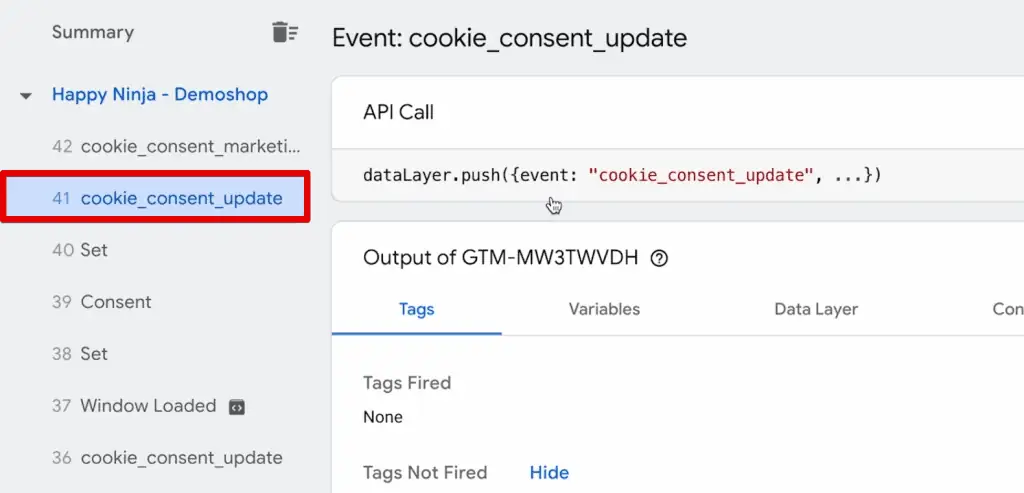
We’ll need an event that Cookiebot puts out with the consent mode. Looking at the Tag Assistant, this event is called the cookie_consent_update.
This update call happens on each page, not only upon the user specifying their consent.
To illustrate, let’s open a different page. Select the Happy Ninja product to open its product page.
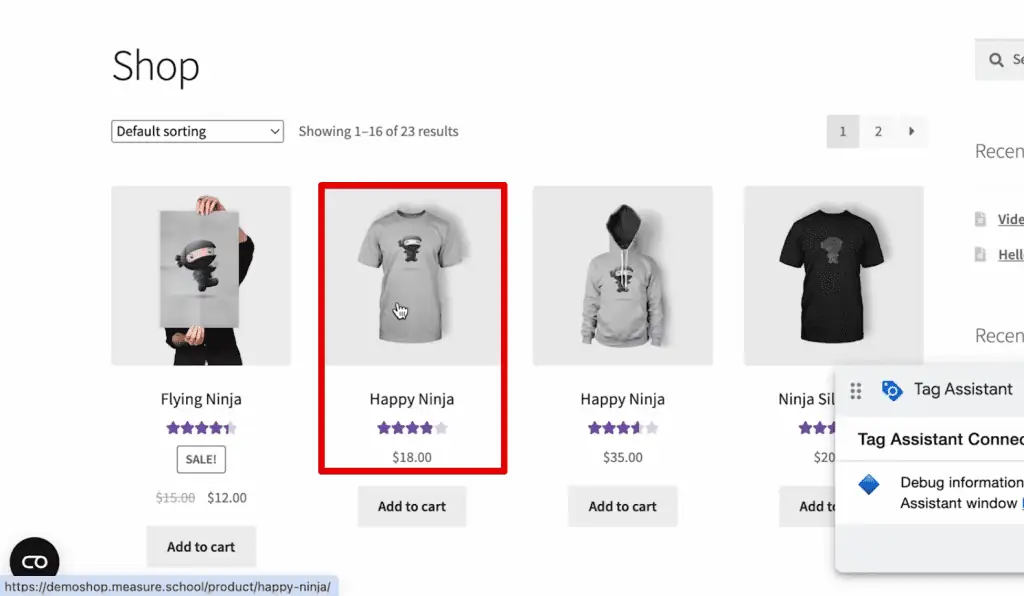
We see this same event firing at the product page.
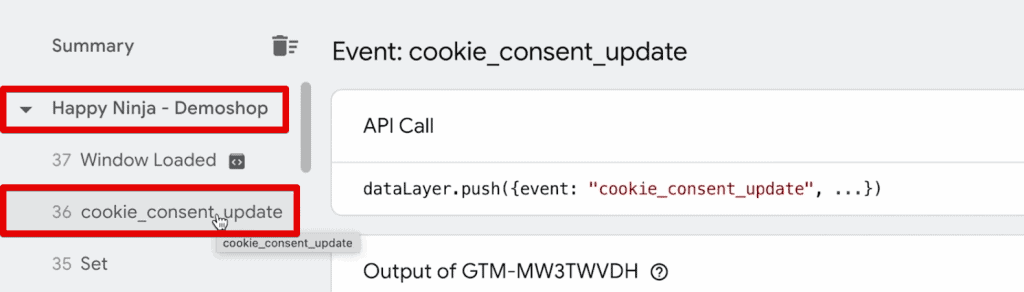
Great! So far, this event seems to fit our use case exactly. For a final check, see if Cookiebot sends this event when the user changes their consent.
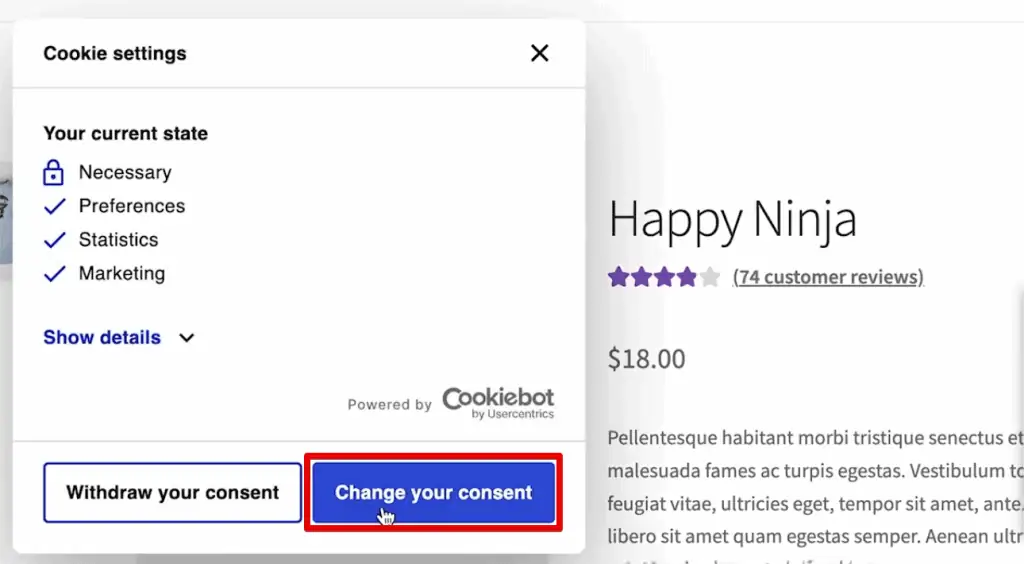
On our demo shop, open the cookie settings by clicking the icon at the lower-left corner.
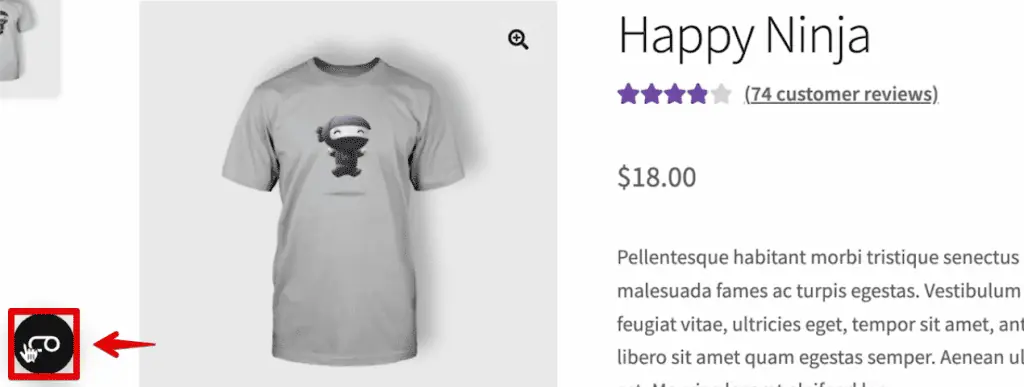
Next, click Change your consent.
Deny the Preferences and Statistics settings and click Allow selection.
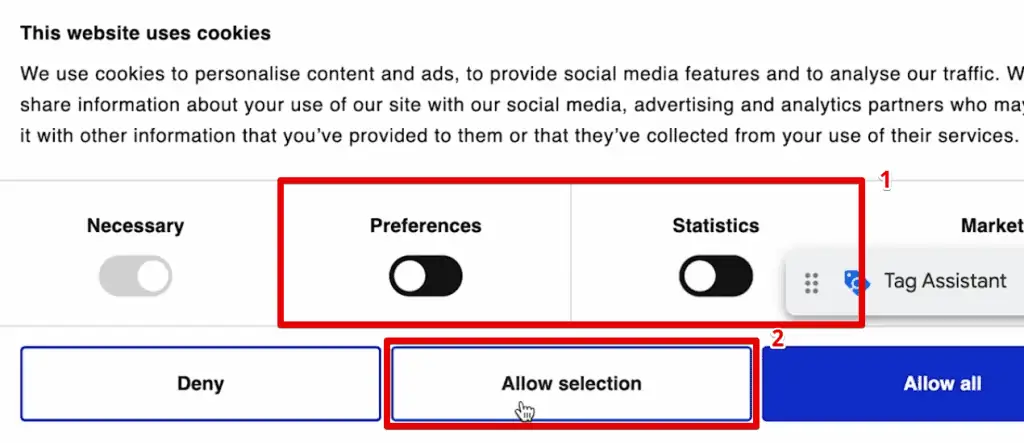
We should have a new cookie_consent_update event here. It happens every time the consent changes.
So, this event is adequate for our needs. Let’s use it as a custom trigger that will fire our tags.
Go to Triggers → New.

Next, select Trigger Configuration → Custom Event.

Enter cookie_consent_update for the event name, provide a trigger name, and click Save.

Next, apply the trigger to our tags where we installed the All Pages trigger.
Select the four tags and click the icon to edit the triggers.
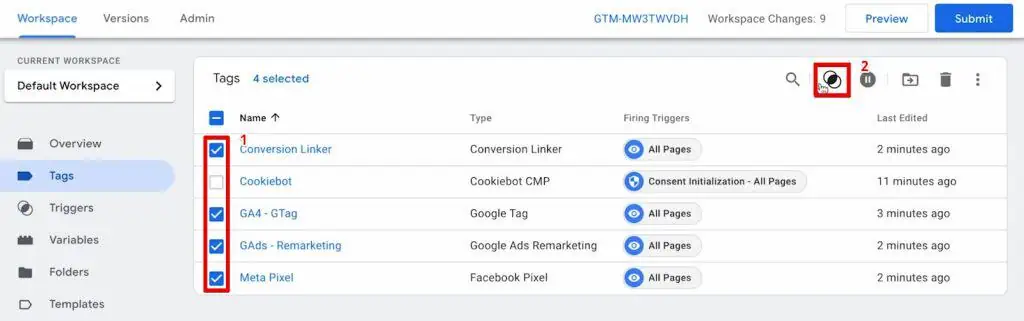
Unselect the all pages trigger and click the + icon.
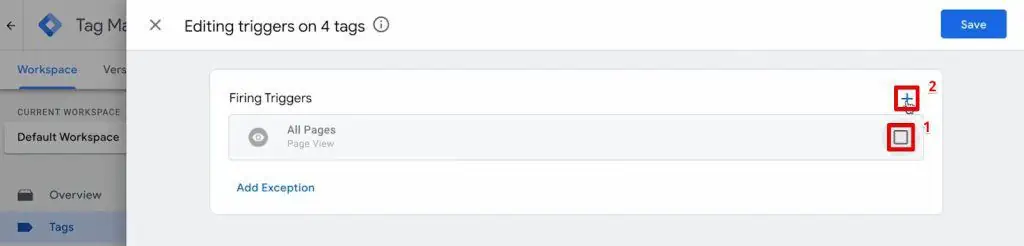
Select the cookie_consent_update trigger and click Save.
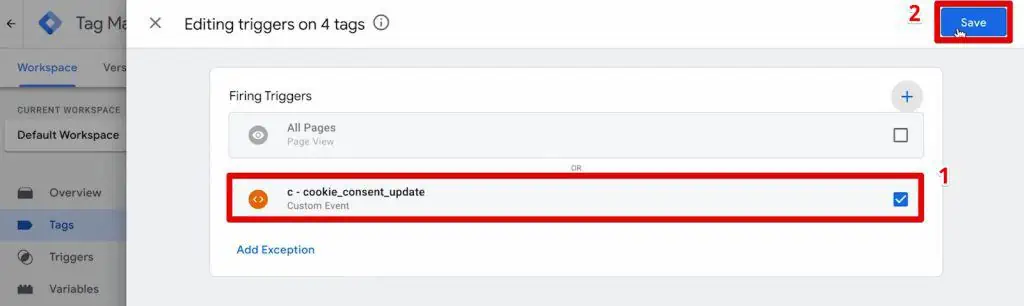
We have changed this around, and now, let’s test it out by entering the preview mode again.
Testing Tags
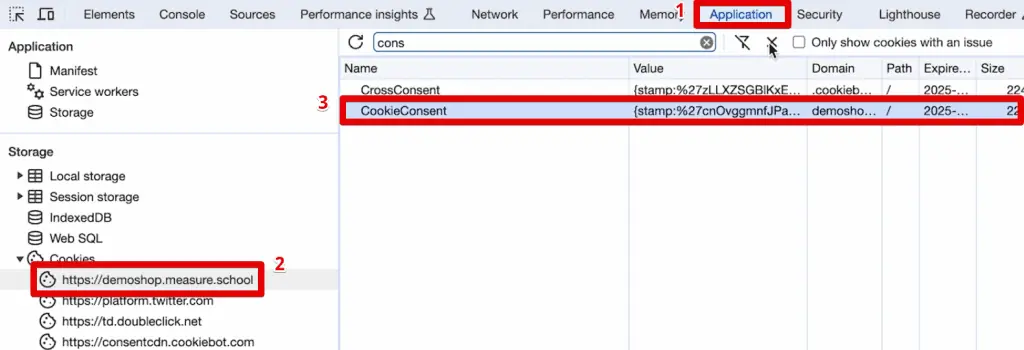
On our page, we’ll delete our cookies on the browser’s developer tools to get our cookie consent banner back.
Open the Chrome Developer Tools and go to the Application tab. Open the cookies on the demo shop, search for CookieConsent, and remove this cookie.
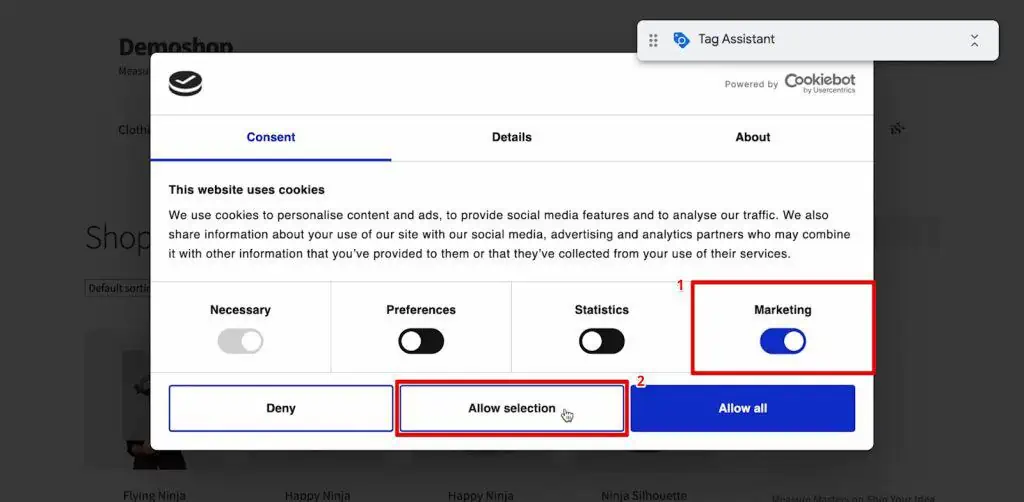
Refresh the page and only enable Marketing cookies. Click Allow selection.
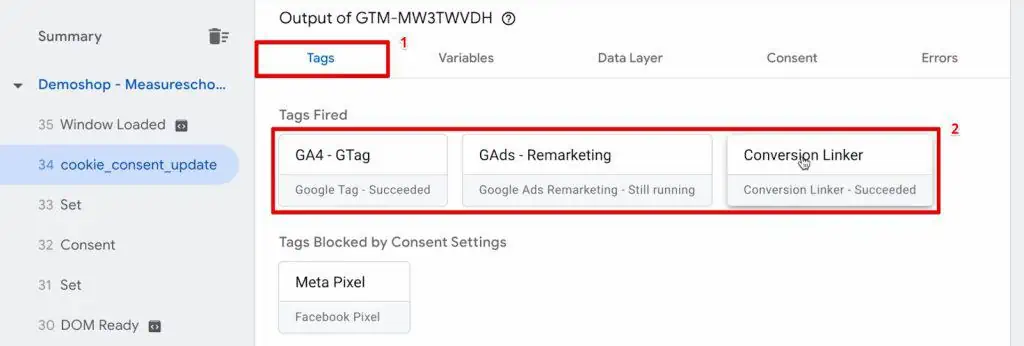
Let’s see what happens in the Tag Assistant. Select the cookie_consent_update event. The meta pixel, remarketing, and conversion linker tags fired. Meanwhile, the GA4 Gtag did not fire due to the consent settings.
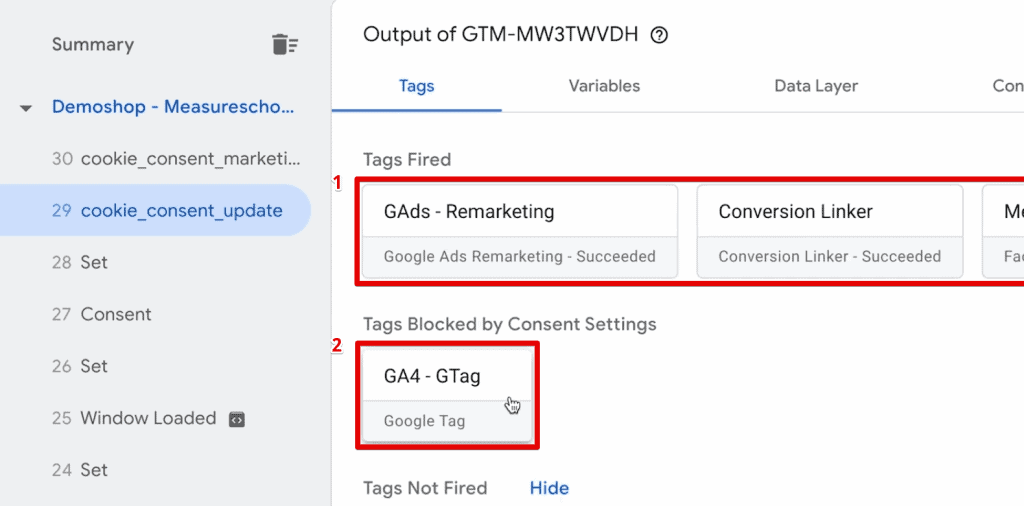
When opening the Gtag, it has the correct firing triggers, but it did not fire due to missing consent for the analytics_storage.
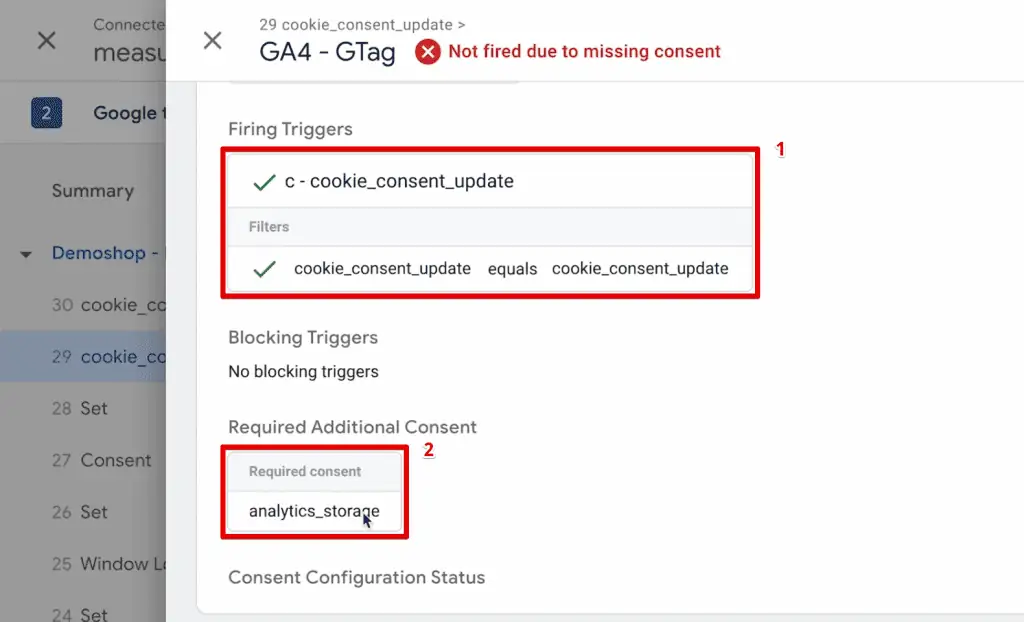
So, we essentially have two kinds of triggers attached to this tag. One is the trigger that determines whether it fired based on given circumstances, and the other is for the additional consent based on the user selection.
You can also go to the Consent tab to check the consent statuses.
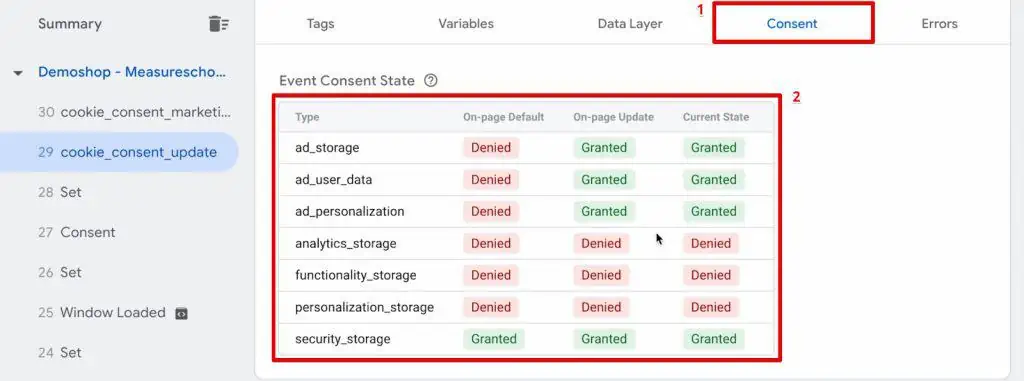
The current consent status is that the user granted all except analytics_storage, functionality_storage, and personalization_storage.
With that, we have now learned how to install consent mode v2 and have put our tags under the user’s control by giving their consent.
How do you know that this new consent mode is working?
Testing the Consent Mode Implementation
Consent mode allows the Gtag to communicate with your other tags on how they should function and what data they send over.
You can check if this is happening by looking at the network requests. First, let’s change the consent settings and allow everything.
Go back to your website and open the developer tools. For Chrome, click the three dots in the upper-right corner. Select More Tools → Developer Tools.
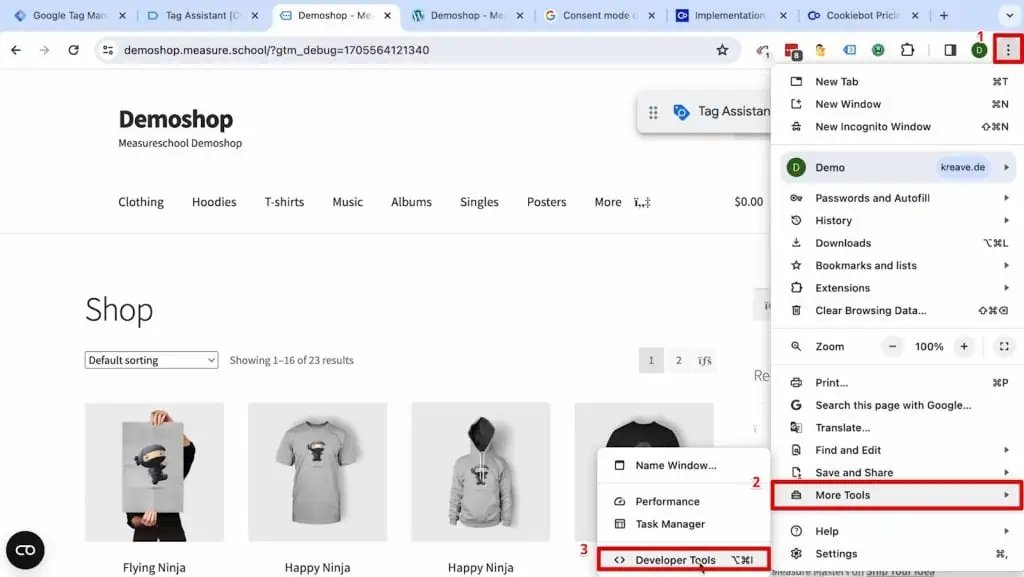
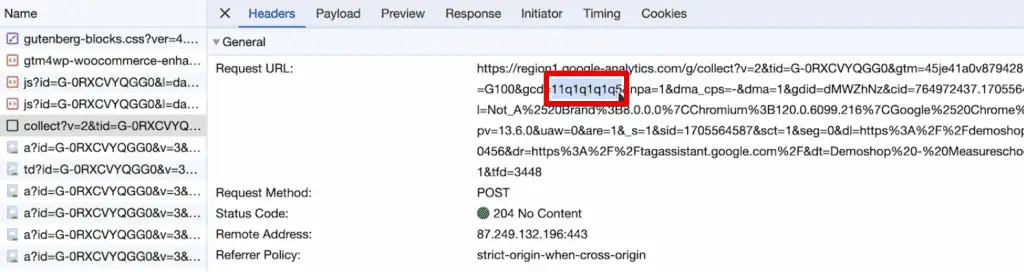
Here, go to the Network tab. Reload the page. There are a lot of requests here, so filter them by putting in your GTM or GA ID. Search “G-” and select the collect request. This request is responsible for sending data to Google Analytics.
You should see the GCS and GCD parameters if you installed the consent mode correctly.
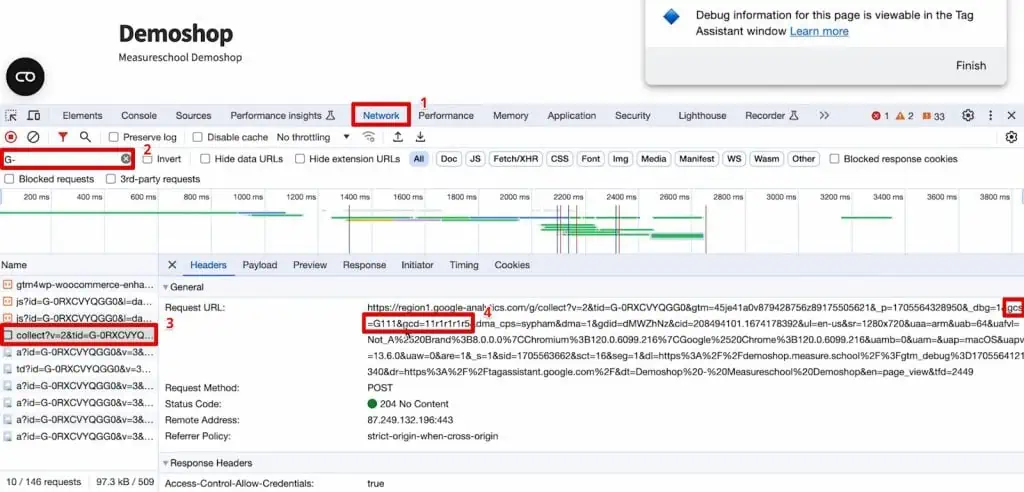
If both these parameters are present, you’ll know that the consent mode sends data over, and the consent status is sent to the mother server of Google Analytics, Google Ads, etc.
If you don’t see one or both parameters, the consent mode is not installed correctly.
Great! We have the basic mode of consent mode for Google products. If the user gives consent, the tags fire, and this extra flag is added to the request.
If you want to send data even if there is no consent available or if the user denies consent, you need to change your setup slightly.
Advanced Consent Mode Implementation
For the advanced consent mode version, it doesn’t need to block the tags from firing once the user denies consent. So, we first will remove our consent settings for the different tags.
🚨 Note: We will only modify the consent settings for the Google tags because the other tags are not governed by the consent mode.
Open the consent overview and select your Google tags. Next, click the shield icon to modify the consent settings.
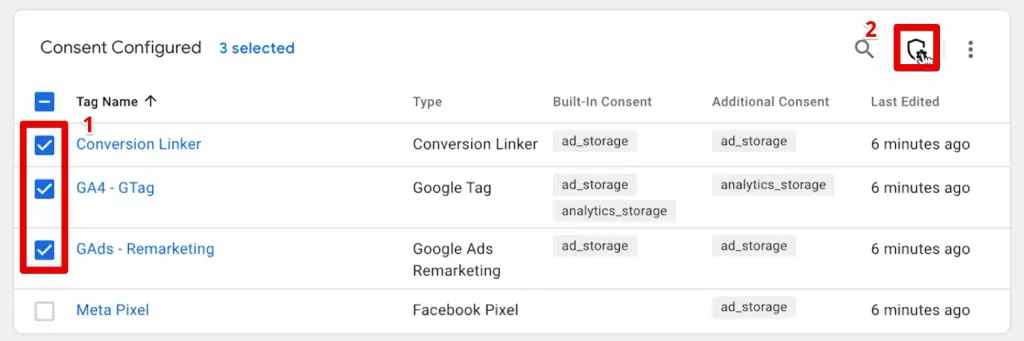
We leave out the Meta Pixel since it does not have the extra request going out as consent mode is just a Google thing.
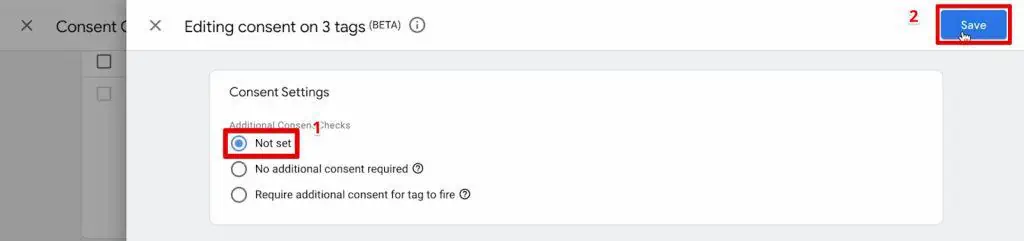
Let’s go ahead and remove the additional consent check for these Google tags. Click Save.
Here we go! We should now have our tags governed by the built-in consent. If ad storage is denied, you will have cookie-less pings sent over. That is how to install consent mode v2, advanced mode implementation.
🚨 Note: We must warn you about using this one, though. It must adhere to your privacy policy and the standards of how you want to implement your consent.
Now, Google says that it will give you extra modeling capabilities in their tools. Nonetheless, you are skipping the consent of the user. I don’t think that’s a good idea, but that’s up to everybody’s interpretation of how you should be implementing this.
Alright, so let’s enter the preview mode again and reload our page.
Let’s say the user denies all types of cookies. In this case, you will see in the cookie_consent_update event that everything is denied.
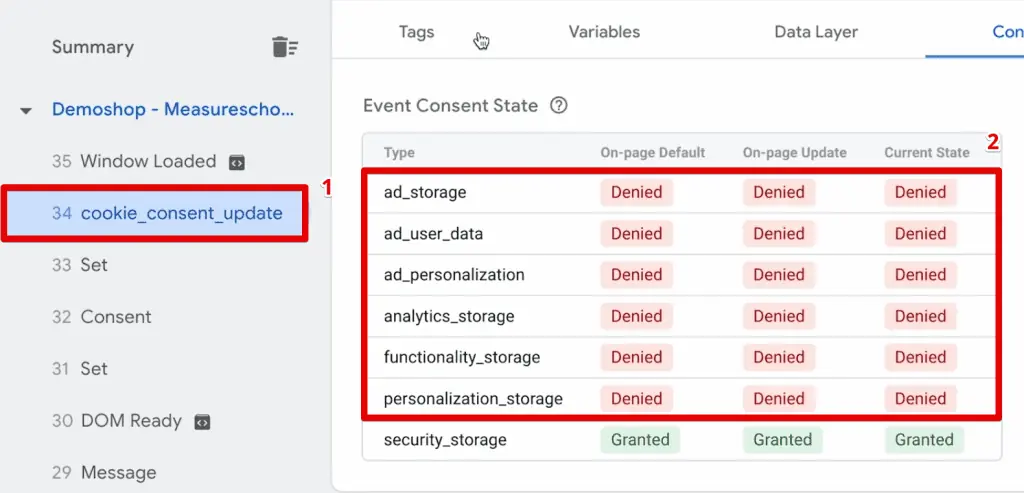
Nevertheless, when we go to the Tags tab on this event, we can see our Google tags still fire.
We are still tracking data but in a different way. In the collect call from our developer tools, we can see that it is a non-consented hit.
You must decode the text in the request here, but our example shows that everything is denied, and only cookie-less pings are sent to Google Analytics.
If you also see this request, it means you have the advanced mode implementation of the consent mode installed.
Summary
So, those are the steps on how to install consent mode v2. We first covered the cookiebot setup and how to get your consent banner running on your website.
Next, we learned how to implement the basic mode where we block tags from firing based on the user selection. Finally, we used the advanced mode implementation to send cookie-less pings upon the user denying consent.
However you want to do it, you should always test your implementation thoroughly to see whether your different settings adhere to the different consent the user has given you. Once you’re ready, publish your tags live, then you’re ready to go!
If you want to learn more about the different tag types in GTM, check out our Google Tag Manager Tags Explained article.
Have you installed consent mode v2 on your website? Do you use the basic mode or advanced mode implementation? Let us know in the comments below!
Sign up to the FREE GTM for Beginners Course...


")
This is configuration advance or basic ? thanks you for all.
Hi. Tnx for sharing your knowledge on this blurry concept 🙂
In your article, you add the consent check analytics_storage to the Google tag under the option “Require Additional Consent for Tag to Fire”. But this action is not necessary with Google Tags, because they already have built-in consent checks. This step can be confusing for some people.
Hi, thanks for the article! However, I have question. Once you set the “cookie_consent_update” event as a trigger, won’t it mess up analyttics by triggering the same tags several times on one page (say, Facebook pixel)? As users can potentially change their consent several times on one page. Thanks!