
Last Modified on September 4, 2024
🚨 Note: Google announced that the consent mode version 2 is becoming mandatory.
Did you know cookie banners are indispensable to today’s web browsing experience?
However, customers expect to be able to access and control their privacy and data. This is where cookie consent banners come into the picture!
Google Tag Manager provides the functionality to implement cookie consent banners on your websites even if the sites are not required to display them yet.
In this guide, we’ll learn how to install a cookie consent banner on your website with the help of GTM, so your users understand what kinds of cookies you use and how to enhance your site’s user experience.
An overview of what we’ll cover:
- How to Set Up the Cookie Consent Banner
- How to Configure the Cookie Consent Banner
- Firing GTM Tags based on consent
- Using Consent Mode with GTM
So, let’s dive in!
How to Set Up the Cookie Consent Banner
There are various variables for connecting your Google Tag Manager account to a consent solution.
This will enable you to fire your tags based on the consent of the users who visited your website.
Moreover, please note that this is not a legal advice blog.
Our solutions in this guide may not apply to all the different sets of audiences.
This is because there are many jurisdictions globally, and countries with various privacy concerns as well as interpretations of the law.
As this implementation requires various variables that go into this, it also requires advanced knowledge of tracking.
We’ve split this guide into four different parts.
In the first part, we’ll learn how to set up a cookie consent banner with the help of Google Tag Manager.
In the second part, we’ll connect the cookie consent banner we set up with our Google Tag Manager implementation.
At this point, our Google Tag Manager will be aware of the user’s consent on our website.
So, in the third part, we’ll connect our Google Tag Manager with our Tags to verify that our triggers are correctly configured.
This will help ensure that the triggers and Tags fire only under certain circumstances based on the consent of the user.
Finally, in the fourth part, we’ll learn about a feature in Google Tags known as consent mode.
Here, we can control and manipulate the reactions of our Tags for Google Ads or Google Analytics to the consent state and in terms of sending the data.
So, let’s move forward to our first step and set up our consent banner with the help of Google Tag Manager.
Cookie Consent Basics
We have created a demo shop where we’ll install a cookie consent solution.
However, the implementations may differ depending on different websites as there are multiple cookie consent solutions currently.
In our case, we’ll be using a free version of Klaro, an open-source project that enables us to install cookie consent banners on our website. It also has an available paid version.
You can access the codes from our GitHub repository. All you need to do is locate the correct codes and configure them on your website.
The process may differ depending on the tools you’re using, but in a more simplified way, the methods are almost similar.
Open the source on the GitHub repository, and install the codes on your website.

This tool won’t be able to audit your site and deploy the tools you want on your website.
Hence, you’ll need to manually check that the cookies are set.
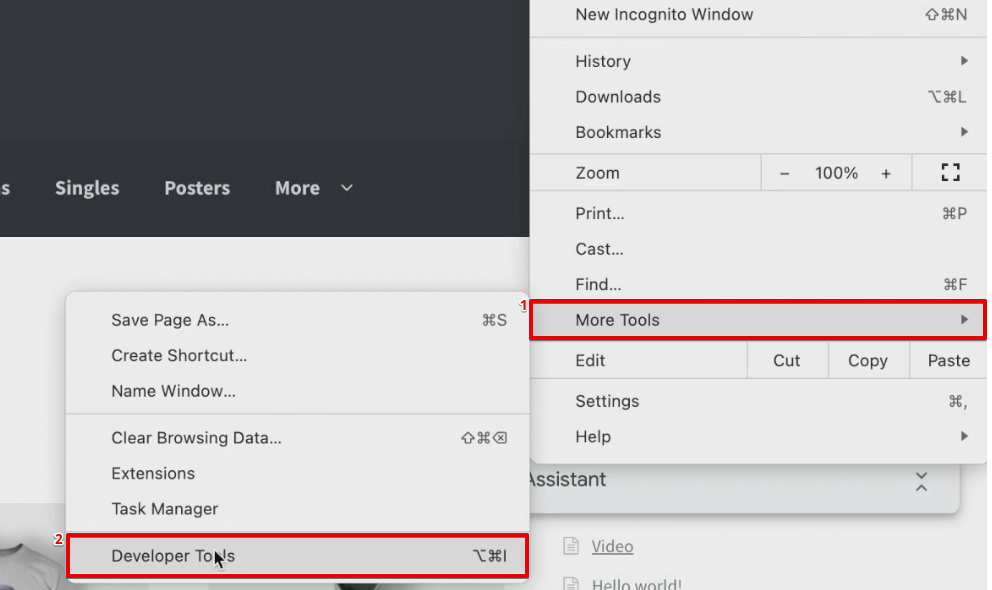
For example, let’s open the Developer Tools from our browser.

Open the Applications tab. You’ll find a list of all the cookies being set on your website under the Cookies section.
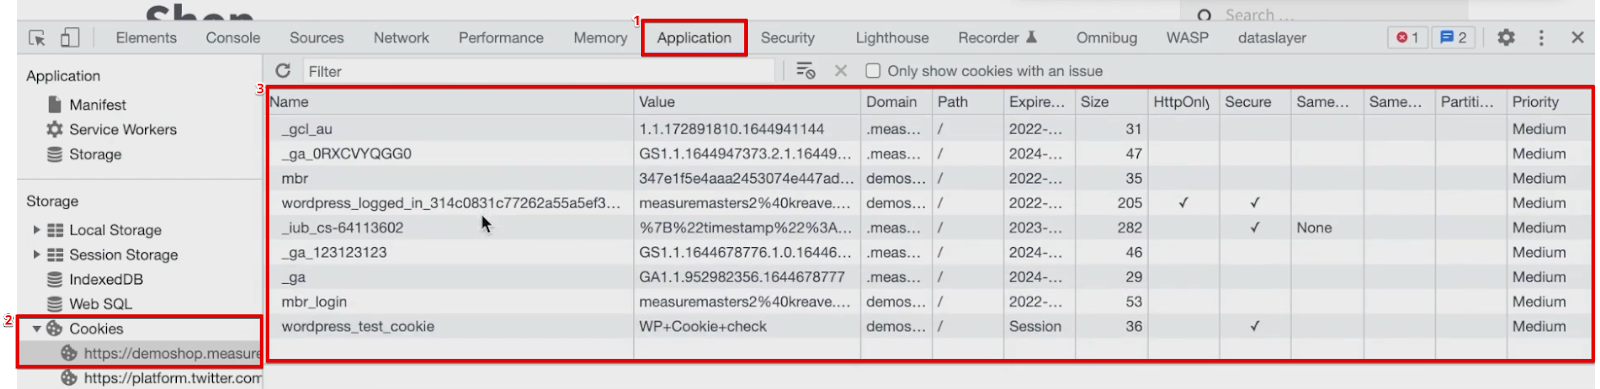
You might need to audit some cookies that were set without any prior consent.
Various tools automatically scan cookies as a part of their services.
We recommend using a paid version of such services to find out the cookies you need to include in your consent banner.
You’ll also need to have a privacy policy that includes the various functions as well.
As this is a technical implementation guide, we won’t go into the details of legal sites for setting up the banner. We advise you to have your basics covered.
Let’s start with a simple example of cookie banner configuration.
Cookie Banner Configuration
On our Google Tag Manager, we already have four different Tags running.
The Facebook Ads PageViews, Google Analytics 4 PageViews, Google Ads Conversion Linker, and Google Ads Remarketing codes.
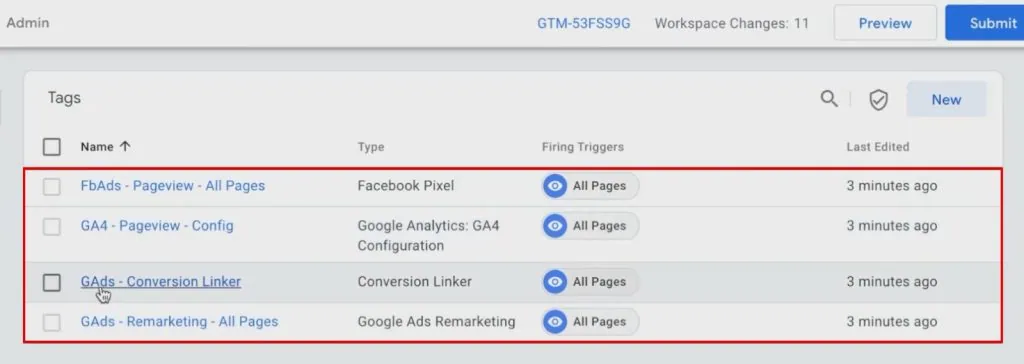
Let’s put all four of these under the cookie consent banner.
Firstly, we’ll need to install the codes as well as a config file.

We’ll also need to include a stylesheet.

Now, coming back to the config file, it will have all the various configurations where you can input the tools you’re using and will be able to see how they’re classified.
For example, in our case, we have an inlineTracker analytics tool, externalTracker, and intercom.
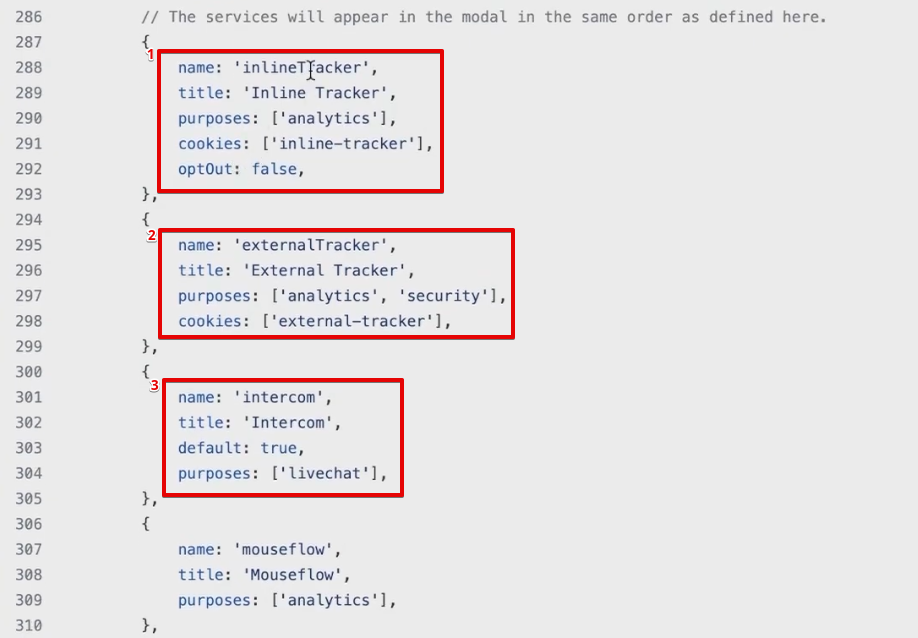
Usually, you’ll need to list these configurations.
However, Klaro enables you to input these files into Google Tag Manager and deploy the entire consent solution through GTM.
We already have the codes prepared. You can find them also in the GitHub repository.
Copy the codes for implementation into Google Tag Manager.
Open your GTM account, and create a new Tag of Custom HTML type. Paste the code in the Tag.
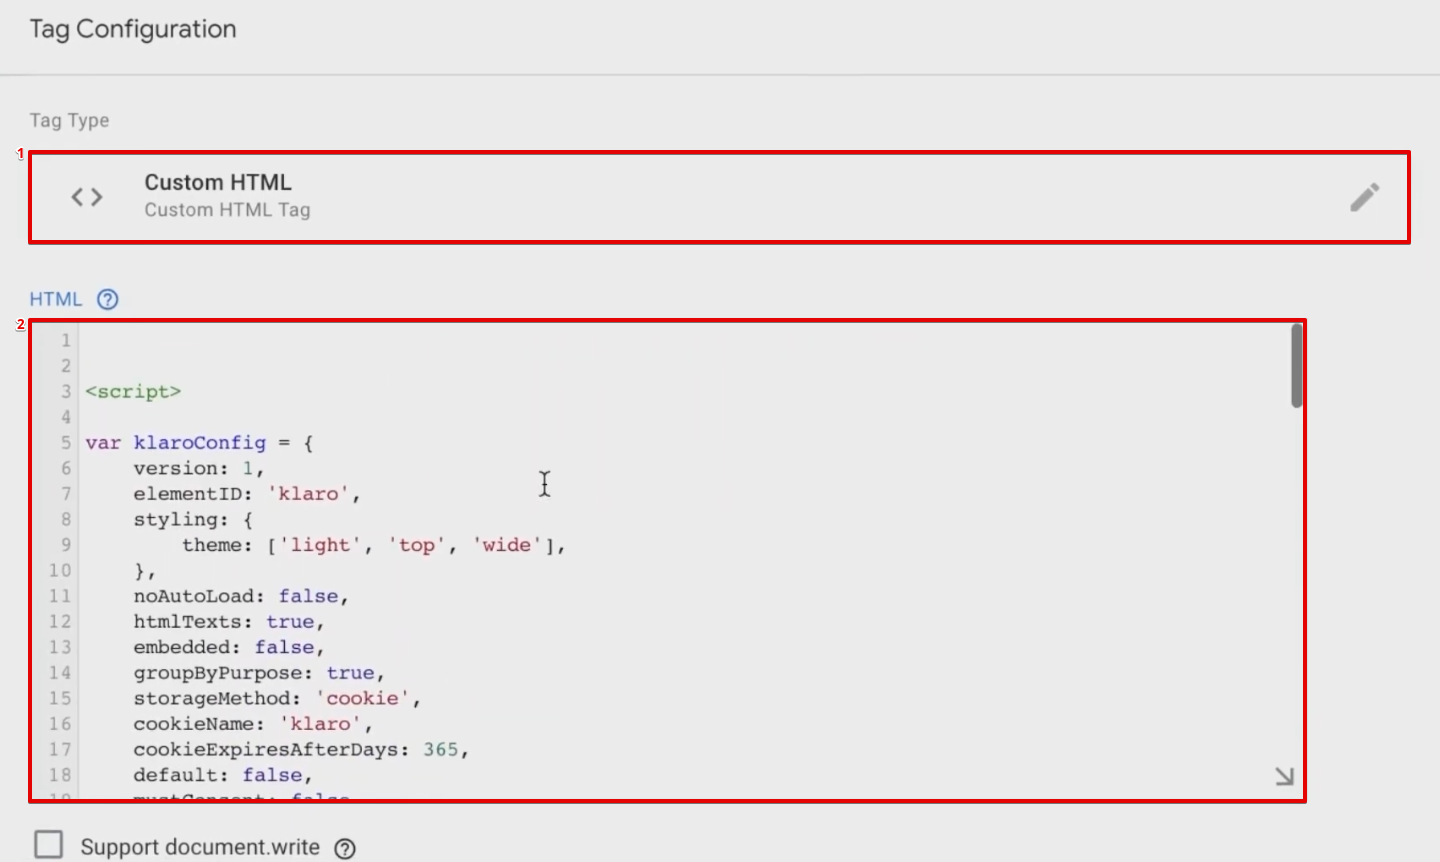
Moreover, we’ll also attach a Consent Initialization – All Pages trigger to this Tag. Add a name to the Tag, and click on Save.
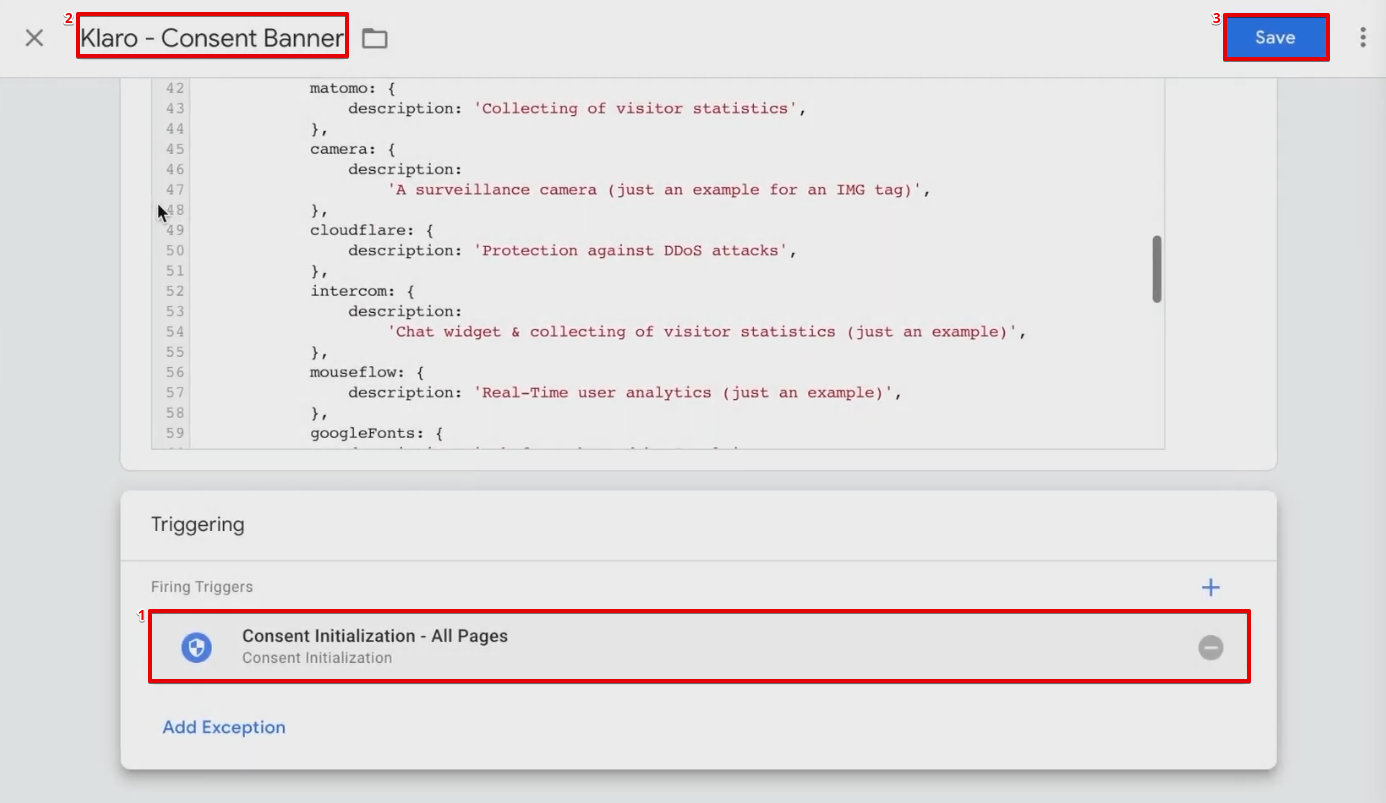
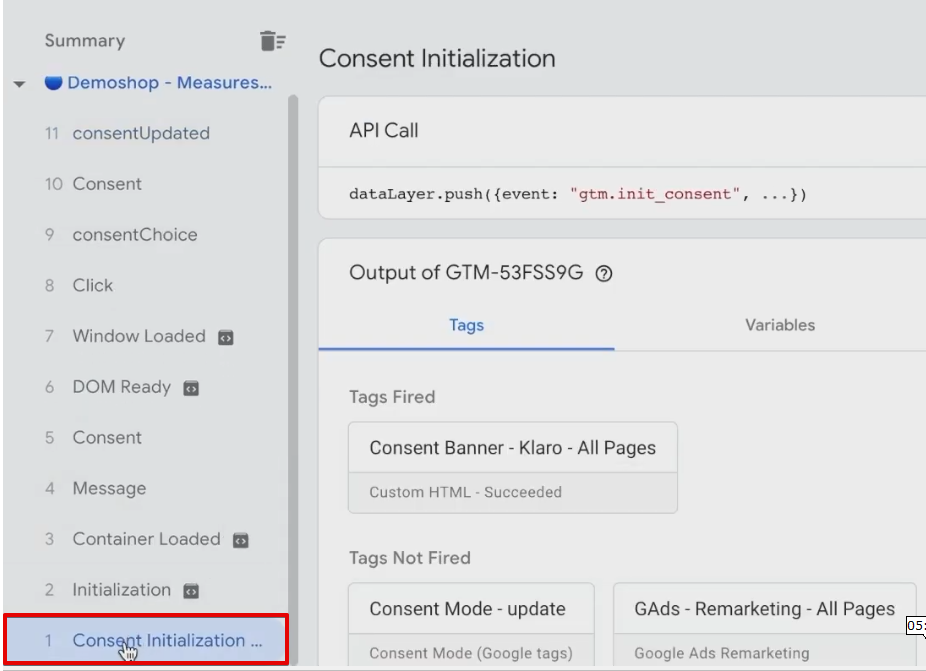
This installed trigger is the first event that fires on a page.
You can also verify it from the Google Tag Assistant account, once the Tags are functioning.
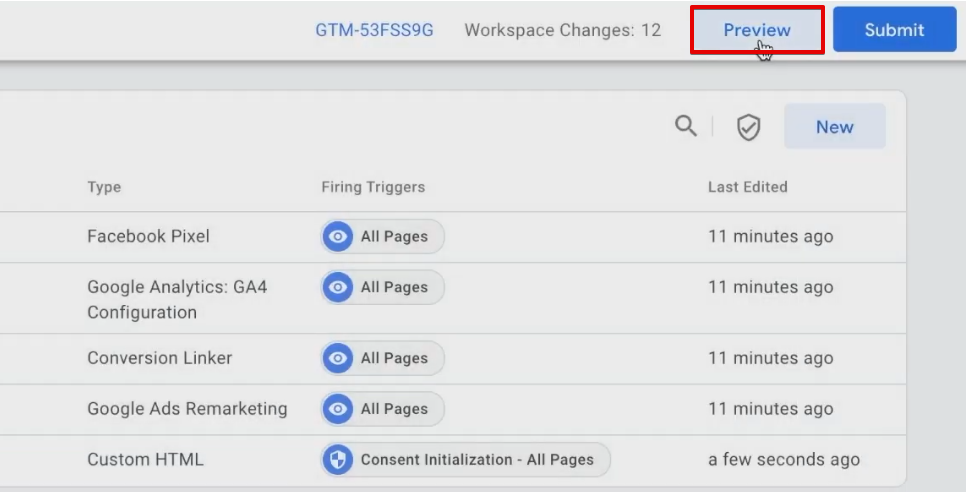
Let’s open the Preview mode of the website once the configuration is complete.
Let’s now see how the cookies are available on our website!
Cookie Consent Banner Mechanism
You’ll see the cookie consent banner on your preview mode once you refresh the website.
This contains all the configurations of the codes that we implemented. You can verify or modify them by clicking on Let me choose…

You’ll find the consent settings option that has various Tags. Click on the ones you wish to select to confirm your choices.
If you click on the Accept All option, then all our cookies are accepted.

Now, let’s understand what it means.
In most cases, these consent choices are saved in the cookies section of the user’s browser.
You can open the Developer Tools to track cookies.
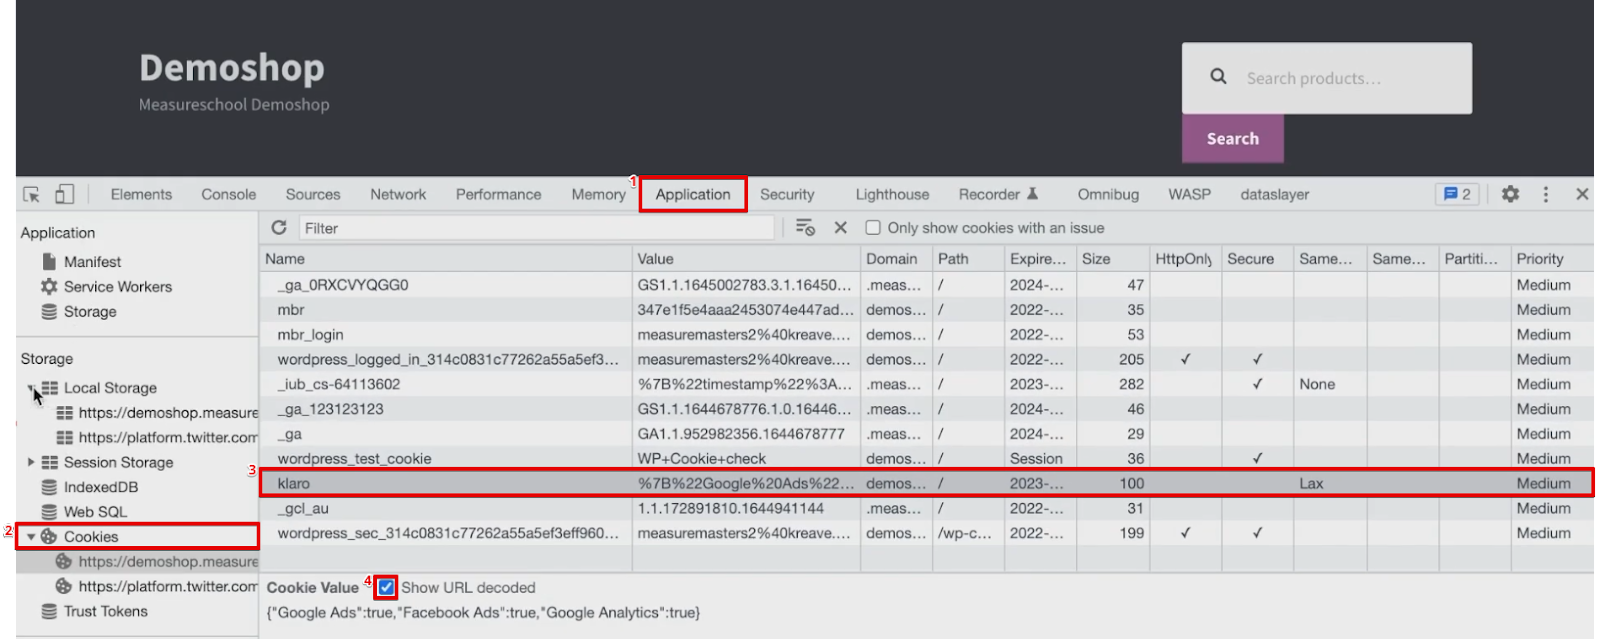
Under Applications, open Cookies.
You’ll find the domain of your set cookies. We have a Klaro cookie installed.
You can check whether the cookie is URL encoded or not by clicking on the Show URL decoded tick.
However, this method might be different from some consent solutions.
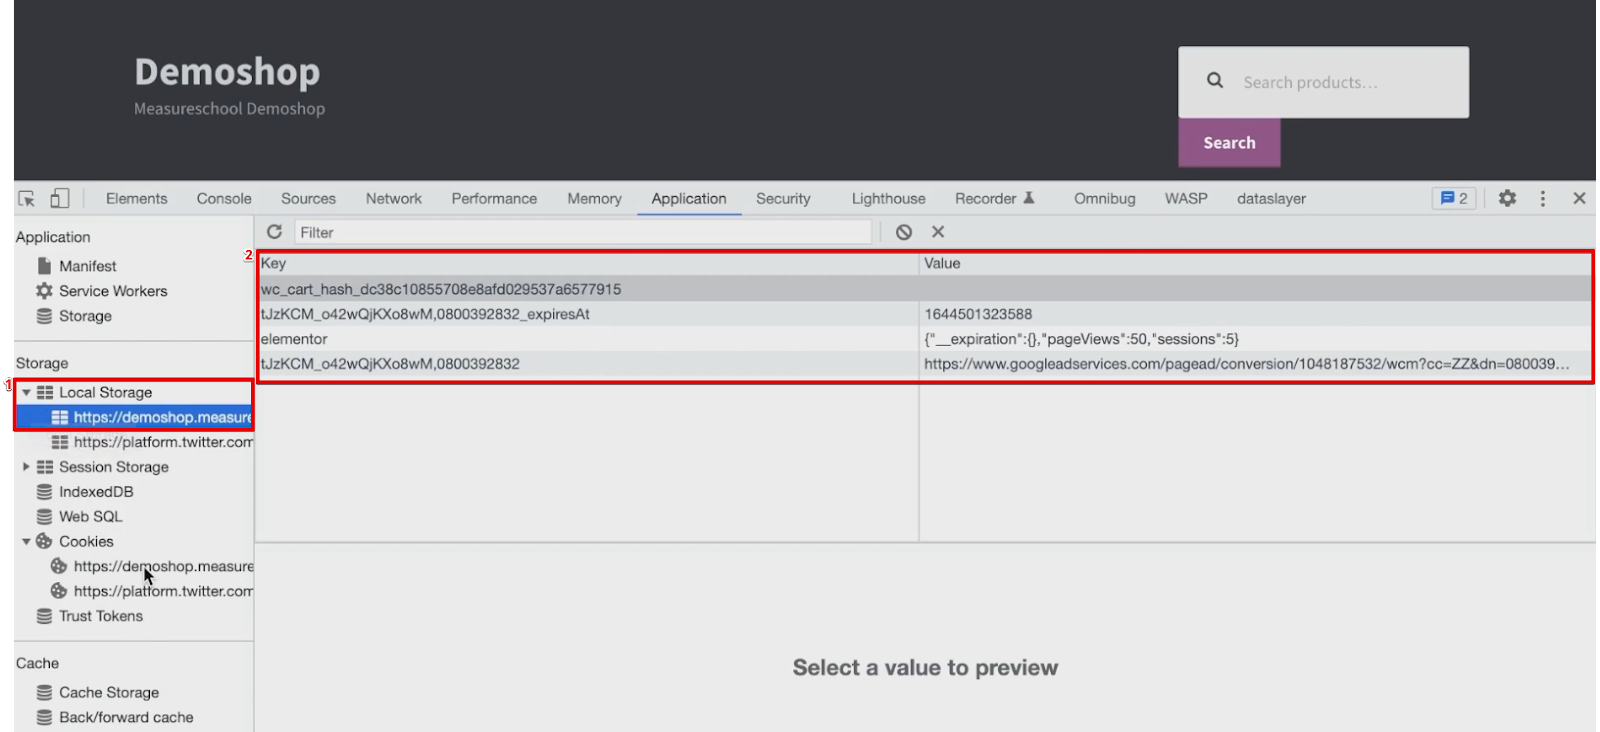
They usually enter the configurations into the Local Storage. You may find any valuable cookies in the list the users have consented to.
Moving forward, let’s understand what happens when we delete our Klaro cookie from the cookies section.

You’ll need to choose I decline the cookies from the pop-up shown on the top of your screen.

We can still see the Klaro cookie. However, this time the cookie mentions that Google Ads, Google Analytics, and Google Facebook Ads are false.

If you understand the mechanism of the cookie consent banner, you’ll also be able to configure the Tags automatically based on the consent given by the user.
Pull Cookie Information to GTM
First, we’ll need to pull the cookie information into Google Tag Manager.
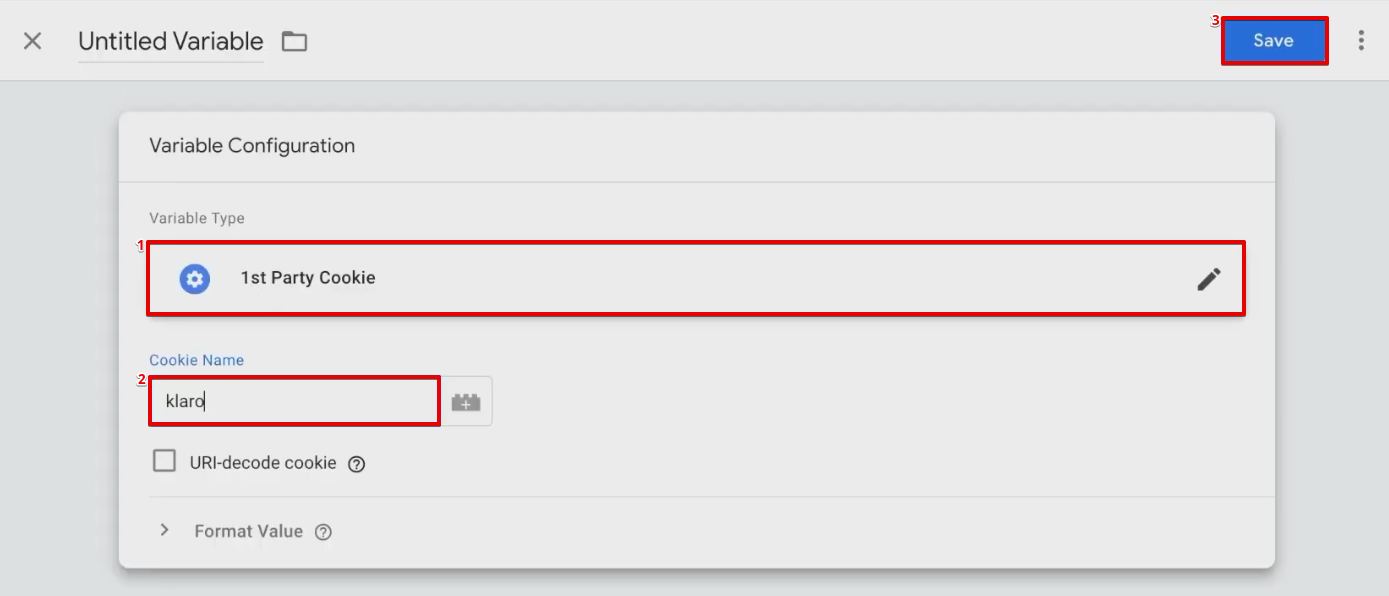
Create a new variable of the 1st Party Cookie type.
Enter the exact name of the cookie. It will be Klaro in our case. Add a name to the variable and click on Save.
Let’s again enter our preview mode to verify the variable performance.
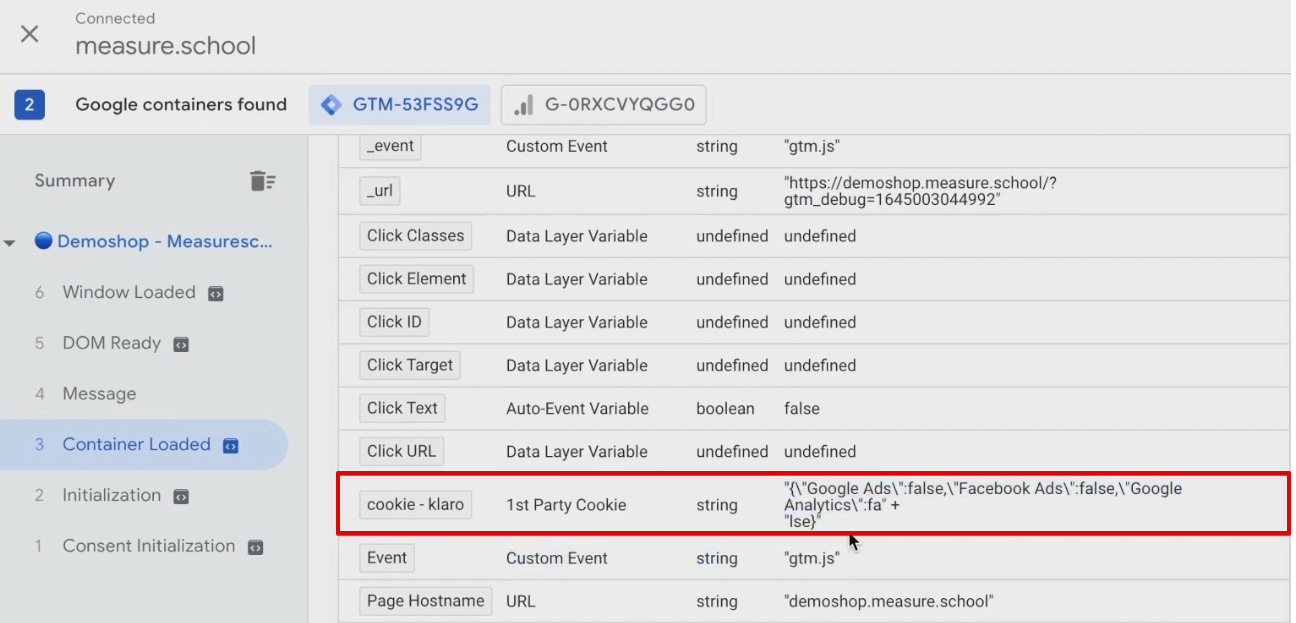
Under Initialization, you’ll find that we pulled the information for the cookie – klaro.
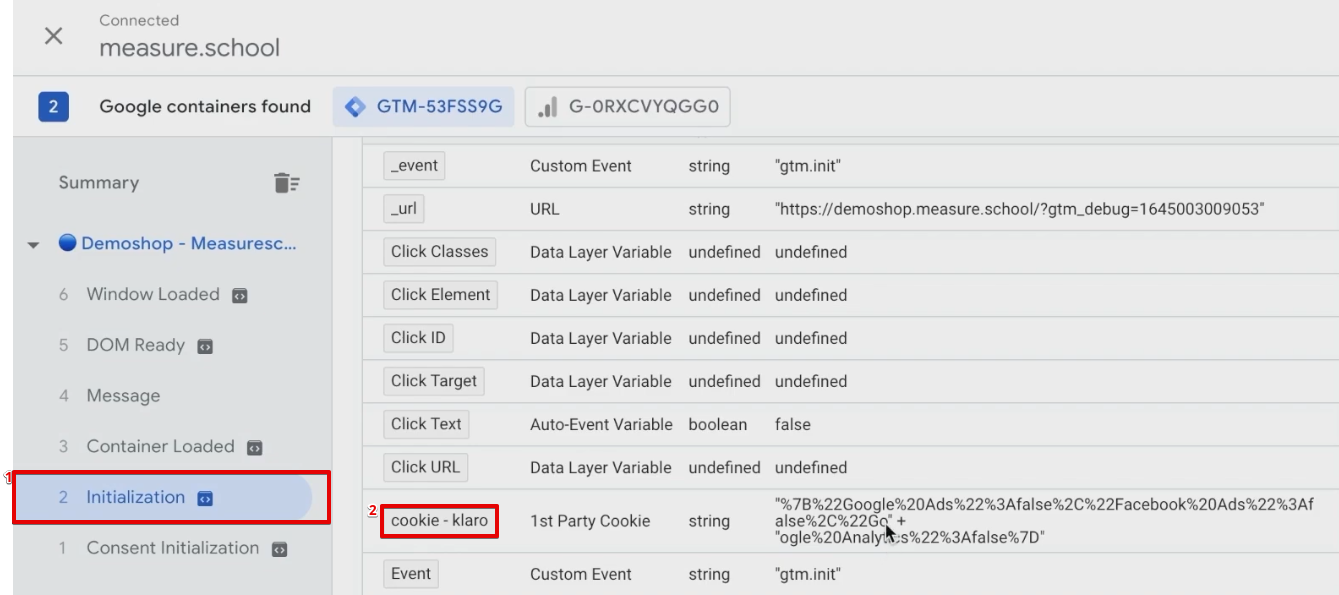
However, as this information is URL encoded, it might be difficult to read.
Under the created variable, choose the option for URL-decode cookie and click on Save.
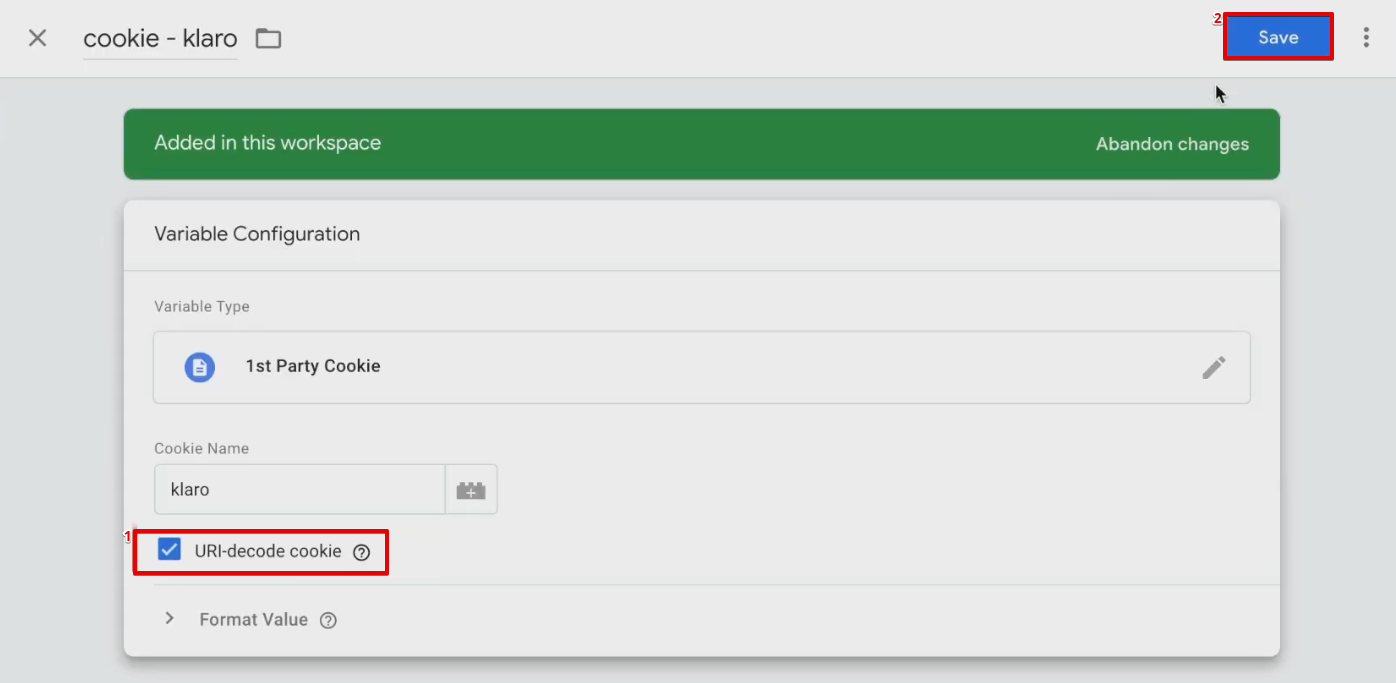
Again, open the preview version of the website. You’ll notice the information is readable this time.
This method is handy in pulling this information into creating triggers or even simply understanding the user consent priorities.
We can also use this process to build an implementation for our system.
Further on, we’ll also utilize the new feature known as Consent Overview mode for creating advanced-level triggers.
How to Configure the Cookie Consent Banner
With the consent overview, we don’t need to build any trigger mechanisms, groups, exceptions, or negative triggers.
Consent Overview Screen
First, we need to connect the consent panel which we installed with the Tags we want to fire, depending on whether the user has given consent or not.
The Consent Overview Screen will help us to keep this process as neat and clean as possible.
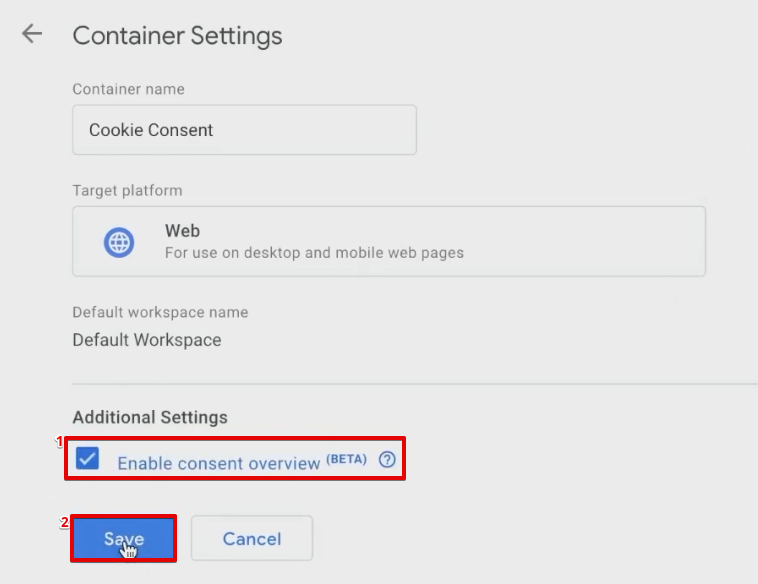
Navigate your consent overview screen from Admin → Container Settings.
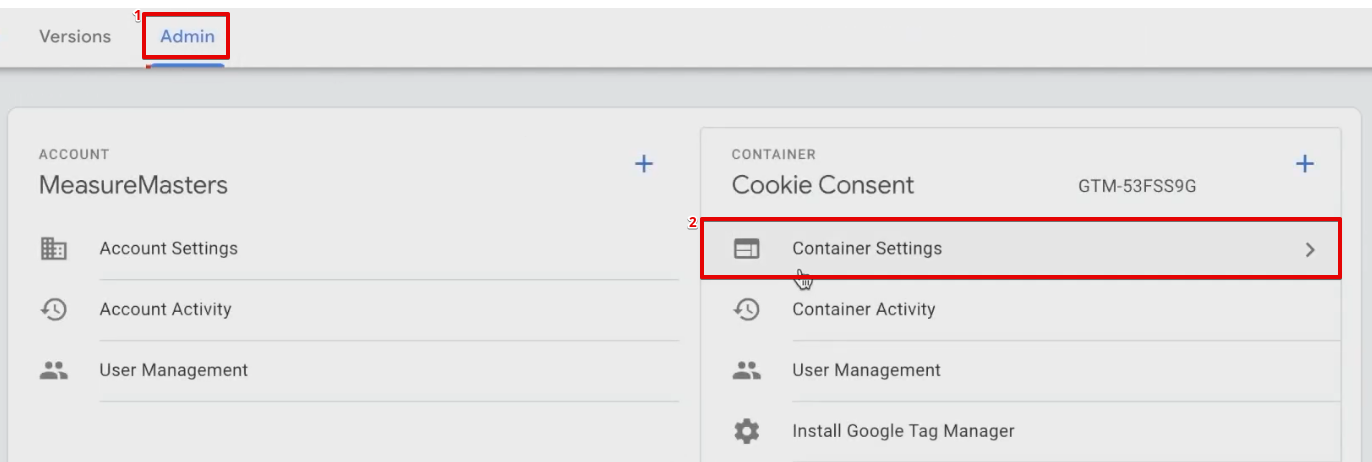
Click on Enable consent overview, and Save it once done.
Moreover, click on the shield icon from the Workspace to open the consent overview page.
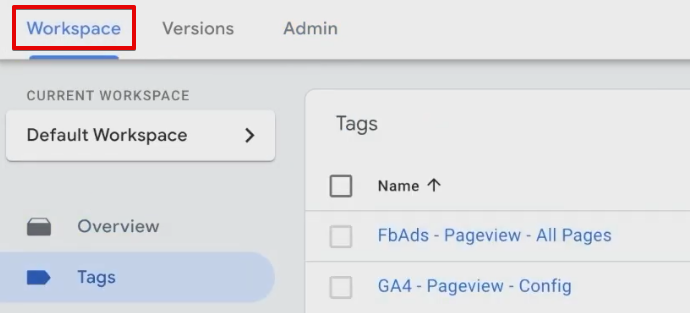
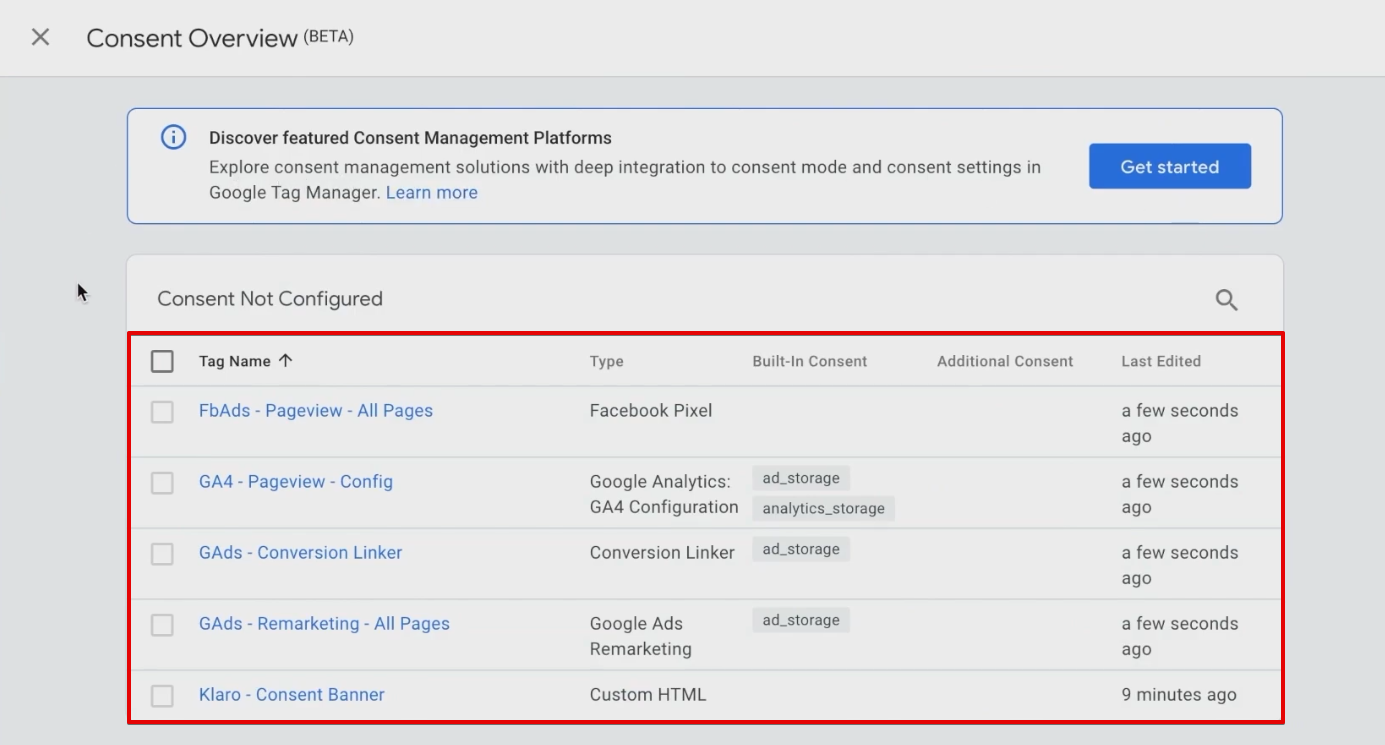
You’ll find all the Tags that are configured with the consent settings in GTM under the consent overview window.
GTM Consent State as a Variable
The functionality of the consent overview acts like a secondary trigger. This way, you don’t need to create any trigger groups or build them in one tag for verifying consent.
Consent overview ideally runs in parallel, so you can know precisely whether or not consent is given to fire a Tag.
As a next step, we’ll fill the information from the cookie into the consent overview screen by using the built-in functionalities of GTM.
Enable your preview mode to verify the current consent state. This can only be done by enabling Tags to fire in various situations.

Other than Tags, we currently can’t check the consent of a user.
Moreover, we also have a community-built variable that we can use for consent verification.
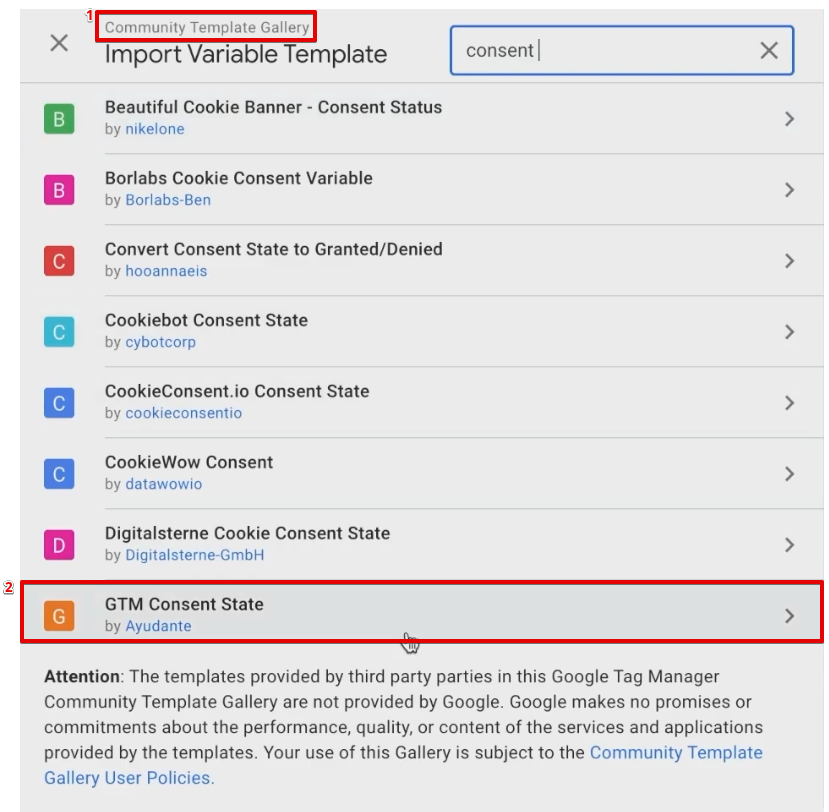
In a new variable, choose Community Template Gallery to open multiple variables.
Search for the GTM Consent State variable type.
Once you add the variable to your workspace, you can further use it from your variables menu.
Create a new variable of the GTM Consent State type. Add a name to the variable, and click on Save.

Enter the preview mode to verify the fired variables.
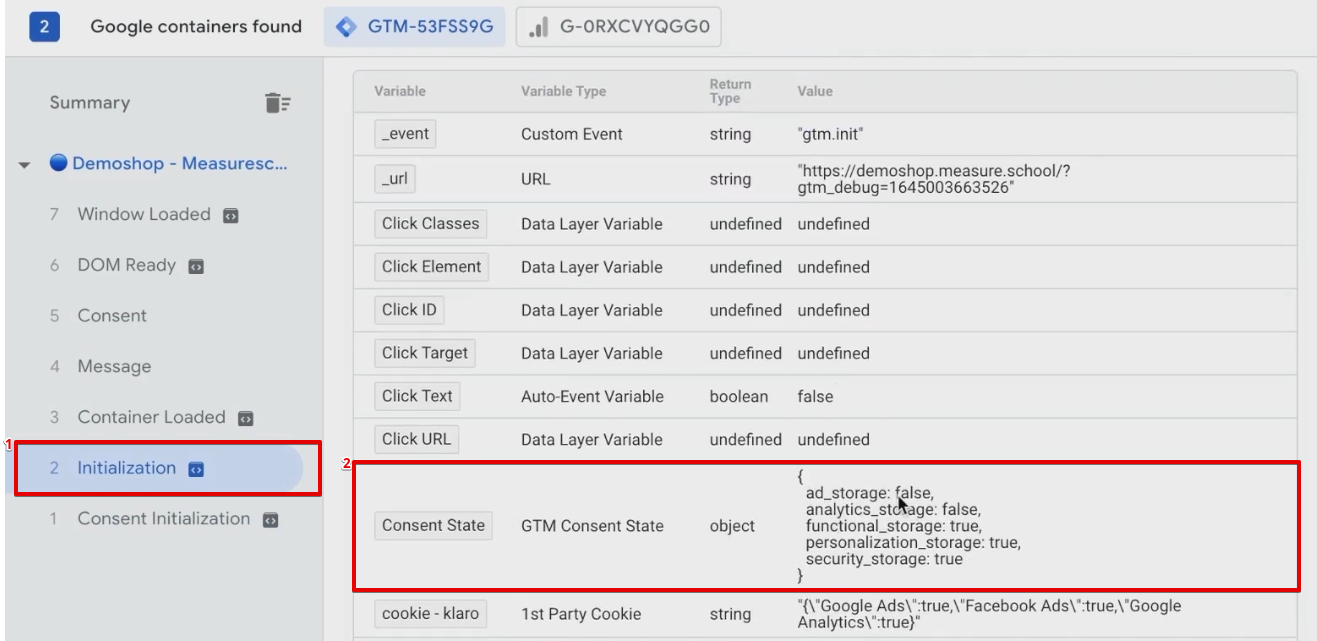
Navigate to Initialization → Variables to verify the variables.
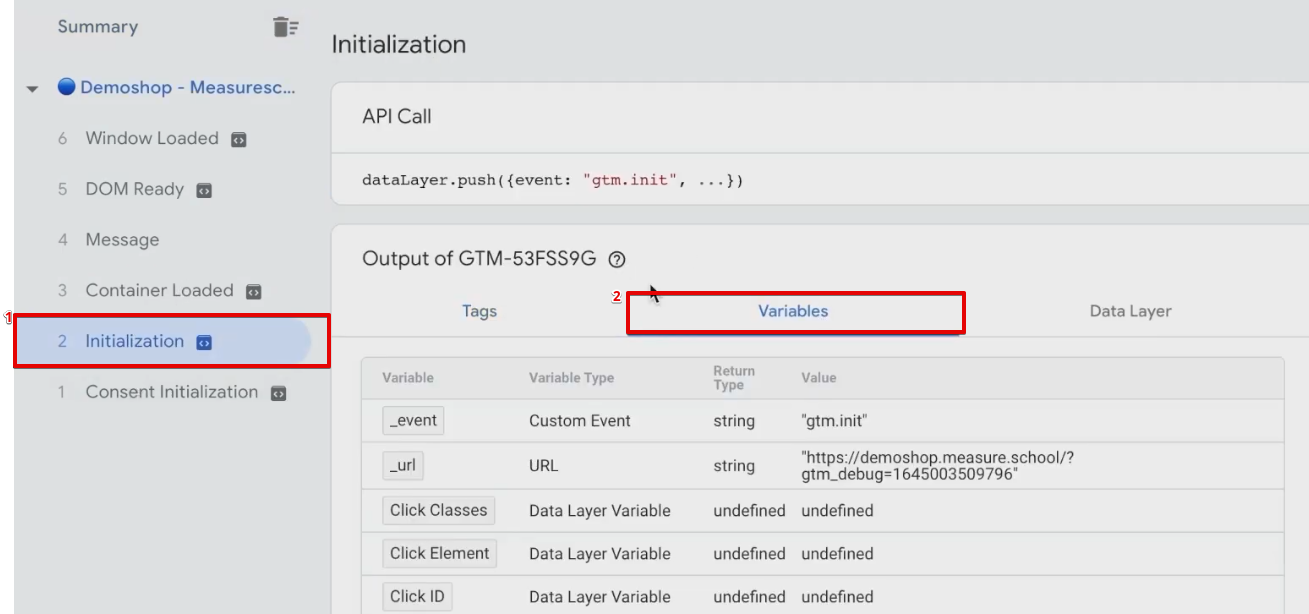
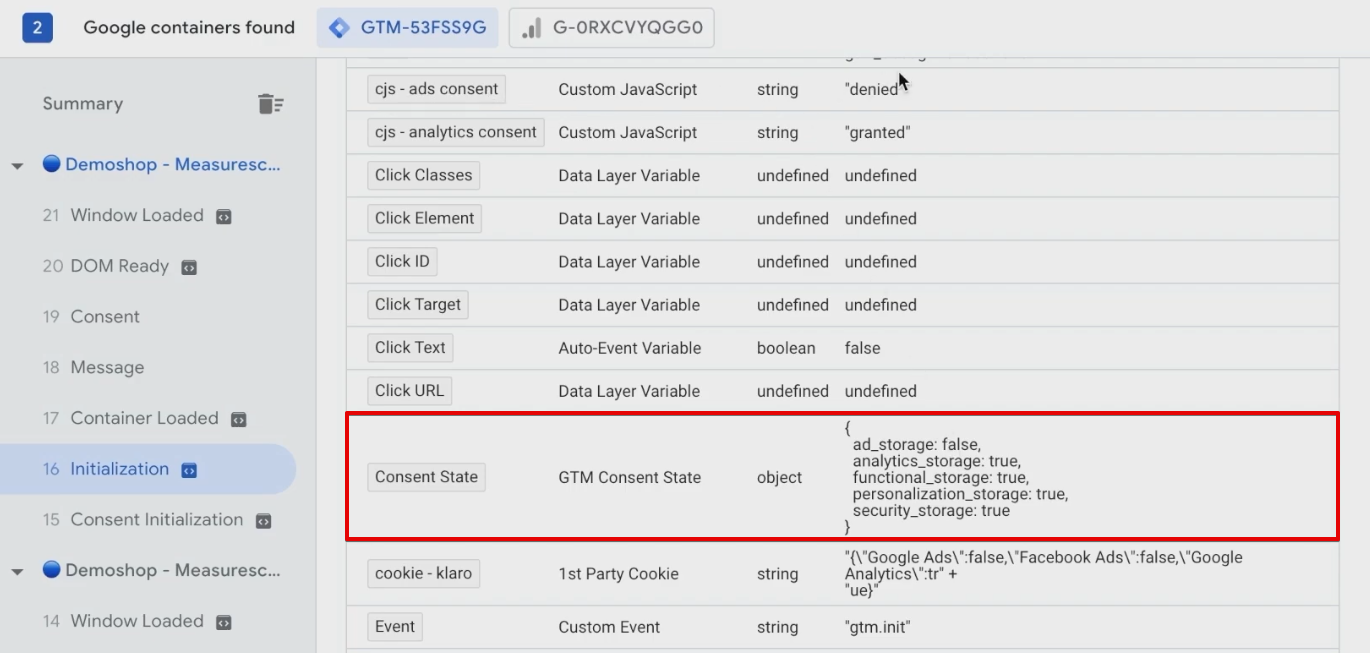
If the configuration is correct, you’ll find the Consent State variable details in the variables section.
The variable details will contain information about various consent provided by the user.

You can create multiple ways to classify your cookies.
In this case, we’ll use the Ad and Analytics storage to classify our cookies for the given guide.
You can create multiple other options, depending on your category system.
As a next step, we’ll extract the information from the variables.
Consent State Variables
Extracting information from the consent state variable is a multiple-step process.
Our first step will be to manipulate the consent state so we can extract the corresponding information.
We need to create a new Tag on GTM. Open the Community Template Gallery and search for Consent Mode (Google tags) as the Tag type.
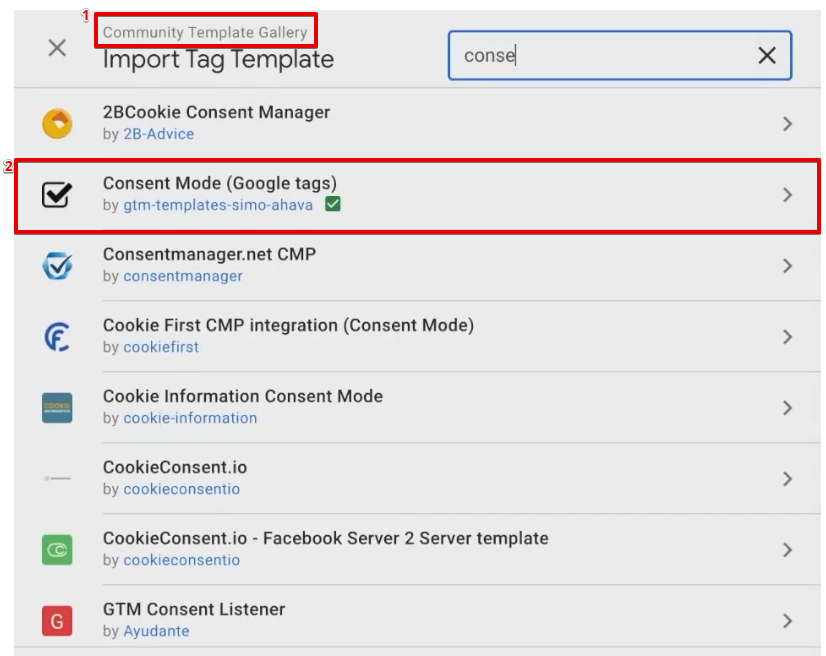
Again, add the Tag type to your workspace so you can use it for your new Tags.
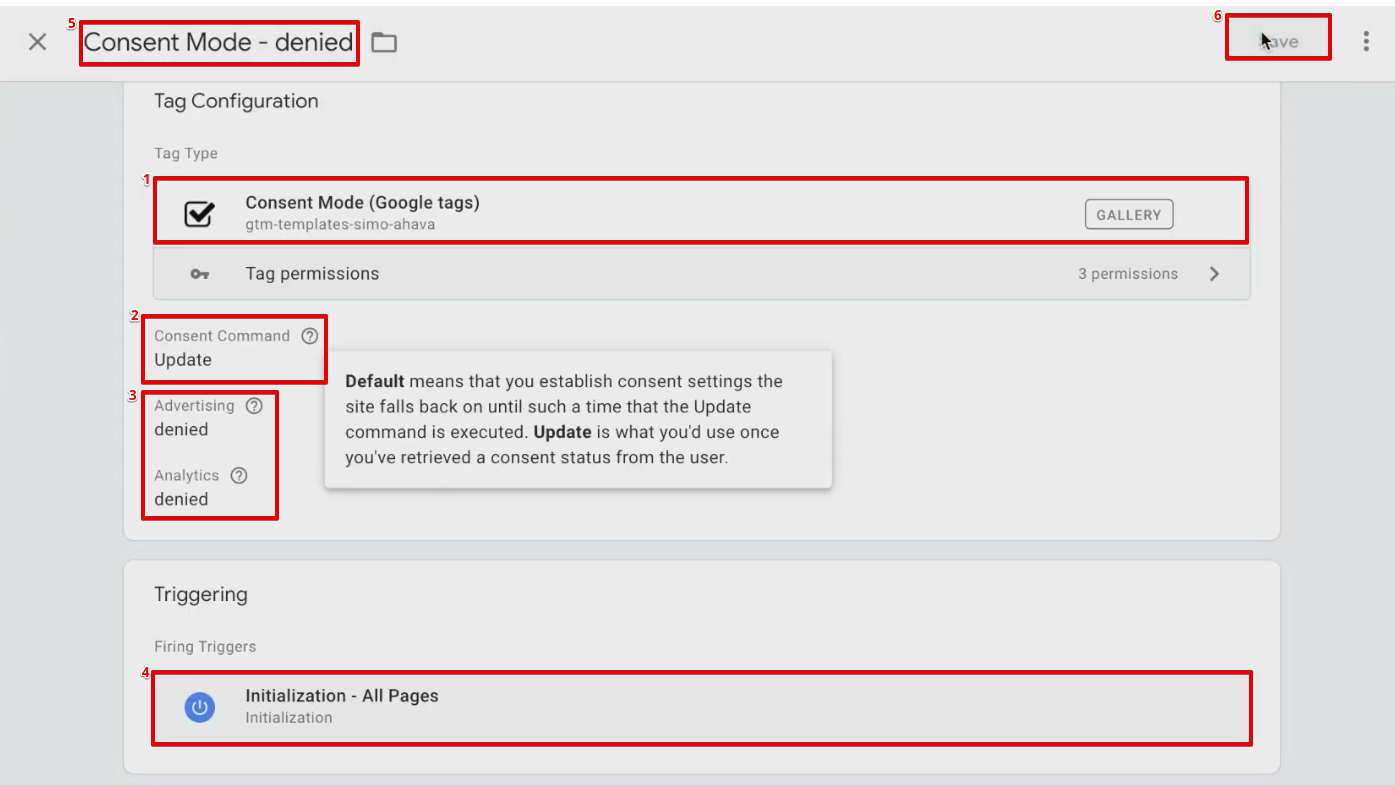
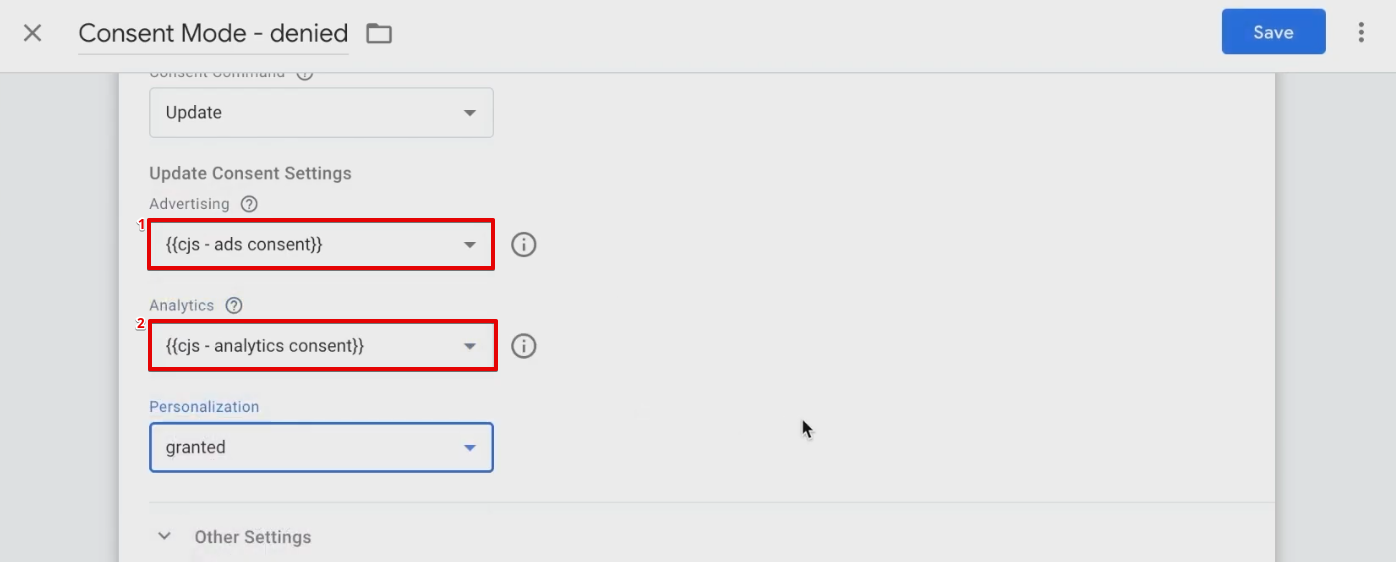
Use the Consent Mode (Google tags) as the Tag type for your new Tag. Set the Consent Command to Update.
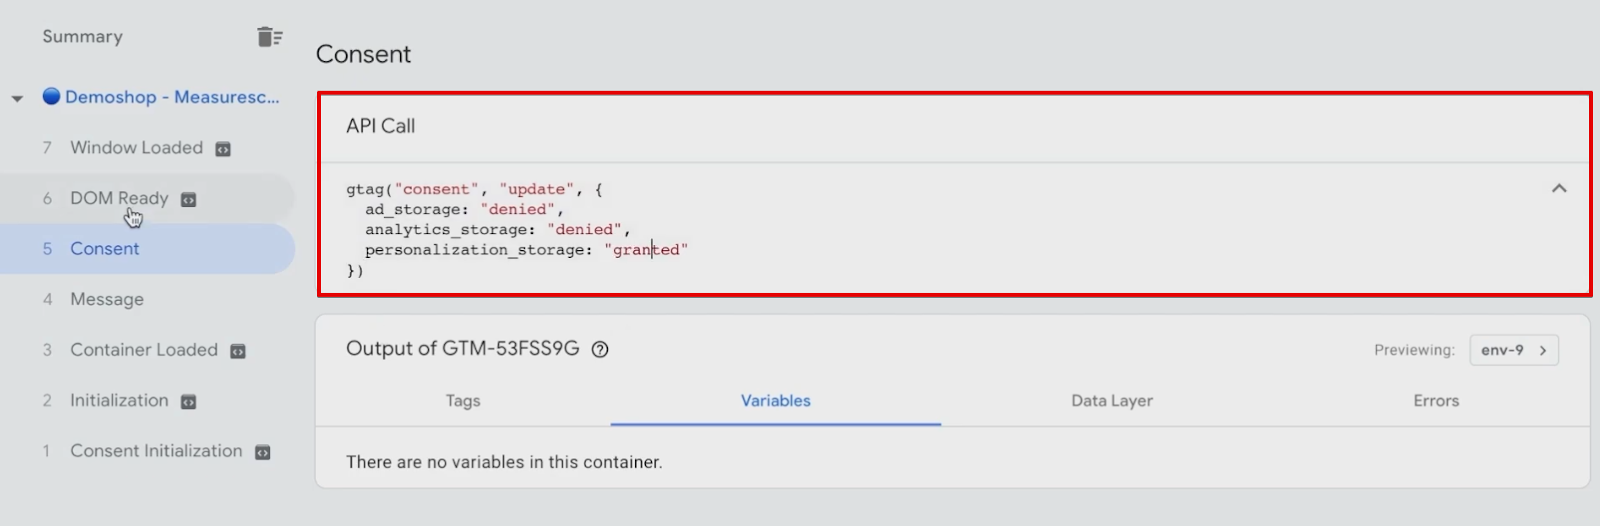
Let’s also Update Content Settings. You can choose granted, denied, or a particular variable for any of the settings parameters.
For experimentation purposes, let’s choose denied for Advertising and Analytics, and granted for personalization.
Add an Initialization – All Pages trigger to the Tag. Give a name and click on Save.
Again, let’s open our preview mode to verify the Tag.
If the configuration is correct, we’ll see under the Consent Initialization that the Consent State is true for all parameters.

However, under Initialization, we have created our Tag. As a result, the Consent State will be false for ad storage and analytics storage.
The consent is an API. The Tag enables us to update and manipulate this information by deploying the corresponding Tag.
Moreover, we also need to connect the Tag to our consent solution cookie. We’ll need to translate the cookie information into a readable script for our Tag.
The cookies follow a specific language that you need to utilize to set the translation dynamically based on the consent banner.
Our next step will be translating the cookie information into denied or granted.
There are other ways of performing this process. It can vary depending on your cookie type and its settings.
As we have JavaScript objects in our cookie already, we’ll be using a custom JavaScript variable.
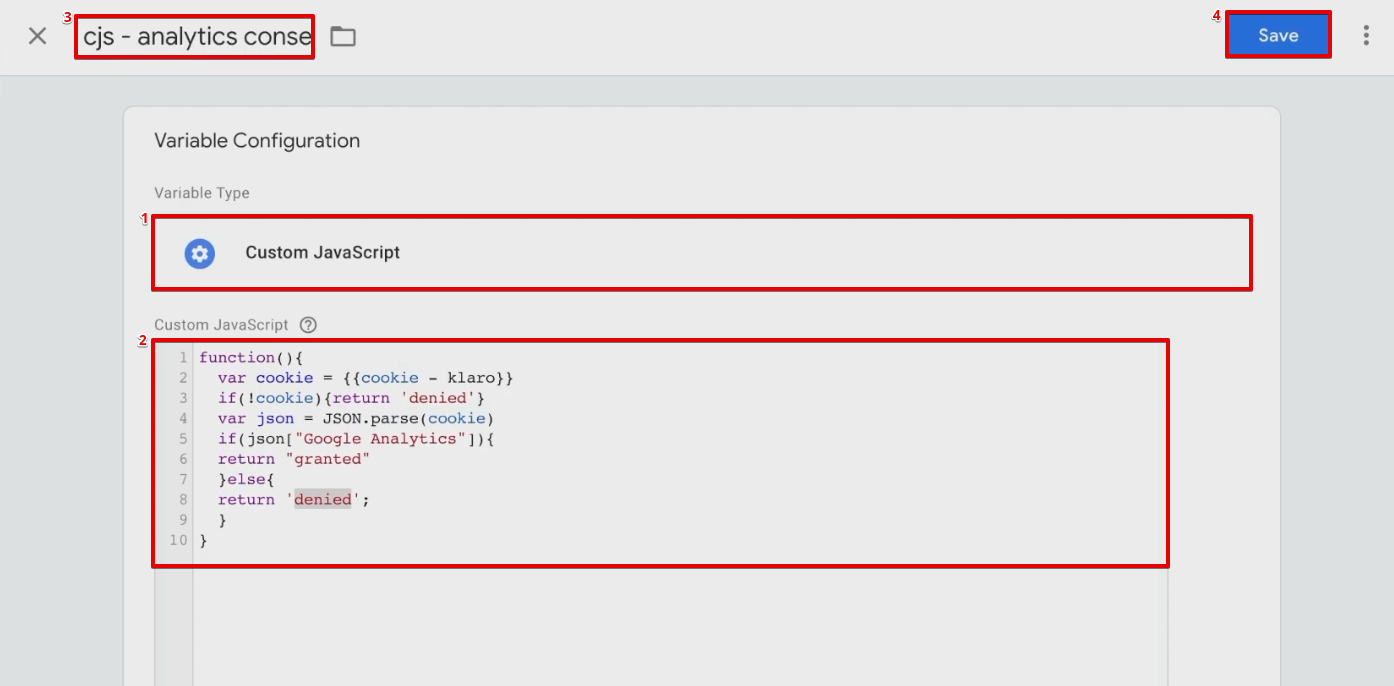
Create a new variable of Custom JavaScript type.
We have prepared a Google Analytics code that identifies whether a cookie is available, if not, it’s automatically denied. You can find this code in our GitHub repository.
If the cookie is available, it will pass the object inside the cookie and search for Google Analytics.
Moreover, if the values are set to true, our variable will be granted. Otherwise, it will be denied.
Add a name to the variable, and click on Save.
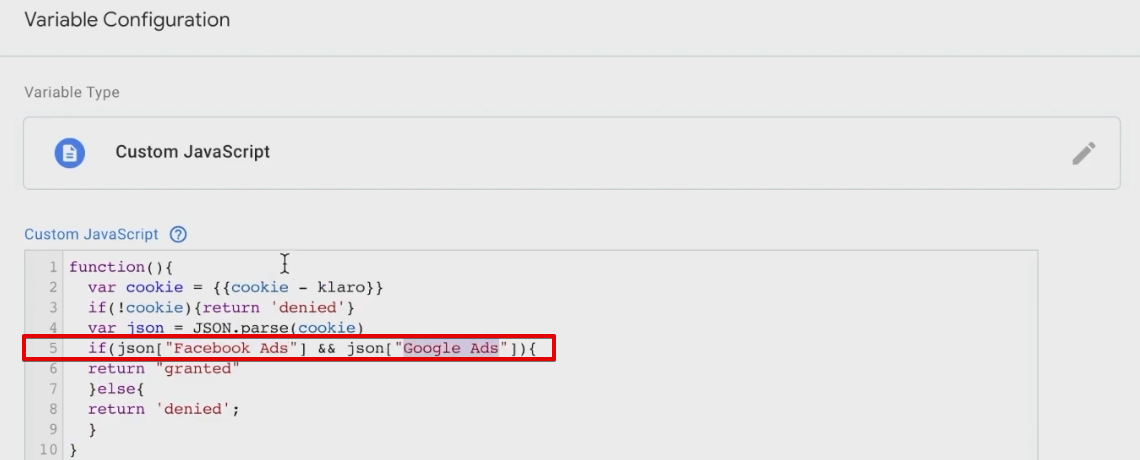
You can also add Facebook Ads, along with Google Ads, in your code to increase your chances for cookie grants.
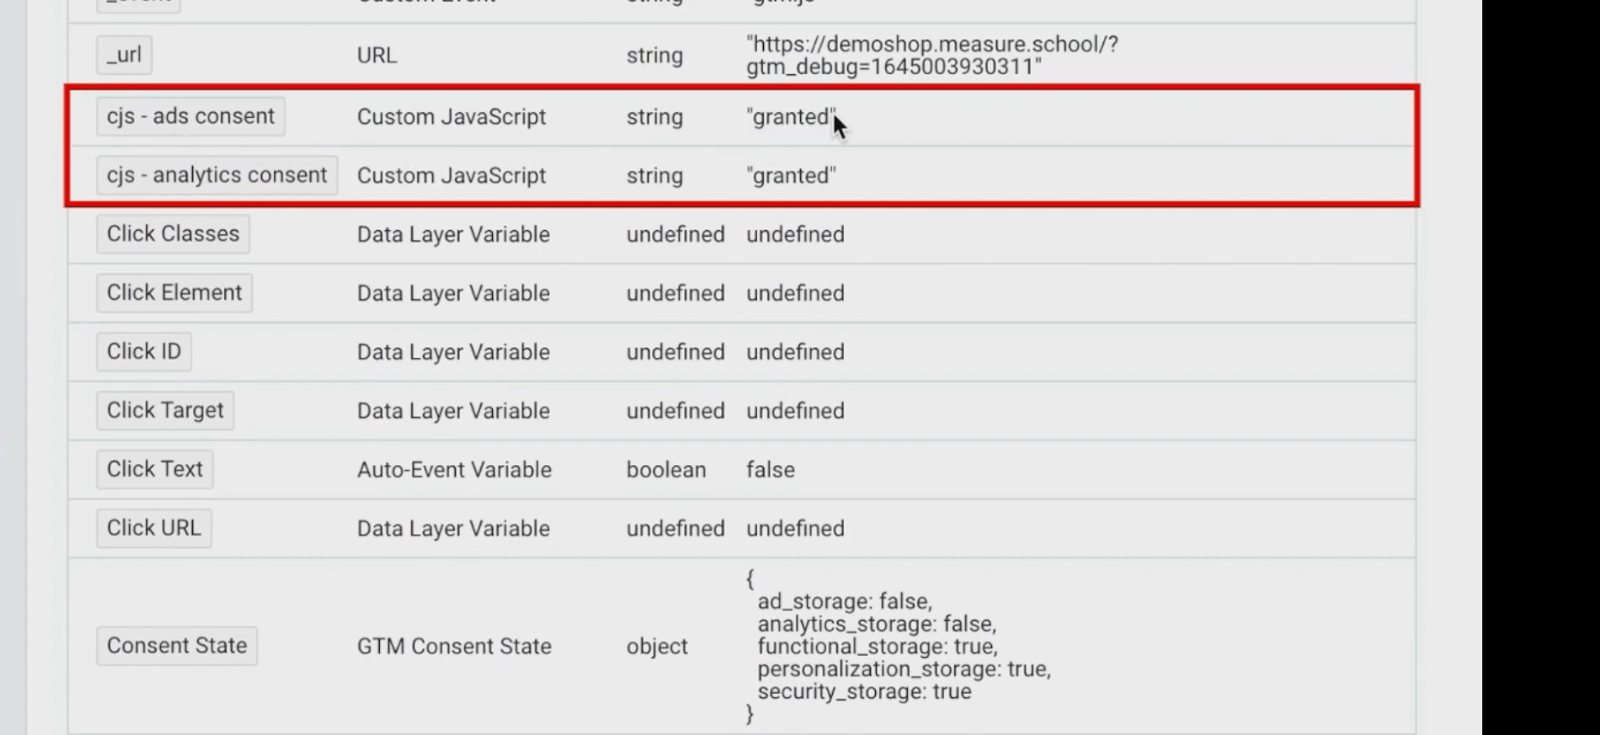
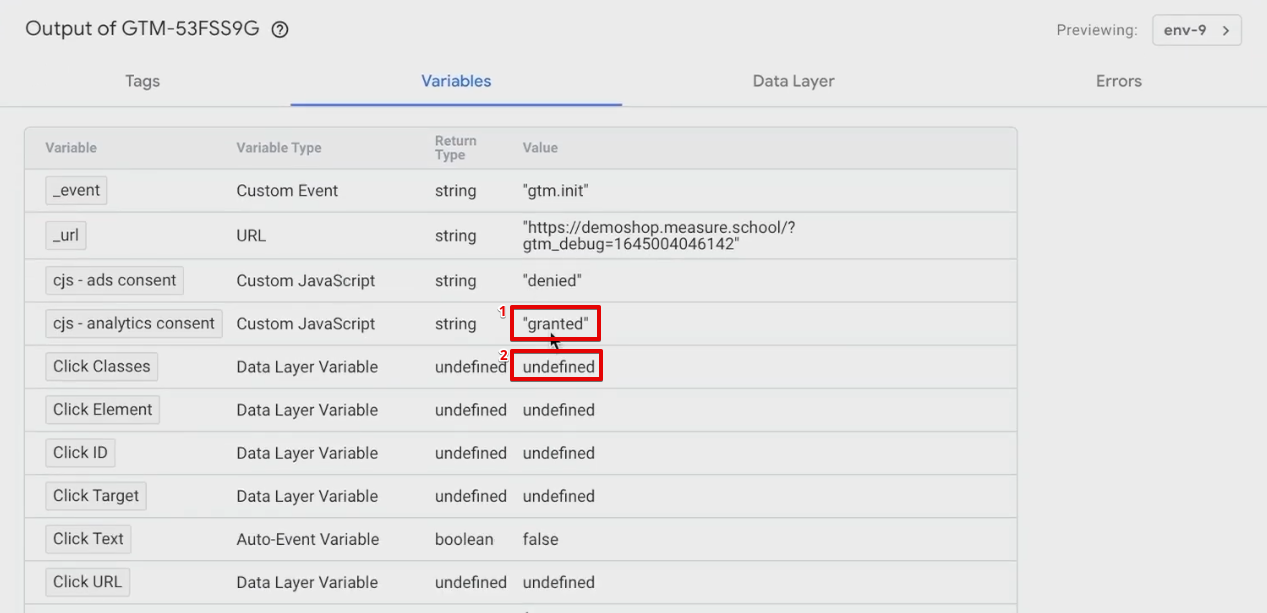
If you preview your website, you’ll be able to see two new variables that show ads consent, as well as analytics consent, is granted.
But what if we deny Google Ads or Facebook Ads? Let’s see how the cookies work!
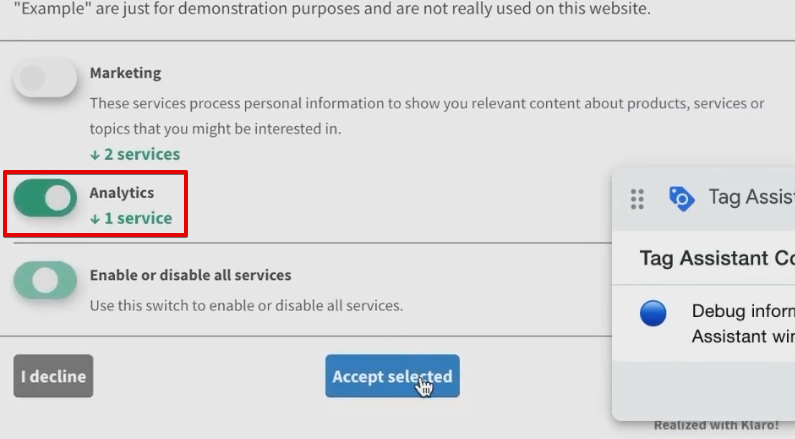
We’ll first delete the klaro cookie from our browser.

Next, we’ll manually choose only the Marketing consent settings to be true. Click on Accept selected.
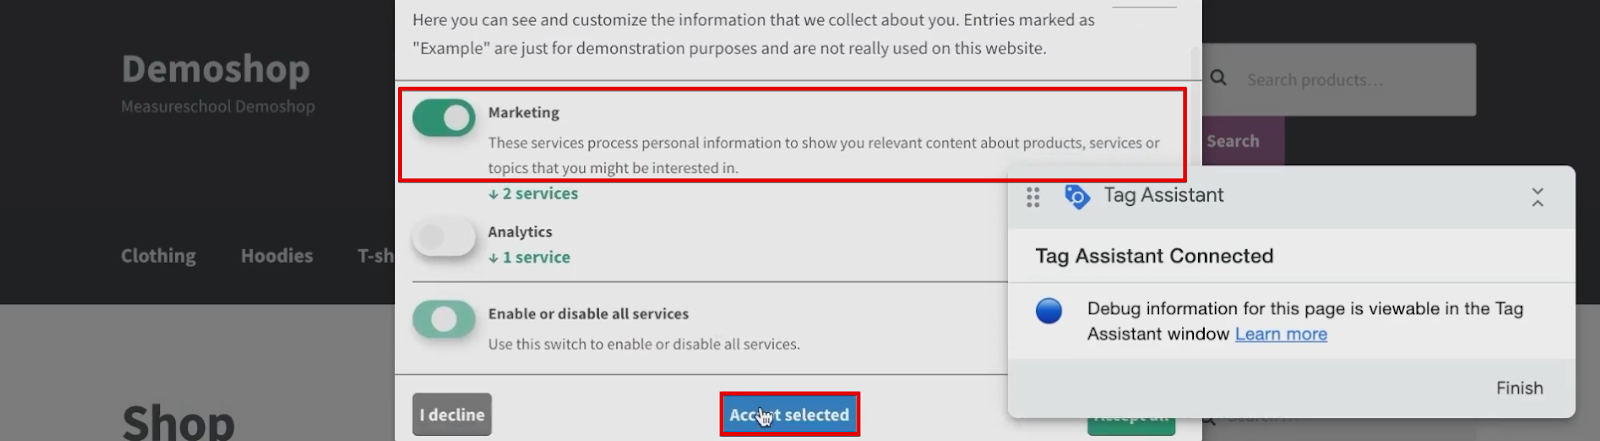
Reload the website preview page.
If the permissions were correctly granted, we’ll see that our ads consent is granted, while our analytics consent is denied.

Moreover, we can now successfully utilize these variables to input into the consent states.
Adding Variables to the Consent State
Open our consent mode Tag. we’ll set the parameters according to the variables this time.
Add the ad consent variable to Advertising and the analytics consent variable to Analytics. Save the changes once done.
This time, we’ll only grant the analytics permissions.
You’ll now see that the ads consent is denied, while the analytics consent is granted.
Moreover, it will also be reflected in the Consent State.
That’s how we connected our cookie consent banner with the consent states of Google Tag Manager.
This will help us to utilize the consent state overview.
Our next step will be to trigger our Tags based on the user’s consent. It will help you to identify which Tags fire and which don’t fire.
Firing GTM Tags Based on Consent
Our first step is to set up triggers for the Tags based on the consent given to the banner.
We’ve created the consent banner and connected it to the consent mode on Google Tag Manager.

Hence, we will know whether the ad storage or analytic storage has been granted in the consent.
Our next step will be to connect appropriate triggers to the corresponding Tags to facilitate correct firing.
We’ll use Google Tag Manager to perform this action.
Consent Settings Facebook Example
Suppose we have a Facebook Tag that we want to fire only if the ads storage permission is granted.
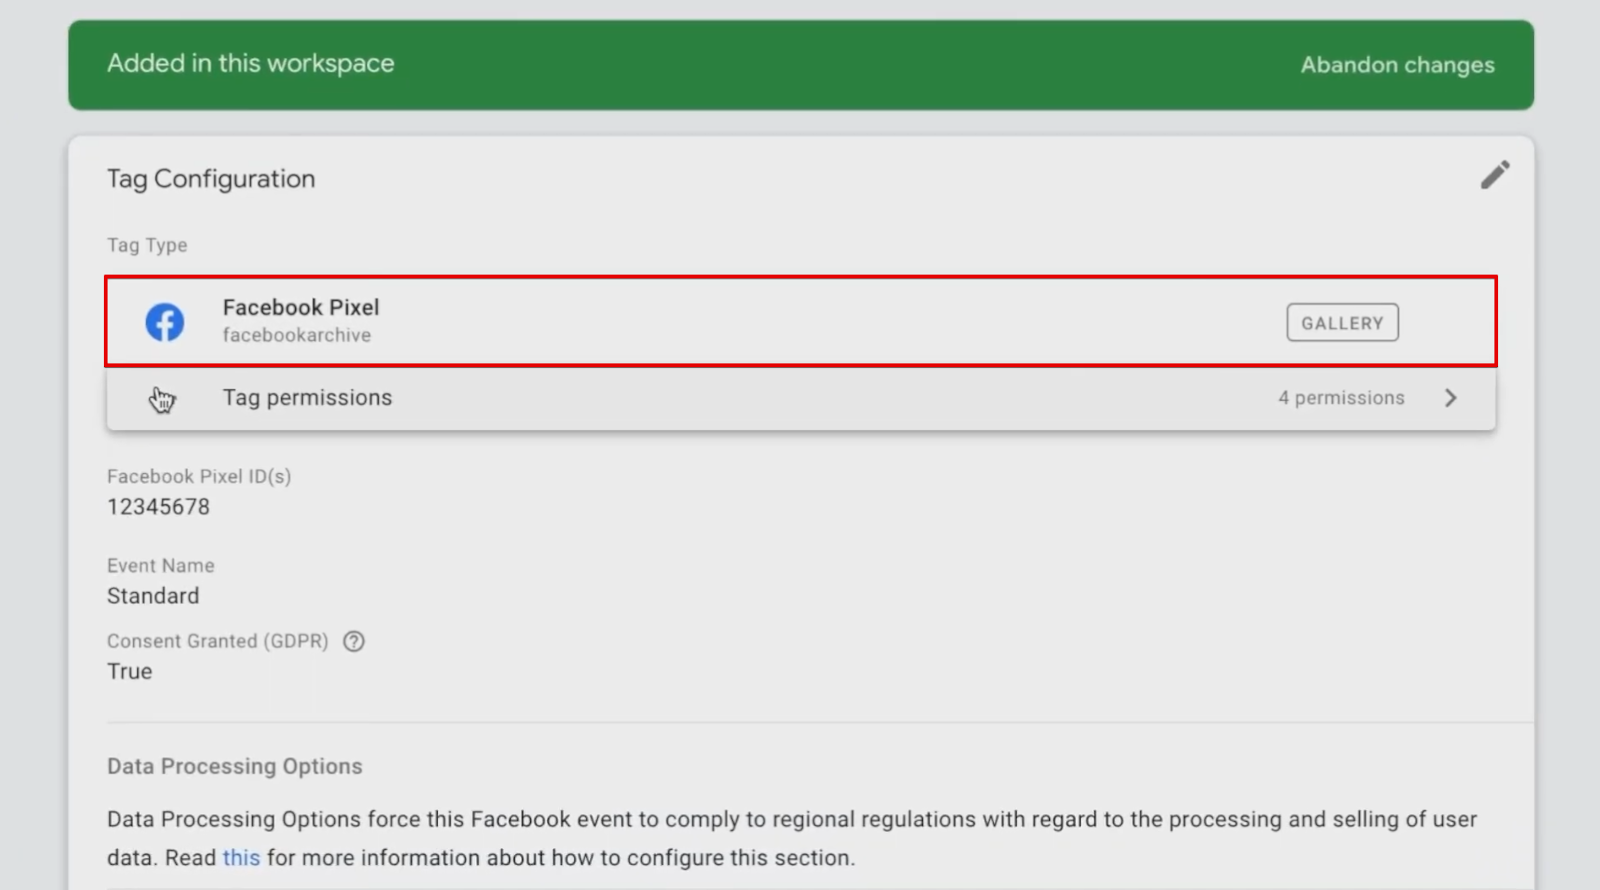
Therefore, we won’t change the trigger in this case. We’ll modify the consent state of the Tag.
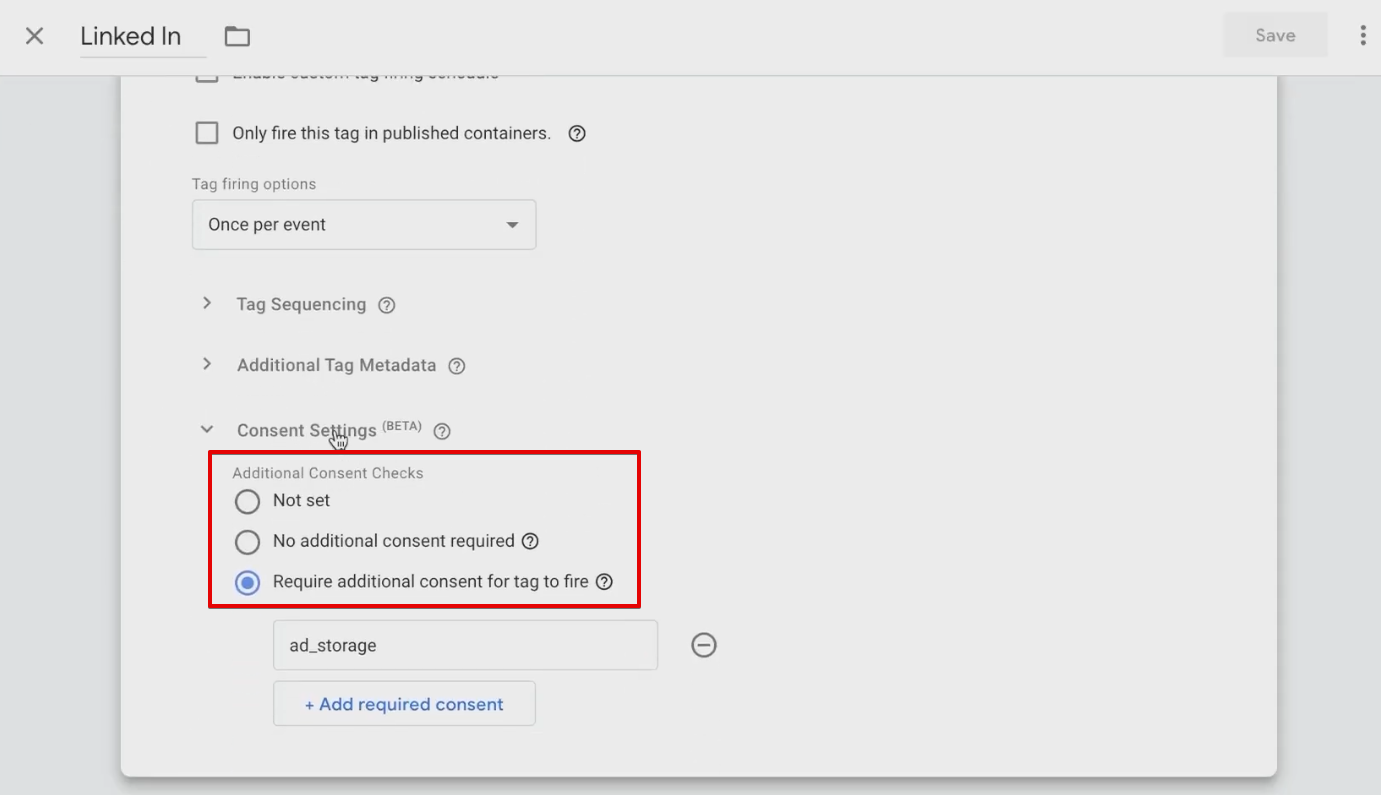
Navigate to Advanced Settings → Consent Settings.
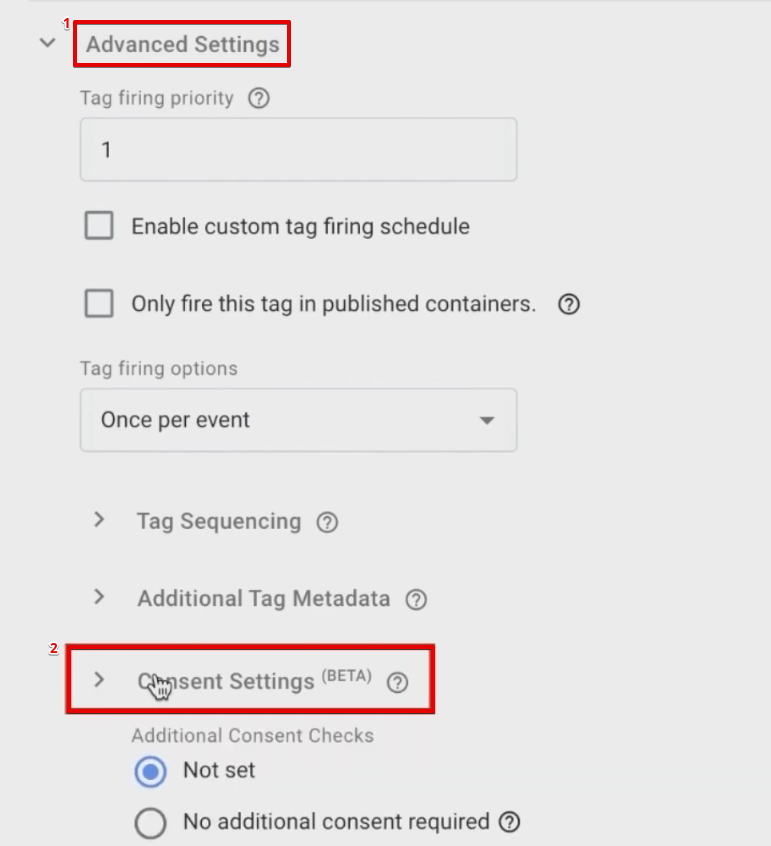
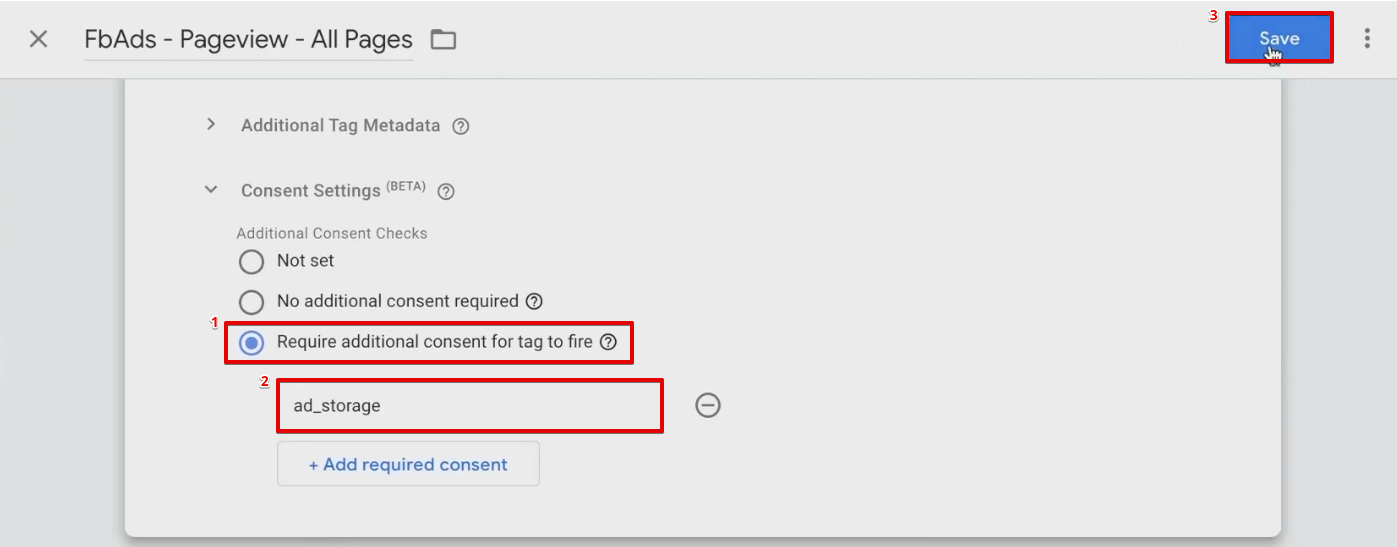
Click on Require additional consent for tag to fire. Mention ad_storage as the parameter for additional consent.
Save your Tag settings after modifying them.
This acts like an additional trigger that looks for ad storage and also fires on all pages.
Let’s also try out our Tag by entering the preview mode.
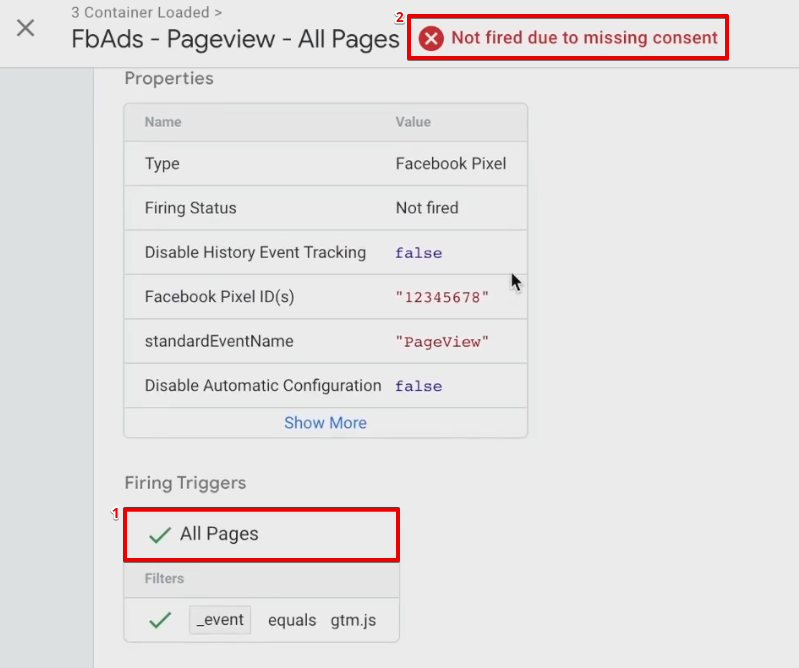
Currently, there is no cookie. So, we also don’t have any consent permissions granted or denied.
We can see under Initialization that our ad’s consent value is denied.
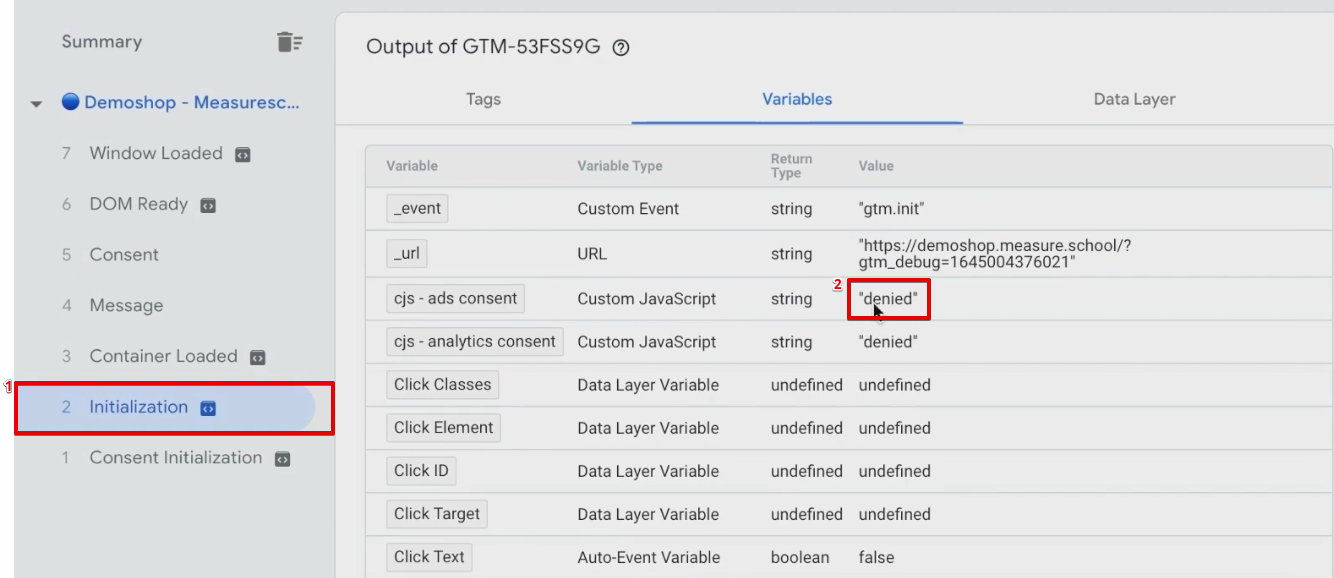
Moreover, our Facebook Ads Tag hasn’t been fired yet.
This is because we don’t have any consent provided for the browser. The All Pages trigger is fired, but we still need to provide consent to fire out the Tag.
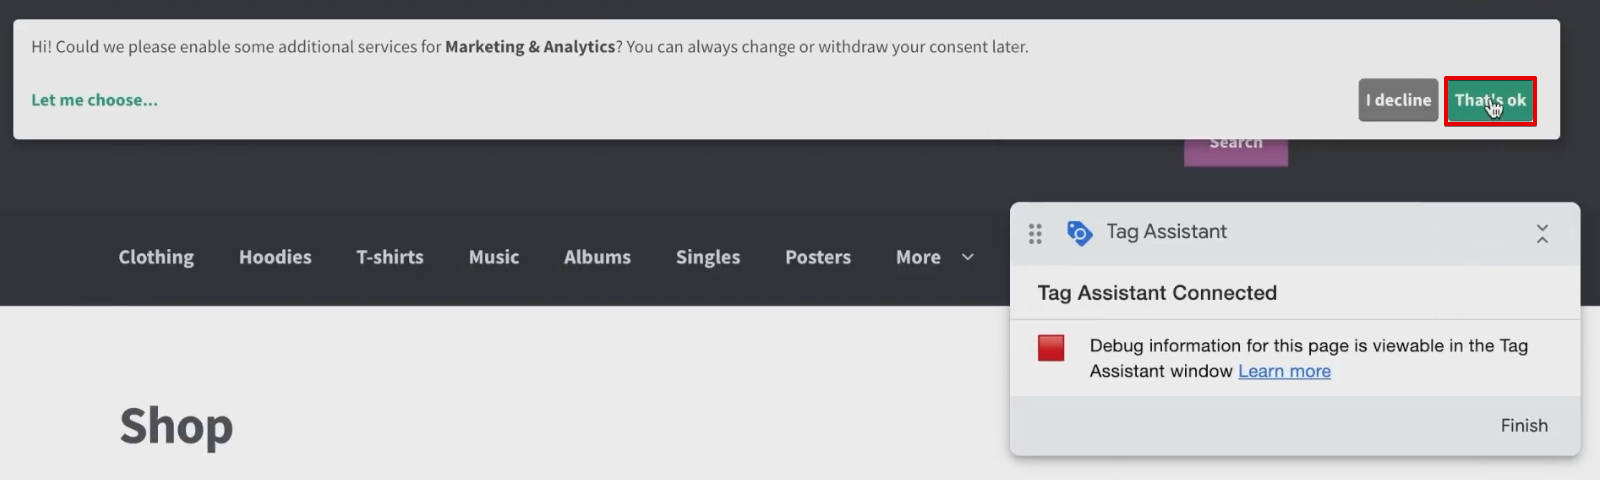
Let’s click on That’s ok to allow the consent.

Reload the page. If the configuration is correct, we’ll see that our Tag fired normally.
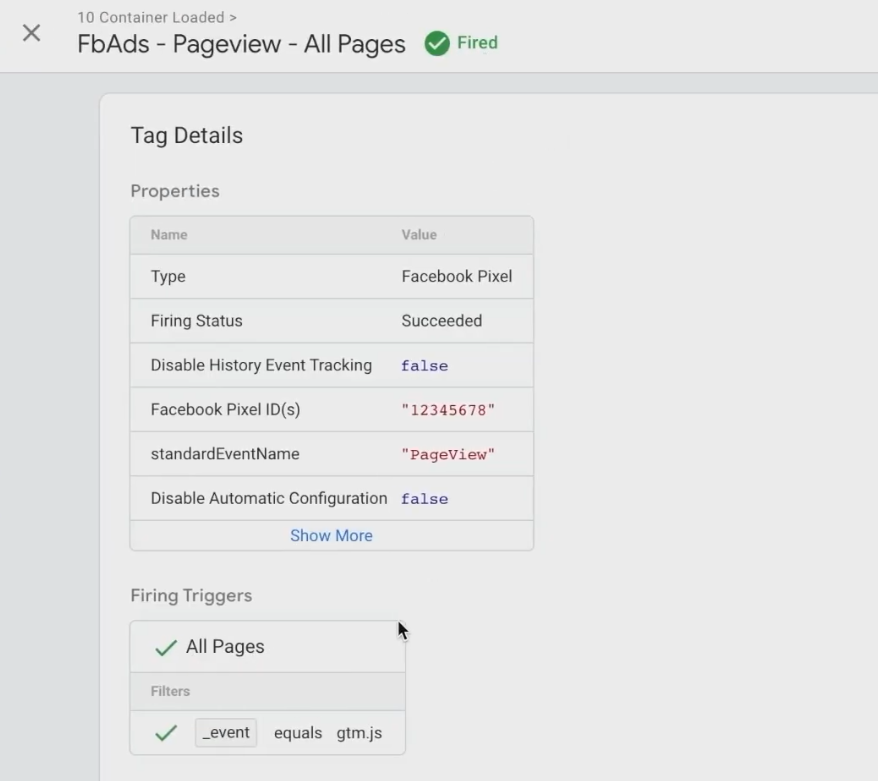
This is because we have our consent for ad storage under the Container Loaded section.

Hence, it acts like another set of triggers that you can attach to a Tag.
Using the Consent Overview Screen
For other Tags, you can manually modify the advanced settings to provide consent and fire them according to your needs.
However, you can do it more easily by using the Consent Overview Screen.
This screen shows all the Tags like Facebook ads according to their consent, configured or not configured.
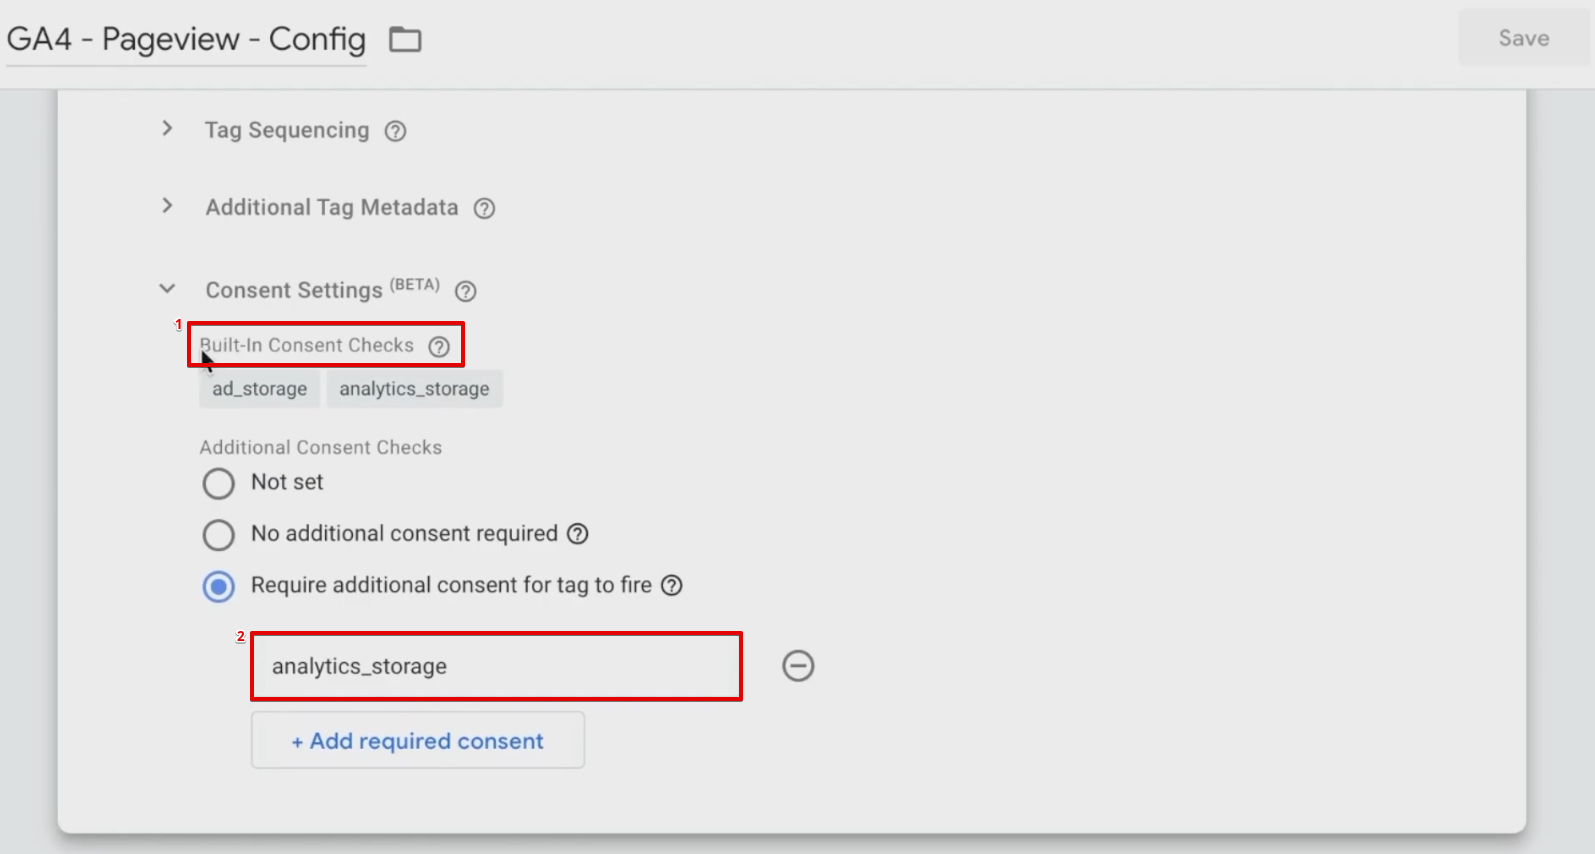
Let’s try to add consent for other Tags like the Google Analytics PageView Tag. Click on the consent icon.
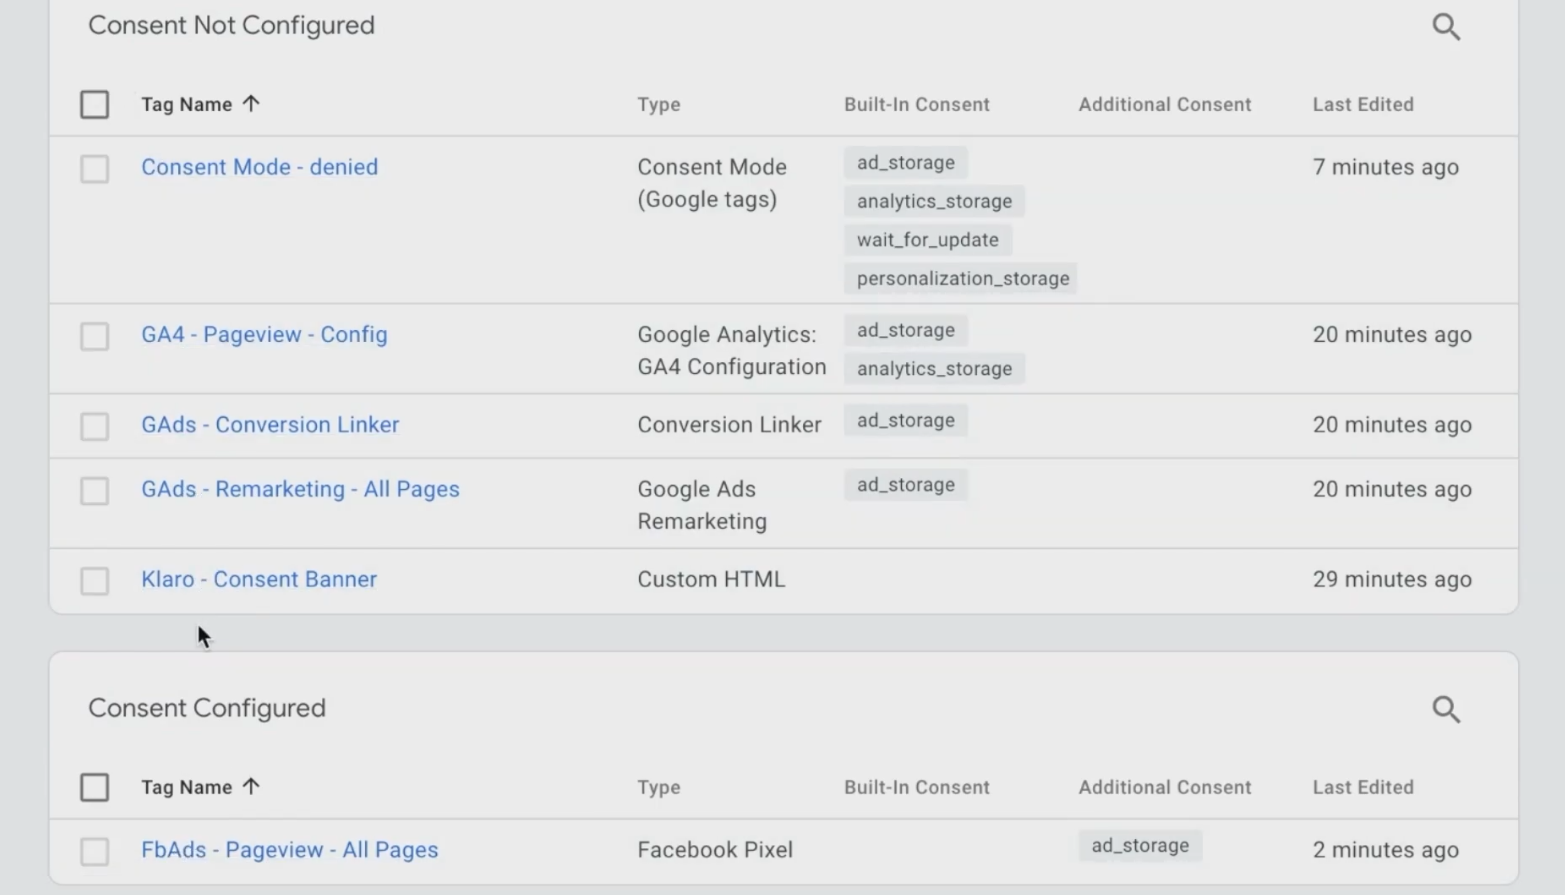
Click on Require additional consent for tag to fire. Mention analytics_storage as the parameter for additional consent.
Save your Tag settings after modifying them.

Similarly, you can add ad storage for the Google Ads conversion linker and remarketing Tag.
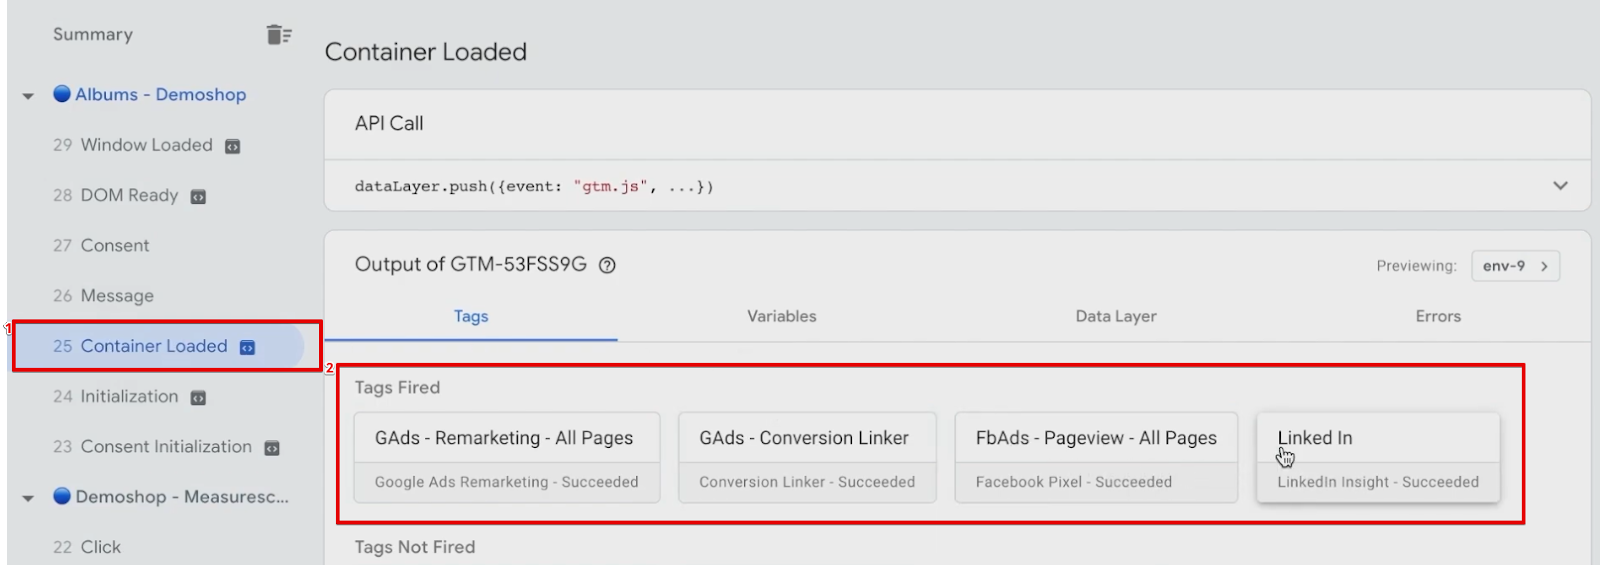
Open the preview mode once you have modified all Tag settings.
If your configuration is correct, you’ll see that all the Tags are fired because we have appropriate consent provided.

Let’s proceed and delete any previous cookies from the browser if there are any.
On your consent window, grant access only to the Marketing cookies. Click on Accept Selected.

On our Container Loaded, we can see that Google Ads and Facebook Ads Tags have fired, but the Google Analytics Tag hasn’t fired.
This is because we only granted limited consent this time.

Again, let’s modify the consent. But this time, let’s grant access only to the Analytics consent.

If your configuration is correct, you’ll see that only the GA4 Pageview Tag fired.

Hence, our Tags are now firing based on the consent we have given to the cookie banner.
What happens when there is no consent given for a browser, but the user still clicks on the permission granted for cookies?
Events Prior to Consent
If consent isn’t provided for the browser, we’ll see that none of our Tags will fire.

Hence, we’ll need to wait for the user to click on a second page on our website for the Tags to load successfully.

So, we need a mechanism that allows the Tags to fire when the user gives access to consent instead of when they click on a second page on our website.
We can use various tools that push the data into the data layer when a user clicks on any consent priorities.
However, it’s better to use button click tracking in GTM to determine whether or not the user made his choice for consent.
Whenever a user clicks on I decline, That’s ok, or Let me choose.., we’ll track their choice by GTM.

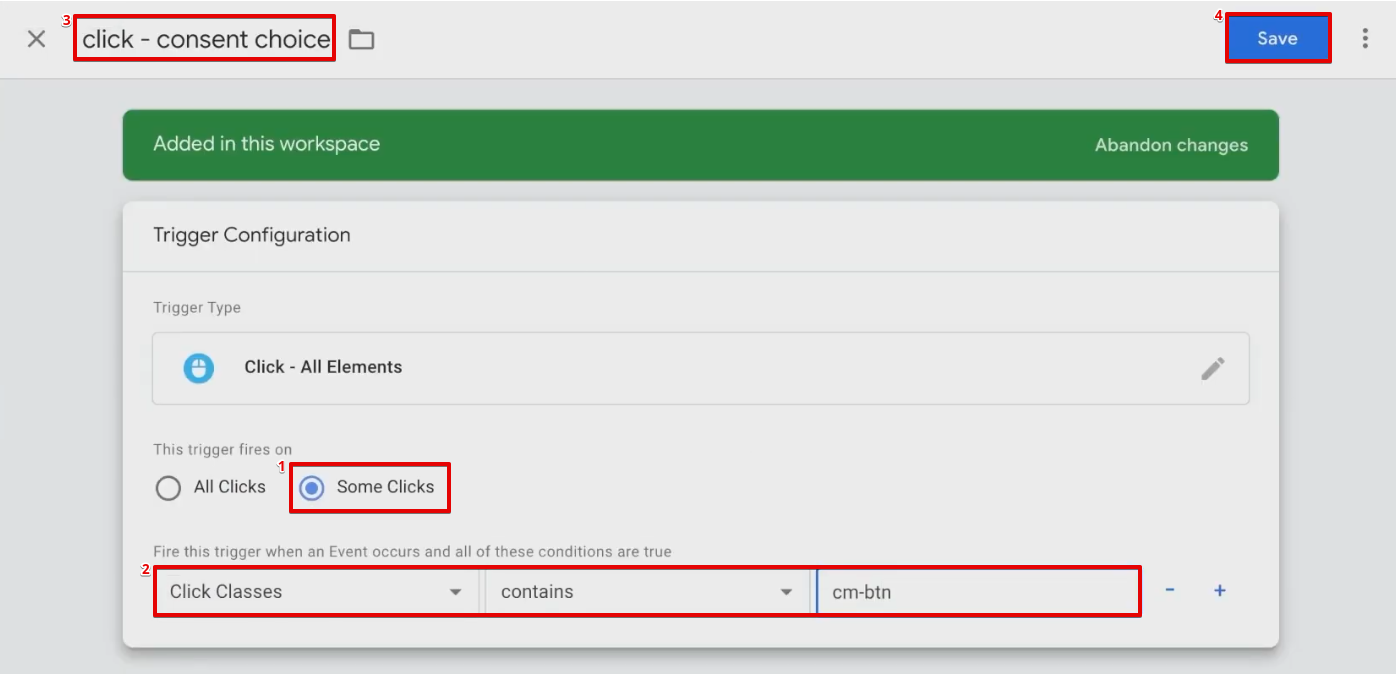
Create a new Click – All Elements trigger. Add a name, and click on Save.

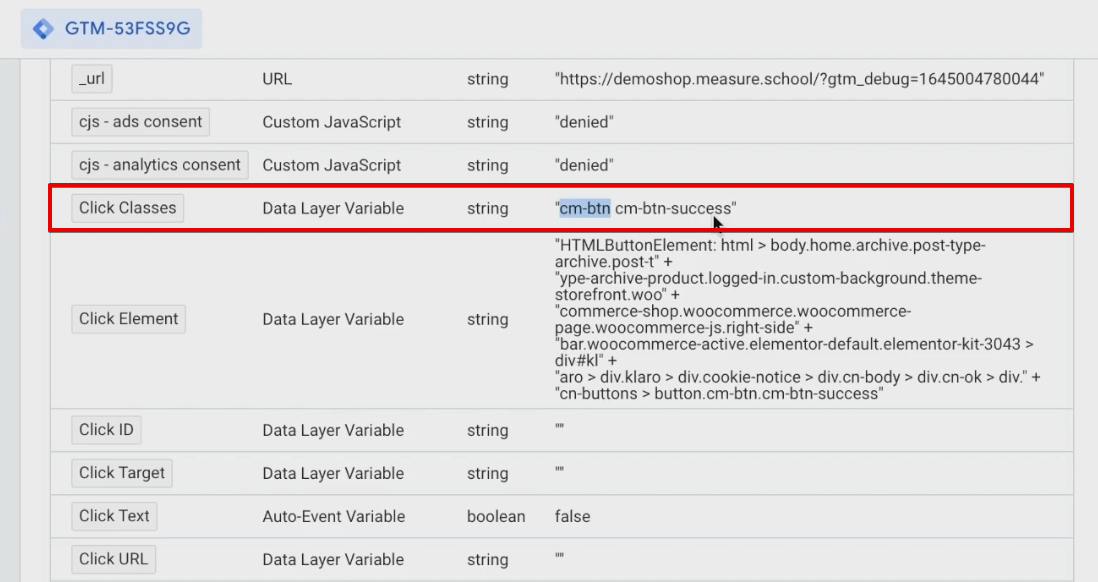
On your preview screen, you’ll notice various click elements like Click Classes, Click ID, Click Element, etc. under the Click section.

However, there is no useful information under any of the mentioned click parameters.
For our case, we’ll choose Click Elements and Click Classes.
Under Click Classes, we’ll use cm-btn.
Modify the click trigger accordingly. Set the trigger to fire on Some Clicks.
Choose firing parameters as Click Classes contains cm-btn. Modify the name and click on Save.
In the next step, you can choose to update the Consent mode Tag based on what the user has chosen.
This is ideally the correct action, but we need to consider the rise conditions.
It occurs when you click on a Tag and expect the consent to be updated.
This occurs because, although we choose to accept consent, the Tag won’t be updated. It will only be updated after the cookie is updated.
Hence, we need to provide sufficient time between when a user clicks and when the data is updated.
We can create a Tag that waits a few milliseconds and then updates the data layer.
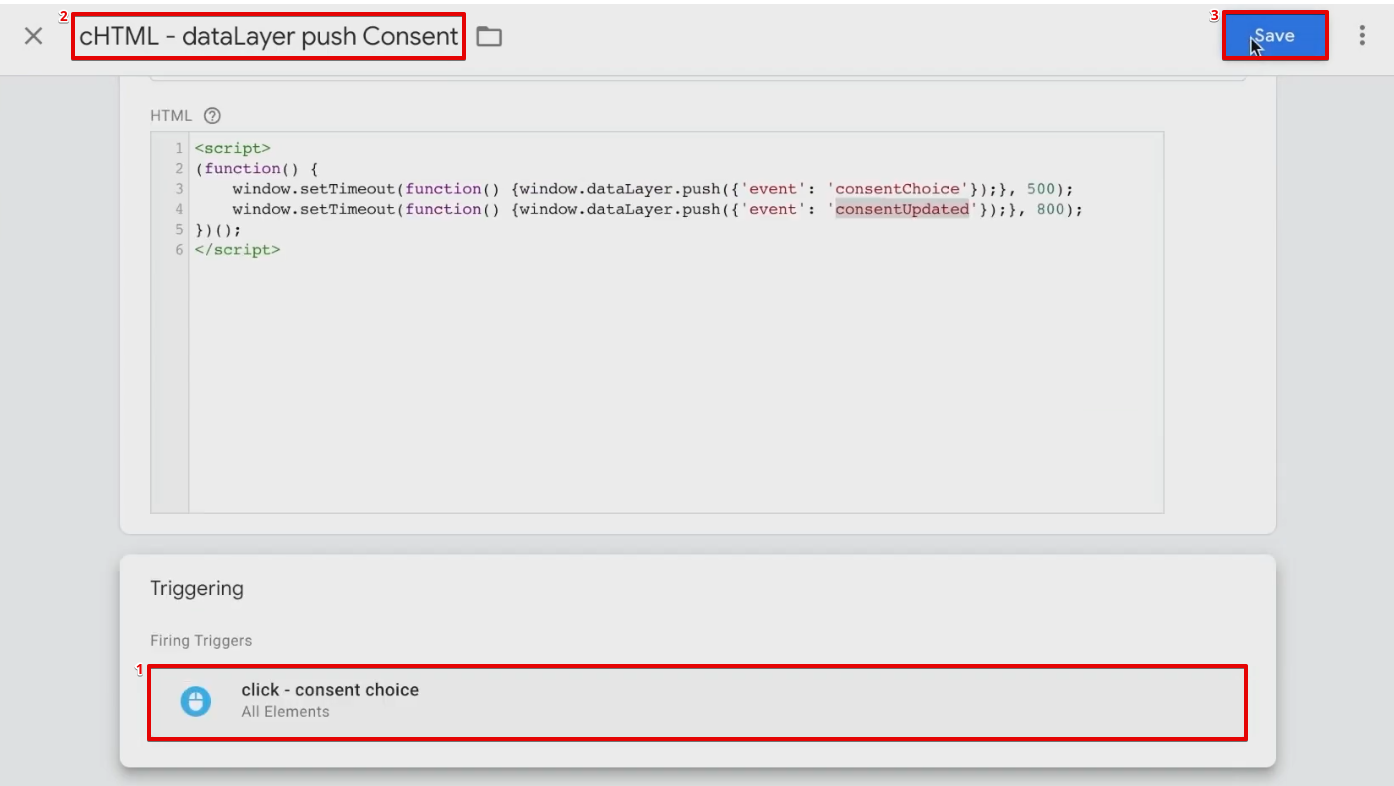
Create a new Custom HTML Tag. Add the code from the repository that pushes the consent choice into the data layer.
The code will enable GTM to wait a few milliseconds before the user choice is updated.
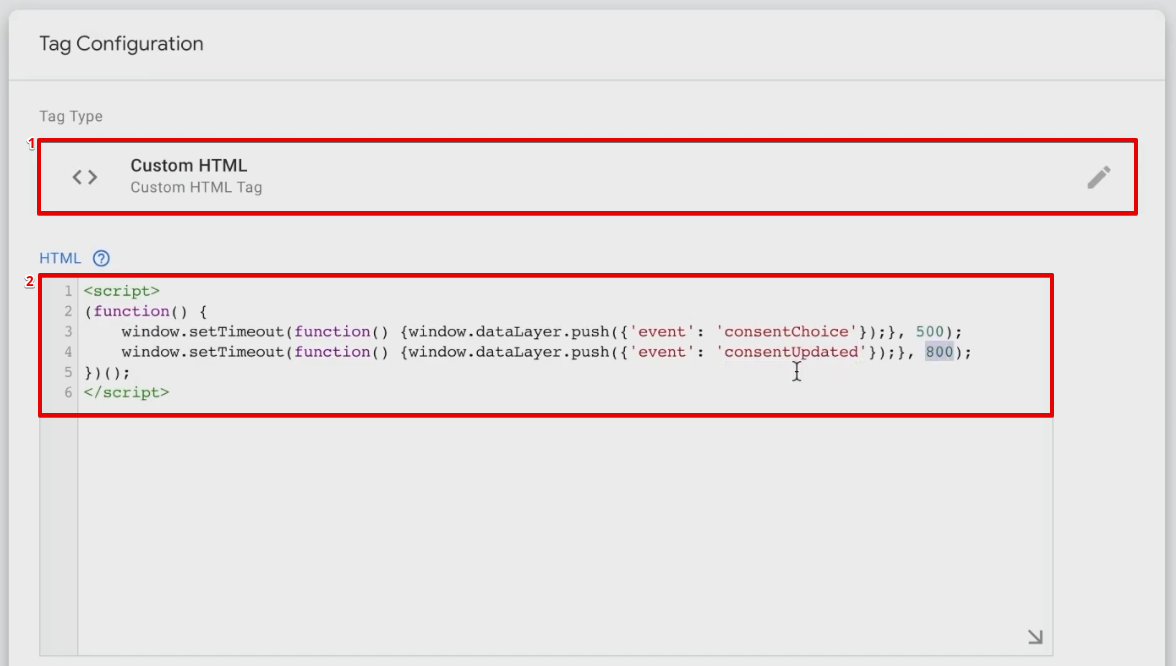
Configure a click – consent choice trigger to the Tag. Add a name and click on Save.
Again, open the preview screen and remove any existing cookies from the browser.
Allow consent from the cookie banner. Under Click, our cHTML Tag has fired.
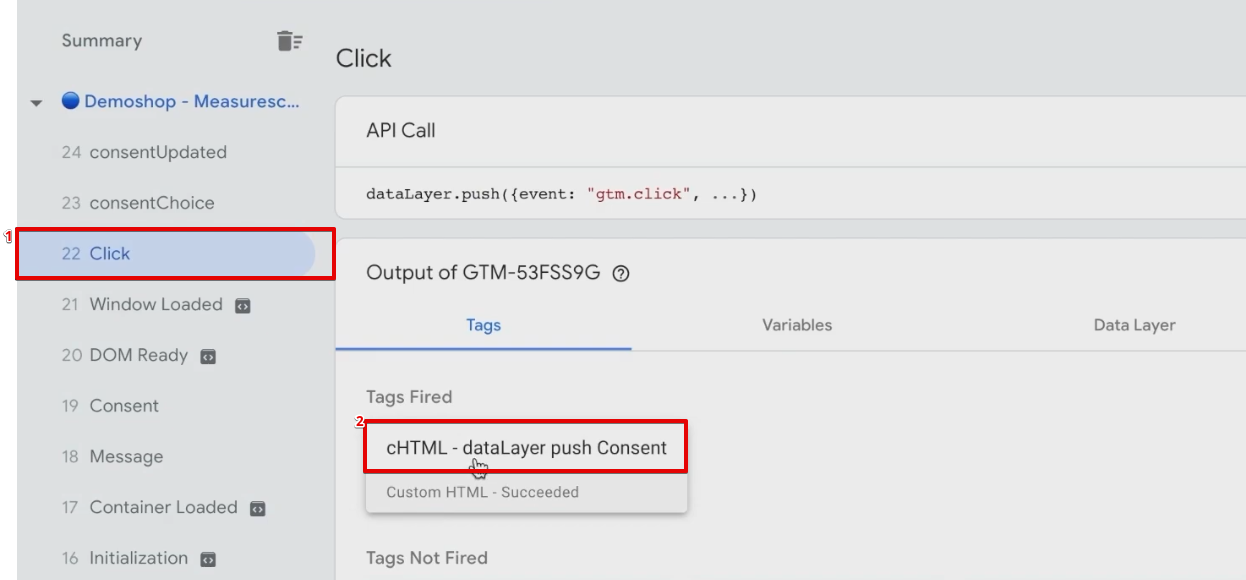
Within a few milliseconds, we also have consentUpdated and consentChoice on our preview screen.
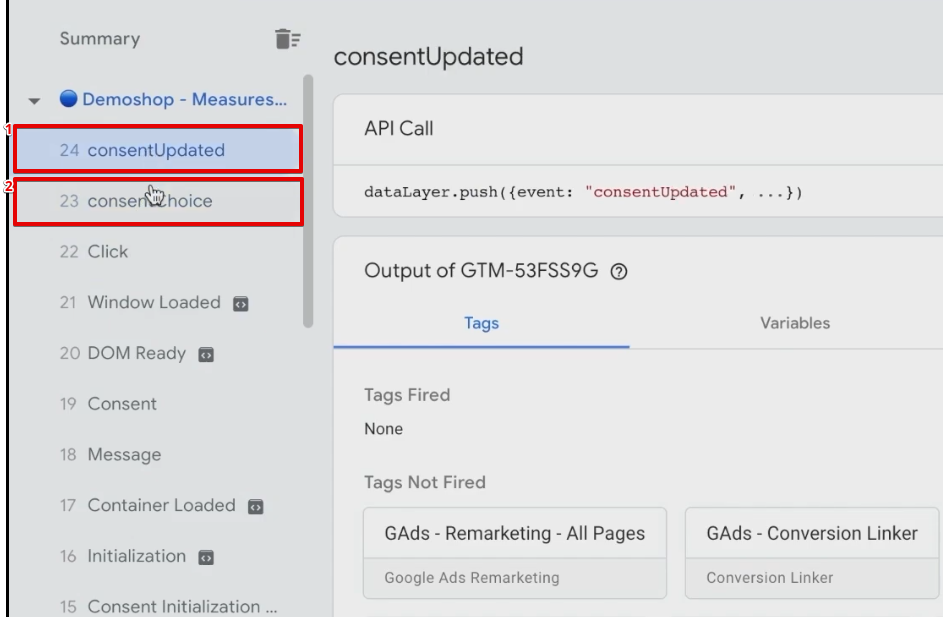
We’ll utilize these for our Tag firing.
Custom Event Triggers
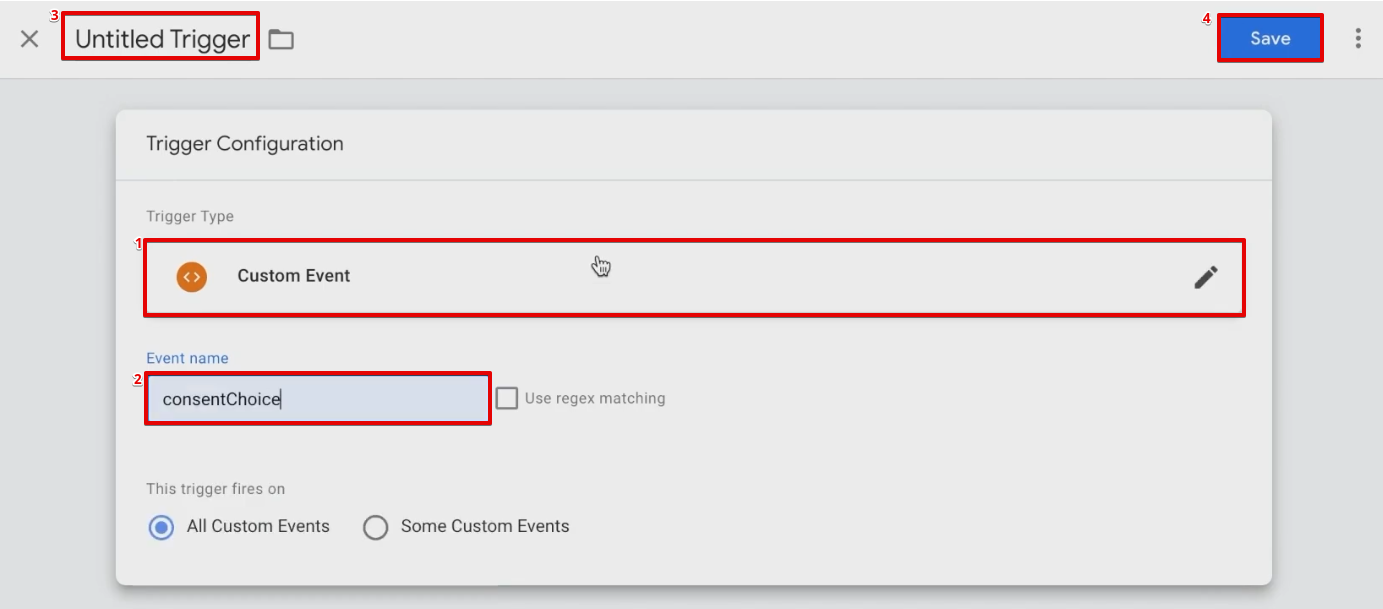
Create two new triggers.
The first trigger will be a Custom Event trigger with the event name as consentChoice.
Add a name and click on Save.
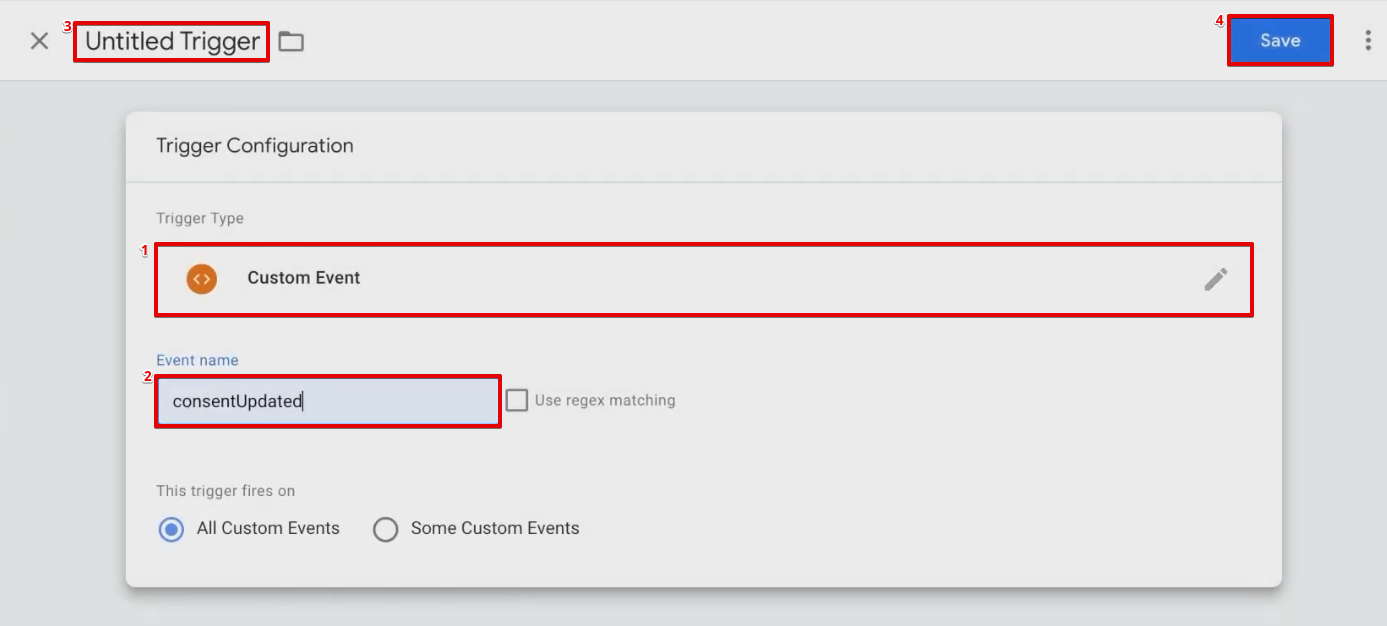
The second trigger will be the Custom Event trigger with the event name consentUpdated.
Add a name and click on Save.
We’ll utilize these triggers to fire our Tags accordingly.
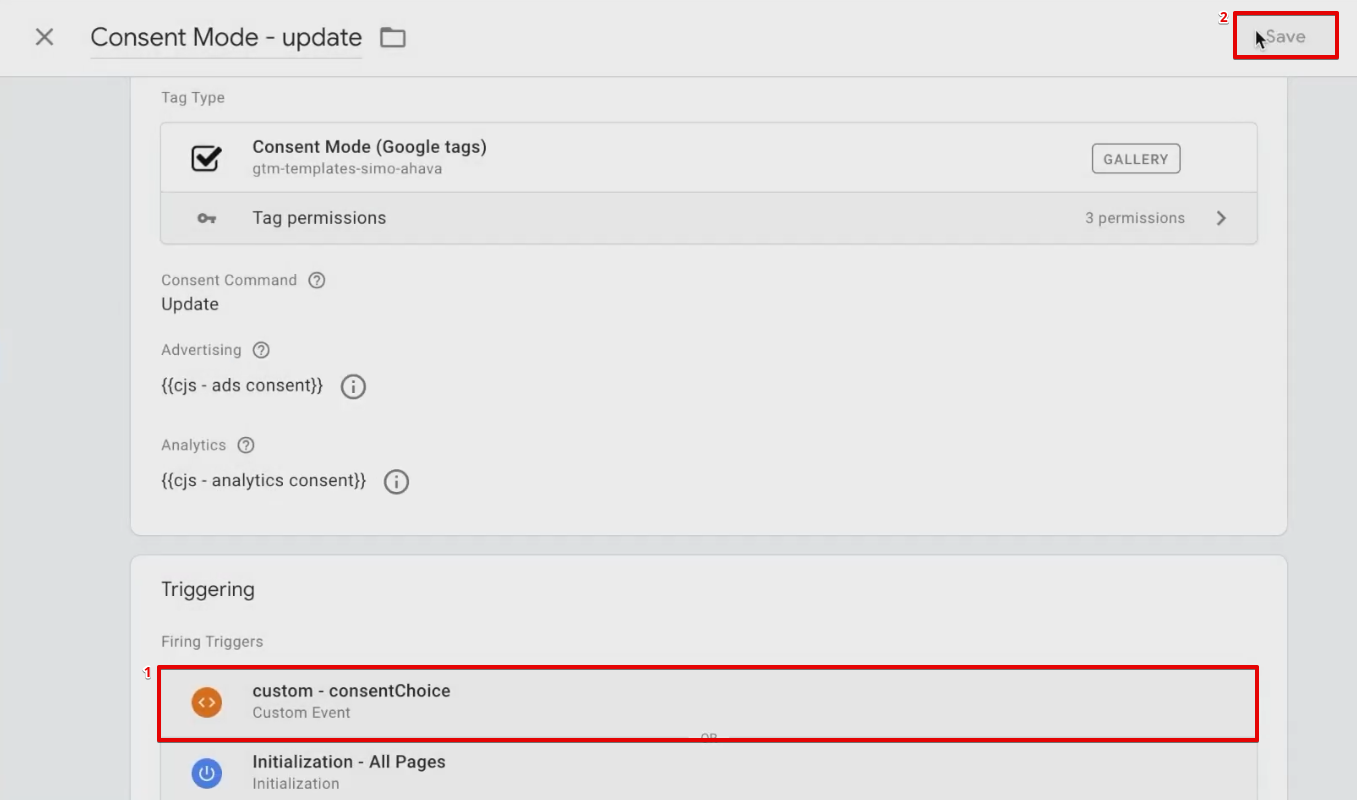
Under Tags, let’s open our Consent Mode Tag.

Navigating the consent mode Tag from the Tags section of GTM
Attach the consentChoice trigger to the Tag, and click on Save.
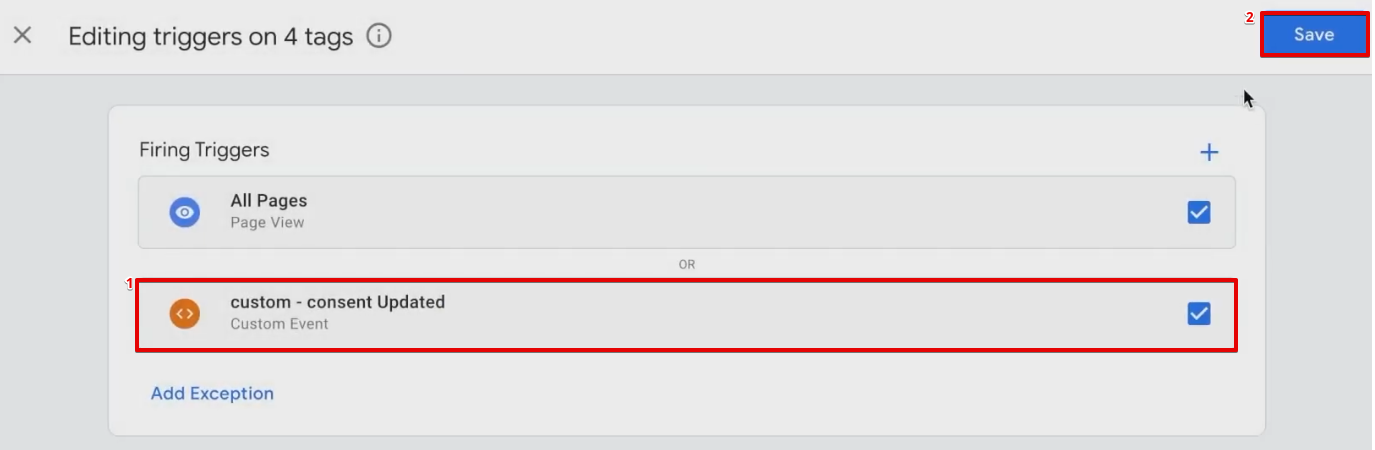
Next, we’ll add another trigger to all the pages that fire on the first user-click.
Choose the corresponding Tags, and click on the double circle icon to attach triggers.
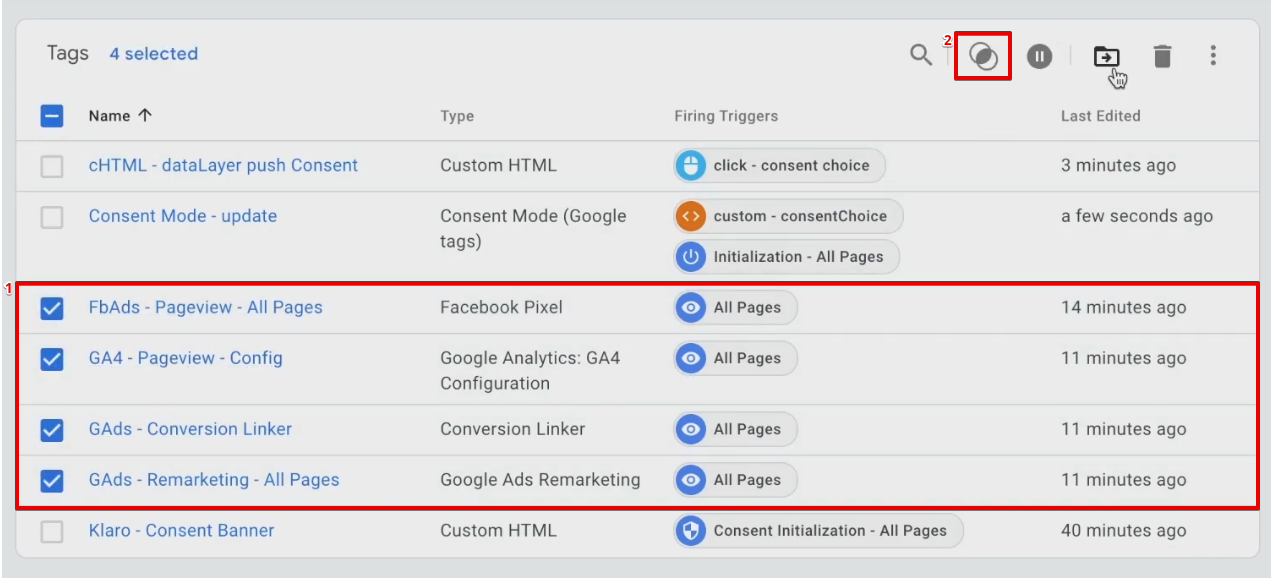
Add our custom – consent Updated trigger and click on Save.
Finally, let’s open the preview mode to test our Tag working.
Testing
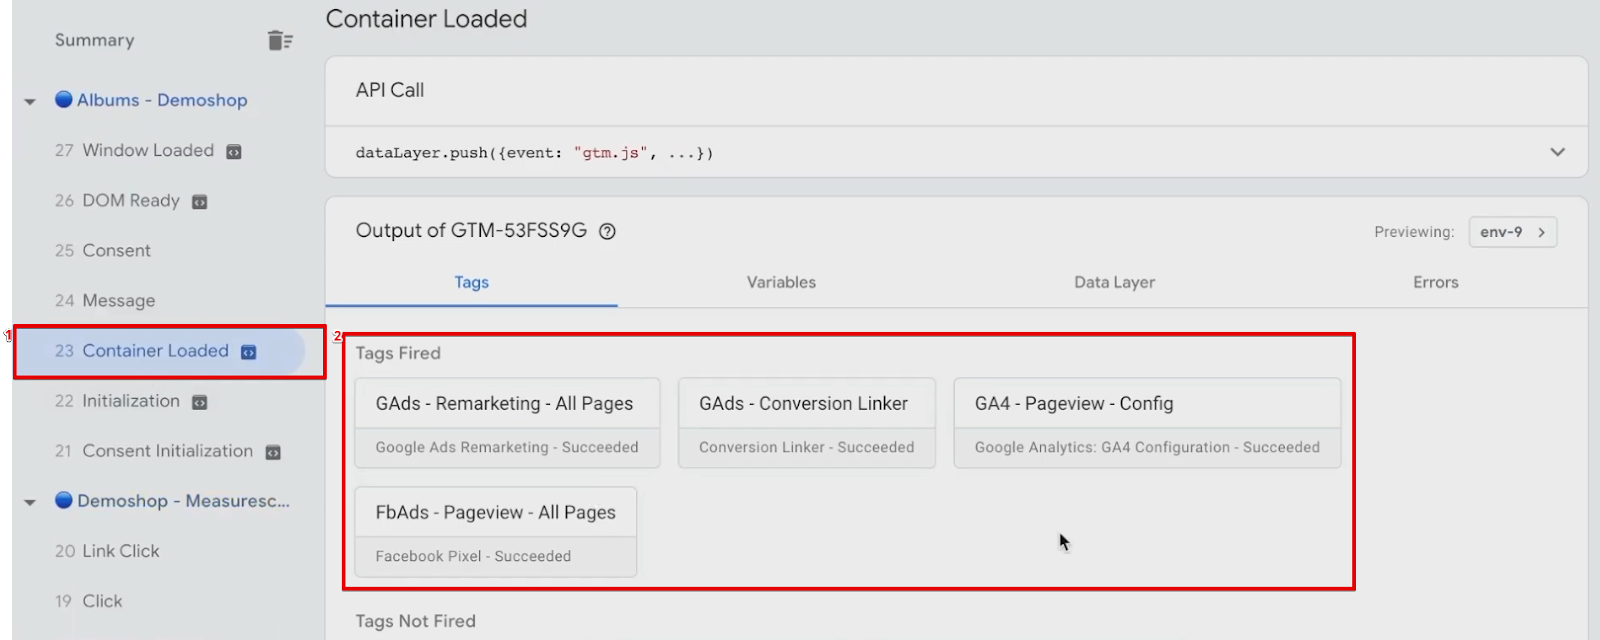
If the configuration is correct, we’ll see all our Tags fired under consentUpdated.
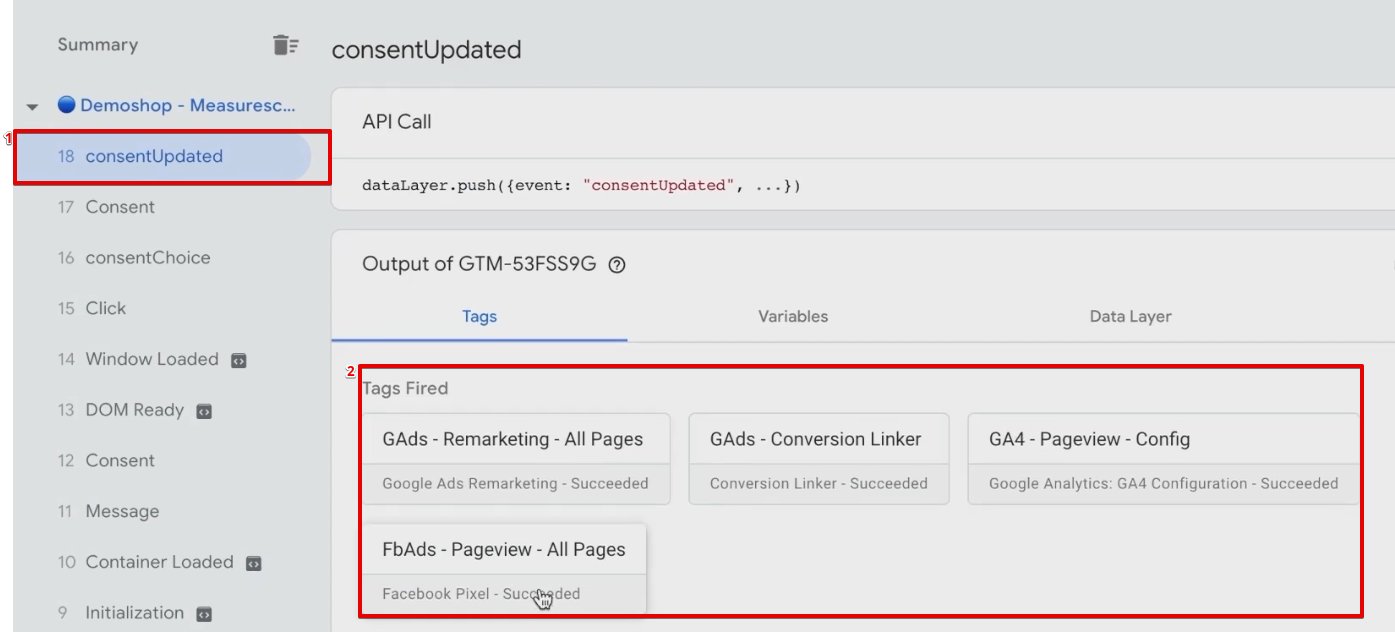
Also, you’ll notice that Tags didn’t fire for Container Loaded.
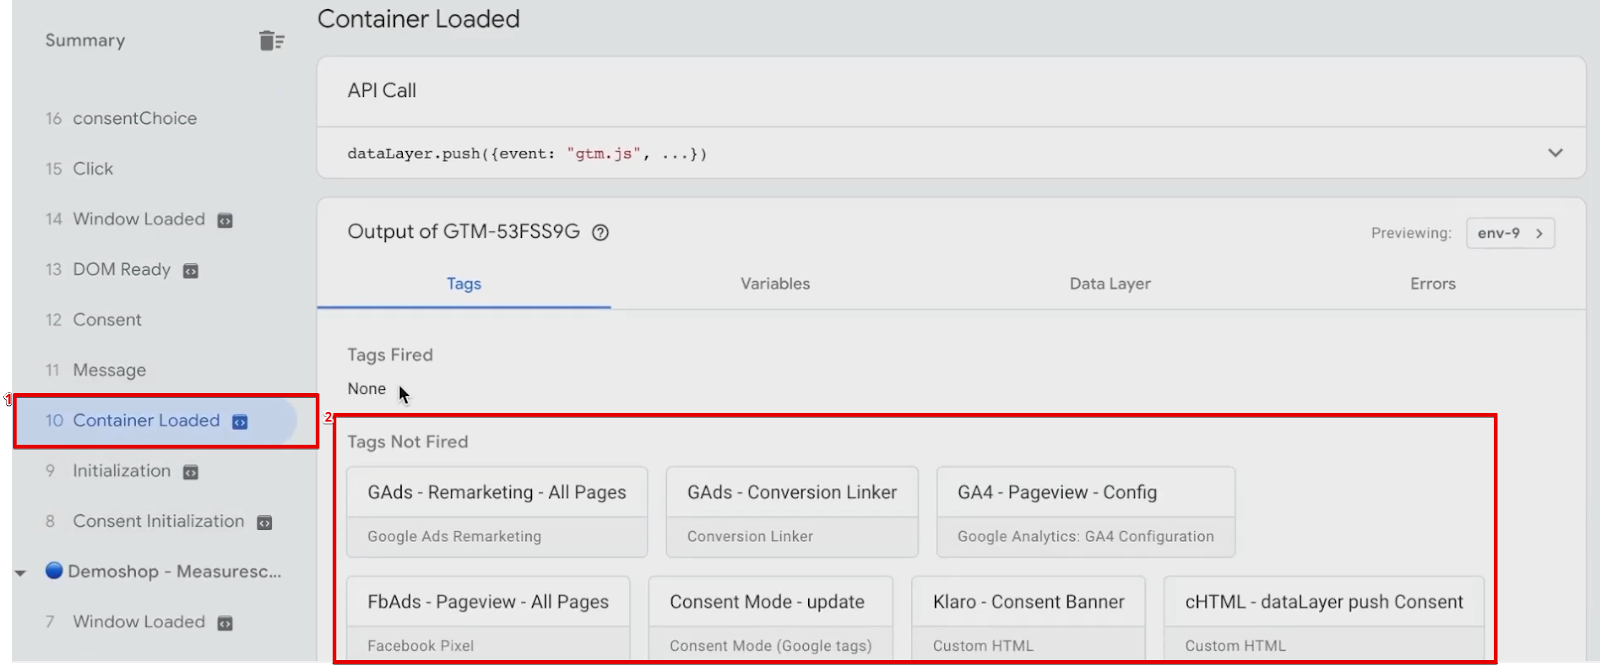
This was the expected action, and it shows that our configuration is correct.
Moreover, if you open the next pageview on your website, you’ll see that the Tags have fired successfully on the Container Loaded section.
These are the two cases of firing when consent is given.
Let’s now see how to add these triggers to new Tags.
Setting Triggers With New Tags
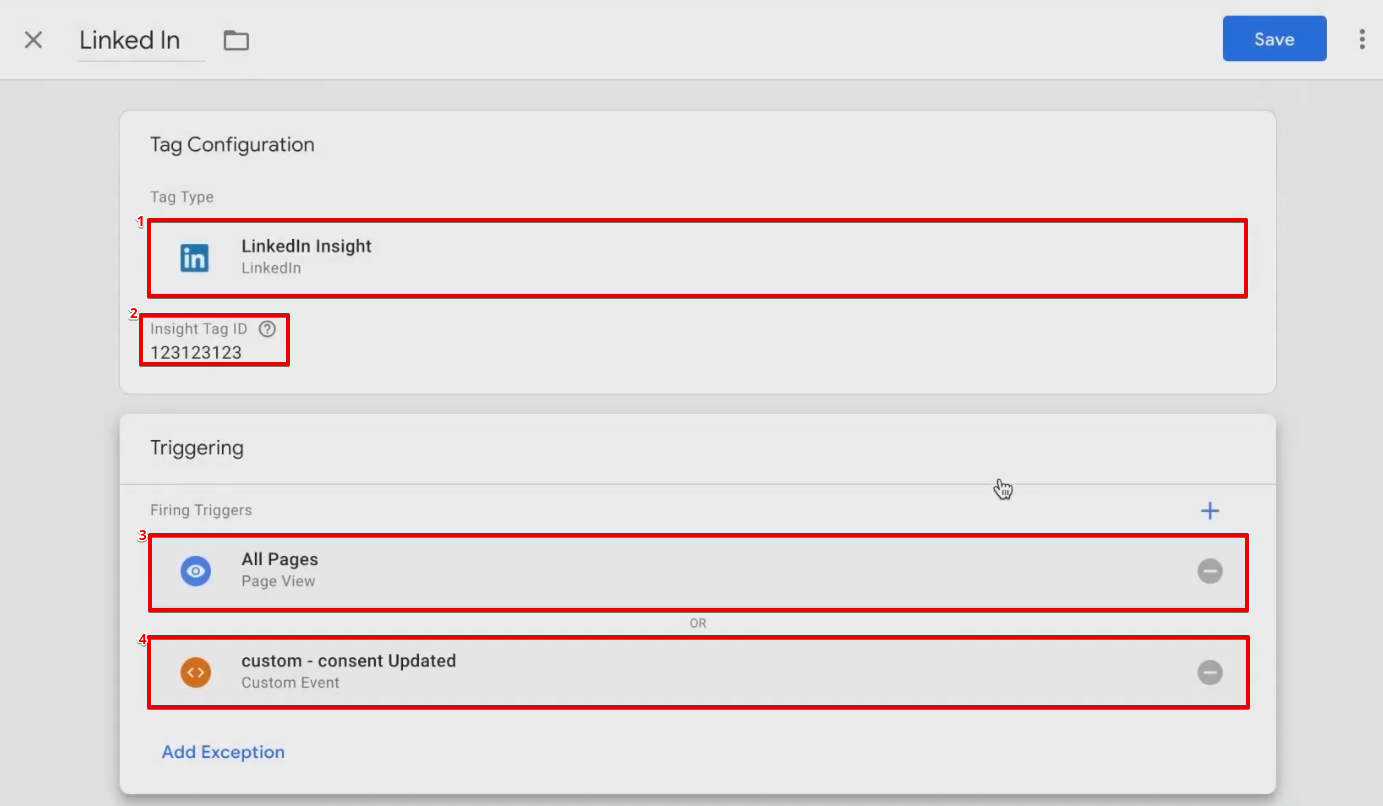
Suppose we create a new LinkedIn Insight Tag. For this guide, we’ve added a random Tag ID.
Configure the All Pages and the custom – consent Updated triggers to the Tag.
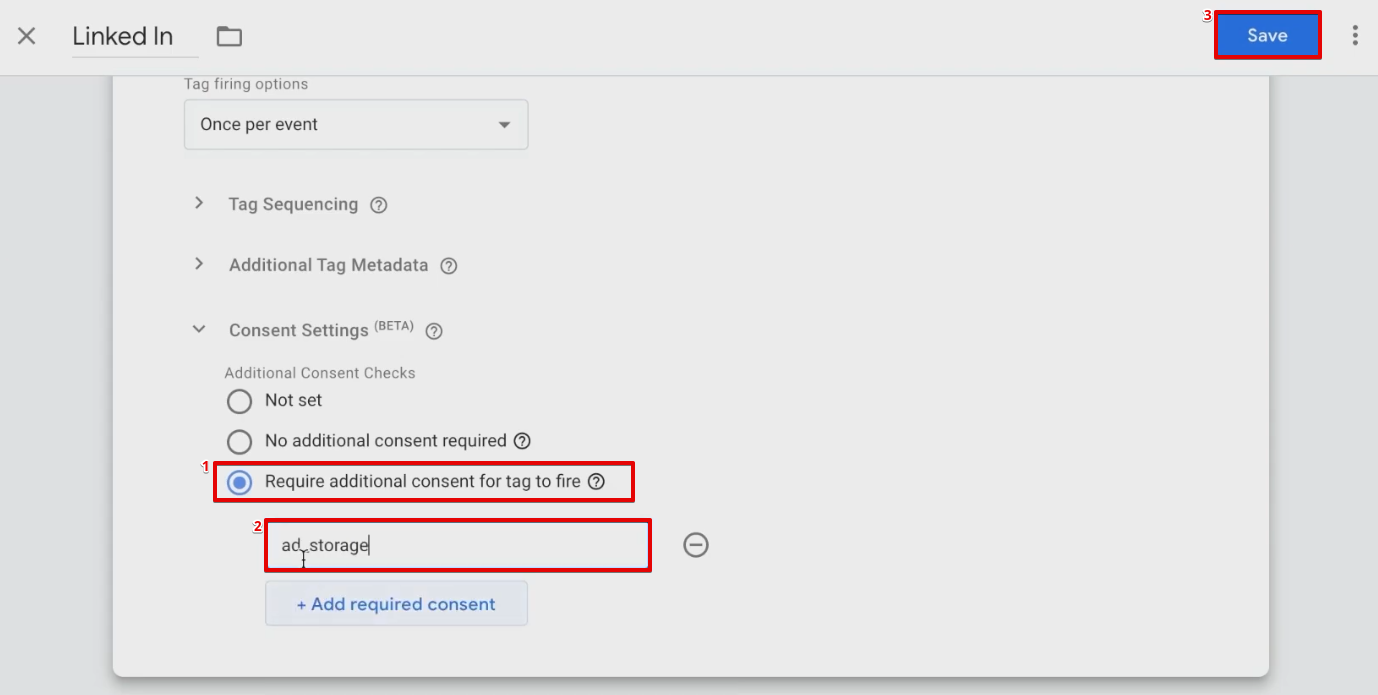
Moreover, under Consent Settings, click on Require additional consent for tag to fire. Mention ad_storage as the parameter for additional consent.
Save your Tag settings after modifying them.
You may still need to change your consent settings and modify them if you add new Tags under ad storage.
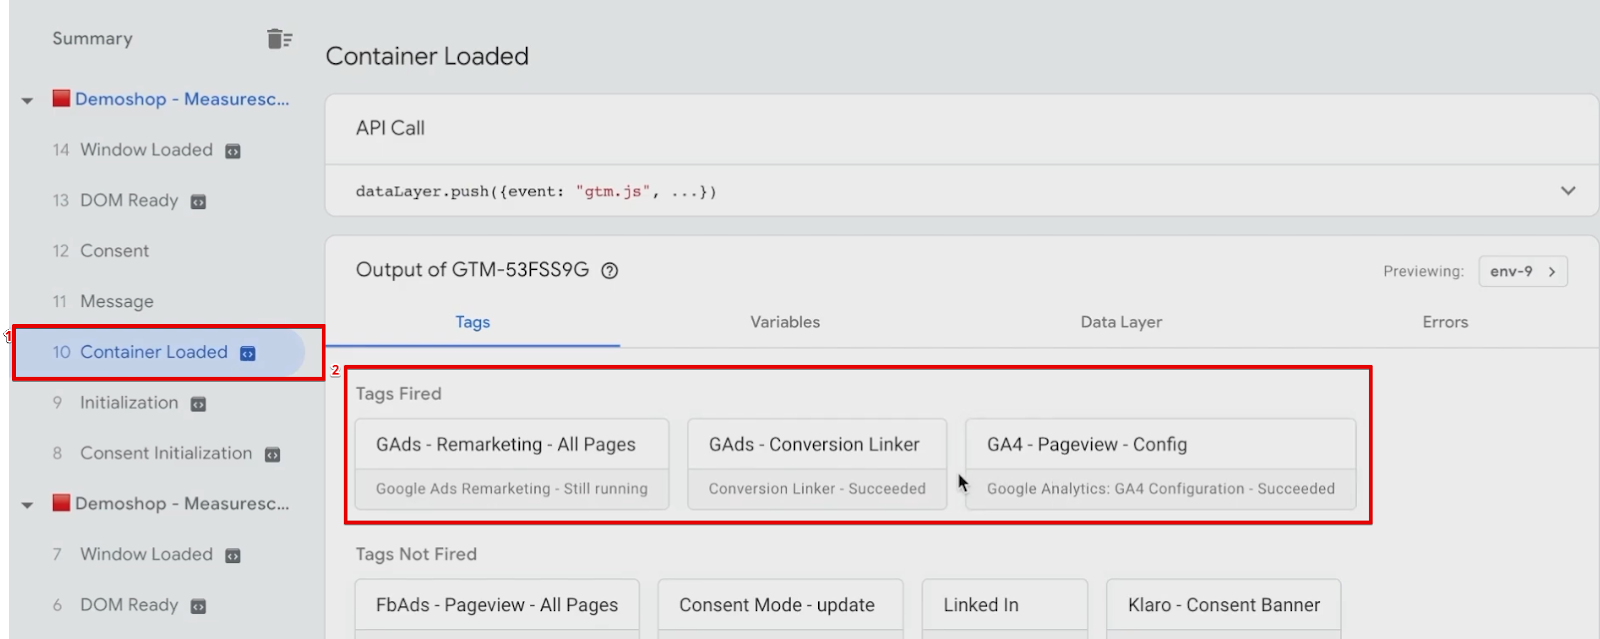
Finally, let’s open our preview screen to see how the Tags work. This time, let’s only give consent for marketing Tags from the consent banner.
If your configuration is correct, you’ll see the Tags fired under consentUpdated section.
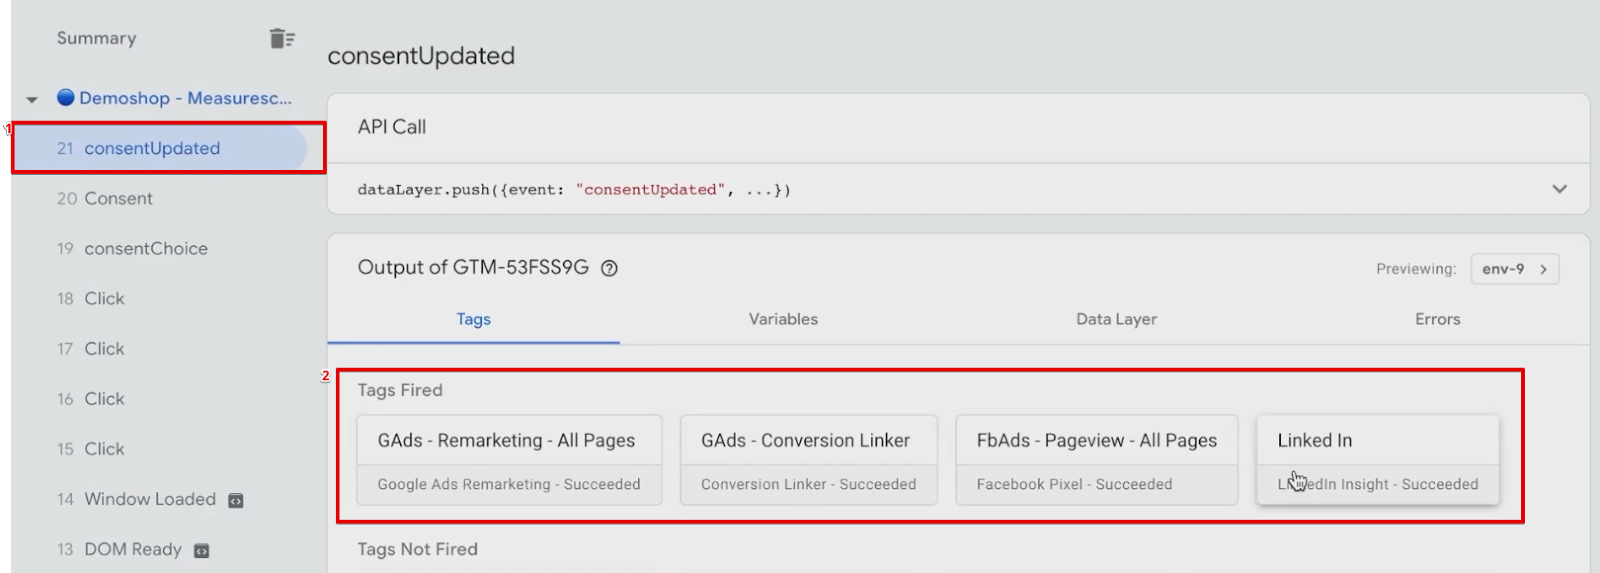
Moreover, if you click on any page of the website, you’ll also see those Tags fire under Container Loaded.
That’s how you can trigger your Tags based on the consent overview and consent mode of the user’s browser.
There’s a new feature in Google Tags called the consent mode.
When it comes to Google Analytics or Google Ads, this consent mode is a little modified.
We’d need a slightly different method to implement the real consent mode for such tools.
Using Consent Mode with GTM
We have a consent mode inside Google Tags that enables us to utilize partial tracking of user behavior.
Before we learn to utilize the consent mode, let’s first understand what consent mode is.
Consent mode is a way to adjust the Google Tags based on the consent given by the user and the reaction of other marketing tools towards the consent information.
Consent status pings, a feature inside consent mode, help us to identify the information that can be used by the Analytics tools.
Various features determine how Google Analytics handles this received data. You can find a complete study in Google’s consent mode help article.
Let’s learn to utilize various kinds of consent modes with GTM.
Built-in Consent Check
Currently, no data will be sent to Google Ads or Google Analytics on the first pageview if we don’t have user consent.
However, with consent mode, we can send partial data to the tools and Google Analytics can decide what to do with that information.
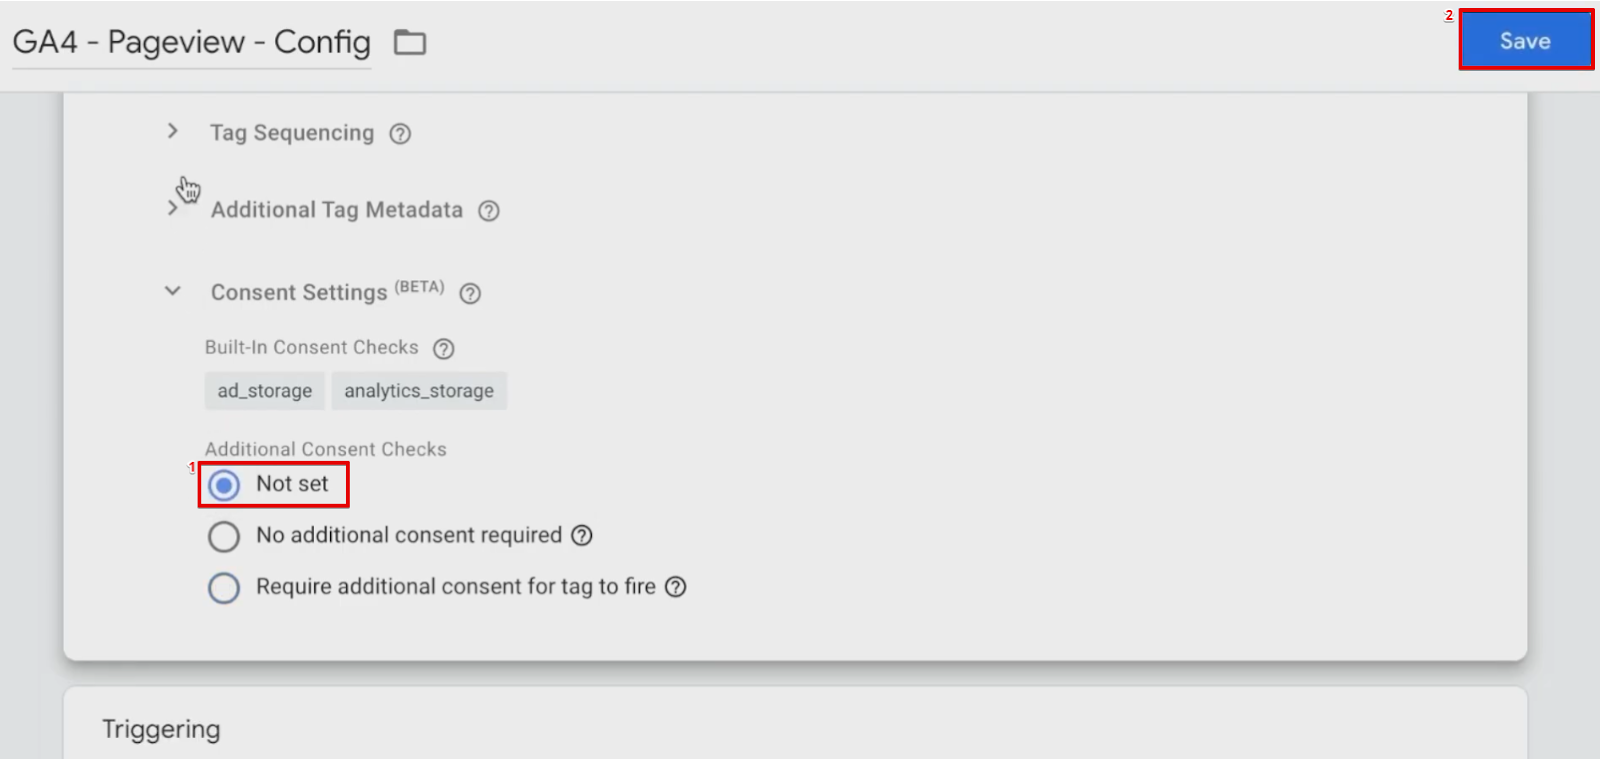
Open our GA4 Pageview Tag. Under Consent Settings, we have Built-in Consent Checks, although we already have an additional consent set up for the Tag.
It can help us to fire the Tags even if consent isn’t given but in a different format.
Let’s choose Not Set and click on Save.
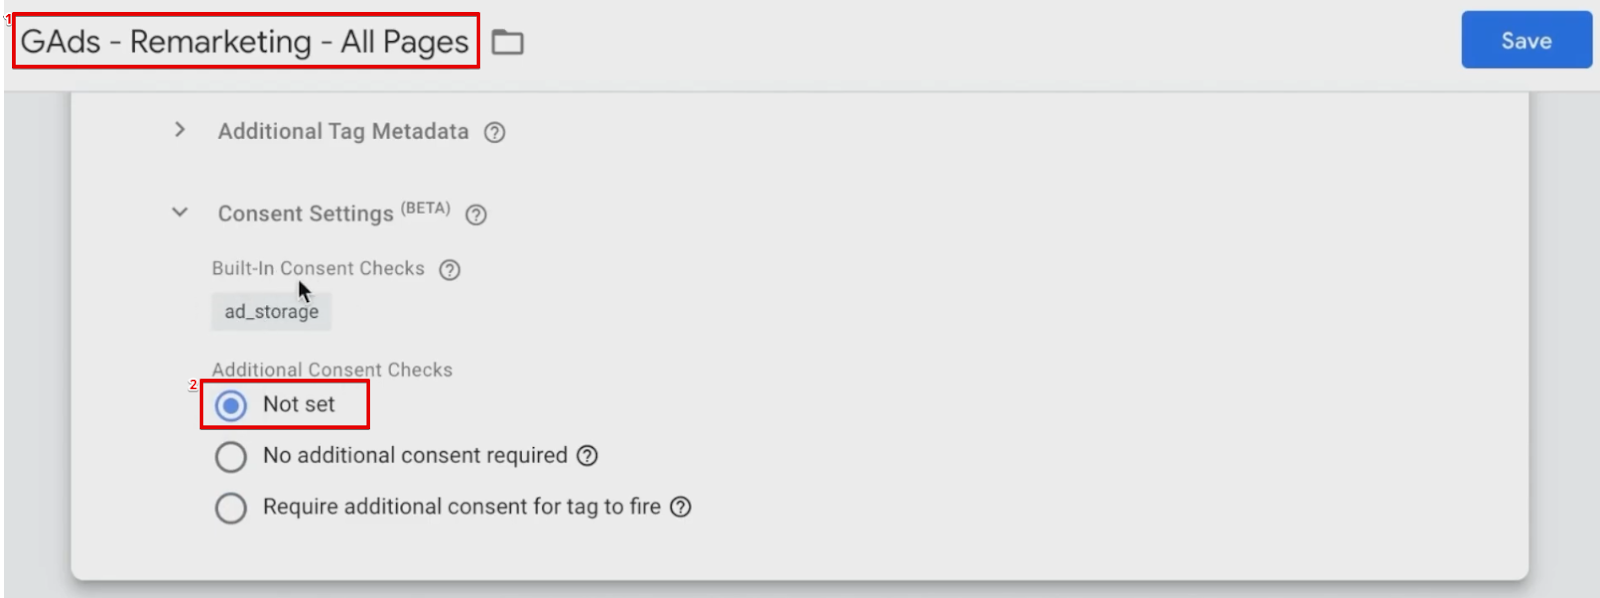
Similarly, we’ll modify consent settings for GAds conversion linker Tag, and the GAds remarketing Tag.
Moreover, if you check our LinkedIn Tag, we don’t have any additional Built-in Consent Checks.
It seems that all the Tags should fire now.
Let’s open preview mode to check how!
Preview
Before previewing, make sure to delete any previous cookies from your browser.
Under Container Loaded, we can see that our Tags fire normally on the page.
Moreover, we can navigate to the Network tab and search for our GA cookie.
This will provide us information noting that Google Analytics can’t use any user data as it doesn’t have consent.
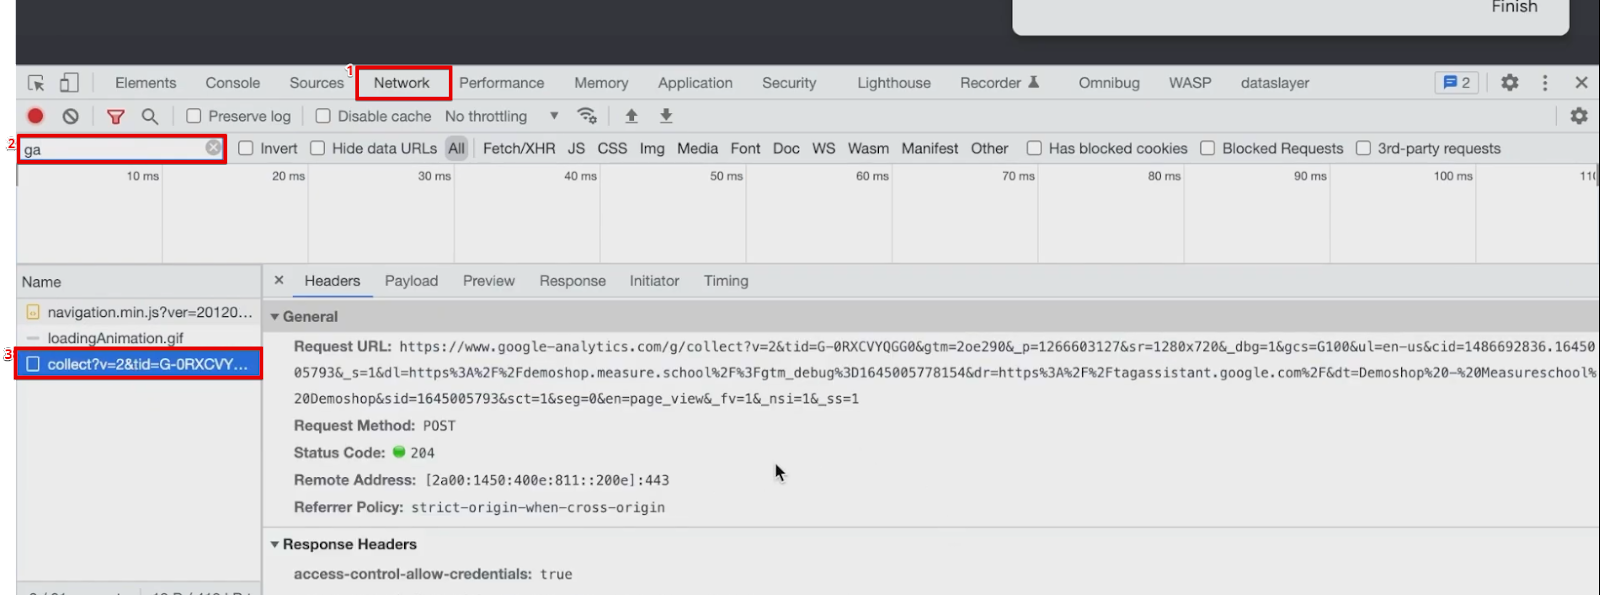
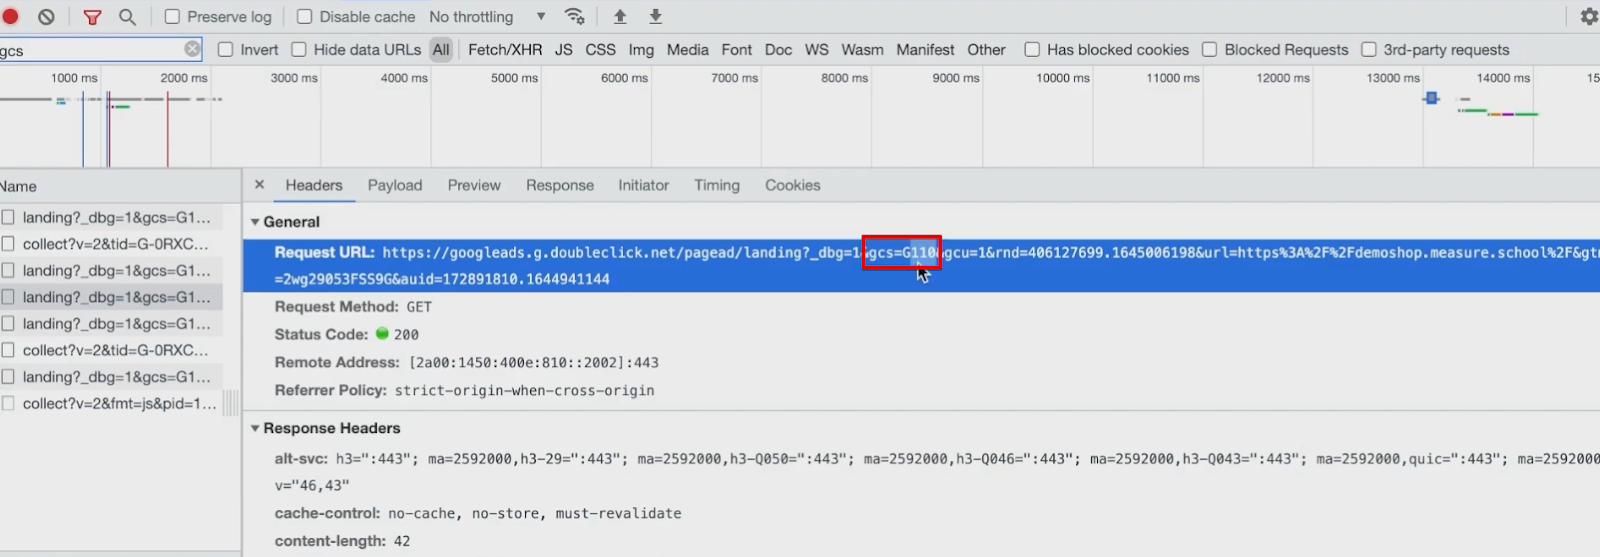
GCS Parameters
The parameter is called the GCS Parameter. It mentions that GCS = 100.
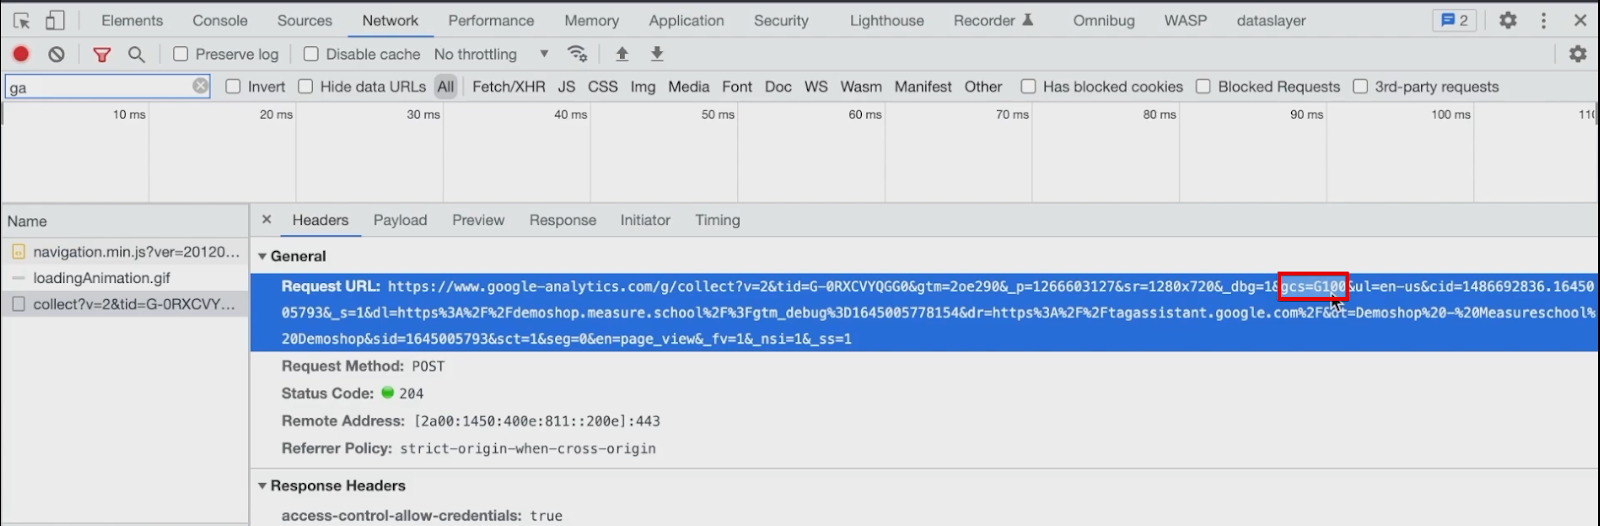
Open the Google Analytics Debugger if you already have it installed.

Reload the page. You can see that the GCS parameter holds the value of G100.
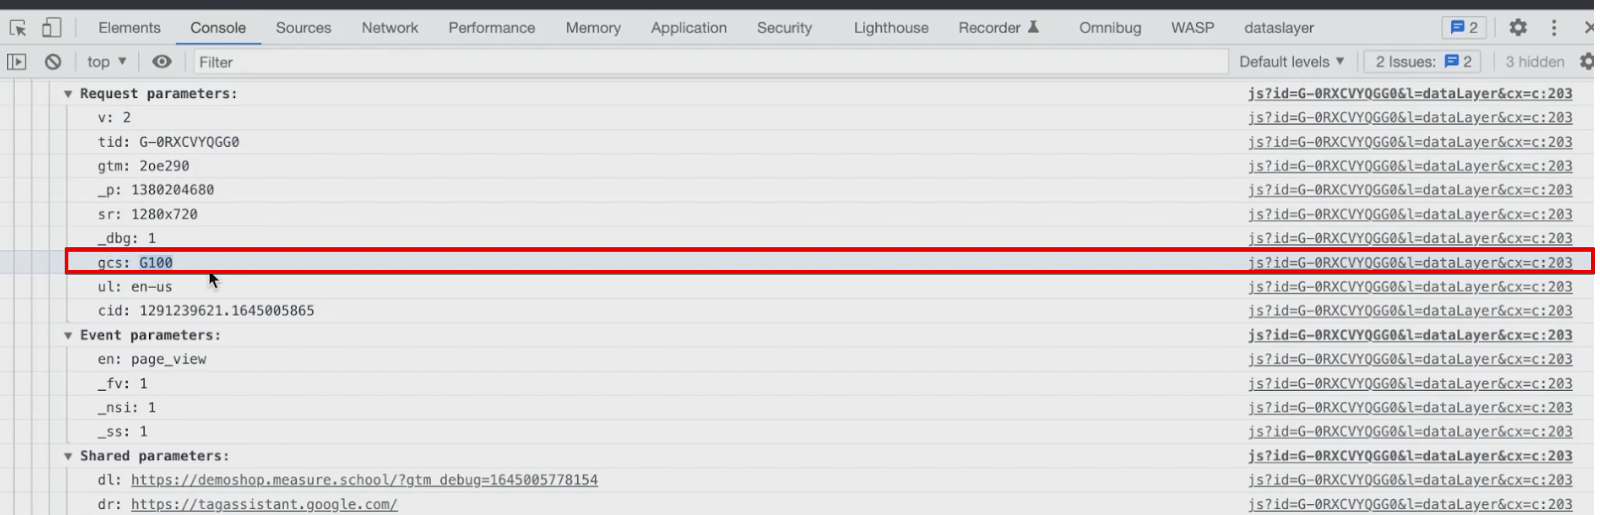
G100 means that no consent has been given yet. Theoretically, the data that gets sent over should not be used for measuring.
So although the data was sent over, we still can’t see it.
But what happens if we choose to accept the cookies by clicking on That’s ok?
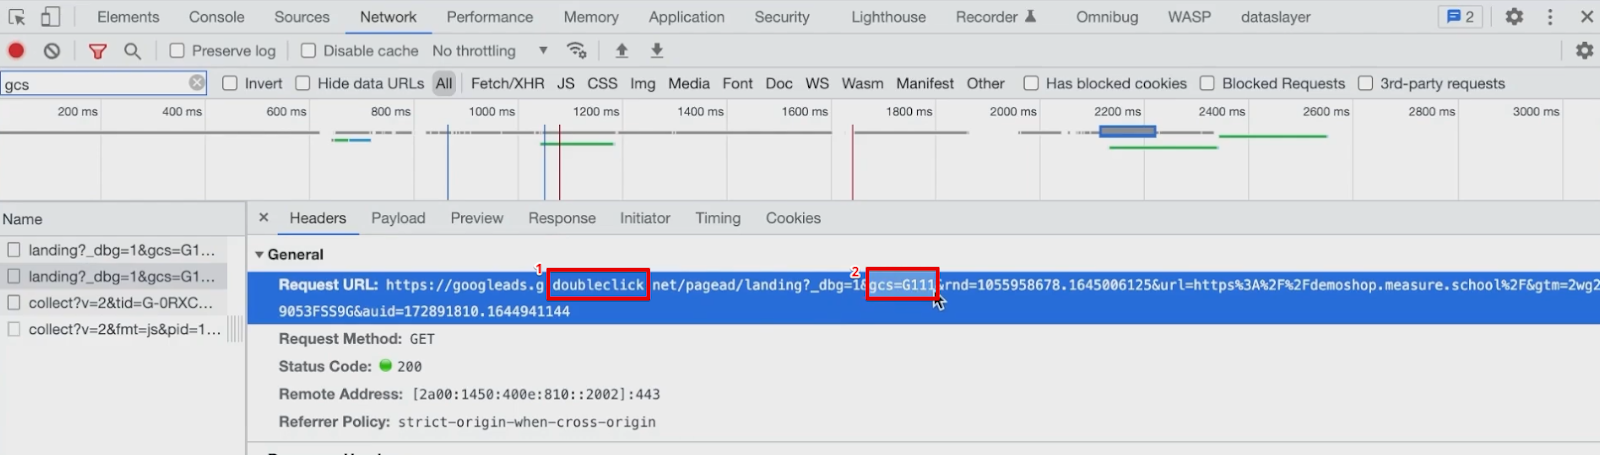
You can see that now the GCS parameter is set to G111.

This means that all permissions for data sharing have been given now.
However, there are no other means to check which consents have been given already. The only way to do it is by looking into the parameters.
Moreover, you can also find various permissions for different tools like Google Ads.
You can see a double-click parameter and a G111 parameter.
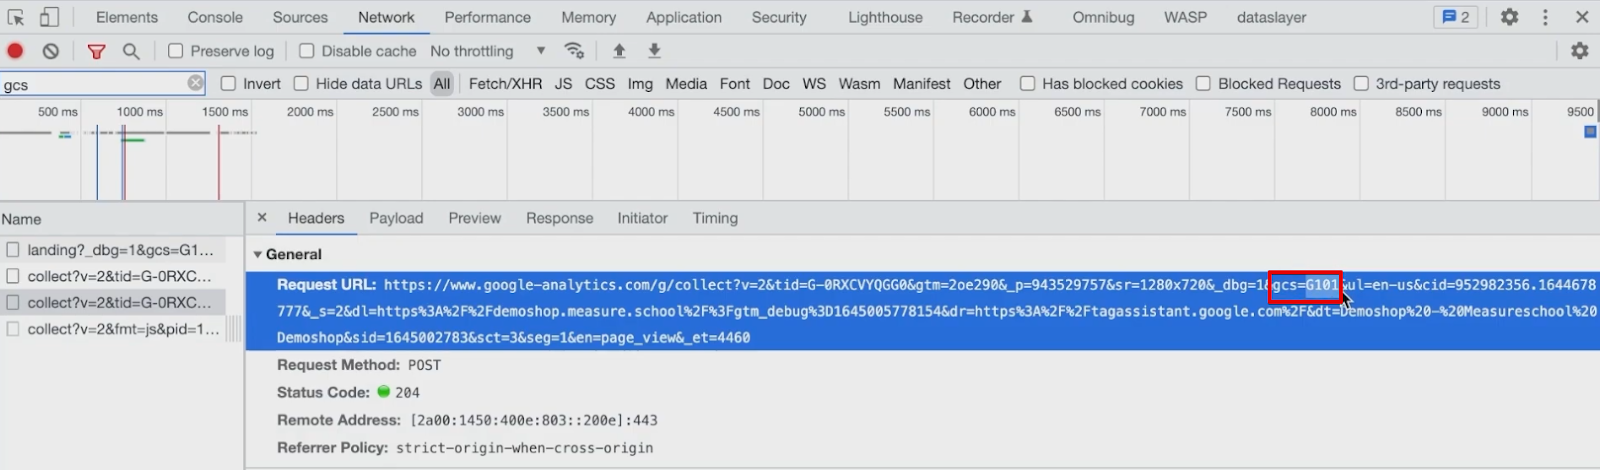
To experiment ahead, let’s choose only Analytics permissions for cookie consent.
We can now see the G101 parameter available. This means that Analytics storage is granted, but the Ad storage isn’t yet granted.
Next, we’ll also experiment by using just the marketing consent.
In this case, we can see that G110 permission is granted.
All of these parameters will correspond to how Google Analytics will react when they see these parameters.
Again, we recommend you read Google’s consent mode help article to get a better idea about various parameters.
Extra Settings
On our Consent Mode Tag, we can choose to Pass Ad Click Information Through URLs, or we can also choose to Redact Ads Data.
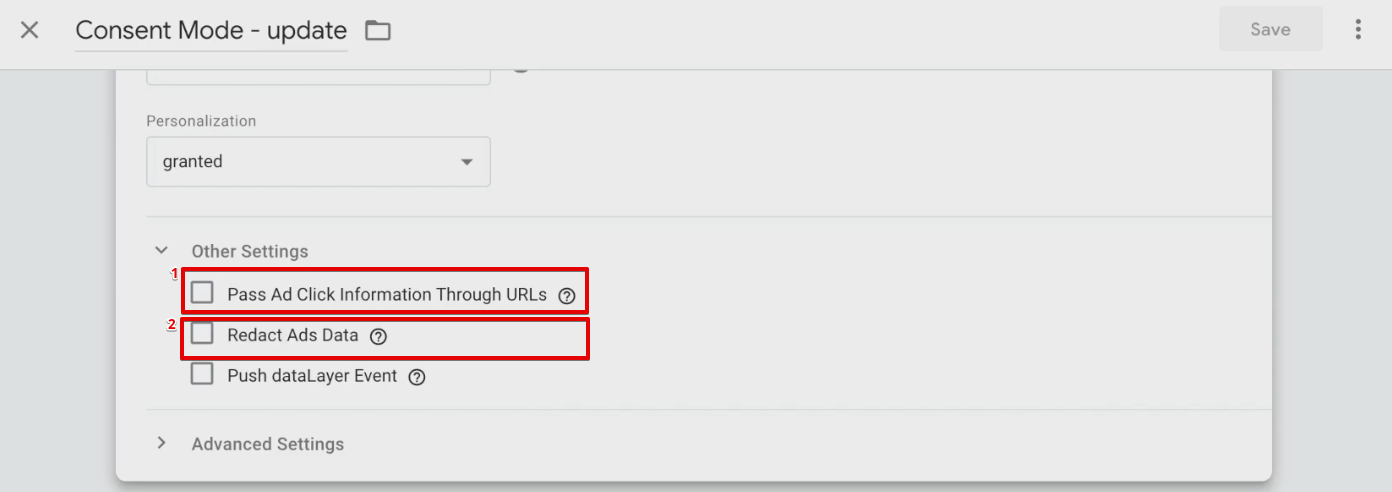
These settings are corresponding to the data in the consent mode. Hence, you can also check them from the consent mode help article.
In some instances like ad data reduction, Google Analytics can see the data in their machine learning, but the data can still be not identifiable.
So, before configuring any parameters for your website, we recommend you go through your local jurisdiction.
Google only uses this data for its Tags like Google Ads or Google Analytics.
But for other Tags like LinkedIn, you still need to manually block them from firing, so data doesn’t get transferred if the user hasn’t given consent yet.
You can now effectively use consent mode along with Google Tag Manager.
Consent is an evolving topic. On one hand, we have technology in which GTM is moving forward, which makes it easier for us to handle consent
But on the other side, privacy laws are constantly evolving.
If you want to keep up to date, we recommend you keep a close eye on our trending blogs.
FAQ
How can triggers be set up for tags based on consent in GTM?
To set up triggers for tags based on consent in GTM, you need to configure the consent settings for each tag. By connecting appropriate triggers to the corresponding tags, you can ensure that the tags only fire if the necessary consent has been granted.
How can I modify consent settings for specific tags in GTM?
To modify consent settings for specific tags in GTM, you can navigate to the advanced settings of the tag and look for the consent settings option. Here, you can specify the additional consent parameters required for the tag to fire, such as ad_storage or analytics_storage.
How does the built-in consent check work in GTM?
The built-in consent check in GTM allows you to send partial data to tools like Google Analytics or Google Ads, even if full consent hasn’t been given. This feature enables Google Analytics to decide how to handle the received data based on the consent status.
Summary
So, that’s how you set up consent and consent mode by utilizing Google Tag Manager!
We learned to install our cookie consent banner, made it work with GTM, triggered our Tags accordingly, and also learned about the new consent mode in GTM.
If you liked this post, make sure to check out our comparison of Google Tag Manager and Global Site Tag (gtag.js).
Which cookies do you use for your website? Do you require consent for analyzing the GCS parameters in your country? Let us know in the comments below!


")
Hey, thank you for the tutorial, its great! Unfortunatelly I fail at klaro code configuration and there is no cookie banner showingon the site. Could you please paste the exact code that you used? (I just need version with Marketing (or Google Ads/Fcb) and Analytics option
Hello, thank you for great article! Could you put a code with simplified version for Marketing and Analytics for people without coding experience? I am struggling to use the one from Github
hey Agata. This code worked for me <script> var klaroConfig = { version: 1, elementID: 'klaro', styling: { theme: ['light', 'top', 'wide'], }, noAutoLoad: false, htmlTexts: true, embedded: false, groupByPurpose: true, storageMethod: 'cookie', cookieName: 'klaro', cookieExpiresAfterDays: 365, default: false, mustConsent: false, acceptAll: true, hideDeclineAll: false, hideLearnMore: false, noticeAsModal: false, translations: { en: { … Read more »
Hey, thanks for the tutorial, its really clear. One question, is there a way to configure GTM to open the klaro cookie consent in order to update what the user previously entered? Can it be done from GTM only without the need to add code in the web site?
Thanks
Hi Tal,
you can force showing the consent popup, according to the Klaro GitHub page, like this:
<a class=”button is-success” onclick=”return klaro.show();”>Change consent settings</a>
Hey, thanks for the tutorial, but… What if user grant/deny any of purposes in detail. E.g. case when I grant only FB pixel, but not G.Ads pixel. and so on. Currently all advertising or all analytics consents should be granted cause the condition for “cjs – ads consent” variable says both must be granted function(){ var cookie = {{cookie – klaro}} if(!cookie){return ‘denied’} var json = JSON.parse(cookie) if(json[ “Facebook Ads” ] && json[ “Google Ads” ]){ return “granted” }else{ return ‘denied’ } } What if the user gives only FB pixel consent but no G. Ads? No pixel would be… Read more »
Any response to my question?
I also have the same question.
Thanks Julian, I was able to get this working by putting config.js into my site (during build) and rest of the configurations via GTM.
https://www.vnextcoder.xyz
Hi,
when firing GA4 tag on event consent update. There is no session_start event. This results in many (non set) traffic source acquisition reports. Is there any solution for this?
Just wanted to say thanks for this guide, without it I wouldn’t have had a chance of implementing Klaro with GTM!
I can’t get it to work pulling the config from GTM itself and I think the JavaScript for reading the cookie in GTM (the Custom Variable script referred to in the instructions) is missing from the GitHub repository, but it’s easy enough to read from the screenshot in the guide.
Really, thanks for taking the time to put this together, it’s much appreciated!
Hey Julian, great guide! I’ve implemented that 2 years ago but now consent mode version 2 became mandatory and I have to update my setup because tracking stopped working completely!
However, I couldn’t find any update described in this guide. Could you either update the guide or write me what I exactly have to update?
Thanks in advance.
Regards