
Last Modified on February 27, 2025
IFTTT—If This, Then That. If you are using the Looker Studio (ex Google Data Studio), then you should learn how to use the Case statement.
Now, functions are a very important part of Looker Studio to create calculated fields. The Looker Studio Case statement is probably the most advanced but most powerful function you can learn in Looker Studio. It works just like If This, Then That!

Subscribe & Master the Basics with our FREE Looker Studio Course
In today’s lesson, I’ll show you how we can use the Case statement in building our dashboards and create calculated fields.
An overview of what we’ll cover:
- What are Functions in Looker Studio?
- The Case Statement Explained
- Use Case: Showing Traffic & Conversions by Weekdays vs. Weekend
- The Syntax of a Case When Statement
- Writing the Use Case Statement
- The Case When Formula
- Other Case Functions
What are Functions in Looker Studio?
To understand functions, it helps to know about calculated fields. Calculated fields allow you to set up reports using the metrics and dimensions in your data. It also enables you to tweak the data based on the customization that your report will need to show using different code techniques.
Functions are among the best features of calculated fields. Functions use branching logic to evaluate data, manipulate geographic information, text, and dates, and perform relevant arithmetic.
There are many useful functions in Looker Studio that you should get to know. However, for this tutorial, we’ll focus specifically on the Case function. (To learn more about calculated fields and some other functions, check out our Looker Studio Calculated Fields Guide.)
The Case function is probably the most advanced and most powerful function you can learn. This function allows for the creation of new categories as well as groupings of data. It uses conditional logic in order to identify the calculated field’s value.
This tutorial will explain the case statement and demonstrate how to use it in our Looker Studio dashboards.
The Case Statement Explained
Today, I’m going to show you how to use Case When, a statement in Looker Studio to create calculated fields. The Case When statement is one of the most powerful formulas available in Looker Studio which you can use in many situations.
The Case When function is an if this, then that type of formula which can be used for more complex conditional expressions. It can help greatly with cleaning up groupings in marketing programs like Google Analytics by segregating values and data with the use of proper conditions.
🚨 Note: Looker Studio now supports both simple and searched CASE statements. The simple CASE statement evaluates an expression against a set of simple expressions to determine the result, while the searched CASE statement evaluates a set of Boolean expressions to determine the result.
Use Case: Showing Traffic & Conversions by Weekdays vs. Weekend
But for the purpose of this tutorial, we’re going to use it to build a table that shows traffic and conversions from Google Analytics by Weekday versus Weekend. And you know, that’s not a dimension that is usually available in Google Analytics.
NOTE: This is a rather advanced feature of Looker Studio. Therefore, you should already know the basics, like how to build reports and visualize data using charts.
Open the report you’d like to use. For this tutorial, we will be using the Google Analytics demo account Google Merchandise Store as a data source. If you’re totally new to Case functions, I’d recommend that you use the same data source so that you can follow along with our steps exactly while you get familiar with the technique.
Our aim today is to create a table and categorize days of the week into two groups: Weekdays and the Weekend. We want to be able to visualize and analyze sessions, conversion rates, etc, per Weekday versus Weekend.
For this, we first need to table. So let’s add one by clicking on the Add a chart button and clicking on the Table option.

After that, the chart will be added to the report.
Next, let’s add our metrics. In this case, we’ll input Sessions into the Available Fields search box and drag our desired field into the Metric section.

We’ll also add the E-commerce Conversion Rate metric and drag it under the Metric section as well.

And we also want to add the Average Order Value. We’ll search it under the Available Fields section and once it’s reflected in the results, we’ll drag it under the Metric section.

This chart seems a bit squished, doesn’t it? Remember that you can always make the chart a bit bigger to see all the data by dragging the edges on either side.

🚨 Note: If you double click on one of the chart’s columns, it will resize all the columns automatically to show you all the data.

For the dimension, we don’t want Medium. We want something closer to be able to see the name of the day of the week. This is something that is available in Google Analytics by default.
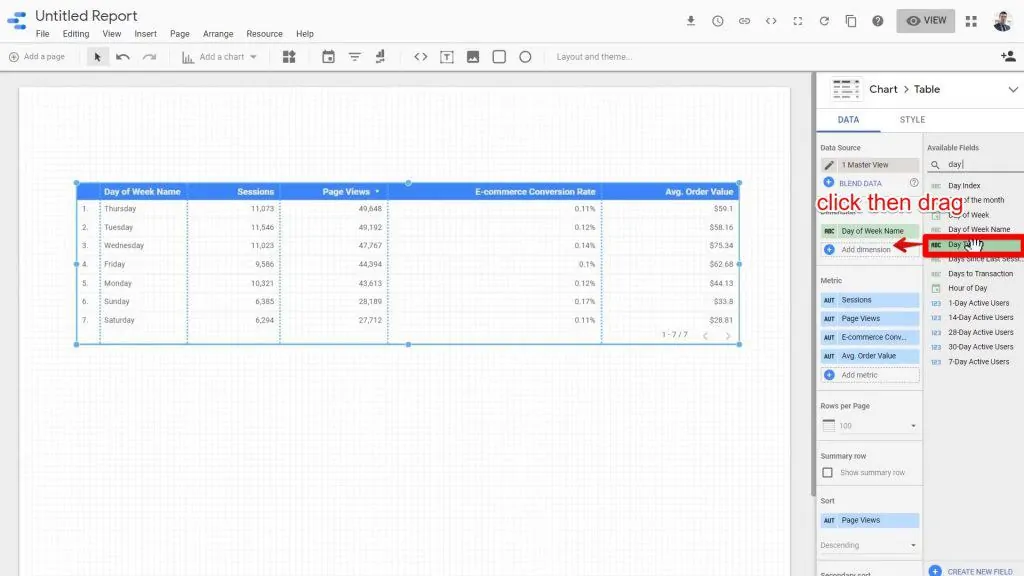
To do this, we will input the Day of Week Name on the Available Fields section and select the correct dimension accordingly.

We just want to use the Day of Week Name as a starting point, so we’ll drag it under the Dimensions section.
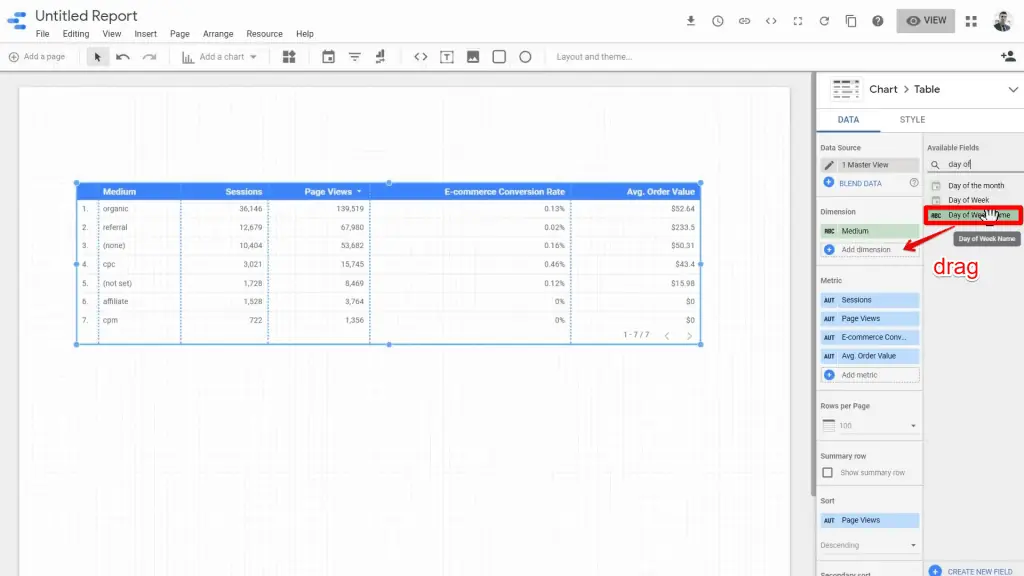
After setting the correct dimension, we now have our weekdays at the Day of Week Name, Sessions, Page views, E-commerce Conversion Rate, and Average Order Value.

Now, this is quite close to what we want, but not exactly. Instead of seeing the name of each day separately on its own row, we’d like to have only two rows, the first being Weekday and the second Weekend. However, this is not a dimension that is already available in Google Analytics.
So to do this, we need to create a calculated field. Calculated fields are fields whose values are evaluated based on some calculations on other fields values.
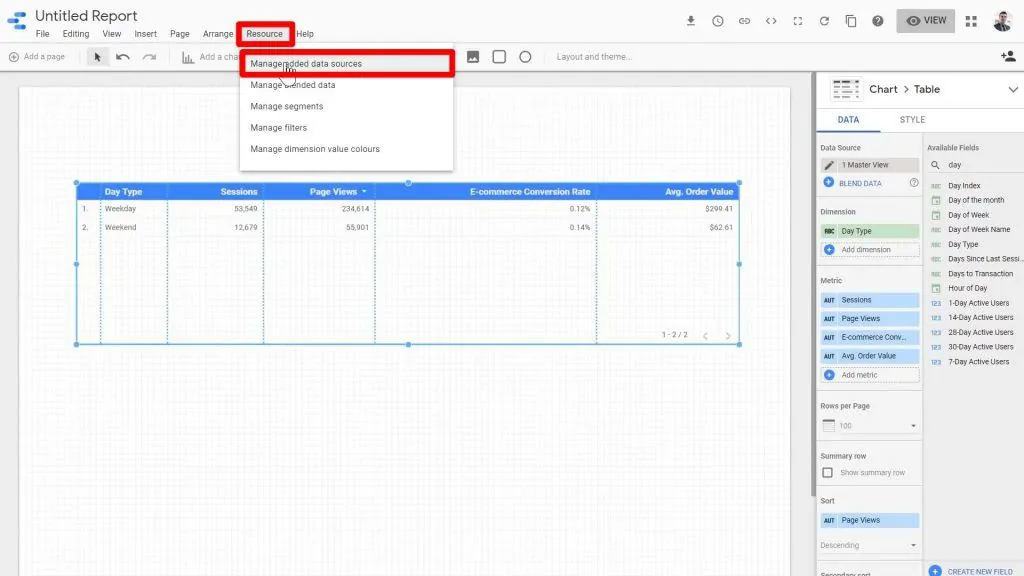
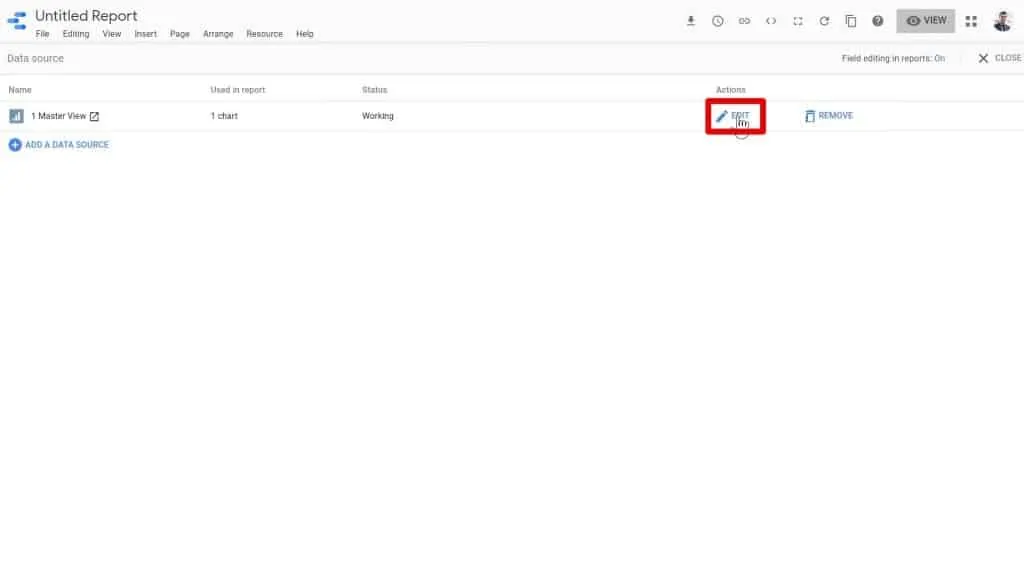
To create one, we need to go to the Resources menu and click on Manage added data sources to see our data source.

Then, click on Edit.

When we edit our Data Source, we can add new fields. To do this, we’ll click on the Add a Field button.

We will then arrive at this interface which allows us to give our new field a name. I’m going to name it Day Type.
And then in the formula section, I’m going to use and introduce you to Case When Statement.
Before I start typing in the formula, let’s recall what we want to achieve in the table above.
First, we want to write Weekday if it’s a Monday, Tuesday, Wednesday, Thursday, or Friday.
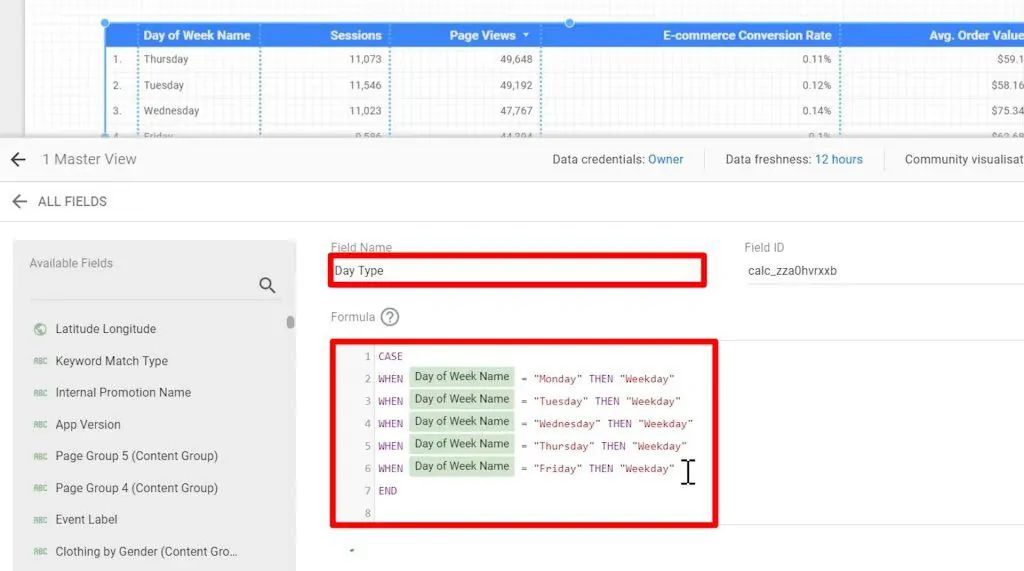
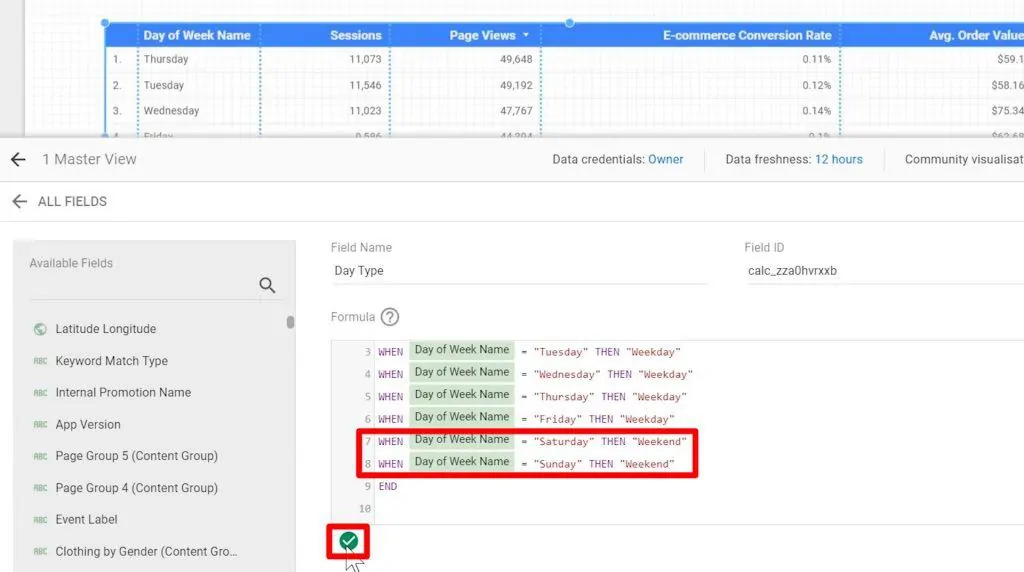
But if it’s a Saturday or a Sunday, they should be classified as a Weekend.
Looker Studio will validate the formula and show a green checkmark once the formula is seen as valid.
The Syntax of a Case When Statement
Let’s go over the syntax so that we can write this logic with a Case When formula.
Let’s type in CASE WHEN. I use uppercase here, but you can write in lowercase as well.
After typing WHEN, it’s going to say it’s invalid, but it’s okay. I’m just showing you it doesn’t allow me to input sample texts here. This will be fixed when we finish our function.
On the second line of code, we’ll type in a code that says when a certain condition is met, it will return a result. The formula for this is WHEN → Condition → = → THEN → Result. (Note that this is just a template or formula for how you can implement a variety of Case When functions—you will need to use real conditions from your data and describe the result that you want to return in your use case.)
And when another condition is true, we want to return another result. Remember that we always end our case with the word END. So, the formula for this next part is WHEN → Condition 2 → = → THEN → Result 2 → END .

Writing the Use Case Statement
So how do we apply this to our use case of weekdays and weekends?
Now in this case, we do not need anything else because we only have seven values for each day of the week. And we already know the return string that we want for each condition. So, let’s start writing.
We’ll write WHEN → Day of Week Name → = → Monday → THEN → “Weekday”. This tells Looker Studio that when the day of week name is Monday, then it is a Weekday.
We’ll do the same for days Tuesday through Friday.
And now, we can Save it.

Then, we’ll click on Finished.
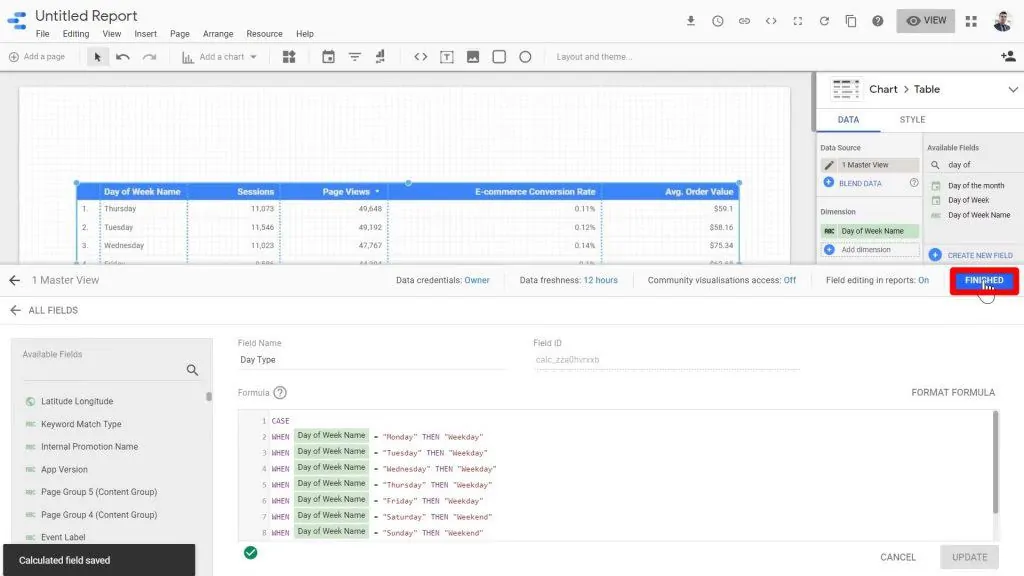
Let’s add our newly-created dimension which is Day Type.
For each day of the week that is a weekday, the Day Type is now Weekday. And for Sunday and Saturday, it is Weekend.

But this still isn’t quite what we wanted. We’d actually like two rows, one for Weekdays and one for Weekends.
So, we’ll get rid of their Day of Week Name as a field in the Dimension list.

That’s better. On our table, we can now see our Sessions, Page Views, E-commerce Conversion Rate, and Average Order Value per Weekday versus Weekend.

We can already see some interesting data in this table.
If I were the owner of this shop, I would rather advertise and promote my products on Weekdays because the Average Order Value is five times bigger than the Average Order Value on Weekends.

The Case When Formula
While I’d like to keep this tutorial short and sweet, I want to return briefly to the Case When formula to show you some interesting things about it.
Again, let’s go to Resource and then click on Manage added data sources.
Then, we’ll click on the Edit button on the view of our data source.
We’ll type in day to find the specific field we need.

Once we’ve found our field, we’ll click on fx (function).

Then, displayed in the code window is our Formula.

You can troubleshoot and edit any of your formulas for any of your metrics using this tool.
Note that if you want to do calculations with metrics themselves, this requires a slightly different approach. To learn more, check out our guide to Calculating a Conversion Rate between Two Metrics.
Other Case Functions
Logical Operators
There are some other useful functions that I want to describe briefly. The first is logical operators, which you can use in the conditions section of the Case When statement.
Instead of using the equal sign, we can use an exclamation mark to say “does not equal to.”

Another thing that we can do is to raise another condition using OR. For example, here we’ll include the field name, which is the Day of Week Name → = → Tuesday → THEN → Weekday .
Although we’ve placed Monday and Tuesday in a single line, we can’t bring all of these days into one line. However, there is still a better solution to remedy this.

To do that, we’ll remove lines three to line six because I want to bring all the Weekdays into one line.

IN Case Statement
For this, I’m going to use the IN Case Statement. The IN Case Statement can group several different conditions inside parentheses. To do that, we’ll input the following into the code window:
IN → ( → ”Monday” → , → “Tuesday” → , → “Wednesday” → , → “Thursday” → , → “Friday” → ) → THEN → “Weekday”.
The result is the same but we achieved the logic that we wanted.

Regular Expressions
To combine Saturday and Sunday, we’re going to use a regular expression.
If you do not know what a regular expression is, then you can use the IN Case Statement like we did for the other weekdays.
We should first delete the fourth line of code for Sunday because we’ll be combining it with Saturday.

We can use a regular expression, in a Case When statement which is powerful. It brings the flexibility of this formula to a whole next level.
It’s easier to write the code in seven lines, one for each day. However, I would like to encourage you to use RegEx as it’s so much more powerful than the IN Case Statement. It’s also useful in a wide variety of situations, so it keeps you flexible.
To implement the regular expression, we’ll type in REGEXP_MATCH → ( → Day of Week Name → “Saturday | Sunday” → ) → THEN → “Weekend” .
The pipe in between Saturday and Sunday signifies “or.” So the code reads as when the day of the week is either Saturday or Sunday.

Now that the formula is valid, let’s Update it.

Then, we’ll click on the Finished button to save it.

And now we have the same table which has two lines of code for both the Weekday and Weekend Day Types.

Case Else Statement
We have one more option, which is Case Else. Which means if none of these conditions are met, then return another result.
Sometimes you want to use Else as a catchall to just include anything that’s not one or two specific conditions that you’ve already included in a function. You can also use it to make sure that data with any errors still gets counted.
For example, if the Day of Week Name field for a data point was populated with something other than a day of the week (i.e. “basketball” or “February”), then your function will give a separate return for these data points.
To use this, we’ll write ELSE → “Result 3” .

FAQ
How do I write a Case When statement in Looker Studio?
To write a Case When statement, you need to follow the syntax:
CASE WHEN [condition1] THEN [result1] WHEN [condition2] THEN [result2] … ELSE [default result] END. You can specify multiple conditions and corresponding results to categorize data.
How can I implement the Case statement in my Looker Studio reports?
To use the Case statement, you need to create a calculated field in your Looker Studio report. This can be done by accessing the data source settings, adding a new field, and defining the Case When formula with the desired conditions and results.
Can I use the Case statement for other types of calculations?
Yes, the Case statement can be used for various types of calculations and data manipulations in Looker Studio. It provides a flexible way to categorize and group data based on specific conditions.
Summary
Using the Case When statement in Looker Studio is very valuable, especially for creating accurate calculated fields.
Through this tutorial, you were able to learn about the importance of the Case function and its applications along with the logical operators, IN Case statements, and regular expressions which are the conditions you can use to optimize your use of the Case When statement.
If you want to dive deeper into GDS, check out our handy guide to functions for calculated fields in Looker Studio, or get to know more about displaying your data with multiple dimensions at the same time in Looker Studio pivot tables.
Do you have any other use cases for Case Functions? Let us know down below in the comments!
Subscribe & Master the Basics with our FREE Looker Studio Course


")
Hi! Can we do a nested CASE statement in Data Studio?
CASE
WHEN
CASE
WHEN
WHEN
END
WHEN
ELSE
END
No, that is (not yet) possible