Last Modified on July 31, 2024
Want to receive Slack notifications for 404 errors, conversions, leads, or any other website activity?
You are at the right place!
If you’re running a business, you might have heard of or are already using Slack. It is a messaging program designed for use within a workplace.
It organizes conversations into channels, private groups, and direct messaging. In addition to these online communication features, Slack can also sync with the apps your company uses, like Google Calendar and Google Drive.
If you want to send alerts directly from your website into a Slack channel using Google Tag Manager, you can now install our Slack Webhook tag template into your GTM account. Our Slack GTM template is available and free to download in the Community Template Gallery.
This will let you send a message directly to any of your Slack channels containing any data you may have gathered inside Google Tag Manager.
Where can this be useful? If you have an error, conversion, or any other event you want to track, receiving a notification message allows you to monitor data in real-time. You can then quickly execute solutions to fix the errors if they occur.
In this guide, you’ll learn how to receive slack notifications for 404 errors.
Here is an overview of what we’ll cover:
- Account Setup
- Using the GTM Slack Template
- Get your Slack Webhook Link
- Testing the Slack Webhook Tag
- Customize your Slack Alters with a Dropdown Menu
Let’s dive in!
Account Setup
First, let’s look at how we have set up our account.
In our Google Tag Manager account, we have a tag that sets up a Google Analytics event that triggers whenever a 404 error happens.

Looking at the tag closely, you can see the data that is being sent over to Google Analytics.
Here we have an event that detects the page path of the error and the referrer – which page the user came from.

Knowing these details will allow you to potentially fix the link from the page referrer and redirect the user to the right destination.
Now, what if we wanted to send this information to our Slack channel so that our team gets alerted? This is where our GTM Slack template comes in handy.
Using the GTM Slack Template
There are various ways to use a GTM custom template, but for this guide, we’ll import the template while creating a new tag.
1. Go to Tags → New.

2. Next, click on Tag Configuration.
3. From here, you can access more tag types by clicking on Discover more tag types in the Community Template Gallery.

4. Search for Slack, then click on Slack Webhook.

5. Click on Add to workspace.
You will then need to allow some permissions, which include injecting scripts into your page and accessing the global variables.
6. Finally, click Add.

7. Next, we’ll have to get our Slack webhook URL.
Get your Slack Webhook Link
8. To get this, we need to create a custom Slack app.
9. Inside your Slack account, click on your workspace → Settings & administration → Manage apps.
This will direct you to the app menu.

10. From here, click on Build.
This will then take you to the apps section of the Slack API.

The Slack API is an interface where you can customize your workspace. It includes a lot of features that allow you to connect, simplify, and automate your work with Slack apps.
11. From here, you’ll Create an App.

12. Provide a name for the app.
This can be any name you want, but for this guide, we’ll call this 404 Error.
13. Next, select your Slack workspace, then Create App.

Now, we’ll add some features and functionalities to the app.
14. In our case, the functionality we are most interested in is Incoming Webhooks, which allows us to post messages from external sources into Slack.

15. Toggle the switch to activate incoming webhooks.

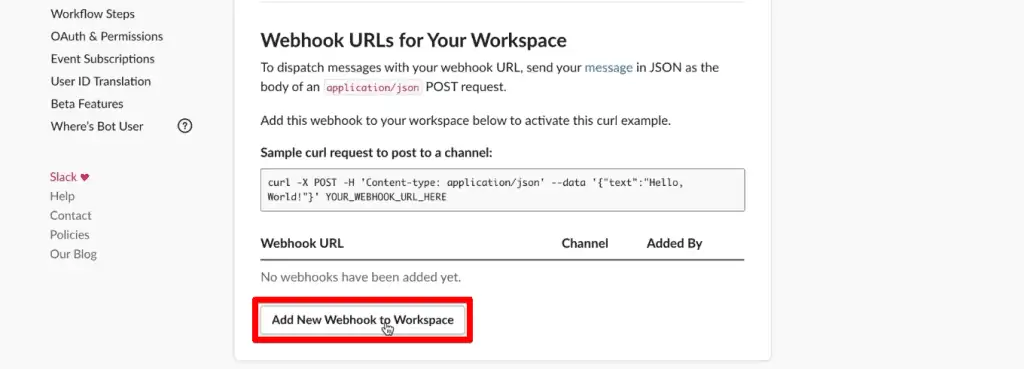
16. Next, scroll down and click on Add New Webhook to Workspace.

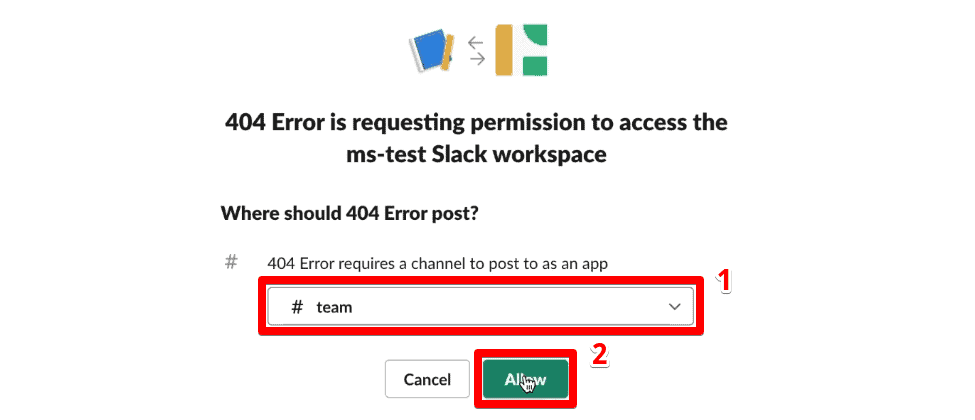
17. Select the channel where you want the app to post the messages we’ll generate. Next, click on Allow.

18. Going to your Slack workspace, you should see a message stating that integration has been added to the channel.

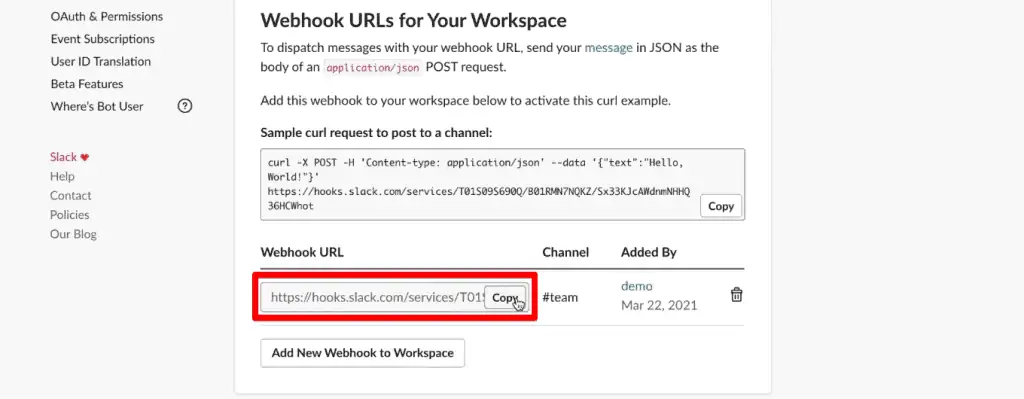
19. Now, go back to your Slack API, scroll down, and Copy the webhook URL to your Slack channel.

20. Paste this value in the Slack Webhook URL section in Google Tag Manager.
21. The Slack message text can be anything you want, but let’s go ahead and input the same data we are sending over to Google Analytics – the Page Path and Referrer.
🚨 Note: Unfortunately, the variable menu does not work in this section, but you can still use variables in your message by enclosing the variable name with two curly brackets.

These are built-in variables, so we should be able to pull them into our message this way.
22. Next, we’ll select our trigger by clicking on Triggering.

We have already prepared a trigger for whenever a page 404 error occurs. In our 404 Error Tracking with GTM and GA video, we covered how to create this trigger by making a JavaScript variable that grabs the page/document title.
The trigger is set to fire whenever the page title contains “page not found”.
Depending on how your website is set up, your page or page title can either display a 404 error, page not found, page unavailable, or another similar message. You should then adjust your trigger configuration accordingly.
23. Once you have created the trigger, select it from the list.

24. Finally, provide a name for your tag and click Save.

Testing the Slack Webhook Tag
Before implementing the tag on your website, you should first test if it is working correctly.
For that, click on Preview.

Before starting Tag Assistant, put a URL to a page that does not exist on your website. Next, click Start.

As expected, the tab opens to a non-existent page and returns a 404 error.

If the error message that your page returned or the page title is different from what you expected, you may need to change how your trigger is set up.
If the trigger is set up correctly, then your Slack webhook tag should show up in the tags fired section of the Tag Assistant.

The final check to ensure you can receive Slack notifications for 404 errors is to check your Slack channel directly.
Going back to your team channel, you should be able to see a message from your 404 Error app.

The message should show the path of the page causing the 404 error as well as the full referrer URL for the 404 error page.
🚨 Note: If the variables are not appearing properly in your Slack message, then check if these variables are enabled in your GTM workspace by going to Variables → Configure. The page path and referrers should be in the pages section.
Now, somebody from your team could go ahead and say that you should fix that error. If the page path is for an irrelevant page, then you can just ignore it.
However, if the 404 error was from a link click within your website to another page, you might instead want to put in a redirect to fix this.
Since your Slack Webhook tag can access just about anything inside your GTM workspace, the information you can relay in the Slack message is limitless.
If you’re trying to send over conversion information, you might want to include the order ID, for example. You can also get informed about JavaScript errors and send them over to your developer so that they can fix them right away.
Customize your Slack Alerts with a Dropdown Menu
Technically, we are already done! You just have to publish the tag live to your website and you will start receiving Slack notifications for 404 errors.
However, we can take this Slack notification a step further by including other functionalities within the Slack message.
To do this, we need to enable the Use advanced Variables option in our tag configuration.

Slack gives us the ability to customize our messages further by using its Block Kit Builder. This allows us to include images, videos, buttons, and more. We can create prototype layouts for our Slack message and use them inside a custom JavaScript variable in GTM.
While we have a live preview of what the message will look like, most of the edits we will make are not through changing the display but by altering the JSON (JavaScript Object Notation) payload.
Feeling a little intimidated? Don’t worry because JSON is self-explanatory and easy to understand.
You can also design your Slack message by starting with a template.
Go to the Block Kit page of the Slack API. Under the Block Kit Builder section, click on templates.

The available templates give you a starting point on how you would want your Slack message to look, and how it is formatted.
🚨 Note: Not all elements available in the block kit builder will work inside the Slack message since it is not an interactive app.
There are a lot of things we can put in our Slack message, but for this example, we’ll include a section specifying the error type, page path, and referrer.
We’ll also add a dropdown menu specifying the status of the 404 error – if it is already fixed, still pending to be resolved, or if the team should ignore it since it’s irrelevant.
Here is what we found works best to include in a Slack message for 404 errors.

If you want to include other items in your Slack message, click on any element from the list at the left. You can then edit its format in the JSON payload editor at the right.

Once you are satisfied with how the block kit looks, click on Copy Payload to easily copy the JSON text at the right.

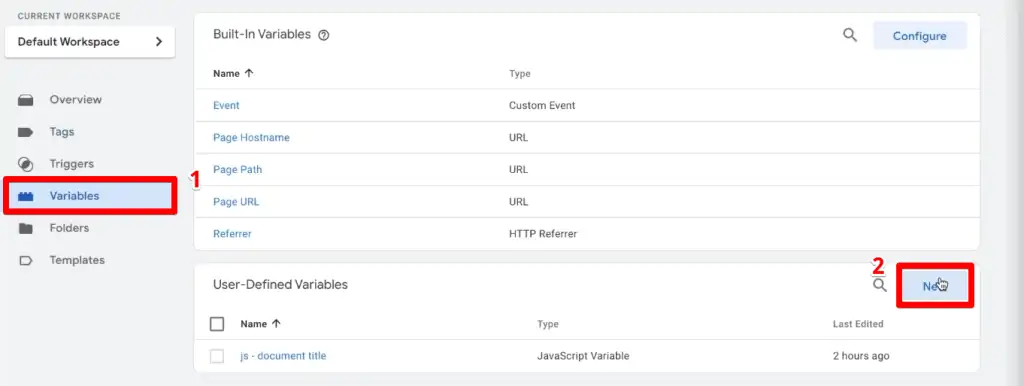
Next, go back to GTM and click on Variables → New.

Provide a name for the variable, then click on Variable Configuration → Custom JavaScript.

A custom JavaScript variable always needs to have an anonymous function that returns a value. So, type the following code:
function(){
return
}
Next, paste the JSON payload after the return portion of the code. Finally, click Save.

Let’s return to our Slack webhook tag and enable the Use advanced Variable option. Select the custom JavaScript variable, then click Save.

After previewing the tags again, you should see the new Slack message in your Slack channel.

When you select an option in the dropdown menu, you will see a warning message stating that the interactive responses don’t do anything since the app is not configured to handle them.

Choosing from the dropdown menu only changes the field displayed, but it is enough for your team to know whether they should follow up on the error or just ignore it.
FAQ
How can I receive Slack notifications for website activity?
You can use the Slack Webhook tag template in Google Tag Manager (GTM) to send alerts directly from your website to a Slack channel. This allows you to monitor data in real-time and quickly address any errors or events you want to track.
Where can Slack notifications be useful?
Slack notifications can be useful for tracking various website activities, such as 404 errors, conversions, leads, or any other events you want to monitor and receive alerts for.
Can I customize the Slack notifications?
Yes, you can customize the Slack notifications by using advanced variables and the Block Kit Builder in Slack. The blog post explains how to enable advanced variables, create a custom JavaScript variable with a JSON payload, and design the Slack message using the Block Kit Builder.
Summary
Great! That’s all the steps you need to follow to receive Slack notifications for 404 errors. We hope you found our Slack webhook tag as helpful as we did. We figured that it’s especially useful for fixing 404 errors on our website.
Don’t be mistaken – detecting 404 errors is not the only circumstance where this could be useful. There are many other instances where you can use the Slack webhook tag template to monitor the activities happening on your website.
You can configure your tag so that whenever somebody comes from Google Ads and converts, a Slack message is sent to your client informing them that a conversion happened. We are sure they’ll be happy to know that the campaign works and their money is well spent.
Check out our guides on GA4 conversion tracking and Meta Pixel purchase and conversion tracking to learn how to set up a conversion trigger that you can then use inside the Slack webhook tag.
Just remember that Slack is not a tracking app, so we wouldn’t recommend sending copious amounts of data into the system.
Now, we’d love to hear from you if you’d be using this and in which circumstances. Which block kit elements did you find work best for your use cases? Let us know in the comments below!


That was wow!