Last Modified on September 4, 2024
Great, so you’ve set up conversion tracking for events across your marketing tools — but how do you assign a value to these conversions so that you can track revenue?
Tracking conversion values will help you accurately measure your marketing campaigns’ financial impact on your business. You can also send this data to other tracking tools like Facebook or Google Ads and further improve your sales!
In this guide, we’ll learn two methods of tracking conversion value with Google Tag Manager and how to send this data to other marketing tools.
An overview of what we’ll cover:
- Why is conversion value important?
- Implementing your custom Data Layer
- Capturing conversion value with the GTM variable
- Passing on the value of the conversion to GTM Tags
- Getting the ‘Total Conversion Value’ with custom JavaScript
So let’s start!
Why Is Conversion Value Important?
With conversion values, you can quantify the monetary impact each conversion has on your business. This is especially important in eCommerce stores, where different products have different prices.
So you can add the conversion value as 1 dollar or 1 euro (depending on the currency or the price of the product that converts).
For example, if you keep the Conversion Value as 1, it will count the value of 10 conversions as $10.

Let’s consider an eCommerce store with different products available at a wide range of prices.
This time, the conversion value will depend on the total order value.

This final value is the amount we’ll send to our Google Ads conversion tracking, Facebook conversion tracking, and also to the sales event that fires in Google Analytics.
We can transfer this information using different methods, but the best practice is to do it with a custom Data Layer.
🚨 Note: If you find that the data layer contains the right information but isn’t in the format you can use, check out our handy guide on how to transform the data layer with Google Tag Manager.
Implementing Your Custom Data Layer
You’ll find the custom Data Layer for your website under the Data Layer tab of Google Tag Manager’s preview and debug console.
🚨 Note: This holds true for a website built in WordPress with the Woo-Commerce plugin. However, this will change based on the installation of your website.
But first, let’s discuss what it means to implement a custom Data Layer.
To demonstrate, we’ll take a look at a new order with a different conversion value.

If you have implemented a custom Data Layer for the web page, you’ll be able to see this order’s details under the Data Layer tab of the preview mode: things like the tax, shipping cost, payment type, individual products, and more.
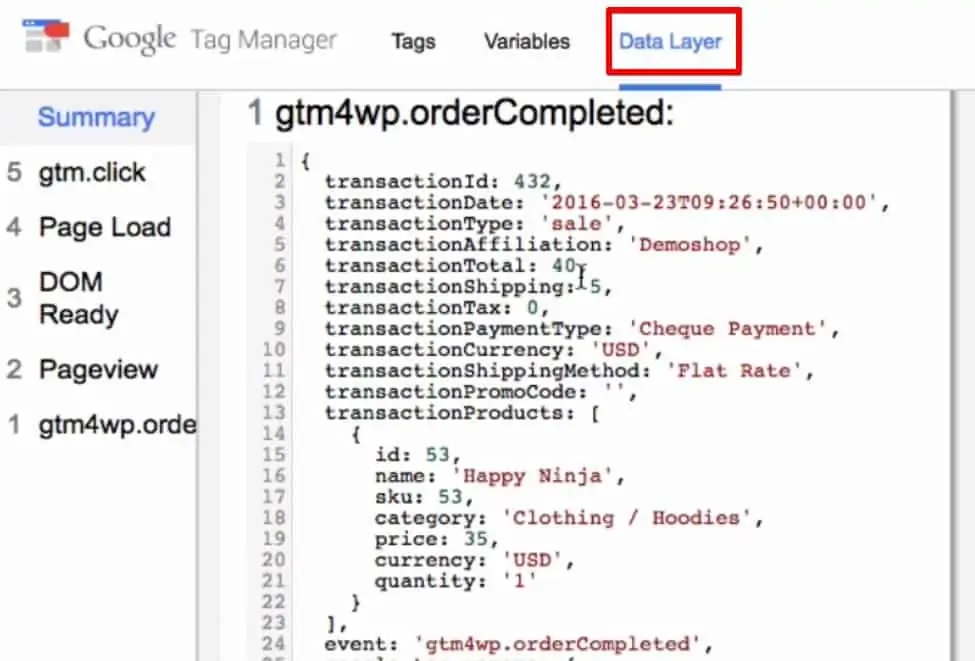
We can collect all of this information and send it to tracking tools that help us manage and analyze conversion data.
You can implement a similar custom Data Layer using the plugin Google Tag Manager for WordPress by Thomas Gieger. This plugin enables the Data Layer for the transaction page on our website.
Depending on your website, you might need to use a different plugin or ask the developer of your website to add the conversion values directly to the Data Layer.
Next, to send these values to the tracking tools, you’ll need a Data Layer variable.
Capturing Conversion Value with the GTM Variable
A data layer will always consist of key-value pairs (if these are unfamiliar to you, check out our post on UTM parameters). For example, if transactionTotal is the key, our value will be 40.

We’ll use this key and add it to a variable. Let’s open the Variables section on Google Tag Manager and create a New Variable.
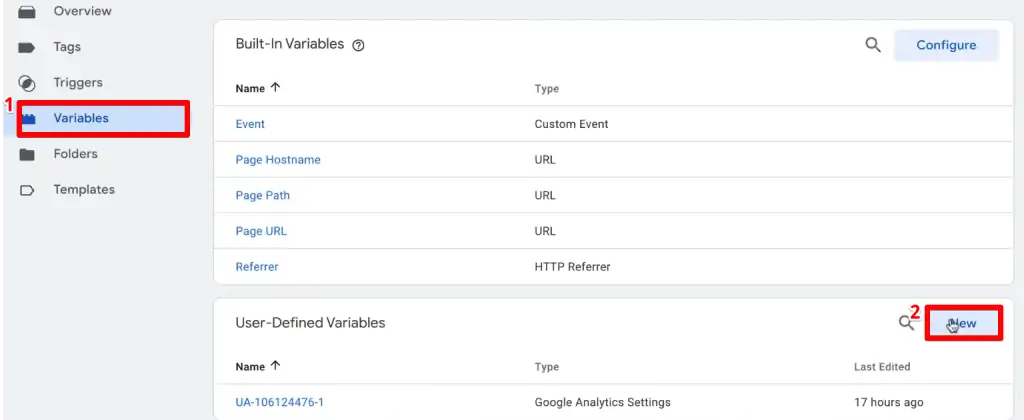
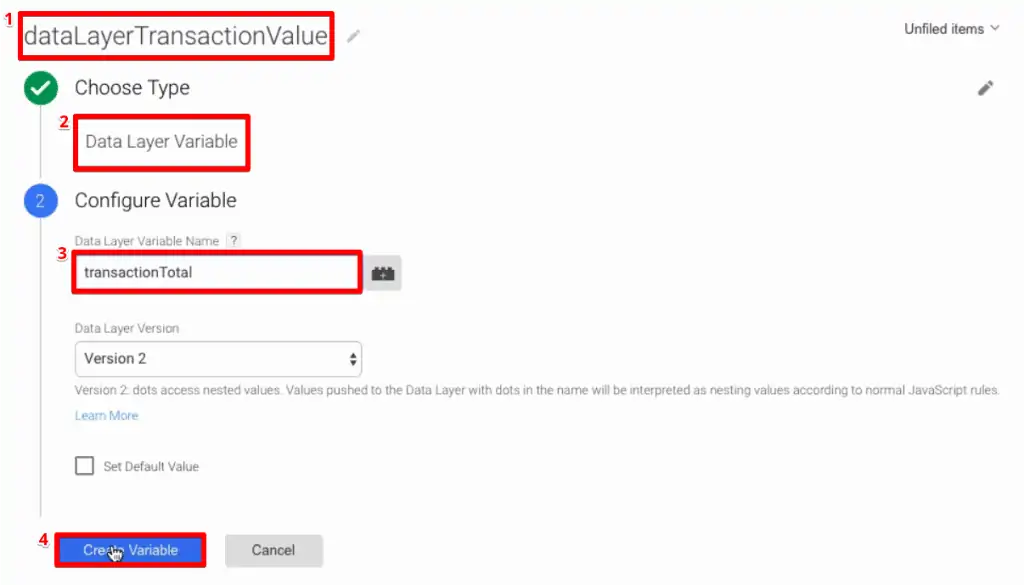
We’ll also add a name to the variable and select the Data Layer Variable as the variable type.
Next, we need to add the key for the variable. In our case, the key will be transactionTotal.
Once done, click on Create Variable.
To see how this variable appears, refresh the webpage in GTM preview mode and place another order from the shop.
You’ll find the Data Layer variable under the Variables tab of the PageView event. The dataLayerTransactionValue will be equal to the total order value.

We’ll also find the different Tags that fired when we made a particular transaction.

We can use this variable to pass the value of the transaction to our tracking tools using Tags.
Let’s see how!
Passing on the Value of the Conversion to GTM Tags
Open your Google Tag Manager account.
Then open one of the conversion Tags through which you want to send the value data.
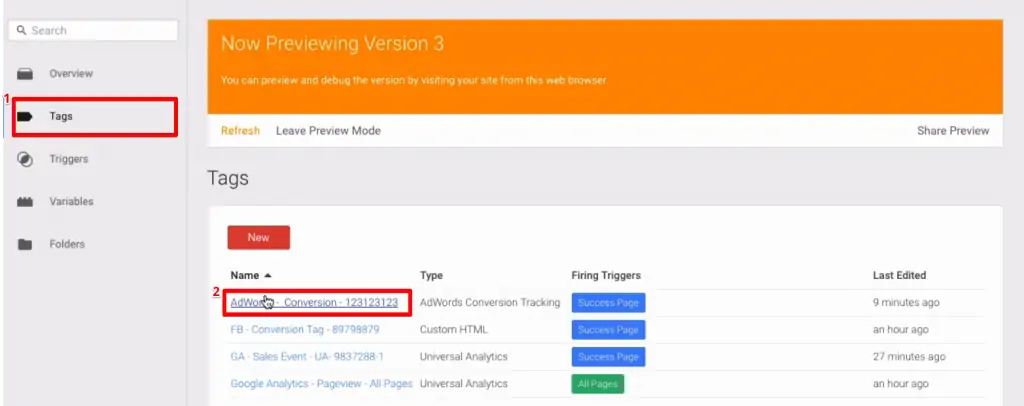
Scroll down to the Conversion Value field and click on the brick beside the value box to select the Data Layer variable.
Next, click on Continue.

🚨 Note: Dynamic values can always be added using double curly brackets around a variable’s name.
So, every time this variable is called, it will pick up the data from the data layer and transfer it to the Tag.
This is the best practice to transfer data into Google Tag Manager. This is because, with a proper Data Layer integration, the data is available in a structured format, making it easier to access.
Another method of fetching this information is by scraping the actual DOM tree.
However, this method isn’t the most accurate one because it records the value directly from the display of the web pages. This means that if the page changes, the value that is fetched will change and impact your tracking.
One way to implement the scraping method is by using a DOM element variable. But in our guide, we’ll do it with custom JavaScript.
Getting the Total Conversion Value with Custom JavaScript
Let’s open the order received page and right-click on the total order value to Inspect the element.
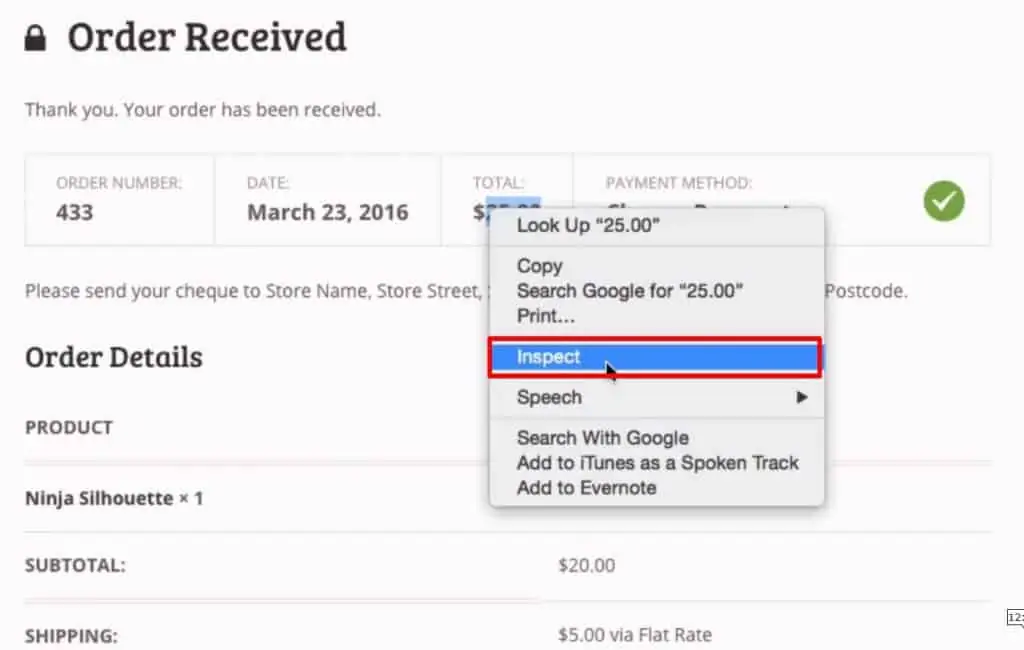
On the right side of your screen, an HTML mark-up window will open.
With the help of a JavaScript variable, we can access the element from the Document Object Model (DOM) and fetch the total value.

This is a fairly easy process for someone who knows JavaScript. However, if you’re a marketer who’s not comfortable writing such codes, I have a recommendation for you!
Using GTM Variable Builder to Write JavaScript
The GTM Macro Builder plugin can automatically write the JavaScript you need to pull the given value. You can download it from the Chrome extension section.

All you need to do is select the desired element on your web page and open the console. Since we only want the value to transfer to our Tag, we won’t select the currency sign in this case.
Once done, we’ll click on the GTM Macro Builder extension to extract the data with the help of JavaScript. And at the bottom of the Console window, we’ll be able to see a query selector code in green. Let’s Copy the code to test it.

Paste the code into the Console and press the Enter key to run it.

This code will return the total conversion value.

Next, we want to make this value accessible to Google Tag Manager.
Create DOM Transaction Variable
Let’s create a New Custom JavaScript variable in Google Tag Manager.
We’ll configure the variable by adding JavaScript code. This code should be a JavaScript function that returns a value.

We’ll also add a Try and Catch function so that it can catch all the errors without interrupting the implementation. You can use our Conversion Value Template to write JavaScript code for Google Tag Manager.
function() {
try {
return;
} catch(e) {
return " " ;
}
}
Next, we’ll paste the query selector that we copied from the GTM Macro Builder. This code will be implemented after we call the return function.
Lastly, click on Create Variable.

Once we’ve created the variable, we can test it.
Let’s refresh the final transaction confirmation page of the demo shop. If the variable is installed correctly, the DomTransactionValue will show the correct order value under the Variables tab of the PageView event.
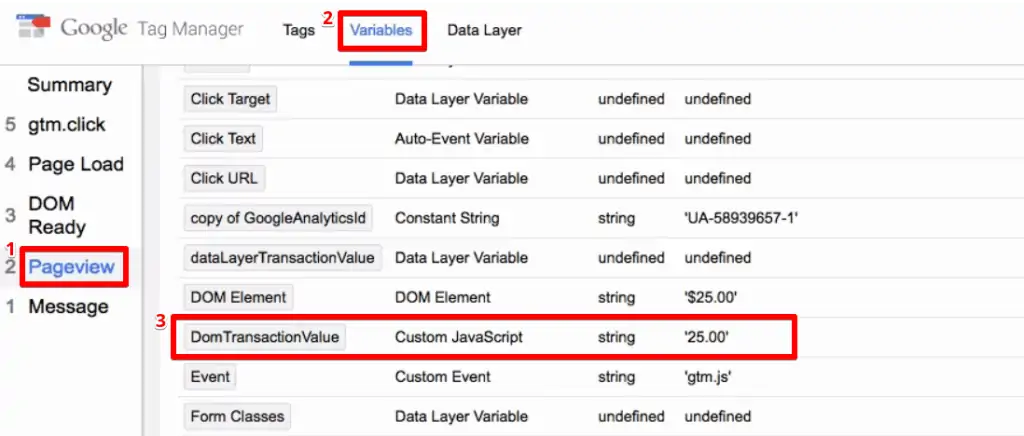
Furthermore, we can use this value to pass into the Tags that fire on the transaction page.
For this example, let’s use a Facebook conversion Tag to do this!
Sending Conversion Value to Facebook
Open an existing Tag for tracking conversions on Facebook. We’ll add our variable in the HTML code that configures the Tag.
First, we’ll need to locate the correct place in the code that accesses the value of the transaction.

Then, simply replace the value of the transaction with the variable name. Again, the variable name will be inside the double curly brackets.

Lastly, Save the Tag.
Similar to this, you can add the variable to the Google Analytics event Tag to send the conversion value to Google Analytics.
🚨 Note: For eCommerce tracking on Google Analytics, you’ll need proper data integration. This is because GA eCommerce tracking sends over a lot of values other than just the conversion value.

To test our Tags, let’s refresh Google Tag Manager and check out another product.
If the Tags are installed correctly, you’ll be able to see all the Tags fired when you place an order.
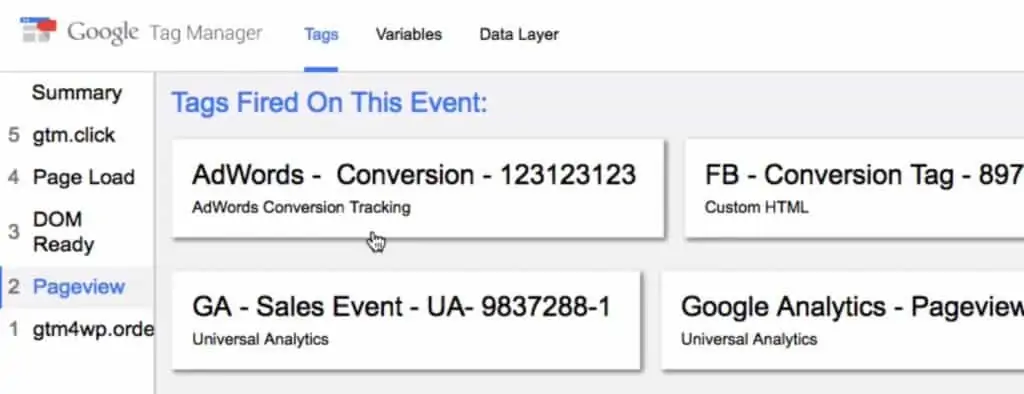
Select a Tag to see if it shows the correct transaction value. However, make sure to select Values as the Display Variables type.

Once done, the values of the Tags will be the same as the ones on the final transaction page.

Similarly, let’s also check the Facebook Tag that has been fired.
If the installation is correct, you’ll be able to see the value equivalent to the transaction amount. This amount will be pulled directly from the DOM element.

FAQ
How can I track conversion value with Google Tag Manager and the Data Layer?
1. Implement a custom data layer to store transaction values.
2. Capture the conversion value in Google Tag Manager with the Data Layer or Custom JavaScript variable.
3. Pass the conversion value to a GTM tag.
4. Test and publish the implementation live on your website.
Why is tracking conversion value important?
Tracking conversion value allows you to quantify the monetary impact of each conversion on your business. This is especially crucial for eCommerce stores where different products have different prices. By assigning a value to conversions, you can accurately measure the financial impact of your marketing campaigns and optimize your sales strategies.
How can I implement a custom Data Layer?
To implement a custom Data Layer, you can use plugins like Google Tag Manager for WordPress or directly add the conversion values to the Data Layer. The specific method may vary depending on your website setup, so it’s recommended to consult the documentation or seek assistance from your website developer.
How can I pass the conversion value to GTM Tags and other tracking tools?
To pass the conversion value to GTM Tags, you need to create a Data Layer variable in Google Tag Manager and link it to the conversion value field of the respective Tag. This allows the Tag to access and utilize the captured conversion value.
Similarly, you can modify Tags in Google Tag Manager to send the conversion value to other tracking tools such as Facebook or Google Analytics, enabling comprehensive analysis and optimization of your marketing efforts.
Summary
So that’s all you need to know about tracking conversion values with Google Tag Manager.
Conversion value is an important point of data to gauge the success of different conversions. With this method, you can send this data to various marketing tools such as Google Ads, Facebook, or Google Analytics.
Before sending the conversion value, you’ll need to set up conversion tracking for your marketing tools.
Were you able to track the conversion values for your eCommerce store? Which method do you prefer? Let us know in the comments below!


Can this method be used to scrape any HTML value off of a page, not necessarily a conversion value? We have a homepage slider with 5 different slides and each slide goes to a different page. We would like to see the traffic that is coming from these slides as events in GA once a person clicks on a slide.
generally yes, but it might be harder if the element you want to pull is inside of another element. You definitely need to test it and see