
Last Modified on January 7, 2025
Google Analytics 4 has been on the scene for over three years, yet for many users, it’s still quite a new tool, especially for those just starting with digital marketing.
But hey! That’s the online world for you – new tools and businesses are constantly added to the giant web traffic ball.
There’s an ever-increasing demand to collect and analyze data for websites and apps, for which you need a tool like Google Analytics 4.
There are several ways to add Google Analytics 4 tracking to a website, and we are going to discuss all that along with the following topics:
- Benefits of Using Google Analytics 4
- How to Hard-code GA4 on the Website
- How to Add GA4 via Content Management Systems
- How to Add GA4 Tracking with GTM
- Verifying your GA4 Tracking
Let’s crack on with adding GA4 tracking to your website!
Why Use Google Analytics 4?
We could do a whole blog post on this topic, but briefly, here are the benefits GA4 can bring you.
- It’s a free analytics tool that can provide data on how users interact with your website and app.
- The updated version brings many capabilities with a focus on predictive analysis and improved privacy measures.
- It gives you a good idea about how different marketing channels are performing for your business, so you can direct your resources to the right place.
- It works on an event-based data model vs its predecessor’s session-based model and meets the changing requirements of how behavior should be measured.
- You can measure and analyze your website and app performance in one property.
- It provides robust reporting thanks to the explorations, where the focus is to do more out-of-the-box analysis vs relying on the built-in reports.
- GA4 comes with built-in events called Enhanced Measurements, that can be tracked without leaving its interface with a simple toggle switch. These events cover scroll, site searches, outbound clicks, video engagement, form interactions, and file downloads. However, with some of them, you would be better off setting up Google Tag Manager because of their limitations.
- GA4 is continuously updated with different features from time to time, so that should help to stay on top of the latest changes and easier to adapt once you’ve learned the basics.
- You can export your data to BigQuery for free so that not only do you own it, but you can also do any advanced analysis and power dashboards.
This isn’t a whole list of the benefits, as there are many other cool features. Depending on your business, some of them can make quite a difference while others might not be significant to you.
The bottom line is that it’s a free tool that provides you with a lot of useful data so why not use it? You can just use it to collect data that you can simply export to BigQuery and use however and whenever you want.
So, assuming you have already created a GA4 property, how can you add Google Analytics 4 tracking to a website?
It depends on whether you simply want to hard-code it, add it via GTM because you want to do a lot more tracking or use a CMS like Shopify or WordPress that has plugins to add GA4 tracking. Let’s explore these options.
How to Hard-code GA4 on the Website
Okay, it’s not as hard to do this as it might sound. This method is also known as installing the Google Tag aka G-Tag directly on the website.
You can do it depending on the access you have to the website’s backend and how comfortable you are with adding codes.
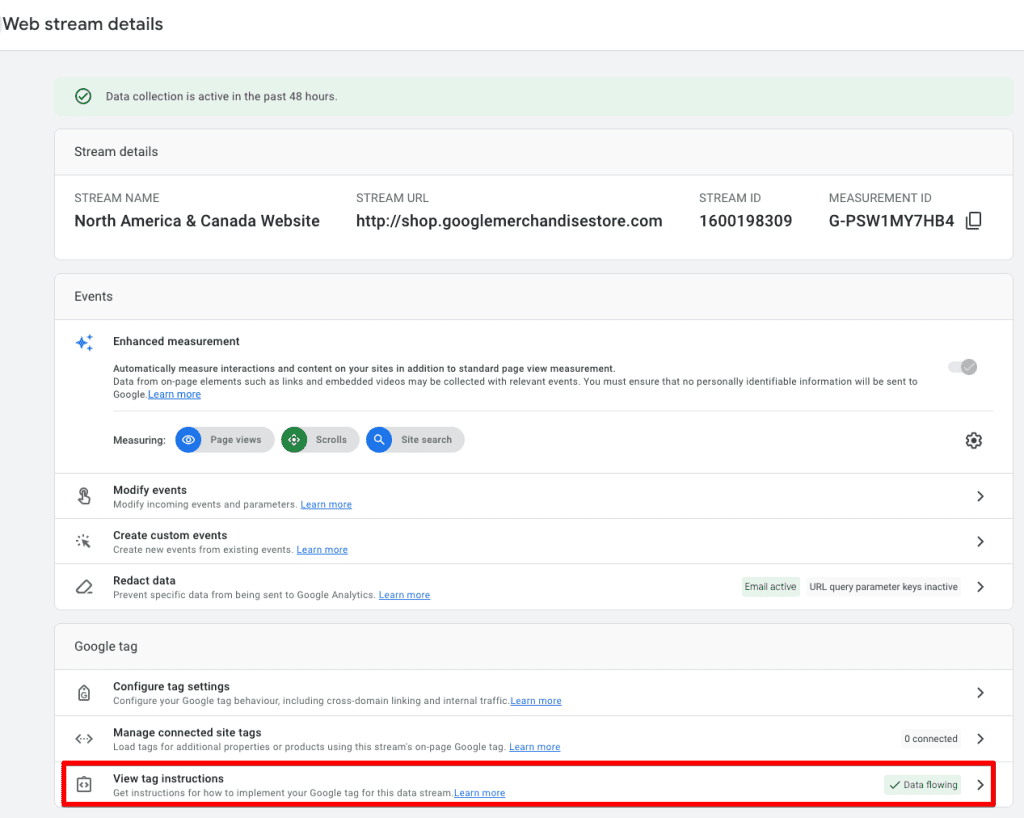
To start, we need to cover how to get your Google Analytics tracking code. This is in your GA4 account’s Admin section under Property settings → Data streams → Click on the stream.

💡 Top Tip: Learn more on How GA4 Data Streams Work in our article here.
Once you’re in the data streams interface, scroll down and click on View tag instructions.
Next, you’ll see the Installation instructions interface. Click on the Install manually tab and copy the Google Analytics code snippet as highlighted.
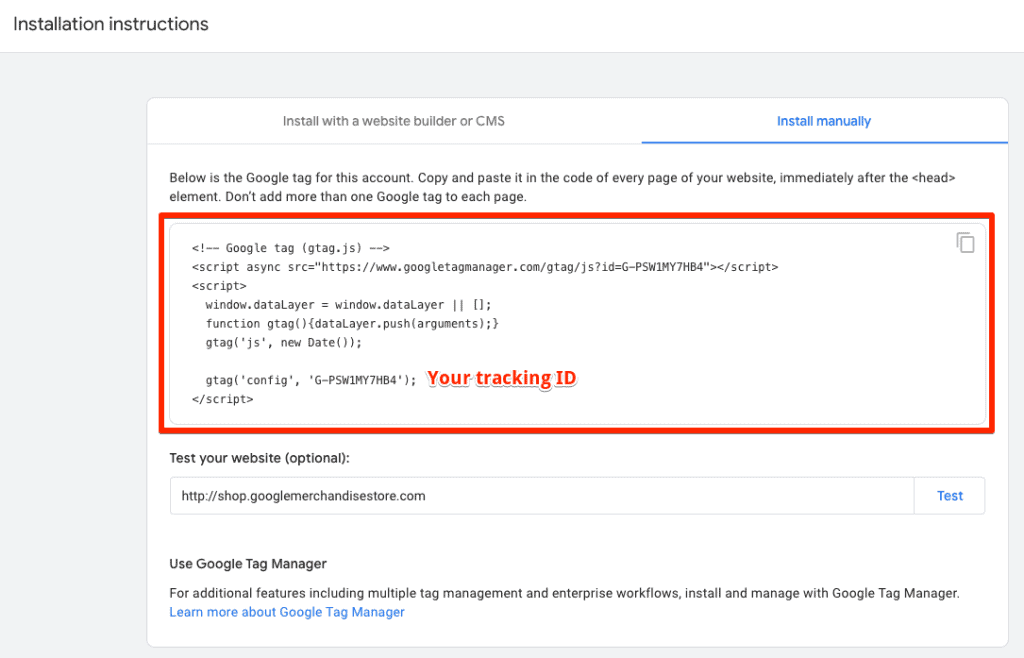
For the Google Analytics code installation, you can either install it yourself or give it to a developer, but it needs to be added to all the pages of the website right after the <head> section.
It’s important not to add it more than once to avoid duplicate tracking codes.
Let’s quickly look at the pros and cons of this method.
Pros
- This method is good enough to quickly install the GA4 for basic tracking.
- No need to use other tools if you know how to simply add the code to your website’s <header> section.
- If resources are available, then the developer or implementation specialist can do any advanced tracking.
Cons
- If you need to track more events and not just the page views, then they all need to be added separately to the website’s code.
- This means you either have to be good enough to do it yourself or have the resources to hire a developer or an implementation specialist to do it for you, which can add to your costs.
- There’s no central place to manage the tracking so you cannot be lazy about having proper documentation.
But what if your website is built on some of the most popular CMSs like WordPress and Shopify?
How to Add GA4 via Content Management Systems
This method of adding tracking to the GA4 code to your site relies on ‘native integrations’ and ’plugins’ these platforms offer.
There are many content management systems (CMS) and website builders that allow you to add GA4 tracking code natively and/or through a plug-in by simply adding the tracking aka measurement ID.
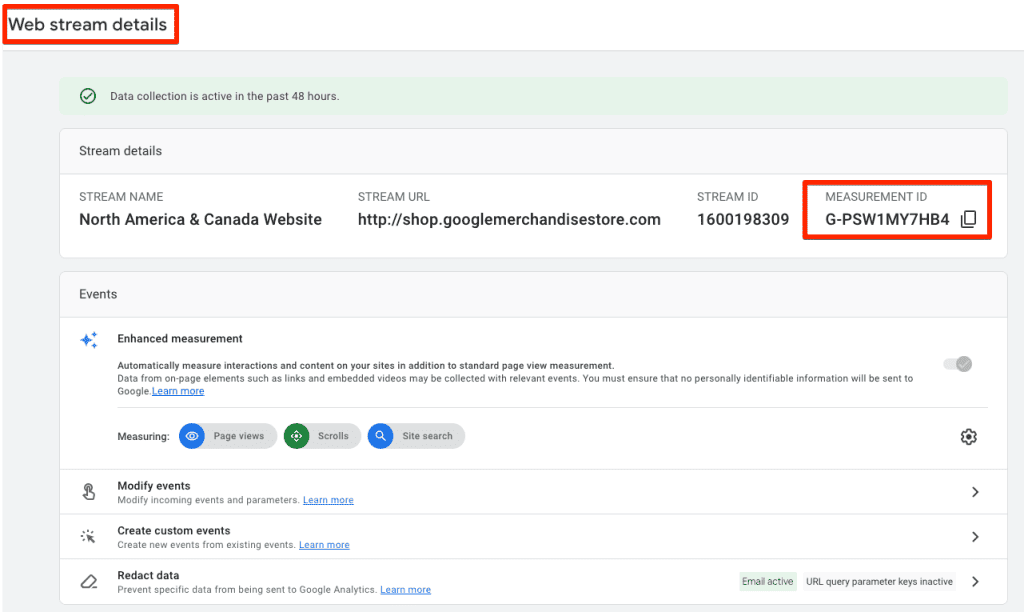
Before we go on about adding the measurement ID, let’s quickly recap where it’s found.
Remember the data streams we mentioned above? So, click on them and you can find your measure ID in Web stream details beginning with G-XXXXXXXXXX as shown below:
The hard-code method in the first approach can also be applied here where you have to add the tracking code in theme files or wherever you’re allowed to add the code.
But why go through all that hassle if you can easily do it with a native integration or plugin? While you ask yourself that question, let’s start by looking at these options.
Native Integrations
Some platforms like Squarespace and Wix allow you to add your GA4 tracking ID natively, i.e., without any code or plugins, while others allow you to do it both ways. Choose which one suits you.
A quick Google search should clarify if that’s doable for your platform or not. For instance, in Squarespace, you can add codes manually or use its native integration.
To add natively, go to your Settings → Website → Developer Tools → External APIs and enter your measurement ID under Google Analytics.
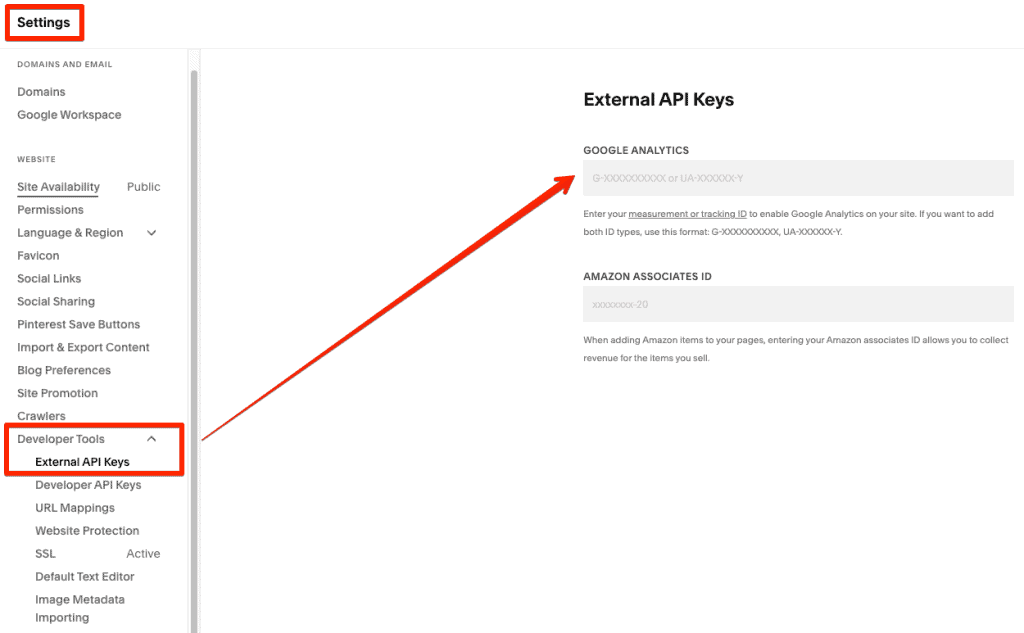
That’s it! You should be able to track your website data now. We’ll cover how to verify that later.
For other platforms like Wix, Shopify, etc., there are similar options, although with UI differences. Even landing page builders like Unbounce, HubSpot, etc. have a similar way of adding your GA4 tracking.
Plugins
Where there’s no easy native way available, there are official or third-party plugins, and WordPress is a prime example.
Although it’s not necessary that if you have native integration available then plugins won’t be available or work, it just gives you more choice and in most cases, plugins come with extra bells and whistles that you might or might not need.
A quick “GA4” search on WordPress shows approximately 100 plugins. Not all are specific to just installing the GA4 measurement ID, but some can handle a lot more.
Which one suits you better depends on two things: 1) what other tracking you want to add, e.g., pixels for other marketing platforms, eCommerce tracking, etc., and 2) the reviews.
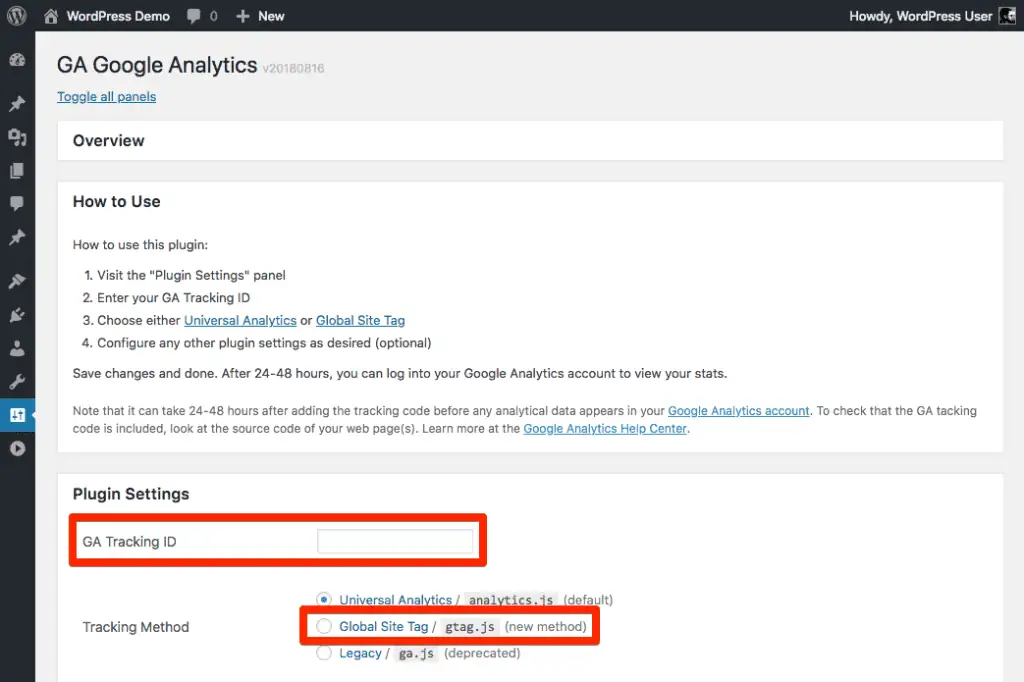
A simple plug-in like GA Google Analytics does the job for you pretty well.
You enter your measurement ID, then choose any other settings you want to customize your tracking like placement of the code (header or footer), tracking admin users, adding any custom code, etc, and save.
You also have Google’s official Site Kit plugin that you can use to achieve the same goal, although reviews aren’t as good. As we’ve said, it comes down to what you want to do with that plugin.
Shopify calls these plug-ins “apps,” so if you want to install GA4 to your Shopify website then you can use a Google & YouTube app that allows you to add tracking quickly to your site.
This app also allows you to connect to your Google Merchant Account and Google Ads as well as connect your store to YouTube.
💡 Top Tip: Check out our list of the Top 10 Chrome Extensions for Digital Marketers for more helpful plugins/extensions.
So, what are the pros and cons of this method?
Pros
- Native integrations and/or plugins make it easier to add GA4 tracking as you don’t have to deal with codes.
- Some plugins come packed with useful features compared to others and provide a lot more connectivity with other tools as well.
- There’s a wide array of plugins to choose from.
Cons
- Native integrations and plugins can be limiting if you want to track any other events.
- Plugins can be buggy or not updated which can cause issues with your tracking.
- Too many bells and whistles might just away the simplicity part out of plugins.
How to Add GA4 Tracking with GTM?
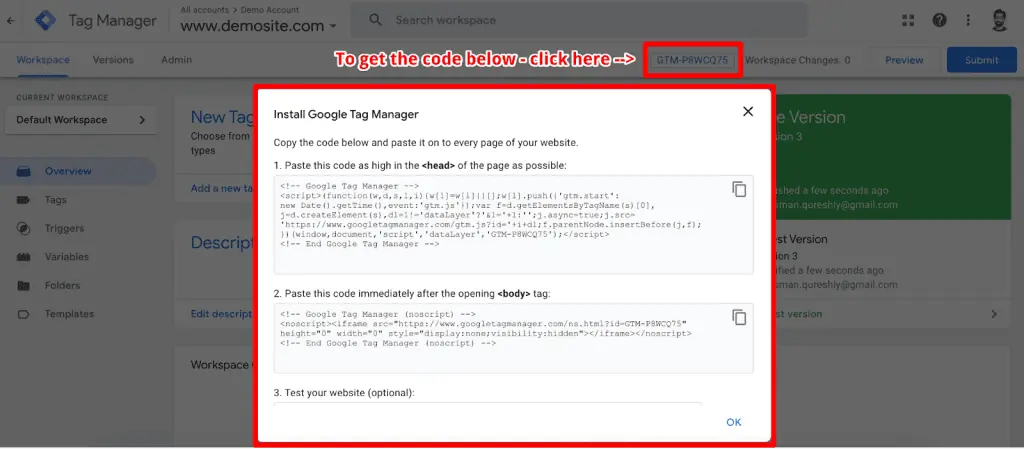
The first and most important step to add Google Analytics 4 tracking to a website is to install your GTM container on your website, which is somewhat similar to how you would add the GA4 code.
You can find this code by going to your GTM container and clicking on the code in the top right next to the Workspace changes counter.
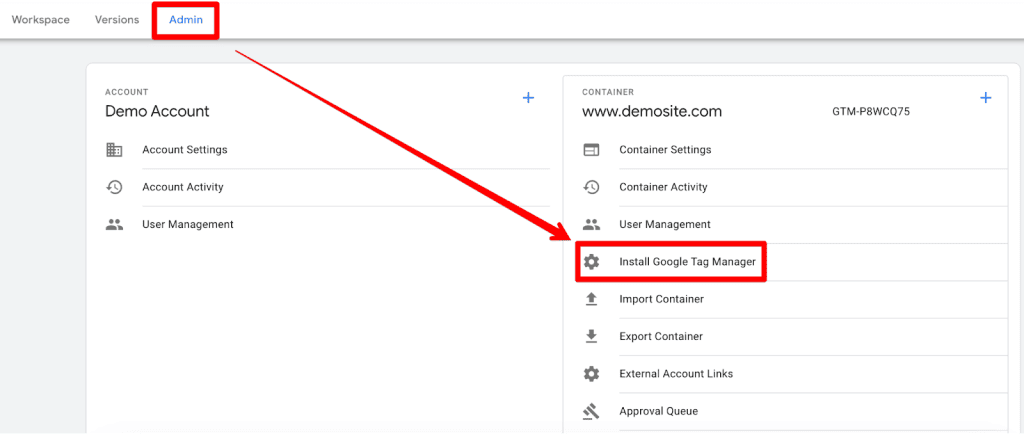
Another method to get this installation code is to go to Admin → Click on the Install Google Tag Manager in the right container column.
This needs to be added in the header and the body section. Although it has been known to work even if both codes are added to the body section, why not simply follow the instructions to ensure it works as it’s designed to?
For GTM, you might not find a lot of native integration available but platforms like Squarespace make it easier to add codes to the site by going to Utilities → Website Tools → Code Injection.
But, in CMSs like WordPress, you can add to the code in your theme files or simply add your container ID with a plugin like GTM4WP which provides a lot of other functionalities vs just adding the GTM code.
Once your GTM code is added, you can go to your container where you can add Google Analytics 4 tracking to a website.
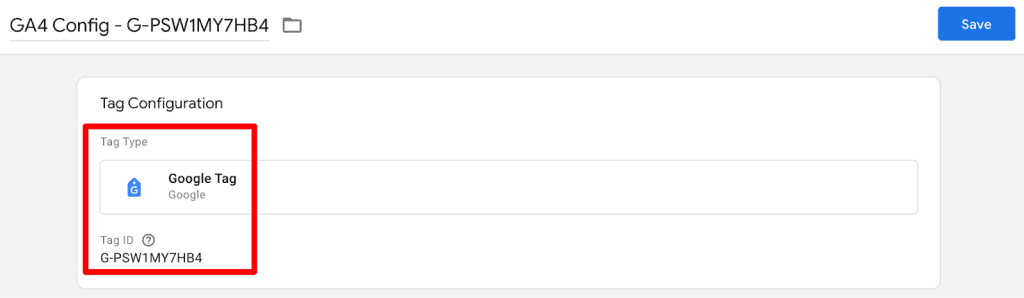
You can start by clicking on Tags → New Tag → Select Google Tag as your configuration → Add your GA4 measurement ID found in your GA4 stream settings, as shown in the How to Add GA4 via Content Management Systems section.
Next, add a trigger for the GA4 code to fire on like Initialization – All Pages and Save.
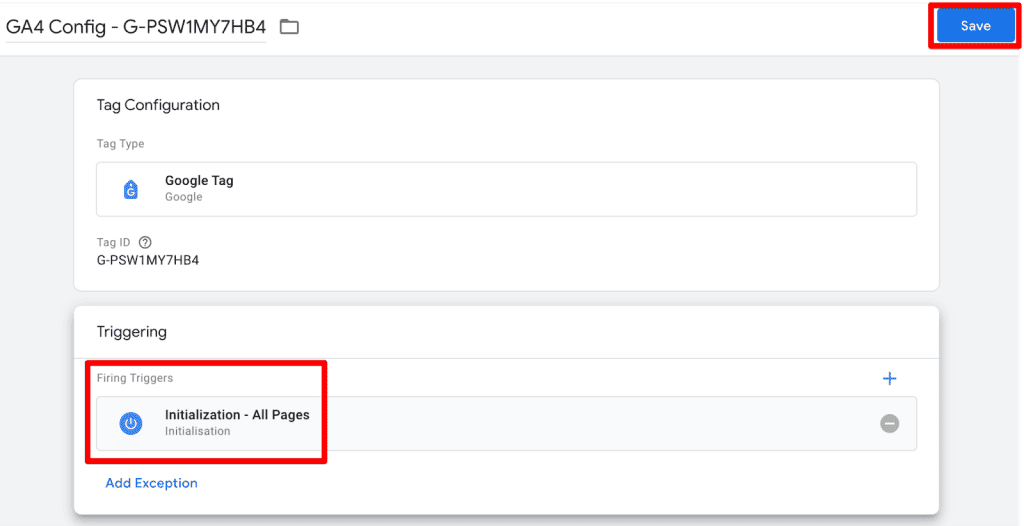
Don’t forget to click on the Submit button in the top right and Publish the container so the tag is live and working properly.

And that’s it! Once the container is published, your GA4 installation via GTM should be complete.
But with GTM, you should preview your setup before publishing so you’re not pushing live any incorrect changes to your site, which is a good practice. More on that below.
How does this method compare to the other two methods?
Pros
- GTM makes it easier to track any type of interaction apart from the basic page views.
- You can manage your tracking setup easily in one place and it’s a robust tracking solution.
- If you get the hang of it, the UI is easy enough to do some basic tracking yourself which reduces dependability on developers.
- You can add tracking for other platforms like Facebook, Google Ads, LinkedIn, Twitter, etc. with GTM as well, not just GA4.
- It makes debugging easier even for basic users.
Cons
- It can become quickly overwhelming if your basics are not clear.
- You need to be comfortable with the technical side of things.
- You have to get through the learning curve to make the most out of this tool.
So, who’s the winner? It depends on your website builder, your tracking needs, and the expertise of the person who’s doing tracking implementation.
But we prefer the GTM way as it provides a lot more control over what, how, and when to track.
With plugins, you can even have a hybrid setup where the plugin does some lifting, and the rest of the lifting is done by GTM.
There’s an opinion to use Google’s Shopify app for GA4 and e-commerce tracking, as it’s easier and more accurate while using GTM to do tracking of other events. So some sort of hybrid setup can work as well.
Verify your GA4 Tracking
Depending upon how you’re adding the code to your site, there are a couple of ways to verify that and it’s often best to use all measures available so your bases are covered.
Verify with GTM Preview Mode
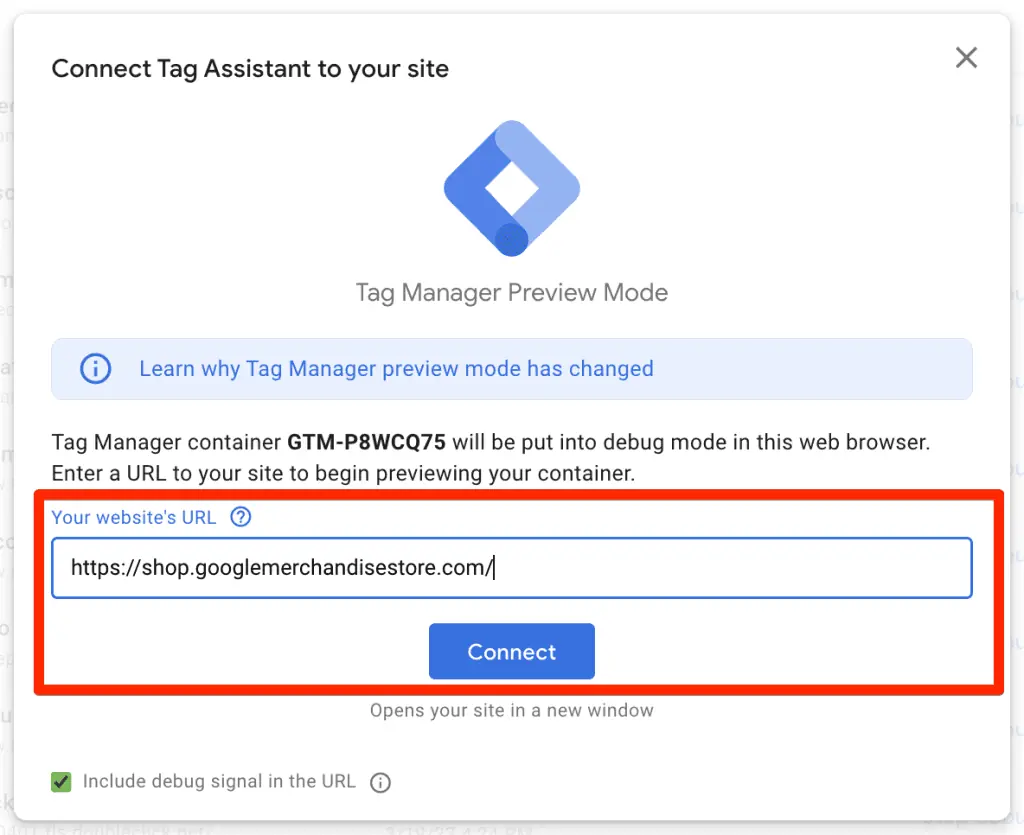
If you use GTM to add Google Analytics 4 tracking to a website, the first step is to always test the setup. You can do that by clicking on the Preview button on the top right next to the Submit button.

This will open a new tab where you can find your website’s URL for which you added the GA4 code and click on Connect.
This will open your website with Tag Assistant connected, where you can verify whether the tag has fired.
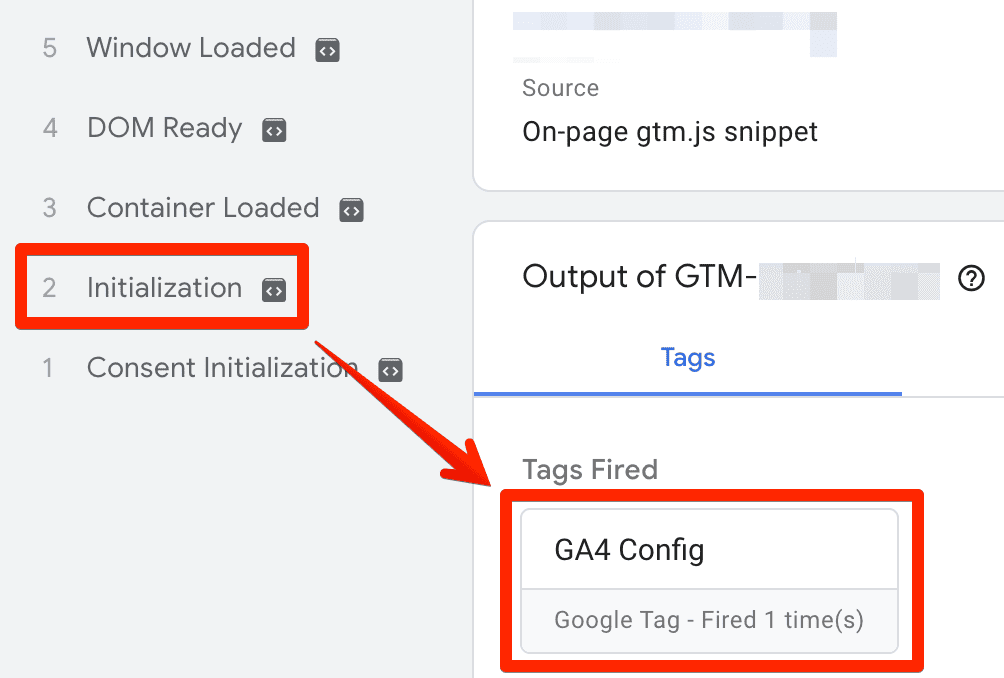
You can also click on the second tab that mentions your GA4 ID and you should be able to see a Page View event being sent to GA4.

So that’s how you verify your data with GTM. Thankfully, GA4 has a pretty useful feature called DebugView, where you can see incoming events live and verify if your events are being shown.
Verify with DebugView
For DebugView to work, you have to first get into debug mode. You can do this via GTM’s preview mode which automatically sends all the data to DebugView or turn on an extension like Google Analytics Debugger.
Once you’re in the debug mode, you can access DebugView by clicking on Admin → Data Display → DebugView.

In the debug interface, you can see a timeline of events coming in where you can click on different events and see what parameters are coming with them.

You can find event parameters and user properties if you click on an event.
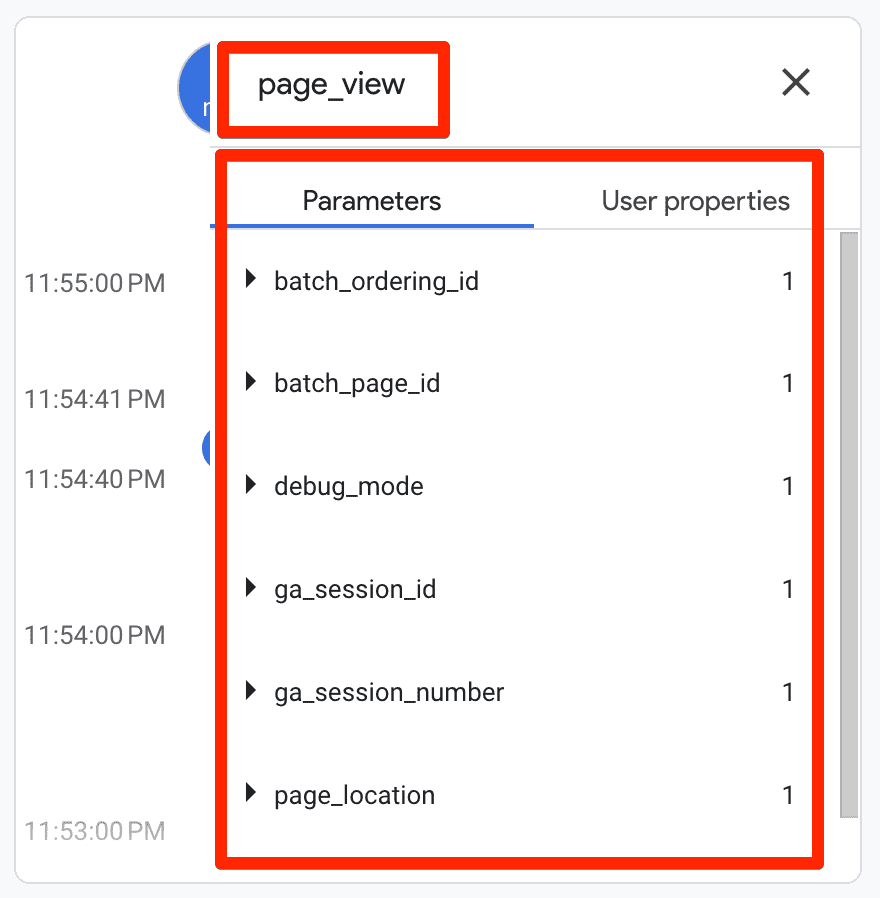
Once you see that the incoming data is correct like the page location, title, etc. in DebugView, then it means you’ve correctly added GA4 to your site.
It can still take 24-48 hours for the data to show up in the standard reports, so don’t worry if you don’t see it right away!
🚨 Note: Consult with this guide if your DebugView isn’t working.
Summary
We started by learning about why we should use Google Analytics 4 and then dived into the three different methods on how to add Google Analytics 4 tracking to a website.
We also learned about the pros and cons of each method and gave our recommendation for GTM or GTM + plugin hybrid solution, whatever works for your website the best in the long run.
But all these methods won’t be very fruitful if you’re not getting the data in your GA4 property.
So, whichever method you decide to use, it’s important to double-check that your setup was done correctly which you can do with GTM’s preview mode and/or the GA4’s DebugView.
Speaking of GA4’s DebugView, Julian worked on an Overview of GA4 DebugView so you can make the most out of your debugging sessions.
Which method would you prefer to add GA4 tracking to your website and why? Share with us and other readers so we can learn something new!


")