
Last Modified on January 7, 2025
If you’re in digital marketing then you must be using Google Analytics one way or another, and understandably so, because data is at the center of understanding what your website visitors are doing.
But interpreting data without context is like looking at your favorite team’s scoreboard without knowing who they are playing against. You can’t analyze their performance.

Master the basics with our FREE GA4 Course for Beginners
This is where segments come in, as they help you to look at the data in the proper context and they are not completely new to Google Analytics 4.
In UA, we can quickly apply segments in the standard reports. Whereas GA4 has molded them into improved versions, as well as changed how they look and where they are found.
Therefore, we will be looking at how we can leverage segments in Google Analytics 4 for different types of analysis by learning all about them including:
- What are Segments and Why are They Important?
- Types of Segments in Google Analytics 4
- Comparing Segments in Google Analytics 4 and Universal Analytics
- How to Create Segments in Google Analytics 4?
- What are the Suggested Segments in Google Analytics 4?
Segmentation is a powerful feature and its improved version in GA4 will help you to draw actionable insights from your data.
So, let’s get started.
What are Segments and Why are They Important?
Segments are a subset of your overall dataset that help you take a deeper dive into the data, as compared to looking at the aggregate data in your GA4 account.
Just a reminder – segments are not the same as filters in GA4. Filters also get you the subset of the data, but they are not usable in other explorations and are restricted to the current report/exploration.
But why are they important? If you’re only looking at your website’s total traffic (be it sessions or pageviews) or conversions, it’s only going to give you a high-level view of your site’s performance.
Let’s say you are getting 500 conversions a week. Great! But what actions can you take based on this information and more importantly how do you increase these numbers?
Here are a few important questions that you will need an answer to:
- What are the top traffic channels to bring the traffic?
- Where are your users located?
- Is it only one type of device that is converting more people or is it evenly spread out?
- What pages have more engagement vs others?
- What page do they land on and navigate to before/after they convert?
These are just a few examples, as these questions vary depending on the type of business and any other circumstances like seasonal changes, Black Friday, and Cyber Monday sales to name a few.
Segments help you to get answers to questions like these and that is why using them is crucial to your analysis.
Types of Segments in Google Analytics 4
User and Session scoped segments already exist in UA, but thankfully (and finally!) GA4 also comes with event-scoped segments. Let’s have a quick look at what they entail.
- User segments would give you the subset of all the users based on your conditions and include all events and sessions of those specific users.
- Session segments only look at the subset of all sessions that match your criteria and would include all the users and events in those sessions.
- Event segments will show you data for the specific events that match your defined conditions and include all those events regardless of sessions and users.
It can get confusing very quickly, especially if you are new to the whole segmenting game. So let us try to simplify with an example of the below user journey over two sessions:
Session 1 – page_view (event) → scroll (event) → add_to_cart (event) → purchase (event)
Session 2 – page_view (event) → click (event) → page_view (event)
| Segment Type | Segment Condition | Result |
| User | Show users with ‘purchase’ event | Both sessions and all seven events will be included |
| Session | Show sessions that include ‘purchase’ | Only the first session will be included |
| Event | Show results for the ‘page_view’ event | Only specific events, i.e., three in both sessions will be included |
To cap it up, the user segment will include everything the user has done (all sessions and events). Next, the session segment will include all the data of the session that matches the conditions.
Lastly, the event segment will show data for the specific event(s) you mention and exclude all others.
The type of segment you choose to create also determines the options and settings available within that scope, which we will cover when we get to how to create segments in the GA4 segment.
Comparing Segments in Google Analytics 4 and Universal Analytics
It’s a good idea to know the differences between the two so you can leverage what’s available in GA4 to its full potential.
- Applying Segments – In UA, you can apply segments to the standard reports easily which gives you a bit more flexibility. Whereas in GA4, you can only apply segments to the reports in the explore section. Moreover, segments created in one exploration are not usable in another.
- Types of Segments – GA4 allows you to create three types of segments as we discussed above (user, session, and events), whereas UA only has user and session-scoped segments.
- Sampling – Higher sampling limits in GA4 mean that you won’t see it with segments so soon compared to UA where it kicks in quicker.
- Sharing Segments – UA gives the flexibility to share the segments with other users/views, but GA4 does not do that. You can only use the segments in the property you create them in. Let’s hope that changes in the future!
- Limitations – UA has views-related limitations that won’t apply to GA4, but at a time in any exploration, you can add only 10 segments.
Some important things are available in both versions of Google Analytics:
- Retroactively applying segments to the data, i.e., you can view the subsets of the historical data Google has already collected.
- You can build audiences from the segments and use them on other Google platforms like Google Ads and Google Optimize.
- You can only compare four segments at a time in GA4 and UA.
- You can choose conditions or sequencing conditions on both platforms, although GA4 gives more power with temporary and permanent exclusions as well as the timeframe in sequential segments (more on this in the next section).
So there you have it! An overview of what’s different and what’s similar, but with a newer look in GA4 segments. Let’s get to creating segments.
How to Create Segments in Google Analytics 4?
Since segments can only be created in the explorations, steps 1-5 will be the same for all the different types of segments you want to create and add to your exploration.
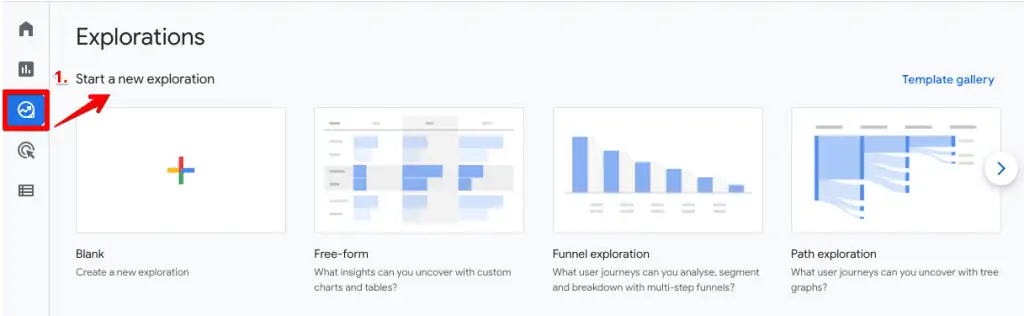
Step #1: Navigate to Explore and Start a new exploration.
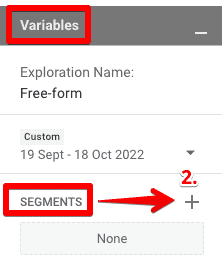
Step #2: Click on the ‘+’ icon in the Variables column to create a segment.
Step #3: Select the type of segment that you want to create, i.e., User, Session, Event.

Step #4: Define the segment conditions → Click on the Save and Apply blue button in the top right corner.
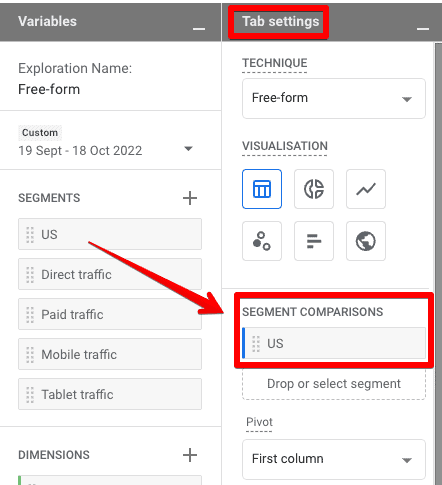
Step #5: Drag and drop or double-click on the segment(s) that you want to apply to your exploration under the Segment Comparisons section of the Tab Settings column.
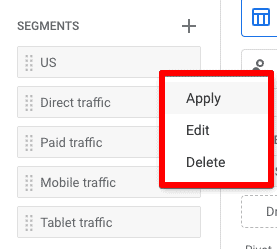
Step #6: If you want to Edit or Delete the segment, then hover over that segment and click on the three dots.
Step #7: You can also use the same method to Apply the segment (but it isn’t as intuitive as drag-and-drop or double-clicking options).
🚨 Note: You can add a total of 10 segments to exploration and apply only 4 under the segment comparisons section.
Conditional Segments
Here’s the general anatomy of the setup interface when defining the custom segment conditions for session and event types:
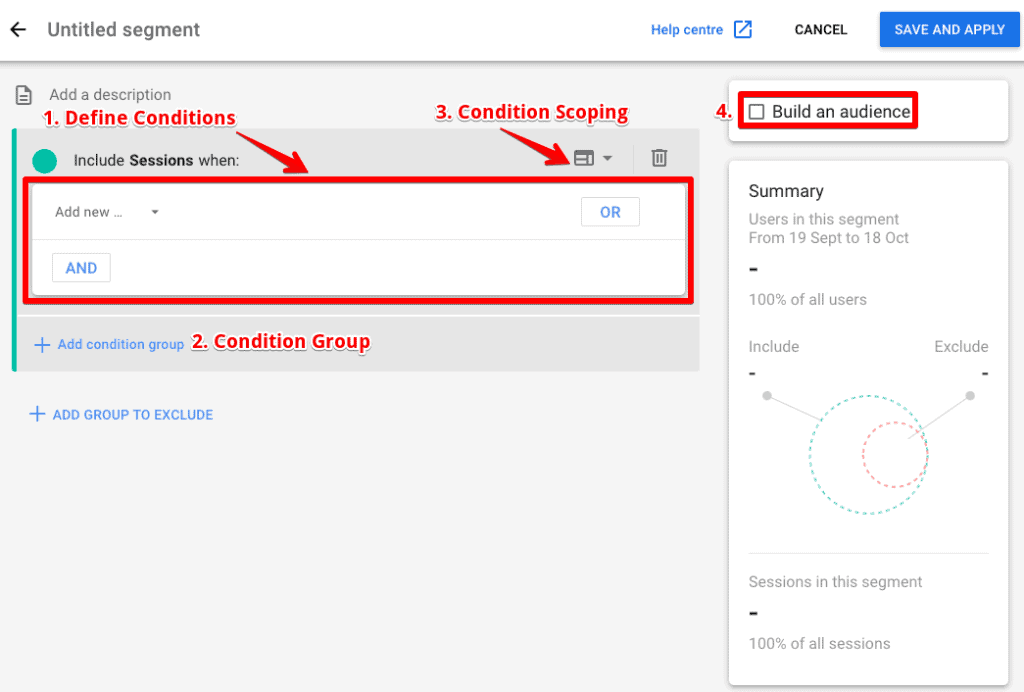
Let’s have a brief look at some of the important options here.
- Defining Conditions – You can use AND/OR options to add your conditions with filters.
- Condition Group – This might do the same work as using the AND condition. However, if you change the scope, then the results might be different, which is something you should play around with to see how they affect your segment numbers.
- Condition Scoping – Session segments allow you to set scoping for Within the same session or Within the same event. Event segments simply allow you to set the scope Within the same event only.
- Build an audience – This allows you to create an audience from your segment to use in your ads for remarketing or Google Optimize experiments.
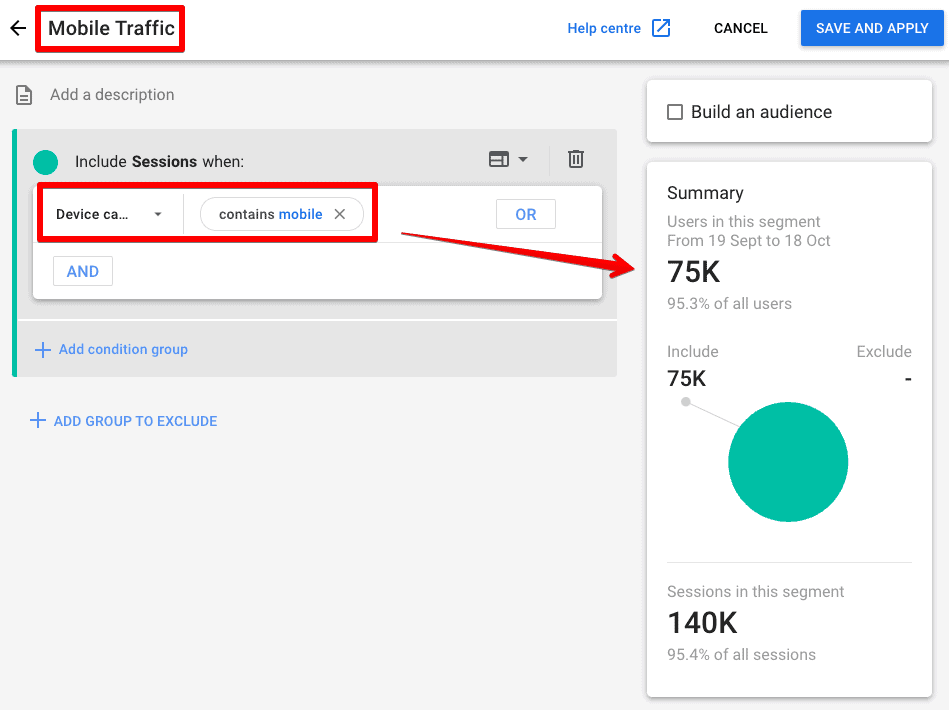
Let’s say you want to see sessions with Mobile Traffic only. Here’s how your segment would look like with the Summary section showing the number of users in your segment:
Condition Filters and Parameters
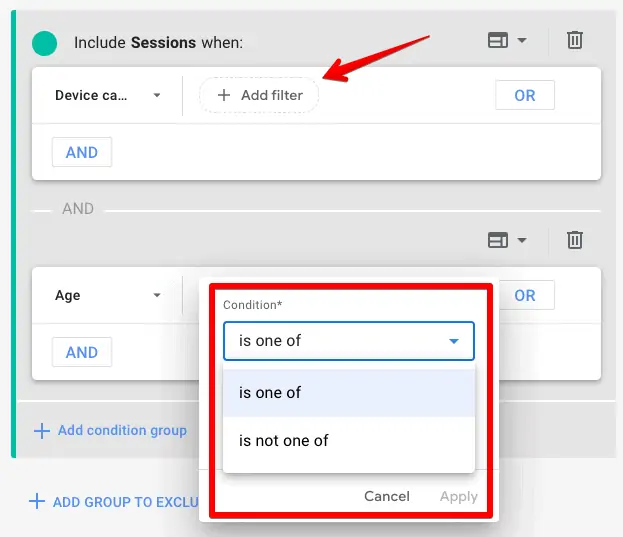
Let’s talk a bit about the condition filter that we can use when creating segments, and some available options that differ depending on the scope of the dimension/metric you select.
When using any dimension in the condition, you will see the usual filters we have in UA like contains, does not match, exactly matches, and so on.
In the example below, the Device category dimension’s condition will have all the generic conditions we normally see. Whereas for the Age (user-scoped) metric, we have only two options available: is one of and is not one of.
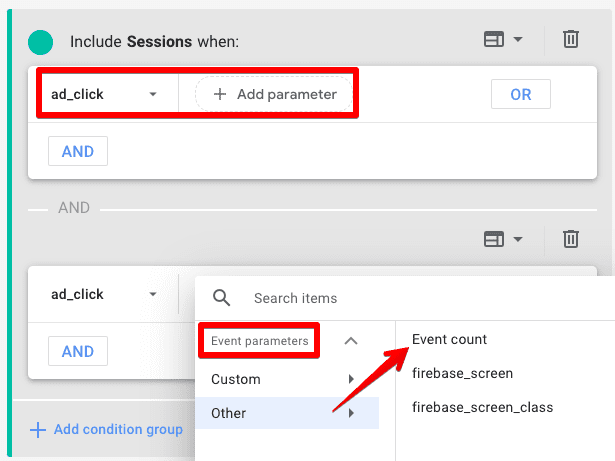
These available options further change when we use an Event as a condition. For this example, we want to segment by Events → ad_click.
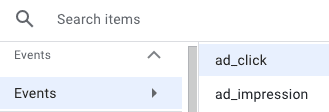
Similar to what we have in UA for events (Event Category, Action, and Label), we now have to Add parameters as an option and things get even more interesting if we want to know the Event count.
Understandably, since the value of the Event count would be in numbers, we have the standard option of greater than (>) only. The cool part is the option to select the Time period in which that event happened. We can select that in days only or at any point in time.
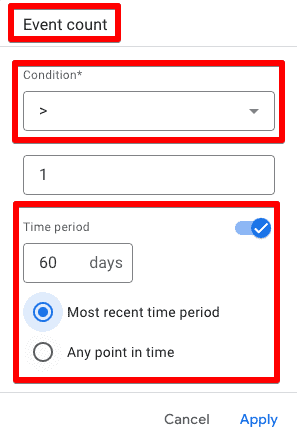
🚨 Note: We can only select a maximum of 60 days currently.
Sequential Segments
What sequential segments can we create in UA? They are now only available in user segment type in GA4, whereas, in UA, we could create them based on sessions too.
This makes sense because it is only plausible for a user to follow a certain sequence vs a session or event. We can always set up a scope Within the same session or Within all the sessions for user segments.
To clarify, you will want to use sequential segments vs conditional when you want to see what steps users took to complete certain actions compared to any sequence, as long as that action is completed.
It is very helpful to evaluate user journeys in signup flows, checkout flows, or in general what the users do after landing on a certain page or after adding to the cart, to mention a few of the possibilities.
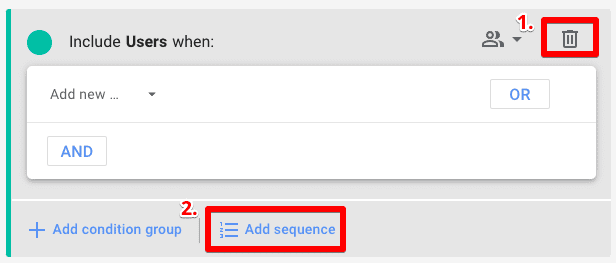
To create a sequential segment, select the User segment, then click on the trash can icon to remove the existing condition group, and select the Add sequence option.
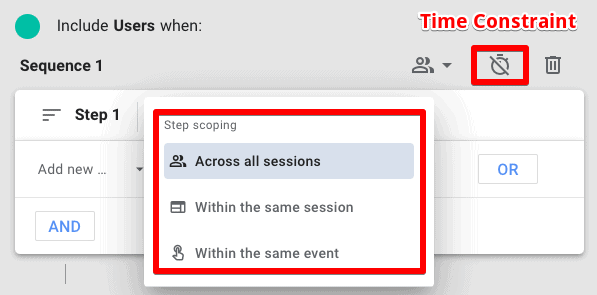
Next, you’ll see a Sequence 1 group added where you can add the conditions for Step 1. You can also set Step scoping, which will only apply to that step, and Sequence scoping which will apply to all the steps in that sequence group.
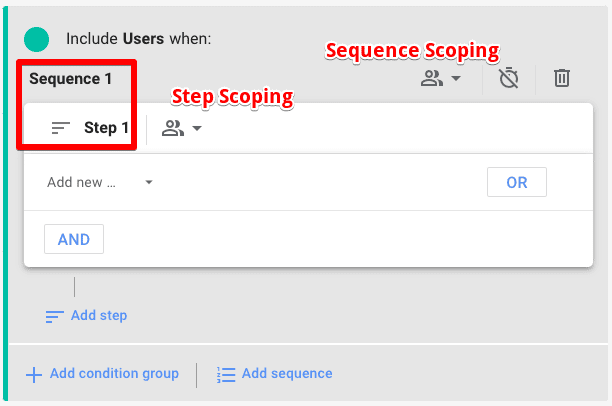
For Sequence scoping, we have the option to select from Across all sessions and Within the same session. For Step scoping, we can select an additional scope Within the same event.
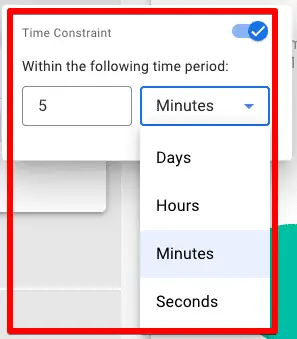
We can also click on the crossed clock icon to select the Time Constraint in which the user has completed the sequence, which is a cool addition in GA4 segments.
The following Time Constraint options are available when it’s toggled on:
The clock icon now goes blue to confirm a time constraint has been applied. At this point, you can further refine your sequence segment by adding more steps and choosing whether it’s indirectly followed by or directly followed by.
Again, you have the option to select any specific time constraint in which Steps 2 and 3 happen by checking the box next to Within, mentioning the time limit, and selecting the constraint type available in Days, Hours, Minutes, and Seconds.
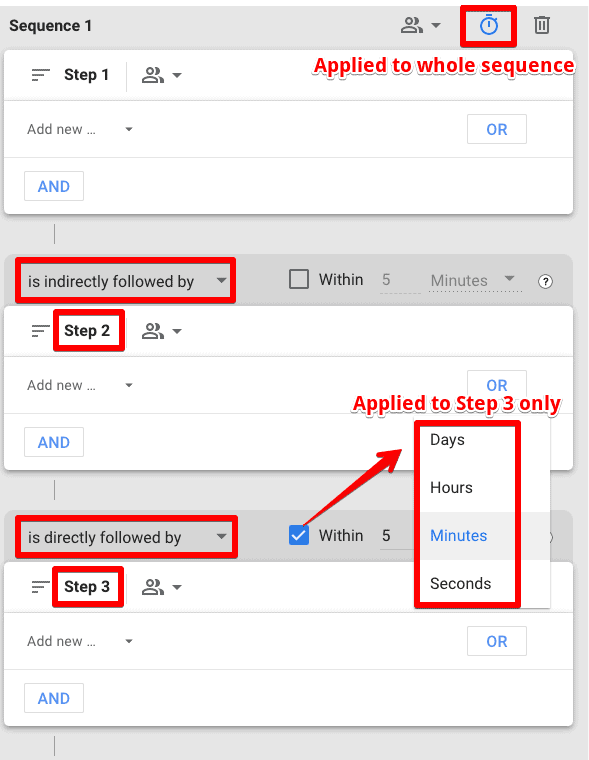
Let’s create a sequence segment in Google Analytics 4 where in Step 1 users complete the add_to_cart event, indirectly followed by Step 2 to complete a purchase, and there’s no time constraint. We get 2K users.

Now, we want to apply the time constraint that Step 2 should be completed Within 5 minutes and see how the Summary changes with only 608 users.

This is why sequential segments are very powerful, and if used correctly, you can draw in a lot of actionable insights.
It is essential to explore these different options and see how changing one variable effects the data you see in the Summary card, to understand how to use it better.
Exclusions
The other important aspect of creating segments is any users you want to exclude from your segment if they follow certain conditions.
Click on the +Add Group to Exclude button to start with exclusions.
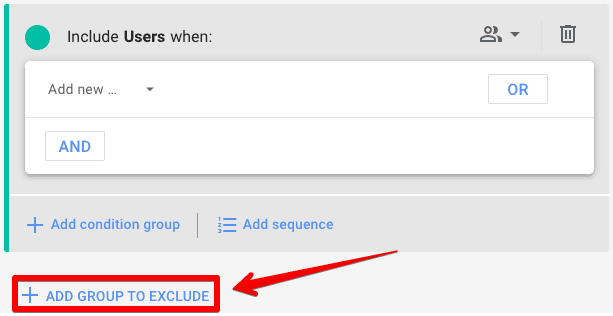
You will then see the exclusion group added in red color and you can choose whether you want to Temporarily exclude Users or Permanently. This setting is then applied to the whole group, whether you add more condition groups or sequences.
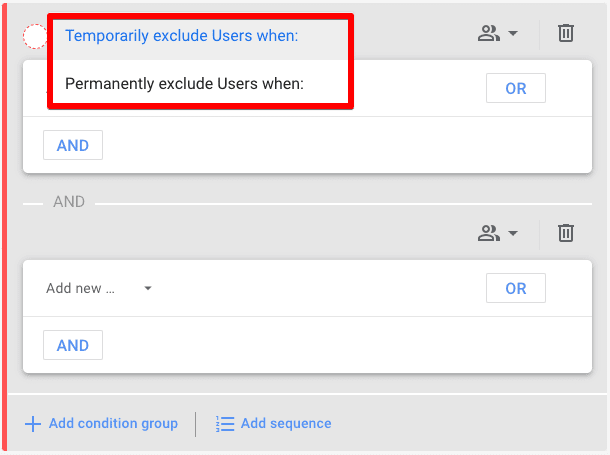
So, what’s the difference between temporary vs permanently excluding the users?
But, it seems to be more useful when you’re building audiences from your segments, so then it will only exclude the users from your audience for a certain time period, i.e. temporarily. Permanently would mean those users should never be part of your audience.
What are the Suggested Segments in Google Analytics 4?
When you start to create a custom segment, Google gives you the option to choose from a list of suggested segments to give you a headstart. There are four types:
- General
- Shopping
- Templates
- Predictive
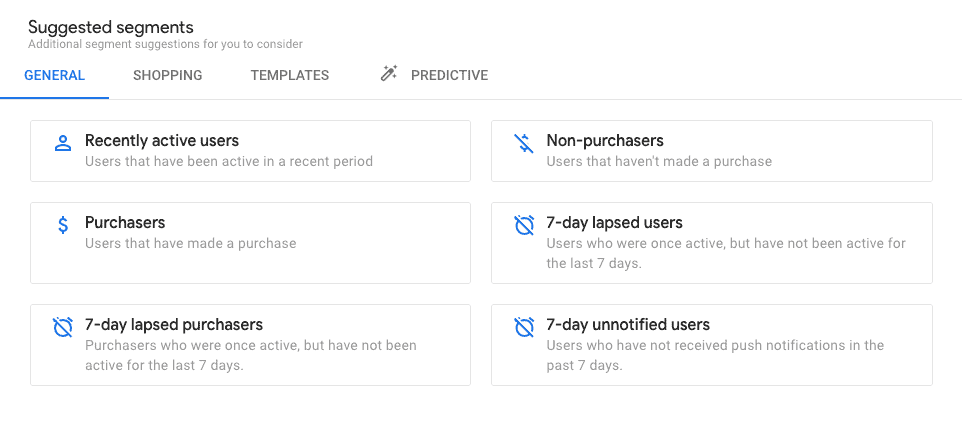
General
There are currently six general suggested segments to get you started quickly with some prefilled conditions.
- Recently active users
- Purchasers
- 7-day lapsed purchasers
- Non-purchasers
- 7-day lapsed users
- 7-day unnotified users
Shopping
Shopping segments are more suitable for eCommerce businesses and save you the time to think about segment conditions. These are:
- Lead
- Registered users
- Wishlist users
- Item searchers
- Billable users
- Basket abandoners
- Checkout starters
- Item viewers

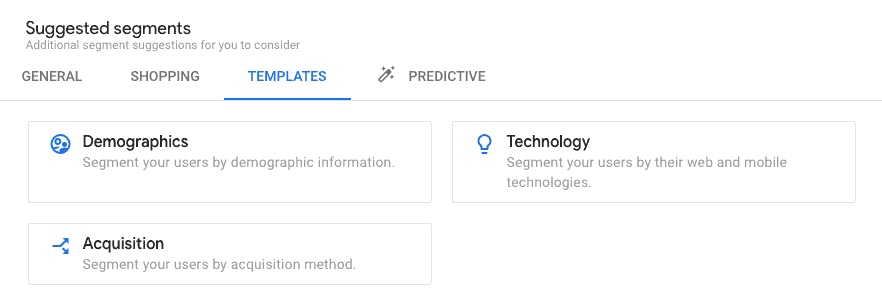
Templates
These segments are also prefilled, but they don’t allow you the flexibility to customize with any other conditions apart from choosing segment-specific filters.
- Demographics
- Acquisition
- Technology
Predictive
These segments are based on machine learning models by GA4 and give you an idea about the users who are likely to buy and churn.
Unfortunately, these won’t be available to every business, especially small ones, as they will need to meet certain criteria to get the Ready to use Eligibility Status. You can read more about it on Google’s documentation on predictive audiences.
It is a good thing if they are available to use, so then you can edit/modify them as you want to. Currently, there are five of these segments:
- Likely seven-day purchasers
- Predicted 28-day top spenders
- Likely seven-day churning purchasers
- Likely seven-day churning users
- Likely first-time seven-day purchasers

If you have the availability of these segments, then using them to build audiences that you can retarget based on their behavior gives you a lot of opportunity!
FAQ
What types of segments are available in Google Analytics 4?
Google Analytics 4 offers three types of segments: user segments, session segments, and event segments. User segments include all sessions and events from specific users, session segments focus on sessions that match specific criteria, and event segments analyze specific events regardless of sessions and users.
How can segments be created in Google Analytics 4?
To create segments in Google Analytics 4, you need to navigate to the Explore section, start a new exploration, and click on the “+” icon in the Variables column to create a segment. Choose the segment type (user, session, or event), define the segment conditions, and save it. You can then apply the segment to your exploration by dragging and dropping or double-clicking it in the Segment Comparisons section.
What are segments in Google Analytics 4?
Segments are subsets of data within Google Analytics that allow for a deeper analysis of specific groups of users or sessions. They help provide context and insights beyond the overall aggregate data.
Why are segments important?
Segments are important because they enable a more granular analysis of website performance. By focusing on specific subsets of data, marketers can answer critical questions about traffic channels, user location, device preferences, engagement on different pages, and user behavior before and after conversions.
What are sequential segments in Google Analytics 4?
Sequential segments allow you to analyze user journeys and the steps users take to complete specific actions. In Google Analytics 4, sequential segments are available only for user segments and not for sessions or events. You can set up sequences with specific conditions and time constraints to evaluate user behavior and identify patterns in signup flows, checkout flows, and other user interactions.
Summary
This session was long, but it is an important topic to cover as segments are super helpful to get insights on your users, as well as to create audiences for remarketing and experiments.
The good thing is that now you know all about the power of segments in Google Analytics 4 gives you a solid start.
The ball is in your court to play around with the different types of segments and their variables like scoping and time constraints, among others, to see how it affects the numbers in your segment.
If you’re looking for some help tracking youtube videos in GA4, then check out our blog on how to track youtube videos in Google Analytics 4 to get started.
Let us know how using segments in Google Analytics 4 is going for you. If there are any hidden gems you’ve been able to find about segments, then don’t hold back in the comments below!
Master the basics with our FREE GA4 Course for Beginners


")
“The cool part is the option to select the Time period in which that event happened.”
But you forgot to explain what does it means…