
Last Modified on January 20, 2025
Feeling stuck with your booking tracking? No idea where to grab these dynamic values for your conversion? Let’s dive into your tracking case together.
You run your WordPress webpage and use the LatePoint plugin to manage your appointments. However, you would love to go further and track bookings as conversions together with the prices.
LatePoint booking conversion tracking with a value in your Google Ads would help you accurately quantify the monetary impact each conversion has on your business.
You would also identify which keywords, ad groups, and campaigns have the best performance and thus would boost your campaign results.
Here’s a quick roadmap of our tracking setup:
- Set up a conversion in the Ads account
- Add a data layer to LatePoint
- Create data layer variables
- Set up your tag and trigger
- Test your implementation
Set up a conversion in the Google Ads account
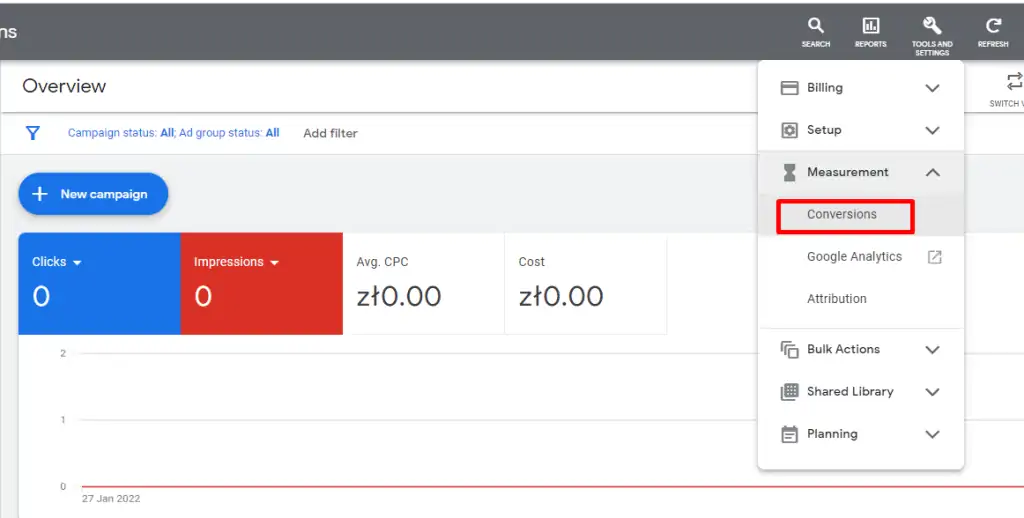
The first step is to set up your Ads conversion in your Google Ads account. Go to your Google Ads account and navigate to Tools & Settings → Conversions.
Select New conversion action to set up a new conversion.

Select the first option, which is Website conversions.

Do not feel confused when the system asks you to provide the URL of your webpage. This is a Google Ads update with new steps added to the configuration. Do not hesitate to enter your URL.

Wait for your webpage to be scanned and scroll down to find the option – Add a conversion manually.

Provide all the settings for your conversion action. Do not forget to choose Use different values, as we want to track your product prices dynamically.

Your conversion is set up, and now it is time to choose your implementation option.
In this guide, we are covering implementation via GTM. Select Use Google Tag Manager, and you would see a conversion ID and label.
Great! Ads configuration is done, and we can move to the LatePoint settings.

Add a data layer to LatePoint
Login to your WordPress admin dashboard and navigate to LatePoint on the left side.

You would get redirected to the plugin settings, where you should click Steps.

Now for the most exciting part. You should copy the given snippet and paste it into the Conversion Tracking field.
What is this snippet about? We are adding a data layer that contains information about your bookings, such as appointment ID and total price. Since you have multiple prices, you cannot simply track them statically.
We created this data layer for you, to ensure that the correct variables are provided.
🚨 Note: We are showing how to set up Ads conversion tracking, but you can use this code for any kind of tracking. This would give you dynamic values that you can use in your configuration.
<script>
window.dataLayer = window.dataLayer || [];
window.dataLayer.push({
  event: 'latepoint_confirmation',
  appointment_id: {booking_id},
  service_id: {service_id},
  agent_id: {agent_id},
  customer_id: {customer_id},
  total_price: {total_price}
});
</script>
Create data layer variables
Adding this snippet is not enough, as we also have to do some additional setup via GTM.
We will start with our variables. The data layer has the correct values, but how can we pass them to GTM? You should go to Variables and click New.

Select Data Layer Variable.

Let’s create the first variable for your price. Provide your variable name and save it.

The second variable to be created for your Ads conversion is the appointment ID.

Set up your tag and trigger
Everything is ready for your Ads tag. Copy and paste your conversion ID and label. Add the dynamic variables we have configured earlier.

Set up a trigger. Since we are pushing an event in the data layer, the trigger type should be Custom Event with the latepoint_confirmation as an event name.

Test your implementation
Now for the most exciting part of the whole process: TESTING! Preview your GTM container and make a test booking to see if your tag is firing.

Testing a tag itself is not enough, as we should also check if our variables are working correctly. You should go to Variables and check if the correct values are displayed there.

If you have reached this point, it is time to pat yourself on the back: You did an excellent job! One small remark: Do not forget to publish your GTM container.
FAQ
Why should I track LatePoint bookings as conversions in Google Ads?
Tracking LatePoint bookings as conversions in Google Ads provides valuable insights into the performance of your campaigns. It helps you identify the keywords, ad groups, and campaigns that generate the most bookings, allowing you to optimize your advertising efforts and improve your campaign results.
Can I use LatePoint Booking Conversion Tracking for other tracking purposes?
Yes, the code provided in the blog post can be used for tracking purposes other than Ads conversions. The data layer snippet captures dynamic values related to bookings, such as appointment ID and total price, which can be utilized for any type of tracking configuration.
Do I need to have a Google Tag Manager (GTM) account to implement LatePoint Booking Conversion Tracking?
Yes, LatePoint Booking Conversion Tracking is implemented using Google Tag Manager (GTM). You will need to have a GTM account and access to your WordPress admin dashboard to complete the setup process.
Summary
We have set up an Ads conversion for LatePoint bookings via GTM. Key takeaways from this lesson:
1) The snippet we have provided is the key component here. You can use it not only for Ad tracking but also for your own tracking purposes if you want to grab those values related to your bookings.
2) You should know now how to set up Google Ads conversion tracking and verify if it is working.
3) Tracking is fun!
Another thing that will help you optimize the conversion tracking of your campaigns would be setting up Google Ads enhanced conversions with GTM.
Did you manage to set up your tracking correctly? Let us know in the comment section below.


")
In your code below, why don’t you use parenthesis around each part?
<script>
window.dataLayer = window.dataLayer || [];
window.dataLayer.push({
event: ‘latepoint_confirmation’,
appointment_id: {booking_id},
service_id: {service_id},
agent_id: {agent_id},
customer_id: {customer_id},
total_price: {total_price}
});
</script>
Why not like the below?
<script>
window.dataLayer = window.dataLayer || [];
window.dataLayer.push({
‘event’: ‘latepoint_confirmation’,
‘appointment_id’: ‘{booking_id}’,
‘service_id’: ‘{service_id}’,
‘agent_id’: ‘{agent_id}’,
‘customer_id’: ‘{customer_id}’,
‘total_price’: ‘{total_price}’
});
</script>
Hi,
can we use only booking_id, as we dont add price in the steps, we got paid in store.
will it work without the total_price ?
Thank you
Thank you for your helpful article!
To make it work, I have to add double parenthesis and quotes to variables names, as described here: https://developers.google.com/tag-manager/devguide?hl=es
However, numbers are not needed to be quoted.
<script>
window.dataLayer = window.dataLayer || [];
window.dataLayer.push({
‘event’: ‘latepoint_confirmation’,
‘appointment_id’: {{booking_id}},
‘service_id’: {{service_id}},
‘agent_id’: {{agent_id}},
‘customer_id’: {{customer_id}},
‘total_price’: {{total_price}}
});
</script>
Solved my issues almost. but needed a small adjustment from ChatGPT:
Your script appears to be mostly correct in structure, but there is an issue with the quotation marks. You are using smart quotes (‘ ’) instead of straight quotes (‘ ‘). Here’s the corrected version:
javascript
Kopiëren
Bewerken
window.dataLayer = window.dataLayer || [];
window.dataLayer.push({
‘event’: ‘latepoint_confirmation’,
‘appointment_id’: {{booking_id}},
‘service_id’: {{service_id}},
‘agent_id’: {{agent_id}},
‘customer_id’: {{customer_id}},
‘total_price’: {{total_price}}
});
Make sure you’re using straight quotes, as smart quotes can cause errors in JavaScript code.