Last Modified on January 7, 2025
Content plays an important role when it comes to bringing organic traffic to your website and also developing your authority in any niche.
So, if content marketing is a big part of your marketing strategy, then naturally you’d want to know how your content is performing.
This can be done using various tools, but one of the most popular and free ones is Google Analytics 4 aka GA4.
However, a lot of the page-level data it shows is quite granular, which can make things difficult to analyze. This is where Google Analytics 4 content groups can be helpful.
But how? Well, we’re going to cover all of that including the following topics:
- What are Google Analytics 4 Content Groups?
- Why is GA4 Content Grouping Good?
- How to Set up Google Analytics 4 Content Groups
- Where to Find Content Groups in GA4?
Ready to learn all about content groups? Let’s get started!
What are Google Analytics 4 Content Groups?
Remember how we talked about page-level data being too granular at the start of this post?
Imagine you have an e-commerce store that sells shoes, so there are women’s shoes, men’s shoes, and children’s shoes, as well as shoes for different uses like hiking, running, etc.
Now, if you’re only seeing data for each specific variation of shoes, it will get quite granular and a bit hard to understand which category is doing better.
Content groups are a good way to categorize them into broader groups or buckets where you can easily analyze their performance and compare them with each other in GA4.
It would make it easier to understand how a group is performing based on its traffic source, device category, or geographical location to name a few things.
It’s always a good idea to name your content groups based on product categories or the type of content, e.g., men’s shoes, women’s shoes, hiking guides, winter sports, etc.
Why is GA4 Content Grouping Good?
In the absence of content groups, you’d be using table filters to group the pages based on any commonalities, e.g., show pages that have /men-shoes in the page path, but that might also include the main category page which has the same path.
This means the report filters are somewhat limited, and you could miss out on some variations. However, you can take things to explorations to apply filters with regex.
Finally, you could always export the data to other tools like Sheets to clean up the data and group it into categories.
But all of this could be bypassed if you have content groups set up. At the same time, you can always analyze the granular page-level data in GA4 as it remains intact.
However, it’s only useful if you have a lot of pages on your website so you can measure the performance of the whole group. Otherwise, with a few pages, it won’t be difficult to understand the performance.
So, how do we set up the Google Analytics 4 content groups? Let’s learn about it in the next section.
How to Set up Google Analytics 4 Content Groups
There are several ways to do content grouping, but none happen directly in GA4’s interface.
For this purpose, we can use Google Tag Manager (GTM) to do that by a) storing the values of the content in variables and b) sending ‘content group’ as a dimension with all our events (more on this later).
Here are two ways how we can save those values:
- Using the Page URL or Path
- Push DataLayer values
The first method doesn’t require developer resources, whereas the second one will require some collaboration with a dev.
Let’s see how we can use each of them.
1. Using the Page URL or Path
The first method is the simplest one. The logic here is that we use a regex lookup table variable that would give us certain outputs, and then we use that variable to generate the values for the content_group parameter.
Go to GTM → Variables → User-Defined Variables → New.

Next, Choose variable type → RegEx Table.

The starting point is the Input Variable which could either be the Page URL or Page Path depending on what part of the URL you want to use. We’re going with Page Path as we are not relying on any sub-domains or query parameters.
The next bit is where you define the Pattern that will match all the website pages. Output is where we can enter the names of our content groups.

A regex table is also helpful if you want to match multiple variations of the URL with the same output, e.g., men-shoes and mens-shoes, as shown in the example above.
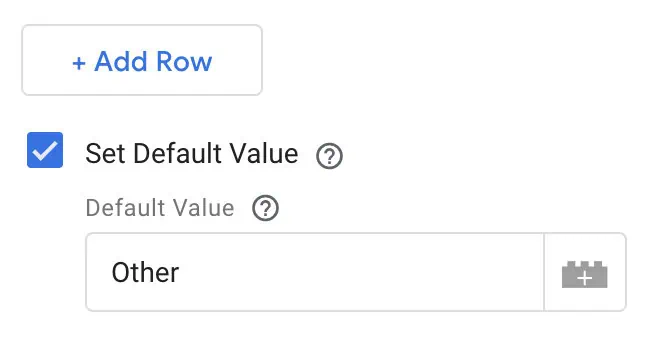
You can also set a default value so you don’t have to deal with (not set) values in GA4 if there are no matches or different pages that can be bundled into one group. For instance, we put ‘Other.’

There are also Advanced Settings where you can choose to Ignore Case, as otherwise, it would look for an exact case as you mention in the pattern above.
The two important settings here are Full Matches Only and Enable Capture Groups and Replace Functionality. Both of these should be unchecked.
Disabling ‘Full Matches Only’ makes it so that wherever the pattern is found, it gives you the output.
If we uncheck it, then it’s recommended to also disable the capture groups and replace functions. Hovering over the tooltip with the question mark will give you more info about these two.

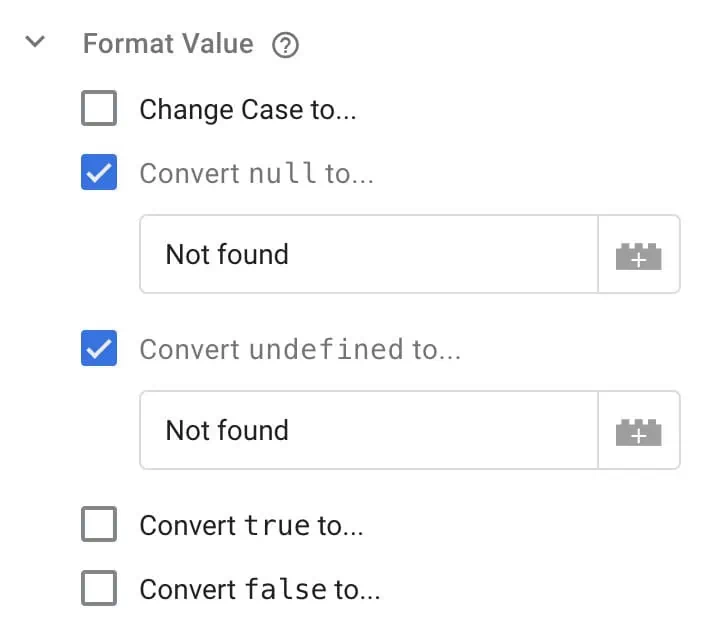
Lastly, you have the Format Value settings that help to further clean the data, like having your value when it’s null and undefined or changing the case to lower or upper.
It would, however, be good if the Change Case to… would allow capitalizing of the first letter of every word though.

This is how we can save values with the help of GTM’s regex table variable. The only problem here is that the variable has to be updated whenever the URL is changed, as it will not meet the matched pattern.
A better idea would be to anticipate any such changes and include them in the pattern. Our next method helps us avoid this issue as it doesn’t depend on page URLs.
2. Push Data Layer Values
For this method to work, you need a dev’s help to push values to the data layer whenever a certain type of page or content is viewed.
Taking the above example of the shoe store, we can push values whenever a certain type of shoe page is viewed as follows:
window.dataLayer = window.dataLayer || [];
window.dataLayer.push({
'content_group': 'mens shoes'
});
You can call the parameter content_group and its value whatever works for you, as long as it can be stored in a dataLayer variable.
Let’s see what it would look like in the GTM’s preview mode.

Next, we can grab and store this value in a data layer variable. So, go to Variables → User-Defined → New → Choose variable type → Data Layer Variable.

Next, we use the same name we pushed to the Data Layer to store the values, i.e., content_group, and save the variable.

We can now go to the preview mode again and see if our dlv – content_group variable has picked up the values that were pushed in the Data Layer.

It looks like the variable has indeed saved the value pushed into the Data Layer. As you can see, this method won’t be affected by any changes in URLs, so it’s safe to use without worrying about it breaking.
This covers the first part of storing the values in the variable. The next part is to send them with all our events using the variables.
The process from here onwards would be the same for whichever of the two methods you choose to store the values. We are going with the Data Layer method.
You can individually add the content_group parameter to each event or you could use the Google tag: Event settings variable to send values with the Google Tag (Config) to all the events at once.
So, Variables → User-Defined → New → Choose variable type → Google tag: Event settings variable → Add the content_group parameter → Select {{dlv – content_group}} for value.

After we have created a settings variable, this could be just selected for the GA4 Config tag, aka the Google Tag, so it sends the content_group parameter with all the events.
So, let’s go to our Google Tag → Scroll down to the Shared event settings → Click on the drop-down to select the Event settings variable. In our case, it’s event settings – GA4.

If you want to double-check the parameters in that event settings variable, you can click the Show inherited parameters button below it.

Let’s save it and put it to test in the preview mode.

Great! So, it looks like our event settings variable is working with our Google Tag.
It’s important to make sure that the Google Tag is loaded after the dataLayer values have been pushed, which happens at 6 Message in the above screenshot’s case.
If we were still loading our tag at 2 Initialization or other earlier events, it wouldn’t send the content_group values.
For one final check to see how we receive the data in the DebugView, let’s go to GA4 → Admin → Data Display → DebugView.

Great! Our content group setup seems to be working fine, and once the data starts coming in, it will populate our content group dimension.
You can also configure additional content groups by adding a number at the end of the content_group(n). For instance, ‘mens shoes’ is the top-level group, and you would want to go two levels deeper with ‘mens running shoes’ and ‘mens hiking shoes’.
This can be done by sending content_group2 and content_group3 parameters with these values. Don’t forget to register these parameters as custom dimensions as they won’t be available by default.
Where to Find Google Analytics 4 Content Groups?
By default, the Content group dimension is available in the Reports → Engagement → Pages and screens report.

Clicking on the Page path and screen class drop-down will show other dimensions available including the Content group.

Apart from this, you can use this dimension in explorations and analyze the performance there as well.
The good thing is that it doesn’t have to be registered as a custom dimension and is already available to use as long as you set the values, unlike additional content groups.
Summary
We started by learning what content grouping is in GA4 and how it can be helpful to analyze the performance of different pages of the same category.
We also learned about the two methods we can use with GTM to store the values of content groups, where the first method using the regex table variable is the easiest one, but can also break if the page URLs change.
The second method is more robust and won’t break easily, though it would need some help from a developer.
If you don’t have a dev around, you could start with the first method as a stop-gap solution and then move to the second method when you can.
We also looked at how to send the values to GA4 using the event settings variable in GTM and tested our setup with the preview mode in GTM and DebugView in GA4.
Lastly, we learned where in GA4 we can find this data. Thankfully, we don’t have to register it as a custom dimension, like many other automatically collected parameters.
If you’re still new to GA4 and wondering how to install it on your website, check out our post on How to Add Google Analytics 4 Tracking to a Website.
Have you set up content groups for your website? How helpful are they to measure the performance? Let us know in the comments below!


