Google Tag Manager has many variables under its built-in and user-defined categories that can be used to return different types of values.
Some of these variables are only useful for the one specific thing they are made of. E.g., a Container ID variable will only return the container’s ID as a string. However, others are more versatile so they can be used for multiple purposes.
Lookup Table variable is one of those and can be quite helpful in some common situations, and specific use cases.
So, this post will cover all about the Google Tag Manager Lookup Table variable including the following topics:
- What is the Google Tag Manager Lookup Table Variable?
- Lookup Table Variable Use-Cases
- Best Practices for Lookup Table Variable
- Limitations of Lookup Table Variable
Let’s get started!
What is the Google Tag Manager Lookup Table Variable?
The lookup table variable is a user-defined variable in GTM that takes another variable as ‘input’ and then we define what the final result of that input variable should look like. We can do that for multiple values resulting from the input variable.
In essence, the Google Tag Manager lookup table variable works on the following logic:
If the input variable returns certain values, it should change them based on your specific values. E.g., if it says “/men-shoes-sale” the final output should be “/men-shoes.”
Optionally, you can specify a default value when the mentioned values are not found.
Let’s look at this variable in GTM to clarify how the above logic plays out. In GTM, go to Variables → User-Defined → Click on New → Select the Lookup Table variable and see the Variable Configuration screen.
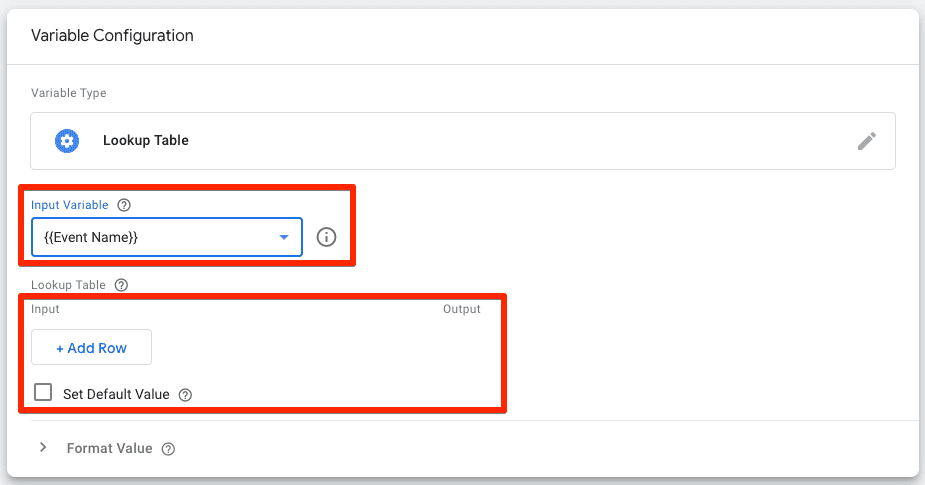
The screenshot above shows the three setup factors we mentioned:
- Input Variable – The value of this variable will be used as a key to look up specific value(s) in the lookup table field.
- The Lookup Table – Input derived from the input variable and the Output we specify.
- An optional Set Default Value checkbox – When no match is found in the Lookup table.
So, if we use the same example as above and add a bit more to it for understanding purposes, here’s what it would look like:
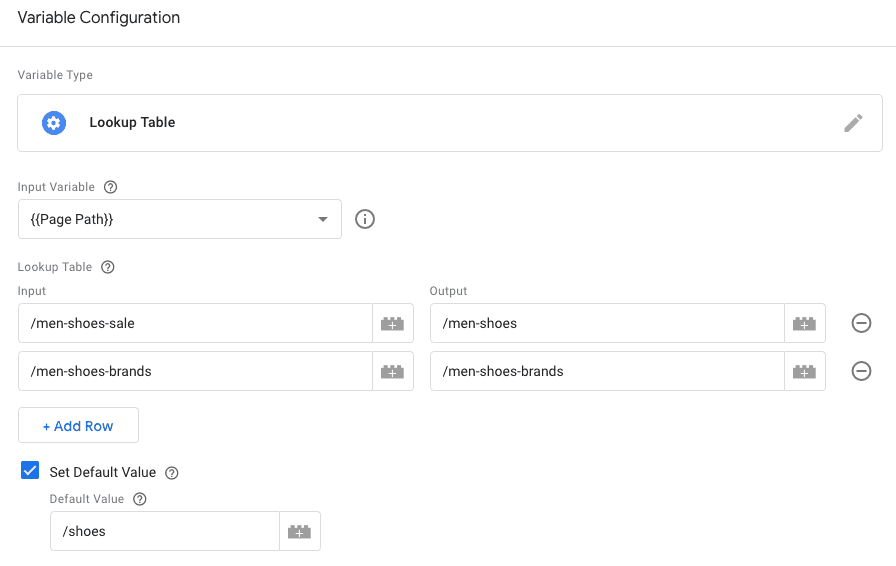
Remember, we are not looking at the logic here – just illustrating how it can work. We’ll look at the logic properly in the use cases chapter.
The small icon with the + icon looking like a Lego is for fields where other variables can be used, and this is possible for input, output, and the default value fields for this variable.
When you click on the icon, it will take you to a screen where you can choose the variable, or you can start typing with two opening curly brackets “{{“ and it will show you a drop-down of all the variables available.
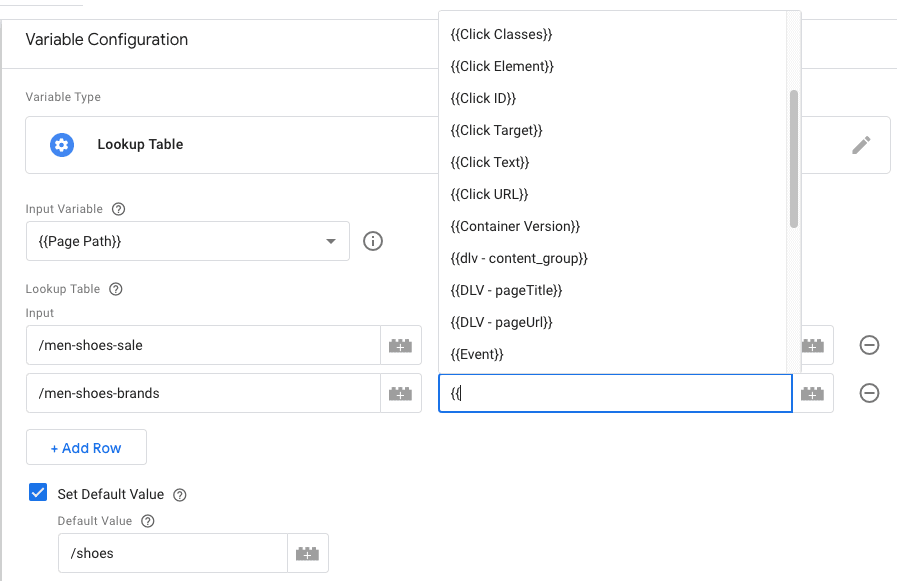
This is a quicker method and shows you that wherever you see the Lego-looking variable icon, you can use the curly brackets to browse the variables. This is how variables can be referenced in GTM.
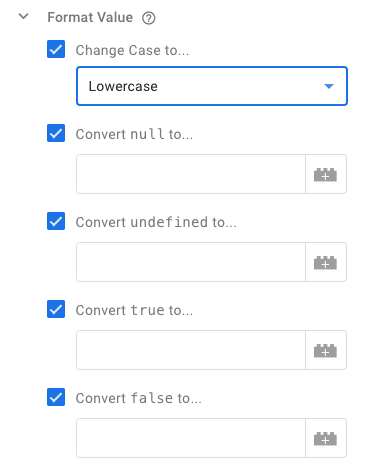
One final aspect of the variable is that you can do further formatting with the Format Value option, where you can change the Case to Lowercase or Uppercase, and null, undefined, true, and false to any other values you’d like to.
Lookup Table Variable Use-Cases
Like many variables in GTM, there could be a ‘n’ number of use cases – some unique to your business and others more applicable to most web analytics setups. Below, we look at some common ways you can use this variable.
1. Multiple Google Analytics 4 Properties
There are cases when you want to filter out traffic based on the page URL or any other input variable and send it to different Google Analytics 4 properties.
For instance, you have different regions or dev, staging, and live site URLs, but you don’t want the dev and staging data in your main property.
In any such case, you can use the Google Tag Manager Lookup Table variable. Let’s take the dev, staging, and live site properties example.
We’ll use the Page Hostname as the Input Variable to send the dev and staging traffic to G-PSW1MY7HB4 and live traffic to G-LT3CJ5KKL6.
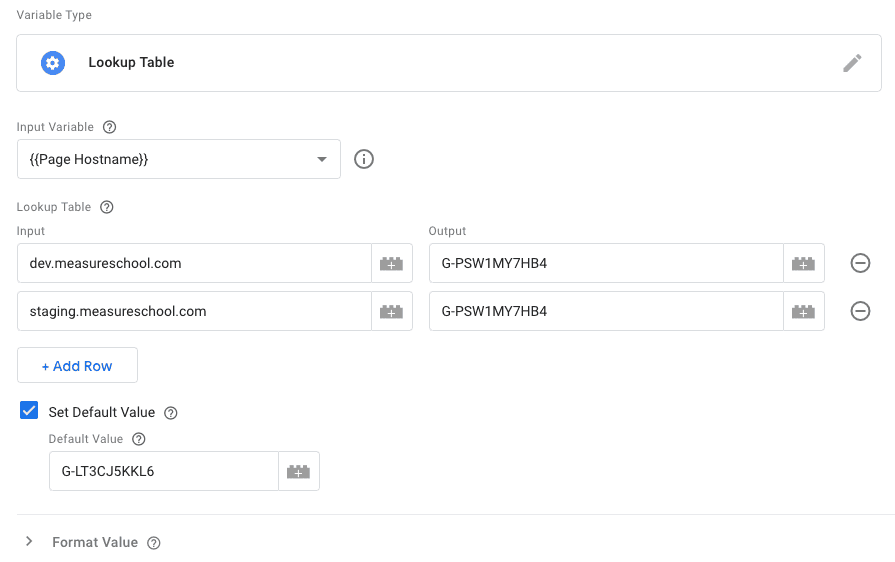
What we are saying here is that when the hostname is dev.measureschool.com and staging.measureschool.com, then send the data to G-PSW1MY7HB, and anything else goes to G-LT3CJ5KKL6.
You could put another spin on it where you mention the hostnames for which you want the traffic to go to the main/live property and anything else goes to the test property.
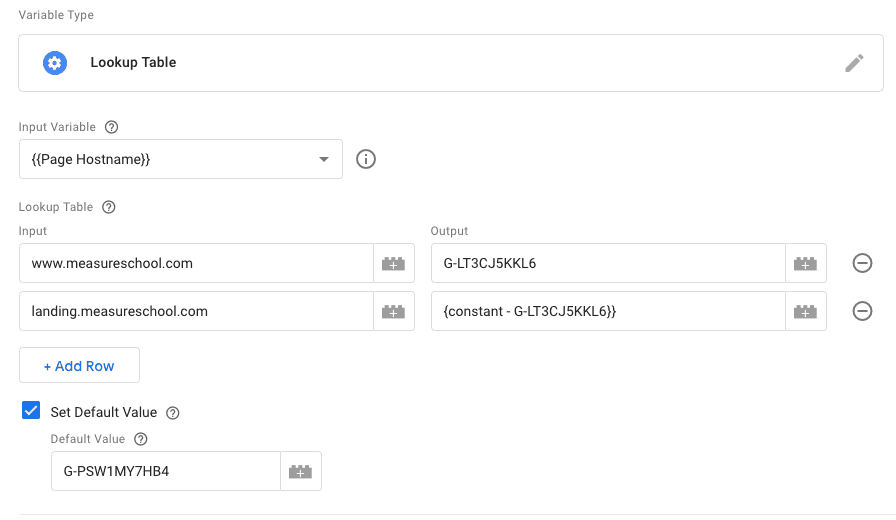
In the above example, we used another variable for output, i.e., constant, in which the measurement ID is stored.
With this approach, we must ensure all the hostnames are mentioned here for the live property. For instance, if you create another landing page with a different sub-domain, it won’t go to live property if it’s not added here.
A similar approach can be used for regional domains or other variations where the input variable’s value makes logical sense.
For instance, if the path has /gb/ or /de/ etc. variations and you want to use that, it will only work for pages where the exact path is found. It will leave out all other pages because this variable only works with ‘exact match.’
2. Data Cleaning
When we extract data from click text, classes, or other attributes, it’s often not very clean. But, we can use the Lookup Table variable to get a cleaner final output that we can send to any tool.
For instance, you’re tracking clicks on a slideshow or data range arrows, i.e., next and previous. When you click, you don’t see any text. However, the classes have some values which are not very clean.

When I click on these arrows, I can see their classes. The next arrow has huge-it-arrows huge-it-next as a class.

The previous arrow has huge-it-arrows huge-it-prev as a class.

So, we can change these values with the Lookup table variable.
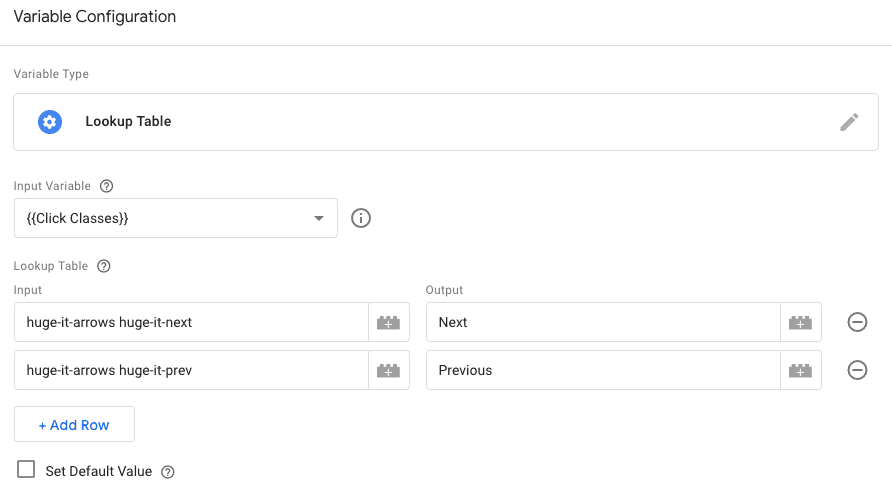
This will make for a cleaner and easier read rather than simply using the classes.
Now, perhaps you have a sub-menu that you’re tracking with no text. However, some classes can help to determine whether you’re opening or closing.
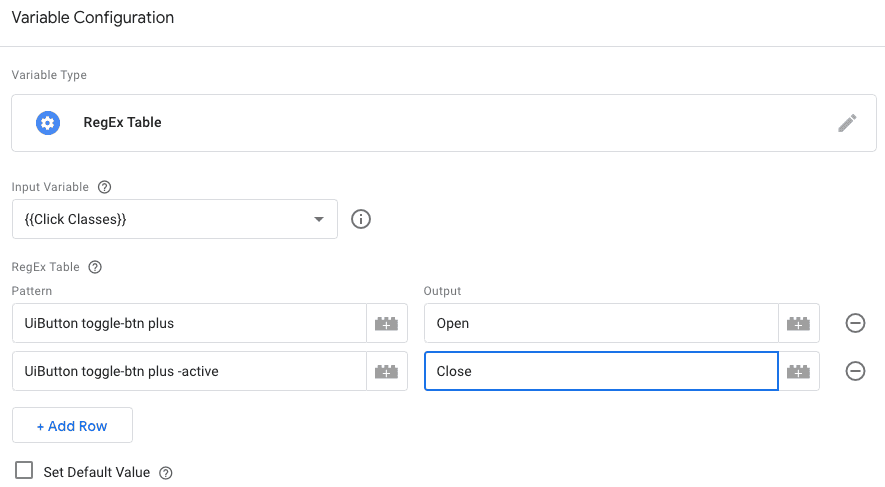
3. Content Grouping
Google Analytics 4 tracks content_group dimension automatically, but we still need to send the data to it with an event by storing data in a variable.
Lookup Table can be a good alternative solution especially if you have some dataLayer work that will be done in the future or is in progress to set up the content groups.
Using page path as our input variable, we can specify the outputs.
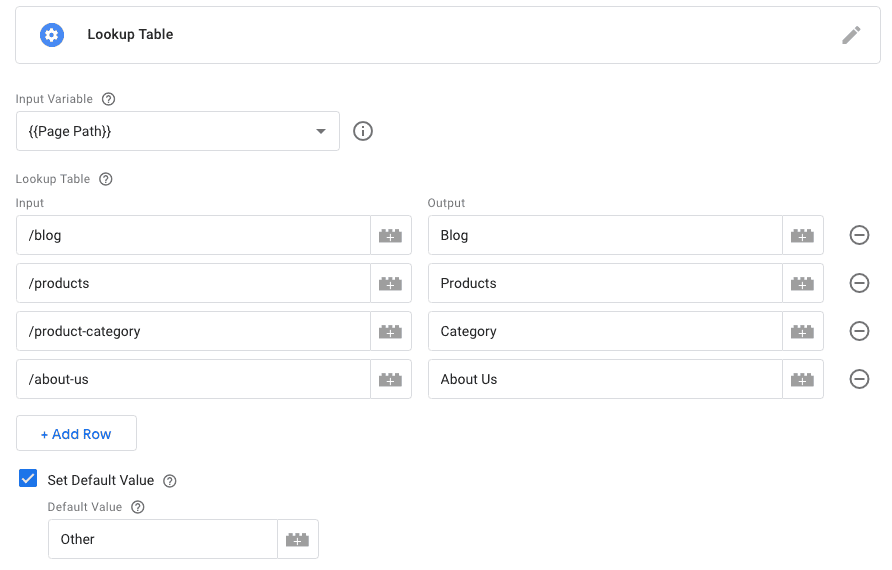
We can now use this Lookup Table variable to send the values for the content_group dimension to GA4. You can also see how we used ‘Other’ for Default Value after categorizing our major pages.
4. Social Media Icons
Another interesting use case is when you track clicks on the social icons and want to know which ones the clicks are coming from.

We are not going into details on tracking them now, but how to get data about which icon is clicked.
When we click on these icons, they have some specific classes.

The other icons have similar classes with different platform names. So, we go to our Lookup Table variable and do the magic again.
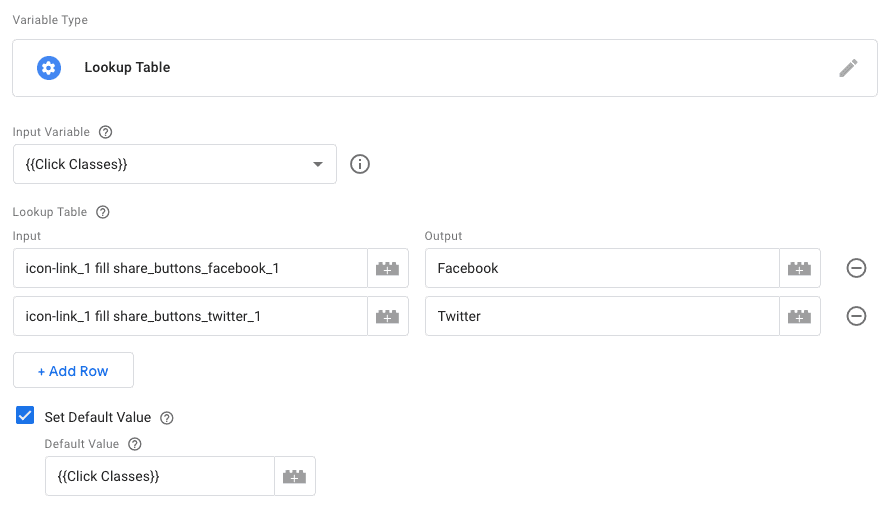
You might have noticed that we have added {{Click Classes}} as ‘Default Value.’ The reason is that if no matches are found, then we will get undefined.
But, with Click Classes as the default value, if the icons or the classes change or any new icons are added, we will still get the original click class.
Here’s what it looks like in action for ‘X’ which is a classic case of how the classes contain the older brand name. This isn’t a very common change as much as classes can change.

A similar result showed up for Facebook. Remember how on purpose, we didn’t add Google in the Lookup Table and also set a default value so we can still get data for icons not accounted for? We can now see those values.

These are a few common use cases of the Google Tag Manager Lookup Table variable.
There could be many others depending on the situation you’re dealing with, like standardizing query parameters or URL fragments, getting the right spellings, grouping certain values, and much more.
But now that you’re aware of it and how it can be used, next time you’ll have some solutions in mind.
Best Practices for Lookup Table Variable
Below are some best practices when using the Google Tag Manager Lookup Table variable:
- Use Exact Match Input Values – It’s important to use the exact values of the input variable, otherwise, the mapping for output won’t work. To clarify, it’s also case-sensitive. So, in our social icon example above, if we use ‘icon-link_1 fill share_buttons_Facebook_1’ where the ‘F’ of Facebook is capitalized instead of ‘icon-link_1 fill share_buttons_facebook_1,’ then it simply won’t work. It’s important to double-check your input values and test before publishing!
- Default Values as a Safety Net – When there are no matches for your input values, then the variable returns ‘Undefined’ which might not be the best case always, as you might lose on some data that isn’t in your Lookup Table. As seen in our social icon example, it accounts for any new values added or if the classes are changed.
- Avoid Overly Large Tables – Where possible, avoid using overly large tables as they become difficult to manage and leave more room for error. It’s a debated issue how much they affect the page performance though; but apparently, it’s not that big!
- Review Tables Periodically – Input values must be consistently reviewed and updated to match the exact format, because even the smallest formatting issue like different cases, extra spaces, or characters can cause Lookup failures.
- Document Your Lookup Tables – Maintain documentation that details what each Lookup Table does, the inputs and outputs it uses, and any rationale for the choices made. Documentation is always a good idea when it comes to your GTM implementations!
- Use in Conjunction with Other Variables – Where data transformations can get quite complex, consider using Lookup Tables with other variables to get the most out of it.
- Check Your Input Variable for Failure – If you don’t see the expected output for your Lookup variable, check the value of your input variable as well. If it’s undefined or has changed, that could be causing the failure to execute, especially when using a Custom JavaScript variable as input.
As always, our list is not exhaustive. But these practices can help you to get the most out of your setup and if used correctly, make it easier to avoid creating multiple tags for the same event and get cleaner data.
Limitations of Lookup Table Variable
It helps to keep the container organized and get cleaner data but Lookup tables have their limitations and understanding them will help us plan our implementation better. Here they are:
- Only Exact Match Inputs – Perhaps its biggest limitation is that if we want to match multiple items, patterns, or cases, we cannot do that with it. For instance, if we have URLs containing ‘/gb/’ and want to give ‘UK’ as the output, it will only work when the path has exactly /gb/ and not any other variations. We won’t see the data for other pages. The exact match also makes it case-sensitive. It won’t account for any other variations in the values of the input variable.
- Static Input Mapping – If your use case requires dynamic or conditional logic that changes based on context (e.g., multiple conditions, calculations), the Lookup Table variable may not cut it because it only takes static, pre-defined input values. In such cases, you might need to use a Custom JavaScript variable or try a different approach.
- Easy to Make Errors – Since entries in a Lookup Table are manually defined, there’s a risk of human error, such as typos or incorrect mappings. It’s easy to type “producton” instead of “production” causing Lookup failure, especially if it’s a large table.
- No Regex Support – Since the values are static, predefined, and exact match, there’s no flexibility for variations or matching patterns. Regex could have helped here, but there’s no regex support for input or output values. However, you don’t have much to worry about because the RegEx Table can account for different variations in a single row.
- Tricky Scaling – Large Lookup Tables can become tricky to scale and manage, leading to errors if not reviewed and updated properly due to changes in input values.
Most of the limitations can be circumvented by using the Regex Lookup Table variable.
More complex transformations or logical calculations for the input values can be done with the Custom JavaScript variable – the king of most versatile GTM variables.
But if you’re using fixed values that don’t change often and small Lookup Tables, then as long as you respect the exact match condition, you will be fine!
Summary
Learning about different GTM variables can be overwhelming, but they are an important component of using the Tag Manager. Today we learned about one of the versatile ones, i.e., the Google Tag Manager Lookup Table variable.
We started by learning about what it is, looking at its different components like the default and formatting value, but most importantly, how they all come together to do the Lookup magic.
Next, we explored different use cases of Lookup Tables and how we can use them to handle multiple GA4 properties, whether it’s for domains or regions, cleaning the data, grouping the content, or tracking social media icons.
We are sure that you might have many other use cases for it.
Moving on, we learned about some best practices that can help us get the most out of our GTM setup, and then we finished things with the limitations that we can face with it and possible solutions for some of those. Hello, Regex Table variable!
Talking about use cases, we touched the content grouping very lightly. But, if you’re interested in learning more about them, check out our post on How to Set up Google Analytics 4 Content Groups.
In the comments below, you can let us know what are some interesting examples of how you’ve used the Lookup Table variable, what you love about it, and what you don’t!


