Last Modified on January 13, 2025
Do you want to improve your conversions while keeping your cost-per-click (CPC) low?
With Facebook retargeting Pixel, you can set up event tracking that provides a great basis for remarketing activity.
Combining the configurations of Facebook Pixel with Google Tag Manager’s flexibility of deployment, let’s create a powerful remarketing setup!
In this guide, we are going to learn how to set up the base tracking, which will enable us to do simple retargeting with Facebook Ads.
An overview of what we’ll cover in this guide:
- An Overview of Facebook Pixel Events
- Why Should You Install Facebook Pixel Manually?
- Installing Facebook Retargeting Pixel with Google Tag Manager
- Setting up Pixel Base Code Tag
- Setting up Page View Tag
- Testing
An Overview of Facebook Pixel Events
Before we get too deep in remarketing, let’s first get familiar with how our Facebook Pixel events look when they fire. This will help us understand the interface and debug errors.
🚨 Note: If you’re getting errors in your Meta Pixel, check out our guide on how to fix Meta Pixel errors and learn how to prevent them from happening again.
Events and activities are shown under Events Manager → Pixels in your Facebook Business account.

Clicking on the Pixel account takes us to a more detailed view.
On this dashboard, you’ll be able to see an overview of all the activities and events that were fired.

If you haven’t done this already, the next step is to set up your account. Click on the Setup button.
Facebook gives you three options to install your pixel code: Use an Integration or Tag Manager, Manually install the Code Yourself or Email Instructions to a Developer.

Why Should You Install Facebook Pixel Manually?
While Facebook gives us the option to use an integrated service like Google Tag Manager, you’ll want to manually install the pixel code on your website.
If we install the Pixel code using a tag management system (TMS), it will install a template into our Tag Manager account. This gives us very little control over the customization of the code.
So a better option here is to install the code manually.
Once we select this option, it will take us to an overview of the instructions.
This is where you will find your Facebook Pixel code.
We’re not concerned with the first part of the code because you’ll still be deploying the code through Google Tag Manager.
So we’ll go directly to the second part, which gives us our base pixel tracking code. We can copy this code just by clicking on it and then install it with the help of Google Tag Manager.

Installing Facebook Retargeting Pixel with Google Tag Manager
On my store, I have already installed Google Tag Manager on the website.
If you haven’t set this up already, you can refer to our guide on how to install Google Tag Manager.
Once that is done, we can start implementing the Tag in our Google Tag Manager account.
Setting Up Pixel Base Code Tag
Firstly, let’s create a new Custom HTML Tag.
Ordinarily, you’ll choose the Tag type based on the tool we want to use. However, there is no Tag template for the Facebook Pixel, so you’ll need to use Custom HTML.
We can paste our Facebook Pixel code in this Tag.
It’s important for you to understand how this code works. The code is divided into three parts:
- Base tracking code. This first part of the code will load the Facebook library and initiate our Pixel so it knows where to send data.

- Event tracking code. Any line that starts with fbq(‘track’ will collect tracking data and send it to the Facebook Pixel account initiated by the base code.
There are a variety of standard events that Facebook will recognize such as contact, purchase, and subscribe; this one is a PageView.

- Noscript tag. If your user doesn’t have JavaScript enabled, this part of the code will try to load an image Tag on the website itself so your event is counted.
…Which is helpful in theory, but since Google Tag Manager only works on pages with JavaScript enabled anyway, you can actually get rid of this code.

💡 Top Tip: Only a very low percentage of users have JavaScript disabled. However, if you still want to absolutely make sure your Tag is deployed even when JavaScript isn’t enabled, you could add this noscript code to a Custom Image Tag.
But back to that second chunk with the events tracking code—in most cases, you’ll actually want to take it out and put it into its own separate Tag.
But why? Isn’t that more work?
Putting the event tracking code into a separate Tag gives you way more control and makes your Tag management easier.
Let’s say that you’re tracking more than one event with your Facebook Pixel. If every Tag loads the entire Facebook library and initiates the Pixel, isn’t that redundant?
So instead, we have one Tag that only deploys our base tracking code and initiates our Pixel. It won’t send any data over to Facebook just yet.
Then, all the event Tags fire separately (easier to organize) and without the base code (faster to load).
There’s just one catch to this setup: your base pixel Tag must fire before your event tracking Tags.
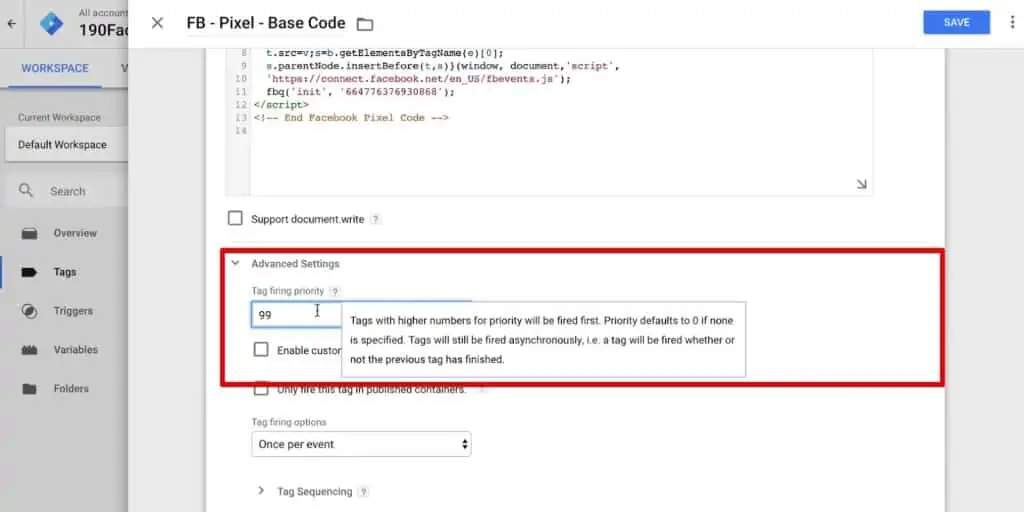
So after removing the event tracking code from your base pixel Tag, you’ll need to go to the Advanced Settings and adjust the Tag firing priority.
The higher the number, the earlier the Tag will fire compared to other Tags. Since this Tag has to fire before any others, we’ll set ours to 99.

Finally, attach an All Pages trigger and Save the Tag configuration.
Our Tag is configured and ready to start tracking—let’s test it out!
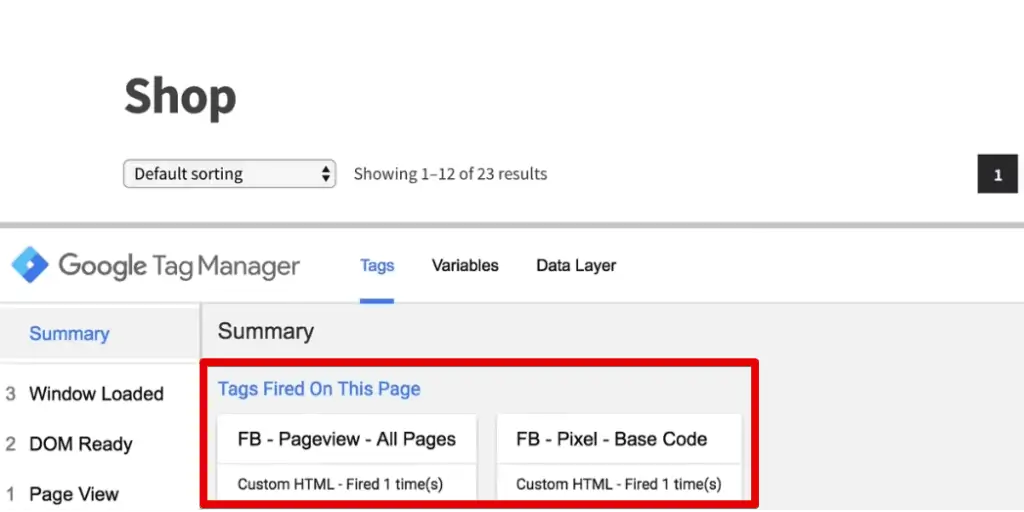
If you enter GTM’s preview mode and open your website, you’ll see that the Facebook Pixel base code has fired and initiated your Pixel.

It’s also a good idea to install the Facebook Pixel Helper browser extension to check your general implementation.
But note that if you use it with just a base code Tag and no event tracking Tags, the browser extension won’t detect your pixel.
This is because we don’t have an event that gets checked, so no information gets sent to your Facebook account.

Setting Up Page View Tag
With our base pixel Tag set up, we can now move to the next step: deploying our event tracking.
In Google Tag Manager, you’ll create a new Custom HTML Tag.
We will input our code in the HTML window. This code is the event tracking code to track page views.
And since it is a Javascript code, we will surround it with a script tag.
<script>
fbq(‘track’, ‘PageView’);
</script>
Don’t forget to attach the All Pages trigger with this Tag and click on the Save button.
We will not set the Tag firing priority for this Tag because the default priority is zero. This means that it will always fire after the base tracking code.
Testing
Our second Tag is ready—let’s test it out!
Enter preview mode and open your website.
This time, our Facebook Pixel base code fired first, then was followed by the pageview Tag.

We can also see this in the Facebook Pixel Helper. The PageView event has fired, and it even picked up some additional Microdata for us automatically.

To make sure that this works correctly on all the pages, you can navigate across your website and check whether the data is transferred correctly using either the GTM preview and debug console or the Facebook Pixel Helper.
You should also check if the data is received by Facebook. To do this, go back to your Events Manager on Facebook and look at the events under the Activity tab.
You can also choose to look exclusively at certain types of events using the menu column on the left.

Facebook Pixel also has another helpful feature if you click on View Analytics.
This opens a more comprehensive view with Facebook Analytics, which has a better representation of the data.

On the Facebook Analytics page, we can go to Events Debugging to see the pageview events for our demo shop.

Thus, our setup is working correctly and tracking page views.
FAQ
Why should I install the Facebook Pixel manually instead of using an integrated service like Google Tag Manager?
Manually installing the Facebook Pixel code on your website provides more control and customization options compared to using a tag management system. It allows you to tailor the code to your specific needs.
How do I set up a page view Tag for tracking page views with the Facebook Pixel?
In Google Tag Manager, create a new Custom HTML Tag and input the event tracking code for page views (‘fbq(‘track’, ‘PageView’)’). Attach an All Pages trigger to this Tag, and save the configuration.
How can I verify if the data is being transferred correctly and received by Facebook?
You can navigate across your website and use either the GTM preview and debug console or the Facebook Pixel Helper to check if the data is transferred correctly. To verify if the data is received by Facebook, go to the Events Manager in your Facebook account and look at the events under the Activity tab.
You can also use Facebook Analytics for a more comprehensive view of the data.
Summary
Alright, so this is it. This is how we can install the Facebook Retargeting Pixel with the help of Google Tag Manager.
Installing the Facebook Pixel is a great start towards marketing analytics for any business. This method also provides the flexibility of Google Tag Manager, which gives us way more room for customization.
Now that we know how to install the base tracking code, our next step will be to track custom events using Google Tag Manager and forward them to Facebook Pixel.
And once we are there, we can set up Facebook Pixel Conversion Tracking. We also have a comprehensive guide on Facebook Pixel Tracking with Google Tag Manager.
So have you tried installing Facebook Pixel with Google Tag Manager? Or are you already tracking your conversions with Facebook? Let us know all about it in the comments below!


I’ve done exactly everything like you. But the FB Pixel Helper doesn’t mar “Microdata” with a green checkbox. There is a blue flash. I guess something went wrong. Do you have any explanation for that?
seems like FB changed their icons. I wouldn’t worry about it too much
Great video Julian.
I always say the base code includes PageView event.
Did you split the code just for didactic purposes or do you think it’s better to have a separeted tag just for the PageView event?
Thanks for a great overview, Julian!