
Last Modified on July 12, 2024
In this guide, we’ll show you how to build higher-quality audiences in your Meta Ads by delaying your Meta Pixel and eliminating bounced users from your audience.
This tutorial will explain:
- Why You Should Delay Meta Pixels From Firing
- How to Create a Base Meta Pixel Tag
- How to Delay a Meta Pixel Event
- How to Set a Tag’s Firing Priority
- How to Create a Meta Audience
How to Delay Meta Pixel with Google Tag Manager (Summarized)
- Create Base Meta Pixel Tag:
- Go to GTM, click on Tags, then New.
- Select Custom HTML and name it appropriately (e.g., CHTML – Facebook – Base Pixel).
- Copy the Meta Pixel code from Meta Events Manager and paste it into the HTML field.
- Set the trigger to All Pages and save.
- Create Timer Trigger:
- In GTM, click on Triggers, then New.
- Select Timer trigger type, set Interval to 5000 milliseconds and Limit to 1.
- Set conditions to *Page Path matches RegEx . **, name the trigger, and save.
- Build Custom HTML Meta Tag for Timer Event:
- Go to Tags, then New.
- Name it (e.g., CHTML – Facebook – 5 Seconds), select Custom HTML, and paste:
<script>fbq('trackCustom','5 Seconds');</script> - Attach the five-second timer trigger and save.
- Test Tags:
- Use GTM Preview mode to ensure both tags fire correctly.
- Use Meta Pixel Helper to verify events in Meta Events Manager.
- Set Tag Firing Priority:
- For the base Meta Pixel tag, set Tag Firing Priority to a value greater than zero under Advanced Settings.
- Select Once per event in Tag Firing Options and save.
- Create Meta Audience:
- In Meta Events Manager, click Create Audience, select your Meta Ads account, and choose the appropriate pixel.
- Create an audience of users tracked by the five-second event and set the duration.
- Name the audience and create it.
Let’s dive into each of the steps!
Why Should You Delay Meta Pixel?
Delaying the Meta Pixel from firing immediately when a user enters your website will filter out any user who isn’t interested in what you have to offer.
Sometimes, users click on links accidentally or click a link, thinking it contains different content than it does. These users typically leave the website immediately (we call this a bounce).
That is fine — not everyone on the internet is part of your intended audience. However, it could be an issue if these users become part of your targeted audience for marketing campaigns.
These users are not promising leads. It could be a waste of your resources to target them. Instead, focus your efforts on users genuinely interested in your website or business.
If you want to optimize your audience for retargeting purposes, you might want to focus on users who have been on your website for more than a few seconds.
We can implement such a delay with the help of Google Tag Manager and create a Meta audience of people who have stayed at least five seconds on your webpage.
If you delay Meta Pixels, it will give you a better quality audience by excluding those who have clicked on a link by mistake or just closed the page immediately and didn’t have the chance to even look at the page.
Then, you should hopefully get better results by advertising to a better-quality audience.
🚨 Note: If you use The Meta Pixel and haven’t integrated Google Tag Manager yet, check out our Meta Pixel Tracking with GTM guide.
Creating Your Base Meta Tag
Let’s begin by creating our base Meta Tag. This Tag will load the Meta Pixel library so your pixel can record other Meta events.
We will create a new custom HTML tag in Google Tag Manager.
To create a new Tag, click on Tags, then New.
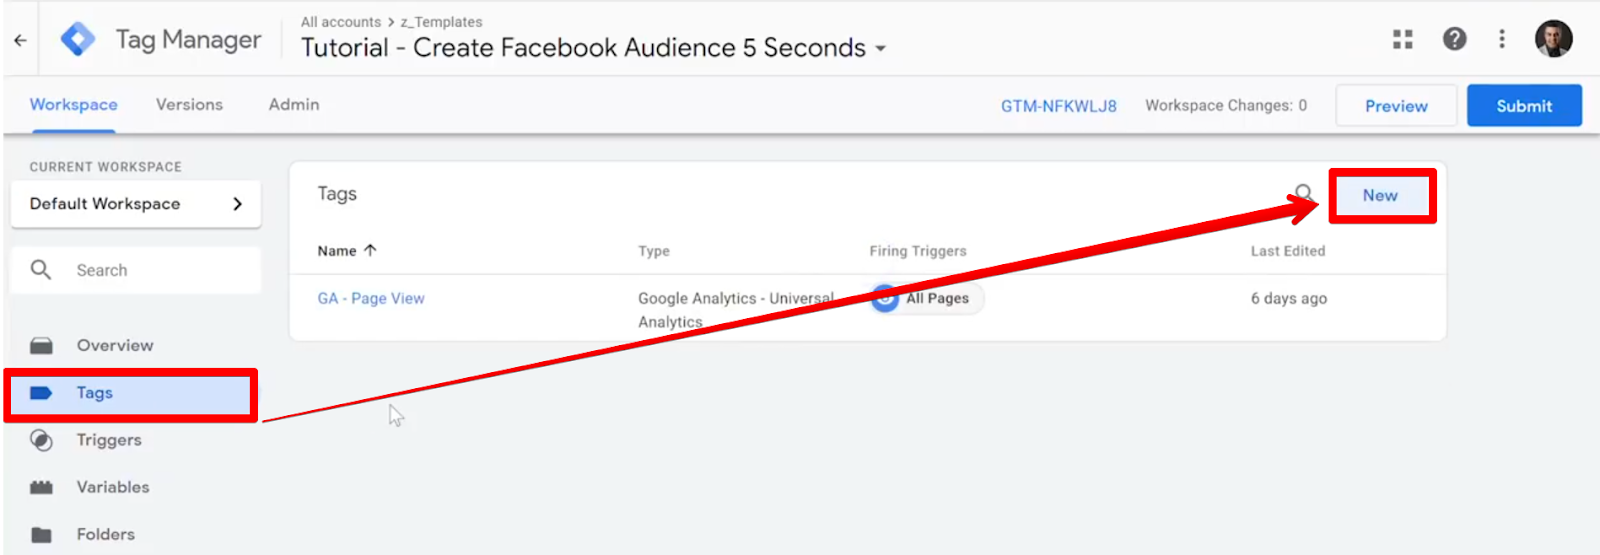
Make sure to give your Tag an informative name. I like to use CHTML for “custom HTML” to describe the Tag type, then the tool and the scope or function of the Tag. I’ve named this Tag CHTML – Facebook – Base Pixel.
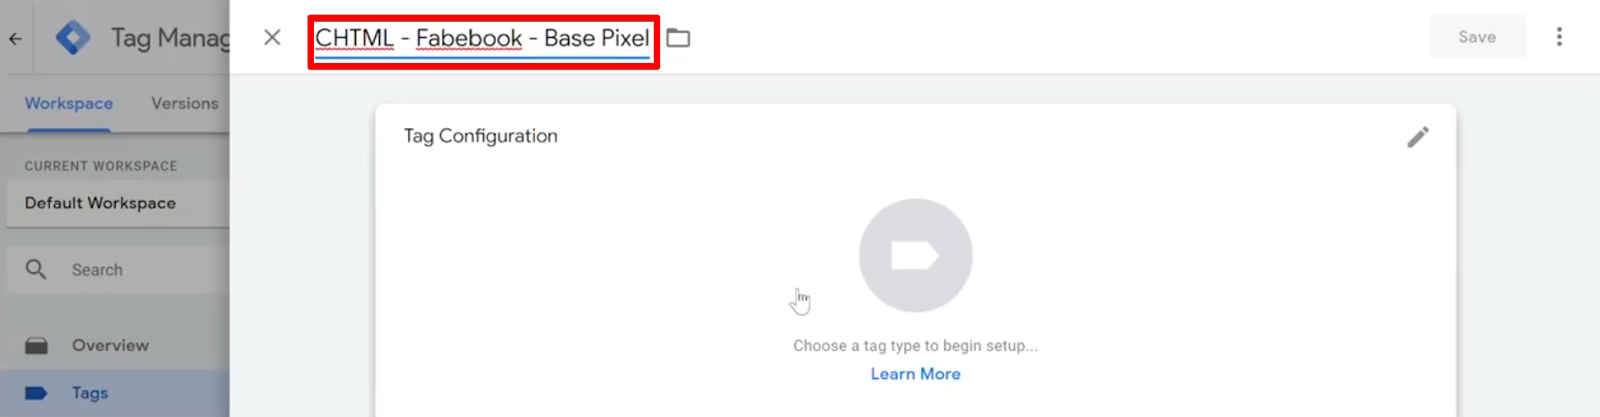
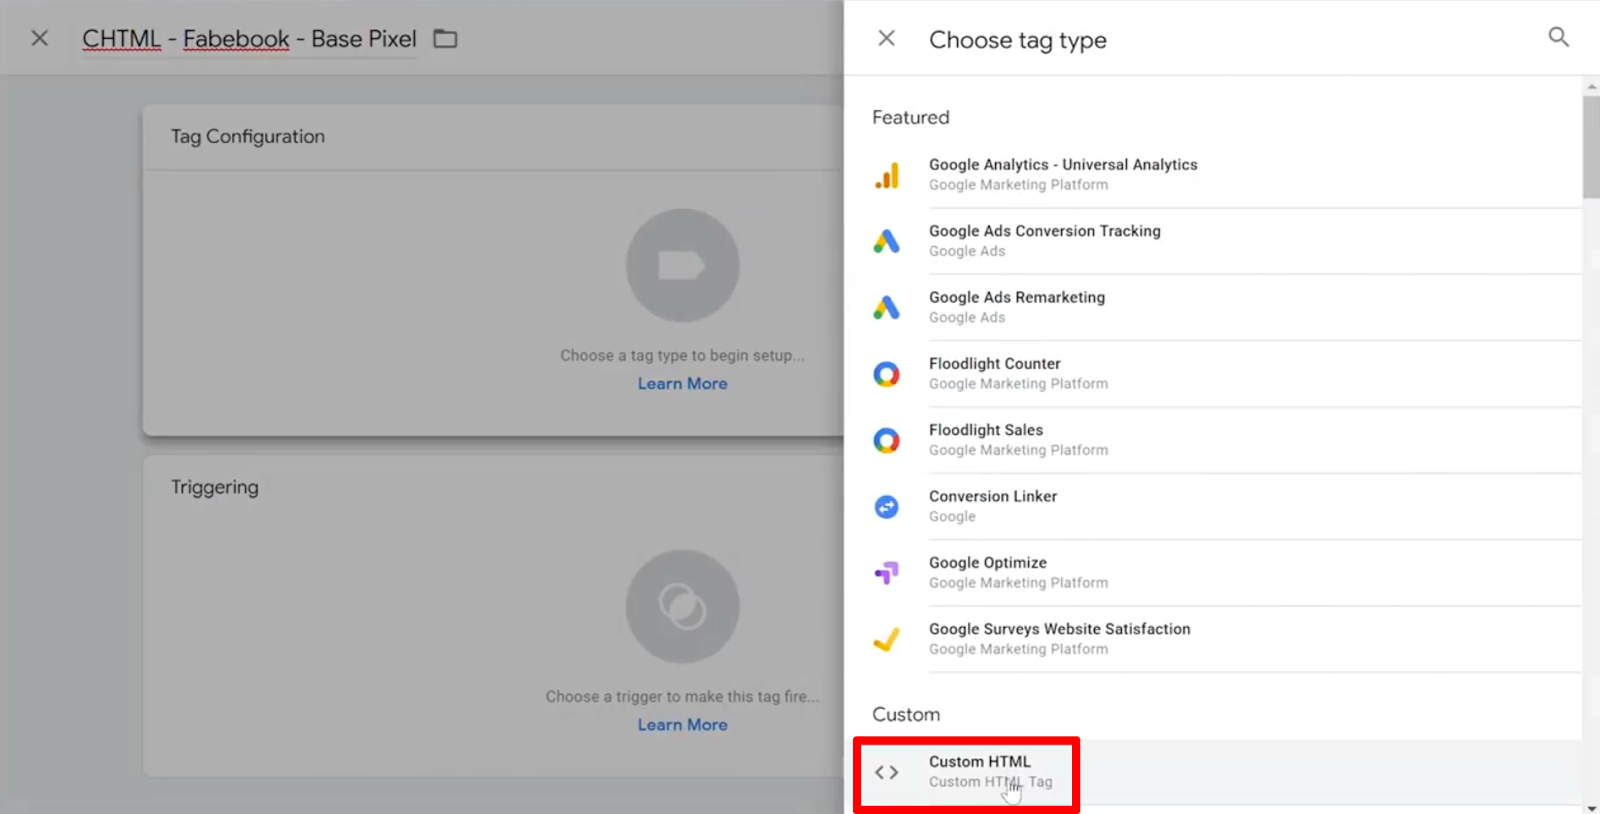
Since there isn’t an official integration for Meta Pixel Tags, we’ll make a custom one using the Custom HTML tag type.
Next, go into your Meta Events Manager account on a separate tab and grab your unique pixel code. (You can find it under Set Up → Install Pixel → Manually add pixel code to website.) You can click on the code box to copy the whole snippet.
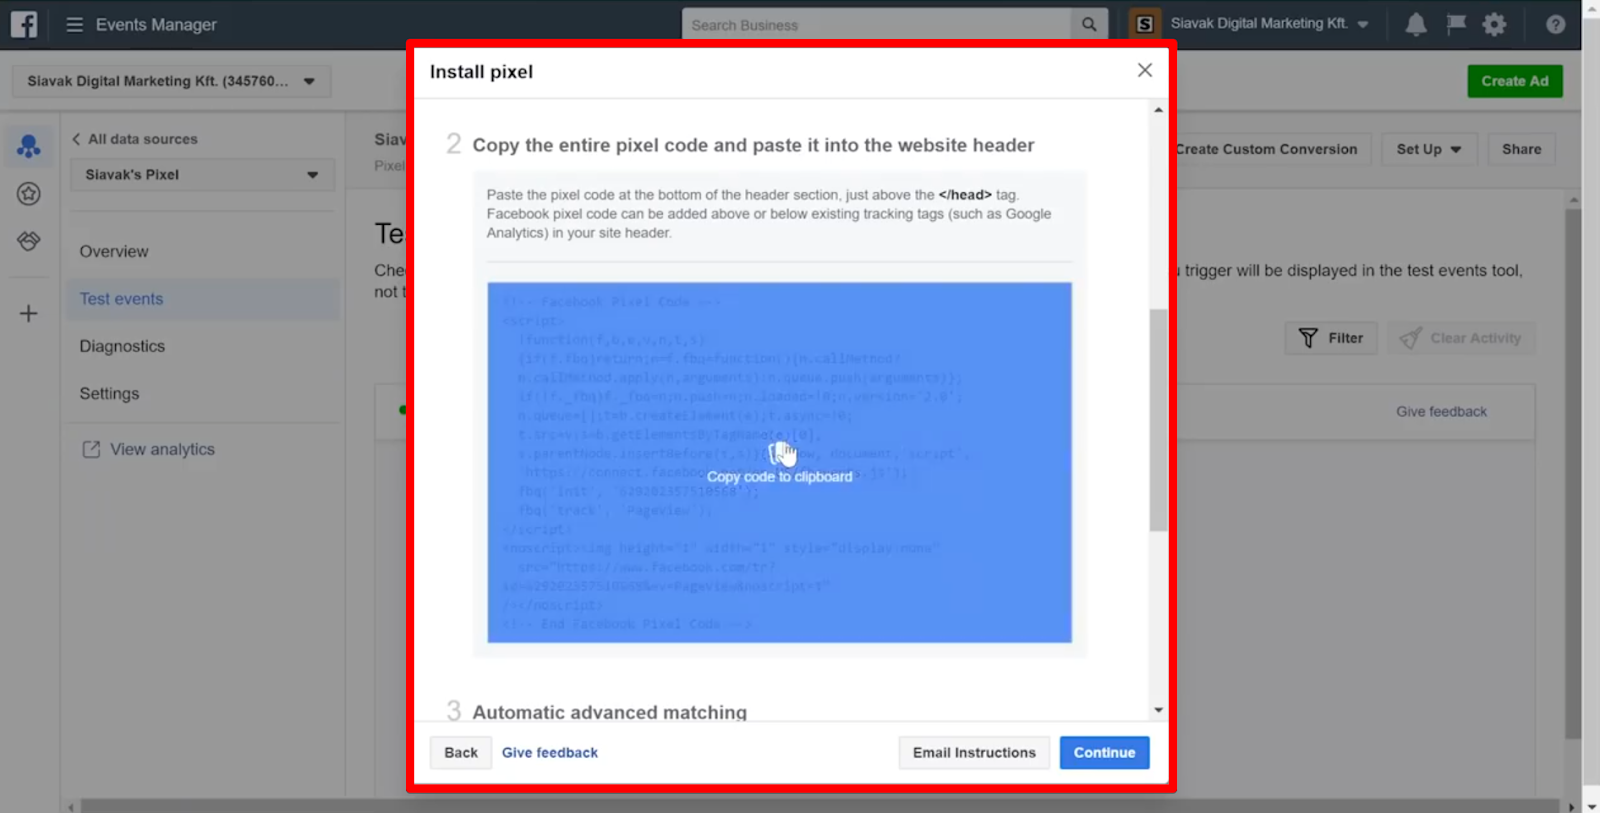
Then, paste this pixel code into the HTML field of your new Tag.

Since we’ll need this base Tag to fire first to track any other Meta events, we’ll want it to fire on all pages across our website.
To do this, we’ll scroll down and click anywhere in the Triggering field, then select the All Pages trigger for this Tag.

Finally, click Save. We’re almost done with this step, so let’s test our Tag to ensure it’s working correctly.
Testing Your Base Pixel Tag
Click Preview to enter Google Tag Manager’s preview and debug mode.
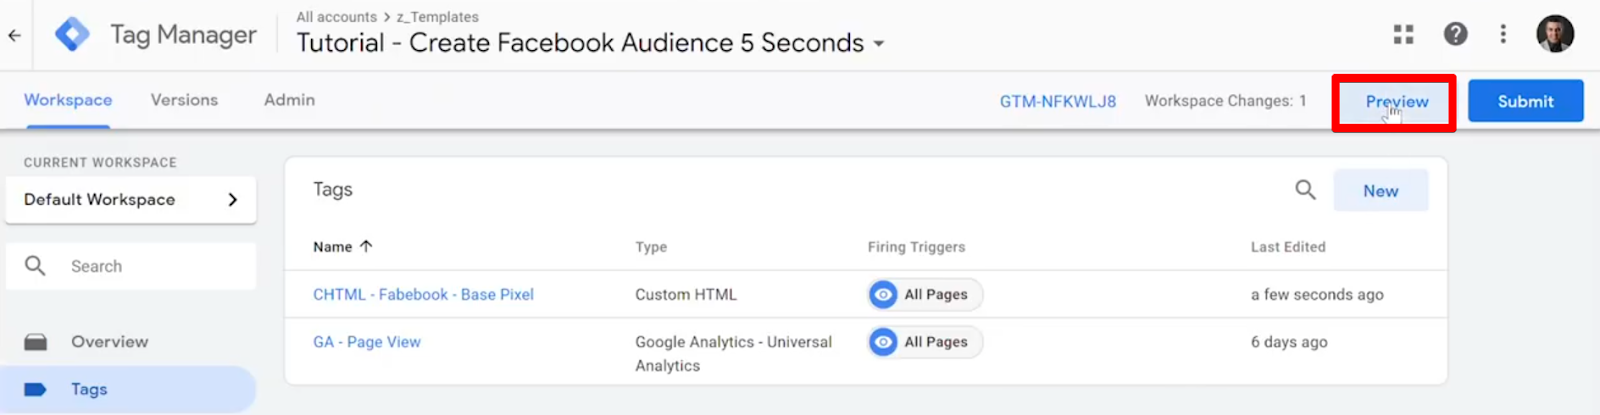
While in preview mode, navigate around your website. If everything is implemented correctly, your CHTML – Facebook – Base Pixel Tag should fire on each webpage.

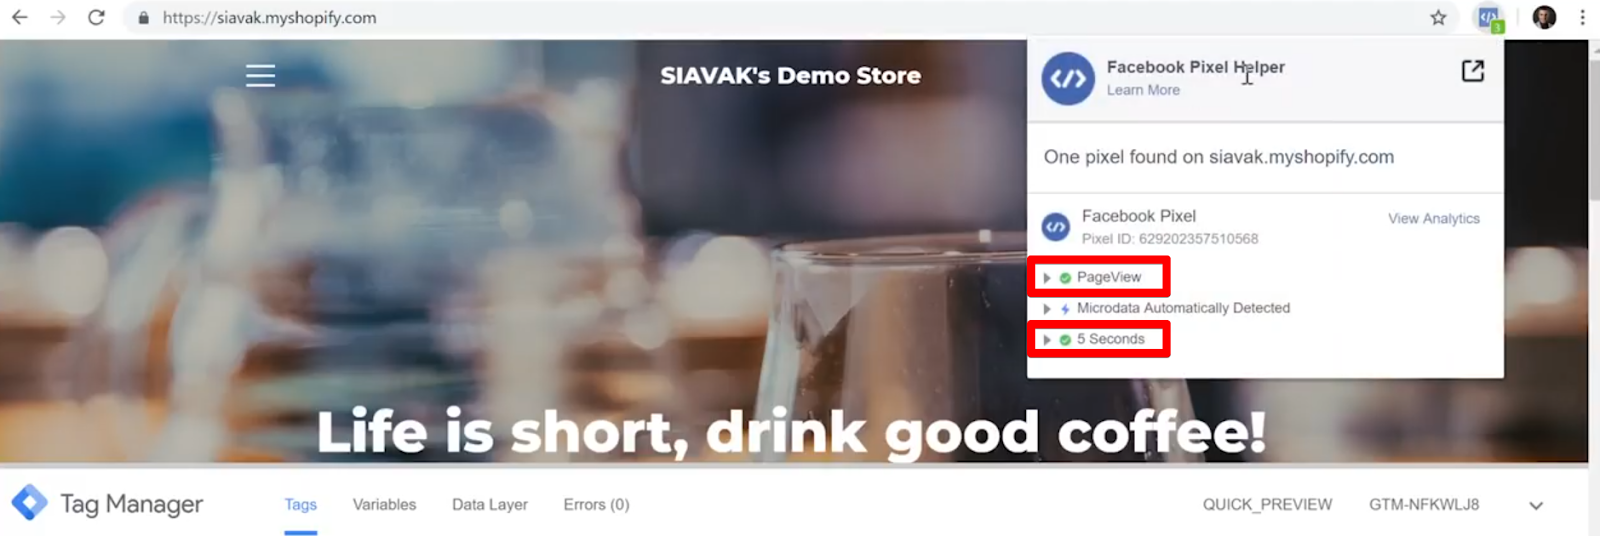
I also like to use a browser extension called the Meta Pixel Helper, which shows here that a PageView event has fired. This is the Tag we just installed, so we know that the Tag is firing correctly and will be sent to our Meta Ads account.

Creating a Meta Event that Fires 5 Seconds After Page Load
Now that we have a base Tag that will load our Meta Pixel library, we can create more customized event Tags to collect better data.
Next, let’s create a custom event for this Meta Pixel that fires five seconds after the page loads. It accomplishes our goal of tracking only users interested in our website and excluding users who bounce.
There are two main steps to this process.
First, we’ll create a timer trigger that will wait five seconds before firing our Tag.
Second, we’ll need to build a new custom HTML Tag that will track a specific Meta event without bogging down page loads with extra code.
Create GTM Timer Trigger
To create a new custom trigger, click on Triggers inside Google Tag Manager and click New.
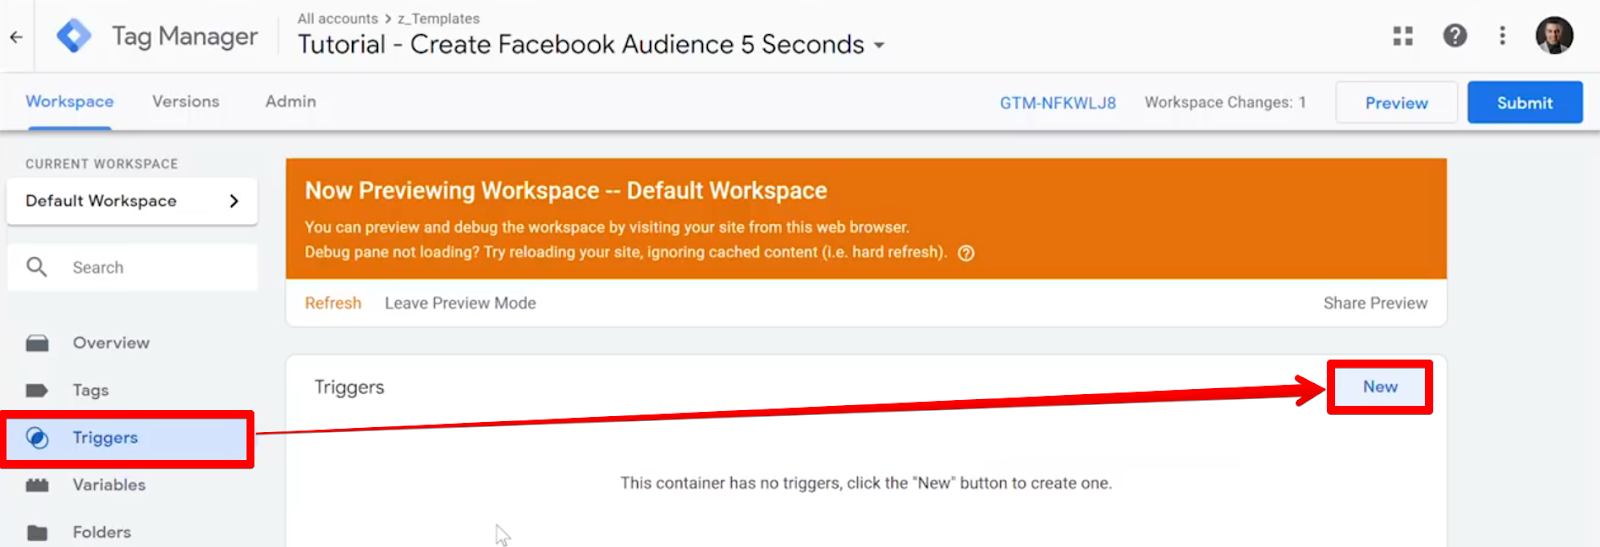
We want to create a trigger that fires five seconds after the page loads.
There is a built-in trigger inside Google Tag Manager that can help us accomplish this called the Timer trigger.

The field Interval determines how long the timer will wait after the trigger to fire a Tag. To achieve a five-second delay on our Meta Pixel Tag, enter 5000 milliseconds in the Interval field.
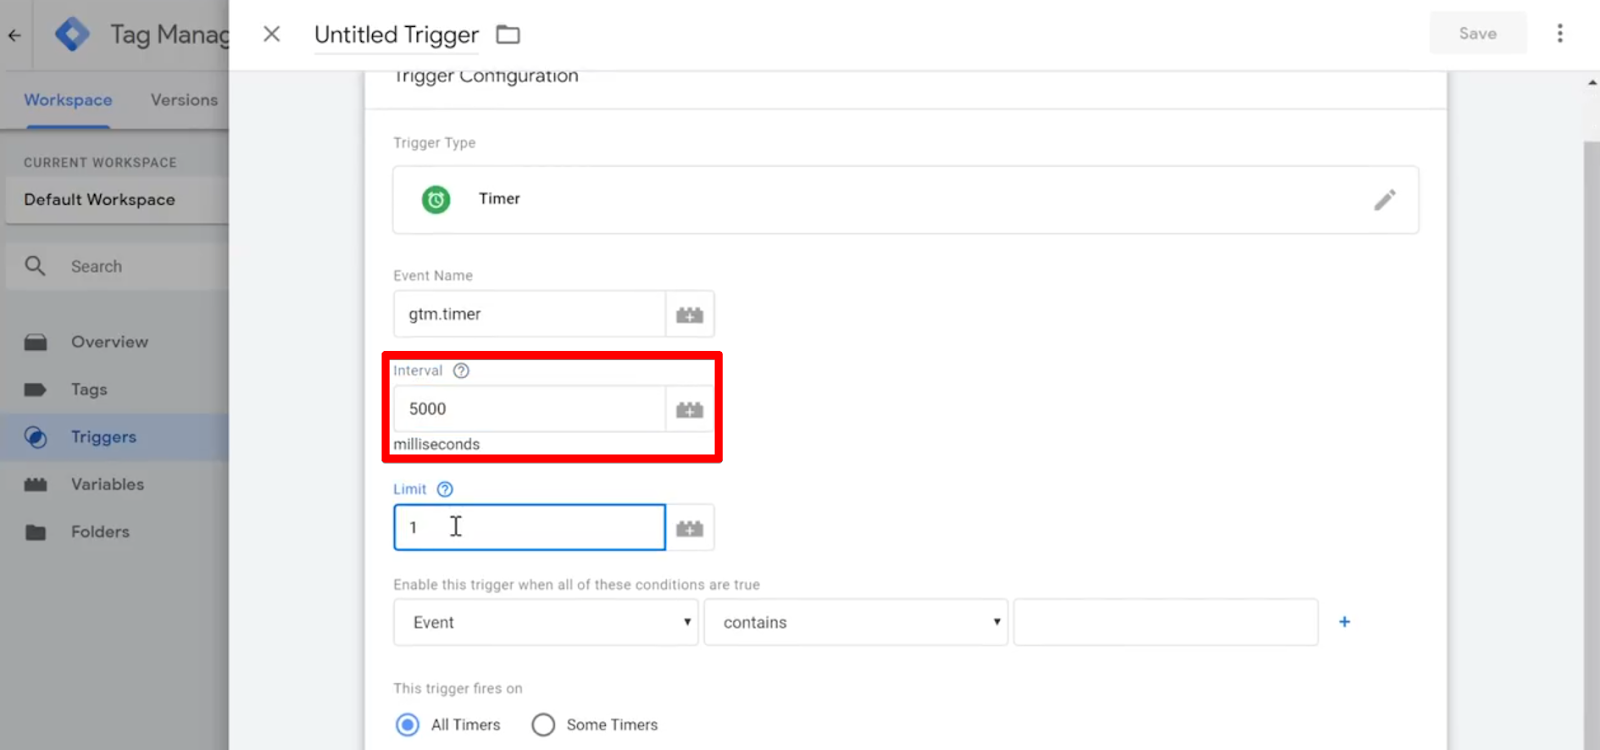
If no Limit is placed on this trigger, it will fire a Tag every consecutive interval. In this case, the Tag would fire every five seconds.
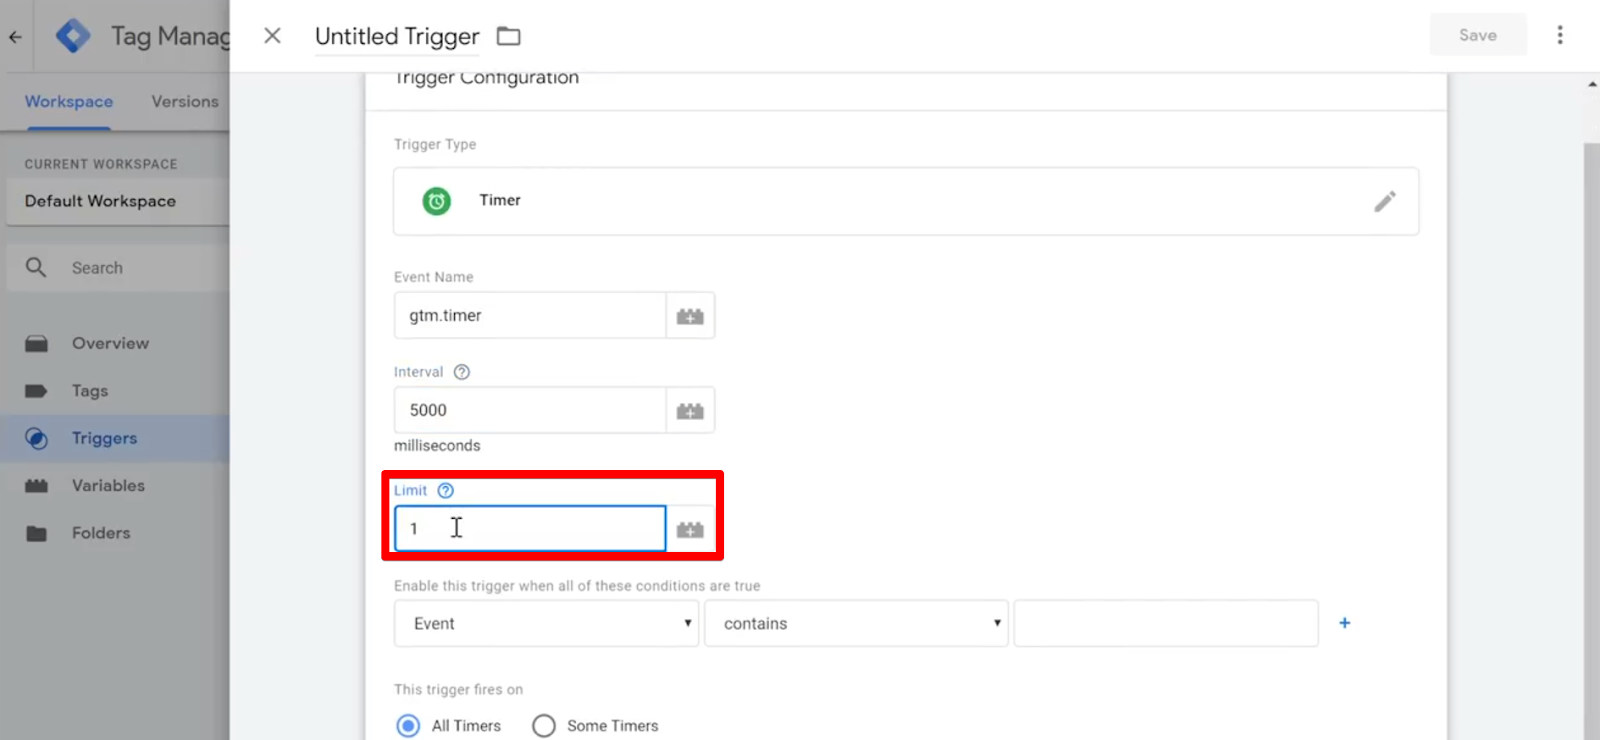
We only want to fire our Tag once per page, so set the Limit to 1.
Finally, we need to set the conditions for this trigger. This will tell the trigger when it should start its timer.
We want this trigger to fire on all pages, so we’ll set the conditions to Page Path matches RegEx .*. The dot-star ( .* ) in regular expression notation means that any value will be considered. The timer will begin on any page on this website.

Finally, don’t forget to give your trigger an informative name—Timer – 5 Seconds is self-explanatory—and Save it.

So, with these settings, we have a timer trigger that fires just once after five seconds on all pages. It is perfect for tracking pageviews from users who don’t bounce.
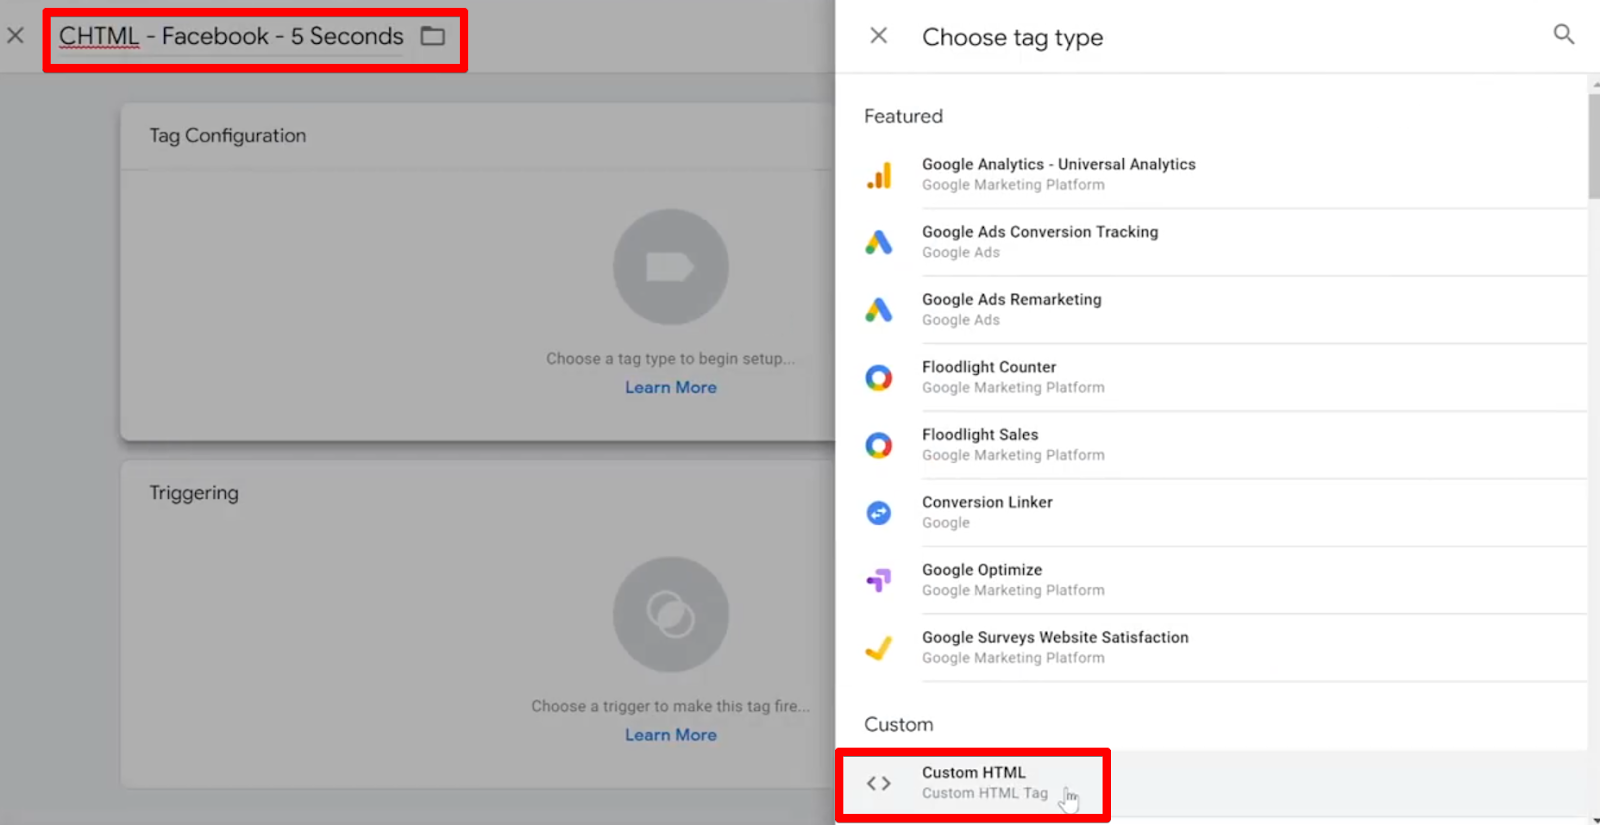
Build Custom HTML Meta Tags
Now, let’s create a Tag that uses our new trigger and fires a custom Meta event.
Go to Tags, then click on New.
Let’s give this Tag a name to distinguish it from our base Tag. I’ll call mine CHTML – Facebook – 5 Seconds. Click the Tag Configuration field, then choose the Custom HTML tag type.
And here, we need to type exactly like this:
<script>
  fbq('trackCustom','5 Seconds');
</script>
This snippet is a piece of JavaScript. The trackCustom element allows us to create our Meta event. I will use the name 5 Seconds so we can identify it in the Meta Ads interface.
Next, we will attach our five-second timer trigger to the tag we’ve just built.

So this piece of code fires five seconds after each page load.
Click Save. Now, we’re ready to test our new Tag!

Testing Your Delayed Pixel Tag
We’re almost done with this Tag. Our last step is to test it in the Google Tag Manager preview and debug mode.
Enter preview mode on your website. Your base Meta Pixel Tag should still fire when the page loads. Then, after five seconds, you should also see your five-second timer event Tag. This should occur on any page across your website.

If you check the Meta Pixel Helper, you can also see that the PageView and 5 Seconds event has fired.
Finally, we should also ensure that our Meta Ads account is receiving the correct data from these Tags.
In your Meta Events Manager, go to Test Events. Under the Receiving activity list, you should see events for your base Tag (Page view) and timer Tag (5 Seconds) on each page you open while in GTM preview mode.

If you want to test this more carefully and see results in real-time, you can also click Clear Activity, refresh your webpage, and come back here. You should see the list populated with data from first your base Tag, then your timer Tag.

Setting Tag Firing Priority
We should take one more step to ensure that our implementation is airtight. We want to make sure that our base Tag always fires before the timer Tag, no matter what else happens on the page load.
This is because without the Meta library initiating from the base Tag, the timer Tag will not successfully send information to our Meta Ads account.
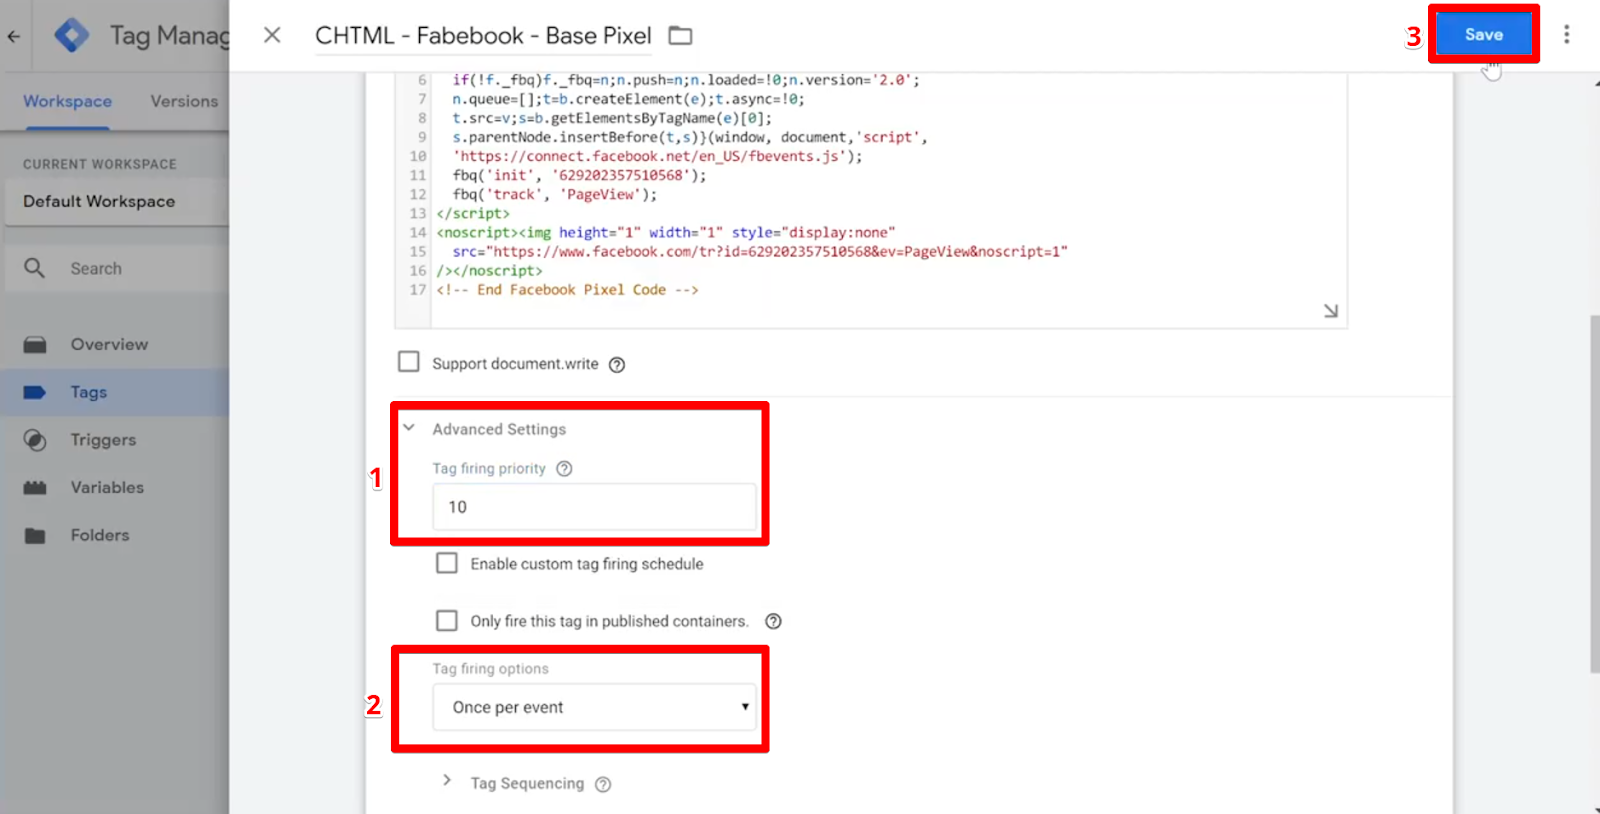
In Google Tag Manager, click on your base Meta Pixel Tag.

To make sure that our base Tag finishes loading the JavaScript library for Meta before the timer Tag fires, we’ll be using some advanced settings that instruct Google Tag Manager to fire Tags in a certain order.

Under Advanced Settings, find the field labeled Tag firing priority. The higher a Tag’s firing priority compared to other Tags, the earlier it will fire (the default is zero). Any value greater than zero will ensure this Tag fires before our other Tags.
Then, find the dropdown options under Tag firing options. Here, we want to select Once per event. Finally, click Save.
Creating Meta Audiences in the Meta Pixel Interface
Finally, we can create an audience of users tracked by our timer Tag for remarketing purposes. These users are some of the best leads for targeted remarketing since we know they’re interested in our website.
In your Meta Events Manager, click Create Audience.

Choose the Meta Ads account where you’d like to create an audience.

Choose the correct pixel that is tracking your new events.

Then, we can create an audience of people who have stayed for at least five seconds by selecting users tracked by our 5 Seconds event.

We also need to determine how long users stay in this audience after being tracked by this event. Remarketing works well within a short timeframe, so I’ll set this to one week.

Finally, give the audience a name and click Create Audience.

With this custom audience, you can target users interested in your website with remarketing campaigns.
🚨 Note: If you’re getting errors in your Meta Pixel, check out our handy guide on how to fix Meta Pixel errors.
FAQ
How do I set a Tag’s firing priority?
To set a Tag’s firing priority in Google Tag Manager, follow these steps:
1. Select the Tag you want to set the firing priority.
2. Under Advanced Settings, locate the “Tag firing priority” field.
3. Assign a value greater than zero to ensure the Tag fires before other Tags.
4. Set the Tag firing options to “Once per event.”
5. Save the Tag configuration.
How do I create a Meta audience?
To create a Meta audience using your delayed Meta Pixel events, you can follow these steps:
1. Access Meta Events Manager.
2. Click “Create Audience” and choose the Meta Ads account you want to create the audience.
3. Select the correct pixel that is tracking your delayed events.
4. Choose the event with users who have stayed at least five seconds on your website.
5. Set the duration for how long users should stay in this audience after being tracked by the event.
6. Give the audience a name and click “Create Audience.”
What are the benefits of delaying the Meta Pixel?
Delaying your Meta Pixel helps optimize your audience for retargeting purposes by excluding users who click on links accidentally or immediately leave the website. It ensures you target a better-quality audience, leading to improved marketing campaign results.
Summary
So there you have it. That is how to delay Meta pixels to build a higher-quality audience.
Check out our guide on Meta Pixel Purchase & Conversion Tracking with GTM, which also improves your ability to track more qualitative data.
Have you tried to delay Meta Pixels from firing with Google Tag Manager? How do you optimize your remarketing audiences? Let us know in the comments below!


")
It would not affect your load time pagespeed?
Positively!
It wouldn’t be more effective start all the pixel code delayed? Making this way your ad rate increase