Many people find that implementing robust tracking for online stores takes time and technical skills.
However, if you’re using WordPress you’re in luck because there are solutions that can get you up and running in under 30 minutes.
In this guide, we’ll walk you through various approaches to WooCommerce Google Analytics 4 tracking, including options for users who have already implemented GA4 in multiple ways.
We’ll cover:
- How Do I Add WooCommerce Google Analytics 4 Tracking?
- Google Tag Manager vs WooCommerce GA4 Plugin
- Advantages of Using Google Tag Manager (GTM)
- What to Do If You Already Have GA4 Installed
- How to Install the GTM4WP Plugin
- GTM4WP Configurations
- Google Tag Manager Configuration
- Testing Your Integration
- Troubleshooting Common Issues
Let’s dive in!
How Do I Add WooCommerce Google Analytics 4 Tracking?
These are the essential steps to WooCommerce Google Analytics 4 tracking using Google Tag Manager.
However, keep in mind that there are use cases where these steps will require adjustments based on your current GA4 or GTM setup. We’ll cover those scenarios throughout the post.
You’ll need to:
- Have a Google Tag Manager (GTM) Account: If you don’t already have one, you must create a GTM account to manage your tags.
- Install and configure the GTM4WP Plugin: Install the GTM4WP plugin on WordPress and configure it to send WooCommerce eCommerce data to GTM.
- Set up GA4 eCommerce tags in GTM: Import the GA4 container template and set up eCommerce tracking tags in Google Tag Manager.
- Test and verify: Perform a test transaction in WooCommerce and verify that eCommerce data is correctly captured in GA4.
Google Tag Manager vs WooCommerce GA4 Plugin
When it comes to tracking WooCommerce eCommerce data in GA4, you may have encountered two main options, using:
- Google Tag Manager (GTM)
- WooCommerce GA4 Plugin
Each has pros and cons, and choosing the right one depends on your setup, preferences, and technical skills.
Common Issues with the WooCommerce GA4 Plugin
While the WooCommerce GA4 Plugin is a powerful tool that provides a straightforward way to integrate GA4 into your store, users have reported several issues:
Delayed GA4 adoption
As of the time of writing, the WooCommerce plugin documentation still references Universal Analytics (UA), even though GA4 is now the recommended version for Google Analytics. Many users have experienced compatibility issues when migrating from UA to GA4.
Subscription model
Although there is a free plugin version, to get the full advantage of GA4 eCommerce features such as Cart page view, you’ll have to buy the paid version which operates on a subscription model. This option may not fit everyone’s needs or budget.
Lack of support
Some users have reported a lack of support from the development team, particularly concerning updates and resolving issues.
Advantages of Using Google Tag Manager (GTM)
Google Tag Manager (GTM) is widely recognized as an industry standard for tag management used by millions of websites.
It provides the ability to track user interactions across multiple platforms, including Google Ads, Meta Pixel, and many others.
One of the key benefits of GTM is its flexibility, giving you full control over the data you collect and how it’s structured.
GTM and the GTM4WP plugin — a popular plugin for integrating Google Tag Manager with WordPress—are free, making them cost-effective solutions for tracking and analytics.
Additionally, the GTM4WP plugin is designed to support eCommerce tracking by using Google’s recommended event names, such as Add to Cart and Purchase, which are fully compatible with GA4’s eCommerce tracking features.
Features like tax inclusion or exclusion can be done with just a checkbox.
What to Do if You Already Have GA4 Installed
If you’ve already installed GA4 manually or through a plugin different than the ones we recommend, you don’t need to worry.
You can still achieve WooCommerce tracking by integrating it into your GA4 setup. Below, we’ll outline two common scenarios and how to handle them.
Option 1: Manual GA4 Code Installation
If you manually installed the GA4 tracking code by adding it directly to your site’s source code, we recommend switching to GTM for better control and easier management:
- Create a Google Tag Manager (GTM) account.
- Install the GTM4WP plugin on your WordPress site and link it to your GTM account.
- Remove the existing GA4 tracking code from your website to avoid double-tracking. Before removing the code, ensure that GTM is properly deploying GA4.
Option 2: GA4 Installed via a Plugin
If you’re using a plugin other than GTM4WP to handle GA4 tracking, there are two paths you can take:
- Switch to GTM and the GTM4WP plugin, following the steps above, for full control over your eCommerce tracking.
- Use GTM and the GTM4WP plugin alongside your existing plugin, but only for eCommerce tracking. In this scenario, you’ll use GTM4WP to push eCommerce data to GA4 through the dataLayer for GTM to send to GA4 while leaving the rest of your tracking setup unchanged.
How to Install the GTM4WP Plugin
Installing the GTM4WP plugin is straightforward and takes only a few minutes. Here are the steps:
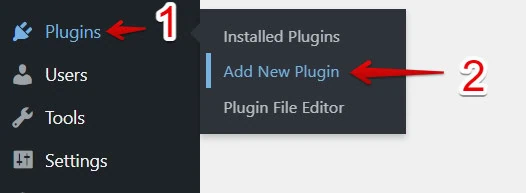
- In the WordPress left navigation, hover over Plugins.
- Select Add New Plugin.
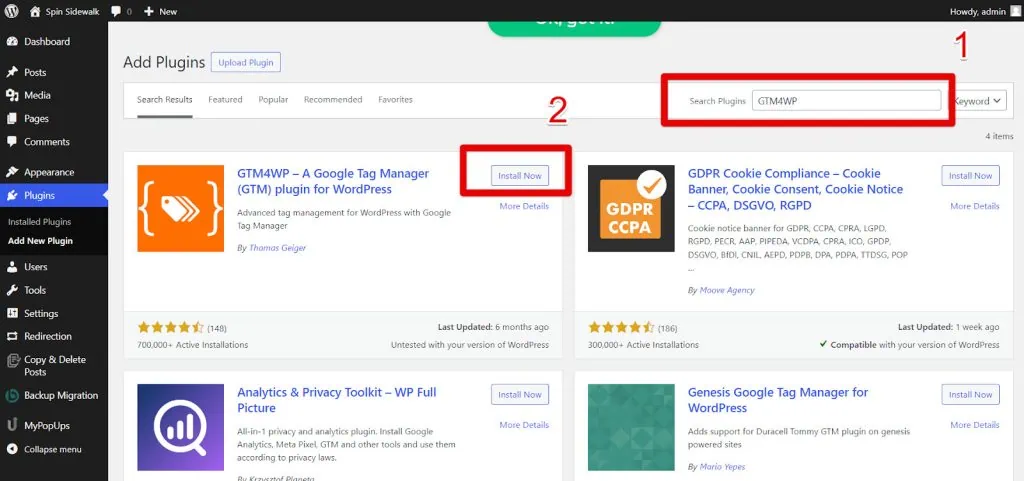
- Type GTM4WP in the search bar and click Install Now.
- Click Activate.
GTM4WP Configurations
In this section, we’ll guide you through setting up the GTM4WP plugin to push WooCommerce eCommerce data to your GA4 property. This setup is done in two stages:
- General tab settings
- Integration settings
No coding is required for these steps.
1. General Tab Settings
Let’s start with configuring the general settings for the GTM4WP plugin.
- In WordPress, go to your list of Installed Plugins.
- Find the GTM4WP plugin and click Settings.

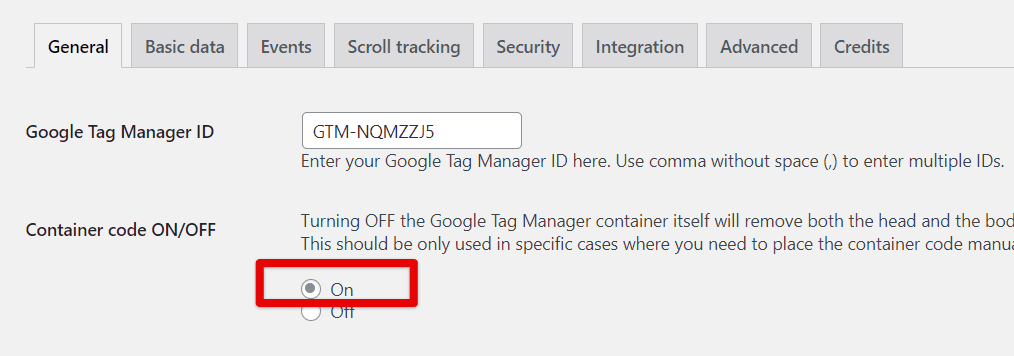
- In the General Tab, locate the Google Tag Manager ID field and paste your GTM container ID.

Depending on how GTM or GA4 was previously installed on your site, follow the instructions below for the Container Code ON/OFF setting.
🚨 Note: This step is critical to avoid double-tracking and misconfigurations, which are common if you’ve used multiple methods to install tracking codes.
If You Already Have GTM Code Installed Manually
If you have manually installed GTM on your website but now want to take full advantage of the GTM4WP plugin for tracking WooCommerce eCommerce data, here’s what you need to do:
- Turn ON the Container Code in the plugin settings.
- Remove the older manually installed GTM code from your website’s source code.
- After removing the manual code, enter your GTM container ID into the plugin settings, as described in step 3 in the General tab settings section we covered just before.
The GTM4WP plugin simplifies this process significantly. Without it, manually installing GTM and eCommerce tracking features would typically require a developer’s assistance, especially for complex implementations like sending eCommerce events to GA4.
With the plugin, the entire process is more accessible to everyone.
If You Don’t Have Google Tag Manager Installed
If GTM has not been installed on your website, follow these steps:
- Create a Google Tag Manager account if you don’t already have one.
- Install the GTM4WP plugin and follow the steps above to configure it and turn the container code ON.

If You Have Google Analytics 4 (GA4) Installed Manually
If you’ve manually installed GA4 by adding its tracking code directly to your website, we recommend switching to GTM for better control and ease of management. Here’s what you need to do:
- Use GTM to install the GA4 code and create tags for eCommerce tracking.
- Once GTM is set up, remove the manually installed GA4 code from your website’s source code.
Without GTM and a plugin like GTM4WP, handling manual installations of GA4 for eCommerce tracking can be technically challenging and often requires developer support. The GTM4WP plugin helps to avoid this complexity.
If You Have Google Analytics 4 (GA4) Installed via a Plugin
If you’ve installed GA4 using a plugin but cannot fully switch to GTM4WP for any reason (even though it’s the recommended method), you can still use GTM and the GTM4WP plugin specifically for eCommerce tracking while keeping your current plugin for general GA4 tracking.
To do this:
- Turn OFF the Container Code in the GTM4WP settings.
- Use the plugin only to send eCommerce data to the dataLayer, while relying on your other plugin for general tracking.

If You Have Google Analytics 4 (GA4) Installed via Google Tag Manager
If GA4 is already set up via GTM, you don’t need to change anything in this step. Proceed to the next section to configure eCommerce tracking. Just keep the Container code turned ON.
2. Integration Settings
Next, we’ll configure the Integration Settings to track WooCommerce eCommerce data in GA4.
- Navigate to the Integration Tab in the GTM4WP settings.
- Select WooCommerce from the list of integrations.
- Check the box for Track Ecommerce.

Google Tag Manager Configuration
Now, we’ll configure Google Tag Manager by importing the GA4 container template.
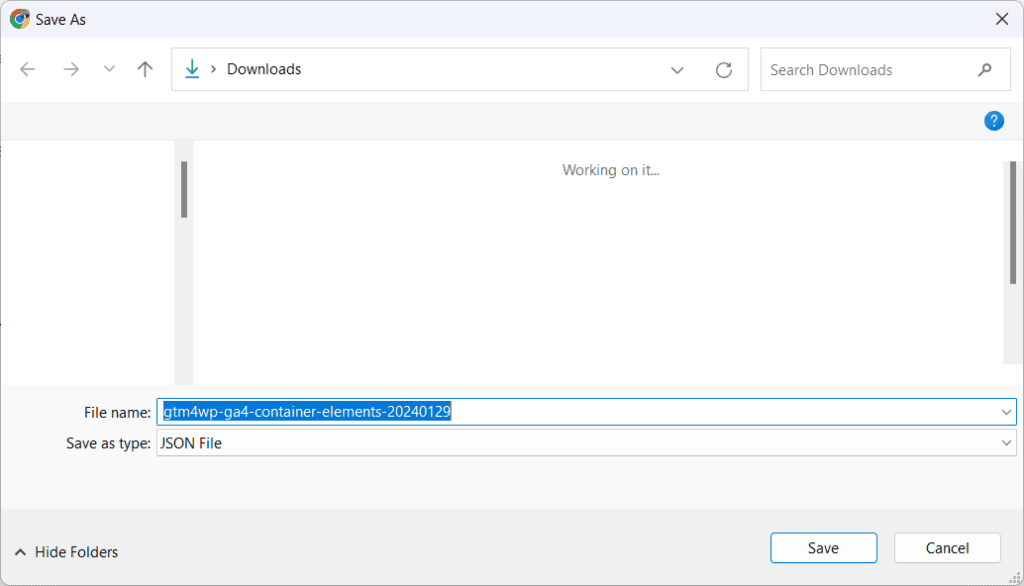
- Click the provided link to access the GA4 Ecommerce JSON file from the provided link. Once on the download page, right-click and select Save As.
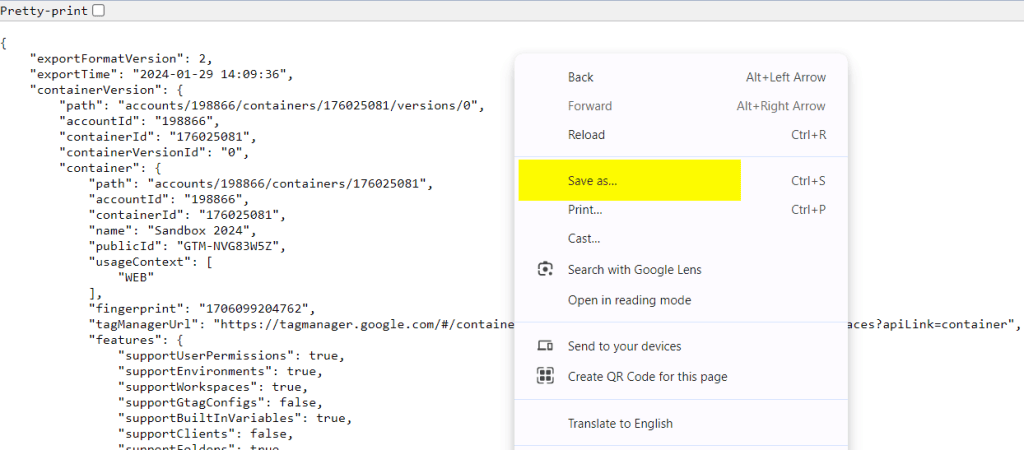
- Save the file as a JSON.
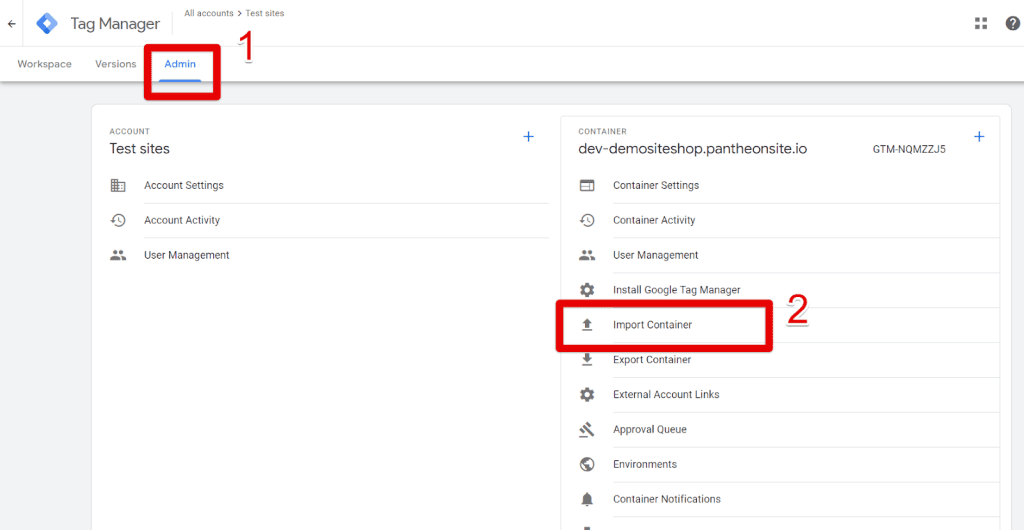
- In GTM, import the file to a container. To do so, go to Admin → Import Container.
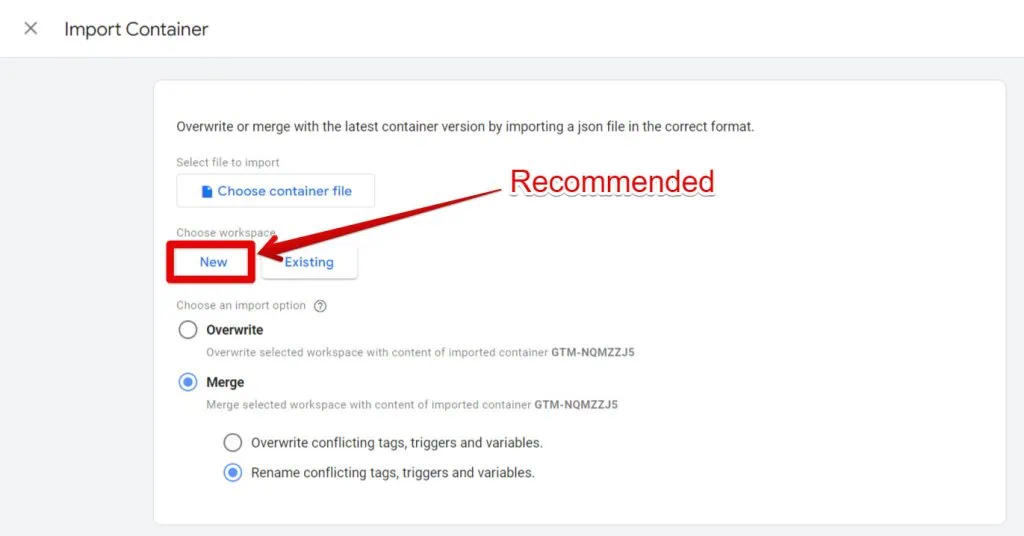
- Select the JSON file you just downloaded.
- Create a new workspace (recommended) and name it accordingly.
- Choose Merge and select Rename conflicting tags, triggers, and variables.
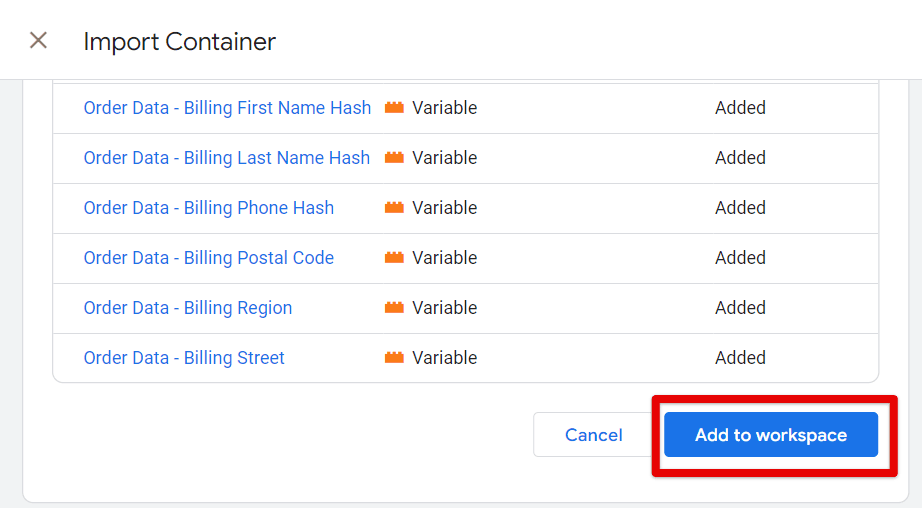
- Check the summary table to ensure all items are marked as “New.” If any items are marked as “Modified” or “Deleted,” review them carefully or consult with a GTM expert.
- Click Add to Workspace once you’ve verified everything.
Review the Newly Added Variables, Tags, and Triggers
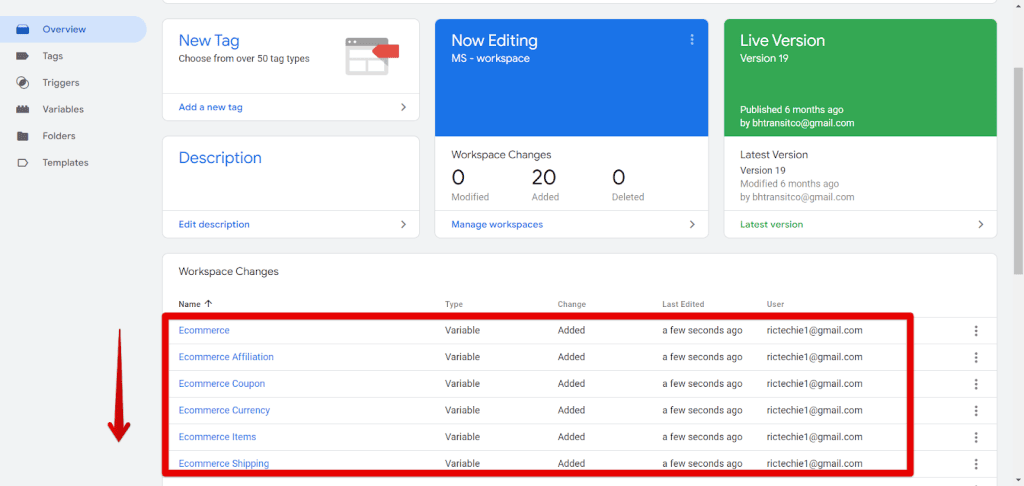
After importing the GA4 container template into Google Tag Manager, you should verify that the correct variables, tags, and triggers have been added.
In the Overview of your workspace, you should see a list of newly added variables, tags, and triggers related to GA4 eCommerce tracking.
Next, follow these steps to finalize and publish your changes:
- Click this link and follow the instructions from Step 2. These are just 5 lines of instructions. This is how it looks:
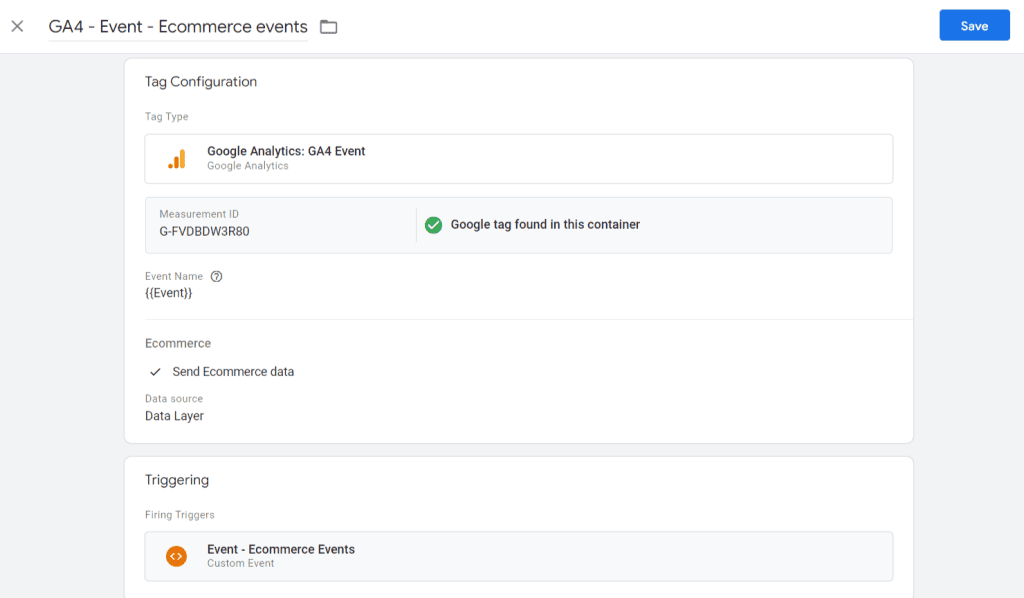
Note that you should either paste your GA4 Measurement ID or use a constant variable that has your GA4 Measurement ID.
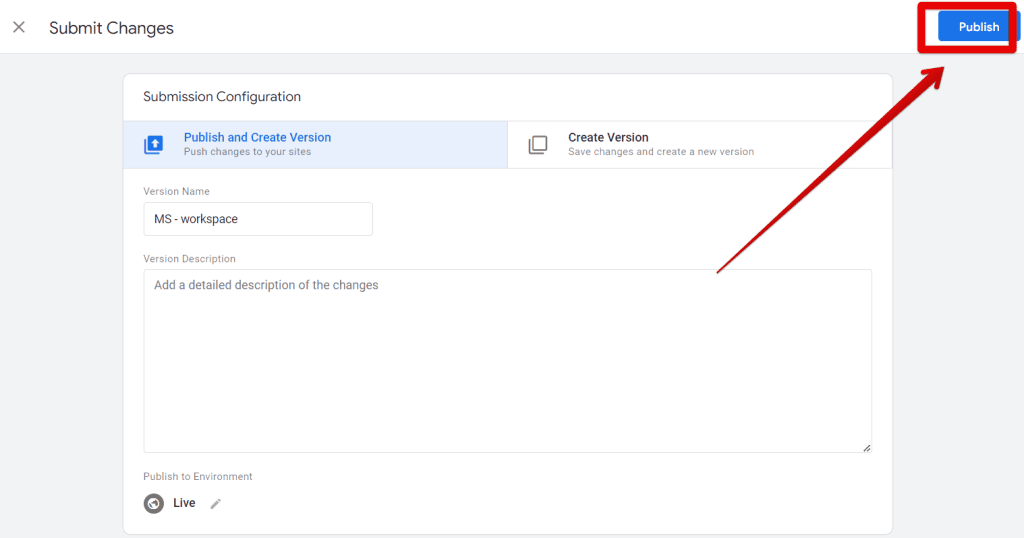
- Then, click Submit in the top-right corner of your GTM newly created workspace to publish the container.

- Click Publish Changes to make everything live.
- Return to your main or default workspace. You should see a message: A new container version is available – Update workspace.
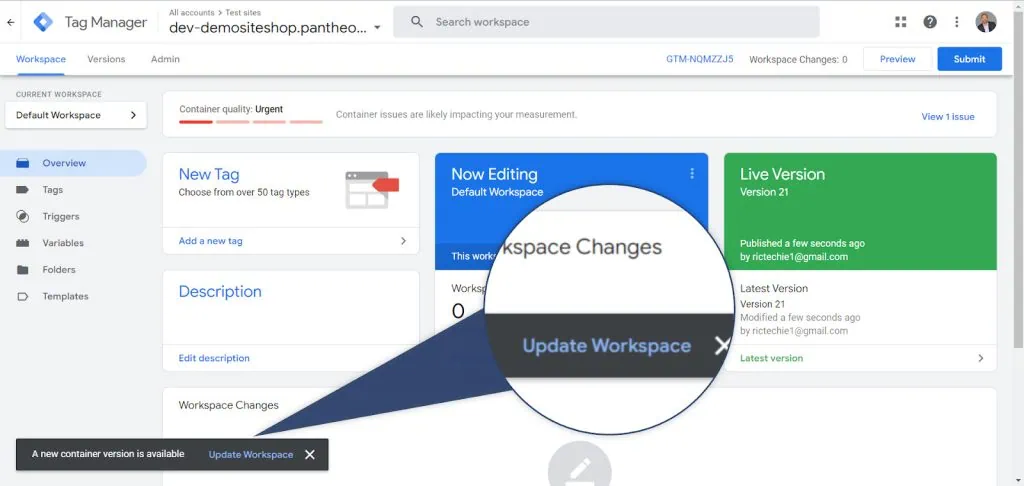
- Click Update Workspace. Then click Update again to complete the process.

Your WooCommerce store should start sending eCommerce data to GA4.
Testing Your Integration
You should test your GA4 and WooCommerce integration to ensure that data is being sent correctly.
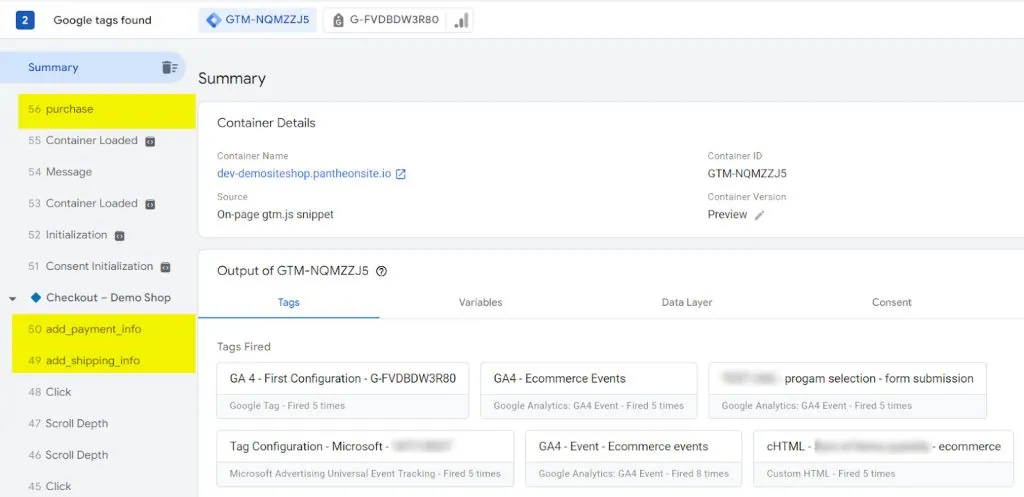
- Go to your WooCommerce store and make a test purchase.
- In Google Tag Manager, check that the eCommerce events are firing. You should eCommerce events appear in the list of event messages:
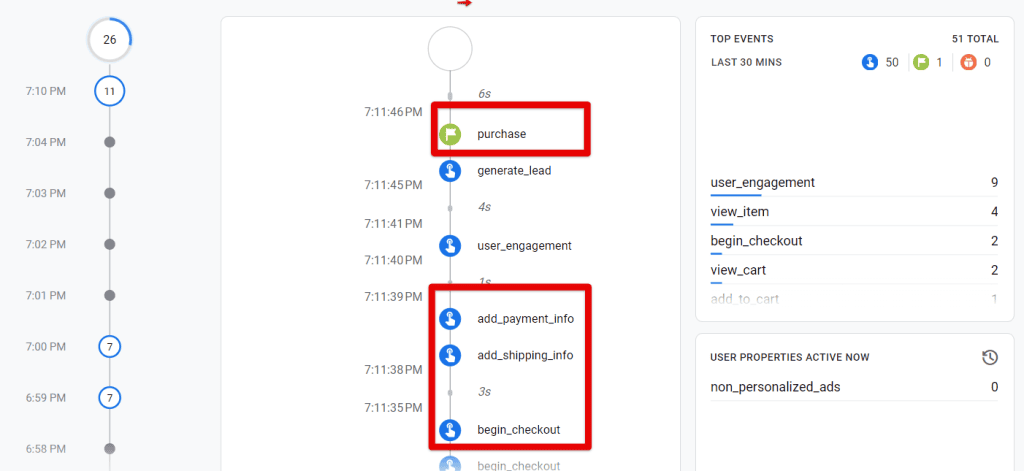
- Finally, use GA4’s DebugView to verify the data reaches your GA4 property.
Troubleshooting Common Issues
While setting up WooCommerce Google Analytics 4 tracking, you might encounter a few common issues. Here are some troubleshooting tips:
- Duplicate Transactions: If you notice duplicate transactions in GA4, check whether GA4 is being deployed via multiple methods (e.g., manually and via GTM). Disable any redundant tracking to avoid duplicate data.
- Missing eCommerce Data: If your eCommerce events aren’t showing up, check that the GTM4WP plugin is correctly configured to push eCommerce data to the dataLayer. Also, ensure that your GA4 property is linked to the right GTM container.
- Incorrect Revenue Tracking: Sometimes, taxes or shipping charges can be incorrectly recorded as revenue. GTM4WP allows you to customize how taxes and shipping are tracked, so double-check these settings.
Summary
We covered how to track WooCommerce eCommerce data in GA4 using the GTM4WP plugin and Google Tag Manager.
We configured the general and integration settings, imported the necessary GA4 eCommerce container template, and published the updates in Google Tag Manager.
We also touched on several use cases, providing solutions for existing GA4 setups. This setup ensures that your WooCommerce store sends accurate eCommerce data to GA4.
Since we focused on capturing data that is not readily available in GTM, you might also want to explore the Matches CSS Selector option in Google Tag Manager for more advanced tracking possibilities.
Have you successfully set up WooCommerce Google Analytics 4 tracking? Let us know in the comments.


