Last Modified on February 24, 2025
We all love knowing where our traffic comes from—but if you want to succeed as a digital marketer, you also need to know where your outbound traffic is going.
With Google Tag Manager, you can track outbound link clicks to learn more about user behaviour, your affiliate marketing success, and more.
In this guide, we’ll learn how to set up external link click tracking using Google Tag Manager and then send that data to Google Analytics.
An overview of what we’ll cover in this tutorial:
- Why track external link clicks?
- Setting up a general link click trigger
- Creating an auto event variable
- Creating a click trigger
- Creating a Tag
- Testing
So let’s start!
How to Track Outbound Links with Google Tag Manager: Summarized Steps
1. Set up a generic link click trigger for when a user clicks any link – internal or external.
2. Create an Auto-Event variable to determine if the element URL is outbound.
3. Change the generic link click trigger to capture outbound links with the Auto-Event variable.
4. Create a tag to test the outbound link trigger.
5. Test and publish the implementation live on your website.
Why Track External Link Clicks?
This tutorial is in response to an important question from one of our MeasureMasters members: “How can I track the clicks on my affiliate links with Google Tag Manager?”
Affiliate marketing is one of the most reliable ways to make money with blogs and other online presences that don’t involve your own eCommerce shop. By giving referrals to a business with an affiliate program, you can get a cut of their revenue from that sale. It’s like advertising on a commission.
Since you get paid per customer, it’s important to know not only how many people see your referral, but how many actually become customers through your affiliate link.
But here’s the catch—affiliate links go to another business’s web page. And without access to that web domain, you can’t track incoming traffic to that page.
However, you can track outgoing traffic from your webpage.
So how do we track this juicy outbound traffic data?
The answer is quite simple: we’ll use the outbound link click tracking method on Google Tag Manager.
I’ve found that Google Tag Manager is the most accessible tool for tracking outbound link clicks due to its built-in functionality for external link tracking. Your goal is to track any external links (those that take the user away from our website) that the user clicks. We’re not interested in any internal links (those that keep the user on our website).
Tracking outbound links will give you insight into why users leave your website and where they’re going. This is super helpful if you track link clicks on affiliate products. This data tells you how successfully your products are selling.
So let’s go ahead and start tracking these links with the help of Google Tag Manager and Google Analytics.
Setting Up a General Link Click Trigger
🚨 Note: Before setting up a manual link click trigger, keep in mind that Google Analytics 4 (GA4) includes an Enhanced Measurement feature that can automatically track outbound clicks without additional configuration. However, if you require more control over tracking or need to track specific link clicks beyond outbound links, follow the steps below.
Before we can start tracking a specific outbound link, we’ll start with a generic trigger that fires on any link click. To do this, go into Google Tag Manager and create a new Just Links trigger. (Once we know that the listener function works, we can refine the trigger for specific external links.)
At first, the All Elements trigger might seem like a tempting choice; however, it won’t track the actual link address which the user leaves the page, which kind of defeats the purpose for us.
We’ll leave all other configurations untouched for now, give the trigger a name, and Save it.

To test our trigger, let’s go to the GTM Preview mode. This is a special mode that puts our browser in a diagnostic debugging mode.

If Google Tag Manager is installed correctly on our website, we should have one tab with our website and one with our debugging console.
And, every time we click a link on our page, a Link Click event will fire in the debug console.
Let’s click on an internal link to see the results.

Similarly, we should see a similar Link Click fire for an external link. Make sure to test both types of links!
For now, both the Link Clicks will show the same results. This is good, but it means that right now we can only generally track when a user clicks any link—internal or external.
We want to filter it down to specifically track outbound links (or external links). So we’ll need to create a variable to distinguish the outbound links from the inbound ones.
Let’s see how!
Creating an Auto Event Variable
In the Google Tag Manager workspace, go to Variables → New.

We’ll create an Auto-Event Variable and select the variable type Element URL.
The Component Type for this variable will be Is Outbound. This setting will check whether or not the clicked link is from the same domain on which Google Tag Manager is installed. If the URL is different, it will track those links as outbound links. Great!
🚨 Note: If you have affiliated domains, you might want to track those affiliated domains as internal links. For example, you may do this if you use payment integrations like PayPal or Stripe for users to make purchases from your site, or if your eCommerce shop and your blog are each on separate domains. (If this is you, then you might want to check out our guide on cross-domain tracking.)
Next, give the variable a name and click on Save.

Let’s go back to our demo shop and see how the variable works.
We’ll click on one internal link and one external link. In the debug console, we’ll see that the Link Click doesn’t fire any Tags for the internal link. In this case, the Auto-Event Variable for the internal link will return the value false so that these links are not tracked.

However, the Auto-Event Variable for the outbound link will be true.

Using this variable, we can track the link with which the user leaves our website.
To do that, we’ll need to create a click trigger.
Creating a Click Trigger
In Google Tag Manager, we’ll reopen the trigger that we created earlier for tracking all link clicks.
Now we’ll change this trigger from a generic link click trigger to a specific trigger that tracks only outbound links. For this, set the trigger to fire only on Some Link Clicks and the condition will be aev Is Outbound equals true.

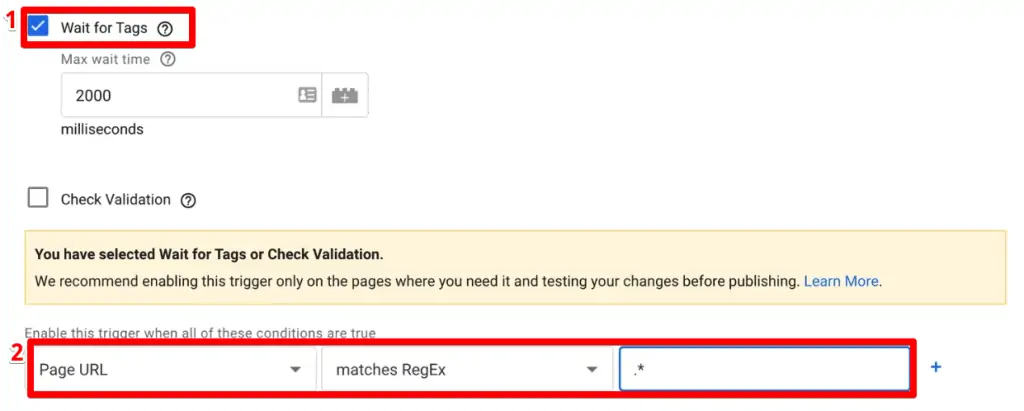
There are also two other options that you might want to use for this trigger—Wait for Tags and Check Validation.
You can use Wait for Tags to allow the browser to process the outgoing request to Google Analytics before it redirects the user to the external website. This is useful if you have some other data that you need to collect before the user leaves your website.
If you check the Wait for Tags box, you’ll be prompted with another set of conditions. These conditions will pertain to the listener functionality, which will ask us where on our website we want to listen to these clicks.
Currently, we want to track the clicks for all pages, so we’ll keep the conditions as Page URL matches RegEx .* This RegEx notation will track outbound link clicks on any URL on your website that has Google Tag Manager installed.

💡 Top Tip: If you’re comfortable with RegEx, you can use it to track links on different pages separately. This could be useful if you have multiple affiliate marketing campaigns that you want to track individually.
Check Validation is another option that you can experiment with. It pertains to the callback function that happens within the browser for the link. For now, we’ll leave it unchecked.
Once done, let’s Save it.

However, to see whether this trigger works or not, we’ll need to fire a Tag.
So let’s create a Tag first!
Creating a Tag
Tags represent information that you can send over to different tracking tools. In this example, we’re sending our outbound link data to Google Analytics. (Similarly, you can also use other tools like Facebook Ads or Google Ads.)
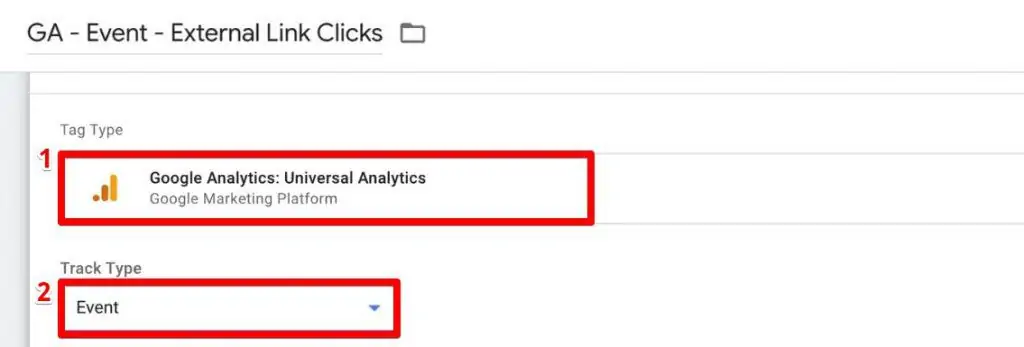
So let’s go ahead and create a new Universal Analytics Tag to send our tracking information to Google Analytics. Our track type will be Event.

You can also configure different parameters for tracking. Remember that all these parameters will also be visible on your Google Analytics tracking records, so if you have campaign-specific data for this Tag, parameters are a good place to put it.
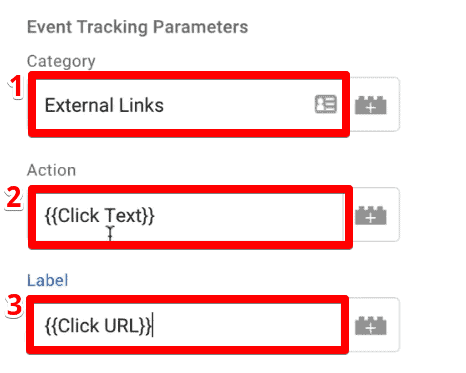
For example, the Category that I’ll use for this event will be External Links. If I type this into the Category field, then every Google Analytics event fired by this Tag will have External Links show up as the Category.
We can also populate our parameters dynamically to differentiate link clicks. Since we’re also interested in knowing which link the user clicks, we’ll activate something called an Auto Event Variable for the Action parameter.
To do this, let’s click the variables icon next to the Action parameter field and select the Click Text variable. This will dynamically fill the parameter with whatever link text was clicked by a user.

In the same way, for the Label parameter, you probably want to track the URL the user goes to. So for the Label, we’ll activate the built-in variable Click URL.

💡 Top Tip: You can also fill the Value parameter with whatever data you’d like. If you’re tracking affiliate links, I might recommend using the parameter to track the monetary value of an affiliate conversion. (However, note that clicking an affiliate link doesn’t always result in a purchase from the user, so the actual value may be less.)
With this, we’ve added our Event Tracking Parameters in the Tag.

Next, we’ll select the option True for the Non-Interaction Hit so that it doesn’t increase our bounce rate.
Then, under the Google Analytics Settings, select the variable with your connected Google Analytics account so that your data is sent to the correct property. (If you don’t have a linked account you can use the Enable override settings option and simply add your tracking ID to send this information to Google Analytics.)

Once this Tag is complete, we’ll attach our outbound link trigger to it. Finally, just click on the Save button to finish your Tag!

That’s it! Our Tag is ready to fire on any outbound link clicks and send information to Google Tag Manager.
But before saving this version in Google Tag Manager, let’s first test our outbound link click tracking.
Testing
First, make sure to refresh your preview mode. I recommend starting by clicking on an internal link. If your Tag is configured correctly, it won’t fire an event for this internal link click.

But when you click on an outbound link, you should see an event fired in the debug console.

This Tag will also send information to our Google Analytics account. To verify this information, you can use the Google Tag Assistant (Legacy) browser extension.
If everything is working correctly, the Tag Assistant should show that a Tag fired in our Google Analytics account. This means that data should have actually been sent to Google Analytics, not just collected by Google Tag Manager.

If we click on the event in the Tag Assistant, we’ll see the information sent with this Tag. The Category will be External Links and the Action will be the clicked text. The Label will be the clicked URL.

You can test this for multiple links to make sure the Tag fires correctly all the time.
Next, we should also verify that the correct information appears in the Google Analytics interface. To do this, open your Google Analytics account and go to Real-time → Events.
You should see an event for each external link click. Their Event Category should appear as External Links, and the Event Action will be the clicked text.

You’ll also be able to see a detailed report under Behaviour → Events → Overview.

🚨 Note: It will take some time to see the tracking data under the Behaviour report. You may need to wait some time before you see the results in this section, but the Real-time report data will update immediately.
Now that we have verified the data sent in different tools, we can go ahead and Submit this version in Google Tag Manager. This will make your changes live and your website will start tracking outbound link clicks.
FAQ
How can I track the clicks on my affiliate links with Google Tag Manager?
By using Google Tag Manager, you can set up outbound link click tracking to monitor the performance of your affiliate links and determine how successfully your products are selling.
Can I track different types of outbound links separately?
Yes, if you have multiple affiliate marketing campaigns or different types of outbound links, you can use regular expressions (RegEx) in Google Tag Manager to track them separately.
Why should I track external link clicks?
Tracking external link clicks provides valuable insights into user behavior, affiliate marketing success, and helps understand where your outbound traffic is going.
Summary
So that’s it! This is how you can track outbound link clicks on your website with the help of Google Tag Manager.
This way you can also track your affiliate links and see how your products are selling. However, you might want to exclude tracking payment links in your setup.
Once you have this configured, you can also track other outbound links that go to different resources such as a PDF, eBook, etc. To do this, you’ll need to use link redirects with Google Tag Manager.
Another useful thing that marketers should track is your popups. Check out our handy guide on popup tracking.
So have you set up outbound link tracking on your website? What are the use cases where it is helpful to you? Let us know in the comments below!


Hi Julian,
I setup external link click tracking exactly the way you showed in your video. The tracking was working perfectly for 30 days straight. Then when we added a skimlinks javascript to the footer of the page and it broke our tracking. We haven’t had any outbound link clicks / outbound urls showing up in Google Analytics for about a week now.
The only difference between our setups is that I added a 2000 milliseconds wait time in the trigger.
Do you know why this skimlinks javascript might have broke our (previously working) GTM setup?