
Last Modified on January 7, 2025
Promotions are an important part of any business’s marketing strategy whether it’s seasonal, occasional, or just something specific to your business.
Naturally, the next step in running any such promos is to understand how well they convert so you can optimize them and plan for any future campaigns accordingly.
In Google Analytics 4, internal promotions are tracked as part of the eCommerce events and have to be set up correctly for us to see that data in our account.
In this blog post, we will look at how to track internal promotions with GA4 and Google Tag Manager. We’ll discuss different topics such as understanding how to track promotions with GTM and where to find the data in GA4. Here’s what we’ll cover:
- Why Track Internal Promotions with GTM?
- Setup Custom JavaScript Variable
- Tracking Promotion Views
- Tracking Promotion Clicks
- Where to Find and Track Internal Promotions with GA4?
This one might be a little technical when it comes to setting up part if you’re not familiar with GTM. You can skip to the last section if you simply want to analyze internal promotions data in GA4.
Why Track Internal Promotions with GTM?
Unlike the ads that you run on third-party sites and platforms, internal promotions are specific to your business only.
These specific products, categories, seasonal promos, etc. could be visible banners or pop-ups that you show all users or personalize based on their website behavior.
If you don’t have access to a developer and/or can’t make changes to the website’s code, then GTM can be super helpful to implement tracking. That’s the whole point of it.
Promotions help you move visitors along the funnel where you encourage them to buy products. This means visitors can view a promotion and then click on it to get to the product/category page.
So, it involves two actions: viewing and clicking, and not everyone who can see a promotion will click on it.
In a way, promos can have their funnel where you want to see how many people viewed it, clicked it, how many added those promoted items to a cart, started checkout, and purchased. More on this in the last section where we look at the Promotions report in GA4.
This use case isn’t specific to only eCommerce, though as you can track other conversions as well where people viewed and click on any internal offer that leads to a conversion.
Let’s start by setting a custom Javascript variable in GTM.
Setup Custom JavaScript Variable
We are going to use Google’s Enhanced Ecommerce demo shop to show the dataLayer format in which the values need to be sent to GA4 so we can create a variable with that info.
Why? Because we need to send information to GA4 in the format it can accept it. Here’s how it would look like when viewing a promotion with the view_promotion event:

Remember how we discussed clicking the promotion and going to that product/category? Its dataLayer is pushed with the event select_promotion as you can see below:

As you can see, both events have similar formats and data except for the different event names. This is the type of format we will be using to store the values in the custom JavaScript variable.
The other tab gtag.js Code (GA4) is to push these datalayers with gtag directly on the website (without GTM).
The difference is that it starts with gtag instead of dataLayer.push, and the rest of it is quite similar but we are going to discuss the GTM method only in this post.
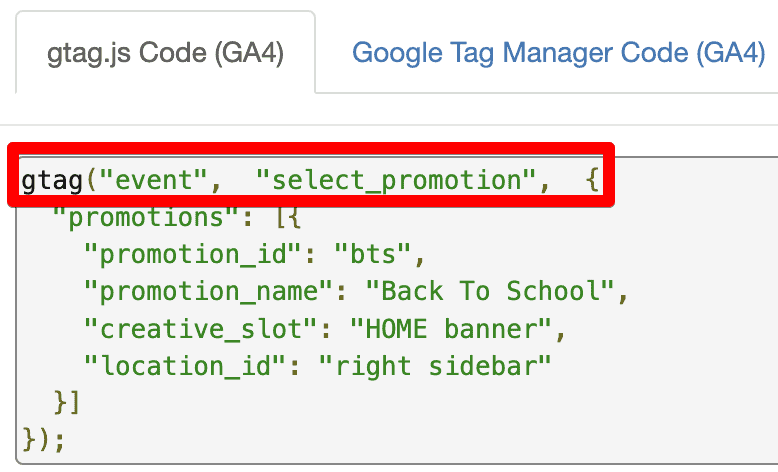
It’s important to note the typo here as the key “promotions” should be “items” with other promotions parameters inside that items array, unlike UA where the products array was not added/required if you look at the Enhanced Ecommerce for Tag Manager guide.
So, to clarify, we need to push two events to dataLayer with the relevant details aka parameters including the items array.
Let’s take the details from Google’s Developer guide for the view_promotion event and create a custom JavaScript variable in GTM.
In your GTM account, go to Variables → and Click on the ‘New’ button.

Next, choose Custom JavaScript as your variable type.

In the code field, you can add the following code. For now, we will be using the format and details from Google’s example, but you will have to ensure that you use the values that are specific to your website’s promotion activities.
function() {
  return {
    event: "view_promotion",
    ecommerce: {
      creative_name: "Summer Banner",
      creative_slot: "featured_app_1",
      promotion_id: "P_12345",
      promotion_name: "Summer Sale",
      items: [
        {
          item_id: "SKU_12345",
          item_name: "Stan and Friends Tee",
          affiliation: "Google Merchandise Store",
          coupon: "SUMMER_FUN",
          discount: 2.22,
          index: 0,
          item_brand: "Google",
          item_category: "Apparel",
          item_category2: "Adult",
          item_category3: "Shirts",
          item_category4: "Crew",
          item_category5: "Short sleeve",
          item_list_id: "related_products",
          item_list_name: "Related Products",
          item_variant: "green",
          location_id: "ChIJIQBpAG2ahYAR_6128GcTUEo",
          price: 9.99,
          quantity: 1,
        },
      ],
    },
  };
}
The items array has parameters for the items in the promo, but they are optional. For the sake of simplicity, we can remove the other parameters in this example and only leave the item_id and item_name for now.
Also, note how we don’t have the dataLayer.push in the above code because GTM takes care of that with the custom JavaScript variable. This is how the final script would look like:
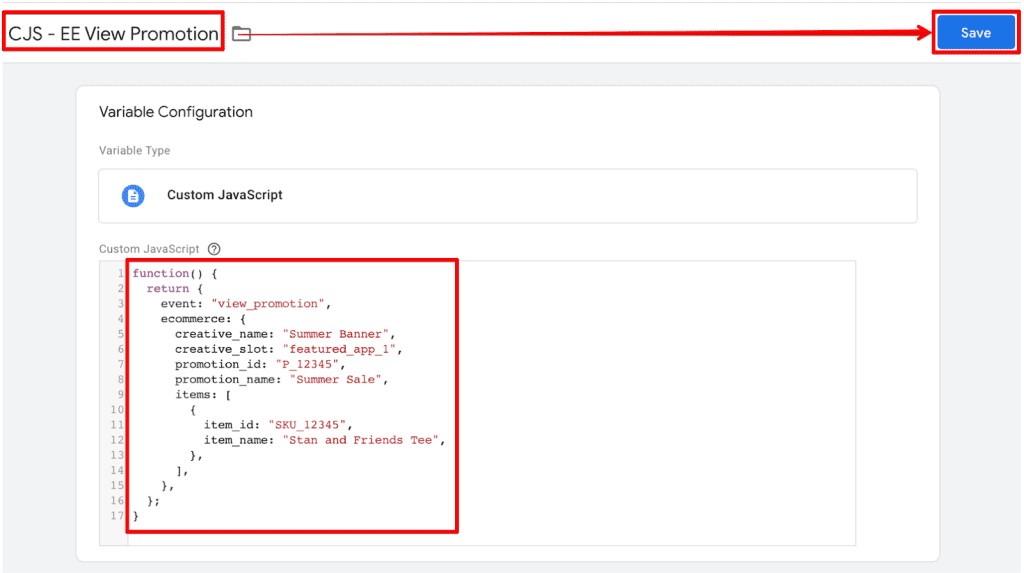
You must give a unique promotion name and ID for each one you run unless it’s the same promotion on every page. You can name these values however you like, but you must remain consistent for the sake of clarity. Lastly, let’s name our variable and save it.
The next step is to test if it’s working correctly. Click on the Preview button in the top right corner so we can check that.

In the events on the left side, click on the DOM Ready and go into the Variables tab. You should be able to find your variable details there with Return Type as an object.
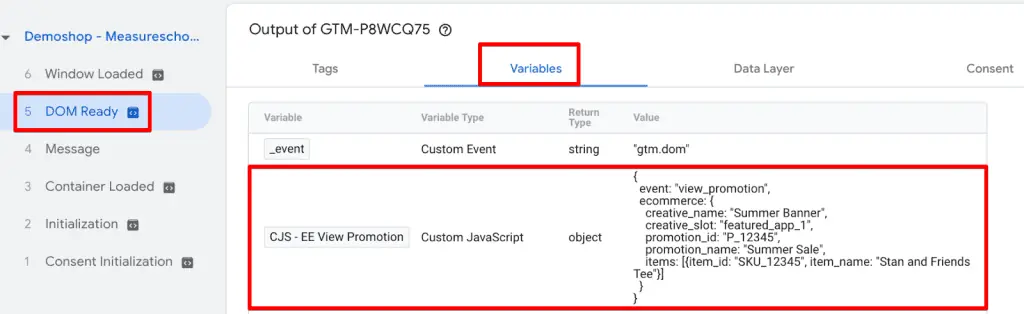
Looks like our variable is working as expected. But before we move on to setting up the triggers, let’s quickly look at another format for storing these values in the dataLayer.
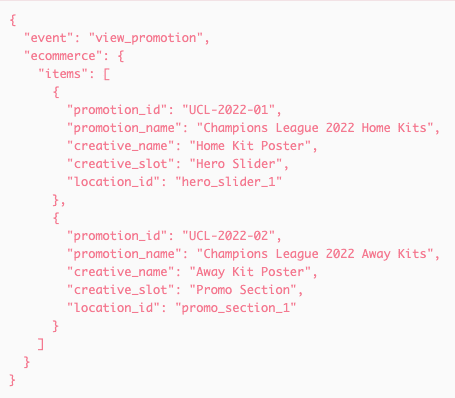
You might have noticed that the parameters for the view and select promotion events are inside the items array vs having them outside as parameters. In this case, you can go ahead without the required item_id and item_name parameters.
Let’s work with this format and see how that looks for our example.

A quick look at the GTM’s preview mode shows the variable is working as expected.

Now we can move on to how we can track the view_promotion events.
Tracking Promotion Views
Let’s start with setting up a GA4 event tag. Go to Tags and click on the New button.

Select the Google Analytics: GA4 Event as the tag type.
🚨 Note: The GA4 configuration tag has been replaced with the new Google Tag.
In Tag configuration, do the following five steps:
- Select your GA4 configuration tag or manually add the measurement ID
- Enter view_promotion as the event name
- Go to More settings → Ecommerce → Check the Send Ecommerce Data option
- Choose Custom Object as the Data source
- Select the Custom JavaScript variable we created above as Ecommerce Object – CJS EE View Promotion

🚨Note: Don’t add items or any other Event Parameters that we already added in the items array of the Custom Javascript variable. If you add it here again, it will supersede what’s in the variable and might not show up in GA4 properly.
Promotion Visibility Trigger
Our next step is to add a trigger, which we will add based on the logic of when the element is visible and how much it is visible.
You don’t have to leave the tag interface to create a trigger. Simply scroll down and click on the triggering area.
You will see the interface to Choose the trigger from the list of triggers you’ve already set up. However, we want to set up a new one. So click on the blue plus ‘+’ symbol.

This is where you can select the trigger type. We will go with the Element visibility type under the User engagement category.

On the trigger setup interface, we can either select an ID or CSS selector. You will need some CSS knowledge. Check this CSS selector guide to get an idea.
Right-click on the promotion banner and click on Inspect.

We can see that the promo image has class = ”well promoWell” that we can use in the CSS selector field.

Also, set it to fire Once per page because other conditions can be limiting or result in too many fires. However, that also depends on your use case.

Scroll down a little and under Advanced settings and you can select how much the element should be visible and if it should fire on All Visibility Events or Some.
We’re going with 50%, which is good enough for most users to view the promotion and fire on All Visibility Events.

Let’s save the trigger and preview it in the GTM.

Looks like our tag is firing well. Let’s also have a look at GA4’s DebugView.

We can see our view_promotion event and the Items array showing the values that we set in our custom JavaScript variable.
Next, we want to get the same info when someone clicks the promotion.
Tracking Promotion Clicks
Once you’ve set up the tag for promotion views, you can pretty much use the same details except that it would trigger only when someone clicks on that promo.
Here are the two places where we need to change things:
- Create a copy of the same Custom JavaScript variable, but change the event name to select_promotion. Rename the variable to reflect that and Save.

- Copy the View Promotion tag, change the event to select_promotion, and select the new variable we just created in step 1 for Ecommerce Object. Don’t forget to rename your tag.

The third step is to set up a trigger that’s based on clicks.
Promotion Clicks Trigger
Let’s go to Variables → Click on Configure.

Here check all the variables under the Clicks type.
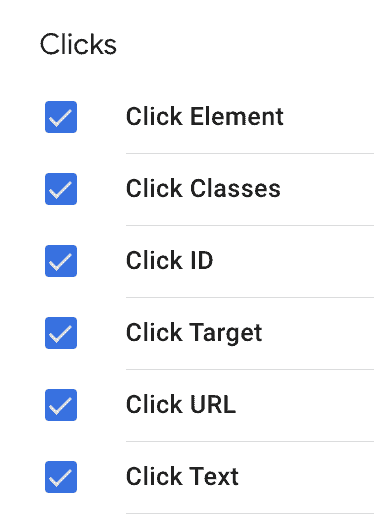
Cool. Now we can go to the GTM preview mode and click on Google’s Ecom shop promo. We should be able to see the Click and Link Click events on the events timeline on the left side, and under the Variables tab we can see those built-in Click variables and their values.
Let’s see what we can find for the Click event.

From the Click variables, we can now choose which variable’s value we can use that’s unique to the promotion on the page.
It seems that the Click ID has “promo-6d9b0” in it, which is unique to the promotion element. To ensure the trigger still works even if the value after the promo-xxxxx changes for different products, we can use just the “promo-” part to trigger it.
Let’s create a trigger for our Select Promotion tag in the same way we did for the view. But this time, we will choose the Click – All Elements as our trigger type.
We want it to fire the tag when the Click ID contains the promo- in it, not on every click, so we’ll choose the Some Clicks option. Let’s name it and save it.

It’s time to test if it works only when we click on the promotion. Let’s fire up the GTM preview mode.

Our Select Promotion tag fired when we clicked on the promotion and if we click on the tag, we can see that the triggering conditions are fulfilled where Click ID contains promo-.

For one last check, we will head over to GA4’s DebugView and see if we can find the select_promotion event with the correct items array we added in our custom JavaScript.

Now you should wait for 24-48 hours to see the data in your GA4 account.
Where to Find and Track Internal Promotions with GA4?
Once you’re done setting up your promotion view and selecting events, and seeing that the data is finally flowing into GA4’s real-time report and the DebugView as expected, the difficult part is done.
1. The easier part is finding the promotional data in the GA4 reports. Click on the Reports → Go to Monetization → Promotions.
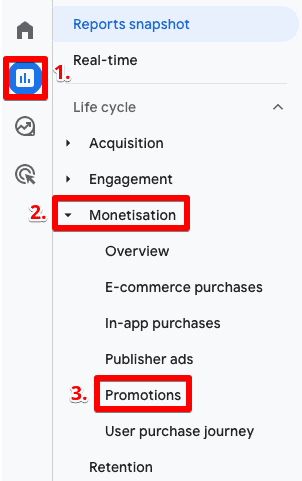
The report shows some interesting info about different promotional campaigns, e.g., items viewed in promotion, clicked, added to cart, checked out, and purchased.

If you use the same promotion names but different IDs and/or creatives, you can go deeper into finding out how those variations performed.
2. Click on the downward arrow next to the Item promotion name dimension as highlighted in the above screenshot, and you will be able to choose from the Item promotion ID and creative name dimensions.

Understandably, you have to give values for these dimensions when you’re setting up the events as discussed in the previous two sections of this post. Looks like Google did not, as there’s a big (not set) dimension for the Item promotion creative name dimension:

This is how you can track internal promotions with GA4. You can do further analysis with segments in the Explorations, but remember that item-scoped dimensions are only compatible with item-scoped metrics and dimensions only.
Summary
This one might get a little complicated if you don’t know your way around GTM and CSS selectors, but with some trial and error, you should be able to pull this off.
The important part is that you follow the format Google asks for and test the data you’re receiving in GTM preview mode and GA4’s DebugView to ensure your setup is correct.
Once all is done, give it a few days and then explore the Promotions report in GA4’s interface, so you can once again confirm the details and finally start analyzing the performance of your campaigns.
You can take your analysis a step further by creating a funnel report so it’s easier to visualize and understand the drop-off points. Here’s a post on How to Create a Custom Funnel in Google Analytics 4.
So, have you tried tracking your internal promotions with some other method? Let our readers know in the comments below!


")
Hi Usman! Nice post!
I have a question: What if the promotion is general and not linked to a specific product? How could we get ecommerce info on that, like how many purchases came from clicking a specific promotion?
Hi Maite, Glad you found it helpful!
Yeah, unfortunately you won’t be able to see general promotions in this report.
You can still track the views and clicks but without product specific data it will just show 0s in items added to cart, checked out, purchased and revenue.
Hope like other things available in UA but not in GA4, Google fixes this issue as well in the future
Thank you for this – just one question (similar to Malte’s?)…
How can I report conversions like “Email signups”?
The Promotions report only has Ecommerce metrics and, even Explore won’t let you add non-ecommerce metrics like Conversions.
Hi John, You are right. Unfortunately, GA4s report only shows ecom specific data. But you can still see how many people viewed and then clicked on promos in the same report or by just looking at those events. There is a process where you can add internal promo name as custom dimension, internal promo views and clicks as custom metrics, then send that with view and click event. You still need promo name which you can save with cookies and send promo name with ecommerce events – all of this can be used to create a exploration in that shows… Read more »
Hi Usman, thanks for the article!
I have quite similiar question as Maite: is there any chance that in Promotions tab report we could get information about ecommerce events (such as: items added to cart, items checked out, items purchased) related to a specific promotion’s name?
I can see on your screenshots: https://measureschool.com/wp-content/uploads/2023/08/Promotions-report-in-GA4-with-metrics.webp and https://measureschool.com/wp-content/uploads/2023/08/Googles-promotions-report-showing-not-set-values-for-the-promotion-creative-name-1024×186.webp that such informations are missing whether when it’s related to promotion name or promotion creative name.
Hi Sebastian, yes, that is possible ONLY if item (product) specific data is being included with those events.
Otherwise, it will be missing like in the screenshots which are taken from Google’s Merchandise Store.
If it’s general promos you won’t have product specific data and those ecom columns will be missing data for those promos.
Hi, Usman!
How to handle the case in GA4 when we have 2 or more promotions for the same product in the same checkout journey, for example
– regular product price – 100$
In the same checkout flow, we would have item_revenue1 (from the 1st promo) = 80$ and item_revenue2 (from the 2nd promo) = 70$
Should we send to GA4 information (item revenue) for the 1st promotion or we should keep only the final item revenue?
Hey sstamenova!
I’d go with the final revenue figure once the purchase is sent to GA4 since it’s the same item after all.
Hope this helps!
hi there, why are those promotions related variables for select_promotion and view_promotion under ‘items’ array. A bit different in Google documentation :/
Hi Usman,
Nice post, thank you!
I have a question.
If I send
select_promotionwith theitemsarray, and I also use the same array forview_item,add_to_cart,begin_checkout, andpurchase, will the promotion report automatically fill with the product information, such as the number of products added to the cart and revenue? Or do I need to include thecreative_nameparameter in the item array for each event?Thank you!