Last Modified on February 24, 2025
We are living in the world of data and analytics and Linkedin is a star here! Using its features like the LinkedIn insight tag allows you to learn about how people interact with your content, which can then help you make the most out of your ad spend.
So, do you want to obtain more data from your LinkedIn ad campaigns? We are here to help you with that!

Sign up to the FREE GTM for Beginners Course...
The LinkedIn insight tag can help you track your conversions, retarget website visitors, and unlock additional insights about members interacting with your ads. With the help of Google Tag Manager, you can deploy this tracking code snippet to your website.
In this guide, we’ll show you how to install the LinkedIn insight tag with Google Tag Manager.
Here is an overview of what we’ll cover:
- Accessing LinkedIn Partner ID
- Installing LinkedIn Insight Tag with Google Tag Manager
- Installing Conversion Tracking for LinkedIn Ads
- Setting Up Event Tracking
Accessing LinkedIn Partner ID
First things first! Ensure that Google Tag Manager is already set up on your website. If it has been installed correctly, enter preview mode.
To install the LinkedIn insight tag, you need to grab your LinkedIn partner ID.
On your LinkedIn account, go to Work → Advertise.

This directs you to the LinkedIn campaign manager.
Click on Account Assets → Insight Tag.

Next, you’ll have to specify the domain which the insight tag can pull data from.
Click on Add domain.

Enter the domain name in the space provided, then click Save.

Next, go to Manage Insight Tag → See tag.

This opens a window that shows the different methods of installing the insight tag.
Choose I will install the tag myself, then copy the tag code.
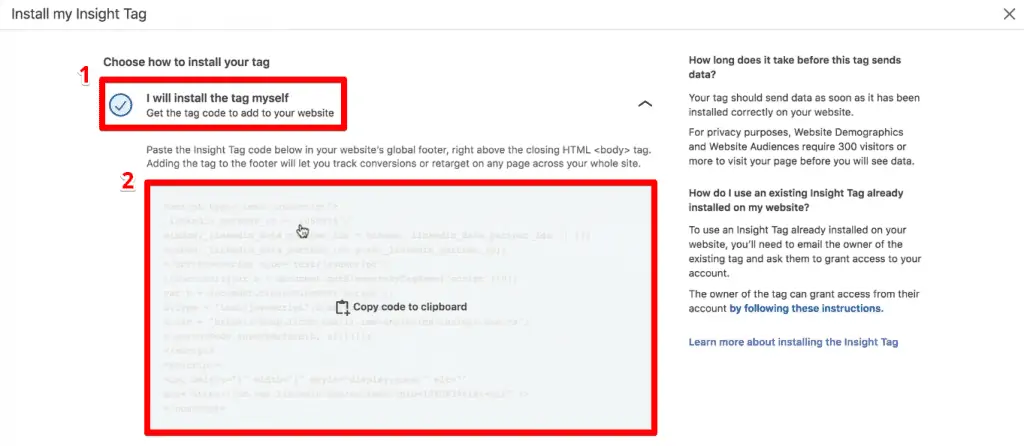
That’s a lot of code, but don’t worry! You only need the LinkedIn partner ID from here.
Paste the entire code in a text editor, then copy the partner ID from the second line in the code.

Now that you have the partner ID, you can install the LinkedIn insight tag with Google Tag Manager.
Installing LinkedIn Insight Tag with Google Tag Manager
🚨 Note: LinkedIn offers an official Insight Tag template in Google Tag Manager’s Community Template Gallery.
In your Google Tag Manager account, click on Add a new tag.

Create a name for the tag, then click on Tag Configuration.

Search for LinkedIn from the list of templates. Then, select the LinkedIn Insight tag template.

Paste the partner ID in the space provided, then click on Triggering.

Select the All Pages trigger.

Finally, click on Save.

This LinkedIn insight tag will provide you with information about page views, and let you retarget and do conversion tracking.
Let’s see if the tag works by refreshing the preview and debug mode.
Click on Refresh.

Going to your website, you should view the insight tag successfully fired in the debug pane.

Unfortunately, there is no tool or extension that you can use to easily verify if the LinkedIn insight tag is working correctly. The only way is to directly check the LinkedIn campaign manager.
Going back to the campaign manager, check if a signal has been received from your domain.

This will usually show that no signal has been received and will take a while before it obtains a signal. Depending on your website traffic, it may take up to 24 hours. Check this again later to verify if the insight tag is working correctly.
Let’s go ahead and deploy this tag to all our website users.
Go back to Google Tag Manager, and click Submit.

Add a version name, then click Publish.

Installing Conversion Tracking for LinkedIn Ads
Now that you have installed the LinkedIn insight tag, you can do conversion tracking for your LinkedIn ad campaigns.
To do so, in the campaign manager, go to Conversions → Create a conversion.

In this example, we’ll create a purchase conversion.
Create a name for the conversion, then select Purchase for the conversion type.

Next, you can estimate how much this conversion is worth to your business. Ideally, the purchase conversion should have dynamic values to reflect your profits from each sale.
However, you are limited to a single value. This means that you can either put an average value or leave it blank.
If you have already set up a campaign, you can then attach this conversion to your campaign.

Lastly, you’ll define how you would like to track the conversion. You can either use the site-wide insight tag or deploy an event-specific Pixel that fires when the user performs a specific action.
The first option is for when the conversion you would like to track is on a specific page. This works great for our example as eCommerce sites usually redirect you to a thank you page or order completed page after completing a purchase.
Now, what if the conversion you want to track does not have a specific URL – for example, an add-to-cart button click?
Usually, a popup appears showing the item you added to the cart, but you are still on the product page. This is where the second option can be utilized.
We’ll discuss how to set up tracking for both options, starting with the site-wide insight tag.
Let’s make a purchase! After the purchase is complete, copy the URL from the order received page.

Paste the URL in the space provided, then select Pages that start with this URL.
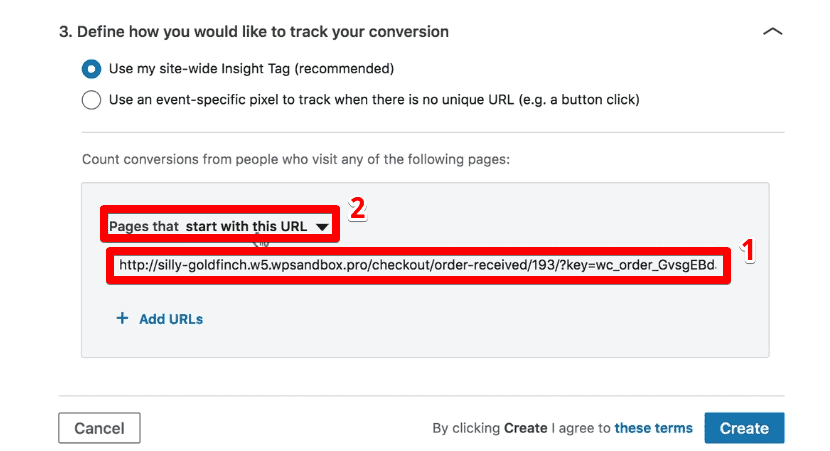
This opens a drop-down menu. You’ll have to only count conversions from pages with URLs containing “/order-received/” since the other parts of the order received page URL changes for every purchase.
Select have URLs that contain the specified text.
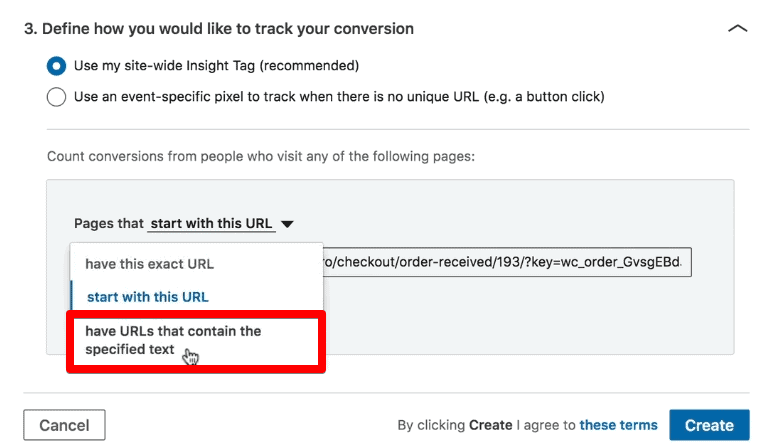
Delete other parts of the URL except for the “/order-received/” portion, then click Create.

Great news! Now every time a user clicks on an ad and makes a purchase, it will be counted as a conversion.
Setting Up Event Tracking
Now that we have conversion tracking in place, let’s discuss how to track purchase conversions using the event-specific method.
Click on Create a conversion.

Create a name for the conversion, then select Purchase in the conversion type.

Select Use an event-specific pixel to track when there is no unique URL, then copy the code for your image tag.

This is specific to the purchase conversion you have set up. If you want to track other events like add to cart or lead, you should select the appropriate type, and then copy the updated code.
You’ll then deploy a custom image tag. In our guide for GTM custom templates, we discussed how to use the LinkedIn event Pixel template when a user submits a form on the website. Check it out if it is more appropriate to the type of conversion you want to track.
Go to Tag Manager and click Tags → New.

Select Tag Configuration → Custom Image.
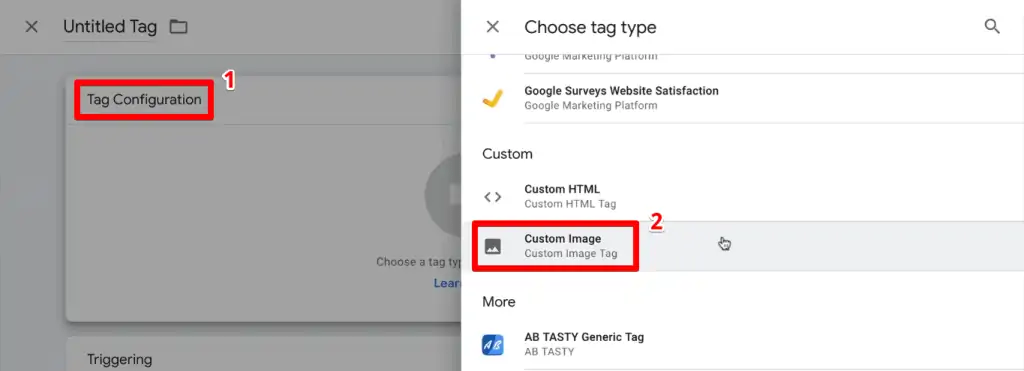
Paste the image tag code in the image URL section. Discard other parts of the HTML except for the URL inside the source attribute.

Next, click on Triggering.
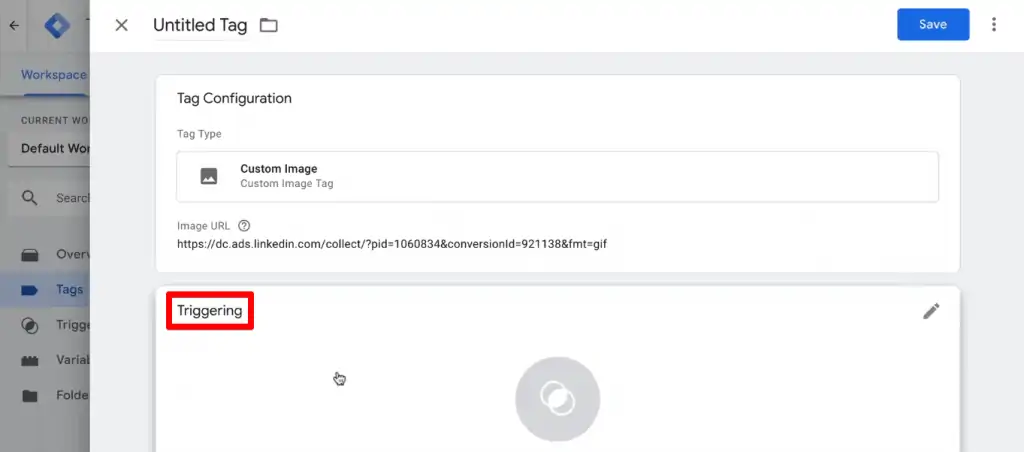
Click on the + sign to create a new trigger.

Selecting the appropriate trigger for the tag depends on how your website has been set up. The general idea for this method is to fire your tag based on an event specifically occurring after making a purchase.
If you don’t have an appropriate event for your type of conversion, our guides on button-click tracking and form tracking techniques with GTM may help you in setting up custom events.
Looking at the preview mode, you now have a custom event from setting up Google Tag Manager for the WordPress plugin. You can use this event to create your custom trigger.
For doing so, in the custom event section, go to the Variables tab and copy the event name.

Name the custom trigger, then select Trigger Configuration → Custom Event.

Paste the event name in the space provided, then click Save.
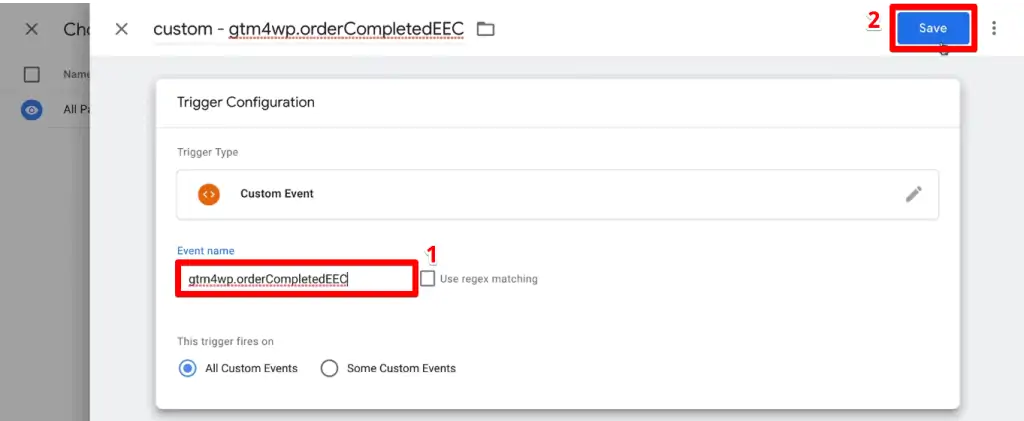
Finally, name the custom image tag and click Save.

Testing
Now that all is done and dusted, let’s test if the tag is working properly by refreshing the preview mode.
Click on Refresh.

Go back to your website and make a purchase again.
Once you have reached the order received page, you should see the custom image tag successfully fired in the debug pane.
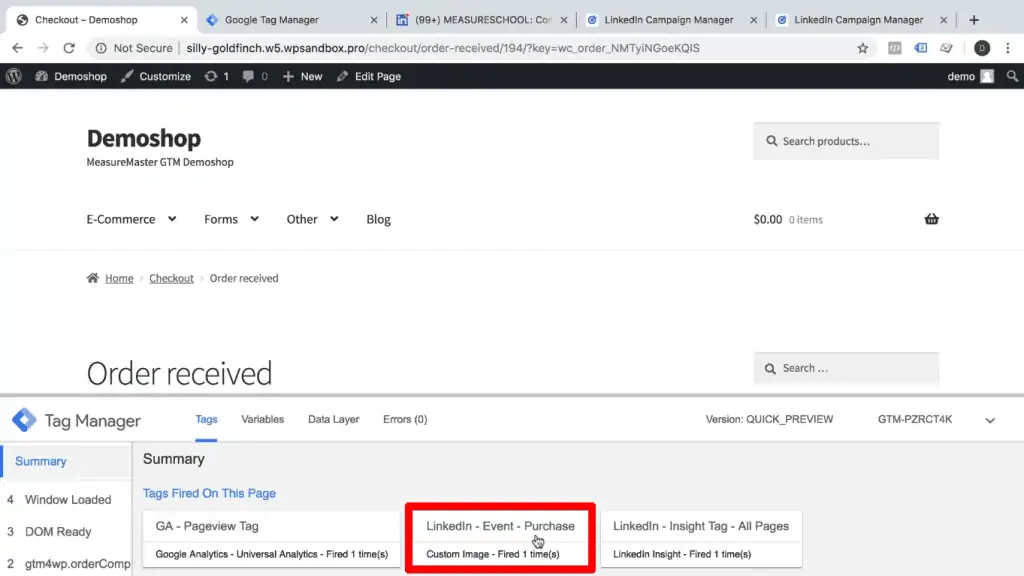
Finalize the creation of your event-specific purchase conversion by going back to your campaign manager and clicking on Create.

This information should then be sent over to your LinkedIn account. Like the conversion tracking method using the site-wide LinkedIn insight tag, you have to be patient before seeing data in your campaign manager.
Since you have created a new tag, you need to deploy this new tag for all your website users again.
To do that, go back to Google Tag Manager, and click Submit.

Add a version name, then click Publish.

FAQ
How do I access my LinkedIn Partner ID to install the insight tag?
To access your LinkedIn Partner ID, follow these steps:
1. Make sure Google Tag Manager is set up correctly on your website.
2. Log in to your LinkedIn account and go to Work > Advertise.
3. In the LinkedIn campaign manager, click on Account Assets > Insight Tag.
4. Specify the domain to be tracked by clicking on “Add domain” and entering the domain name.
5. Go to Manage Insight Tag > See tag. Copy the entire tag code and retrieve the LinkedIn Partner ID from the second line of the code.
How do I install the LinkedIn Insight Tag using Google Tag Manager?
To install the LinkedIn Insight Tag using Google Tag Manager, here’s what you need to do:
1. In your Google Tag Manager account, click on “Add a new tag.”
2. Name the tag and select “Tag Configuration.”
Search for “LinkedIn” in the list of templates and choose the LinkedIn Insight Tag template.
3. Paste your LinkedIn Partner ID in the designated field.
4. Configure the tag triggering, such as selecting the “All Pages” trigger.
5. Save the tag and test its functionality using the preview and debug mode in Google Tag Manager.
6. Once confirmed, publish the tag to make it live on your website.
What is the LinkedIn insight tag, and how can it benefit my ad campaigns?
The LinkedIn insight tag is a tracking code snippet provided by LinkedIn that allows you to gather valuable data about how people interact with your content and ads on LinkedIn. It helps you understand user behavior, track conversions, and gain insights to optimize your ad spend for better results.
Summary
Congratulations, you have made it to the end!
So, this is how you can install the LinkedIn insight tag with Google Tag Manager. With this tag installed, you can do conversion tracking for your LinkedIn ad campaigns, either through the site-wide insight tag or an event-specific Pixel.
Want to unlock the full capabilities of GTM? Our Google Tag Manager tutorial for beginners covers all the basics, like understanding what are GTM’s functions and features, how to install it, integrating tracking with other tools, and where to go next to continue learning.
What are the types of conversions you want to track for your LinkedIn ad campaigns? Which method of tracking is more appealing to you? Let us know in the comments below!


Excellent. Thanks. Time to get more serious on LinkedIn..
Hi Julian,
How do you set up the condition that the visitor first has to provide consent (GDPR) for you to fire the LinkedIn Insight tracking? I have seen your video’s on how to set this up for Google Analytics. But I cannot figure out how it is done for Linkedin.
Rgrds, Ivo
this depends entirely on your Consent Management tool and the mechanisms it uses.
Have you done any ecommerce tracking with LinkedIn? Dou you have any example codes (including data layer examples for linkedin) for these LinkedIn JS parameters:
w=["conversion_currency","conversion_id","conversion_type","conversion_value","order_id"],h={conversion_currency:"cur",conversion_id:"conversionId",conversion_type:"type",conversion_value:"val",order_id:"oid"}nope, not yet
Excellent post, Julian! Thanks a lot!
What if I want to track conversions with lead generation forms that work only inside LinkedIn and not on my website? How can I manage to track them with GTM?
you are not the webmaster of linkedin and can’t install tracking there, so to get that information LinkedIn would need to provide it to you through their interface.