
Last Modified on October 23, 2024
Wix is free, (at least to start) easy to work with, and very powerful in the long run. Connecting Google Tag Manager and Wix is simple and that gives you access to lots of powerful tracking abilities. So in this guide, you’ll learn how to install Google Tag Manager on Wix
An overview of what we’ll cover
So let’s get started!
Prerequisites
- Wix website on a paid plan – The free plan doesn’t allow you to connect a domain or use Google Tag Manager. So a Wix Premium Plan is required – the Basic plan is sufficient.
- A website domain that is connected your Wix website
- A Google Tag Manager account – if you don’t have an account yet, go here to set one up.

Installation Steps
Installing Google Tag Manager
To install Google Tag Manager on Wix we need the GTM ID.
To get that, go to your Google Tag Manager Workspace and click on the link.

A pop-up will open and here you’ll find your GTM ID.

Copy just that, you won’t need the entire code.
Once you have the GTM ID, you should go to your Wix website and click on Marketing Tools. Here you will see a little button that says Marketing Integrations.
This is where you are able to connect other tools like Hotjar, Google Ads, Mailchimp, or the Facebook Pixel. Click that and you’ll be taken to a new screen, where you’ll see all the types of integrations possibilities provided by Wix.
Click on Google Tag Manager.

Click on Connect in the Google Tag Manager section. Click the blue Connect Google Tag Manager button and Paste the code you copied earlier. Wix will tell you if the code has any extra spaces, for example, and highlight the field in red.
Click Save and you’ve finished! You have now installed Google Tag Manager on your Wix website.

If you’ve made a mistake or want to change the GTM ID used in your site, it’s very simple.
Go back to the Marketing Integrations screen, click on Connect within the GTM section. Use the blue circle (with three white dots inside of it) and select Edit. Now you can insert another Google Tag Manager ID. Save it and you’re good to go.
Install Google Analytics with GTM
Installation Steps
Now since we want to track Google Analytics events with GTM, you’ll want to create a new Tag.
If you’ve ever created a Tag before, it’s the exact same thing, nothing changes. Feel free to skip this next section if you already know how to do it.
From your Google Tag Manager Workplace, go to the Tags section.

Click on the blue New button and give it a name, like Google Analytics.

Click on the Tag Configuration section and select Google Analytics: Universal Analytics.

In order to input your Google Analytics ID, click on Enable overriding settings.

Paste your Google Analytics ID from your Google Analytics account.

Now click on the Triggering section and select All Pages.

Before saving it, let’s name it. It’s best practice to use a naming convention. Once that’s done, click Save.

Testing GTM and Google Analytics are Installed Correctly
You can test the effectiveness of your new Tag deployment in various ways. In order to be 100% sure that your Tag deployment is successful, I advise you to use all 3 of the methods that I show you in this guide:
- Preview Mode in Google Tag Manager
- Google Tag Assistant
- Real-time and Regular reports in Google Analytics
Testing via Preview Mode
The first tool we’re gonna take a look at is the Preview and Debug Mode.
Go back to Google Tag Manager and click on Preview.

The page will refresh, and a big orange rectangle will appear, confirming that the Preview and Debug Mode is now on.

Now navigate to your website, or refresh the you already had it open. A window will show up at the bottom of the screen, that’s the Preview tool in action. That’s where you can see all the Tags that fire, or don’t fire, on a specific page, as well as Events, Variables, and Data Layers.
If everything is in order, you’ll see your Google Analytics Tag, firing once. And the tab called Errors will have a 0 after it, meaning there are no problems with your installation. Check a few more pages and they should all show 0 errors.

To exit the Preview Mode, go back to Google Tag Manager and click on Leave Preview Mode. You’ll also want to refresh or hard-refresh (CTRL+F5) your website, to make the Preview overlay disappear.
Testing via Google Tag Assistant
If you use Google Chrome, another way you can test your Tag deployment is via the Tag Assistant extension. Click here to go to the Chrome Web Store and install it.
This will save you a lot of headaches in the long run and help you diagnose any potential issues with your GTM Tags. Either on your website or your clients’. It helps you easily diagnose any issues with Tags you’ve installed or that you have to work with.
After you’ve installed it, navigate to your Wix website and click on the Tag Assistant extension. You’ll get a screen asking you to enable it. Click on Done and refresh the page.

When you click it again a new screen will pop up that should show 2 things: your GTM status and your GA status.

There’s a smiley face before each element, to quickly help you understand if there’s an issue. Your installation should show one green smiley face (for Google Tag Manager) and one blue smiley face (for Google Analytics).
Normally, you would see all the green smiley faces. The issue is not with you, it’s with Google and the way it prefers Tags to be inserted. Essentially, if it’s visible on the page, your traffic and data should be accurate.
Red sad face means there’s a critical issue you need to solve. If you see this on your clients’ websites, quickly act on fixing it.
Scroll through a few main pages (homepage, blog articles – if they exist, secondary pages, contact pages, etc.). Each time check the Google Assistant status. If no red status shows up, your Tag installation was successful.
Testing via Google Analytics
The final way of making sure your Wix GTM implementation was correct is to open your Google Analytics property. Head to the Realtime tab and click on Overview.
Open up your website and start going through a few pages. Inside of Google Analytics have a look at the data coming in. It’s usually not going to be instant, so give it a few seconds.
It should show a user moving from page to page in the Top Active Pages section.
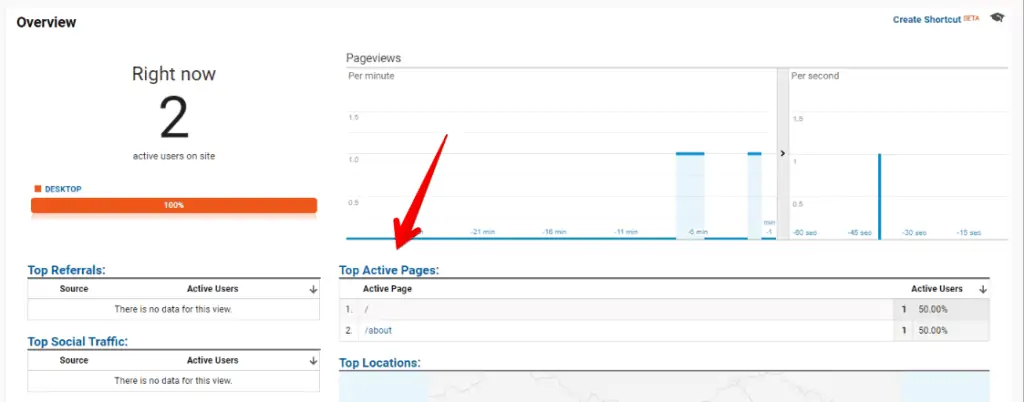
If everything checks up, this testing procedure was successful as well. Great job!
Publish Tags in GTM
In order to activate the Tag, we need to go through one last step, which is Publishing the changes.
To do that, click on the blue Submit button at the top.

Add a Name and a Description, this way in case someone else is gonna be working on this GTM Account will be able to quickly identify all the changes that were made. Now click Publish.

Google Tag Manager can do so much more than just track pageviews within Google Analytics for a Wix website. So let’s take a look at our second tracking element: clicks.
Advanced GTM Tracking
Click Tracking
You just implemented a Google Analytics Tag, so you have a rough idea of what Tags are and what they do.
To understand how to track Clicks, let me give you a little explanation of the 3 main elements within GTM that allow the tracking of any Event: Variables, Triggers, and Tags.
In order to be able to “tell” Google Analytics that something has happened on the website, you will need to set up an environment where GTM “listens” for specific events (the trigger).
The variables help the trigger find more meaning in an event – whether you want to track a Button Click with a specific name or a Link Click that leads to a specific website.
Then, you will look at what events are happening and choose which ones you want to track (the Tag).
Now that you know the basics, let’s implement a very basic Click Tracking Tag.
Enable Click Variables
First, in the Variables section within Google Tag Manager, we want to make sure we have all the Click types available for the Triggers.
Click on Configure.

Some elements will already be checked, like Page URL and Event. But since not everyone uses all the variables, there’s no reason for them to be active all the time.
Scroll down to the Click section and check all of them. They’ll be added and saved in the background.

Once you do that, you can close the window.
Without these Click types, you wouldn’t be able to connect the right variable to the trigger. Once you have them added, you’ll also be able to use them for further projects down the line.
Create the Click Trigger
Second, we need to create a Trigger. Go to Triggers and click on New.

Let’s name it Click Trigger. Now click on the Trigger Configuration section.

Under the Click section, choose All Elements.

We want to first see what kind of Clicks are detected on the website, and then we will choose a specific Click to track. For now, leave the configuration as is – the trigger will fire on All Clicks.
Save the trigger.

Now that you’ve added Click Variables and you’ve created a New Trigger, let’s dig a little bit in the data and individuate which specific click we want to track.
Activate the Preview and Debug Mode in Google Tag Manager.

Open your website, or refresh the page, and as usual you’ll find the GTM overlay at the bottom of your screen.
Start looking at things to click on – tabs, buttons, links. Click on the elements one by one.
In the Summary tab on the left, Clicks will start showing up, so you know your implementation worked. If you hadn’t added your Variables and Trigger, that section wouldn’t contain these Clicks.

You don’t just get Clicks. You also get data associated with those Clicks. For this example, I want to track how many people click on the Facebook icon in the menu section.
After we’ve clicked on it, a new Click Event appears under the Summary tab. Click that and go to Variables.

These are the elements that describe that specific Facebook icon. And we want to use one of these elements back in GTM, in order to track the Clicks just for that icon.
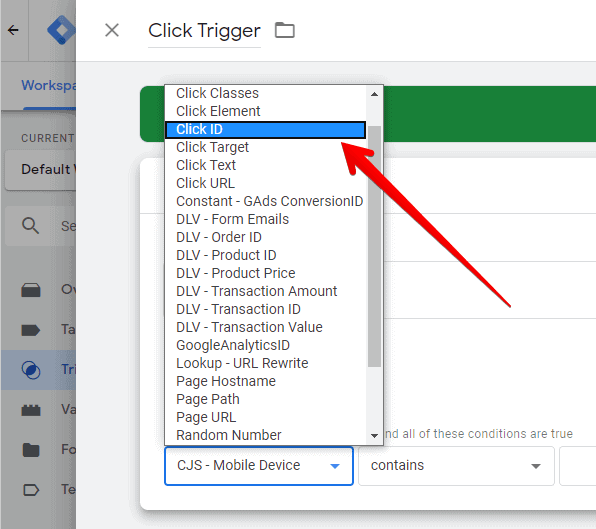
Click Classes looks blank. Click Element doesn’t look like it would help.

But let’s take a look at Click ID. That’s a unique identifier for this icon, meaning only that icon has it. So you’ll only track that specific element. We’ll copy that entire string of text (no quotes or extra characters).

Let’s go back to Google Tag Manager, to the Triggers section, and select the Click Trigger.

Under This trigger fires on, change the firing mechanism from All Clicks to Some Clicks.

We want to only “listen” to Clicks for that Facebook icon. So we’ll then select Click ID from the first dropdown.
The second dropdown tells the trigger HOW it should look for that ID (equals, contains, does not contain, does not end with, etc.). This allows you to set up some very interesting scenarios. You can do exclusions, very specific inclusions, or even combinations if you add more firing triggers.
We’ll simply leave contains.
And in the last field, we’ll enter the Click ID we’ve copied from the website earlier.

The Trigger part is now done, but remember at the beginning we said you need 3 elements: Variables, Trigger, and a Tag? So, now we need a Tag to send the event (Facebook icon click) to Google Analytics.
Create the Facebook Icon Click Tag
We’ll now go to Tags

and create a new one, like earlier, by clicking on New.

We’ll name it GA – Click – Event and click on Tag Configuration to choose a type.
Again, we will select Google Analytics: Universal Analytics. But this time, under Track Type we’ll switch from Page View to Event. New options will open up.

You can now configure what to send to Google Analytics as an Event. We’ll fill in Category, Action, and Label.

All these will get sent to GA exactly how you entered them here. So you have a lot of control over how to want to name and organize events.
Under Google Analytics Settings you will input your Google Analytics ID again, just as you did earlier with your regular GA Tag.
In the final step, we will combine the Trigger with the Tag. So, we will click on Triggering and select the Click Trigger we created earlier.

The Click tracking implementation is complete. Time to test out how it works. Save your work.
Testing
Activate the Preview and Debug Mode in Google Tag Manager.

Open your website, or refresh the page, and as usual you’ll find the GTM overlay at the bottom of your screen.
Now, we’ll click on the Facebook icon. We see that a Click is registered and the Tag we’ve created has been fired.

To be absolutely sure everything was done correctly and the right data is sent, we’ll go back to Google Analytics.
Under the Realtime report, go to Events. Here we also see our Event, with the data we entered in the Tag itself.

Now you can track Clicks, let’s move on to forms.
Form Submission Tracking
By now you understand that Google Tag Manager’s Preview Mode is a blessing. It shows every interaction with the website, allowing you to see, step by step, what goes on, and if you need to track anything extra.
In order to understand what elements are available to track in your Wix website, we need to go to your GTM account.
Click on Preview and visit your Wix website.
This time, you will need to find a form and interact with it, without any fields filled in, just as a baseline. This makes it easy to diagnose what data is already flowing from your website. In our example, a few Clicks appear, but nothing else.

Since we want to track when a form submission had been successful, we don’t want to track just Submit Button Clicks. But rather, when a form submits the data from those fields and there are no errors.
Now fill in some dummy data in the form and click the Submit button. Notice that your debug window now contains an Event called lead.

Wix does a great job at sending specific types of events – since a contact form would be coming from a person, it’s useful to already have it categorized as a lead.
Click on it, then click on Variables, and you’ll see custom data associated with that lead in the Variables section.

What we want to do now is to capture that event and personalize it, in order to send it towards Google Analytics.
Go to Triggers and create a New one.

Let’s name it Form Submission.
Click on the Trigger Configuration area, scroll down, and under Other choose Custom Event.

Since we know the event is titled lead, type that into the Event name field. Leave it to activate on All Custom Events and Save the Trigger.

Now we will need to create a Tag that will push the data to Google Analytics, just like we did earlier with our Click Tag.
Go to Tags.

Create a New Tag

name it GA – Form – Event, click on the Tag Configuration area and choose Google Analytics: Universal Analytics.

Next, change the Track Type to Event and Fill in the Category, Action, Label, and Tracking ID.

In the Triggering section select the Form Submission Trigger you’ve created earlier.

Now you can Save the Tag and test it.
Let’s go back to your Wix website and fill in all the required form fields and submit it. Now open up Google Analytics and go to the Realtime report, under Events. You should see your newly created event.

If you want to make sure it’s the one you created, click on the Event Category name and you should also see a column called Event Label. You’ve entered all this data earlier when you created your Tag in GTM.
And that’s it, you’ve set up Form Submission tracking Tag in GTM for your Wix website!
We’ve covered a lot in this guide, but we’ve just scratched the surface on what Google Tag Manager can do for your website. If you’re interested in learning more about GTM, our Google Tag Manager tutorial is a follow-up on your journey.
If you work on multiple GTM accounts, sometimes work gets repetitive. You’re going to create the same Tags, Triggers, or Variables time and time again. To speed things up, use the GTM Copy Paste extension.
FAQ
Can I implement the eCommerce tracking code in Wix?
Yes. Since a Wix eCommerce website is very similar to a standard eCommerce experience (Magento, WooCommerce, etc.), implementing it is no different. Wix has a basic article on getting it set up.
Preview and Debug Mode not working. What should I do?
One thing to check first is switching browsers. You can have a main browser (say Chrome) and a backup one (say Firefox). And keep that backup one barebone – just the Google Tag Assistant installed.
Login into Google Tag Manager from the backup browser and check if Preview and Debug Mode works now.
You might also want to check if there are programs blocking certain features of your browser.
The last thing is crucial: use Google Tag Assistant to make sure your container is successfully installed on the Wix website. Otherwise, there won’t be anything to debug.
Analytics Is only tracking the first page for my Wix website. What’s the solution?
Check to see if your Google Tag Manager is set to track all pages. Also note that Real-time in Google Analytics is fidgety sometimes, so you might need to give it some time. Visit a few more pages from different pages and report back in GA.
Another thing to note is that clearing your browser cache (CTRL+SHIFT+DELETE on PC in Chrome – choose Cached images and files) can sometimes be a solution to this issue.
Do I need to have both GA and GTM connected to my Wix website, or can I remove the Google Analytics snippet once Google Tag Manager is there?
Wix provides both Google Analytics and Google Tag Manager integration support. The guide above has shown you how to insert GA through GTM. So that essentially saves you a step, you don’t have to use 2 different integrations.
If you’ve used the GA integration and GTM+GA, you’ll end up tracking each page twice. What you can do is remove the Google Analytics Tag from Google Tag Manager and only keep the GA integration. That is if you only want to track pageviews.
Our recommendation, however, is to remove the GA integration altogether and just keep the GTM+GA combination. It gives you the same pageview tracking but allows for way more flexibility and power in what you can achieve using Google Tag Manager.
Pageviews are not recorded when using Google Analytics through Google Tag Manager. How do I fix this?
There are a few things you need to check:
1. Is the Google Analytics Tag inside of Google Tag Manager present and published?
2. Does the Google Analytics Tag contain the right UA-… code?
3. Are you checking in the Realtime section of the correct Google Analytics account?
4. Are there any tools/extensions that might prevent Google Analytics from functioning properly, like uBlock Origin, Ghostery, or Adblock Plus?
5. Is the Wix website published? Have you visited it from different browsers?
I get the message “Multiple installations of Google Tag Manager detected”. What can I do?
This can happen for a variety of reasons. The first thing to check is whether Google Tag Assistant is measuring correctly. Look for what containers are being tracked and try to identify them within your own GTM account.
The second thing is to look out for are extensions that might block or send faulty data to your website. Check things like ad blockers or antivirus extensions.
Deactivate them for a bit, then refresh the website to see if multiple installations of GTM are still detected.
Summary
Let’s quickly go over what we’ve covered in this Wix Guide:
- How to install Google Tag Manager and test it’s working, using a few methods, including Debug Mode and Real-time preview within Google Analytics
- How to track Link Clicks in GTM, on a text or button, taking the user to another page on the website or to a different website
- How to use Google Tag Manager to track form submissions in Wix, making sure you are looking at the success event (and not just the Submit button event)
As you’ve seen so far, tracking a Wix website is not so different than installing GTM on WordPress for example. But there are a few quirks here and there you should be aware of, to make your tracking as smooth as possible.
🚨 Note: You can also integrate GTM with other tools such as ActiveCampaign and Google Sheets.
Anything we missed or think we should add? Let us know in the comments section!


")
This article was very useful, thanks a lot! My issue was that the GA didn’t work properly (with goals) and with the Tag Manager Assistant I could find out that there are no HTTP responses from GA. I disabled the GA integration in WIX and I’m now using the GTM+GA integration. Now I can see the page views in the GA Real-time report. However, the Google Tag Assistant doesn’t recognize my GA integration, and the click events are only triggered in the debug mode but not on the live site. Do you have any idea what can be still the… Read more »
did you publish a version?
How can I add user id to GA via GTM in Wix
I dont’ think that is possible
Hi Julian! This was very helpful, thanks so much for providing this article. I do have a question about setting up the general GA-Pageview-All Pages tag. Under advanced settings should I have the Tag firing options set to Once Per Event or Once Per Page?
once per event is the default. Just leave it at that
Enhanced Ecom Tracking in Wix?
Datalayer available?