Last Modified on January 13, 2025
Analytics is all about generating insights that can help us make meaningful actions. Sometimes these insights are ad-hoc and completely depend on the situation whether it’s reactive or proactive analysis.
Other times, there are set parameters or conditions where we want to get periodic insights whenever those conditions are met, and this is where custom insights come into play.
GA4 custom insights, previously known as custom alerts in the Universal Analytics days, have been revamped with the introduction of Google Analytics 4.
In this blog, we will discuss how the feature has evolved in GA4 and what you can do to make the most out of it. Here’s what you will learn in this post:
- What are GA4 Custom Insights?
- Where to Find GA4 Custom Insights?
- How to Setup GA4 Custom Insights
- Best Practices for Custom Insights
This is an interesting topic to learn about as we haven’t seen it being used to its fullest by most GA4 accounts. Setting up useful custom insights can help us stay on top of our website performance game. Let’s begin!
What are GA4 Custom Insights?
The whole point of having analytics is to have insights that you can use to improve and grow your business. But that also means often having dedicated analysts going through raw data, cleaning it, and then providing you insights that you can act upon.
Since analysts are better used with more complex analytical tasks, the ability to have insights on predefined conditions and machine learning can be helpful.
Now, there are currently two types of insights that you can get in GA4 – automated and custom.
Automated insights are good for basic information like an unusual dip or spike in traffic, revenue, or any other data point that’s significant enough, as per GA4’s machine learning algorithm.
Custom insights give you more control over what type of insights you want to see which are normally more relevant than generic, e.g., a specific KPI dips down suddenly, allowing you to take quick action.
You can set up as many as 50 GA4 custom insights currently, which is more than enough for most businesses. These insights are retained for one year after they are generated.
These insights show up on Insights Cards once the conditions are met.
Where to Find GA4 Custom Insights?
There are three places from where you can see and interact with the insights in GA4.
Analytics Home
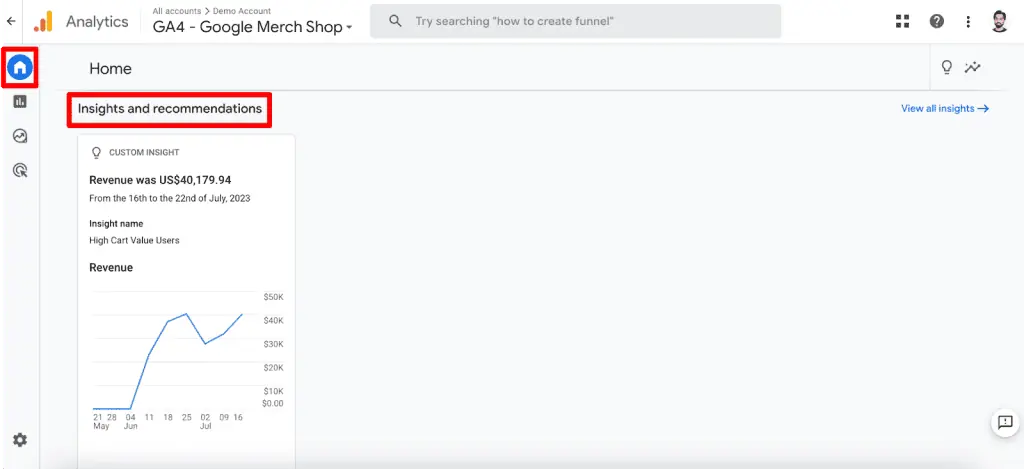
Click on Home on the sidebar and scroll down until you see the Insights and Recommendations section with Custom Insight card(s).

Reports Snapshot
The second place where you can see your GA4 custom insights is the Reports Snapshot interface.
Click on the Reports → Reports snapshot → Scroll down until you see the Insights card.

In this interface, you will only see one card with multiple custom insights (if there are any).
Advertising Snapshot
Click on Advertising in the left sidebar and you will be taken to the Advertising snapshot where you can find the Insights card.

This card is similar to what you see in the report snapshot above.
For all these reports, there’s a link to ‘View all insights’ on the right or bottom right that takes you to the Insights dashboard, where you can see the complete list of GA4 custom insights and manage them, i.e., create, edit, and delete.

You don’t see the create button in our sample here because it’s a GA4 demo account and we don’t have the right permissions. You would need an Analyst or Editor role to create, edit, delete, or share insights.
The Insights dashboard shows the most recent insights (automated and custom) for your property and is refreshed in real-time when your predefined conditions are met, as well as when your GA4 property identifies new insights (automated ones).
Don’t forget to click on the individual cards to get full details.

The interesting part about interacting with the insights is that Google’s Analytics Intelligence is trained on your choices and ranks your new insights accordingly.
How to Set Up GA4 Custom Insights
How to set up GA4 custom insights summarized:
- Access Insights Dashboard: Go to the Insights dashboard from Analytics Home, Reports Snapshot, or Advertising Snapshot.
- Create Insight: Click on the Create button.
- Set Conditions: Define the conditions for the insight, including evaluation frequency, user segments, and specific metrics.
- Name Insight: Provide a relevant and clear name for the insight.
- Manage Notifications: Optionally, set up email notifications for specific team members.
- Finalize: Click Create to save the custom insight.
When on the Insights dashboard that you can get to from the three reports discussed above, click on the Create button in the top right corner (visible with right account access).

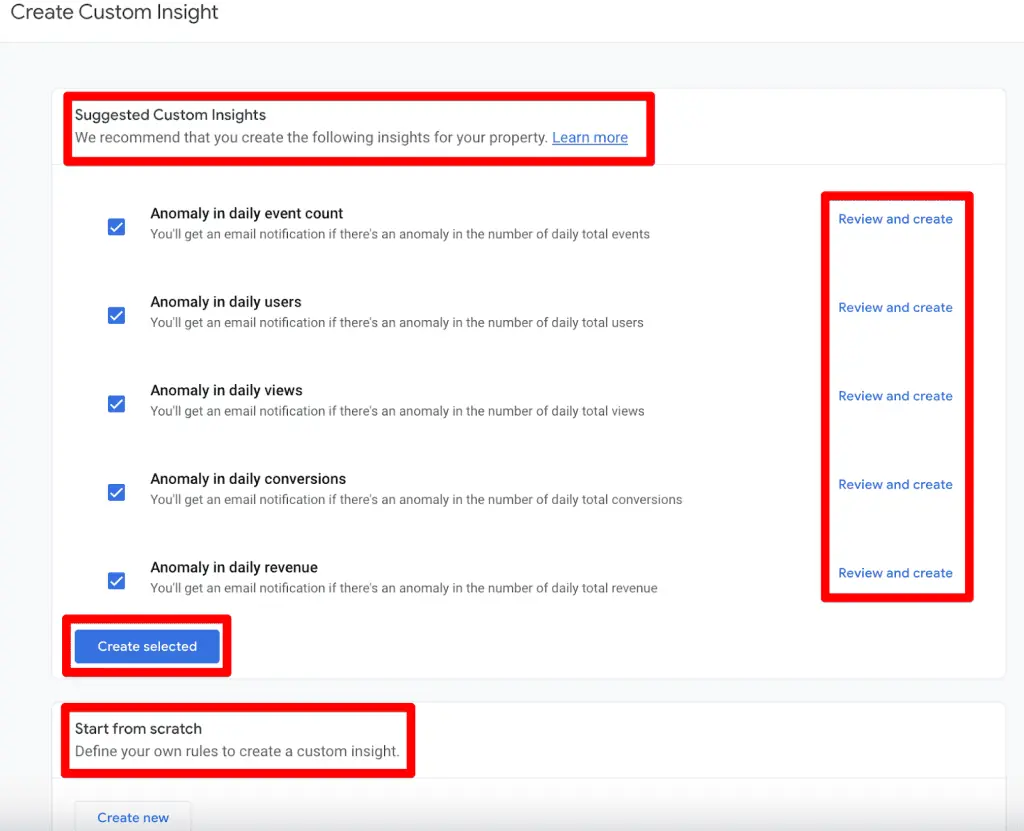
Next, you can create insights from the five suggested options or completely from scratch. For the suggested ones, you have the option to review and create or simply create all the selected ones.

If you click on the Review and Create option, you will see the conditions for the insight to trigger. Let’s check out the Anomaly in daily revenue insight setup.

There are three parts to the setup interface:
- Set conditions
- Choose insight name
- Manage notifications
The most important bit is setting up the conditions, as they will define when and what you see in your insights. Let’s slice and dice it.
The first part of the conditions is selecting the frequency of when the conditions should be checked, i.e., hourly, daily, weekly, or monthly.

The next condition is to choose a segment, i.e., All Users or a set of users that meet specific criteria.
If you use the suggested recommendations by GA4, you will see that by default it includes All Users. Click on the Change button next to All Users.

The segment setup interface will show up on the right side where you can choose five conditions and choose from different dimensions like Demographics, Geography, Platform/device, Traffic source, User lifetime, and Audiences.

While other conditions can be helpful for different purposes, an effective one could be to use saved GA4 audiences, e.g., people who added to the cart but didn’t complete the purchase.
You will have four options for the Match Type for all dimensions except the Audience name, which works on exactly or does not exactly match conditions.

In the final condition, you have to choose the metric and its condition, i.e., anomaly, or other conditions like greater than or equal to, lesser than or equal to, % increase, % decrease, % change is more than.

The second part of the custom insight setup interface deals with naming the insight. Choose what is easy to understand and relevant for you.
The anomaly condition works based on a statistical model that Analytics Intelligence uses, so it’s system-defined.
Since it’s a model, it needs training based on the evaluation frequency, i.e., 2 weeks for hourly, 90 days for daily, and 32 weeks for weekly anomaly detection. Read more about anomaly detection here.
💡 Top Tip: Check out our post on Anomaly Detection in Google Analytics 4 for a more in-depth guide on how to implement anomaly detection on your account.
The third part of sending email notifications is optional, However, it can be helpful if certain people in your team or company don’t want to log in to GA4 every time to keep a check on KPIs.
Once done, simply click on the Create button in the top right corner. You will see a screen with the list of all your custom insights, and you can note that we only have one for now.

If you don’t enter an email address, the Email notifications toggle will be grayed out and if you turn it on, then it will select the account owner’s email address automatically unless you change that.
If you want to edit or delete, all you have to do is to click on the three dots highlighted in the above screenshot.
🚨Note: By default, All users on the property can see custom insights in the reports regardless of whether you send them notifications or not.
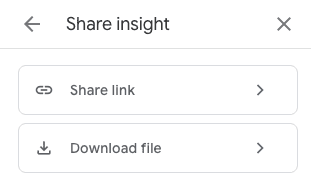
Once the insights are generated, you can see them in your reports. You can also share the insights if you click on them for details and then click on the 3 dots in the top right corner.

You either share it as a link for people who have access to the property or download it as a PDF, PNG, or CSV file.

So there you have it! You now know how to set up GA4 custom insights but what type of insights should you create? What are the dos and don’ts?
Best Practices for Custom Insights
While creating custom insights is quite a useful feature if used properly to stay on top of important KPIs, it is also important to not make a mess out of them.
We’ll discuss some best practices below to help you make the most out of your GA4 custom insights.
Measure what matters
This can be applied as a whole to your analytics tracking. You don’t want to clutter your insights cards with everything because then the important insights won’t be easily visible. The evaluation frequency, metrics, and conditions can make a lot of difference in the results.
Give insightful names
Your custom insights must make immediate sense when you look at them, especially the frequency bit. You can easily forget to rename it when you change it from daily to anything else.
Also, it’s important to use simple names that are understandable by everyone who is going to see the insights. So, avoid short names or acronyms that are relevant only to you.
Don’t send notifications to everyone
It might be tempting to just add everyone’s email address so they receive custom insights in their email inbox every time something happens. However, it’s important to ask yourself if it’s relevant to the person you’re sending it to and how can they act on it.
It might even be a better idea to consult with those people first if they would agree to receive these notifications.
Assign roles
Connected to the previous note, it’s important to assign roles to people who are responsible to deal with any anomalies or issues that custom insights raised. Otherwise, the insights won’t bring a lot of value.
Having a document that shows who created the insight, why and who is responsible to take action can be quite helpful. In the event you leave the organization, the new employees will be able to jump right in.
Review insights
It’s quite easy to set up the insights at once and then forget about them. However, there should be a set review period like quarterly, for you to double-check if the insights are still valid or need some tweaks.
The alternative is you might end up piling more insights over time, and if those people who created them are not working there anymore, you won’t know if those insights are needed anymore or not.
It would just take more time and energy to clean up, as mentioned above, documenting it would be quite helpful and time-saving.
Insights to get started
While suggested insights might be a good idea to get started in terms of detecting basic anomalies, another good way to get started is to set up some basic insights with email notifications.
These could be when users, sessions, revenue, conversion events/purchases, and events dip to 0. This would tip you off in real-time. This is especially relevant if you are a small organization where the analytics person is also handling other tasks as well.
These best practices can go a long way in helping you get the most out of your GA4 custom insights, With more trial and error, you can even develop them further.
Summary
We’ve learned a lot about GA4 custom insights in this post from what they are to where we can find them in GA4. We also delved into how you can set them up in GA4, and most importantly, how to make the most out of them by following certain best practices.
Custom insights have a lot of potential value if they are used properly, and it’s never too late to start. We suggest you start working on a plan to set up GA4 custom insights for your property and keep tweaking them at times so that it suits your business.
If you’re still new to GA4 and working out how to track events in GA4, then you can hold on setting up the custom insights for now, and check our handy post on Google Analytics 4 Event Tracking Checklist.
Have you set up GA4 custom insights? Let us know how it has helped your business in the comments below, especially compared to the custom alerts in UA.


