Last Modified on April 23, 2024
Would you like to implement server-side tracking on your website for free?
Installing third-party tools originally meant having to add snippets of code directly to your website. With the median websites using 20+ third-party solutions, website load times have become slower due to the browser having to execute each code individually.
As we enter an age where everything happens online, speed becomes a competitive advantage. In today’s digital climate, a mere 0.1-second change in load time can affect user journey and influence conversion rates by up to 10% across different industries.
Enter Cloudflare Zaraz for server-side tagging. Instead of installing third-party tools directly onto your website, this tool manager loads them on the cloud, away from the browser.
This not only boosts page speed but also diminishes security risks involved in using third-party tools, as Cloudflare Zaraz merely acts as a pipeline and saves no information about the end user.
With this tool, you can now effortlessly load analytics tools, advertising pixels and scripts, chatbots, marketing automation tools, and more without having to go in and change your website’s code.
Here is an overview of what we’ll cover:
- What is Cloudflare Zaraz?
- Adding Third-Party Tools to Your Website
- Creating a Trigger in Cloudflare Zaraz
- Creating Third-Party Tool Actions
- Should You Use Cloudflare Zaraz?
What is Cloudflare Zaraz?
Cloudflare is a service that you can put in between your website and your server domain. When users visit your website, they will go through Cloudflare’s globally distributed network designed to make everything you connect to the Internet secure, private, fast, and reliable.
They offer a lot of different free and paid services which include DDoS attack prevention, SSL for SaaS applications, and automatic website optimization.
Cloudflare Zaraz is one of the latest additions to its suite of products and was a startup built on its other service called Cloudflare Workers, even before its acquisition.
If you are familiar with Google Tag Manager’s server-side tagging, it essentially does the same thing, but for free. Its cloud-loading makes third-party tools load outside the browser, while still getting access to the information they need.
As Cloudflare Zaraz is still in its beta phase, it remains to be seen if it will continue to be free once it has been released officially. Nonetheless, let’s discuss how to use this service, its benefits, and downsides over server-side GTM, and evaluate if it is worth checking out.
🚨 Note: In July, 2023 Zaraz is transitioning out of beta and is available to all Cloudflare users. Pricing is also updated: free for the first 1M Zaraz events per month.
Adding Third-Party Tools to Your Website
To access Cloudflare Zaraz, all you need to do is click on the Zaraz icon on your dashboard.
Using Cloudflare Zaraz does not involve having to go into your website’s code and having to configure it in any manner. Simply connect your domain to Cloudflare.

From here, everything is straightforward. There is a section for adding third-party tools and a section for creating triggers for when you want to send events to these tools.
Let’s demonstrate how easy and simple it is to add third-party tools to your website by installing Google Analytics.
Installing Google Analytics using Cloudflare Zaraz
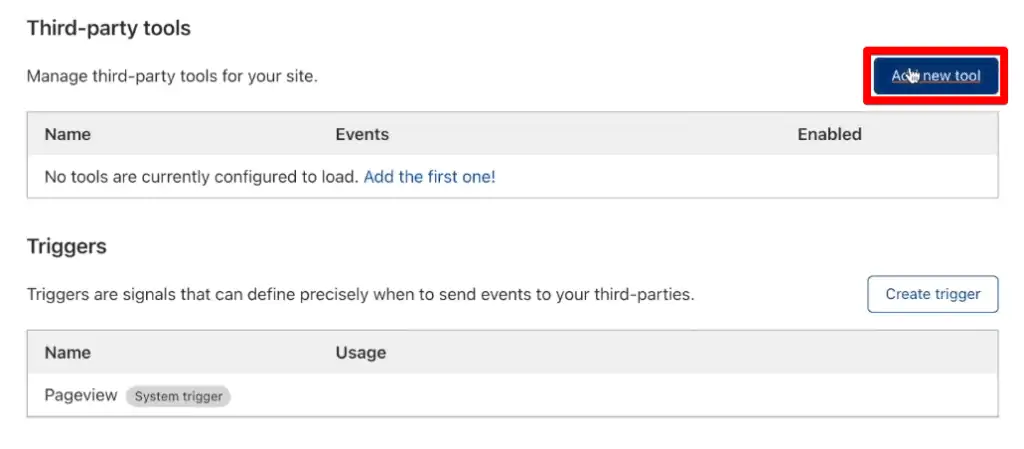
To start, click on the Add new tool button.
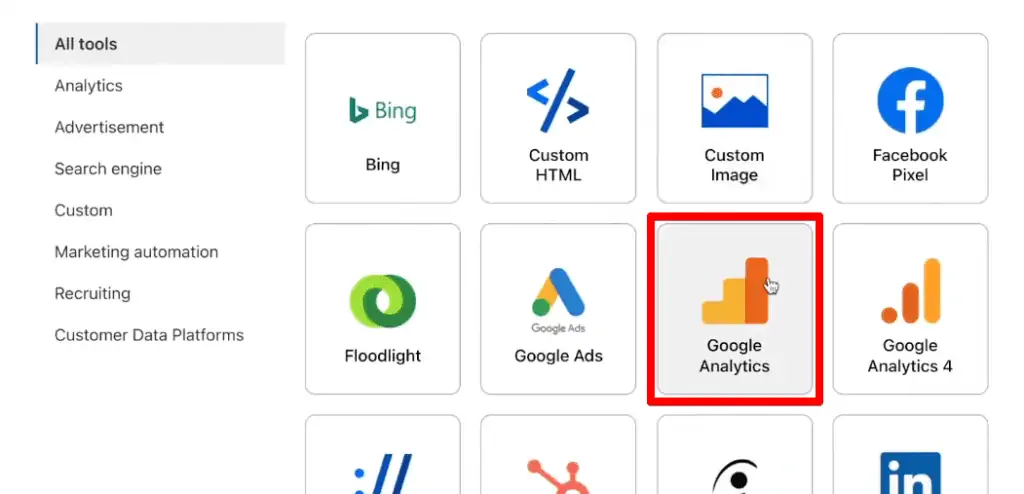
Select Google Analytics.
Click Continue to confirm.

To set up Google Analytics, all you need is to know your tracking ID.
The tracking ID is the unique identifier of your Google Analytics account which you can access by going to your admin settings and going to the data stream for which you need the ID.
Paste your tracking ID in the space provided, then click Save.

That’s it! Google Analytics is now installed and you can see this tool on your Cloudfare Zaraz dashboard.

The best way to confirm if it has been properly installed is by going to your Google Analytics property and checking if you can view a PageView event in your reports.
Click on the Real-time Overview report. You should see that a new user has been detected in the pageviews section.

Great! Google Analytics is completely installed on your website.
If we look at our browser’s network requests from the Chrome Developer Tools and search for Zaraz, we can see the request that is automatically configured to send data over to Google Analytics.

Heading over to the Headers tab, we can view the request URL.

You will notice that it is being sent over to our domain. This domain is important because it is first-party data now, and an ad blocker is unlikely to block this request.
By utilizing Cloudflare Zaraz, a virtual path is automatically created where our data is first sent to the first-party endpoint and then relayed to our third-party tools.
Installing other third-party tools is just as simple as what we have demonstrated earlier. Let’s add Google Analytics 4 and the Meta Pixel to our website.
Installing Google Analytics 4 and Meta Pixel
Again, start by clicking on Add new tool.

Let’s start with adding Google Analytics 4.

To proceed, you only need to know the Measurement ID of your Google Analytics 4 account, which you can also access by going to the data stream from the admin settings.
Paste the measurement ID in the space provided, then click Save.
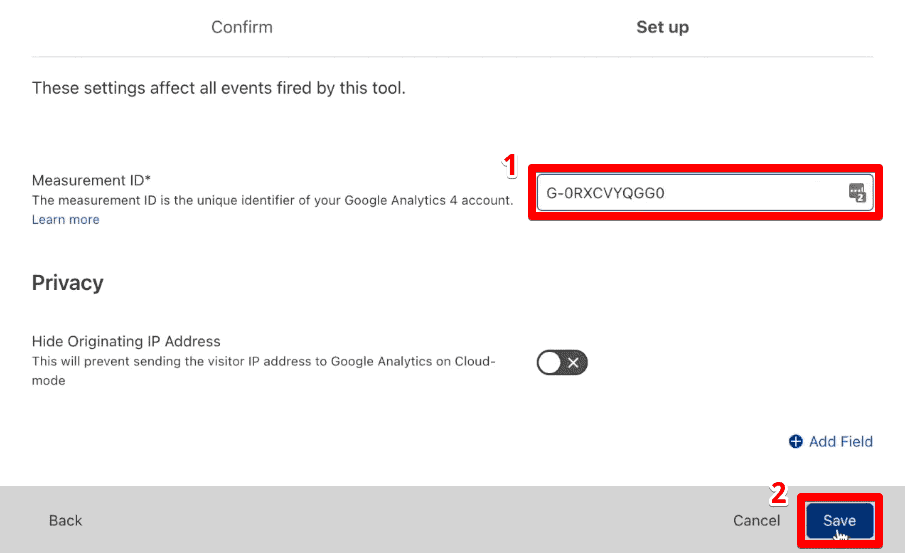
Now, let’s add the Facebook (Meta) Pixel.

For the Meta Pixel setup, we need our Pixel ID, which is your Facebook Ads account identifier.
Copy your Pixel ID from your Meta Business Suite Events Manager.

Paste the Pixel ID in the space provided, then click Save.

Great! We have installed all our tools simply and easily.

If we go back and refresh our website, we will notice that we still only get one request to send data to all of our tools.
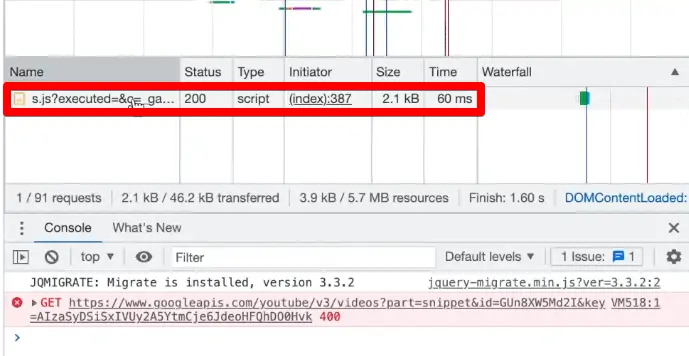
It may take a while, but your pageview event should show up in the Meta Pixel Events Manager.

While your events do show up on your Google Analytics reports and the Meta Pixel overview, an important and different functionality when using Cloudflare Zaraz is how to test and debug your events.
If you had been using Tag Managers before, you should be familiar with the Test Events tab to fix Meta Pixel errors and the DebugView for Google Analytics properties.
You will not see any data when you go to these pages if you installed these tools using Cloudflare Zaraz.

Instead, Cloudflare Zaraz introduces its own Debug mode for which you can troubleshoot events and trigger systems.
To activate debug mode, you need to create a special debug cookie containing your debug key in the Console tab of your browser’s developer tools.
As Cloudflare Zaraz does not load third-party scripts, the debug mode is limited in that you cannot view which tags fire on which pages. While it does show a hash ID, there is currently no concrete way to identify which hash is for which tool.
Since Cloudflare Zaraz is still in its beta version, we are sure to receive more developments and features until it is released as a fully-developed product. Hopefully, they can improve more on the testing aspect of server-side tagging.
Another instance where the testing limitations are highlighted is when you specify a conversion API access token along with your Meta Pixel.
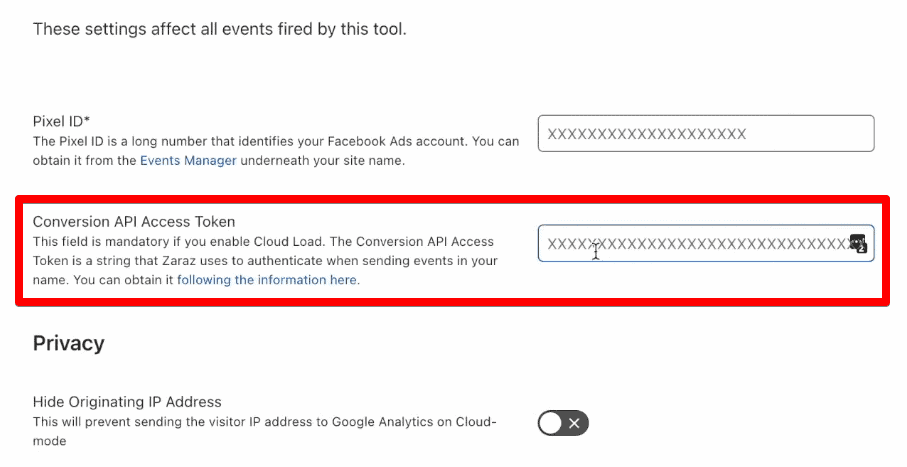
We have covered how to send Meta Pixel events via the conversions API using Zapier before, but this method would probably be the easiest way to install the conversions API through any kind of platform.
You only need to put in your access token and you’re done.
Despite the ease of installation, further tests need to be done to see if it is an effective way to install the conversions API.
This is a bit challenging to do as in the Test Server Events instructions, you would have to add the test event code to your server’s payload.

This is where the simplicity of the Cloudflare Zaraz interface becomes a drawback, as it is unclear where to place this code and if it can be used at all.
Nonetheless, now we have connected three tools to our website easily without installing any code.
Creating a Trigger in Cloudflare Zaraz
By default, we have everything firing on a pageview trigger and are sending the pageview event to our third-party events. Cloudflare Zaraz also allows us to implement events that we can fire on specified triggers.
Let’s start with creating a trigger.
Click on Create trigger.

Let’s say we want to fire only on a specific page. For this example, let’s set a trigger for whenever a user views their cart.
Take note of the URL for this page.

Provide a name for the trigger.

Next, we need to specify the matching condition. This is nothing like the variables in GTM, so you should check out the Cloudflare Zaraz documentation to determine which is appropriate for the trigger you want to implement.
Go to Access properties. For this case, the match rule condition we should use is the {{system.page.url.pathname}}.

Paste this to the variable name field. Specify the matching condition to be “contains cart” and then click Save.

With our trigger setup, we can now create a new event, which Cloudflare Zaraz calls an action.
Creating Third-Party Tool Actions
To create a new event, go into your third-party tool in Cloudflare Zaraz and create events from there. Let’s create the cart view event to be sent over to Google Analytics.
Click on Create event.

Provide an event name, specify the firing trigger, choose Event as the event type, and provide the Event Action name.

You can also specify the Event Category and Label that will be sent to Google Analytics.
Finally, click Save.

After refreshing your webpage, you can view this event in the Events report in the Real-time reports category.

Since Cloudflare Zaraz is a young service compared to most Tag Managers, you are a bit restricted by the different variables available.
From the surface, it seems that adding third-party tools and creating a trigger is all that Cloudflare Zaraz can do. However, there is more than meets the eye from the interface as other functionalities are available to be utilized.
These include Data Layer compatibility and the ability to fire certain events on your page by adding an events API JavaScript code to your website.
If you want to track custom events on your website that might happen in real-time, you would have to use the zaraz.track function anywhere inside the <body> tag of a page.
We won’t cover how to use the events API with Cloudflare Zaraz for now, but the documentation provides all the details you should need like the parameters to use in the function and how to create a trigger based on it.
In summary, Cloudflare Zaraz creates a JavaScript code that bundles up all requests – from ones in the interface to the more advanced data layer and events API custom events.
It then sends it to the server, which then gets forwarded to the respective third-party tool.
Should You Use Cloudflare Zaraz?
Cloudflare Zaraz is an interesting tool for people who want to simply implement server-side tagging without deploying any kind of code.
It is best for those who only need to do basic things like installing third-party tools and implementing common types of events without needing to access their website’s code.
With its simplified interface, it provides the easiest way to fulfill these basic requirements. However, it means giving up the conveniences we are used to in GTM, like building more sophisticated tracking deployments.
Despite the ease of use and being free, the biggest thing to consider when determining if you should use Cloudflare Zaraz, is the inability to control the data flow.
Since this toolset merely acts as a pipeline between your website and third-party tools, you can’t dive deeper into server-side tagging and build your deployment, ultimately not being able to take control of your data flows.
Another thing to consider is that the Test Events tab in Meta Pixel and DebugView in Google Analytics does not show any data when you use Cloudflare Zaraz, as noted above.
The debug mode they offer does provide a means to troubleshoot your events and trigger systems, but they are still limited in the information they provide and not as detailed compared to the built-in test modes in your third-party tools.
If these are important to you, then GTM server-side tagging might be the better fit for you. However, the simplicity and ease of using Cloudflare Zaraz make it worth considering if you only need the basic capabilities of server-side tagging.
FAQ
How do I add third-party tools to my website using Cloudflare Zaraz?
To add third-party tools, you need to access the Cloudflare Zaraz interface and click on the “Add new tool” button. From there, you can select the tool you want to add, such as Google Analytics or Facebook Pixel, and provide the necessary information (e.g., tracking ID or measurement ID) for the tool. Save the settings, and the tool will be installed on your website.
Can I test and debug events with Cloudflare Zaraz?
Cloudflare Zaraz offers a debug mode that allows you to troubleshoot events and trigger systems. However, it has some limitations compared to the built-in test modes of individual third-party tools. Debug mode in Cloudflare Zaraz does not provide detailed information about which tags fire on which pages, but it can help identify and fix issues with your events.
Should I use Cloudflare Zaraz or GTM server-side tagging?
The choice between Cloudflare Zaraz and GTM server-side tagging depends on your specific requirements.
If you need a simple solution for basic server-side tagging without accessing your website’s code, Cloudflare Zaraz can be a good option.
However, if you require more advanced tracking capabilities, control over data flows, and comprehensive testing and debugging features, GTM server-side tagging might be a better fit.
Summary
So, that’s how you use Cloudflare Zaraz for server-side tagging. This toolset was originally a startup built on the services Cloudflare offers before being acquired and integrated into its suite of products.
It promises to make your website faster and more secure with its cloud-based loading. The current beta version boasts an easy way of adding third-party tools to your website and creating custom triggers and events.
With its simple interface and server-side tagging implementation, Cloudflare Zaraz is perfect for those who only need to install third-party tools and track basic types of events.
If you want to dive deeper and take control of your data flows and build more sophisticated tracking deployments, check out our guide on how to set up GTM server-side tagging.
What are some further capabilities you wish for Cloudflare Zaraz to integrate? Do you think this tool is a plausible alternative to GTM server-side tagging despite its current limitations? Let us know in the comments below!


Do you think this is better than using stape which you reviewed? Thanks in advance.
Excellent tutorial! Quick question: when I create a new action under 3rd party tools I can select “Event name”, but there are no fields for “Event Category” or “Event Label”. Any ideas why?
Hi Julian, and thank you for this article.
Based on sharings from different people including yours, I did a little test to see how it works and what the actual benefits are vs Google Analytics loaded through a client side GTM container.
I noticed a small increase in performance, but a huge discrepency in real-time location testing inside Google Analytics when using Zaraz.
I remember from your first video that you might have had the same problem but not sure, how accurate is the location tracking now for you when using Zaraz?
I had a 1200km / 750 miles discrepency.