
Last Modified on January 4, 2024
Wouldn’t it be amazing if you could customize your Google Tag Manager tracking with user data from ActiveCampaign?
Using a special Apps Script, you can pull users’ contact information from your ActiveCampaign account and push it to your Google Tag Manager Data Layer.
From there, you can segment and personalize your web tracking to get the very best tracking data.
🚨 Note: If you’re new to Google Tag Manager, check out our in-depth Google Tag Manager tutorial.
In this guide you’ll learn about:
- Solving the problem with data tracking
- How is information pushed to the Data Layer?
- What ActiveCampaign information is available in the Data Layer?
- Pulling information from ActiveCampaign into Google Tag Manager
- What can you do with the available data
- Limitations
So let’s get started!
Solving the Problem with Data Tracking
Oftentimes the data that we are tracking live in different places.
Some of your data may live in Google Analytics, while other data might be in Facebook Analytics.
And then there are CRM systems like ActiveCampaign, which also has meaningful data but is totally separate from your other tools.
So how do we make these tools interact with each other?
I’ve written an Apps Script to do just that!
This Apps Script allows you to pull information from ActiveCampaign into our Google Tag Manager Data Layer, and use it from there for personalization, segmentation, and customization of our tracking and of our website.
How Is Information Pushed to the Data Layer?
Links from your ActiveCampaign marketing will have the user’s ID attached to the link URL. Using our special Apps Script, Google Tag Manager grabs thisID and pushes related information to the Data Layer.
Let’s take a look at how this works.
If I’m making smart marketing decisions, I’ll always have some kind of link to content that might convert users.

And when a user clicks the link in their email newsletter, they’ll be directed to our demo shop.
Do you see the contact hash on the URL of the demo shop?

Google Tag Manager will pick up the contact hash and connect with ActiveCampaign via a Tag.
With this Tag, we’ll make an AJAX call to our Apps Script, which passes on our ActiveCampaign ID hash and feeds it into the Data Layer.

The only thing that we change in this Data Layer is that we use a special event key.

And this, my friends, is where the tracking magic starts to happen.
What ActiveCampaign Information Is Available in the Data Layer?
When Google Tag Manager uses this special Apps Script, the Data Layer can give us all kinds of user and session information.
For starters, we get some basic subscriber information. We get their subscriber ID, their signup date, their name, and their email address.

The Data Layer will also give us hard and soft bounce rates, plus the date the email was bounced..

Finally, the Data Layer will include user actions, their automation history, profile tags, and any custom fields that you’ve created. This means that you have even more room to customize your tracking!

So where does Google Tag Manager get all of this great data? The information in our Data Layer actually just mimics what we see in our Contacts record in ActiveCampaign.

This information is very helpful when used with Google Tag Manager!
For example, you can pull data from the Data Layer to create pre-filled form fields on your website.

So are you ready to take advantage of all this great data for your tracking? Let’s learn how!
Pulling Information from ActiveCampaign into Google Tag Manager
This is the most important part of the process!
How do we pull all this meaningful information from ActiveCampaign into Google Tag Manager?
I have prepared an Apps Script to help you do that.
The Apps Script might look a little technical at first—but I’ve done the hard part for you.
All you have to do is make a copy of the Apps Script to add to your own Google Account.

This Apps Script builds an API proxy, which functions as an interface that protects our API key from changes on the client side. This is how you can safely and effectively pull data from one tool to another.
Here’s how the Apps Script looks:

The best part about this tool? Google Apps Script is completely free!
Once you have it copied on your Google Account, it will work as an API Proxy.
This is how it will look on your account:

Configure Your Google Apps Script
Once you have the Apps Script on your own Google Drive account, you just need to make some simple modifications for it to work.
All you have to do is enter the URL for your API and your API Key. In my Apps Script, you’ll enter these over the placeholders xxxxxx and yyyyyy.

You can find the URL and API Key in your ActiveCampaign account.
Go to ActiveCampaign then click Settings → Developer.
And there it is, your URL and Key.

Copy both of them and paste them into the placeholders.

This Apps Script simply takes the information from the URL that you’ve added and sends it to ActiveCampaign. Afterward, it gets a response back and forwards it in JSON format to our client.
Finally, don’t forget to Save your configuration!

Deploy as Web App
The next step is to deploy your new Apps Script as a web app.
To do this, go to Publish and click on Deploy as web app…

Next, you will see a dialog box on your screen.
The only thing you need to change on it is Who has access to the app.
Select Anyone, even anonymous from the options.

Finally, click on the Deploy button.

Google will ask you to review some permissions, so just click through and confirm the account that you want to authorize to deploy the script.
This will connect your Google account to external services, i.e. the ActiveCampaign API.
Once you finish this, you’ll be given a link for your Current web app URL. Copy this to another document or keep this tab open—we’ll need this URL later!

Tag Link in ActiveCampaign
The next step is to set up links that point to your website in ActiveCampaign.
By attaching a special Tag to the URLs, Google Tag Manager will be able to tell which users clicked on your campaign links to visit your website.
In your Campaigns menu, click on a campaign that includes any links to your website (note that you’ll need to repeat this process for all links to your website across all of your campaigns).
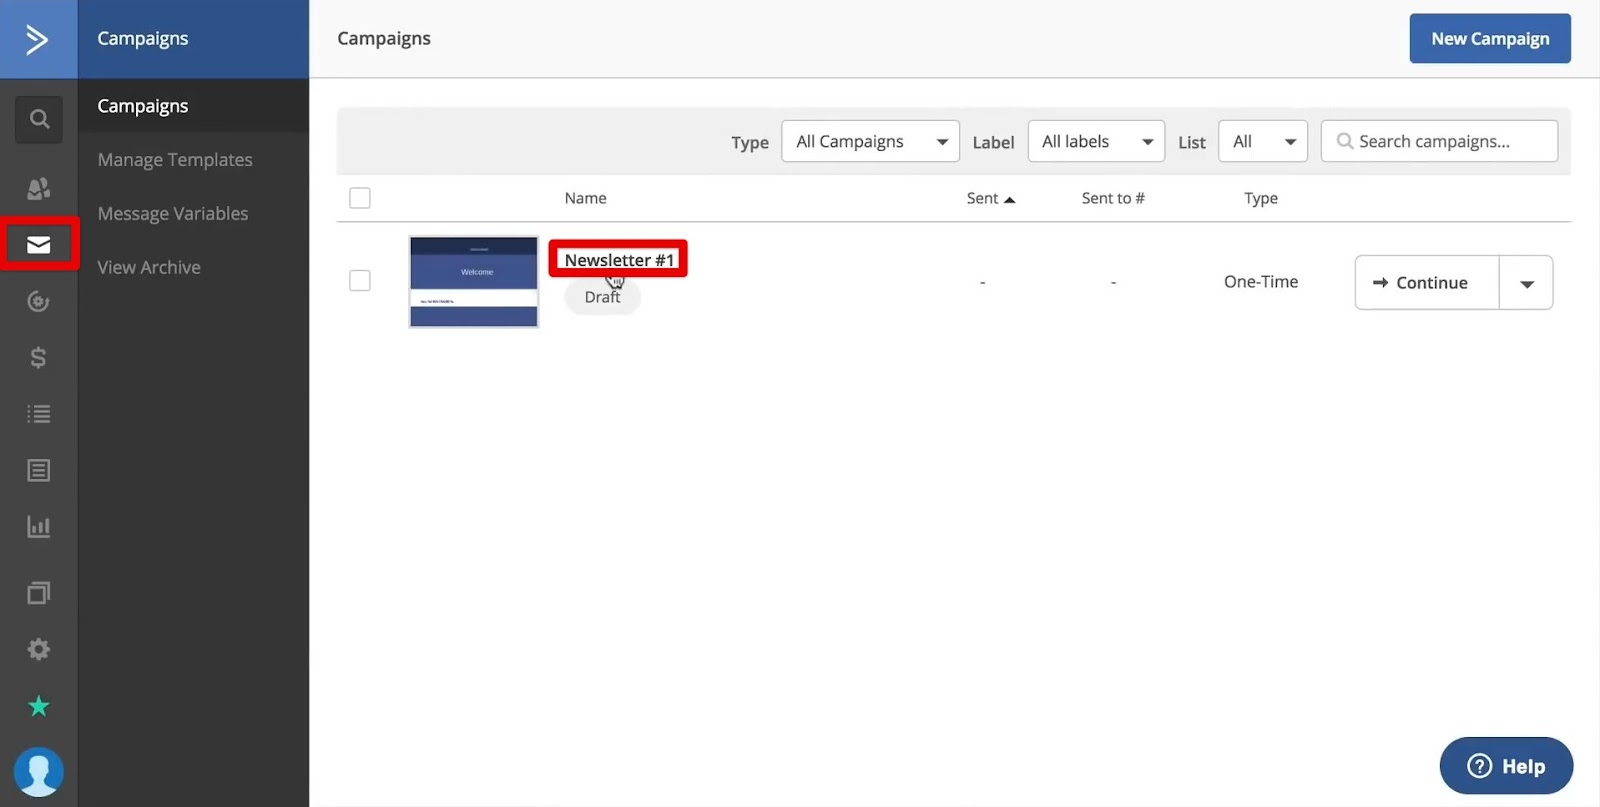
Under the Design tab, you can tag any and all links that point to your website. Click to select any buttons or links and edit them.

To attach a special tag that will help you track users, click on the gear icon next to the link in your Options sidebar.
To attach our special tag, we’re going to use a query parameter.
At the end of the URL, add a question mark followed by a key value pair. We’ll create a key named for our ActiveCampaign ID (I abbreviate this as acid), and we’ll use the personalization tag recognized by ActiveCampaign %SUBSCRIBER_HASH%.
This means that the full query parameter that we add to the end of our URL is ?acid=%SUBSCRIBER_HASH%.

You’ll need to do this for every link that points to your website.
This query parameter attached to the URL is how Google Tag Manager will be able to identify users who visit your site via an ActiveCampaign link. If a user clicks on a link without the query string, then Google Tag Manager will have no way of pulling their ActiveCampaign information in the Data Layer..
But how do we know if this is working?
We can test our campaign without sending it to a real audience!
Click on the gear icon and scroll down to the Test your campaign section. Write a subject line and enter an email address to receive the test, then click Send Test.

Once you get the campaign in your inbox, you can click on the link in the email that you’ve customized for tracking.

If everything is formatted correctly, the browser will replace %SUBSCRIBER_HASH% with the actual subscriber hash (identification code) of the user.
With this subscriber hash, you can identify the user correctly. This is what we will tell Google Tag Manager to look for.

Next, we’ll configure Google Tag Manager to fetch this information, query the API and then push this information into the Data Layer.
Building Query Parameter Variable and Triggers in GTM
You will need the Google Tag Manager installed on the demoshop to accomplish this next step. (If you haven’t done this already, check out this handy guide to install Google Tag Manager!)
So how will GTM pick up data from the query string in the URL?
Simple: we’ll set up a Tag using a query parameter variable.
But first, let’s enter the preview mode to be able to test our configurations before publishing them.
We can then go ahead and create a new variable in Google Tag Manager.
Since we want to pull data from a URL, the variable type will be URL with the component type as Query.
Check the Variables tab for your Window Loaded API event, and there it is! The value of the variable url – acid should be updated with the subscriber hash.

Next, we need to build a trigger that fires every time there is a subscriber hash. We don’t want to fire our Tag and make an API query if there is no hash available.
So let’s create a Page View trigger which fires only when the subscriber hash variable is undefined.

We’ll test this trigger once we attach it to a Tag.
This Tag is a listener Tag for our ActiveCampaign contact information. It is especially important because it talks to the Google Apps Script.
The Google Apps Script then makes the query and sends it back to our Tag.
Setup Listener for ActiveCampaign Contact Information
We’ll go ahead and create a new Tag of the type Custom HTML.
Then all you have to do is copy the Listener – AC Contact Information Code and paste it in the HTML window.
Replace the placeholders xxxxxx and yyyyyy in the code with Apps Script URL and subscriber hash variable name.
Apps Script URL is nothing but the Current web app URL which we had copied earlier while deploying the Apps Script.

Next we will attach a trigger to this Tag.
This is the trigger that we have already built. It fires every time there is a subscriber hash available.
So let’s test our new listener!
Enter your preview mode and check out your page with the subscriber hash query parameter.
You should see that your listener has deployed.
This listener sends information to our Apps Script, which is then sent to the API response which pushes it back into the data layer. Thus, a special event called acUser is created.

The Data Layer for acUser will include dynamic information about your user based on their data in ActiveCampaign!

We now have the setup to push the contact information of a user into the Data Layer.
Benefits and Use Cases: What Can You Do with this Data?
But your tracking doesn’t stop here!
Getting the data is just the first step. What matters most is what we do with that data!
The dynamically-obtained data from the ActiveCampaign account can be used for much more than just pageview tracking. It can be used to create custom events and track user behavior online.
The benefits of tracking this data into Google Tag Manager is manifold. You can customize your campaigns and your website on the go with this type of dynamic data!
Needless to say, such personalization is what brings conversions!
Pull Information Via Data Layer Variables
Our first step would be to pull the data out of the Data Layer via Data Layer variables.
Let’s create a new variable of the type Data Layer Variable.
Add the Data Layer Variable Name from the Data Layer as part of the variable configuration.

Pasting the Data Layer Variable Name in the Variable Configuration and saving the variable in Google Tag Manager
We can do this for as many variables as we require from the Data Layer.
Again, before testing out the variable, let’s Refresh the preview mode.
Under the Variables tab of the special key event, you should find the variables and their respective values.

Segment and Customize Data
But our data is meaningless if we don’t use it to improve our marketing campaigns.
So to maximize our benefits, we can customize or segment our data!
Let’s take this newsletter widget as an example.
Since the users are identified and the system already knows their email address, we can probably make use of the email.
For example, we can pre-fill the form field to make it easier to sign up for the newsletter.

We’ll create a new Tag for this customization.
Add a JavaScript code to this Tag that selects the form field and replaces it with the email variable.
<script>
//Pre-Fill a Form field
document.querySelector("#ninja_forms_field_9").value = '{{dlv-email}}';

//Personalize some text
//document.querySelector(".gamma.widget-title").innerHTML ;

//Hide an element
//document.querySelector("#ninja_forms_widget-2").style.display = "none"
</script>
Next, we’ll attach a trigger to this Tag.
For this, create a new trigger of the type Custom Event that fires on the acUser event.

We’re now done with the Tag Configuration, so let’s test it out.
Refresh the preview mode.
And we can see that the email in the newsletter is replaced with the email in the data layer.

Similarly, we can also personalize the text on our website.
For example, the website greeting text!
We will create a similar Tag with some modifications in the JavaScript code.
<script>
//Pre-Fill a Form field
//document.querySelector("#ninja_forms_field_9").value = '|';

//Personalize some text
document.querySelector(".gamma.widget-title").innerHTML = “Hi”+”{{dlv-first_name}}”+”!” ;

//Hide an element
//document.querySelector("#ninja_forms_widget-2").style.display = "none"
</script>
Let’s try this out.
Refresh the preview mode of Google Tag Manager and there it is!
The greeting on the website is updated with the first name of the user based on the contact data from ActiveCampaign!
So the custom – acUser variable has changed depending on the user.

You could use this for segmentation as well.
To do that, you need to trigger a Tag based on the user that is actually on the page.
For example, we wouldn’t want to show the sign up newsletter to a user that is already subscribed.
We can set up our Tag accordingly by modifying the previous JavaScript code.
<script>
//Pre-Fill a Form field
//document.querySelector("#ninja_forms_field_9").value = '|';

//Personalize some text
//document.querySelector(".gamma.widget-title").innerHTML = “Hi”+””+”!” ;

//Hide an element
document.querySelector("#ninja_forms_widget-2").style.display = "none"
</script>
Next we’ll attach the Custom Event trigger to this Tag.

Limitations
Once we’ve updated the Tag configuration, we’ll refresh the preview mode and reload our web page.
On our demo website, the newsletter signup widget disappears after a flash effect!

That’s because the page changes after the initial page load.
First the API is contacted and then it sends back information to decide whether to show the widget or not.
This is an obvious downside of this method.
We need to wait till the API comes back with information in order for us to customize the website.
Though, there are some workarounds available with A/B testing tools.
But this is just the nature of getting the information first, before doing an action on the website with JavaScript.
One obvious question that might come to your mind is: What about the privacy laws?
Aren’t these all personally identifiable information?
Well, yes, there is personally identifiable information in here.
Therefore, I would recommend not pulling certain data points, like the first name and last name, into tools like Google Analytics.
However, the script exposes only the information of the user that is actually on the website. We can’t read any other information, and it doesn’t save that information in Google Tag Manager.
In other words, when done correctly, this script helps target our marketing without exposing personal information to marketers or developers.
If the user navigates to the next page, the URL won’t have the Active Campaign ID anymore. This means that our data layer won’t be filled with our AC user information.
This brings us to the next question: Does it only work when the user has come from the newsletter or from the link of the email that he clicked?
Unfortunately, yes.
You could take this data layer information and push it into something like local storage or a cookie in order to have it available later on for personalization purposes.
But that’s an entirely different project that we’ll cover in another guide.
FAQ
How does integrating ActiveCampaign with Google Tag Manager benefit my tracking efforts?
Integrating ActiveCampaign with Google Tag Manager allows you to leverage the user data stored in ActiveCampaign and use it to enhance your website tracking. By pulling user information from ActiveCampaign into the GTM Data Layer, you can segment and personalize your tracking data. This integration provides a more comprehensive understanding of user behavior and enables you to optimize your marketing campaigns accordingly.
Are there any limitations when integrating ActiveCampaign with Google Tag Manager?
While integrating ActiveCampaign with Google Tag Manager offers powerful tracking capabilities, there are a few limitations to consider. First, you need to ensure that the necessary ActiveCampaign tags are properly set up in GTM for data retrieval. Additionally, it’s important to handle user privacy and data protection in compliance with relevant regulations and policies. Lastly, regularly review and update your integration to ensure it remains accurate and aligned with any changes to your ActiveCampaign setup.
Summary
Alright, so there you have it. This is how you can pull the contact information of the user from ActiveCampaign into Google Tag Manager.
We also saw how to use this data for segmentation, customization, and personalization of our tracking and our website.
Another useful thing would be setting up ActiveCampaign event tracking with Google Tag Manager.
Are you tracking the interactions on your popups? If not, check out our handy guide on popup tracking with Google Tag Manager.
How are you planning on using that data? What is your use case? Leave us a comment to let us know!


")
It do not work for me. From script.google result is [object Object] and no data. Inside the script, Logger gets the data, but it is not returned to the browser.
Found the problem. Cross-domain origin.
Hi, thanks for the great article! How difficult would be to create such a script for Mailchimp?
we already got one within our MeasureMasters community
Script does not work for me. I do not know what is the problem. Can anyone help?
What is the common problems when dealing with this.
This is great! I am wondering if its also possible to send user interactions on the landing page back into activecampaign. Perhaps using activecampaign events? Just thinking out loud.
Hi, I’ve been using it for more than 1 year and it worked perfectly but now for about 1 week it hasn’t worked. The Listener – AC Contact Information tag is activated but the acUser event is not created, do you know if there are any changes to be made to the Apps Script ? Thanks for the support Julian
do you get any error message in your javascript console or in Apps Script itself?
Access to XMLHttpRequest at ‘https://script.google.com/macros/s/xxx/exec?acid=xxx’ from origin ‘https://www.xxx.com’ has been blocked by CORS policy: No ‘Access-Control-Allow-Origin’ header is present on the requested resource.
script.google.com/macros/s/xxx/exec?acid=xxx:1 Failed to load resource: net::ERR_FAILED
Ps: xxx replaces the url parameters App Script and acid