
Last Modified on January 20, 2025
Do you want to analyze your users’ activity on your ad campaigns to organize the traffic to your website?
One of the most valuable actions for marketers is tracking purchase values and conversions.

Sign up to the FREE GTM for Beginners Course...
In this guide, we’ll set up WooCommerce Google Ads conversion tracking via Google Tag Manager.
We’ll learn to implement a purchase conversion and track its value with dynamic values for WordPress WooCommerce on our website by creating Tags and implementing them.
An overview of what we’ll cover:
- Why do we need to set up Conversion Values?
- Setting up a conversion in the Ads account
- Verifying Google Tag Manager implementation
- Making a test purchase to analyze
- Creating a Tag with the correct trigger
- Testing
Let’s start!
Why Do We Need to Set Up Conversion Values?
Conversion value enables us to see the revenue in our conversion reports.
It’s crucial to know how much profit you’re generating with Google Ads to keep track of your return on investment.
You can generate even more profit using this value for your campaign optimization and thus increase your conversion rate.
The total value of your conversions can also help you identify which keywords, ad groups, and campaigns have the best performance.
Additionally, you can also use it for your bidding strategies to boost your campaign performance.
Today, we’ll dive into the implementation of eCommerce stores built with WordPress WooCommerce.
So let’s start setting up our conversion with dynamic values!
Setting up a Conversion in the Ads Account
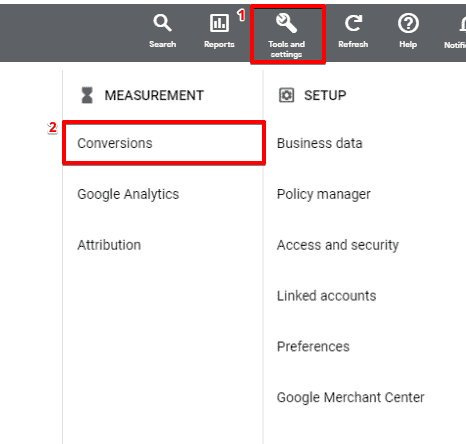
On the home screen of your Google Ads account, navigate to Tools & Settings → Conversions.
We’ll choose the Website option, as we’re implementing the new conversion for your eCommerce store.
If you’re not sure about which option to choose, we recommend you read a complete overview of each step.
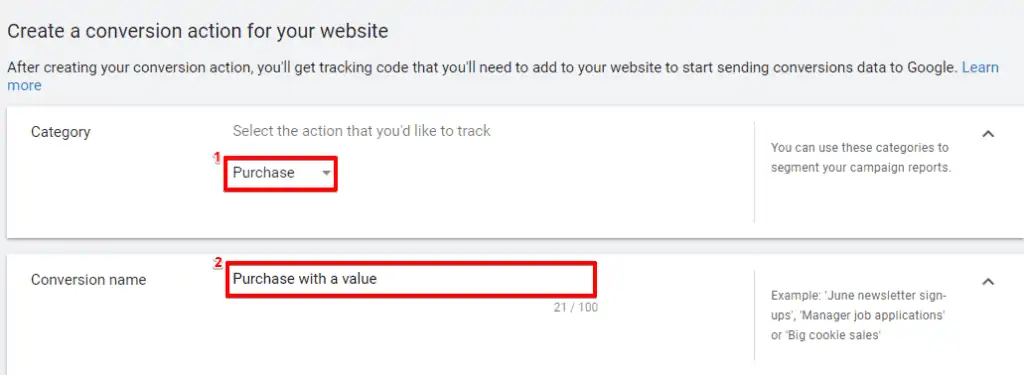
Once done, we’ll choose our category as Purchase. Let’s also give this conversion a name.
We’ve made the conversion as Purchase with a value.
It’s always a good habit to have your own naming conventions for your campaigns.
This results in a better navigation process and facilitates your workflow by keeping everything well-structured and organized.
Moving forward, we’ll keep the Use different values for each conversion option for implementing the values of the conversions as we can have multiple products to offer to customers.
Here, you should also provide a default value for your purchase conversion. One of our next steps will be the implementation of dynamic values.
If your dynamic values are missing or not working properly, the default value you entered here will be used and shown later in your report.
Under the Count category, select Every in the count section, as each purchase is valuable to us.
Once done, click on Create and continue to save and proceed.
Next, we have to add the dynamic variables. There are several ways to do this, and this is why you should understand how your Google Tag Manager is implemented.
Let’s check how the Google Tag Manager is implemented on your webpage to find the optimal data layer solution.
Verifying Google Tag Manager Implementation
You can verify Google Tag Manager implementation by two various methods.
The first option is to implement it in the code directly or with a plugin different from GTM4WP.
We will also need a data layer to grab our dynamic values from it. We suggest you find a solution for your situation in case you don’t already know.
The next option enables us to implement it with the help of the GTM4WP plugin.
We’ll use this method for today’s guide. It’s frequently used for GTM implementation, so we decided to focus on it.
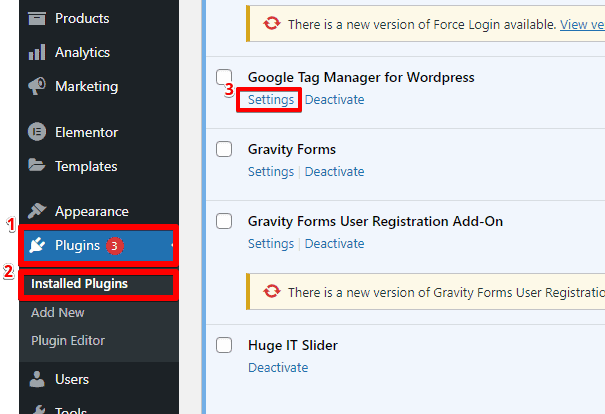
On your WP admin panel navigate to Plugins → Installed Plugins.
Search for Google Tag Manager for WordPress, and click on Settings.
Once done, go to Integration → WooCommerce from the opened window.
Select a tick on Track enhanced e-commerce and save your changes.
However, we still need to check if the data layer is working properly by making a test purchase that helps us in analyzing the situation.
Let’s see how.
Making a Test Purchase to Analyze
Even when you add a product to the cart, you should see the eCommerce data with the help of the extension by simply clicking on it.

You’ll be able to see that the eCommerce object is displayed and contains our desired value.
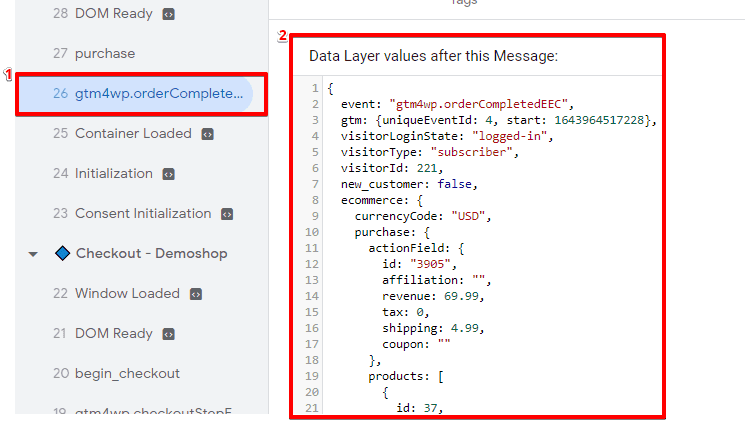
In our case, it’s ecommerce.purchase.actionField.revenue, and you can even copy the key directly from the extension.

We can also use the GTM preview to see what is happening on the webpage. You should click on the Data Layer to see the object we’re going to grab dynamic values from.
If you’re not sure how you can access the needed value in the JavaScript object, you can also use the extension mentioned above.
Choose one of your products and make a test purchase. In this way, you can see what you can use for your variable setup.
Since we have to track purchases, we’re interested in tracking a purchase confirmation.
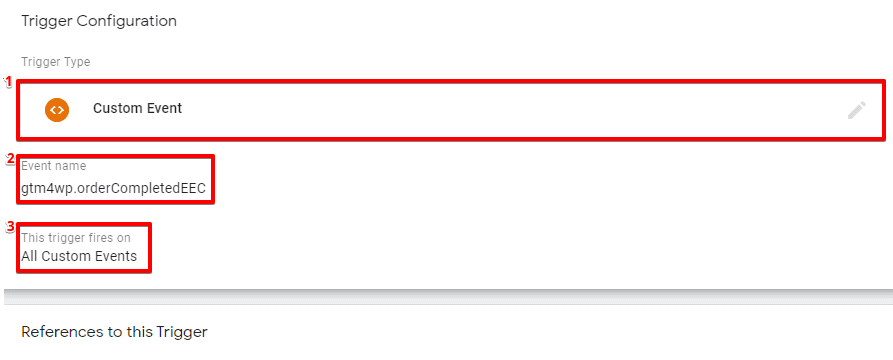
We can see the event gtm4wp.orderCompletedEEC that’s sent by the plugin when a user makes a purchase, and we’ll use it for our trigger.
Next, we’ll see how to add a corresponding trigger for our Tag.
Creating a Tag With The Correct Trigger
We choose the GTM option in the Ads account, and there you’ll find your Conversion ID and Conversion label.

💡 Top Tip: Since the implementation is done via GTM, check if your conversion linker is there, and ensure accurate Ads conversion tracking.
Next, we’ll add our dynamic variable. Click on the gray plus next to the conversion value and create a new Data Layer Variable.
Next, paste the copied key into the variable name field. We named our variable as Revenue, but you can use any name you prefer.
Do exactly the same steps for your transaction ID. To avoid duplicate conversions, we should create one more data layer variable for the order ID.
Sometimes customers might buy products and save a confirmation page to check it one more time, or simply reload it after purchasing items.
If you have a transaction ID set up in your Tag, Google Ads is smart enough to understand that the second conversion with the same transaction ID is a duplicate and it won’t be counted.
We made our test purchase and identified the trigger condition to be used.

Let’s add a Custom Event type trigger. We’ll choose the event sent by a data layer gtm4wp.orderCompletedEEC to make sure our dynamic values are available at that stage.
Therefore, we fire our trigger on All Custom Events for our trigger and copy its name. This event can be seen in the preview or in the extension as well.
Lastly, we’ll test the work we’ve done.
Testing
Let’s preview our implementation. We have to make a test purchase again to check if our Tag is firing.
If the configuration is done correctly, we’ll see that our Tag has fired.

However, the firing tag is not enough in our case, as our main goal is to track revenue. Therefore, we should also check the Variables section to see if our Revenue is displayed correctly.

Your implementation is successful if your values are mentioned correctly. Don’t forget to publish your container.
FAQ
How do I verify the Google Tag Manager implementation?
There are two methods to verify Google Tag Manager implementation:
Method 1: Direct Implementation
Implement GTM directly in the code or with a plugin other than GTM4WP.
Method 2: Using GTM4WP Plugin
1. In WordPress admin panel, go to Plugins → Installed Plugins.
2. Search for “Google Tag Manager for WordPress.”
3. Access the settings.
4. Enable the “Track enhanced e-commerce” option under Integration → WooCommerce.
How can I make a test purchase to analyze the implementation?
To make a test purchase:
1. Add a product to the cart on your website.
2. Use a data layer checker plugin to verify if the eCommerce data is displayed correctly, including the desired value.
3. Use GTM preview or Data Layer to inspect the JavaScript object and identify dynamic values for your variable setup.
What should I do if my dynamic values are missing or not working properly?
If your dynamic values are missing or not working properly, then:
1. Ensure data layer is implemented correctly and values are accessible.
2. Double-check variable configuration in Google Tag Manager.
3. Use the correct keys.
4. Use data layer checker plugin or GTM preview to inspect and troubleshoot values.
Summary
Now, you should be able to implement a purchase conversion with dynamic values for WordPress WooCommerce without any problems.
This method helps you get a better understanding of your audience set and helps in customizing your ad campaigns.
Moreover, you can also implement Facebook Pixel as well as Google Ads conversion tracking for an even better tracking experience on your website.
Did you set up your conversions successfully? What naming conventions do you use for your campaigns? Let us know in the comments below!
Sign up to the FREE GTM for Beginners Course...


")
great post
Awesome! Thank you very much! This is a wonderful article
I really appreciate your feedback, Maria. I wish you to enjoy your tracking adventure!
It could be clearly. If you have a video about this post. Thank you
Hi Daniel! I have found some videos for you that could be helpful in this case: https://www.youtube.com/watch?v=ZGuiuRBYLpE https://www.youtube.com/watch?v=nnzVTszCylk I have recorded 2 new videos which will be released very soon on YouTube. The only thing is that I do not show how to activate the plugin in WP, as this is supposed to be a video about the general way of tracking conversions with a value, but you can follow the instruction in this article to do that (basically, we need to enable it in WP admin Plugins –> Installed Plugins –> Integration –> WooCommerce –> Track Enhanced Ecommerce –… Read more »
Any info on the best way to implement Enhanced Conversions in Woocommerce?
I would recommend a combination of a dataLayer implementation + GTM.
Any idea which variable to use for Customer data (customer email), as that is not in the dataLayer code? Thanks
Thanks for a very detailed article… very clear and smooth!
Thank you for your feedback, Gultekin! 🙂
Hi, great post i have did it for google ads, Thank you so much! Is this works with bing ads too? Or any related post about woocommerce+ bing ads tracking?