Last Modified on January 19, 2024
Are you looking to generate more leads from your existing site traffic?
Wish you could show popups to people based on CRM data and other data points?
If so, OptinMonster might be the tool for the job.
Personally, I like using OptinMonster on my own website to offer course signups and resource downloads. You can also use them to grow your email list by offering bonuses like discounts or other exclusive benefits.
In this tutorial, I’ll teach you how to Create Custom Popup Triggers with OptinMonster using Google Tag Manager so that you can tailor your popup marketing to specific website users.
Some of what we’ll cover in this post:
- Creating your OptinMoster popup
- How to install OptinMonster’s Base Code With GTM
- How to create more powerful triggers for your popups (incl. Data Layer & cookie-based triggers)
- How to configure your OptinMonseter account
When I first installed OptinMonster, I really looked forward to using it in combination with Google Tag Manager. However, I found that there isn’t currently a native way to launch OptinMonster popups using the trigger capabilities of Google Tag Manager.
That’s why we had to come up with this little workaround that I’m about to teach you to open up the triggering options available to you.
With this method, we can utilize all the goodness of the Data Layer in combination with Google Tag Manager to trigger OptinMonster popups to specific segments of our audience by firing on almost any custom trigger or event you can dream of.
Are you ready to see how this works? We’ve got lots to cover, so let’s dive in.
Create a New OptinMonster Campaign
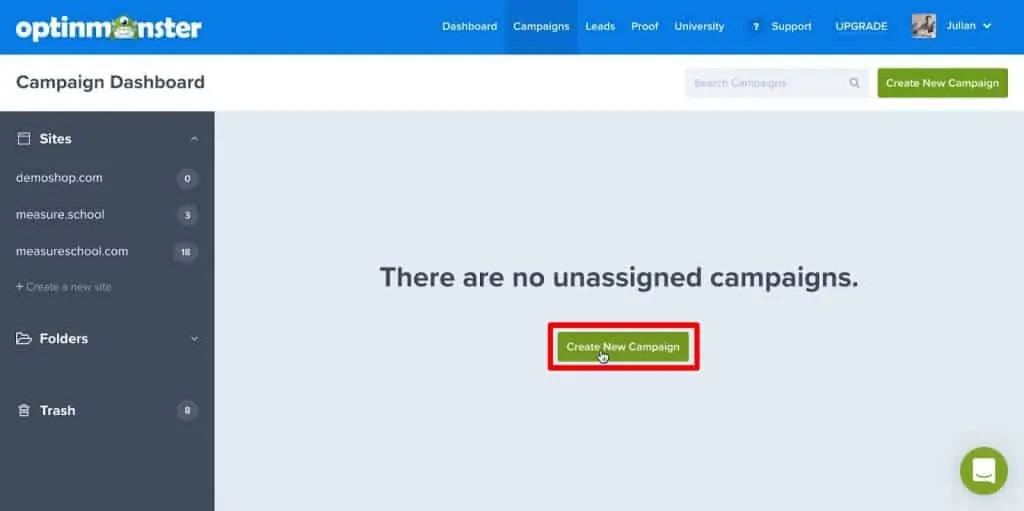
Our journey starts in the OptinMonster dashboard.
1. Click on the Create a New Campaign button.
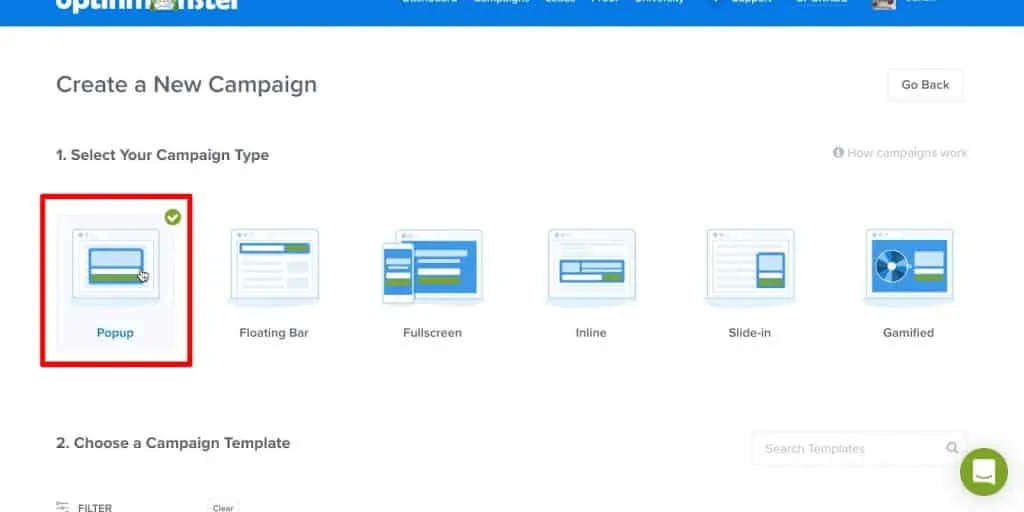
2. Here you can choose between the different campaign types. For this guide, we’ll choose the classic Popup since it’s easy to implement.
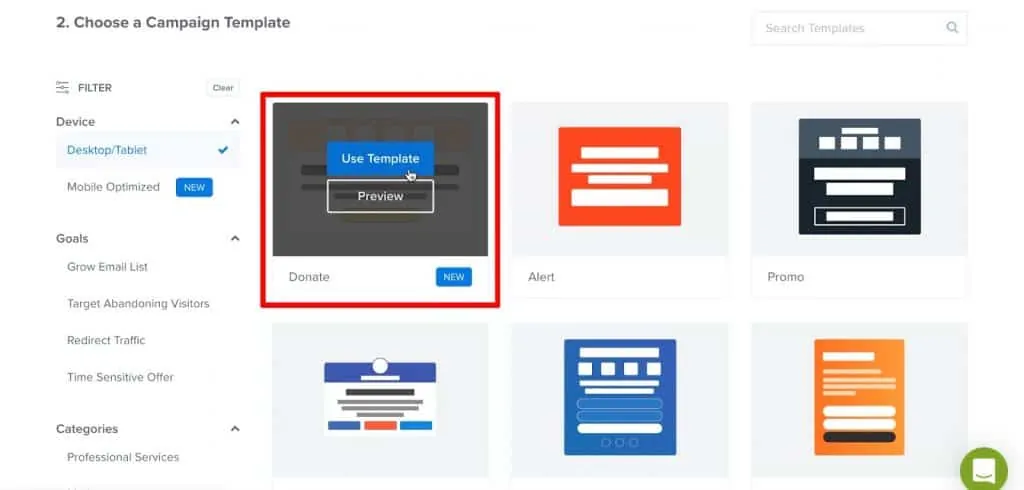
3. Next, pick the design template that you’d like for your campaign. We’ll go with this Donate template for now.
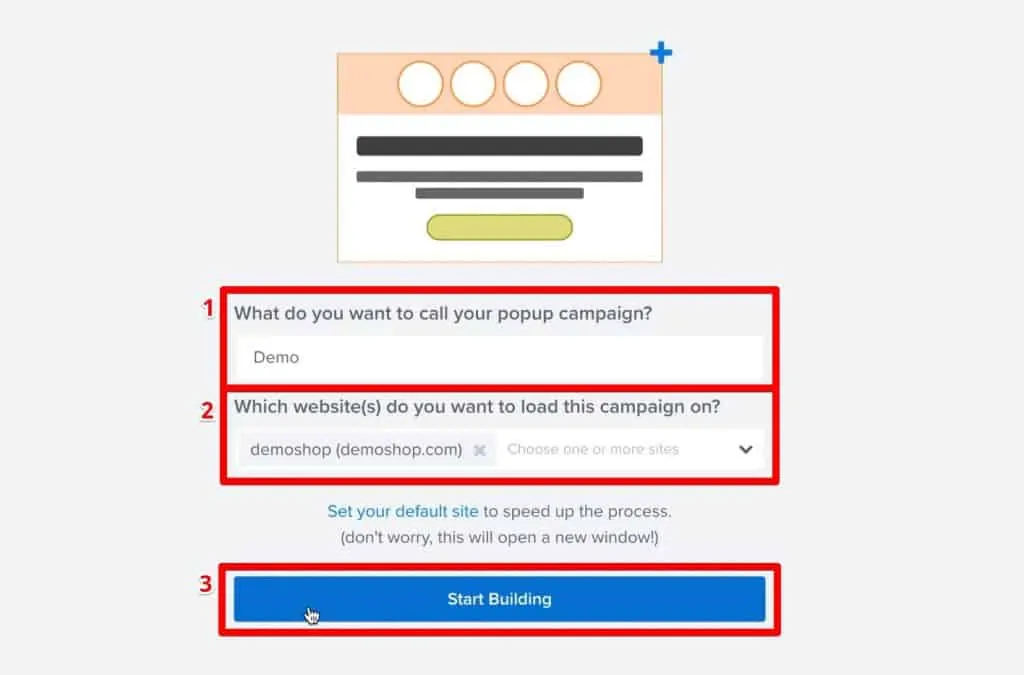
4. Give your campaign a name and select the website where you want the popup to appear. When you’re done, click Start Building.
And here we have our popup.
This template has a cool countdown, some information, and a call-to-action button. I’ll leave it up to you to play around with this and change it around however you want for your own campaign. For this guide, let’s focus on how to implement this on our website.
Install OptinMonster with Google Tag Manager
In order to trigger OptinMonster campaign popups using Google Tag Manager, we’ll first need to install OptinMonster using a general Tag that will load our account information.
Configure Campaign in OptinMonster
Our next step is to choose some preliminary Display Rules, which you can find at your topbar.
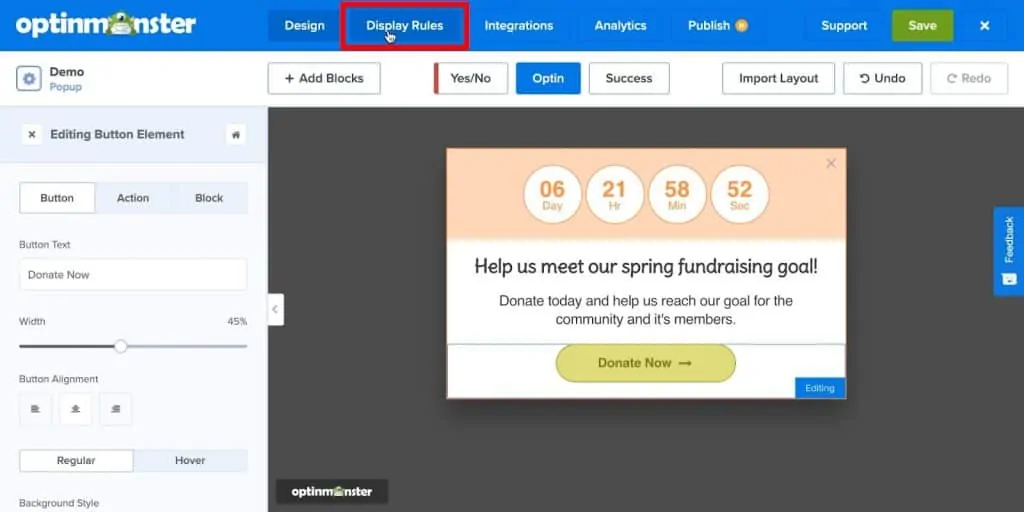
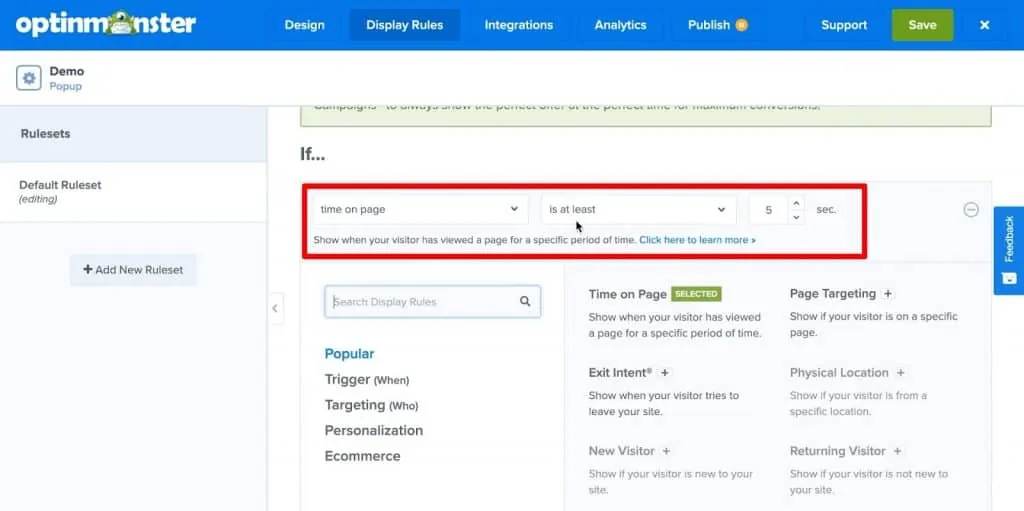
OptinMonster has some native trigger options. We’re going to eventually replace these with more customized triggers in Google Tag Manager, but for now we’ll set up this popup to appear after a user has been on the page for five seconds with the rule time on page is at least 5 sec.
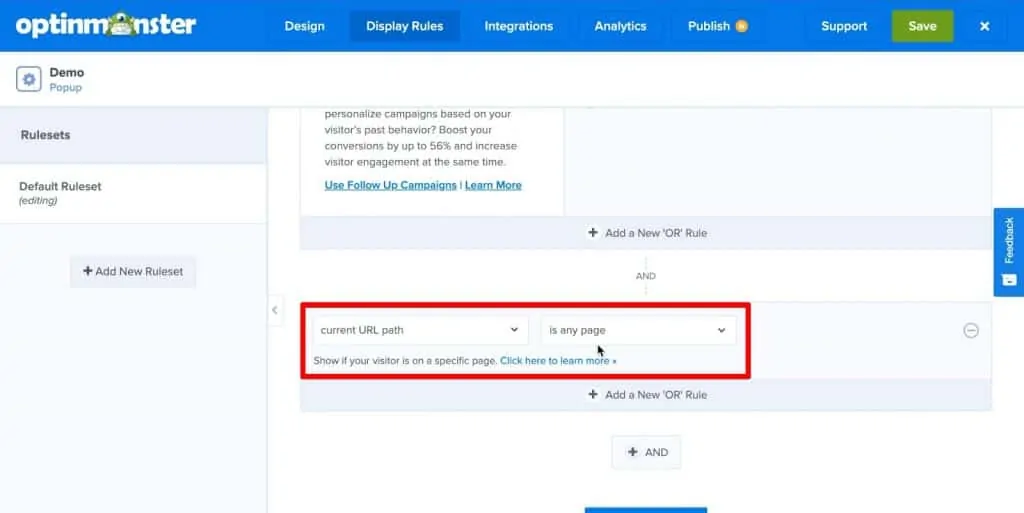
You can add on more rules to specify where or for whom the popup is triggered. We’ll also add the rule that the current URL path is any page. With these two rules, this popup will be shown after five seconds on any page.
In this tutorial, we are going to ignore the Integrations and Analytics configurations. We don’t really need to worry about these, since if you have any optin fields, you’ll simply integrate them with your CRM.
Instead, click on Publish in your topbar and scroll down to Platforms.
There are a few ways to deploy your OptinMonster campaign. You can use the Display Rules to implement it on any website, or you can use special conditions like a MonsterLink, WordPress plugin, or a campaign-specific option for developers.
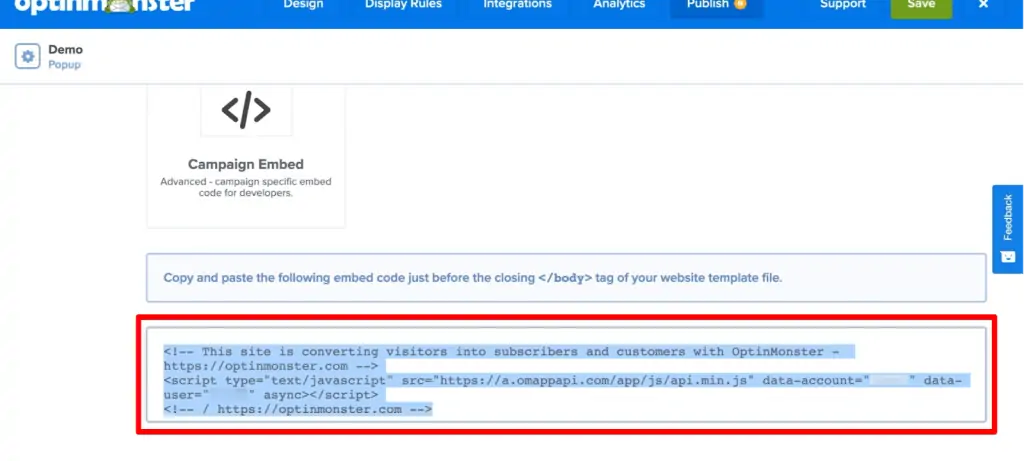
If you just want to use the display rules, then you could probably use any of these options. But if you want to take advantage of triggers in Google Tag Manager, then you need to select the Any Website option.
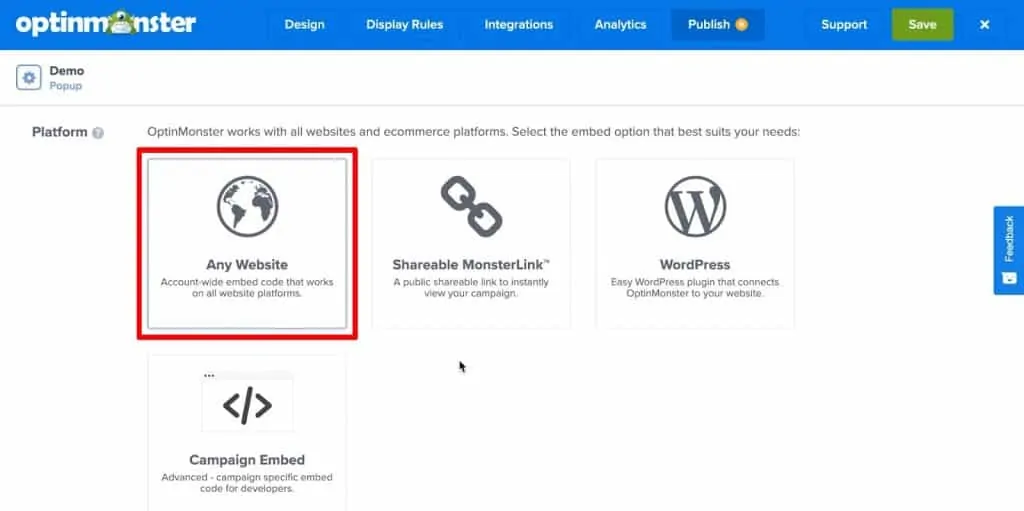
Scroll down and copy the code snippet for your Any Website embed.
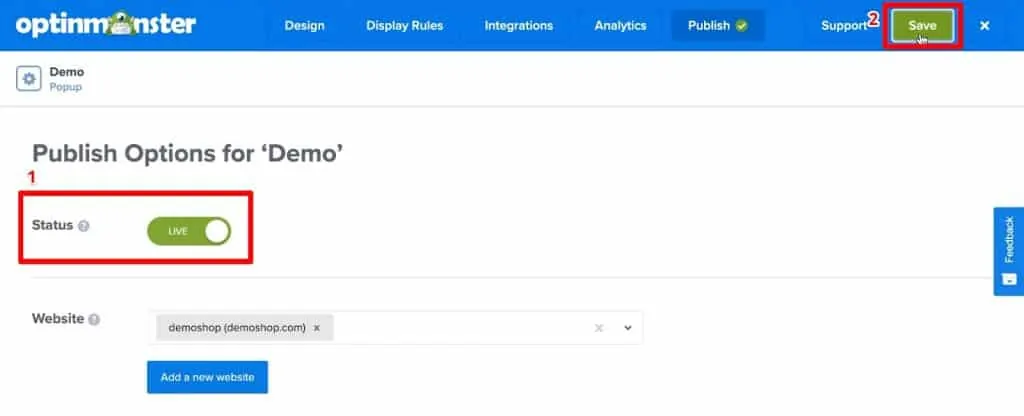
Finally, let’s make our popup live on our website. At the top of the Publish screen, click the switch next to Status so that it says Live. Click the Save button in the topbar.
Configure Campaign Tag in Google Tag Manager
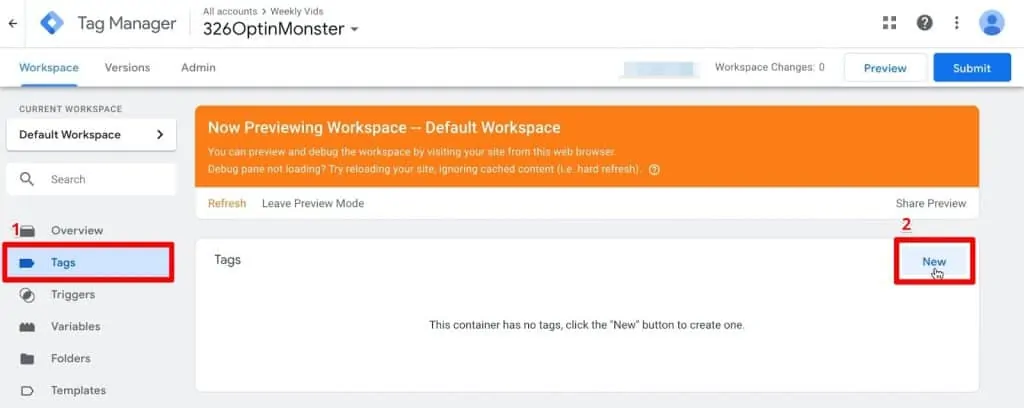
In a new tab, open your Google Tag Manager dashboard. Click on the Tags header, then click the New button.
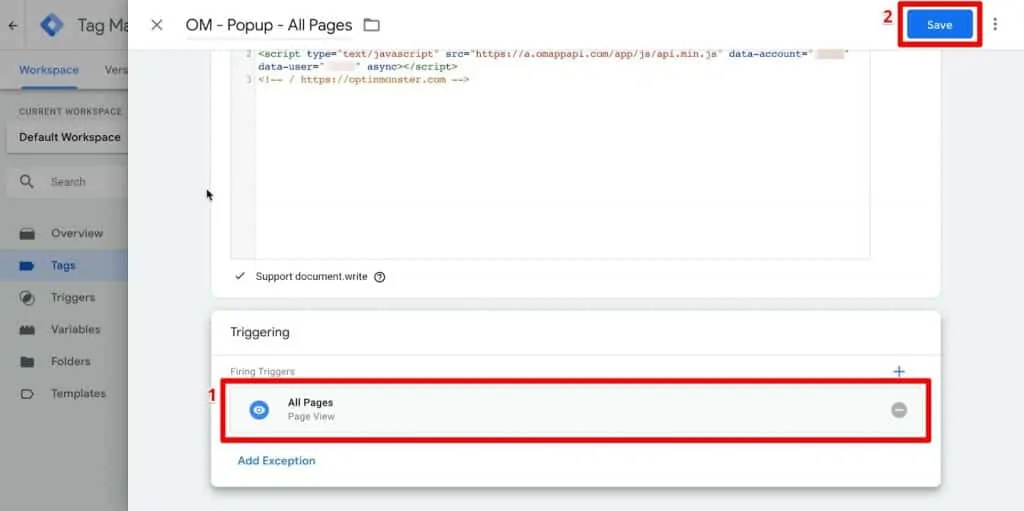
Name your new Tag, then choose Custom HTML as the Tag Type. In the HTML field, paste your code. This is the general code that we’re going to deploy that will eventually allow us to launch any OptinMonster campaign on our website through Google Tag Manager.

You will need to check the box for Support document write because this code will implement the popup via the document.write() functionality of JavaScript. So be sure to tick that on.

Finally, select the All Pages trigger so that this code will be deployed on all the pages.
This is important even if you want to launch a campaign that doesn’t appear on all pages! This is a general Tag with a base code that will allow specific campaign Tags to load properly later on. It’s like the code library that loads in a Facebook Pixel and enables tracking.
So make sure that this Tag fires on all pages and click Save.
Test GTM Implementation of OptinMonster
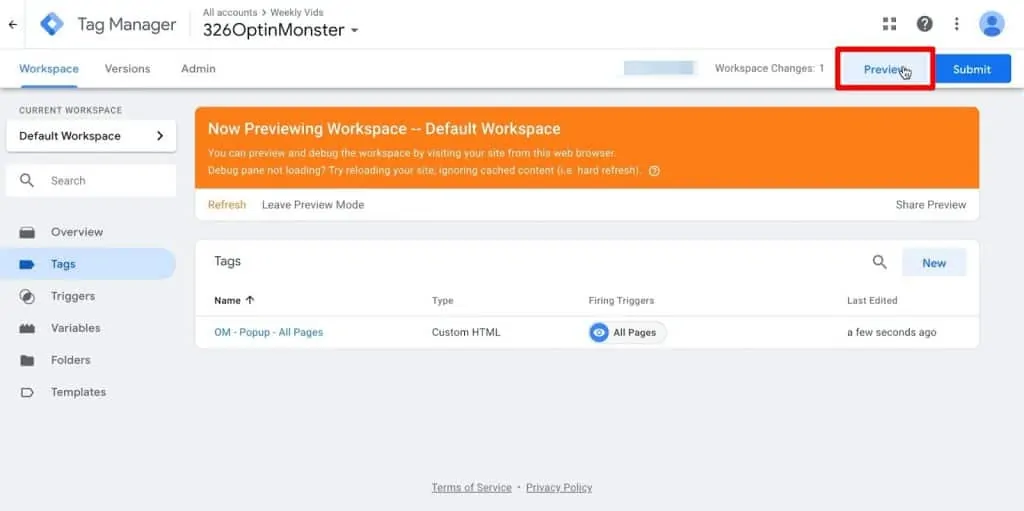
In Google Tag Manager, click on Preview to enter the GTM Preview & Debug Mode in your browser.
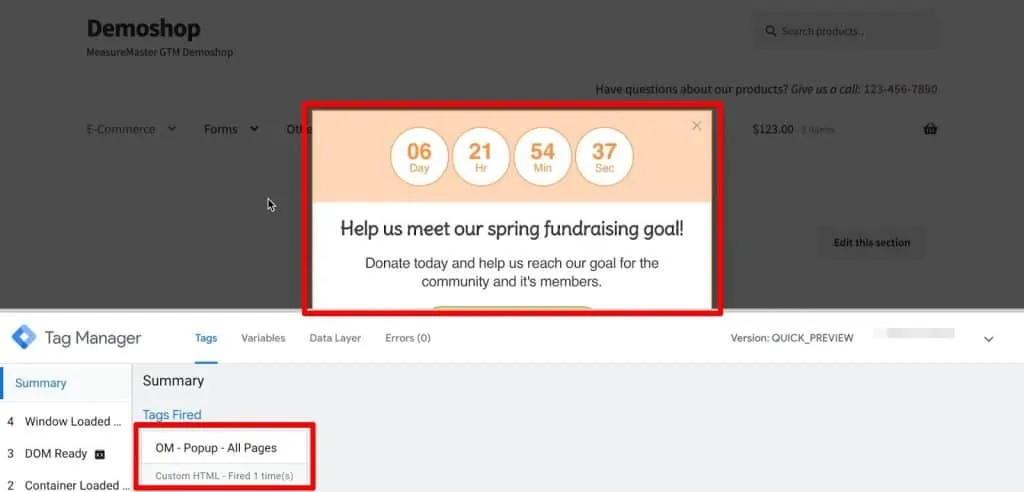
Go to your website. Fulfill the trigger conditions you set in OptinMonster’s Display Rules to see your popup. In this case, our popup appeared after being on the page for five seconds. You should also see that your Tag has fired in the GTM preview console.
Trigger an OptinMonster Popup using Google Tag Manager
If you simply want to utilize the display rules that are available in OptinMonster, then you could stop here now that you’ve installed your campaign with Google Tag Manager. And OptinMonster has some really cool ones such as time on page, page targeting, and if the user is about to exit the page. If you upgrade to certain plans, you’ll even be able to target users in certain locations or returning visitors.
But what if you are well-versed in Google Tag Manager and you want to take advantage of the different trigger types it offers?
You could easily build these same rules yourself, plus you could utilize the expanded trigger capabilities of Google Tag Manager. For example, you could use YouTube video tracking in order to show your popup at a certain time, or you can build custom triggers using ReGex and the data layer.
So that’s when you need to change your deployment slightly. Let me show you what I mean.
Build a Trigger in Google Tag Manager
Let’s try a little example with the YouTube Video trigger in Google Tag Manager.
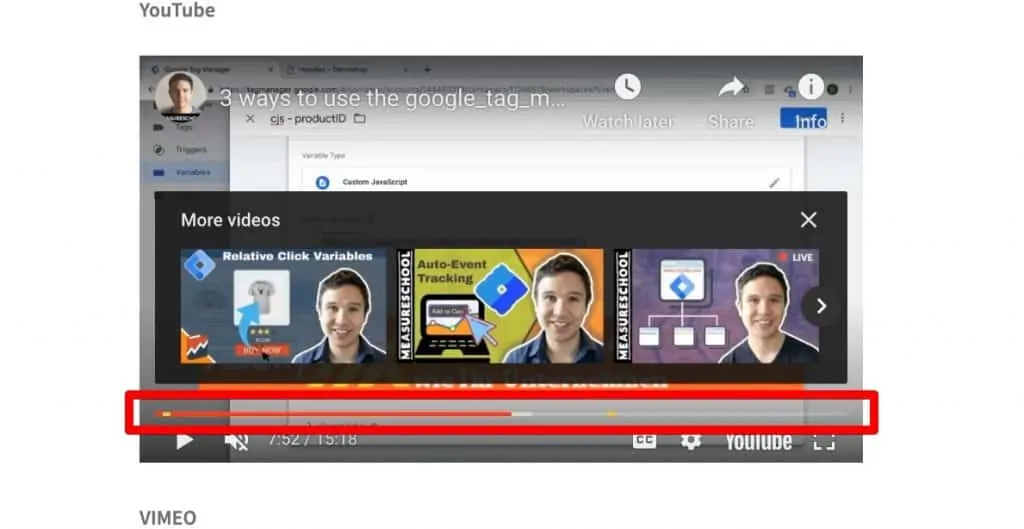
I have a page on my website with an embedded YouTube video. This is what we want to track. Let’s say that if somebody watches more than fifty percent of the video, I want to deploy my popup.
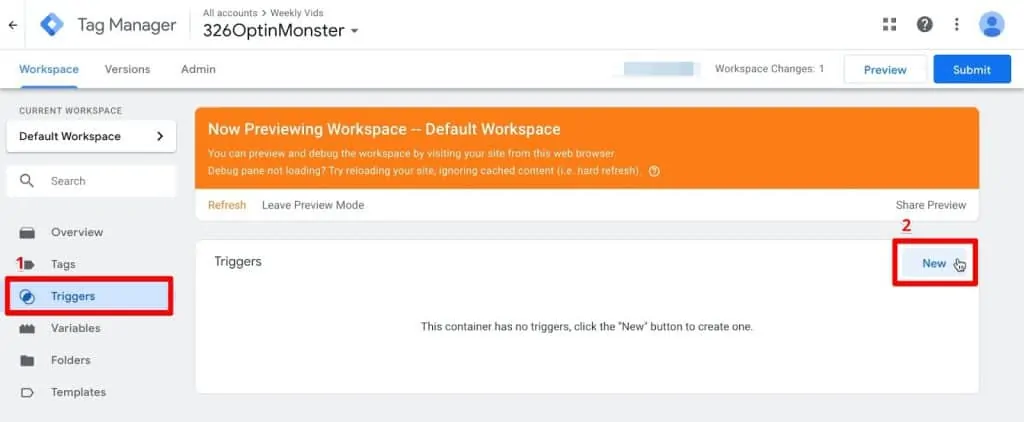
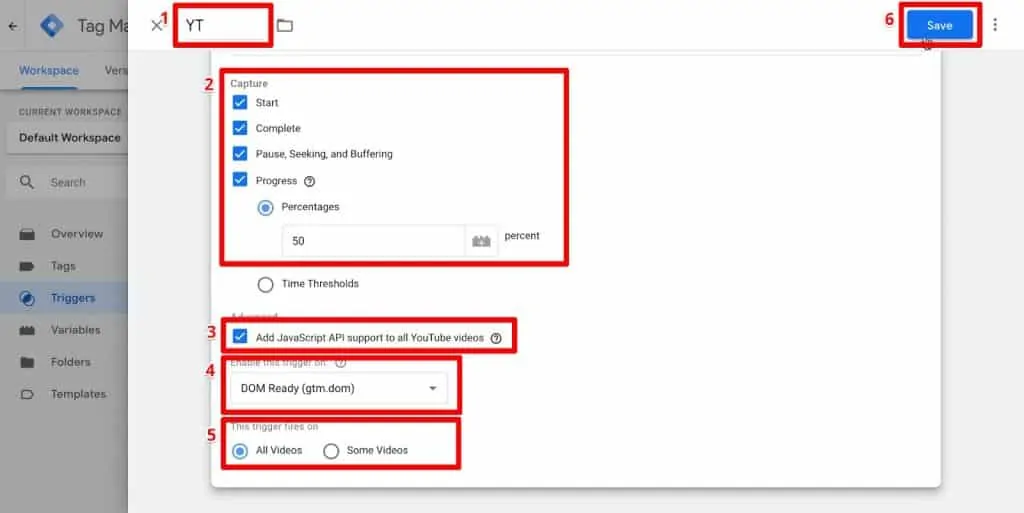
In order to make this work, we’ll first need to configure a YouTube Video trigger. In Google Tag Manager, go to Triggers and click New.
Click on the Trigger Configuration box to choose a trigger type. For this example, we’ll select YouTube Video.

Name your trigger and check all of the Capture boxes: Start; Complete; Pause, Seeking, and Buffering; and Progress. I want to launch my popup when a user has watched at least half of my video, so I’m going to click Percentages and enter 50 percent as the variable.
We’ll also check the box for Add JavaScript API support to all YouTube videos, set this trigger to be enabled on DOM Ready (gtm.dom), and fire it on All Videos. Click Save.
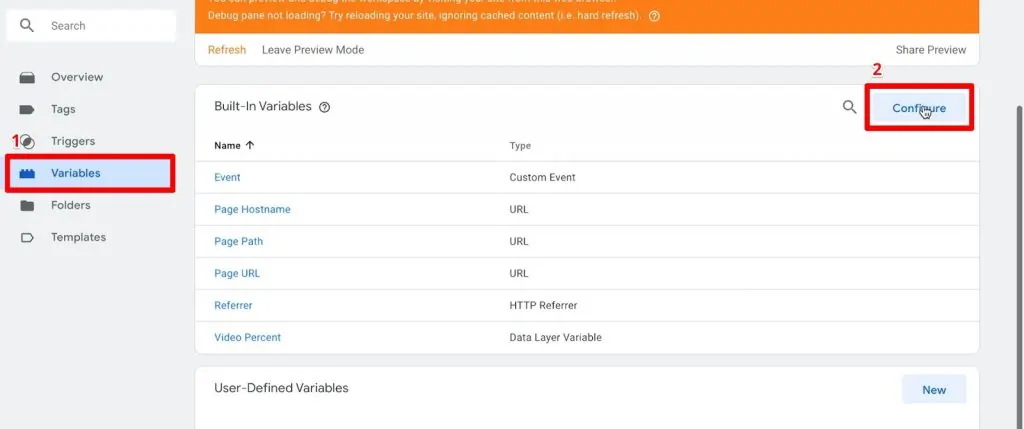
You also need to enable a variable so we can see the video percentage in the data layer. To do this, go to Variables and click Configure.
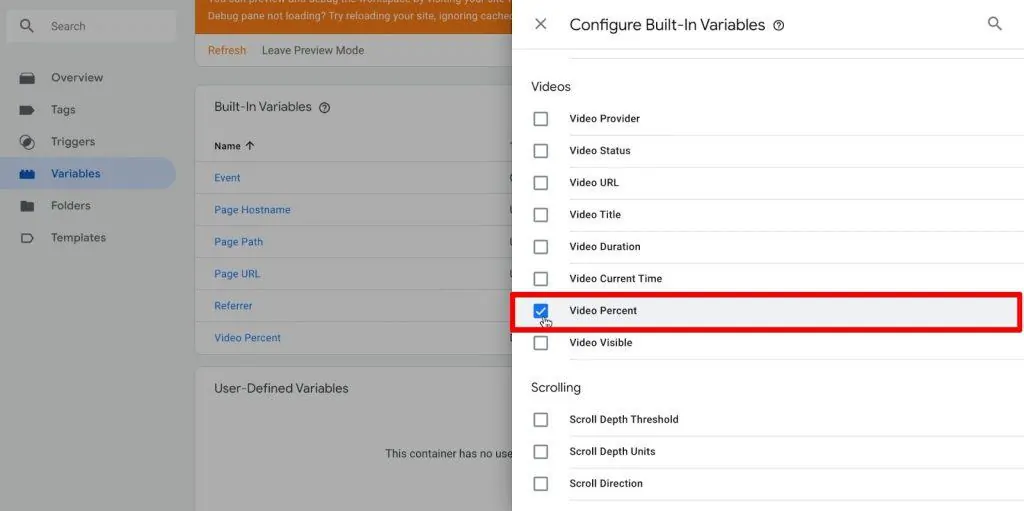
Scroll down to the Video variables and check the box for Video Percent.
Test Listener Functionality of Trigger
Now we can try out the listener functionality of this trigger. We need to make sure that it is correctly configured to launch a popup at the targeted moment, which is halfway through the YouTube video.
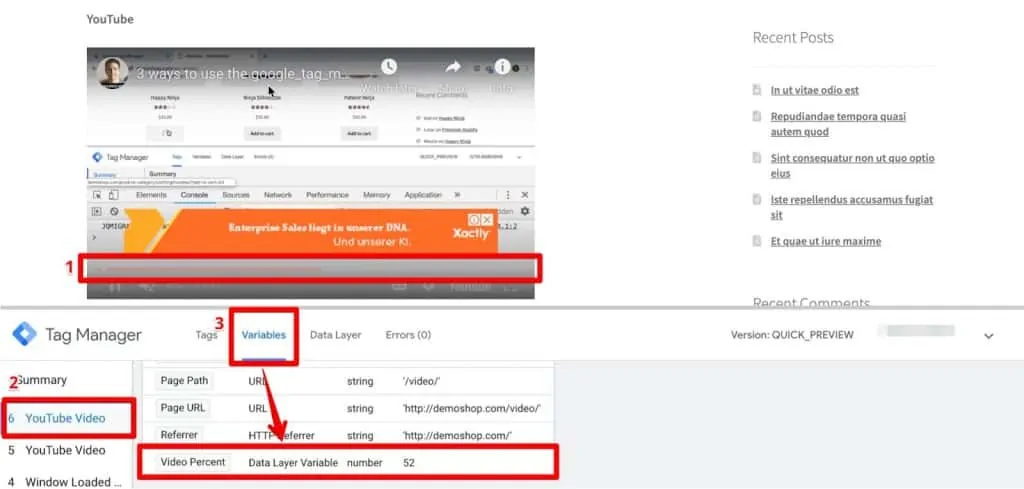
Reload your page in GTM Preview & Debug Mode and check out the GTM preview console. Our listener should start listening on the DOM Ready event, and starting the video should initiate a YouTube Video event. If you check the Variables tab for that event, you should see the Video Percent at zero.
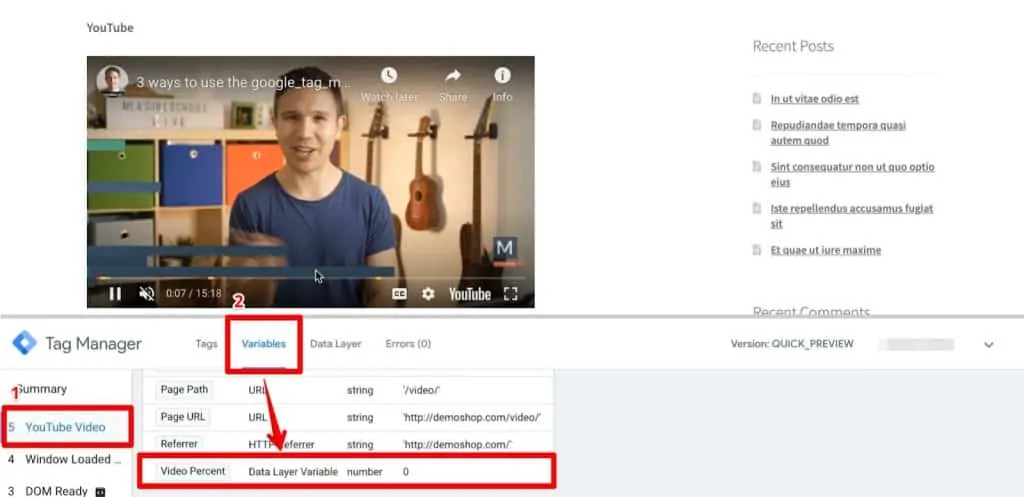
If you skip ahead in the video, you should see a new YouTube Video event in the GTM preview console. This time, the Video Percent will be fifty-two percent. At this point, we will want to fire our Tag.
Build a GTM Tag for an OptinMonster Campaign Popup
Let’s refine our trigger a bit for our Tag that will load our OptinMonster popup. In Google Tag Manager, click your trigger to edit it.
We’ll change the name of the trigger so that it reflects our specific rules. Then, let’s go ahead and fire this trigger only on Some Videos where the Video Percent is greater than 50.
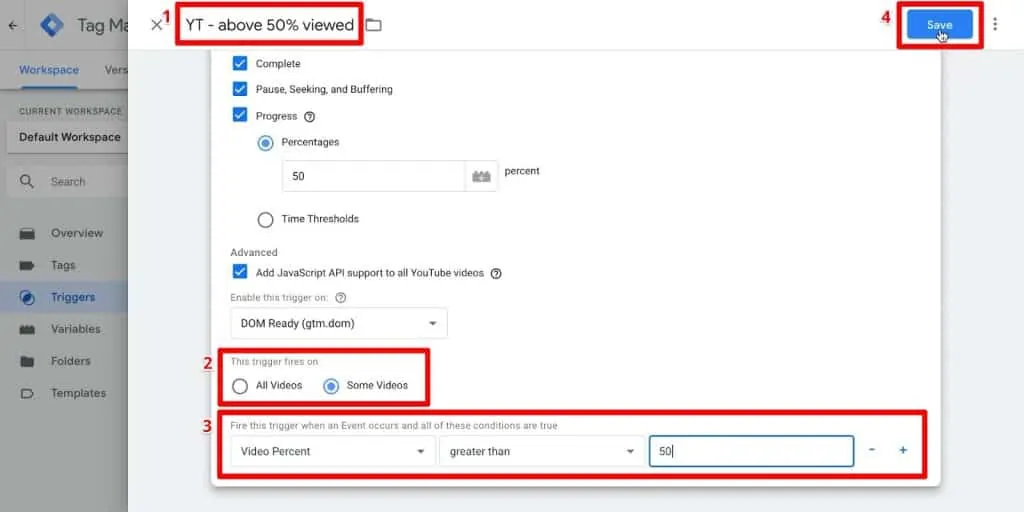
Now that the trigger is defined correctly, we need to implement a Tag that will launch our OptinMonster popup. In order to do this, we have to make some minor adjustments in our OptinMonster account.
You know now that OptinMonster uses its own Display Rules system to determine when to activate a campaign. To use the Display Rules, you just need to have our general Tag installed from before. However, since we want to use the triggers in Google Tag Manager, we actually need to get rid of OptinMonster’s Display Rules altogether.
To do this, go to your OptinMonster dashboard and click on Display Rules. If you have more than one If… condition for your campaign, click the minus icon ( – ) to delete them.
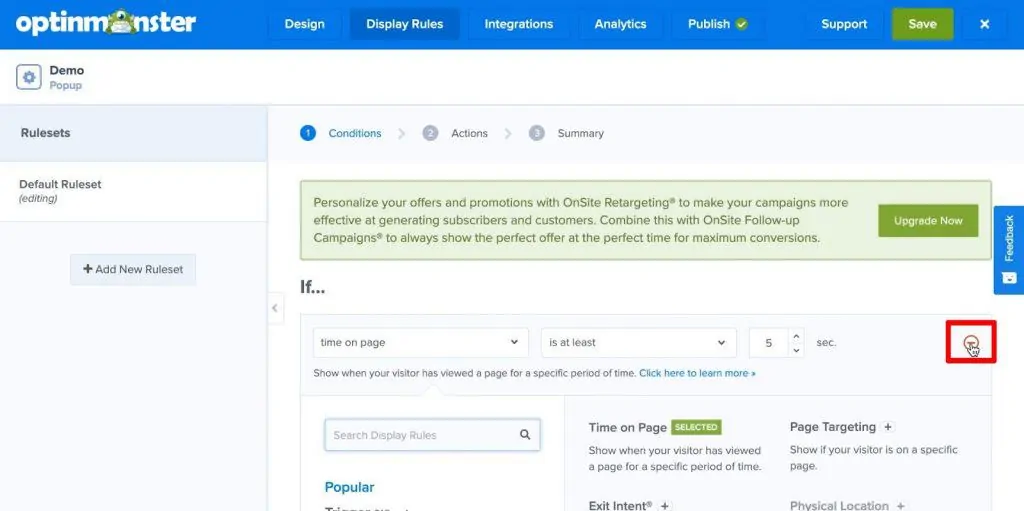
For this campaign’s only condition, we’re going to select an option called MonsterLink™ (on click). This means that there will be an invisible link that launches the popup in your site’s code, which our Tag will click on when it fires.
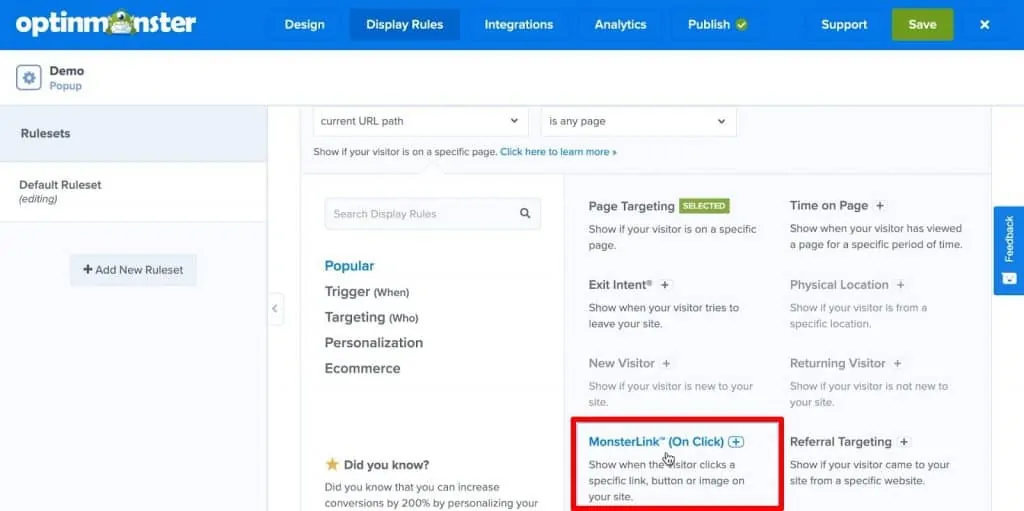
Click the Save button in the topbar to implement the change.
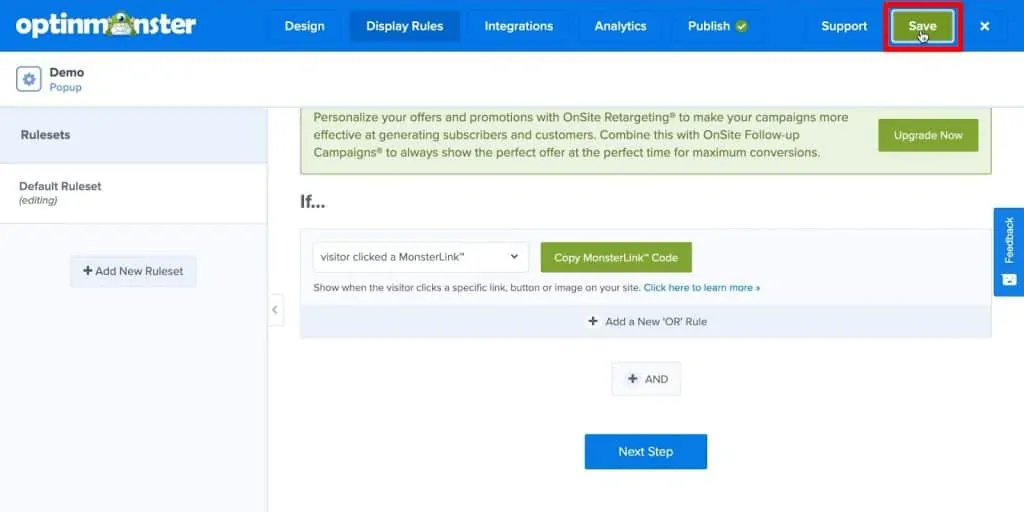
The last thing we need in order to build our new Tag is our campaign ID, which tells OptinMonster which campaign to deploy. We can actually find the ID in the URL after app.optinmonster.com/campaigns/ and before /edit. Copy your campaign ID.

The current Tag that we have in Google Tag Manager launches our OptinMonster code library. Next, we’ll create a new Tag that will launch the popup for our specific campaign.
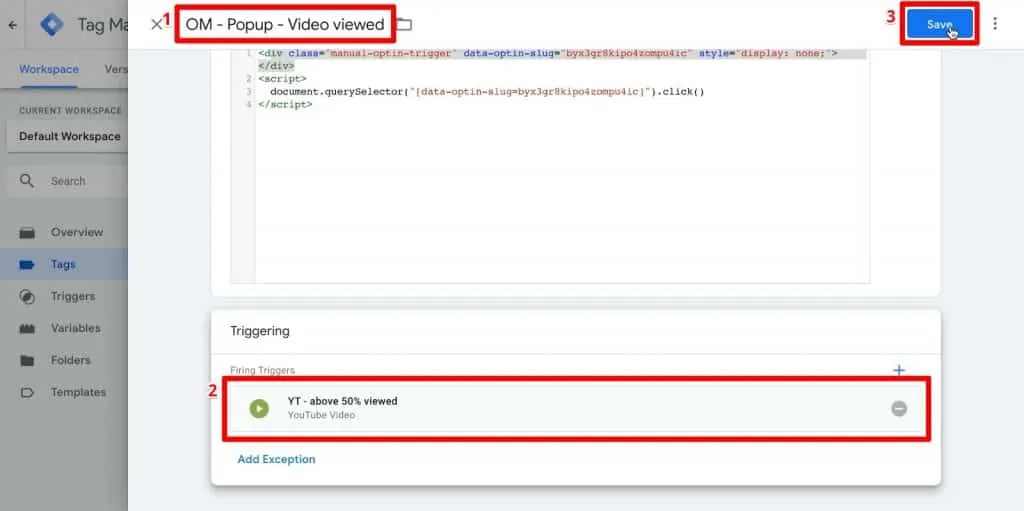
Go to Tags and click New. Choose Custom HTML as the Tag Type, then enter the following prepared code snippet.
<div class="manual-optin-trigger" data-optin-slug="**CAMPAIGN ID**" style="display: none;"></div>
<script>
  document.querySelector("[data-optin-slug=**CAMPAIGN ID**]").click()
</script>
Replace **CAMPAIGN ID** with your actual campaign ID copied from OptinMonster.

Now what will this code do? First of all, it will deploy or pend a div element to our page. This div element has certain attributes that we know how to target.
Second, this div element will also act as kind of a button that you need to click in order to show the popup. This is what OptinMonster calls the MonsterLinks. Really, it’s just a div that isn’t visible because of the parameter style=”display: none;”.
In the background, our new Tag will use a little bit of JavaScript, search for this element, and then click it. Basically, it’s a virtual click by JavaScript. We implement the div, click it, and that then triggers the right popup.
So let’s try this all out. Let’s give our Tag a name that tells us which popup it launches and when: OM – Popup – Video viewed. Select your YouTube Video trigger and click Save.
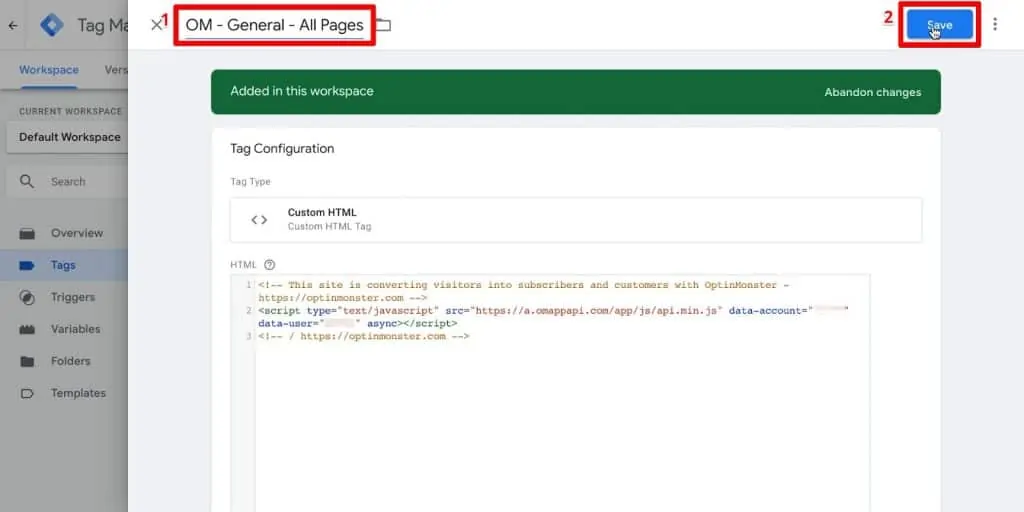
Finally, just to keep things consistent and organized, let’s rename the Tag that contains our general code. It’s just a library that gets deployed, so it doesn’t do anything on your page by itself. It’s only useful if you give it a command with a second campaign Tag.
However, it’s still useful to keep as its own Tag separate from your campaign code. You can reuse it for multiple campaign Tags, so let’s call it OM – General – All Pages and click Save.
Test OptinMonster Popup Launched with Google Tag Manager
Finally, let’s test this in the GTM Preview & Debug Mode. Let’s reload our video page and check out the preview console.
At first, no popup should appear. If we start playing the video, we have a YouTube Video event that shows we’re still at zero percent. But if we skip ahead to fifty percent or further into the video, our OptinMonster popup will fire because our Tag was deployed.
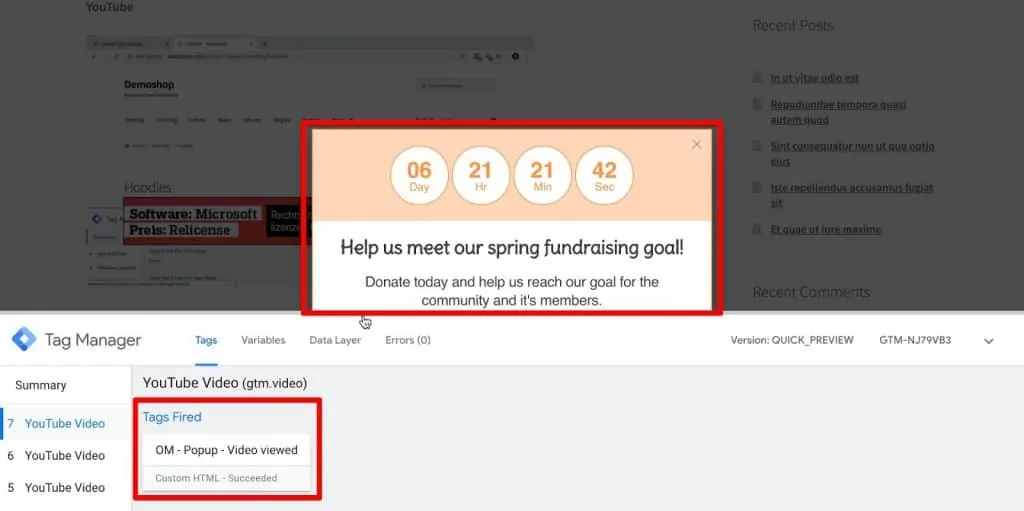
And you can obviously do this with any kind of other trigger, such as the click trigger, element visibility trigger, scroll trigger, and so on. You can utilize any kind of trigger that you want with this syntax when you combine it with this embedded node. Once it is clicked, it will show your popup or banner that you have defined by OptinMonster.
So this is a method to deploy many different OptinMonster banners or popups on your page, and triggering them individually via Google Tag Manager. You could also do this if you have the right data layer information in there and only fire this for certain people, for example. So you can be very specific with the targeting via Google Tag Manager and simply use OptinMonster as a way to build these kind of popups but deploy them through GTM.
FAQ
Do I need to install OptinMonster separately if I’m using Google Tag Manager?
Yes, you still need to install OptinMonster separately by creating a new campaign and configuring the display rules in the OptinMonster dashboard. However, instead of using the native trigger options provided by OptinMonster, you will be using Google Tag Manager to trigger the OptinMonster popup based on custom triggers or events.
Can I integrate OptinMonster with my CRM using Google Tag Manager?
Yes, you can integrate OptinMonster with your CRM (Customer Relationship Management) system using Google Tag Manager. If you have opt-in fields in your OptinMonster campaigns, you can integrate them with your CRM to capture leads and manage customer data effectively.
Can I use Google Tag Manager to trigger OptinMonster popups based on YouTube video progress?
Yes, you can use Google Tag Manager to trigger OptinMonster popups based on YouTube video progress. By configuring a YouTube Video trigger in Google Tag Manager and setting the desired progress threshold (e.g., 50% viewed), you can launch the OptinMonster popup when a user reaches that specific point in the video.
Summary
All right, so there you have it! This is how you can trigger OptinMonster campaign popups with the help of Google Tag Manager.
This approach gives you even more power over your OptinMonster campaigns. With a little bit of Google Tag Manager knowledge, you can fully customize your popup triggers even with a basic OptinMonster plan.
You can also combine GTM with other tools such as ActiveCampaign and Google Sheets.
Are you ready to give this a try? I’d love to hear from you what you will use this for on your website. Leave me a comment down below and so we can learn from each other!


Oh amazing tutorials thanks Julian
Hi Julian, Thanks for the post!
If is possible to pass a first-party Cookie GTM Variable to Optinmoster as Smart Tags? We have to push User ID to optinmoster and send it to CRM through webhooks
not sure. I’m not using Smart Tags. Let us know if you figure it out.
Hi Julian,
Thanks for the awesome tutorial 🙂 I am trying to implement, using the element visibility method. When I debug gtm, it fires the tag (trigger is therefore setup correct) however, the popup does not show up. I have set up the campaign to fire only on monsterlink, copied the tag code, and placed my campaign id. I see the tag is firing correctly on the element visibility, but still the campaign does not show up….
do you have the document write option ticked in your custom HTML tag?
Same issue. Can’t see my popup campaign although my tag is triggering properly (based on my Click URL = true) I have ticked the option mentioned above. Please help 🙂
Is it possible to trigger Optinmonster Campaigns based on values in the datalyer?
Thanks!