
Last Modified on January 7, 2025
Not impressed with the standard navigation menu in Google Looker Studio?
As you’re building your dashboard, you’ll find the need to create multiple pages to better showcase valuable insights from your data. You’ll then look for ways to help users navigate your report and will discover that Looker Studio has this built-in functionality.
Even though this prospect excites you, you feel that the native navigation bars in Looker Studio are lackluster. Whether it’s because you want something more unique and engaging or want to make them follow the theme of your dashboard, you’re looking for an alternative.
Seek no more because we’re here to show you how to create navigation bars in Looker Studio that are functional, visually appealing, and user-friendly.
Here is an overview of what we’ll cover:
- Looker Studio Pages & Reports Overview
- How to Build a Navigation Menu (Type 1)
- How to Build a Navigation Menu (Type 2)
- Adding Reference Points to a Navigation Menu
- Editing and Downloading Free Icons
Let’s dive in!
Looker Studio Pages & Reports Overview
Looker Studio has excellent built-in capabilities when dealing with multiple pages, reports, and various types of navigation.
If your report only has a few pages, keep things simple and consider the standard navigation bars in Looker Studio.

Here, we have a section for each page showing an icon and the page title created when adding pages to your report.
There are two ways of adding pages to the dashboard; the first way to add pages is by selecting Page → New page.

Another way is by clicking on the page navigation section to manage pages, which opens the report pages pane. Hover over the + button.

Then, you can either click on Page or Add a Page.
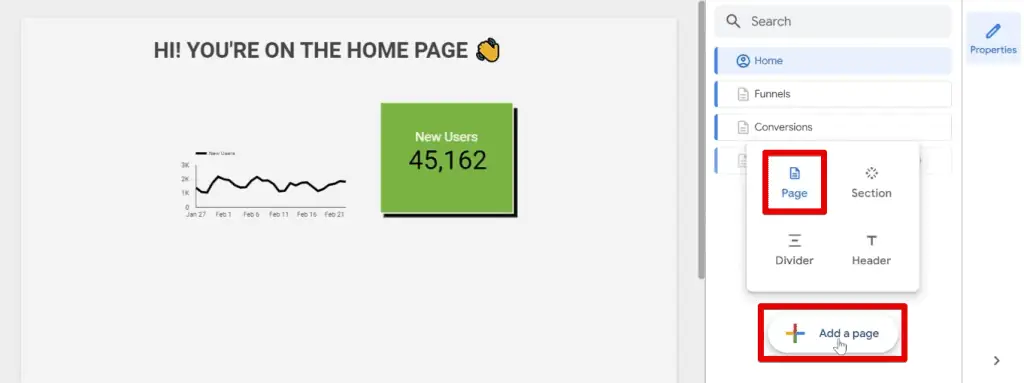
Looker Studio creates the navigation bar automatically when you add a new page to your report.
To modify the standard navigation bars in Looker Studio, go to Theme and Layout → Layout → Navigation Type.
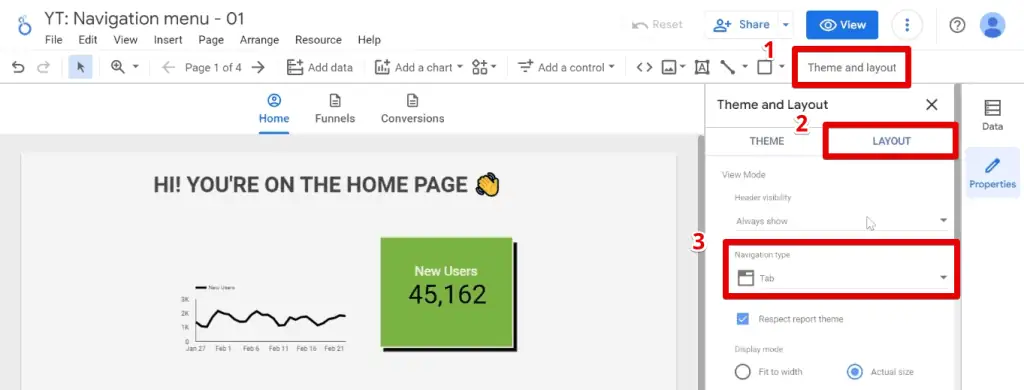
Here, you have the following navigation type options: Left, Tab, Top Left, and Hidden.
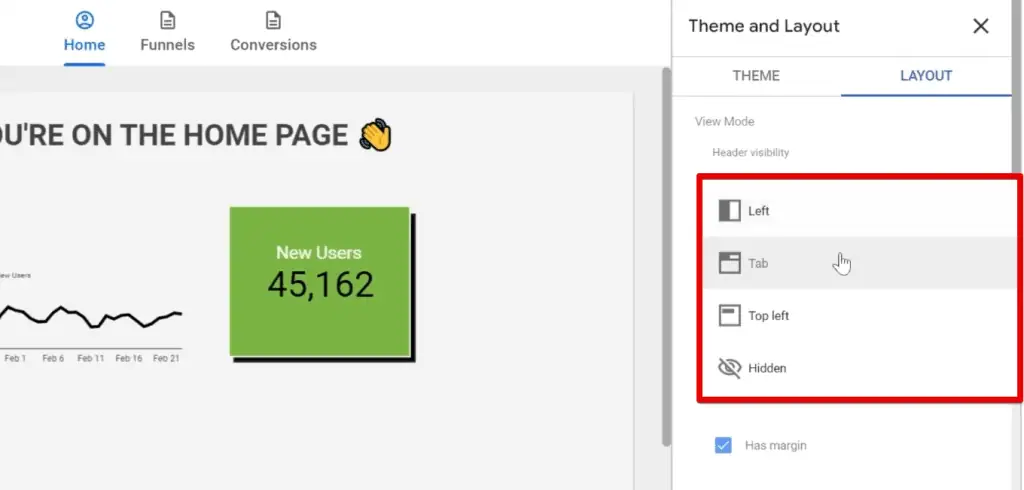
If you select the Left navigation type, the navigation bar will move to the left. It will only show the icons, but you can still view the page titles by clicking the > arrow.

These are the basic things you could do with the standard navigation bars in Looker Studio.
Among the frequently overlooked features in Looker Studio are adding/changing icons to your pages and using drop-down menus to categorize your pages.
You can see the structure by going to manage your pages. For this example, we have three categories: acquisition, behavior, and conversions. Each of these categories has a set of pages.
Looking at the Acquisition category, we have the Traffic sources page and an untitled section on top that contains the First user medium page.

To build this, you should follow the first steps of adding a page to your dashboard – manage your pages, then hover over the plus sign.
You’ll see four options: Page, Section, Divider, and Header.

If you want to categorize your pages with a drop-down menu, add and sort your pages into different sections.
Moving and sorting a page or section can be done by clicking and dragging each one to whichever location you want it to be.

How to Build a Navigation Menu (Type 1)
Although Looker Studio covers the basic navigation needs, your dashboards may require more flexibility and customization. Your client may ask you to build a navigation menu like this one:

This navigation menu suits the design of your dashboard better and makes the user experience more seamless. Let’s look at how to build the first type of navigation bar in Looker Studio.
We have built three pages in our sample dashboard: Traffic, Funnels, and Conversions.

First, add a shape that will be the background for our menu.
Go to Shape → Rectangle.
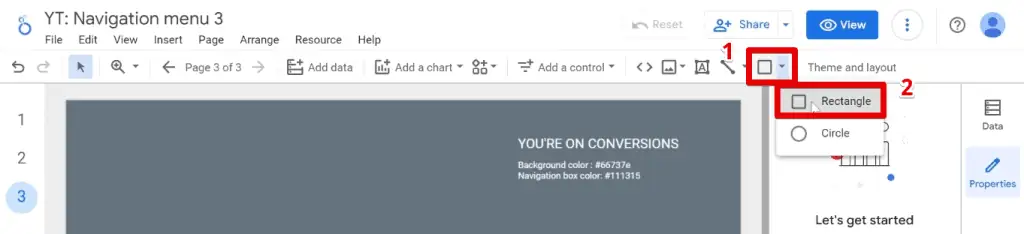
Inserting a rectangle into the dashboard
Insert this anywhere on your dashboard and resize it to a vertical rectangle. Next, set the border radius to 25 and the background color to dark grey.

🚨 Note: We have left the hex codes for the exact colors we used in this tutorial in a textbox on our dashboard.
Next, add your logo to the navigation menu. Make sure that it has a transparent background.
Select Image → Upload from computer.

Insert your logo on the top portion of the rectangle. Resize your logo to fit the navigation menu.
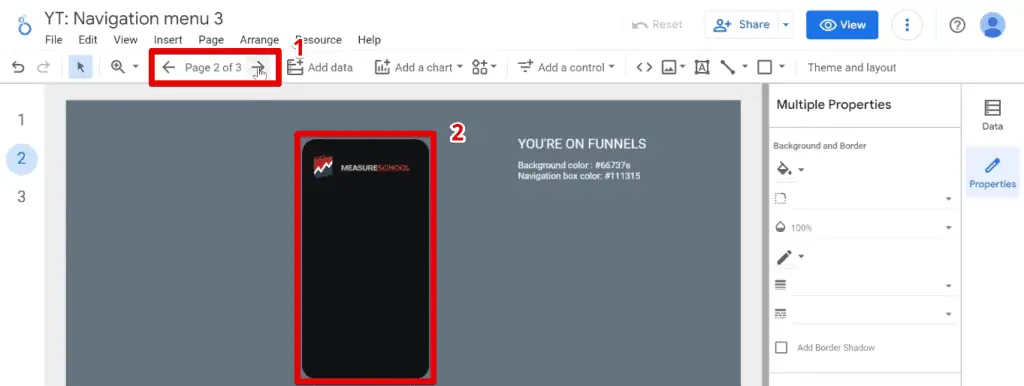
Now, we need to copy our navigation menu base for all the pages and ensure that they are located in the same place.
Instead of repeating the process for the other pages, select all elements of our navigation menu, right-click, then click Make report-level.

When you navigate to the other pages, the navigation menu will appear at the same location.
Now, we’ll add multiple shapes to build our navigation buttons.
🚨 Note: The techniques we’re using are discussed in more detail in our How to Create Interactive Buttons in Looker Studio guide.
Insert a rectangle that has the same width as our navigation menu. Next, change the background color. We’ll start with the same color as our navigation menu, then click the + button to use a custom color.

To add some contrast back, select a color that’s a little lighter. Next, select Done.

Next, create a copy of our rectangle. You can do this by right-clicking on the rectangle, then selecting Duplicate.

You can also use the keyboard shortcuts to copy and paste the rectangle. Create as many copies as the number of pages we have in our dashboard.

Hold down the CTRL key while selecting the rectangles. Copy and paste the shapes to all of our pages. Then only keep the rectangle corresponding to the page number. For example:

Follow the same procedure for the third page, but keep the third rectangle instead.

Let’s go back to our first page. Now, we’re going to add texts and icons to our navigation bars in Looker Studio.
Add Text, then type Traffic for the first button. Change the font color to white or light grey, and the font size to 16px.

You can either repeat the process or duplicate the text for other pages. Change the text for the other pages.

Next, let’s add our icons. Here, we used images saved to our computer.
Don’t worry. We’ll show you where to get these kinds of icons later.
The next step is to select the icons and text and copy them to the other pages.
When you copy the icons and text, confirm that they are positioned correctly.
Now, let’s go back to the first page and remove the other rectangles. Only keep the rectangle to highlight the first page.

All that’s left to complete our navigation bars in Looker Studio is to add our navigation links.
Here, we’ll utilize the technique of adding a transparent image on top of the buttons, so that the whole shape can be clicked.
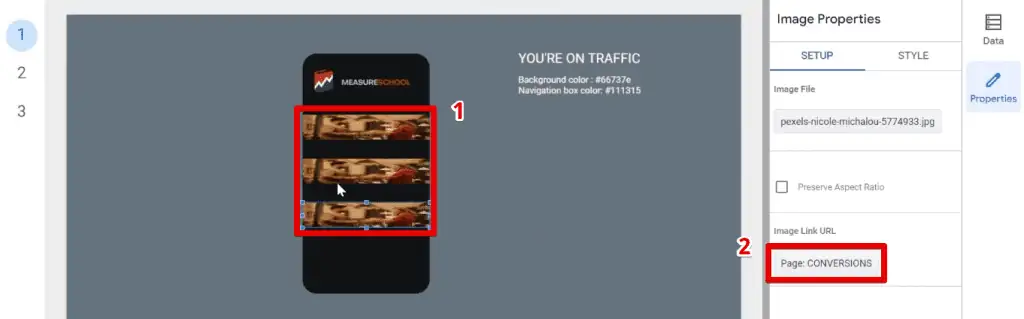
Insert any image and uncheck the Preserve Aspect Ratio option. Resize the image to fit the navigation button, then click the Insert link.

Uncheck the option to Open the link in a new tab, then select our first page. Finally, click Apply.

Copy and paste the image over the other buttons and change the image link URL to their corresponding page.
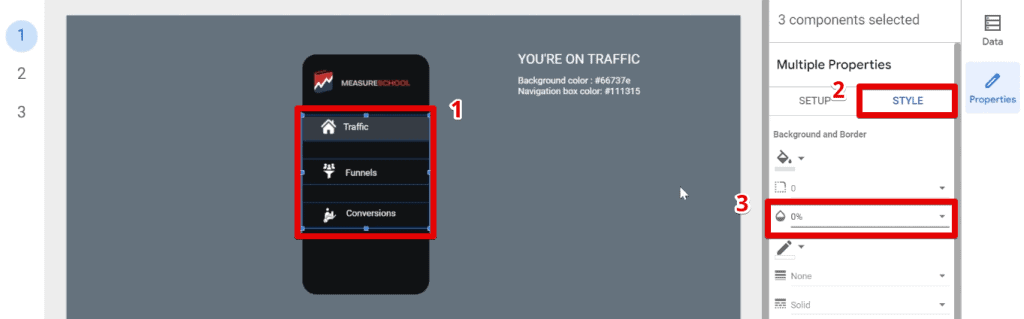
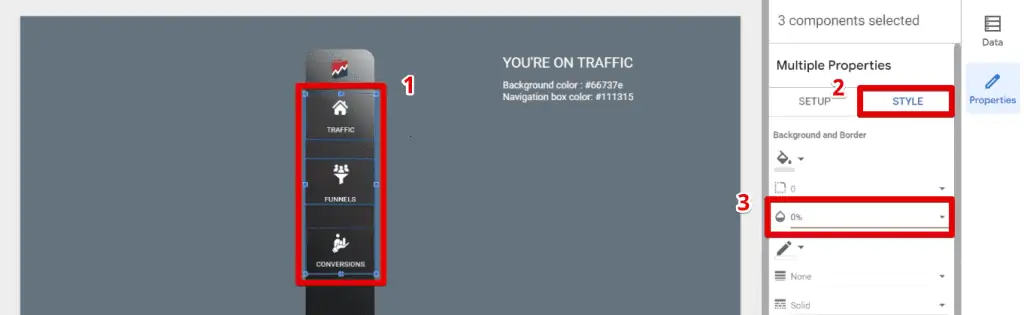
Select all three images. In the Style tab, change the opacity of the image to 0%.
Don’t click away from our selection yet, and copy our images. Go to each of your pages and paste these images.

That’s how to create the first type of navigation bars in Looker Studio.
How to Build a Navigation Menu (Type 2)
Now, let’s build the following navigation bars in Looker Studio. The process is similar, but you’ll see that there are minor changes.
We’ll start with another rectangle, but this time, let’s make it a bit narrower. Set the border radius to 20, and choose the same dark grey color for the background color.

Next, select the image and upload your logo. Resize and place it at the top portion of your navigation menu.
Select both the logo and rectangle, right-click, and select Make report-level.

Before adding icons and text to our navigation bars in Looker Studio, let’s change the look of our background by adding a gradient.
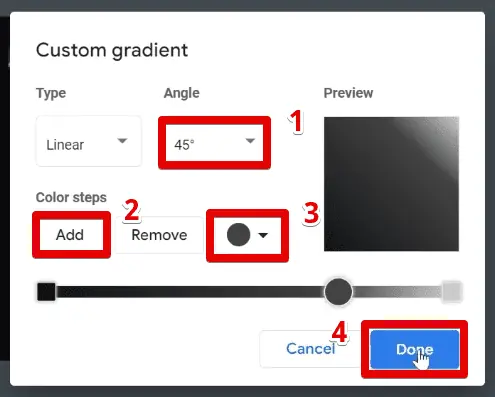
Go to Background Color → Gradient.
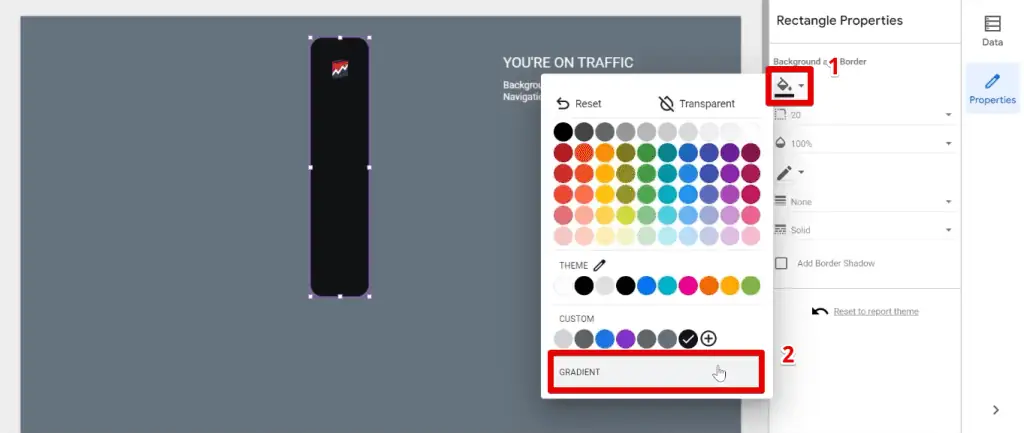
Set the angle to 45°, Add another color step of a grey color, and then click Done.
Now, let’s add our icon. Next, add text below for the page title.
Duplicate the icon and text for the number of pages you have on your dashboard. Space them evenly across your navigation menu.
Replace the text and icons with the equivalent ones for your pages. Resize your navigation bar as needed.
We’re only left with three more steps.
First, let’s start by replicating what we did earlier for making our icons and text available on all our pages. Select all our icons and text and paste them to the other pages.
This is a fine result. However, flickering will occur when you navigate to the other pages.
When you go to a different page, images will take a short time before loading and texts will have a fade in effect.

To fix these tiny movements, we can set the icons and the text at the report level. Remove the logos and texts from the other pages or click undo until they are removed for all pages except one.
💡 Top Tip: To quickly select multiple elements in your dashboard, click and drag across the elements you want to select.

Repeat the steps for making elements report-level. Now, if we go to the other pages, there should no longer be flickering for your navigation menu elements.
Now, let’s add our navigation links. You should know how to do this by now.
Upload any image and unselect the Preserve Aspect Ratio option. Resize it to fit the section of our navigation buttons. Finally, add the correct Image Link URL for the equivalent pages.

Next, select all the images containing image links. Go to Style and change the opacity to 0%.
Before clicking away, right-click on the images and also make them report-level.
Adding Reference Points to a Navigation Menu
Now, let’s add a reference point for our navigation bars in Looker Studio.
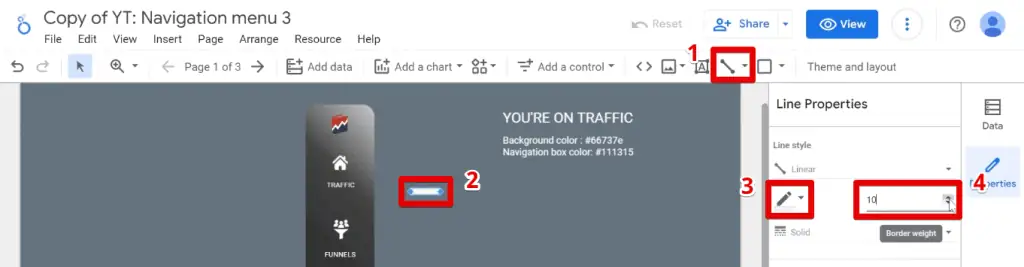
There are many ways to do this. You can either add an icon or an image. The quickest and simplest way to do this is to insert a line.
Select the line icon beside the shape icon. Insert a short horizontal line and change the color to white or light gray. Finally, increase the border weight to 10.
The final thing to do is to position it properly and copy it to the other pages.
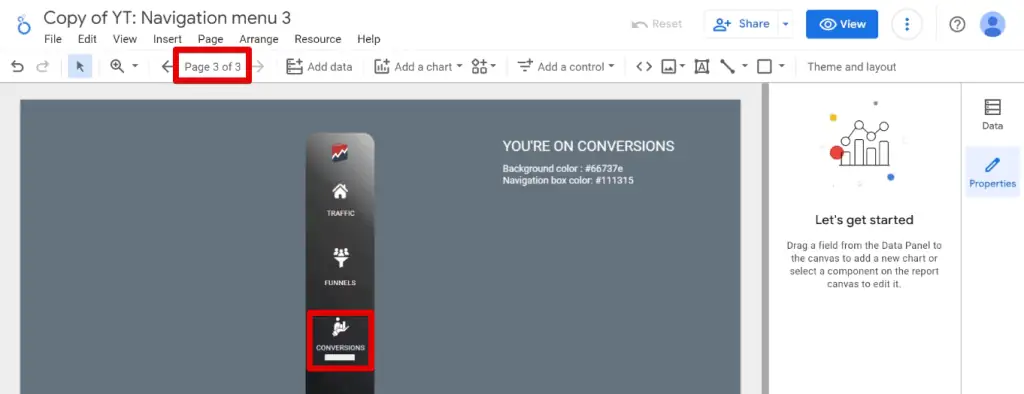
Navigate through the pages of your report to see if the reference points on your navigation bars in Looker Studio are in the correct spots.
Editing and Downloading Free Icons
Here is a free resource to get icons for your navigation menu.
There are many available resources, but the one we’ll recommend allows you to edit the icons so they fit your needs better.
Go to the site called FlatIcon and search for “home”. Select one of the icons.
You can download the icon as is or change the format by clicking on the Edit icon.
Here, you can play around and change the color of your icon. In our example, we made it white. Download the icon in a PNG format. For the size, the 24px, 32px, and 64px sizes are more than enough for the icon.
Once you download it, you can copy the link and add it to a page to credit the author of the icon you’ll be using.

FAQ
How can I modify the standard navigation bars in Looker Studio?
To modify the standard navigation bars in Looker Studio, go to Theme and Layout → Layout → Navigation Type. From there, you can choose different navigation types and customize the appearance of the navigation bars based on your requirements.
How can I add reference points to my navigation menu in Looker Studio?
You can add reference points to your navigation menu by inserting a line or other icons/images as indicators. Position them properly and make them report-level to ensure consistency across pages.
Where can I find free icons for my navigation menu in Looker Studio?
A recommended resource for finding and editing icons is FlatIcon. You can search for icons, customize their colors, and download them in various sizes (e.g., 24px, 32px, 64px) in PNG format. Make sure to credit the author if required.
Summary
Great! That’s how you create navigation bars in Looker Studio. First, we looked at the native capabilities of Looker Studio and then looked at how to build two types of navigation menus. Finally, we looked at a free resource for editing and downloading icons.
If you want to improve your Looker Studio dashboards, check out our guide on How to Make Your Looker Studio Dashboards Interactive.
Are you satisfied with the native navigation bars in Looker Studio? Which navigation menu type did you prefer? Let us know in the comments below!


")