Last Modified on January 20, 2025
Looking for ways to get more conversions for your website?
The first hurdle to getting a conversion is for users to be aware of what you’re offering. This role for advertising oftentimes can become a means to obtain prospects and visitors to your website.

Subscribe & Get our FREE Google Ads Technical Audit Checklist
Two of the most common ad types you will encounter while browsing the internet are display and search ads. At first glance, it seems that search ads are the better option due to their higher average click-through and conversion rates.
Compared to search ads, users are shown display ads while they’re consuming content, not while they’re actively looking for solutions. This significantly lowers the chance of a click, so why bother with them at all? Why are they so common, despite seeming ineffective?
The greatest benefit of display ads is their ability to improve your brand awareness and distinguish your brand from competitors. As more people become familiar with your brand, the likelihood of them clicking on and engaging with your campaigns increases.
In this article, we’ll show you how to set up Google display ads properly so that you have the best chance of success with your Google display campaign.
Here is an overview of what we’ll cover:
- Google Display Campaign
- Campaign Creation
- Campaign Settings
- Budget and Bidding
- Targeting
- Ad Creation
- Publishing the Campaign
Google Display Campaign
Before going through the steps of creating Google display ads, it is important to know what is a Google display campaign.
A campaign is a set of ad groups that share common settings. Under those are the specific ads and keywords.
What is a Google display campaign?
A Google display campaign is a type of campaign that serves visually engaging ads on articles, videos, or websites that your target audience regularly browses.
These types of ads are served on the Google Display Network, which has a collection of over two million websites, videos, and apps that reach over 90% of Internet users worldwide.
With the immense potential for reach, a display campaign can introduce your brand to tons of consumers, both relevant and irrelevant.
As display ads cost money, deciding where you want to put your ads is important. To ensure they only show where you want them to, you need to deploy targeting strategies. There are essentially two main targeting categories: contextual targeting and people targeting.
The first category targets websites based on the content of the page. Let’s say you own a business that sells dog food, then you might want to target a website that talks about dogs.
Another targeting strategy in this category is called placement targeting. Here, you can be very strategic and advertise on a specific website, video, or app.
The other category, sometimes called behavioral targeting, is more focused on targeting an individual rather than where someone is on the web. A classic form of behavioral targeting would be a retargeting campaign.
Let’s say someone visited your website, viewed a product, but didn’t purchase it. You could target the same user with a display ad on that very product a week later regardless of where they are on the web. It might seem a bit creepy, but it’s extremely effective.
Before proceeding, make sure you know the type of targeting you want to use to help your Google display campaign meet its goals.
Campaign Creation
Our journey of learning how to set up Google display ads starts with creating a new campaign.
On your Google Ads account, click on the + button.

Select a New campaign.
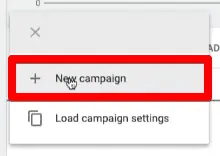
🚨 Note: To better determine the effectiveness of your ad, ensure that you have already set up conversion tracking before we launch this campaign. If you haven’t, consider also setting up enhanced conversions to optimize the conversion tracking of your campaigns.
Next, we need to select the goal for the campaign.
If you already know what you want to achieve for your campaign, you can select the display campaign goal from the available list. While this will provide you with features that will directly help you achieve your goal, it also makes some settings unavailable for you to edit.
It is recommended to select the Create a campaign without a goal’s guidance option if you want to have all possible settings available at your disposal.
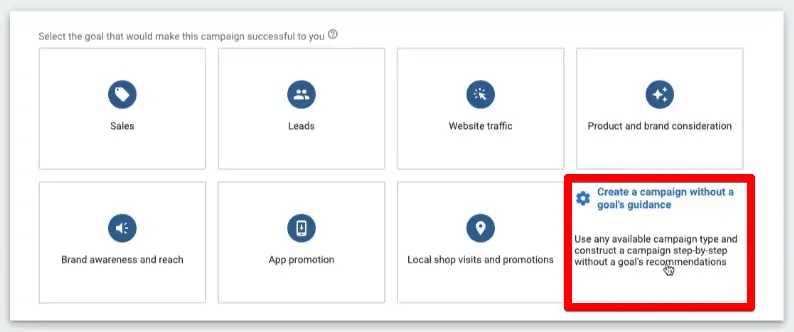
Next, choose the campaign type.
Campaign Type
Since this guide is focused on how to create display ads on Google, select Display.
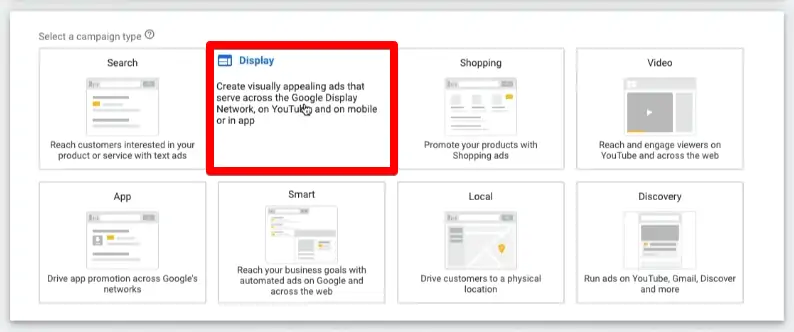
In the past, you would select a campaign subtype. However, a recent change to the display campaign creation has combined the flexibility of standard display campaigns and the automation of smart display campaigns into a single display campaign.
We’ll show you how to select which automation and optimizing techniques from the smart display campaign you can implement, what scenarios they should be used on, and how to remove or disable them later in this tutorial.
Provide a name for your campaign, then click Continue.
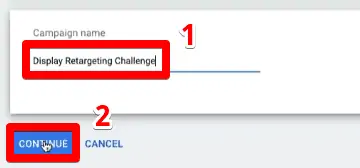
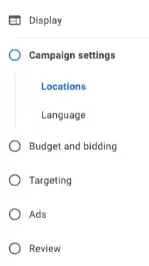
The left pane of the screen shows the different settings that we will set. You can easily go back or skip ahead to different sections by clicking on the items in this list.
Campaign Settings
The campaign settings allow you to choose the locations and languages where you want your ads to appear.
Let’s start with selecting a location we want to target. For this example, let’s choose to target the United States.
If you’re not from the United States, click on Enter another location, type in the United States in the search bar, then click on Target.

Under location options, we can specify if we want to include people who have shown interest in our targeted and excluded locations, or only include those that are in or regularly in said locations.
In this example, let’s choose the Presence: People in or regularly in your targeted location option for the targeted locations.

To select a location to exclude, simply search for that location in the search bar and click on Exclude.

When a campaign has been running for a while, people from other countries will eventually pop up if they frequent your targeted location. You can specify an excluded location to remove these people, and thus, only target people that live in your targeted location.
The next interesting feature can be accessed by clicking on Advanced search.

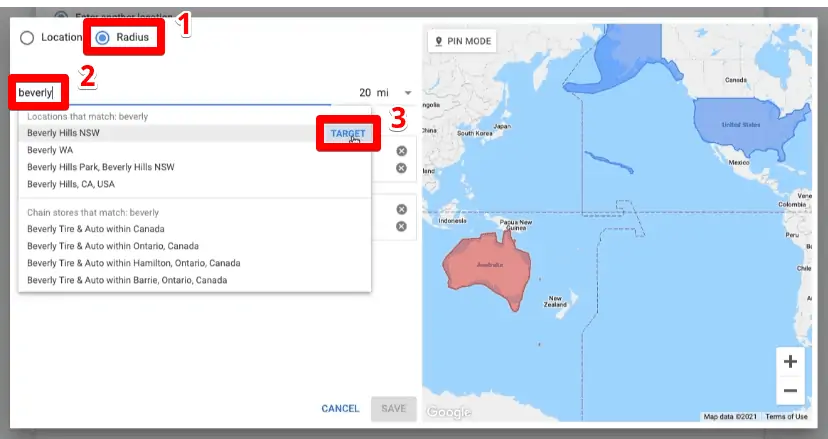
Here, we can specify a location and target people within a certain radius. Let’s say we want to target the area within a 20-mile radius of Beverly Hills.
Click on Radius, type in Beverly Hills, then click on Target. Since the default is 20 miles, there is no need to alter the radius.
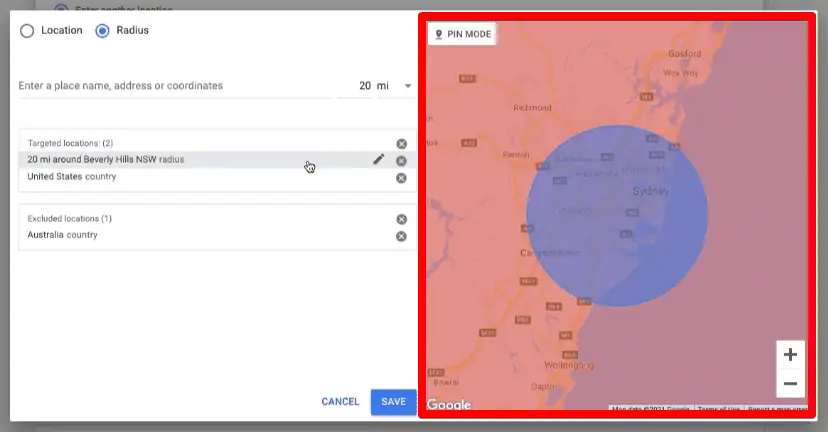
On the right side of the screen is a map of the locations you have targeted and excluded.
More Settings
Aside from the default location and language settings, there are still more settings you can change in the campaign settings section.
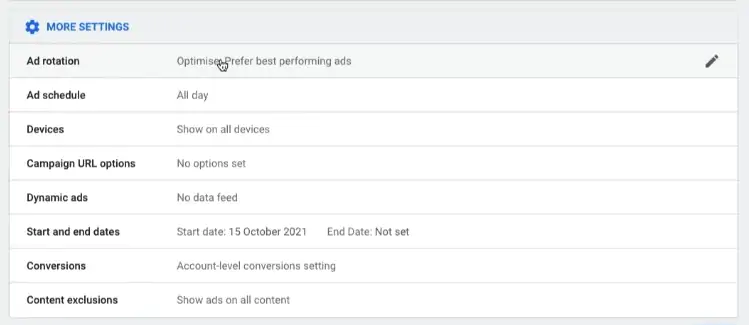
Let’s discuss and change some of them, starting with ad rotation.
By default, this setting is set to optimize where impressions will be skewed for ads that are doing better or expected to get more clicks and conversions.
It is recommended to change this setting to Do not optimize: Rotate ads indefinitely so that you can compare the performance of your ads and run a proper split test.

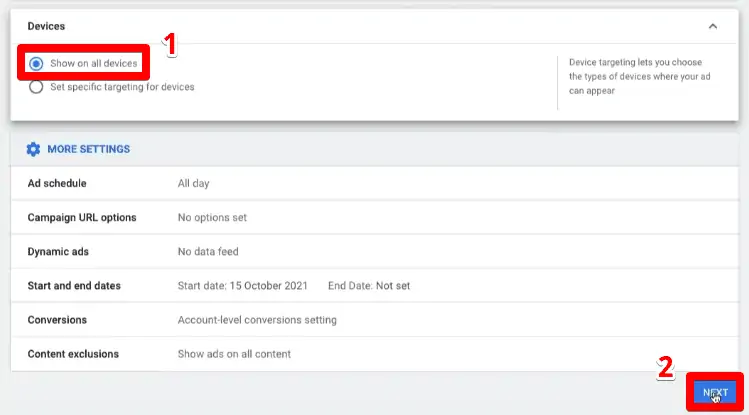
Next, the device settings allow you to set specific targeting for devices. You can be very specific in targeting as you have the option to select by device type, operating system, device model, and network.
For this example, let’s leave it to Show on all devices, then click Next to move on to the next set of settings.
Budget and Bidding
The first thing we’ll set is the average daily budget for the campaign.
Your budget influences how often your ads appear and how prominently featured. While they will be days when you’ll spend more or less than your daily budget, the most you’ll pay per month is 30.4 times your daily budget.
To set an average daily budget, type this value in the space provided.

You can always change this value anytime, but it is recommended to place a budget of $1 as an extra layer of security.
Next, we will specify a bidding strategy. The bidding strategy you choose will determine the way your budget is spent.
Since we are creating a new campaign, you should manually set your bids. While display campaigns support automated and smart bidding strategies that manage your bids for you, these are not recommended for new campaigns.
To receive the best results from the machine learning technology of automated bidding, you should only implement it when it has enough data. Once your campaign has run for a while, implement the bidding strategies to bring the best results.
Choose Manually select bids, then click on select a bid strategy directly.
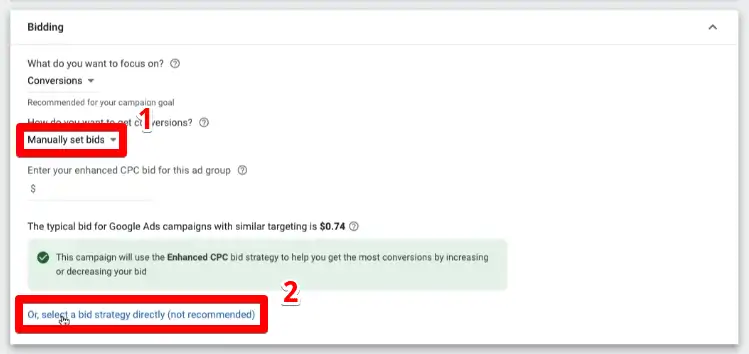
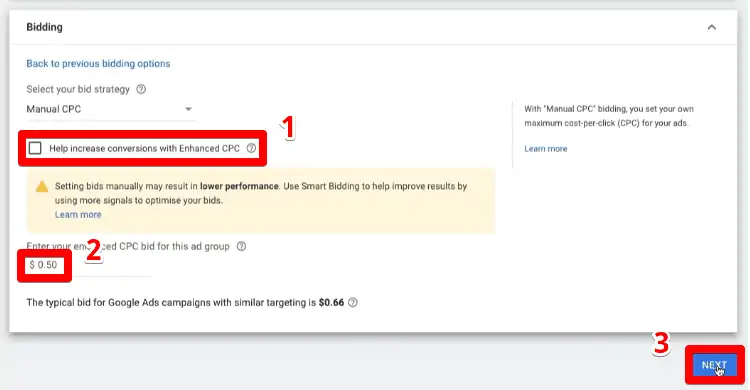
With Manual Cost-Per-Click (CPC) bidding, you will set the maximum price on the cost of someone clicking on your ads. You can also optionally implement Enhanced CPC which combines manual CPC and smart bidding strategies to help maximize conversions.
Keep in mind that enhanced CPC will adjust your manual bids, raising them in situations that seem likely to lead to a conversion and lowering them in less likely situations. Again, this is not recommended for new campaigns as there is no data as a basis for these decisions.
Deselect the Enhanced CPC option, then put your manual CPC bid for the ad group. Finally, click Next.
Targeting
Next, we will choose the targeting strategy.

As mentioned earlier, there are two main targeting categories: contextual and people targeting. Audience segments and demographics are under the people targeting category and keywords, topics, and placements fall under contextual targeting.
There are many options available for audience targeting with Google display ads which we can see by going to the browse tab in audience segments.
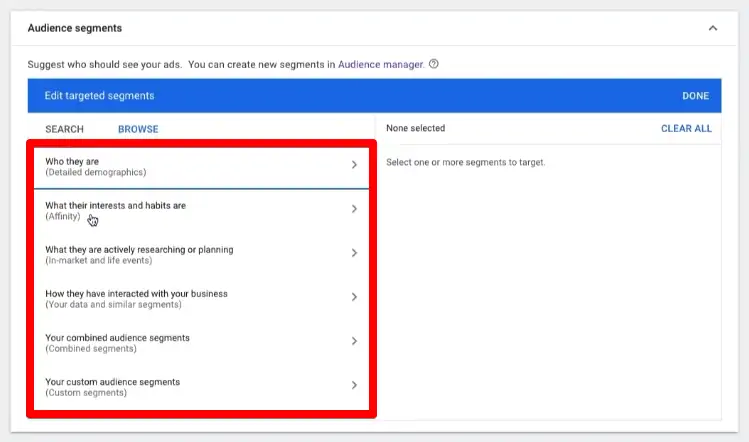
We have detailed the demographics, affinity, in-market, remarketing, combined, and custom audience segments. We will not go into detail about what each option entails, but you can get a general sense of what they are based on the description included.
Select an audience segment of your choice on the left side. Every segment you’ve selected can be seen on the right side.
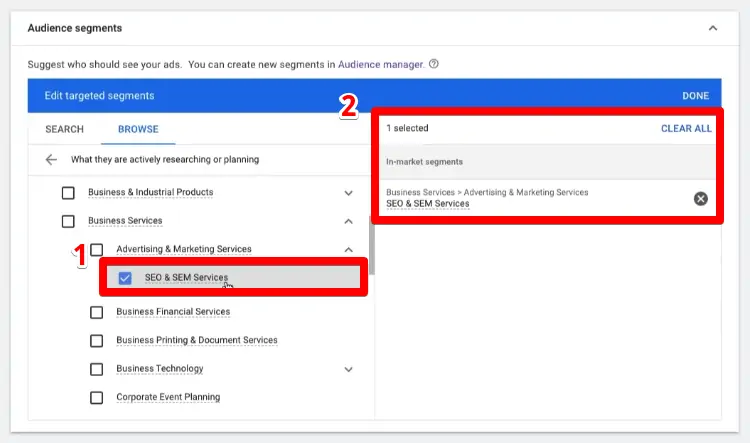
Note that you should only select audience segments or other targeting signals that are relevant to your business. Choosing the right targeting strategy is a step toward helping your campaign meet its goal.
Once you have selected all targeting options you want to apply, click Next.
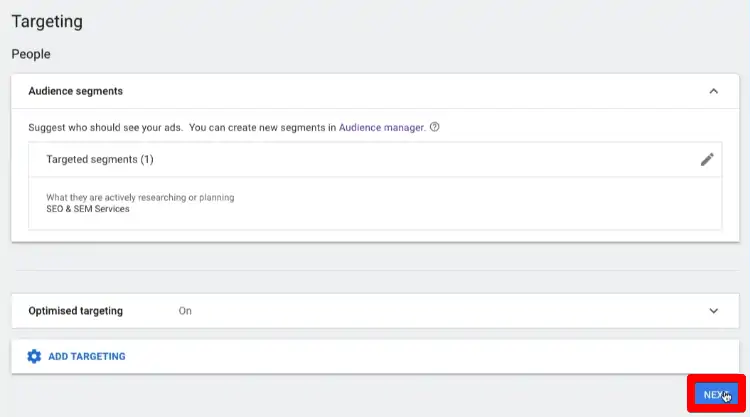
Ad Creation
The next step is the display ad creation.
By default, the responsive display ad type is selected. With this display ad type, you can upload images, headlines, logos, videos, and descriptions, and ad combinations will be automatically generated for your websites, apps, YouTube, and Gmail.
Since responsive display ads save you time by creating different versions of your ads based on the assets you specify, let’s keep this as the display type for this Google display ad example.
The first thing we need to specify is the Final URL we are sending people to. Next, we’ll add the Images and Logos our ads will use.
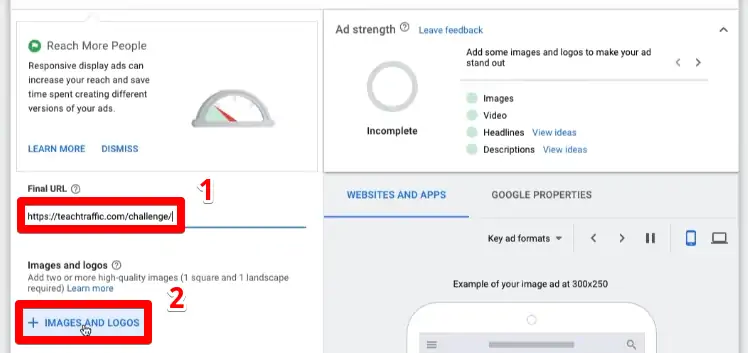
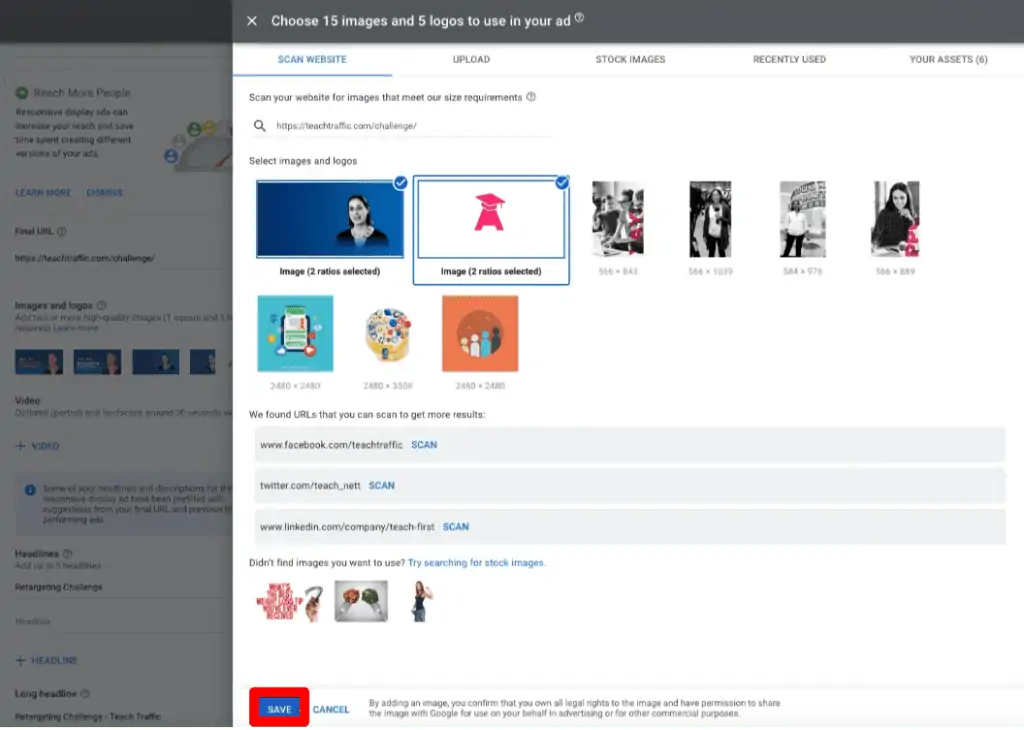
Here, we can scan the landing page URL and extract our assets from there.
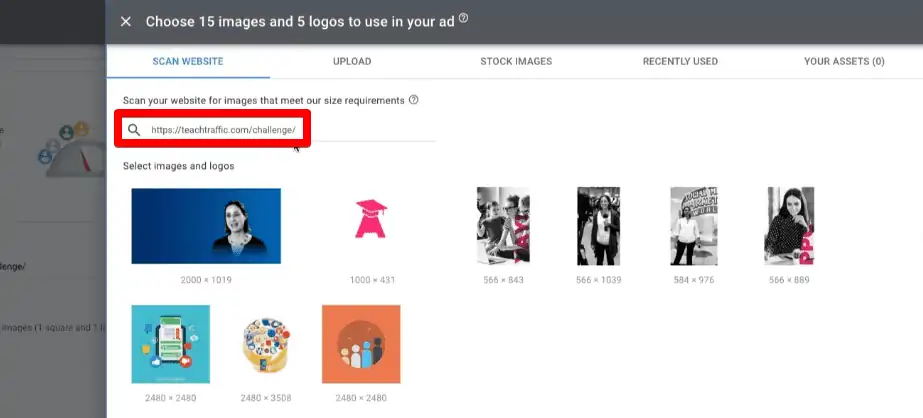
You can also upload your images and logos. Check out the common sizes for responsive display ads that you may use.

Click on the images and logos you want to use in your ad, select the applicable ratios for cropping, then click on Select Ratio.
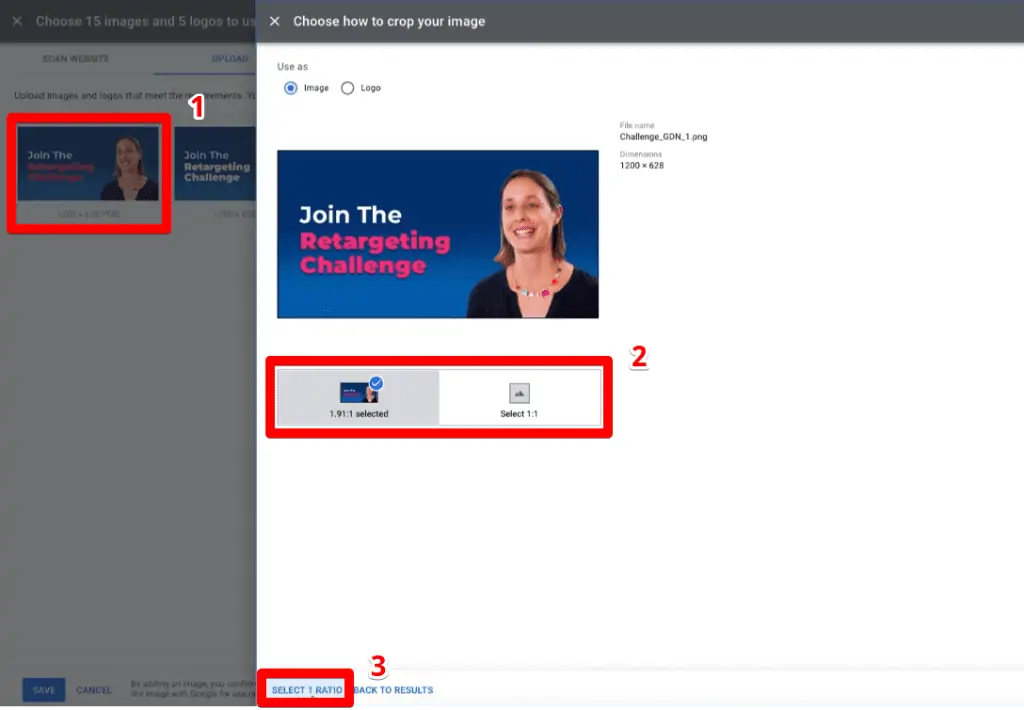
Once you have selected all images and logos you want to include, click Save.
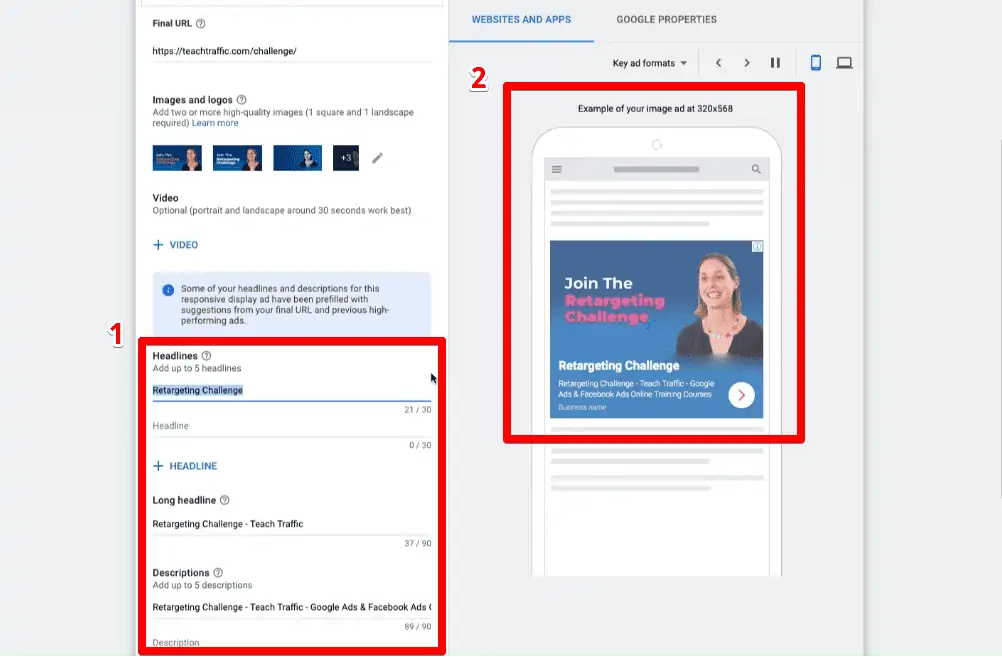
Next, we’ll specify Headlines, a Long headline, and Descriptions. On the right side of the page is a preview of the different ad combinations.
You don’t have to fill in all possible headlines and descriptions, but do ensure that your ad strength is at least average before proceeding to the next steps.
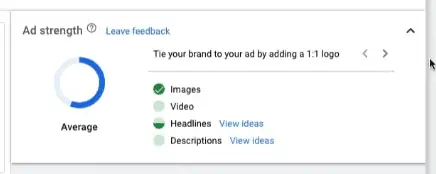
To get the best ad strength score and improve the effectiveness of your ads, consider uploading 5 or more images, 2 or more logos, 5 headlines, 5 descriptions, and a video.
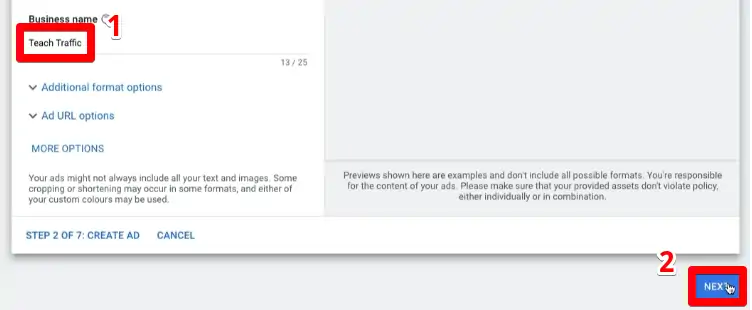
Lastly, put in your Business name, then click Next.
Publishing the Campaign
The final step in our tutorial is to review and publish the campaign.
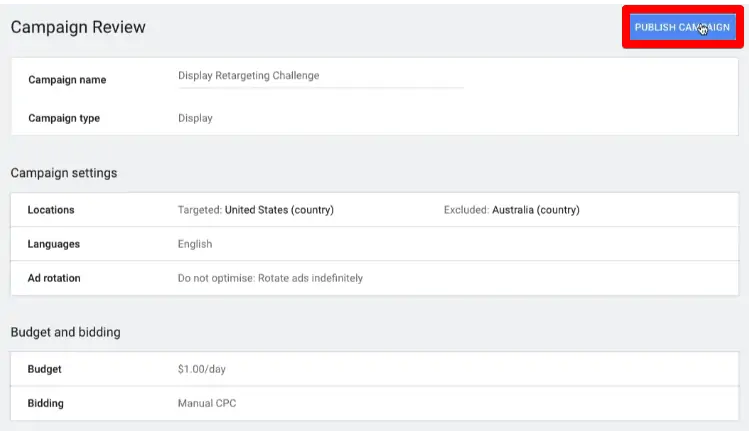
In the review section, we are given a summary of all the settings we have specified. At the top are the general campaign settings and below are the ad group settings.
One thing we want to edit here is optimized targeting.
Depending on your campaign’s goal, optimized targeting can help you reach new and relevant audiences that are likely to convert. It finds people outside your targeted audience whose behavior matches converting users in your current audience.
Like automated bidding, this strategy is not recommended for new campaigns. Having more conversion data is needed to help Google Ads find people who are likely to convert. You should also disable optimized targeting if you’re running a remarketing campaign.
Since remarketing targets consumers based on specific online behaviors, optimized targeting essentially renders this campaign useless, as it will show your ads to users outside your predefined remarketing audience.
First, provide a name for the ad group, then click on Optimized targeting.
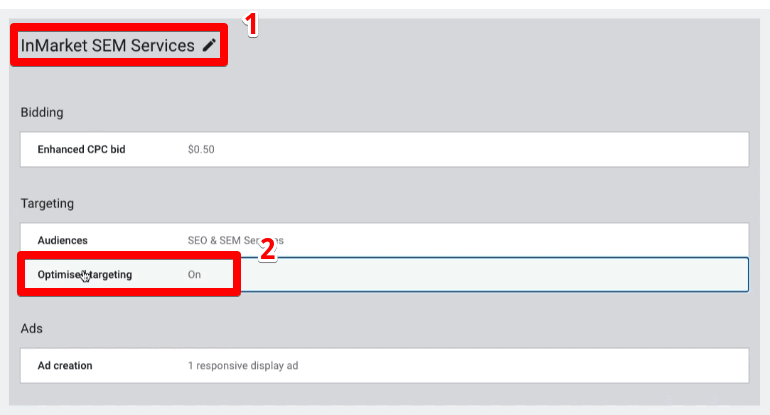
We are then directed back to the Targeting section. Untick the Use optimized targeting option, then click Next.

In the Ads section, we can add another possible ad variation by clicking on +New Ad.
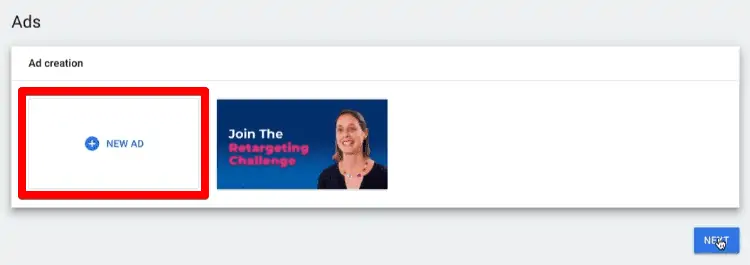
Note that with responsive display ads, it’s going to be mixing and matching different types. It may be worth it if you want to test different types of images.
Moving back to the review segment, confirm that all settings are what you wanted, then click on Publish Campaign.
Finally, the last thing you may want to explore is adding in placements to exclude from your campaign.
In your ad group, go to Placements → Exclusions.

FAQ
How can I optimize my Google display ads?
To optimize your Google display ads, you can:
1. Continuously monitor and analyze the performance of your ads.
2. Test different ad variations, including images, headlines, and descriptions, to find the most effective combinations.
3. Refine your targeting strategies based on the audience response and conversion data.
4. Regularly review and adjust your campaign settings, budgets, and bidding strategies to maximize results.
How can I exclude specific placements from my Google display campaign?
To exclude specific placements from your Google display campaign, you can go to your ad group settings and navigate to the Placements > Exclusions section. Add the placements you want to exclude to ensure your ads don’t appear on those particular websites, videos, or apps.
Can I track conversions for my Google display ads?
Yes, you can track conversions for your Google display ads by setting up conversion tracking in your Google Ads account. This allows you to measure the effectiveness of your ads and optimize your campaigns for better results.
Summary
We discussed what Google display campaigns are, the main targeting categories, the campaign creation steps, and the different settings you can configure.
If you also want to learn more about shopping ads, check out our 5 tips for optimizing Google shopping campaigns.
What do you think about display ads? Do you think they are better than search ads? What targeting signals will you use for your display campaigns? Let us know in the comments below!


Great article Julian Juenemann. I enjoyed reading this article. Best blog to learn display ads in 15 minutes.
Thank you for the elaborate explanations