
Last Modified on January 20, 2025
If you feel that you are wasting money with Google Ads, you can get more effective results by setting up a Google Ads Search Campaign the right way!
There are some common mistakes that marketers usually make while setting up their search campaigns in Google Ads.

Subscribe & Get our FREE Google Ads Technical Audit Checklist
In this guide, we will look at the common mistakes and how to avoid them for an optimized Google Ads search campaign.
An overview of what we’ll cover:
- Not setting up conversion tracking
- Search Network + Display Network
- Ad Schedule
- Location targeting setup
- Maximizing conversions bidding
- Keyword theme Ad groups
- Writing the Ad
- Negative Keywords
Let’s dive in!
Not Setting up Conversion Tracking
The first classic mistake that people make is they don’t set up conversion tracking.
Google Ads conversion tracking measures the success of your ad campaigns by tracking the conversion behavior of your audience.
This is your way of telling Google what your goals are!
For example, if you’re an eCommerce store, a conversion would be somebody who ultimately purchased your product or if you are a local business, it might be somebody filling in a contact form.
First, you need to set up Google Ads conversion tracking before you start creating any campaigns. Conversion tracking will help you know if you’re getting returns on the money you have invested in Google Ads search campaigns.
There are multiple methods to track conversions in Google Ads. You can either use the built-in Google Ads Conversion Tracking method, or you could import your existing goals and eCommerce conversions into Google Ads from Google Analytics.
If you’re not sure that you’ve set up conversion tracking, you can check it under the Conversions menu of Google Ads. To access it, navigate to Tools & Settings → Measurement → Conversions.
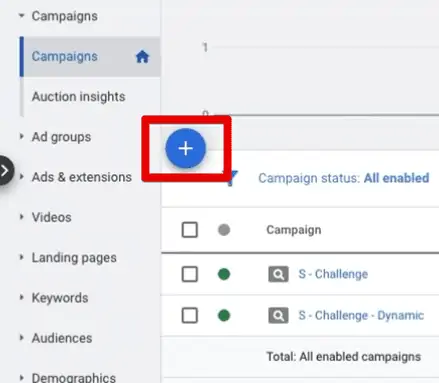
Let’s create a new search campaign to understand how to avoid mistakes. To do this, click on the plus button on the left of the screen.
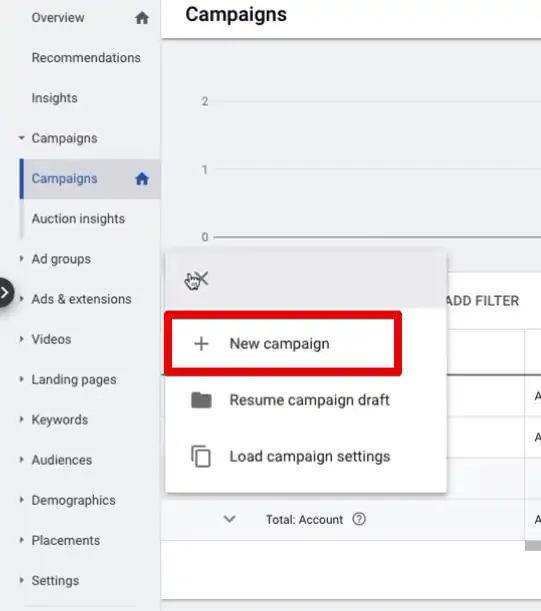
This will give you options to start campaigns. Click on New campaign.
Next, we need to select the goal of a successful campaign.
For this example, let’s try the Create a campaign without a goal’s guidance. This gives you all the available settings to set up a campaign, thus providing more flexibility in defining your goals.

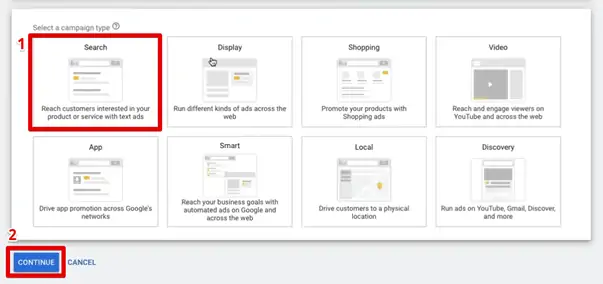
Let’s select a campaign type. There are many campaign types that you can select from.
But now, we want to set up a search campaign. So let’s click on the Search option and click on Continue.
Click on Start New to start the campaign.

Let’s give a relevant campaign name and move forward in our search campaign setup.

Search Network + Display Network
The next step in our search campaign setup brings us to a second common mistake.
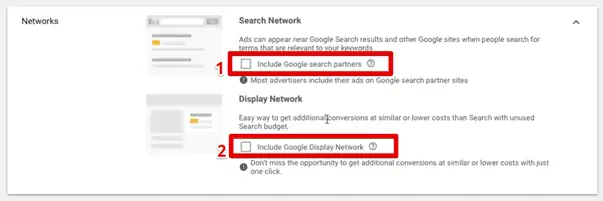
Google by default keeps the Search Network and Display Network options checked.

The Display Network option gives many impressions with a low click-through rate.
It is a good idea to keep the Display Network option on. But, it is not recommended to use the Search Network option.
The Search Network shows your ads on Google partner sites. You can choose to keep this option checked or not based on your requirements. For this guide, we’ll keep it unchecked.
To move ahead in our setup, click on Show more settings.

It will expand the menu to give you more options for your search campaign setup.
Ad Schedule
Here, you can set an Ad schedule to run your ads. By default, the ad will run every day with no time restrictions.
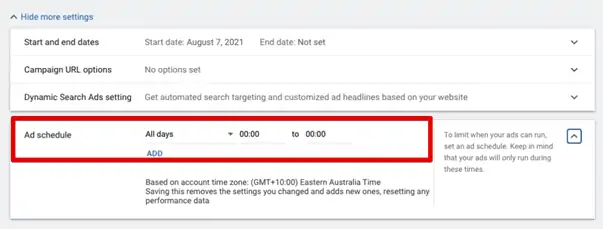
A mistake that marketers, especially local businesses, make is to ignore this setting.
If you have a business that runs only for dedicated hours in a day, it would make sense for you to run the ads only during those hours.
You can select the days and the timings for when you want the ad to run. The Ad schedule is where you can limit when your ads can run.

On the contrary, if you’re selling an online course, you don’t need to have an ad schedule.
Thus, depending on your type of business, you should consider whether to add an ad schedule or not.
Location Targeting Setup
Another common mistake is that we don’t input our location targeting properly. It is necessary, especially for local or small businesses.
In this case of promoting an online course, we would create different campaigns for different countries. Let’s try to apply some location targeting in our Ad Search Campaign.
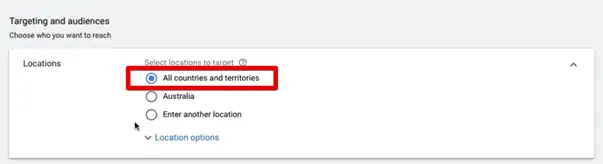
Be aware that All countries and territories are selected by default. It’s a classic mistake to avoid this default setting that Google has kept for us.
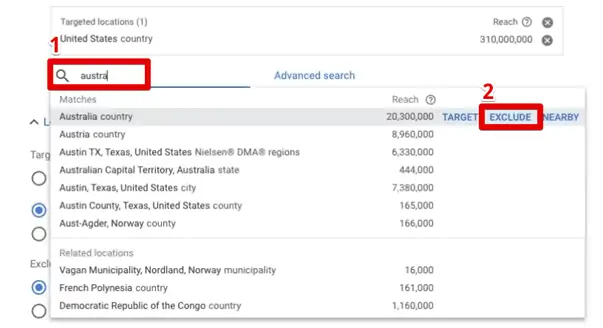
Let’s say we want to target the United States. We can choose a country to target from Enter another location.
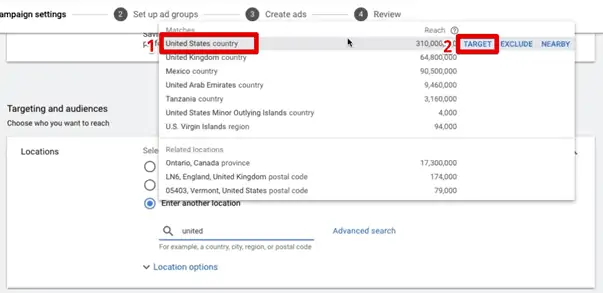
If you want to make sure that you don’t advertise in certain places, you can also exclude countries.

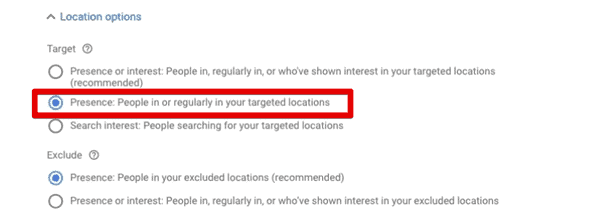
If we hover over the location options, there is another little setting called Target which is part of the location targeting. The default setting is for People in, regularly in, and, or who’ve shown interest in your target locations.
This default setting means that the Ad would be shown to somebody who has shown interest in the US (because we’ve set our location target audience as the US).
If somebody who’s in Europe has shown interest in things in America or the country in general, then the ad will be displayed to them too.

It helps to keep a tight location target setting, so only the people in that area are targeted. Then, choose the middle option Presence: People in or regularly in your target locations on your Target setting.
If you’re a local business, you don’t want to target a whole country, but just the people in your area. We can take it a bit more granular, and go to Advanced Search and go ahead for Radius targeting.

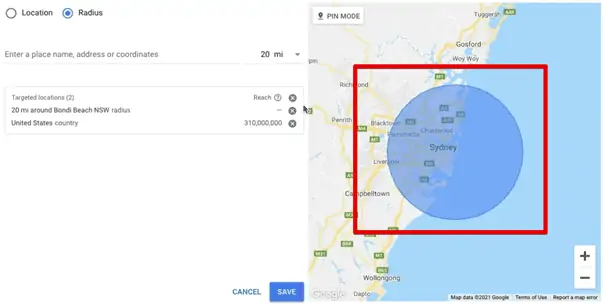
Let’s imagine we are in a suburb in Sydney. Let’s enter Bondi, then we select Bondi beach. We enter a 20-mile radius and click Target.
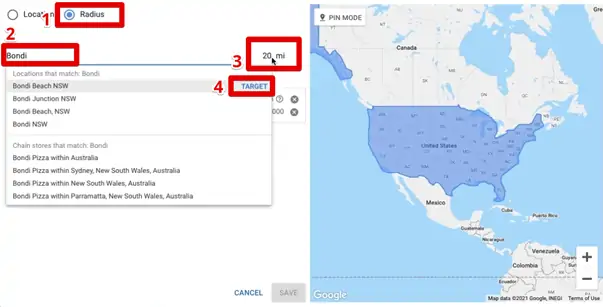
You’ll see it shows a 20-mile radius there, so you can do Radius targeting easily.
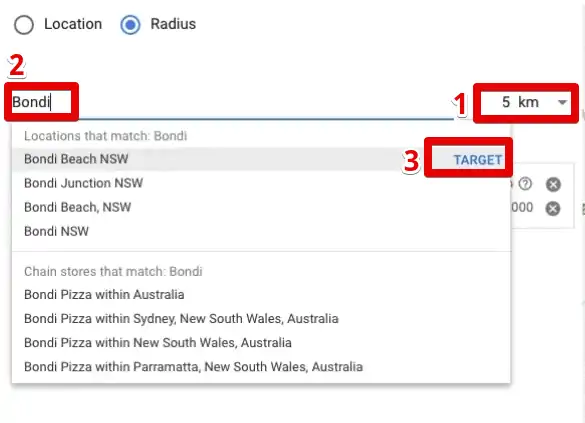
If you want to change the 20-mile radius to kilometers, you can change it to kilometers. We can make it 5 kilometers. We’ll type in Bondi, and click Target.
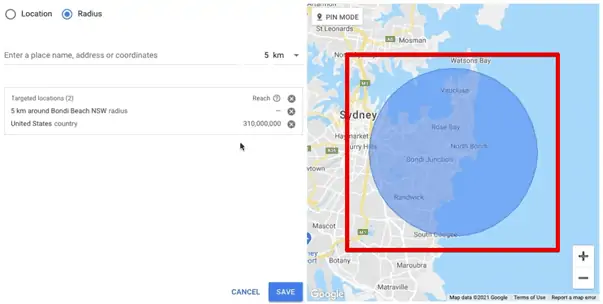
Choosing a kilometer radius makes it tighter for more impact
You can see it’s a much smaller circle, implying the ad is specific to that area only.
Depending on what type of business you have, where you want to advertise, and what’s appropriate for your depths, you can refine it even more.
Suppose you have a dental practice in Bondi, and you don’t want to advertise it to all of Australia. You only want to advertise to the area that’s reachable to you.
You can also exclude a country. So, let’s pretend we want to exclude Australia, we can add an extra layer of the filter.
Maximize conversions bidding
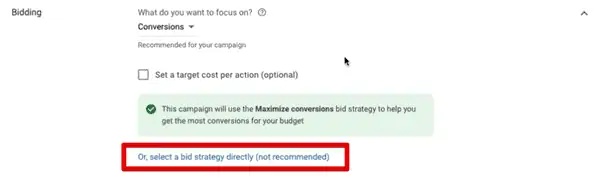
Another default setting by Google that we don’t pay attention to is the Maximize conversions bid strategy for your Ads.

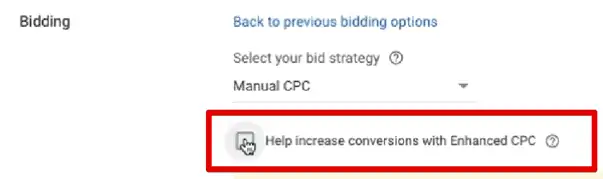
If you are starting a new search campaign with a new account, we recommend you choose the select a bid strategy directly option.
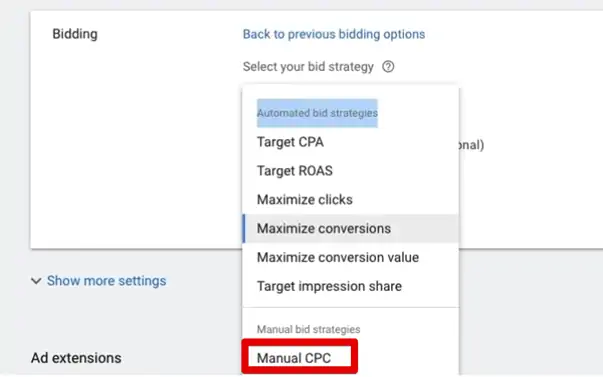
Click on Maximize conversions to select your bid strategy.

Then choose the Manual Cost per Click (CPC) bidding option.
A cost per click is how much you will pay for a click on your Ad. Having a Maximum Cost per Click bidding makes you pay the higher price set by Google.
In Manual Cost Per Click bidding, you get to choose how much you will pay Google to those who click on your Ads.
There is a category called Automated bid strategies. This category has many bidding strategies such as Target CPA, Target ROAS, Maximize clicks, Target impression share, etc, which are handed over to Google. This means that Google will inform you how much you’ll pay for the bid.
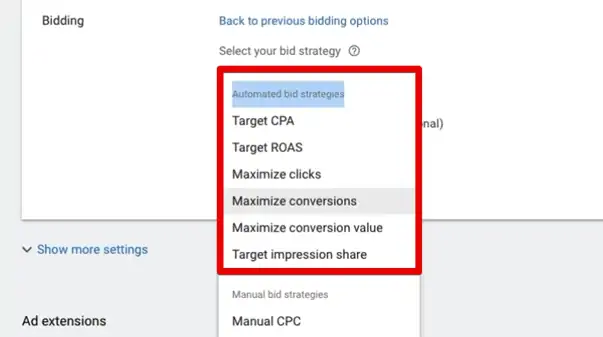
These Automated bid strategies are advanced techniques. Once your account has some conversions under its belt, and once it has the data, then Google will automatically optimize your account.
Once you have some data, then you can do the automated bid strategies. But initially, you want to do Manual CPC.
Another sly setting is the Help increase conversions with Enhanced CPC. Here Google is asking if they have permission to bid a little bit more when you can get a conversion.
This is not a good idea, so proceed to deselect it as well. You need to be strict with Google, and with the manual cost per click.
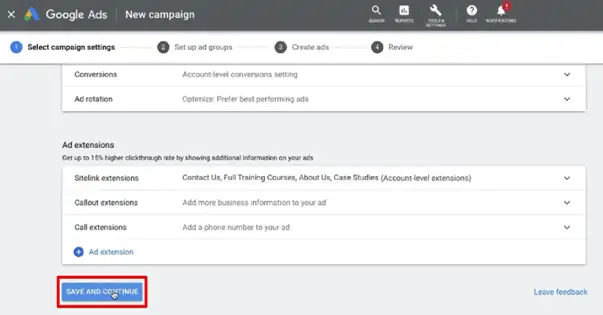
Click on Save and Continue.
Now, let’s proceed to explore other fatal mistakes we can avoid.
Keyword theme Ad groups
An ad group contains one or more ads that share similar targets. Each campaign is made up of one or more ad groups.
One of the most important things to do while creating an Ad group is to make the ad target the audience by using specific keywords.
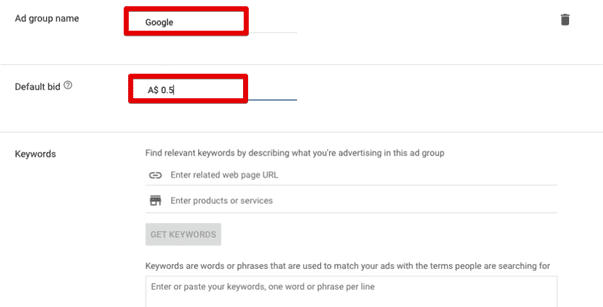
Here, we create an Ad group name called Google. Set the default bid, in this instance, 50 cents. You can always change this later on.
We are going to add some keywords. A mistake that many people make unconsciously is that they don’t create keyword-themed Ad groups.
It’s erroneous to add all the keywords in one Ad group. Sometimes one might add all the keywords in the same group, related or not, hoping for a far reach. This usually doesn’t work very well. There is a way you can avoid this!
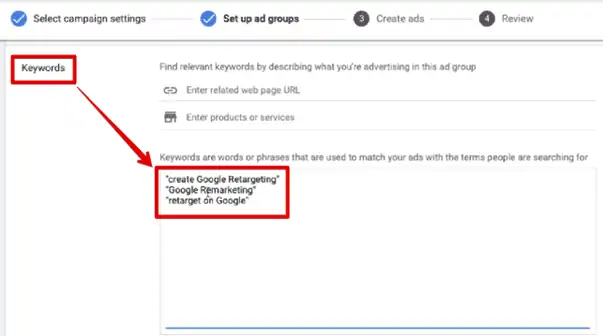
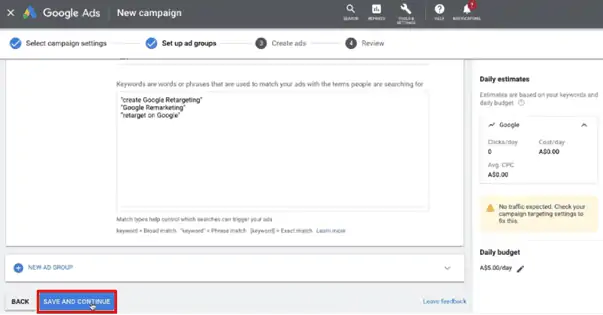
You need to make keyword-themed Ad groups. You can proceed to create one Ad group per keyword. Go ahead and put your keywords in the dialog box.
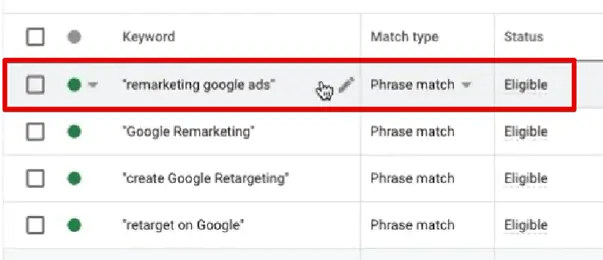
For instance, we’ll do a phrase match and say create Google retargeting in inverted commas.
💡 Top Tip: Adding syntax is a great way to get your campaign up and running efficiently.
If you put a keyword without any syntax, it’s called a Broad match. If you add inverted commas to your keyword, it is a Phrase match. Having square brackets around the keyword gives an Exact match.
Google’s algorithm will help fetch results to the searcher when they type in a word or a phrase. It then becomes necessary that you should ensure that you have a phrase match as your setting, if not an exact match
On the ad group, you see these keywords are very related to each other. There are slight variations, but it’s all about Google remarketing or retargeting Google or retargeting on Google.
Using a Phrase match allows for additional terms before and after it. So, we don’t have to think of every possible combination. We can be a bit flexible with that.
You can avoid this error by creating keyword-themed Ad Groups and making sure the keywords are closely related to each other.
If you want to add to keywords, go ahead while making a new AdGroup for the cohort of keywords you’ll be using.
You can focus your ad on Facebook consumers by creating a Facebook retargeting ad. Finally, polish the ad created by designing your Facebook-centric ad group.
Let’s Save and Continue.
Writing the Ad
This is where we’re going to need a final URL. Go to your website, copy and paste the URL on the Final URL section because that’s where you want to send the traffic to.
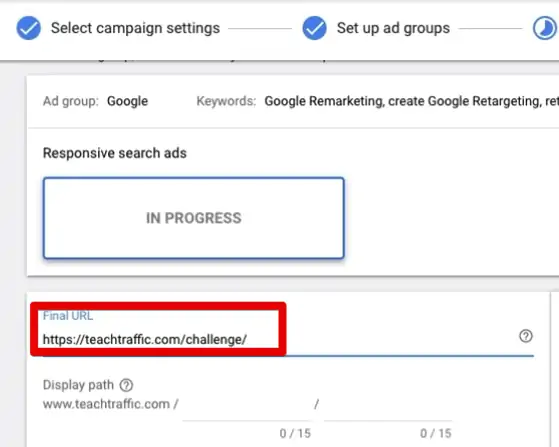
🚨 Note: The default type for a new Ad Group is to have Responsive search ads.
When you paste the final URL, notice, that it’s changed the display path to teachtraffic.com and here you can put in whatever words you want.
This URL can be up to 15 characters long and it’s useful to optimize the search campaign. Let’s do it in lowercase. We can say ‘retargeting challene‘, because it’s a 14-day retargeting challenge.
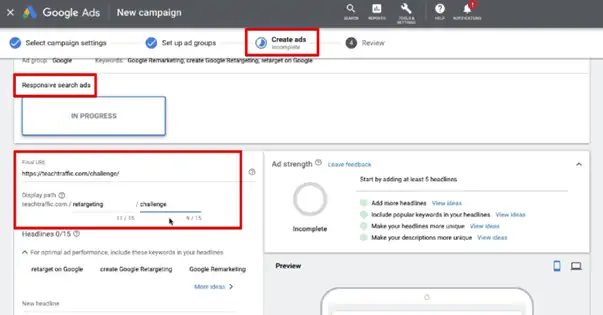
Even though this URL teachetraffic.com/retargeting/challenge does not exist, it’s a way of having more keywords in the ad. It displays the same way in the preview.
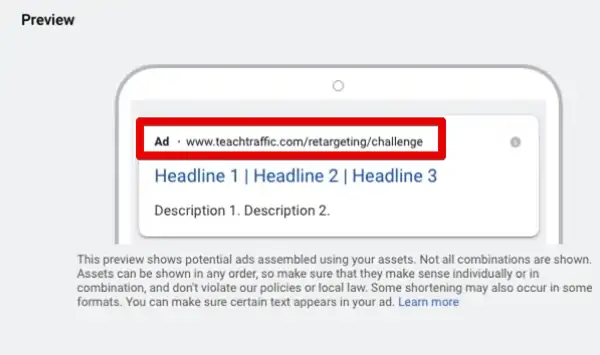
Don’t worry if the URL you’ve submitted is not live on your website; it’s a good way to get some keywords in the ad group.
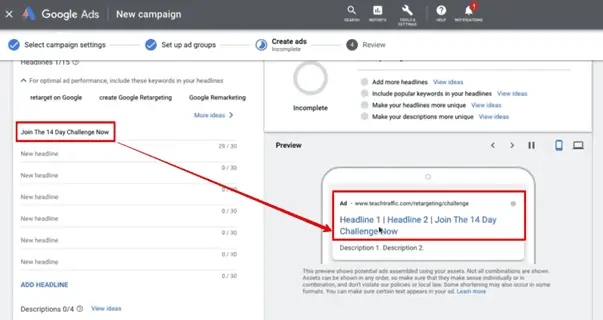
After you input the URL, start creating the headlines. You can put up to 15 different headlines of which Google will choose three different headlines randomly.

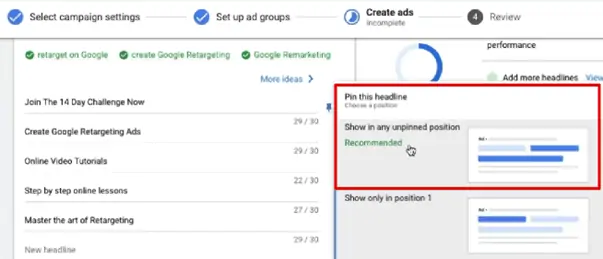
You can also pin a headline as well; this helps in making sure that the chosen headline will always show at that particular position.
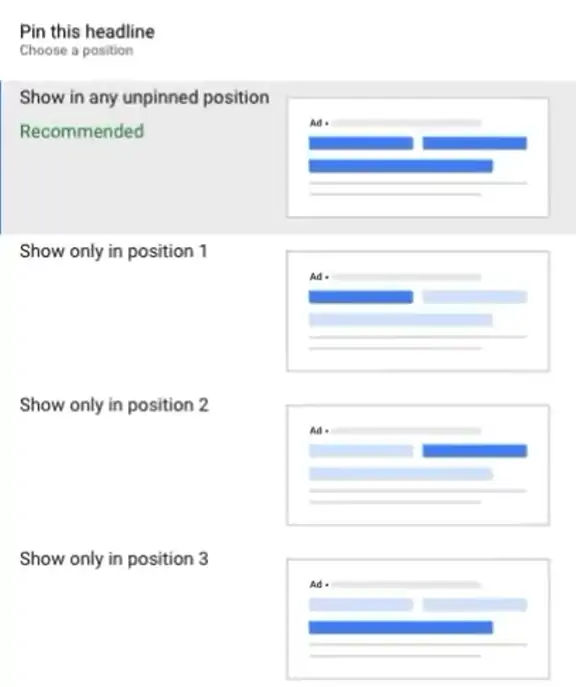
All right, so let’s put in some headlines. Make sure they are short and direct. You can notice that Google tries to suggest a headline based on the Ad you’ve created.
We are keeping the Join The 14-Day Challenge Now. You can notice that the Preview shows the headline at a particular spot. You can pin it and can choose where the headline should be displayed.
In this instance, we’ve chosen position 1, which means it will only show in position one. Thus, this headline will always show in position 1 while headlines 2 and 3, will rotate through different options.
In considering the keywords chosen to create Google retargeting, let’s say create Google Retargeting Ads. This may get disapproved because Google is a trademarked term, but it may slip under the radar.
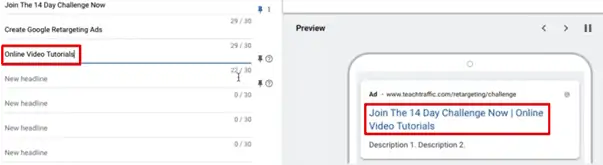
We’ve added other headlines such as Online Video Tutorials and we notice it shows up on the preview.
If you’ve used up all available characters for a headline, fret not. Just keep adding headlines and Google can work an algorithm to make your ad work.
You can choose to pin a headline or two and keep them in order. If you want to unpin, just click the pin button and it’s unpinned.
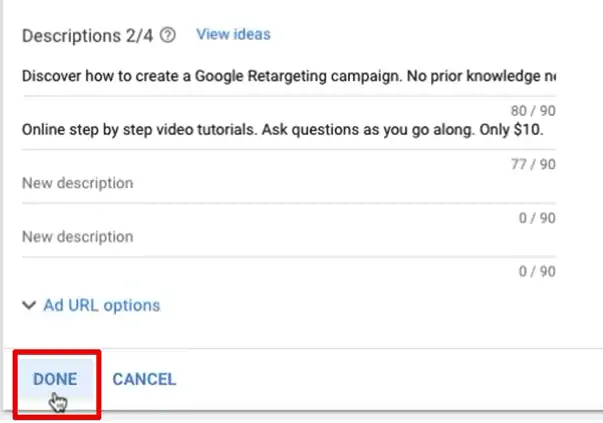
Next, we will write our description of the Ad with up to 90 characters. Google provides us with four spaces to write in our descriptions and then chooses two of these four for us randomly.
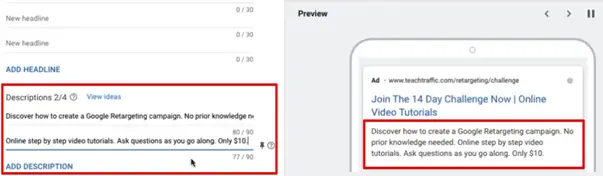
You can choose to pin one of these, similar to our headlines. Google shows two descriptions in an automated manner.
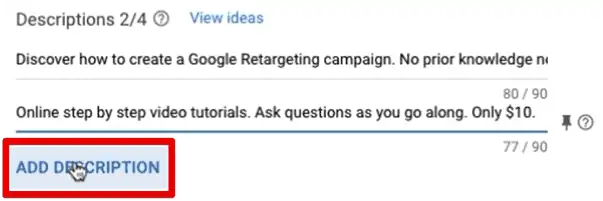
If you put in the four, they will oscillate and change between which two they choose. So, once we’ve finished this, we click Done.
How likely is it that your one ad will work all the time? You should add another ad variation to the same ad group. You will find that the performance of different ads works differently.
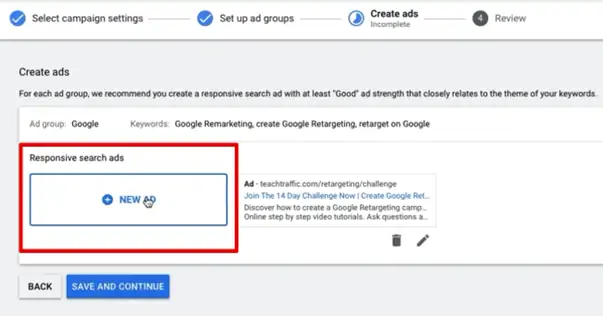
Another benefit of having more than one ad per ad group is that Google figures which ad works better for the audience and keeps that ad running more often. In case your Ad #1 doesn’t work its magic, you always have Ad #2 or #3 to count on.
This is a Google Split Test – the two Ads are split and tested to see which performs better. Let’s add at least two different Ads to split tests. I am going to click Save and Continue to create our ad.
If it says that no traffic is expected, don’t worry about it. They’re trying to get us to choose more keywords, which is something we want to avoid.
I’m just going to hit Publish. Let it run for 48 hours and see how it goes.
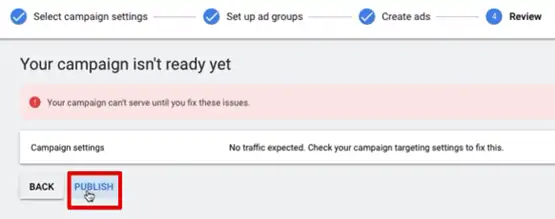
After publishing the campaign, the webpage shows you an overview of the ad campaign you created.

BONUS: Negative Keywords
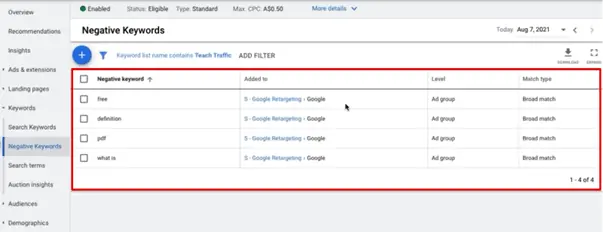
Heading over to the Ad Campaign you’ve created, under overview, click on Keywords and find Negative Keywords.

This is the bonus mistake! Negative keywords will tell Google when somebody types a particular word, and we do not want the ad to show.
You want to add negative keywords because they will save you from wasting money on ads and audiences that aren’t right.
In this instance, a classic negative keyword would be ‘free’. Somebody who wants free information cannot access it because we’re selling this information.
Another one would be, ‘what is retargeting?‘ – we don’t want that either. We want somebody who knows what retargeting is. We just want them to learn how to do it.

‘Definition’ is another word we want to avoid. This could be somebody who’s just been researching retargeting.
Thus, whether a word or a phrase, if you believe it’s going to display your ad, you can prevent the display to unwanted traffic by using Negative Keywords.
Often, people have no negative keywords. You can start a practice of keyword lists. This is one central location to look after the negative keywords that you can then apply to multiple campaigns.
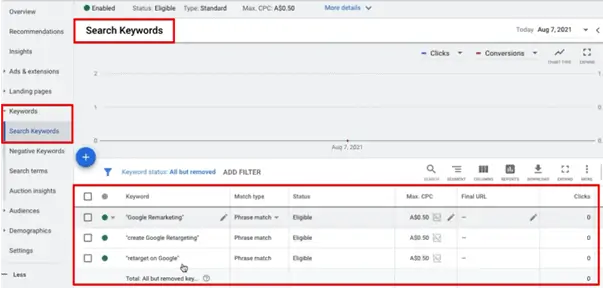
Click Save and now you’ve got the list of negative keywords. We can also see the search keywords that we put.
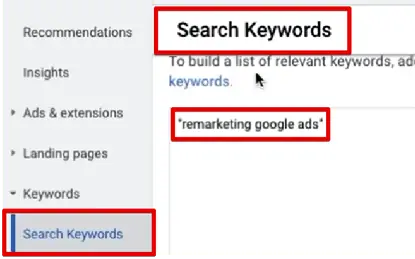
If you want to add some more keywords, you can just easily go over the keyword suggestions and add them. Make sure to put them in double quotes to ensure a phrased match instead of a broad match.
You can also go over to the Search Keywords and find your keywords for the ad group.
You may add, remove or alter the keywords from the list. Heading over to the plus sign on the top left corner to add words, you’ll be taken to the list where you can input the phrases. On the right, you can also find a list of suggested words.

If you choose to add keywords, either by typing or from the list, remember to use the double quotes to ensure it follows a phrase match.
Once all the additions are done, you can save it and you’ll have a preview of the keywords that are in use/active for your ad group.
In conclusion, these are the 8 fatal mistakes one can make while creating a new ad campaign.
FAQ
Should I keep the Search Network and Display Network options checked in my search campaign?
By default, Google Ads keeps both the Search Network and Display Network options checked. While it’s a good idea to keep the Display Network option on, it is not recommended to use the Search Network option for a search campaign.
How can I set an ad schedule for my search campaign?
You can set an ad schedule to run your ads by accessing the ad schedule settings in your campaign setup. You can choose the days and timings when you want your ad to run or set it to run all days with no time restrictions.
What are keyword-themed ad groups, and why are they important?
Keyword-themed ad groups are ad groups that contain ads with similar targets. Each ad group focuses on specific keywords that are closely related to each other. Creating keyword-themed ad groups helps improve the relevancy and performance of your ads.
Summary
We’ve gone through the 8 fatal mistakes one can make while creating an advertisement on Google Ads. You can not only save your money on Ads but also optimize them to the right traffic and increase revenue by avoiding them.
Setting up conversion tracking helps you know whether the Ad is profitable for you. A display or a search network option would show your Ads everywhere – appropriate and inappropriate – leading to unwanted traffic. You’d want to turn off the Search Network and Display Network settings.
Ad scheduling helps you avoid the display of an ad at odd hours. Schedule your Ad to advertise as per your convenience and get the clicks coming in!
Location targeting is important to ensure you’ve targeted the right audience geographically.
Minimize the bidding by choosing manual bidding strategies and keep Keyword-themed Ad Groups in your campaign.
Make sure you write a compelling ad with all the choices provided. Use the Negative Keywords list to ensure the ads don’t pop up when the said word is used.
If you’re a retailer, make sure to check out these 5 tips for optimizing Google shopping campaigns.
Do you have any other strategies that work well for you? Let us know in the comments below!
Subscribe & Get our FREE Google Ads Technical Audit Checklist


")