
Last Modified on July 5, 2024
Where are you from?
Well, that’s probably a question that a website has never asked you specifically. But they know exactly where you are. This is how they give you suggestions or advertising that is tailored to your location.

Sign up to the FREE GTM for Beginners Course...
So how do they do this? It’s something called geolocation.
In this guide, we’ll show you everything you need to know about geolocation tracking with Google Tag Manager.
An overview of what we’ll cover in this guide:
- What is Geolocation?
- How to Use Geolocation with Google Tag Manager?
- Use Cases
- Use it for GDPR Compliance
What Is Geolocation?
Geolocation tracks your general location (such as city or zip code) based on information such as your IP address.
Geolocation has been around for a long time in digital marketing. You probably have seen advertising like “singles in your area,” or the language or currency settings were automatically adjusted to your location. This is the work of geolocation.
How to Use Geolocation with Google Tag Manager?
Now you’re probably wondering how you can utilize geolocation in combination with Google Tag Manager to deploy codes or show certain things on the website based on the location of the user.
Well, it’s not a built-in functionality of Google Tag Manager per se, and that’s why we need to utilize third-party services to get that geolocation information. And in this tutorial, I’m gonna show you how.
Before we get started, let’s acknowledge first that it’s not possible to locate the user using Google Tag Manager’s built-in features.
Why is that? Well, to geolocate the user, you would need to have the IP address of the request that comes in from the serve. Google Tag Manager is JavaScript that runs on the browser of the user, and there’s no way of identifying the IP address through the browser alone. And therefore there’s no way in Google Tag Manager to, for example, build a variable that would get us the IP address through JavaScript.
So how do we work around this?
There are 3 ways to use geolocation with Google Tag Manager:
- Using A Geolocation API
- Building Custom Listener In Google Tag Manager
- Building A Data Layer Variable
Using A Geolocation API
The only way we could do this is through outside help from either your server, where you could install a script that sends it back to the page or to use a geolocation API. One of those is geoPlugin. It’s a free API service that you can install on your website.
This geoPlugin is free to use unless your site gets a certain volume of visitors, so I recommend reading through their user policy to see if you need premium access.
You don’t have to sign up for anything, but if you want to use the geoPlugin with your SSL site so you have https at the front of your domain, then you need to pay for access. It’s quite affordable at around $12 per year. For that, you would then also need your API key to attach to the script here.
So how would we install this? All you would need is this JavaScript here that you can simply copy from their website.

Now, we’ll install this with Google Tag Manager.
In Google Tag Manager, go to Tags and click New. Click in the Tag Configuration field to choose a Tag type. We’ll select Custom HTML and name this GEO for now.

Now, let’s implement the code. Paste the following script from geoPlugin’s website into the HTML field:
<script language="JavaScript" src="http://www.geoplugin.net/javascript.gp" type="text/javascript"></script>

Then let’s attach a trigger. I’ll just go with the All Pages trigger and save this.

Refresh our preview and debug mode, refresh our page, and this is now deployed on our website.
This code requests information from the geoPlugin. Then, geoPlugin will send the data back and give us some information in the form of some JavaScript functions.

To execute these functions, go to View → Developer Tools → JavaScript Console.

You can then type in one of these commands. So, for example, let’s go with geoplugin_city().

It will give us back the actual city where the plugin located us.

Let’s go into geoplugin_countryCode(), now assuming we are in Berlin.

We should get DE for Germany (“Deutschland”).

A host of other functions are available here that you could execute. Some are more useful than others but you could use these in your Google Tag Manager account.
Building Custom Listener In Google Tag Manager
I’d recommend building a custom listener function out of this. So I’ve done this right here, where you load the geoPlugin.

We execute these functions, put them in variables, and then push them to the Data Layer so that we’ll have them available in Google Tag Manager as well.
So how do we do this? In this case, the code for the listener Tag starts with
<script>
  (function()  {
Then, each line of code after that creates a GTM variable out of the geoPlugin functions. The variable is created and named after the geoPlugin functions (i.e., geoPlugin function geofunction_city becomes var city inline 4). After variables are attached to geoPlugin functions, the next part sends these variables to the Data Layer:
dataLayer.push({
The first line associates these variables with the event Tag that we named GEO earlier in the tutorial. Then, each line after that instructs GTM how to present each variable in the data layer. Then, the code just needs the closing tags.

Now, let’s add this to our page. For this, we just need to add our trigger. Unpause the trigger if it is Paused, save it, and refresh the page.

And this code should then deploy our data to the Data Layer. We can see here our geo event. Let’s look into the Data Layer. We have these Data Layer information now available, i.e. country name, country code, currency code, the city, and the region.
There’s also more data available in the API. We haven’t pushed all of the data here. You can look through the documentation to find more relevant data for you.

Building A Data Layer Variable
Now, what can you do with this information once it’s in the data layer? You can build a Data Layer Variable.
Let’s say we wanted to pull out the country name from the Data Layer. How would we do that? You can go over to Google Tag Manager → Variables → New User-Defined Variables.

This will be a Data Layer Variable for the country.

The next step is to Choose variable type. We’ll choose Data Layer Variable here.

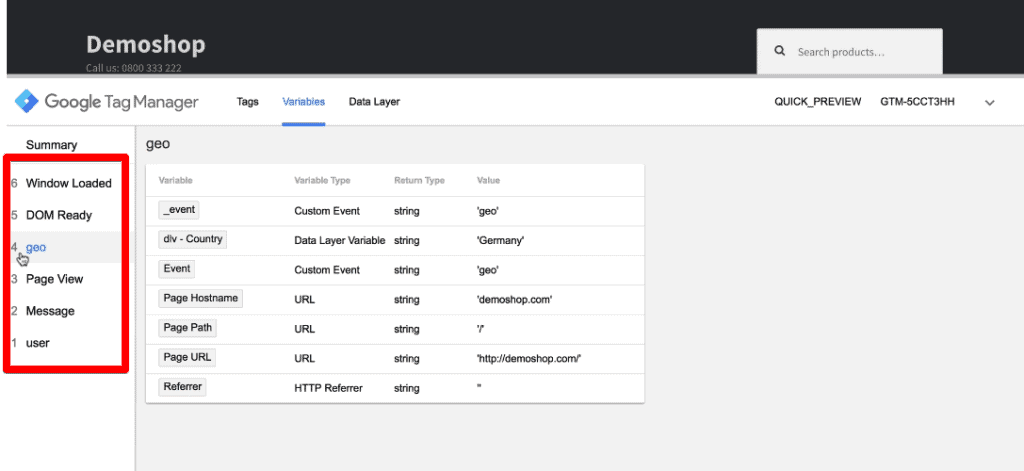
Now, enter the key, which in our case, is the countryName.

Alright, let’s save this and refresh our page. We should now see in our Variables menu i.e if you go to geo, that our dlv – Country is Germany.

Use Cases For Geolocation
Use Geolocation In Google Tag Manager Tags
Now, what can we do with this country and this variable? Well, obviously we could use this in our tags.
Use Geolocation In Google Analytics Event Tag
So if we had an event tag by Google Analytics, we could use this in our actions. For example, if we click on the brick icon we can choose our dlv – Country and to send this over to Google Analytics.

Use Geolocation In Facebook Event Tag
Once this Tag gets fired, we could also put this into a Facebook Tag.

So, if you have a custom event you could just add this in an object. It is called the key event, country in our case. Then input {{dlv – Country}} along with the key event.
Thus, every time you send a track click, it would also have the custom parameter attached as the country and then the country that the user came from. This is how you can use it in Tags.

Use Geolocation In Google Tag Manager Triggers
But, you’d probably be more interested to use this in our triggers. So, let’s add a new trigger.

For triggers, it is equally easy to add this. We could also build a country trigger for Germany and use our preferred trigger here.

However, we need to be very careful when this information is actually available. Because if we look into our waterfall of the different events that fire, we see that the geo information in the data layers is only available after the PageView.
Sometimes it is available before the DOM Ready, and sometimes after the DOM Ready. This will depend on your website, how fast it loads and how many Tags are there in your Google Tag Manager account.
Now if we wanted to use this in a trigger that fires normally on DOM Ready or Window Loaded, this would be fine. But any information or any event that you would use previous to the geo event would not fire because the event data is not there yet. This is one thing you should be aware of.
Now, go to Custom Event since we already have a geo event in our Data Layer.

Your custom event is geo and the trigger will be fired only when the condition dlv – Country equals Germany is met.

Let’s save this and then we could attach this to one of our Tags. For this, click on Tags → GA – Event – Click and Choose a trigger that we had created earlier named geo – country Germany.

Save this and refresh our page. We will see that the geo Event Tag has fired because our Variable dlv – Country was Germany.

Now to test this out, let us open up a VPN and select United States. Then, refresh the page.

You will see a different page because mine is actually running on the local host. But, note that the Listener – Geo Tag fired, and the GA – Event – Click didn’t fire.

This is because our geolocation will now be the country ‘United States’.

This works as expected. I hope you now understand how you can use this geolocation plug-in for your purposes to deploy Tags.
Use Geolocation For GDPR Compliance
You also might want to use this for compliance purposes for GDPR or any other privacy laws. There is an add-on available with the geoPlugin. But, the condition here is that your country should be a European country.
There’s also an add-on to this geoPlugin which actually lets you see if the user is eligible for the EU Cookie Law.

This will be applicable only if the visitor comes from one of the 27 European countries that have the EU Cookie Law in place. You could deploy the geoplugin_ cookieConsent() to see whether the user is eligible. This is because not all the European countries come under the purview of the GDPR relevant zone.

If a user is eligible under the EU Cookie Law only then show them a cookie consent form and other users from other countries are not shown the form.
This is more involved because you would probably like to connect tools like Google Analytics or Adwords. But, you only want to fire these Tags when somebody consents to your cookies and consents to being tracked. So there would be multiple operations.
First, you would like to know if the user is from one of the eligible countries. This can be done with the geo API. Then show the user the cookie consent form and only if he confirms it, you would send off the Google Analytics Tag.
But that, in turn, would also mean that a user who is not from one of these European countries would not be shown this information. However, he still needs to be geolocated. This means the earliest that you need this information is actually at geo level and not at the PageView level.
Thus, you would not fire your Google Analytics and other tracking tools at the earliest possible moment i.e at the PageView level when the page actually loads. Instead, you would need to wait every time for the Geolocation API and do your different checks such as if the user wants to be tracked or not.
However, this would mean that you will have a greater discrepancy in your data quality. This is because the later that you fire codes, the lower the probability of the user still being on the page. The user could have moved on to the next link or left your site by the time the Geolocation API gives back the data to you.
Thus, it is important to prioritize carefully if you want to install such privacy checks with this Geolocation API.
Accuracy Issues of IP-Based Geolocation
- VPN Usage: Many users employ Virtual Private Networks (VPNs) to mask their actual location. This can lead to inaccurate geolocation data as the detected IP address might be from a completely different region.
- Mobile Networks: Users accessing your site via mobile networks might be detected in the location of the network’s data center, not their actual location.
- Shared IPs: Some users might share the same IP address (e.g., users in a university or large corporation), which can skew location-specific analytics.
FAQ
Can GTM itself locate the user using geolocation?
No, GTM cannot directly locate the user using its built-in features. GTM runs on the user’s browser, and there is no way to identify the user’s IP address through the browser alone. To work around this limitation, you need to rely on external services like geoPlugin or scripts installed on your server to retrieve geolocation information.
How can I use the geolocation data in GTM?
Once you have retrieved the geolocation data using the geoPlugin API and pushed it to the Data Layer, you can create Data Layer Variables in GTM to access specific information. These variables can be used in tags, such as Google Analytics or Facebook tags, to customize actions or conditions based on the user’s geolocation.
What are some use cases for geolocation with GTM?
Customizing content or advertisements based on the user’s location.
Enhancing GDPR compliance by displaying cookie consent forms only to users from eligible European countries.
Tailoring analytics tracking or marketing campaigns to specific regions or languages.
Summary
And that’s it! This is how you can utilize geolocation with the help of Google Tag Manager. You may want to geolocate a user for different reasons and you can utilize this technique to do the same.
There are multiple ways in which you can use geolocation with Google Tag Manager. One of the ways is to use a geolocation API such as geoPlugin. You can also build a custom listener or a data layer variable to geolocate users with Google Tag Manager.
Also, you can use the geolocation API to enforce GDPR Compliance.
If you’re new to Google Tag Manager, our free beginner video course on Google Tag Manager is a great place to start!
Please feel free to leave a comment below about your experience using geoPlugin to geolocate users.
Sign up to the FREE GTM for Beginners Course...


")
Hi Julian, when I try the functions I get this error, any idea
Had the same issue but as it turns out my shop will only work with the SSL version. It’s 12 Euro’s per year. https://www.geoplugin.com/webservices/ssl
After you subscribe, then use the following script per their website:
This happens to me too.
Meaning the error below described by Alvaro.
I was also getting the error described by Alvaro.
However, I realize that because my site is secure (https://mySecuresite.com) – I needed to subscribe to their SSL version of the script.
It’s only 12 Euro per year.
Sign up here: https://www.geoplugin.com/home/?action=payment&type=ssl
Worked just fine after that.