
Last Modified on November 1, 2024
🚨 Note: All standard Universal Analytics properties will stop processing new hits on July 1, 2023. 360 Universal Analytics properties will stop processing new hits on October 1, 2023. That’s why it is recommended to do the GA4 migration.
Google Analytics E-Commerce functionality is great for tracking sales in an E-Commerce store and Goals are nice if you have a Thank You Page after your Form Submit, but what about conversions that don’t happen on your website itself?

Master the basics with our FREE GA4 Course for Beginners
This is where having a system for offline conversion tracking may be useful.
Let’s take this example scenario: A visitor goes to your website, fills out your interest form and leaves submits their contact information to you, ready for you to follow up with them.
Your data then gets stored in your CRM (such as ActiveCampaign) and your Sales Rep follows up with this hot lead via the phone. A few days later the results are in.
The prospect is now a client and you have successfully converted this user.
In your CRM you can now mark the user as a client, but Google Analytics would be left in the dark, forever wondering whether they became a client or not.
After all, your client didn’t visit a Thank You Page and no trigger indicating a conversion was fire.
Obviously this is a huge problem and can lead to your data in Google Analytics not lining up with your CRM…so what can we do?
An overview of what we’ll cover:
- Enter Google Analytics Offline Conversion Tracking
- What is the Google Analytics measurement protocol?
- How can we utilize the measurement protocol for Offline Conversion Tracking?
- Building an Offline Conversion Tracking CRM implementation
Enter Google Analytics Offline Conversion Tracking
Since there is no automatic connection between the user converting and Google Analytics, we’ll need to establish something manually.
Google Analytics actually has a method for sending data without going through the Google Analytics Tracking script (ga.js or gtag.js).
It’s called the Measurement Protocol.

What is the Google Analytics Measurement Protocol?
You can simply think of it as the API that you can use to send data into Google Analytics. Yes, one way to utilize the Measurement Protocol would be to use the tracking script via JavaScript, but that all happens directly in the user’s browser.
If you wanted to send data on behalf of someone else, you’d need to use the server-side capabilities of the Measurement Protocol which means sending a post request to the endpoint.
One important part of sending information to Google Analytics is the Client ID. It identifies the user uniquely to Google Analytics and lets it connect your tracking data to a source.
How Can We Utilize the Measurement Protocol for Offline Conversion Tracking?
If you have the Client ID of the original user, who submitted his information into your CRM, you can utilize this ID to construct a Measurement Protocol hit and transfer it to Google Analytics.
And voila, it’s actually quite straightforward, you have just turned this form submit into an E-Commerce Transaction within Google Analytics.
Building an Offline Conversion Tracking CRM Implementation
Components
To put this theoretical construct into practice we need 4 main elements:
- A standard Web form connected to your CRM. An important part of this is including a hidden form field that is ready to receive the Client ID and store it in the CRM with the user’s profile.
- Grab the User’s Client ID from the Google Analytics tracker and push it into our CRM (with a hidden form field) to attach it to the internal user profile
- Prepare a Webhook catcher which builds a Measurement Protocol Hit and sends it off to Google Analytics
- Configure our CRM to send off a Webhook request every time a conversion takes place
The tools
For offline conversion tracking to work, we’ll need a few different tools:
- Google Tag Manager – to get a hold of the assigned Google Analytics Client ID and to fill that information into our hidden form field.
- Google Apps Script – (in combination with Google Sheets) to build our Webhook catcher which also will act as our Measurement Protocol Hit builder and sender. In combination, we’ll have a Google Sheet to configure our Hit and keep a log of the data we have sent.
- Active Campaign – This is the CRM we use at MeausreSchool, but you could use any CRM that captures information and is able to send off a Webhook. Parts of this guide will be specific to Active Campaign, but the principles apply to other tools like Hubspot, Salesforce, MailChimp or Drip.
The User Flow
Let’s step through the flow of what we want to actually happen bit by bit. This will help us come up with a clear plan of implementation and help us later if we need to debug our implementation:
- The User enters the site and your Google Analytics Pageview tag fires. This will automatically create a Client ID in the GA Tracker and Cookie
- When the user enters a page with a form on it a Google Tag Manager Variable will fetch our Client ID for the GA Tracker and a Custom HTML Tag will automatically fill it into a hidden form field we prepared. Once the form is submitted we should have the Client ID attached to the internal profile of the user
- The user converts. Internally, in our CRM, we manually mark that they have converted (via a Tag in ActiveCampaign), which kicks off our Webhook post to our Google Apps Script. Part of this webhook post will contain the Client ID that we’ve captured beforehand.
- Our Google Apps Script URL receives the information of the CRM and runs through a custom script that uses the Client ID + the information configured in our sheet to build a Measurement Protocol Hit. This hit will then be sent to Google Analytics. Afterward, the Apps Script will write an entry into our Log Sheet for safekeeping.
- The Hit is received by Google Analytics and processed into an E-Commerce Transaction. We can check up on the hit by entering our Real-Time Reporting and seeing the Event show up in the Events tab. We should also be able to see our data in the E-Commerce reports, as well as in our standard reports which show our Conversions (like the Acquisition reports).
But this will only show after some processing, which can take anywhere from 30 minutes up to 48 hours. Another interesting place to view your offline conversion tracking data is in the User Explorer Report, where you can see each individual user and their interactions by Client ID.
Prerequisites
In this guide, I want to focus on the essential techniques to getting conversion Tracking set up in your CRM. To follow this you should already have set up:
- A Form on your website with a hidden Form field that is ready to receive the Client ID and attach it to the profile of the user who submitted the form
- Google Tag Manager with a basic Google Analytics Pageview tag installed and working on your website
- A Google account to use Google Drive and Google Sheets with
The Step by Step Guide to Setting Up CRM Offline Conversion Tracking
As discussed previously we have 4 key elements to put in place if we want to make this tracking technique work. As the Form, with its hidden form field, is a prerequisite (which I won’t cover here) let’s start with setting up our Google Tag Manager tags to transport our Client ID into the form.
Setting Up Google Tag Manager Client ID Capturing
Let’s enter our Google Tag Manager account and create one Variable and one Tag (btw. You can also conveniently use this Container Download to directly upload the Tag and Variable to your account).
This guide assumes that you have Google Tag Manager already installed and a Google Analytics tag that sends over regular Pageview Hits. Now we’ll install a Variable that grabs the current ClientID from your Tracker.
To install this Variable, go to the Variables Menu and click on New in the User-Defined Variable section. Name it, I’d go with “cjs – ClientID”. For the type, choose Custom JavaScript Variable. The code you need to enter is from my friend Simo Ahava’s old blog post:
function() {
  try {
    var trackers = ga.getAll();
    var i, len;
    for (i = 0, len = trackers.length; i < len; i += 1) {
      if (trackers[i].get('trackingId') === "UA-123456-7") {
        return trackers[i].get('clientId');
      }
    }
  } catch(e) {}
  return 'false';
}
On line 6 don’t forget to change the UA Code to your Google Analytics Tracking ID.
With this setup. Let’s put our Browser into the Preview mode and head back to our website to see the results. We should now be able to see our Client ID Variable filled on the Dom Ready or Window Loaded event.
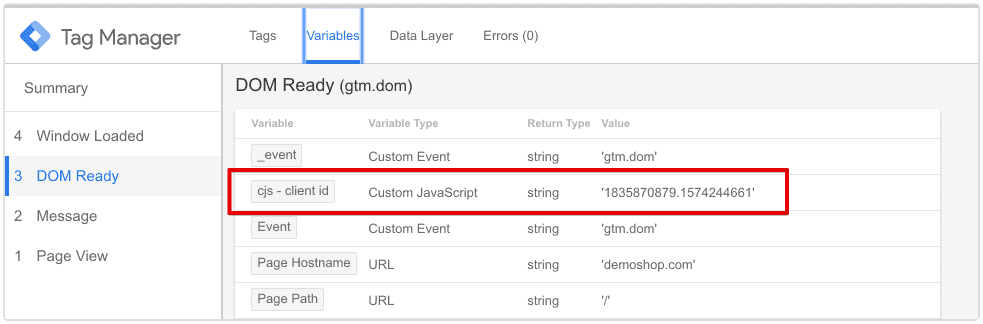
You now have the Client ID Variable correctly installed.
Next, head over to the page your form is embedded on. We’ll need to take a look at it in the Elements Panel in Chrome Developer Tools and find the hidden form field in the HTML.
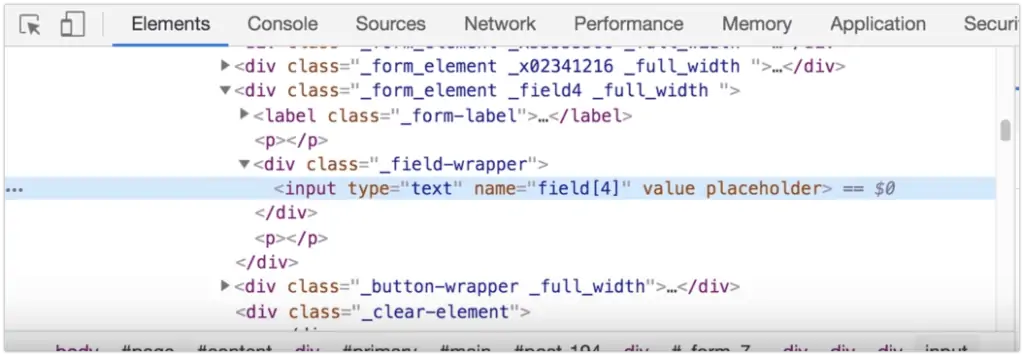
In my example form here, I see this line, which resembles my hidden form field we want to fill. We’ll need to find the correct CSS selector that lets us identify this element uniquely. If you don’t know anything about the CSS Selector you may want to check out this tutorial game.
In our case, the input field has a name. Therefore we can use the CSS Selector:
input[name='field[4]']Let’s bring it all together by implementing a custom script that takes our Variable and fills it into the hidden form field in our form.
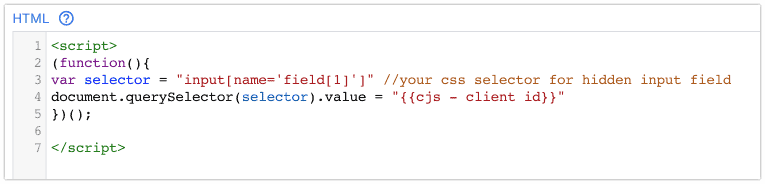
Back in Google Tag Manager, let’s build a new Custom HTML Tag to fill our form field. We’ll go to Tags > New and type the name: Form Fill – Client ID – Dom Ready. As the configuration, we’ll choose the Custom HTML Tag option and enter the following code:
<script>
(function(){
var selector = "YOURCSSSELECTOR" //your css selector for hidden input field
document.querySelector(selector).value = "{{cjs - client id}}"
})();

</script>
Now we can use our previously determined CSS Selector to replace the YOURCSSSELECTOR placeholder on line 3. Be sure to keep the quotation marks that surround your CSS Selector.
The last step is to attach a trigger to our tag.
We don’t want the tag to fire too early (which would be before the form is actually visible to the user) and not so late that the user has time to fill out the form. So let’s click on the trigger section and then on the + to create a new trigger for this tag.
As the name, I’d simply suggest ‘dom – form’. The type would be a Dom Ready trigger and we’ll choose the Some DOM Ready Events to open up our filter conditions. Here we want to configure two conditions. One for ensuring we are on the right page and another to ensure our Client ID is actually available. So we’ll configure them:
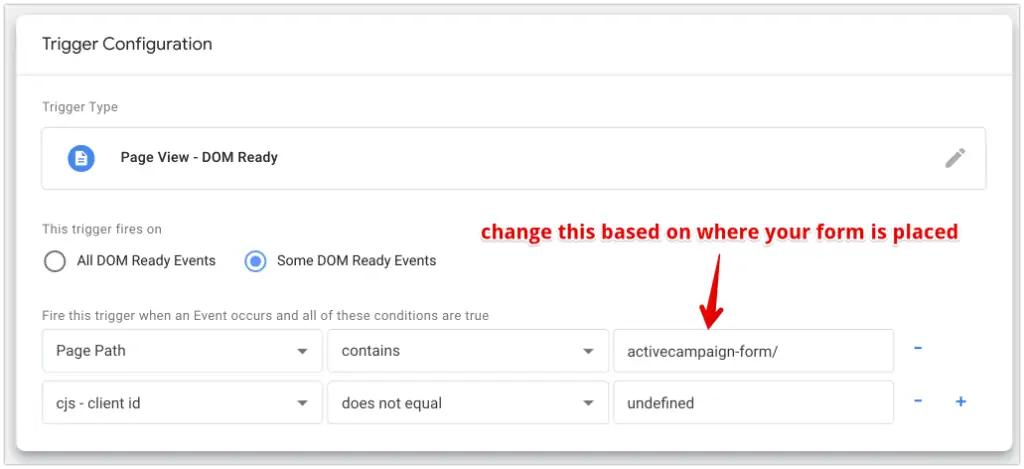
The first condition is something you want to edit so it’s unique to the URL of the page where your form is located.
Alright, this should be good to go. Let’s test this. We’ll refresh our Preview Mode and refresh our page where our form is on.
Then let’s fill out our form with some test data and send it off.
When we go to look up the user in our CRM, (here ActiveCampaign) we should now see the Client ID in the appropriate field.
How to Trigger a Measurement Protocol Offline Conversion
The second component we need to set up is a Measurement Protocol Hit Sender for our Offline Conversion. This is where Google Apps Script comes in.
Why Google Apps Script?
Because it’s a lightweight version of a server setup, that has only one function: Receiving our Client ID and Sending our Measurement Protocol Hit to Google Analytics. Of course, we could also do this with any other server-side scripting solution (like Node.js), but this solution can be easily copied and deployed:
The first step is to optin below to get the offline conversion tracking template:
Copy it into your Google Drive Account.
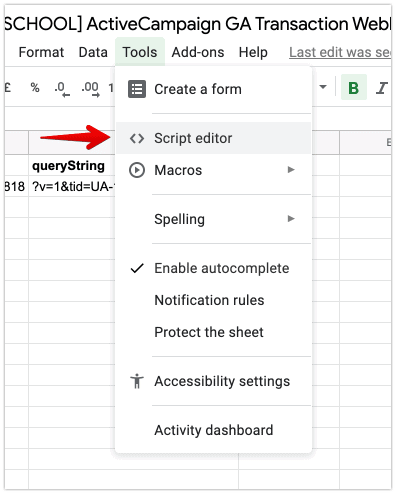
Once it’s opened up we need to authorize the script and note down our Apps Script URL. So click on Tools > Script Editor and you should see a little script I’ve written that does the heavy lifting of sending & receiving our data.
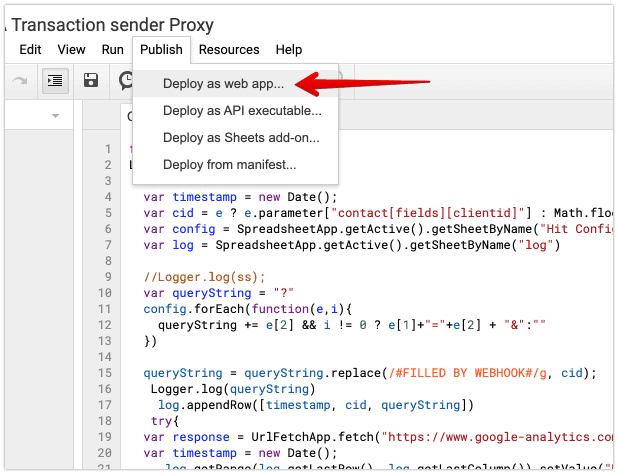
All you need to do is click on the top menu item Publish > Deploy as Web App.
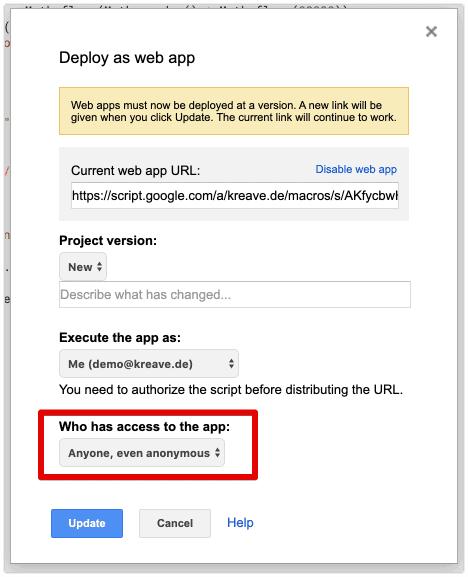
On the next screen, you only have to ensure the last option Who has access to the app: is set to Anyone, even anonymous. Then you can click on deploy.
Next, you will be greeted with the permissions screen. You need to give permissions in order to receive and send data via the Apps Script application.
Don’t worry, we won’t be able to see or read any of your data – this is something that stays entirely in your Google Account. What it does is facilitate a connection between your CRM and Google Analytics.
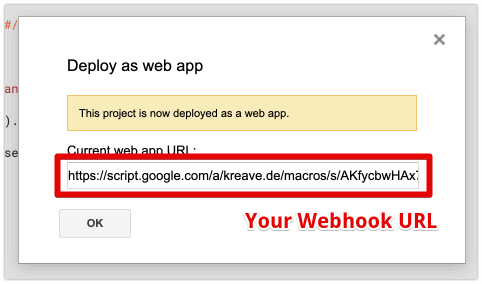
Once you have gone through this process, you should get your new Web App URL, which is the Webhook URL we’ll use in our CRM later on. So note this URL down for later reference.
You can then close out of these windows and go back to the sheet.
Configuring Google Sheets to send data to Google Analytics
Head to the second tab in your sheet which is entitled Hit Config. Here you’ll see how our Hit is constructed and what data is preconfigured to be sent to Google Analytics. By default, we are sending an event hit to Google Analytics which will fill your Enhanced Ecommerce Reports through a transaction payload.
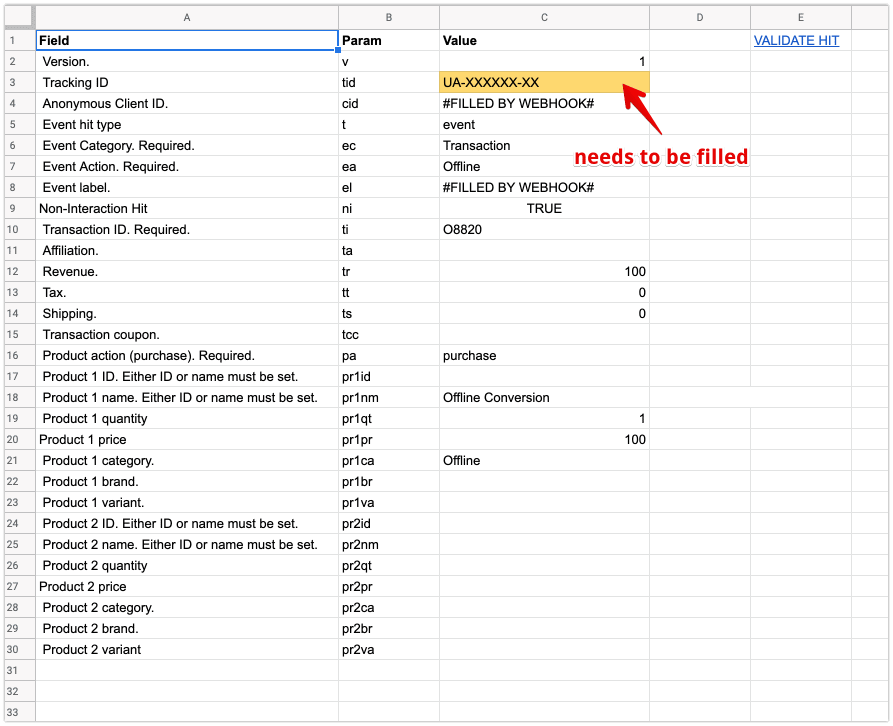
You could alter the hit if you wanted to, but it might take additional validation (use the link on the top of the page to validate your hit) and even customization of the script, so be aware of what you are getting into.
For anyone who just wants to get this working, you wouldn’t need to do anything else other than changing the yellow box value for your unique Google Analytics Tracking ID.
Bringing it All together: Connecting ActiveCampaign to Our Measurement Protocol Script
Now that we have set up our AppScript, we just need to send the actual user profile from our CRM to the Script.
There are different ways of doing this, but in our particular example with Active Campaign, I will go with the Automation option. This will allow me to set a trigger (such as when a tag is added to the contact) and then send that data to Google Analytics.
For a ready-made ActiveCampaign Automation solution you can simply copy this automation into your Active Campaign account. It uses the adding of the tag “Offline Conversion” as a trigger and sends the User Contact to a Webhook URL. The only step you need to adjust is the actual webhook URL. Click on the Webhook step and replace the URL with your Web App URL from your Google Apps Script.

Don’t forget to Activate your new automation and voila everything is done and setup.
Let’s Test Our Offline Conversion Tracking
Now that everything is set up, we should be able to track Offline Conversion. Let’s go through our testing scenario:
- Fill out your Form
- Find your contact in ActiveCampaign and add the tag ‘Offline Conversion’
That’s all there is to it.
In Google Analytics you should now see a new Event in your Real-Time Report, Events section (click the Tab Events (Last 30 min) as it is a Non-Interaction Hit), this should be visible right after you added the tag.

Once your data is tracked and processed (it can take anywhere between 30 mins to 48 hours) you should also be able to see your user in the User Explorer Report.
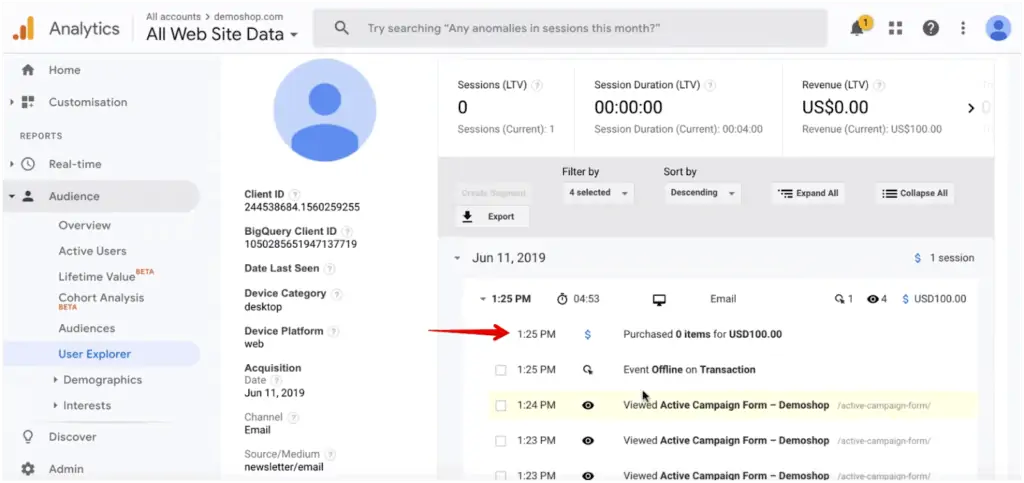
This is where you can see the exact users ClientID (should be the same as in the AC Profile), their revenue, LTV and also the original source of that user.
And of course, this data will also be transferred into our E-Commerce Reports – although the data you’d see is limited to a random Order ID with no products attached to the transaction.

FAQ
How can I track offline conversions with Google Analytics?
Google Analytics provides a method called the Measurement Protocol, which allows you to send data to Google Analytics without using the standard tracking script. By utilizing the Measurement Protocol, you can track offline conversions by sending relevant data, such as client IDs, to Google Analytics.
How do I set up offline conversion tracking with Google Tag Manager?
The process involves creating a custom JavaScript variable in Google Tag Manager to fetch the client ID, using a custom HTML tag to fill the client ID into a hidden form field, and setting up a trigger to fire the tag when the form is submitted. This captures the client ID and associates it with the user’s profile.
How do I trigger a measurement protocol offline conversion?
To trigger a measurement protocol offline conversion, you need to set up a webhook catcher using Google Apps Script. The webhook catcher receives the client ID and other information from your CRM system, and then constructs a measurement protocol hit based on that data. The hit is then sent to Google Analytics, converting the offline conversion into an e-commerce transaction.
Summary
Users don’t always convert on a website. That little fact is ignored by a lot of website owners and they are missing out on some sweet conversion data.
Luckily Google Analytics gives us the capability to send conversion data into the system via the Measurement Protocol. Unfortunately, this is a pretty manual process which is not always the preferred option when it comes to tracking things.
In this tutorial, I presented my little solution to getting set up with offline conversion tracking.
We basically just made GTM talk to our CRM, which then talks to Google Analytics through Google Apps Script.
While you could achieve the same result using many other methods, I like this solution as it’s Free and allows you to use a few cool features in your marketing tools. Besides, it’s always cooler to build something yourself, that you control.
I’d love to hear from you in the comments, if you tried this solution out and if you have any questions.
Master the basics with our FREE GA4 Course for Beginners


")
Thank you for this interesting article. This was very helpful. I was wondering if you could use a Goal instead of a Transaction as hit? Thus, if it’s possible to change the Google Sheet file with Goal attributes? I think that would be even more interesting in order to measure intermediary steps, like when a phone call occured, before an actual sale happens.
Goal is not a hit type in Google Analytics. You can only send in Pageviews, Events, Timing Hits and Transaction (old e-commerce). We are actually sending an Event here. You could simply build a Goal based on an Event and the config of Transaction. Of course you can also customize the settings in the sheet to send any other hit type you’d like.
How do we take this a step further and figure out which Google Ad (search ads) that they clicked and found our website? Can we track that as well ?
Great explanation Julian! Do you have any solution or idea for this case: A customer visits the website and then decides just to send an email or just picks up the phone and calls? At least in Germany this is what still happens the most…
I wonder if there is a better way than asking the customer how they found us and converted… often they don’t know exactly anymore…
Thanks for you input!
Greetings Felix
for email you could use the same method. For calls you would need to look into Call tracking software that changes your number on the website dynamically and keeps track of the client id.
the client id part doesnt work! the value returned ‘false’ and i tried it to capture to the form and it appears nothing. Need help…i’m using wix
function() {
try {
var trackers = ga.getAll();
var i, len;
for (i = 0, len = trackers.length; i < len; i += 1) {
if (trackers[i].get('trackingId') === "UA-123456-7") {
return trackers[i].get('clientId');
}
}
} catch(e) {}
return 'false';
}
This code return 'false' to my preview testing. Need Help
You need to change the UA-12345-7 and change it to your GA Tracking ID
Hi Julian! Great post! Thanks! I am trying to check Device Path for our clients. We have a form in our web where we get potential client data (Email, Name, etc). After that, in our CRM, we manually turn each user to Client (Status:Won) As far as I understood, I will be able to send an event from my CRM to Analytics when someone turns to be a client. But I am facing two problems: 1-In User Explorer section I just can visualize transactions splitted by Users IDs, not any other event. It is possible to visualize Events by User… Read more »
you would need to send in the client ID as a custom dimension. Then you could split it up
Hi Julian. Could you elaborate on this? I’m facing a similar issue where I want to see more information about the sessions that resulted in the offline conversion. I have everything setup as per your guide and also send in the clientID as a custom dimension, but I still can’t see any information other than client ids and the conversion details. Nothing about the session that resulted in the conversion such as the landing page or source. Unless I click on each client ID individually. Thanks!
Hey man, Thanks for the outstanding video and the article. I was able to fetch the client id to the Marketo instance we have. But the Problem is when i’m filling the form in Chrome it’s all good. But when comes to Mozilla the script is not able to fetch the ga id to the datalayer itself. can you please help?
Hi Julian, thanks a lot for the great tutorial! It is definitiely a very valuable way of getting around iPaaS tools when they can’t be used… (legal reasons and other). My question would be if you are sharing the App Script code somewhere?
yes, you can make a copy of the sheet here https://docs.google.com/spreadsheets/d/1oKNZhJ6SjJZVmyA4oh5q_XcYZ_FNC8YWNqY2Y7tSc8g/copy
Hi Julian,
Great idea. Question for you, for some reason I am getting undefined Cid.
example:
?v=1&tid=UA-MY -1&cid=undefined&t=event&ec=Transaction&ea=Offline&el=undefined&ni=true&ti=O9812&tr=100&pa=purchase&pr1nm=Offline Conversion&pr1qt=1&pr1pr=100&pr1ca=Offline&)
This is what my CRM sends out :
https://script.google.com/macros/s/AKfycbxOy4IjAtqN18mx8mZhp47inNkcInV9rilxmGprC08ichMBPBw/exec?cid=Buyers.GAID /// this should be cid sent with form///
Thank you!
It would be super helpful to have a GA4 version of this, if possible.