

Last Modified on February 12, 2024
In this guide, I’ll be going over my top 10 Google Tag Manager variables and give you a brief overview of each one.
I won’t get too much into how each variable actually works but I will go into some of the ways you can use them in GTM.

Sign up to the FREE GTM for Beginners Course...
🚨 Note: If you’re new to Google Tag Manager, check out our Google Tag Manager tutorial and master the basics.
What are Google Tag Manager Variables?
Variables are like placeholders within Google Tag Manager that let you fill your tags, triggers, and other variables with this placeholder information. These variables get resolved during the page load and can hold different values.
Here are the Top 10 GTM variables:
1. Data Layer Variable
The first variable is the Data Layer Variable. If you have a Data Layer already set up on your page, you’ll be able to pull out the data stored in the value of Data Layer and transfer it to a Data Layer Variable as shown in the visitorType example below:

Once you have set up your Data Layer Variable, you will see it under Variables.

How to Set Up a Data Layer Variable?
To set up your Data Layer Variable, simply go over to Google Tag Manager and on the variables panel, create a new variable of the type Data Layer Variables. In this case, we want to pull out the value of our visitor logged out and store it in a Data Layer Variable.

To do this, simply enter the key into the Data Layer Variable Name field and you’ll be able to then pull this out of the Data Layer and store it in a variable.

Once done, you will see that you’ve successfully set up the visitorType Data Layer Variable.

There are a few other tricks to this Data Layer Variable. You can check it out here:
2. Auto-Event Variable
If you don’t see auto-event triggers available in this list – for example, the Click Trigger – then you need to enable all your auto-event tracking variables before moving forward.

How to Enable Auto-Event Variables?
To enable Auto-Event Variables, go over to your variable menu and Configure your built-in variables.

Here you will find certain Auto-Event Variables that you can enable, just click them and they will be enabled for you in your account.

Head back and try your click trigger. If it’s already installed, just head over to your page and reload it. You should see in your variables menu, the enabled Auto-Event Variables.
Not all of them always get filled. But if they get filled, they have some important information that lets us distinguish our different clicks from each other. And make sure our filter within our auto-event trigger is correctly filled.

3. Google Tag Settings Variables
Since the launch of GA4, there has been no replacement for the much-loved Google Analytics Settings Variable available for UA.
The wait was finally over after Google launched two new settings variables as part of the new Google Tag template. These are:
- Google Tag: Configuration Settings
- Google Tag: Event Settings
Let’s explore how these variables work.
1. Google Tag: Configuration Settings
The Google Tag can be used for any Google product like Google Ads and Merchant Center as well and replaces the GA4 Configuration tag that was used specifically to set up the GA4 measurement ID.
The Configuration Settings variable is quite useful for parameters that we can send to GA4 when the tag is first fired on the page before any GA4 event tags.
These could be things like your server-side container URL, send_page_view parameter as well as other parameters that you want to send every time the Google Tag loads.
The Google Tag is generally set to fire when the page is loaded the first time, refreshed, or when you navigate to a different page – this won’t apply to SPA websites.

🚨Note: The little checks next to the parameter names mean that it is a predefined field but that doesn’t mean you cannot add your own parameters.
This saves us time to add any parameters to the main Google Tag every time we want to update it.
In practicality, you can do that in the main Google Tag template because most users don’t have multiple tags to send the data to so many Google products where adding any parameters manually can take a long time.
The Google Tag Event Settings variable, however, can be more useful and we’ll see why in the next section.
2. Google Tag: Event Settings
This variable is helpful for adding any event parameters and user properties in one place that you want to send with every event and use them across all your event tags.
There are a lot more GA4 Event tags so updating them manually every time can be time-consuming whereas using this variable will mean you just update it once and all the event tags will inherit those values.
For instance, you want to send the content group and event timestamp with every event as the events are batched in GA4.
Although this variable is useable with other Google products the user properties are specific to GA4 – which can be added here as well.

Similar to the configuration settings variable, the predefined parameters have a little check mark next to them. These are different than the configuration ones.
The event settings variable also solves the issue for the SPA sites where the configuration tag only fires the first time and you want certain parameters to be sent with every event.
If you want to go more in-depth, check out our guide on the Google Tag settings variables.
4. URL Query Variable
The next variable is the URL Query Variable. This variable is particularly useful if you see any kind of query string in your URL and would like to get its information.
How to Pull Information through the URL Query Variable?
To pull out information through the URL Query Variable, go over and create a new variable of the type URL.

Choose Query as the component type, then type in the Query Key.

The key is whatever is in front of the equal sign of your desired value. In this sample, it would be simply s.

5. Referrer Variable
The Referrer Variable is a variable that is already built in and also enabled by default. You could find it under your variable menu shown below:

What is a Referrer Variable?
Referrer Variable is the URL that the user just came from, before he entered a page. We could utilize this to always fire a tag when somebody comes from google.com, for example, or we could also utilize this in our other tags to send that data to our analytics tools.
6. 1st Party Cookie Variable
If you navigate around with Google Tag Manager on your page, you’ll know that the preview mode reloads every time you go to a new page. That also means that the Page View, DOM Ready, and Window Loaded, appear new in your preview mode, and the data layer gets filled with new data.

Unfortunately, Google Tag Manager cannot remember anything that was going on beforehand. Each page load means a new loading of Google Tag Manager. With web development, you can persist the data. And commonly there are cookies used to do this. You can set cookies with Google Tag Manager, but that will be for another post.
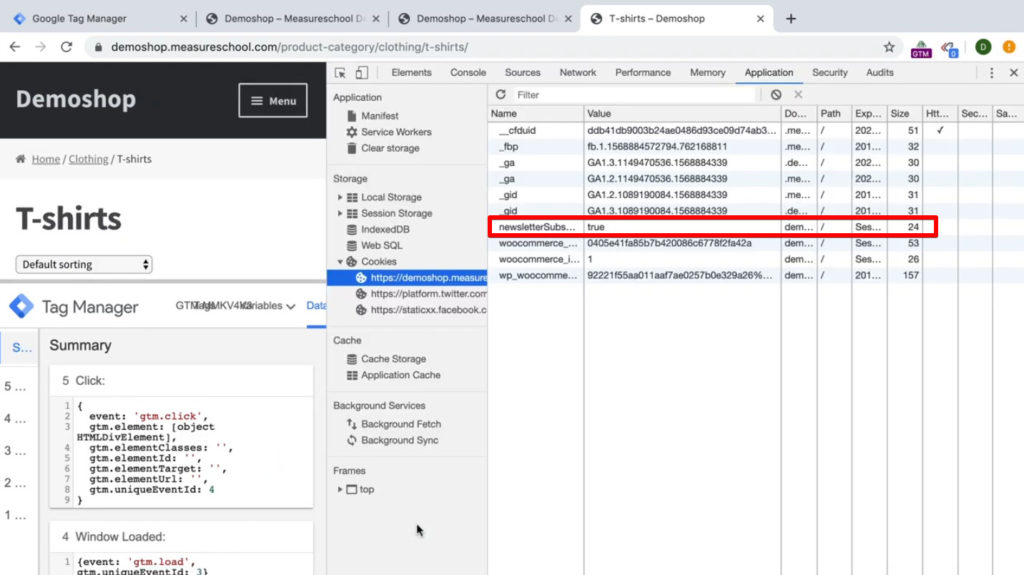
How to View Browser Cookies?
To view the cookies set on our browser, you need to open the chrome menu and go to Developer Tools.

Here we get some useful information under the application tab. And Cookies right here we can see what data was set through different code on our website.

Now in some cases, there’s more useful information. In other cases, it’s unusable because you don’t really know what it exactly means. But as I said, you could actually also set your own Cookies.
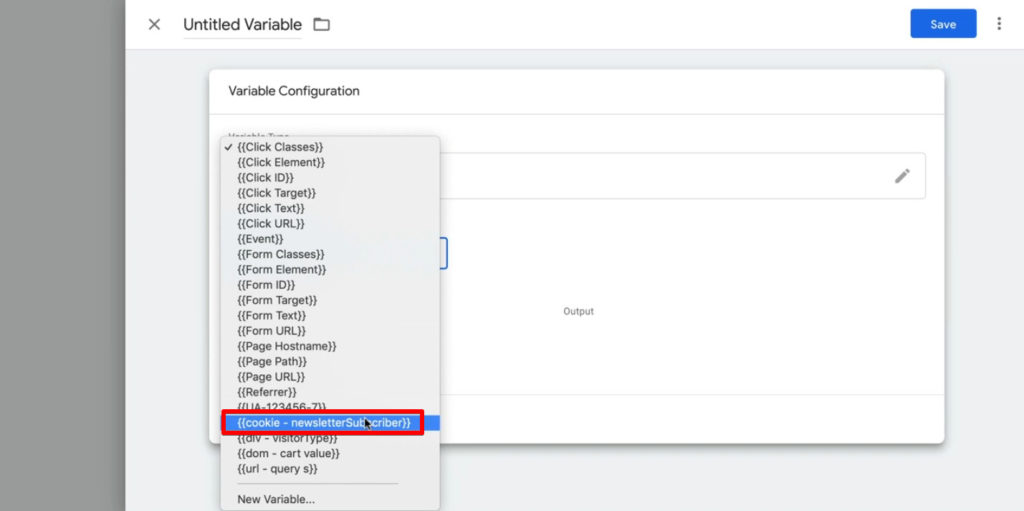
For example, this Cookie here is this user newsletterSubscriber was set to true. Probably he came from a newsletter source.
Building 1st Party Cookie Variable
To build a 1st Party Cookie Variable, all you need to do is go over to Google Tag Manager and under the user-defined Variables will choose a 1st Party Cookie Variable as our type.
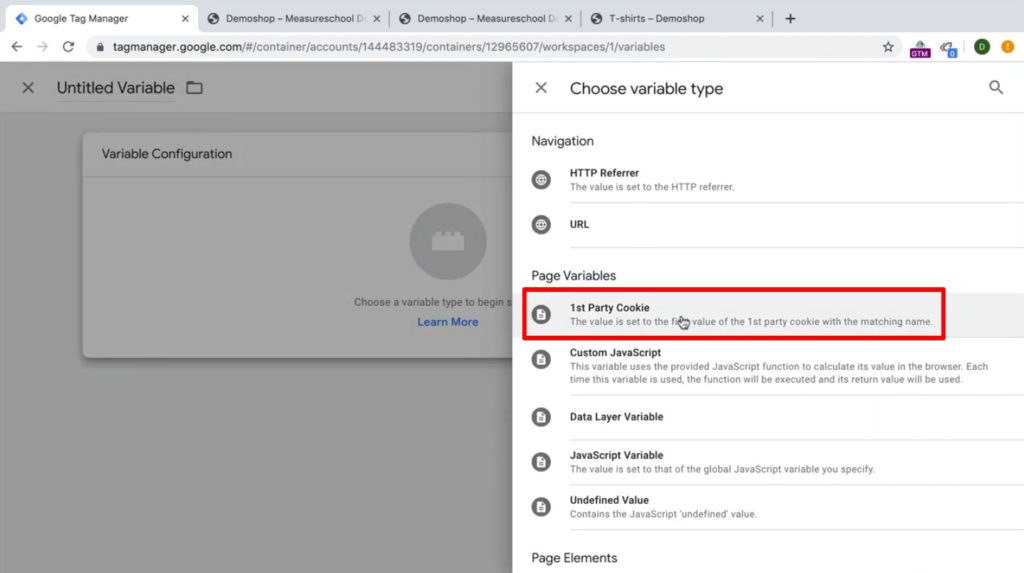
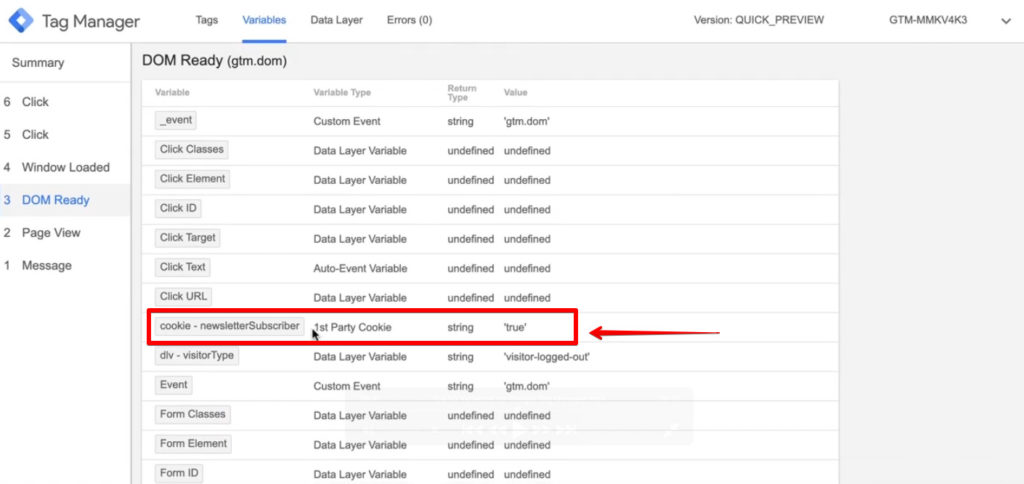
In this sample, the Cookie Name is newsletterSubscriber. And this should now pull out the right value from our Cookie.

And voila, here we go.
7. DOM Element Variable
DOM stands for document object model. This is how our site is marked up and we can simply right click on any element on our website and click on Inspect in Chrome.

This will open up the elements pane here and give you the visual representation of the document object model. With the DOM Element Variable you’ll be able to pull out any kind of node that you are interested in and get either an attribute or the text in between those elements.

How Does It Work?
An example will be pulling out the cart menu, and the amount of the cart menu. You would need to either know the ID or the CSS Selector. Luckily in this sample there is a class called amount which you can utilize in your variable really easily.
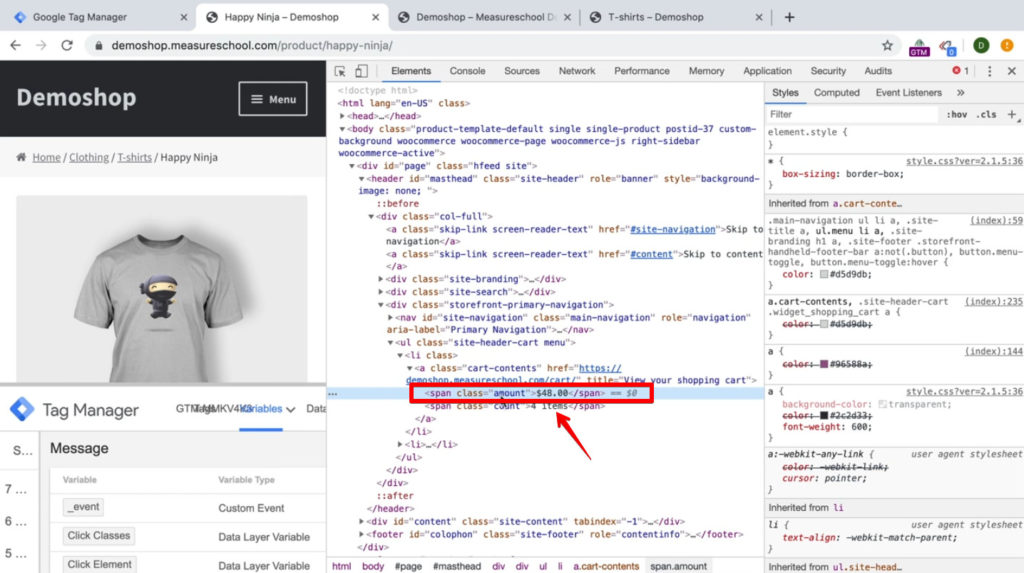
So let’s head over to Google Tag Manager. And under variables, we’ll go into our new user defined variables and click on the DOM Element for variable type.

The selection method is CSS Selector because we don’t have an ID, and we have a class so, in the element sector, you put a dot first then the amount. Note that you need to know a little bit about CSS Selectors in order to do this.
And then we can choose the attribute that we want to pull out. Since we want to pull out the text, we can leave this empty for now. Then press Save.

Screenshot of Google Tag Manager showing a variable configuration with CSS Selector as the Selection Method, .amount as the Element Sector, and a blank for the attribute name.
Try it out!

8. Lookup Table Variable
Getting more advanced, we’re gonna take a look at the Lookup Table Variable. The Lookup Table Variable has different use cases, but the easiest would be to simply rewrite an existing variable.
How to Rewrite an Existing Variable?
An example would be the variable we created earlier that would pull out the value from our cookie newsletterSubscriber, true.
Now if you use this inside of an event tag, for example, you would simply see true in the action and you wouldn’t quite know what this means. So you would like to rewrite this variable into something more recognizable like subscriber. This is easily possible with the Lookup Table variable.
Now, let’s head over to Google Tag Manager and build a new user defined variable. And this time, we’ll go with the Lookup Table.

In the variable dropdown, choose cookie.
If the input is true, then we want to rewrite it into Subscriber. If the input is false, rewrite it into a Non Subscriber. And for the default value, we can just set it to Unidentified.

Alright, let’s try this out! Our variable that we had before shouldn’t change. We still have cookie newsletterSubscriber true, but rewritten, we should have this in our Lookup Table as Subscriber.

9. Regex Lookup Table Variable
The next variable is the Regex Lookup Table Variable. What you might have noticed is that when we created our Lookup Table subscriber variable, we need to be very precise with the names.
If I type in anything extra or put a white space, it wouldn’t match up anymore. And we’ll just get undefined in our field value.
Therefore, the matching option that we have in this first input column is similar to “equals true” so the cookie newsletterSubscriber needs “equals true” in order for it to go into the output subscriber.
But what we also have available is a variable type of Regex Lookup Table.
What is Regex?
Regex stands for regular expression. And if you’re familiar with Regex, you know that you can really get detailed in your search query, which can be very powerful.
How Does It Work?
For example, we would like to classify all product pages into a product category. So we would like to have an output of “product”, simply to classify our product pages. And we can have one for category pages as well. We can easily do this with a Regex Table Variable.

In the variable Configuration page, the input would simply be Page Path. If the Page Path contains anything like / product then the output should Product. And if there’s a /category in there, then the output should be Category.

So what I will do here is put around dot stars, which means everything multiplied. So let’s put this in the front and the back here and see if this works. Let’s save this, and refresh the page.

And in all variables we now see the Regex table has the name Category that matches up the category page based on the URL path.

And if you go to a product page, it also matches the name, Product, in the Regex Table.

You can become more sophisticated with Regex Table than you are with the normal Lookup Table. And this can be very valuable, for example, for content grouping and Google Analytics or to look at the Referrer.
You could also do channel grouping really effectively, and send this on to Google Analytics easily. So Regex Table is really an advanced feature, which can be quite powerful in Google Tag Manager.
10. Custom JavaScript Variable
And we have come to, champion, the variable that rules them all, which is the Custom JavaScript Variable. Now, the Custom JavaScript Variable is probably the most versatile, but also the most complicated to write yourself (or the easiest to use if you just copy the code you need).
To be honest, the Custom JavaScript variable could potentially be used to replace all the variables that you have seen in this post, because JavaScript is the technology that is powering Google Tag Manager, and therefore will be able to do everything that Google Tag Manager does with only using JavaScript in this Custom JavaScript Variable.
How Does it Work?
Let’s go with a little example. In Google Tag Manager, I can simply go over to the user defined variables again, and create a new Custom JavaScript Variable.
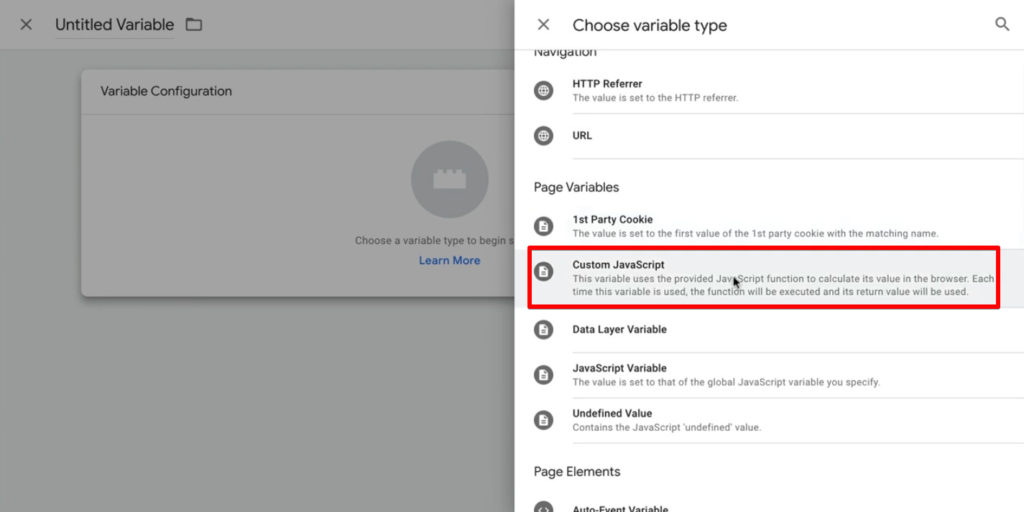
Here, we need to adhere to some conventions. One is to write an ominous function that returns a value.
To put this in right from the start in between, you can execute any kind of JavaScript code, you obviously would need to know a little bit of JavaScript. And also you need a return value.

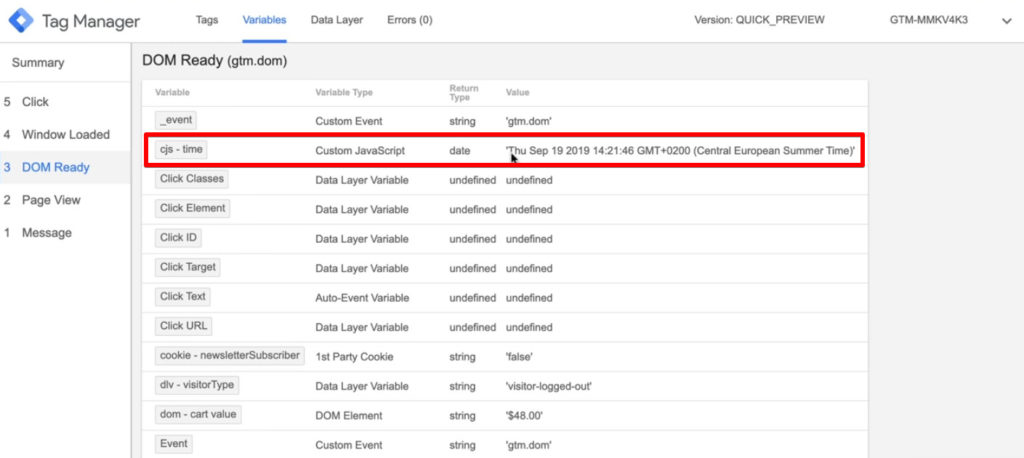
As an example, let’s go with the current time, which we can get by writing a new Date and it’s return value as time.

Refresh your page and in the variables, you’ll see a variable of the Return Type date with the current date and time as the Value. And this should dynamically change. You see here at the second level, that some of these are changing, depending on when the event loaded.
Again, with a little bit of more JavaScript code, you could probably make this quite useful. I just hope that you understand the potential of this Custom JavaScript Variable.
JavaScript can really help you step up your measuring game, so make sure to learn the top 5 techniques in JavaScript for Google Tag Manager.
FAQ
How do I set up a Data Layer Variable?
To set up a Data Layer Variable, go to the Google Tag Manager interface and navigate to the variables panel. Create a new variable of the type “Data Layer Variables” and enter the key into the Data Layer Variable Name field. This will allow you to extract and store the desired value from the Data Layer.
How do I use the DOM Element Variable?
The DOM Element Variable allows you to extract information from specific elements on your website using CSS selectors. Right-click on the element you want to extract, choose “Inspect” in Chrome, and identify the appropriate CSS selector. Create a new variable of the type “DOM Element” in GTM and configure it with the CSS selector to retrieve the desired attribute or text.
What is the Lookup Table Variable used for?
The Lookup Table Variable is used to rewrite or transform existing variables into more recognizable values. By defining input and output pairs in the lookup table configuration, you can map specific input values to corresponding output values.
Summary
Alright, so there you have it. These are my Top 10 variables that I use within Google Tag Manager. There are more out there and there are also many other use cases for these specific variables.
Learn more about tracking conversion values which helps you accurately measure the financial impact of your marketing campaigns.
I leave it up to you to give me your tips down in the comments below. I’d love to hear from you as always.
Sign up to the FREE GTM for Beginners Course...


")
In the regex table variable you suggest using page path when creating variables for a content group
The one challenge with that if the URL contains query strings, they won’t get picked up, so I recommend using Page URL instead as it contains everything
yea, good call
Hello, Thanks for that valuable information. Is there any way I can retrieve the value of a cookie with the 1st party cookie, in the case of a dynamic cookie name ? >>> My GDPR consent tool issues a different version of the cookie name (incremented with each update of the consent & pixels) like gdpr-43 (then gdpr-44). As I want trigger based on this 1st party cookie, what can I do to make sure I always retrieve the name of the “latest” cookie, to use it for my cookie name variable in the setup of the 1st party cookie… Read more »
I guess you could try to use custom JavaScript to make it dynamic. But you’d definitely need some JS experience for that
Can I populate the result value of a variable in GA. For example, I want to know what my users are searching for on a map and I can’t do it with the search of GA. At the moment, what users are searching is populating as you can see attached as an
Click Text Auto Event Variable a value comes up which is the one I want to populate in GA in order to know which addresses they are searching from our website.
Basically I want to put on my dashboard with a widget the results Value of that Variable
I’m looking for a variable where the format is a number. Is there an easy way to change the format from a string to a number? I would like to change the price (it must be a number) of a ecommerce-Datalayer without building a new datalayer.
I’ve had a similar question and seems there is no dedicated Number built-in GTM variable. So, eventually create another variable of Custom JavaScript type and just converted the
pricevariable to integer/float depending on what the input is, basically this snippet:function(){
return parseFloat({{price}});
}