

Last Modified on November 16, 2023
Did you know that you can track the audience’s movements with the help of the URL they use to access your website?
The URL has a string attached to it which contains various UTM parameters that can track and send information to the servers.

Sign up to the FREE GTM for Beginners Course...
In this guide, we’ll learn to create our own custom UTM parameters via Google Tag Manager and send the information across to the Google Analytics account to analyze it.
If you’re new to Google Tag Manager, we’d suggest going over our handy GTM tutorial for beginners first.
An overview of what we’ll cover:
So, let’s start!
What are UTM Parameters?
UTM Parameters are encoded messages that are added to the URL of the user in the form of query strings.
These parameters are readable by the search engines and sent over to our analytics accounts. They can help us in tracking the user activity on our web pages and analyze that data.
Let’s learn more about what they can do!
UTM Campaign
In this guide, you’ll learn to create a custom UTM parameter.
This means we’ll create parameters other than the existing standard Google Analytics campaign parameters.
🚨 Note: If you’re using Google Analytics 4, check out our handy guide and learn how to track UTM codes in GA4.
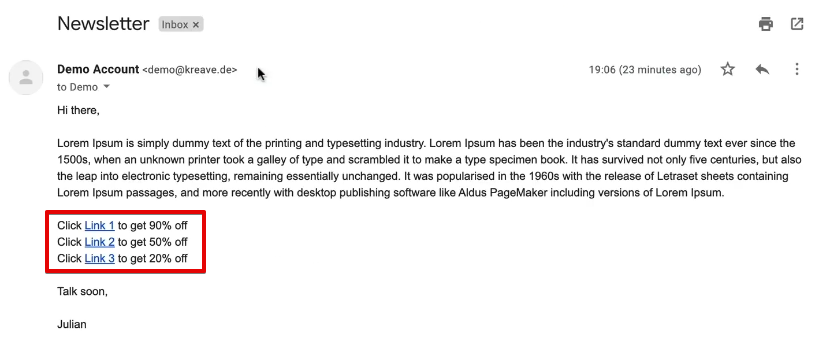
We have created a demo newsletter for mailing our audiences.
Each different link provides a different discount rate.

The URL parameters of these links are readable by Google Analytics. They further transfer this data into the campaigns.

You can also track the exact source of the traffic from your campaign data in the Google Analytics account.
You’ll need to navigate to Acquisition → Campaigns → All Campaigns. You’ll find all your active campaigns in this section.
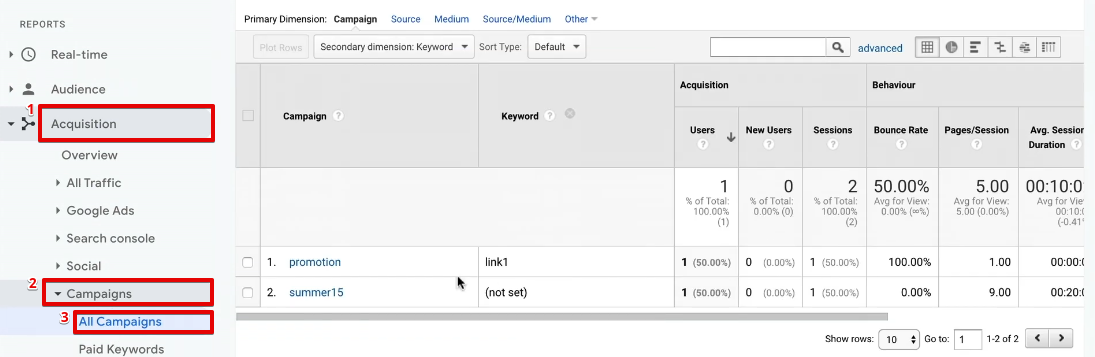
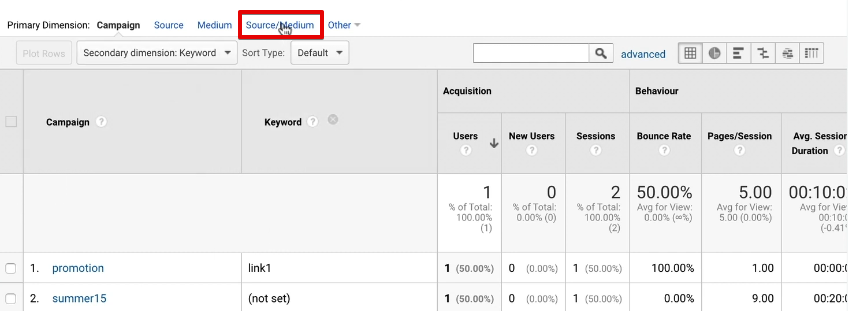
You can use various parameters including the keyword or also the Source/Medium campaigns.
For this campaign, we have used the Google Analytics Campaign URL Builder tool to create the URL.
You’ll need to fill out the required fields: Website URL, Campaign Source, Campaign Medium, and Campaign Name.

In addition to that, you can also add the Campaign Term and the Campaign Content to the URL.
Which Three Campaign Parameters Are Recommended to Manually Track Campaigns?
The three recommended campaign parameters to manually track campaigns are Campaign Source, Campaign Medium, and Campaign Name.
The campaign source parameter allows you to track the source from which the user accessed your website.
The campaign medium allows you to track the medium that the user used to access your website.
Lastly, the campaign name gives you information about the particular campaign that enables the user to access your website.
Which Tags Are Standard Google Analytics Campaign Parameters?
There are three standard Google Analytics campaign parameters, utm_source, utm_medium, and utm_content.
As the name suggests, these parameters are used to track the source of the user, the medium user used for accessing our website, and the content that the user accessed on our platform.
However, in this guide, we’ll learn to create a new parameter to track the user activity on our website manually.
🚨 Note: If you want to know your traffic’s initial source before landing on your website, you can find it out with GTM.
This happens when you have already exhausted all the parameters and still need a custom parameter to track any particular user movements on your webpage.
We can create such custom parameters with the help of Google Tag Manager, and forward this data to Google Analytics account, so we can analyze it.
Let’s see how!
How to Create Your Own UTM Parameter
Let’s take the example of the URL links we added to our newsletter.
We have different discounts on the basis of different links in the newsletter.
Unfortunately, no such parameter is available in the URL builder that can give us custom discounts based on the URL.
This is where we need to create our own UTM parameter.
Let’s say we add our own parameter of discount=90.

Refresh the page and see if Google Analytics picks up the data.
Unfortunately, Google Analytics can’t interpret the parameter as it is going beyond the set of the parameters defined to it.
We’ll learn to create a new UTM parameter, and send this data to Google Analytics so it can interpret and understand the data.
We already have the value of 90 for the keyword discount.
We already have a Tag for PageView. We’ll need to create a new custom variable to make this data available for Google Analytics to read.
Let’s see how!
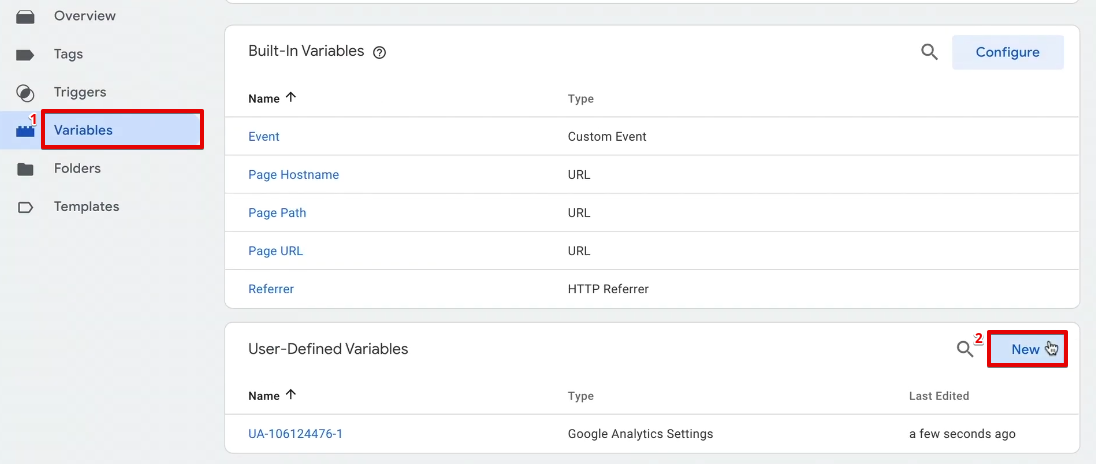
Building a New Custom Variable in Google Tag Manager
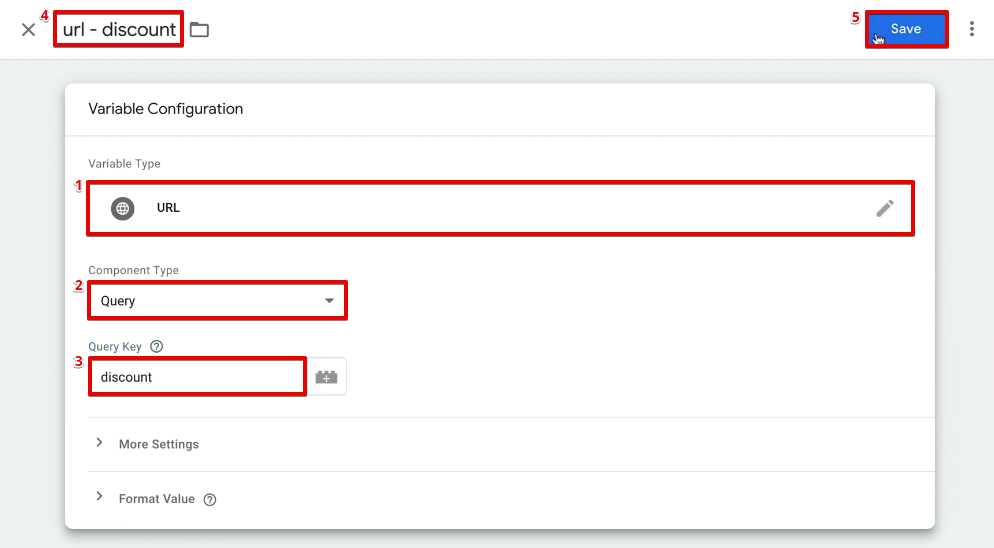
Click on New from the Variables section.
We’ll choose the Variable Type as URL. Our Component Type will be Query.
We’ll use the Query Key of discount. The query key is the keyword we use before the equal sign on the query string.
You can understand how to use query strings and parameters before setting up custom parameters.
Once done, we’ll add a Name to the variable, and click on Save.
We’ll refresh our preview and debug mode, as well as refresh the website to see how the variable works.
We’ll check the Variables section for the PageView event.
We can see that the url – discount holds the value of 90.
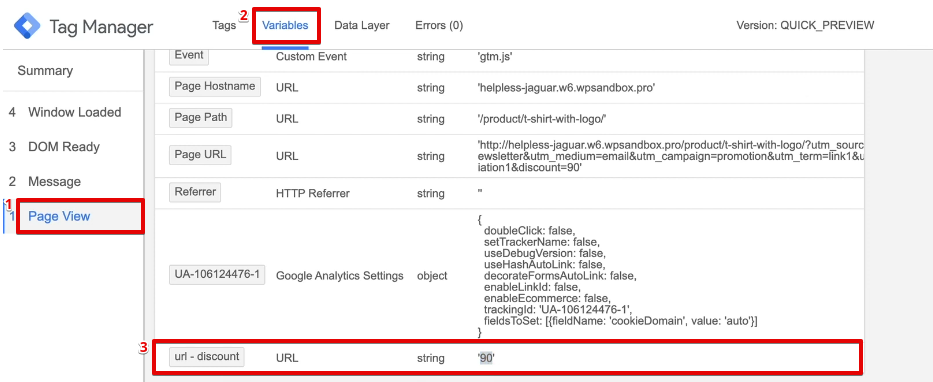
Let’s also check whether this value is dynamic. We’ll add a discount value of 50 in the URL this time instead of 90, and reload the page to see the results.
We can see that as the page loaded, the value of 90 changed to 50.

Once we have captured this information into the variables, we’ll send this to Google Analytics by using a custom dimension.
Custom Dimension
On your Google Analytics account, navigate to Secondary dimensions, you’ll find all your Custom Dimensions here.

Let’s learn how to configure them!
Open the Admin Settings and navigate to Custom Definitions → Custom Dimensions → New Custom Dimension.
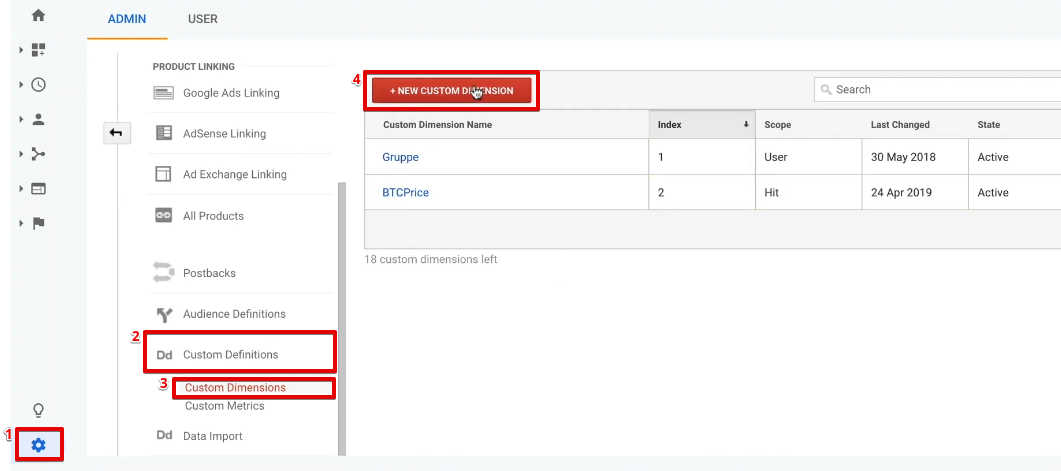
We’ll add a Name to the dimension, and use the Scope as Session because our UTM parameters are also scoped to sessions.
We’ll keep the status as Active only.
Once done, let’s click on Create.

Next, we’ll need the dimension value of the dimension we just created. In our case, the value is 3.

Let’s now configure this into Google Tag Manager!
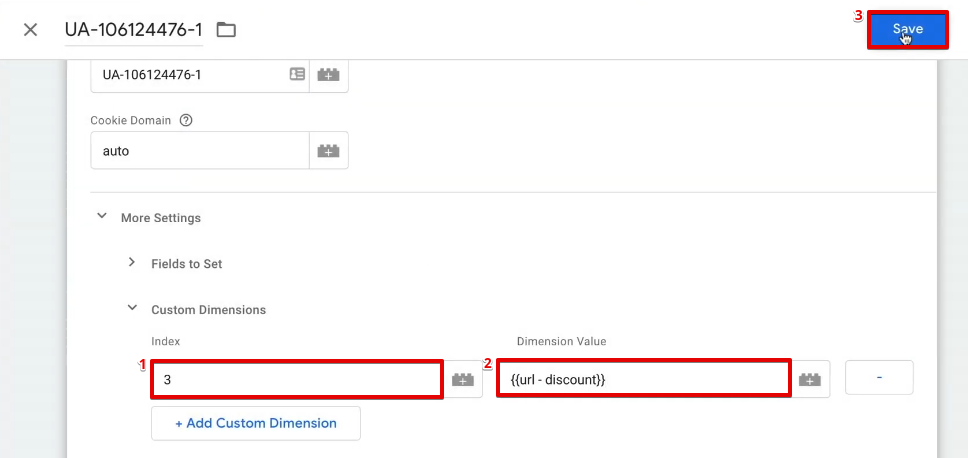
We’ll need to build the custom dimension into the PageView Tag in the Google Tag Manager account.
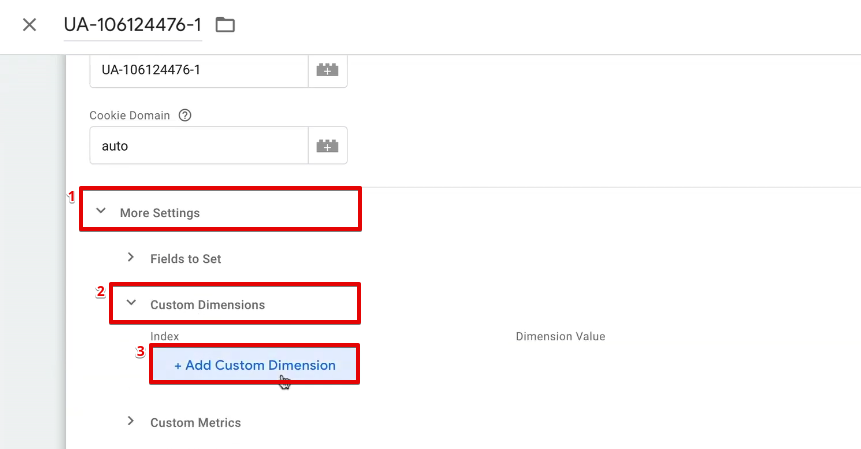
On the Tag, click on Enable overriding settings in this tag.
Then open More Settings → Custom Dimensions.

Here, we’ll need to add the Index and Dimension Value of the new dimension by clicking on Add Custom Dimension.
The Index number will be 3 in our case, and choose the Dimension Value as url – discount. This means dimension number 3 will be filled with the URL discount as its value.
Once done, click on Save.

This is how we added a dimension to one Tag. However, we can also add it to all the Tags by directly adding the dimension to the Google Analytics Settings variable.
This is the recommended method.
Google Analytics Settings Variable
Let’s open our Google Analytics Settings Variable.
We’ll again navigate to More Settings → Custom Dimensions → Add Custom Dimension.
The Index number is 3 in our case, and choose the Dimension Value as url – discount.
We’ll Save it once done.
Let’s refresh the website and also the page from the preview and debug mode.
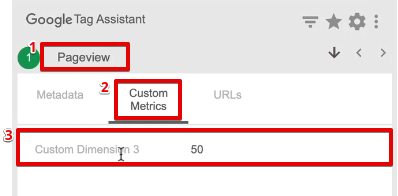
We can see that the Tag has fired correctly. Let’s check the Tag details in the Google Tag Assistant.
In the Pageview section, we’ll open the Custom Metrics. We can see that the custom dimension of 3 was fired, with a value of 50.
Let’s now learn to analyze these results from the Google Analytics account.
Acquisition Reports
We’ll open Acquisition → All Traffic → Source/Medium.
You can see the newsletter/email source mentioned.

We can open the Secondary dimension and search for discount, and click on it.

Once that’s done, the custom dimension of discount will be added to the reports.

The data might take some time to populate. We recommend giving a few hours’ time for the data to load completely.
Additionally, you can also add this parameter to any other session-based report to verify the discounts availed by the users.
All we did here is that we just extended the dataset of Google Analytics with another dimension that is customized to our needs.
In the end, you’ll need to submit this as a version to make the data live for all the users from the Google Tag Manager.
FAQ
What is the purpose of accessing campaign data from the source/medium reports in Google Analytics?
Accessing campaign data from the source/medium reports in Google Analytics allows you to analyze the performance of different marketing campaigns and identify the sources and mediums that drive traffic to your website. It helps you understand which channels are most effective in driving conversions and enables you to make data-driven decisions for your marketing strategies.
How do I configure the discount custom UTM parameter in the report section of Google Analytics?
Configuring the discount custom UTM parameter in the report section of Google Analytics involves setting up a custom dimension. Once you have created the custom dimension for “discount,” it will be added to your reports. This allows you to track and analyze the discounts availed by users based on the UTM parameters in your marketing campaigns.
Can I use custom dimensions for purposes other than tracking discounts?
Absolutely! Custom dimensions in Google Analytics provide flexibility to track various aspects of your website and marketing campaigns beyond discounts. You can create more than 20 custom dimensions to capture and analyze specific data points such as user behavior, campaign performance, content engagement, or any other metrics relevant to your website’s goals and objectives.
Summary
So that’s how you create your own custom UTM parameters via Google Tag Manager.
This is just one of the examples for customizing the Google Analytics installation to accommodate your needs.
Learn more about Google Analytics 4 custom dimensions and track various things to optimize the installation according to your website needs.
Were you able to create your own custom dimensions? Where else can you use this technique? Let us know in the comments down below.
Sign up to the FREE GTM for Beginners Course...


")
Hello Julian, I am trying to store the Initial Traffic Source in 1st Party cookie, i.e. Organic, Referral, Direct & Email. Now once they are stored. The URL of website does not have any utm strings present in them. Now i want to generate the UTM string parameter and if user clicks on thridparty link (sub domain OR other). The UTM Parameters should capture the actual source, medium, campaign data from the 1st party cookie (__utmzz) and send it to with the link click For Example. user visit using Organic Channel Website URL when loaded – http://www.example1.com And than user… Read more »
Thank you for this! I have set this up for my site, but I have a question about how the data appears in Google Analytics. When users land on a page via a URL tagged with my custom UTM parameter (utm_audience), instead of attributing the visit to that page url (e.g., /index), GA creates a new page URL that appends the custom UTM (but not any of the traditional UTM parameters). For example: If I have an ad driving to the Index page of my site, and I tag it with only traditional UTM parameters–when I look at landing page data… Read more »
Dear Megan,
Thank you for your feedback! Yes, this is true that Google Analytics is smart enough to process the standard UTM parameters and exclude them from the reports. However, custom parameters require some special treatment and thus additional set-up. So we have 2 options here: either to create a filter in your Google Analytics in order to exclude this parameter or to add the query parameters to the exclusion list.
Hi, thanks for the tutorial, really useful. I went through all the steps many times, but the data never appears in GA for me. In GTM I connected it to my pageview tracking tag where I can correctly see dimension: [{index: “3”, dimension: “test}] for a custom dimension called “src” in GA. I also have a variable called {{ url – src }} and the url is using “?src=test”, so everything looks fine in GTM. Unfortunately though the data never appears in GA when I add a “src” secondary dimension to the acquisition reports, although many days have passed since… Read more »
You might want to take a look if the data gets sent to GA. You can utilize the GA Debugger Extension on Chrome to see what gets sent to GA. If your new dimension is not in there, then there is something wrong with your GTM configuration.
I can’t see my custom dimension in the console through the Debugger extension.
But I can see my “test” custom dimension correctly associated both with my Page Tracking tag, and with my Google Analytics settings variable when I preview GTM, which means that my GTM configurations is correct in this case or is there anything else that could go wrong afterwards?
One thing I noticed is that the “Container Loaded” is triggered twice, the second time without triggering any tags – could that be the cause of the custom dimension not working?
Thanks a lot for your help
Could you possibly create a training for creating your own Custom UTM Parameters via GA4 and Google Tag Manager? It seems to be connected to URL query variables and ‘fields to set’ parameter events – but an updated run through would be super helpful.
Hello Julian, do you know how can we do this with GA4, because the GA4 tag in GTM doesn’t have the custom dimension feature as the UA had?